Micro Satellite
System
3-867-384-31(1)
©1999 Sony Corporation
SA-VE705
SA-VE702
SS-V703
Operating Instructions
Mode d'emploi
GB
FR
2GB
WARNING
To prevent fire or shock hazard, do not
expose the unit to rain or moisture.
To avoid electrical shock, do not open the cabinet.
Refer servicing to qualified personnel only.
Do not install the appliance in a confined space,
such as a bookcase or built-in cabinet.
SA-VE705/
SA-VE702

3GB
GB
About this manual
The instructions in this manual are for SA-VE705, SA-VE702, and SS-V703 Sony Micro Satellite
Systems.
Differences between the systems
· SA-VE705
The SA-VE705 is 5.1 channel speaker system consisting of two front speakers,
two rear speakers, one center speaker, and one subwoofer. It supports Sony Digital
Cinema Sound, Dolby* Pro Logic, and Dolby Digital, and is thus geared
towards the enjoyment of movies.
· SA-VE702
Consisting of two front speakers and one subwoofer, the SA-VE702 is suited for the enjoyment
of music.
· SS-V703
This system consists of two rear speakers and one center speaker. It can be combined with the
SA-VE702 to produce a system that is equal to the SA-VE705.
* Manufactured under license from Dolby Laboratories Licensing Corporation. DOLBY, the double-D symbol
;
, "PRO LOGIC" and "Dolby Digital (AC-3)" are trademarks of Dolby Laboratories Licensing Corporation.
Number of speakers in each system
Table of Contents
Hooking up the system ......................... 4
Positioning the speakers ........................ 7
Listening to the sound
(SA-VE705 and SA-VE702 only) .... 9
Adjusting the sound ............................ 10
Precautions ............................................ 11
Troubleshooting ................................... 12
Specifications ........................................ 12
Model name
Speaker
Front
Rear
Center
Subwoofer
SA-VE705
2
2
1
1
SA-VE702
2
--
--
1
SS-V703
--
2
1
--
Note to customers who own only the SS-V703 (and not the SA-VE702)
To enjoy Dolby Digital, five speakers and one subwoofer must be provided.
We recommend that the SS-V703 be used in combination with the SA-VE702 (sold separately). If you use
another speaker system instead of the SA-VE702, that system should be as similar as possible in specifications
and identical in size to the SS-V703.
Any difference in operation is clearly indicated in the text, for example, "SA-VE705 only."
4GB
Hooking up the system
Connect the speaker system to the speaker output terminals of an amplifier.
Make sure power to all components (included the subwoofer) is turned off before starting the
hook-up.
This manual explains three connection configurations (A, B, and C). See the configuration for
your particular speaker system.
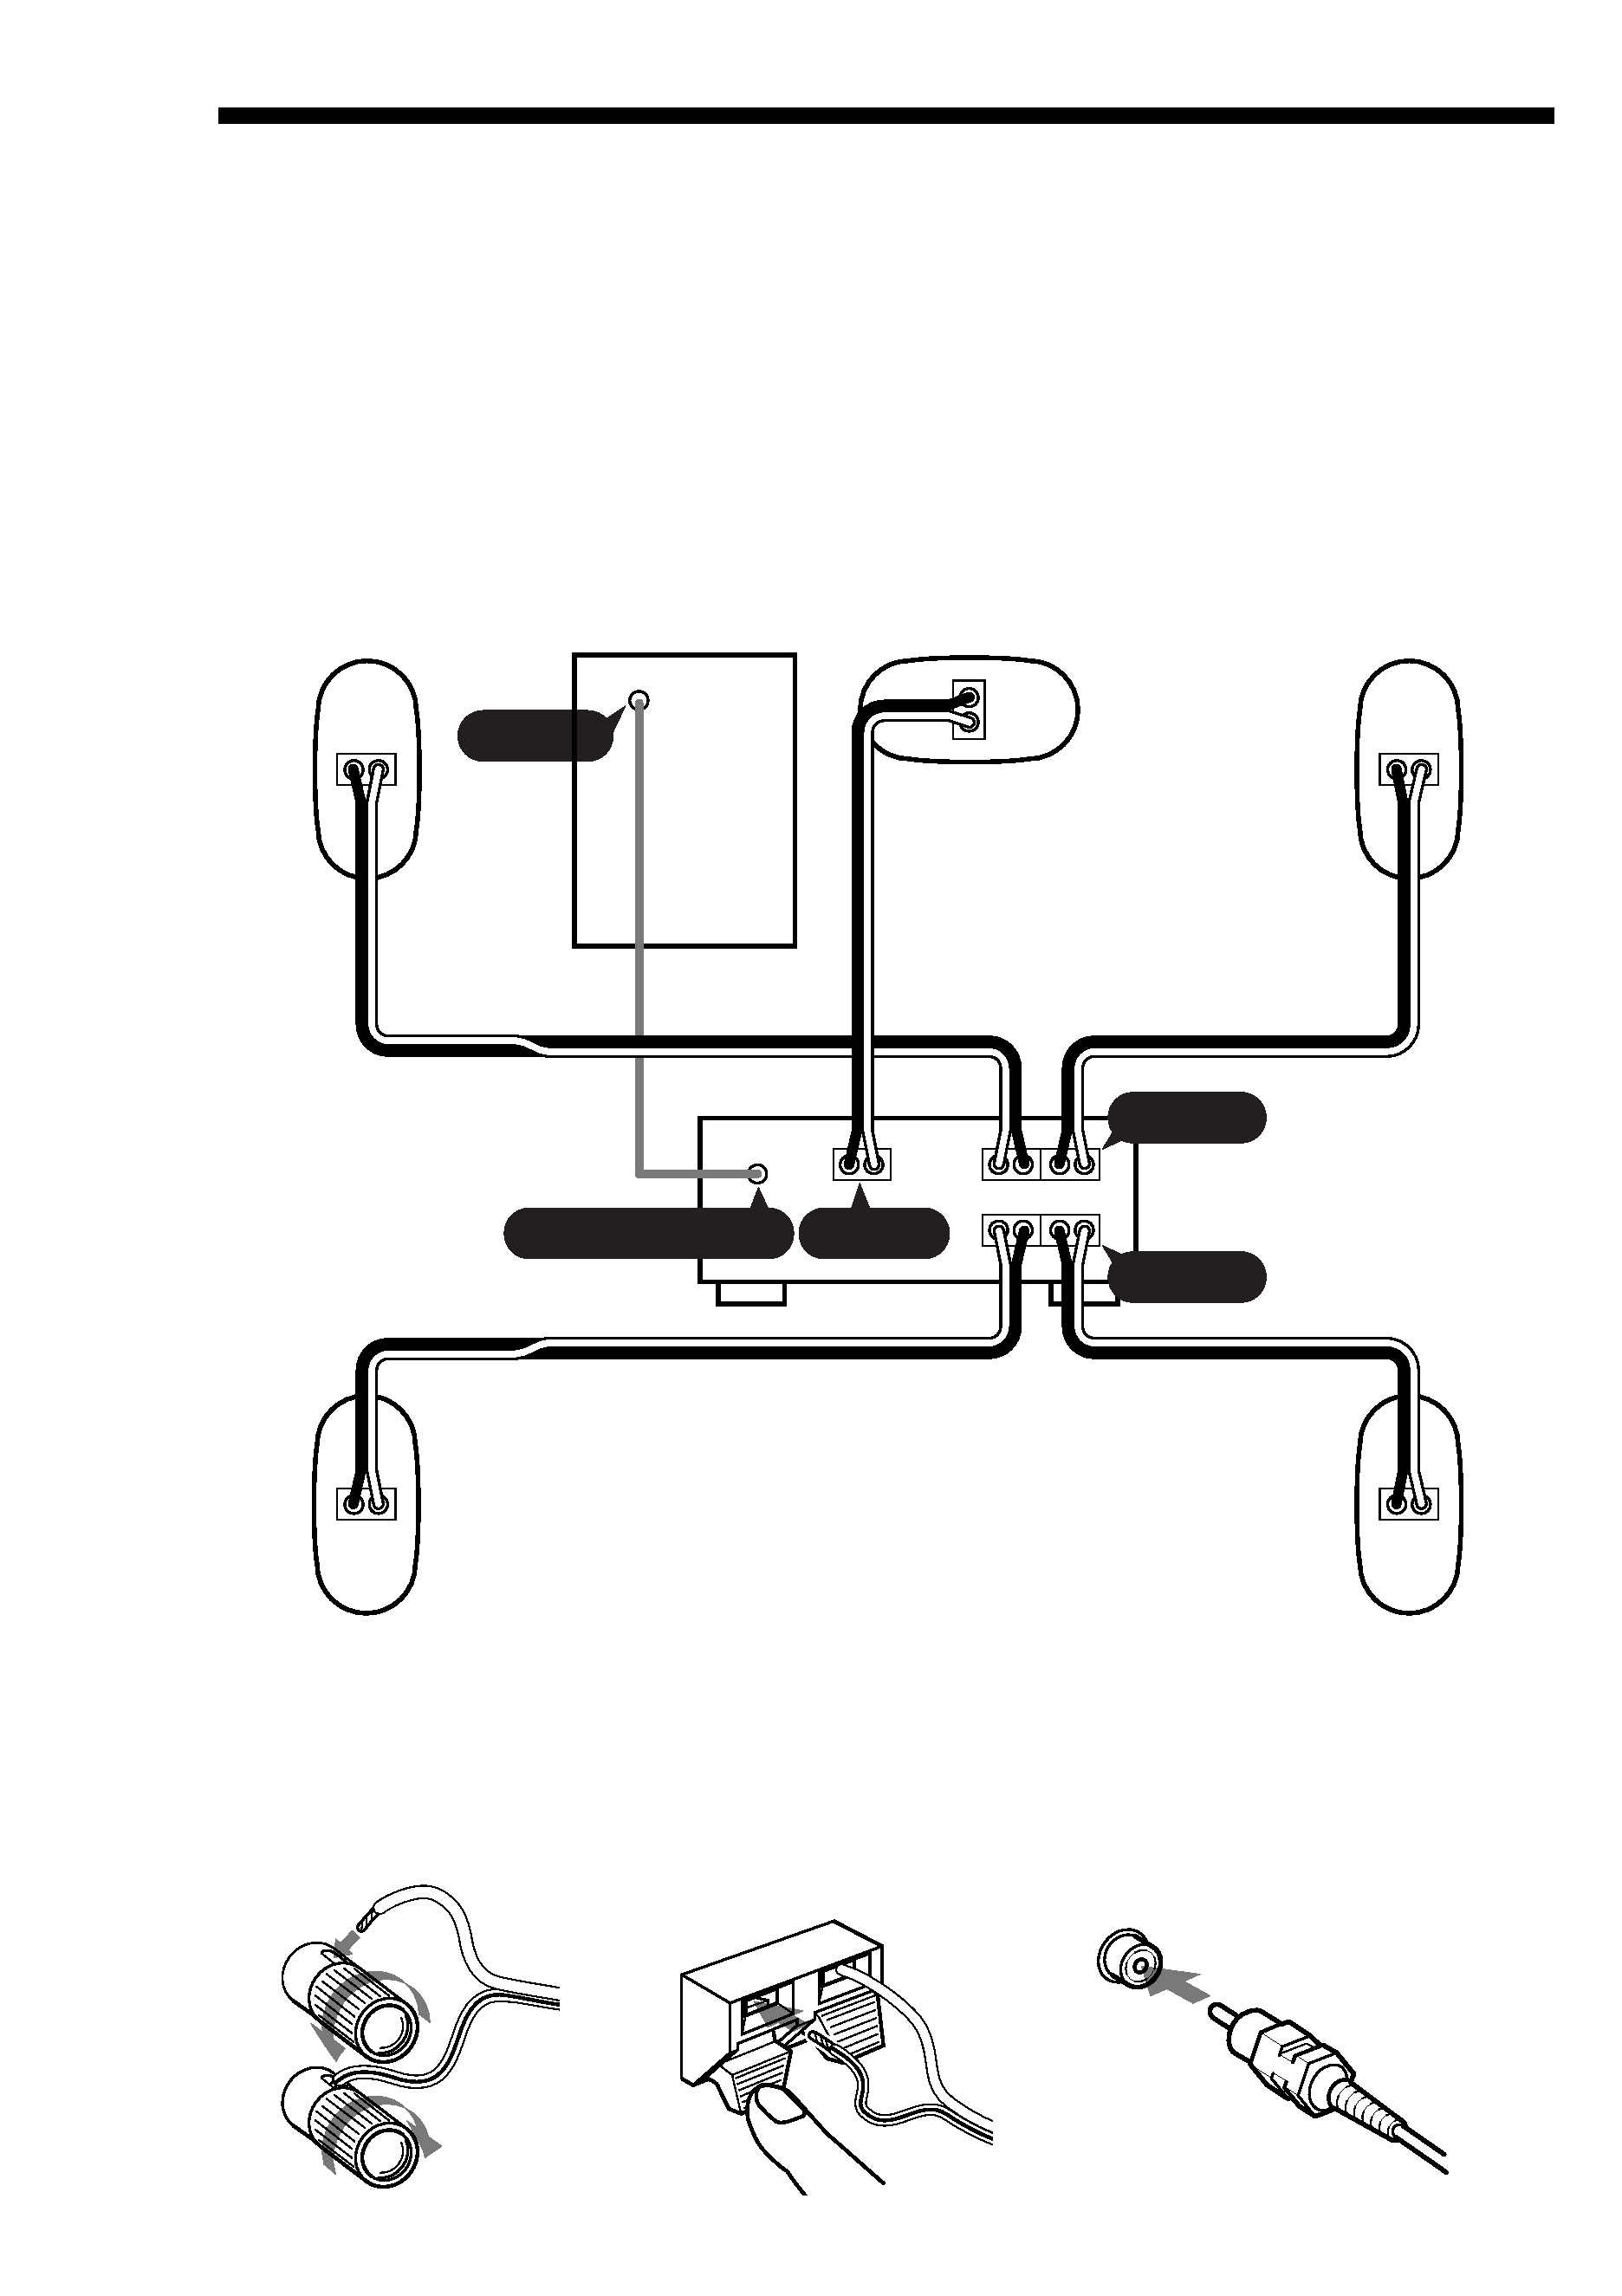
Hookup A (For the 5.1 channel)
This configuration is used when the amplifier is connected to a DVD player, LD player, VCR or
other video devices.
eE Ee
Ee
Ee
Ee
e
E
Ee
Ee
LINE IN
WOOFER OUT
FRONT
CENTER
REAR
R
R
L
L
* SS-V703 (when used in combination with the SA-VE702)
Attach the satellite speakers (front, rear, and center speakers) to the supplied speaker stands for positioning.
For details, see "Positioning the front (and rear) speakers" on page 7 and "Positioning the center speaker
(SA-VE705 and SS-V703 only)" on page 8.
Terminal (jack) connections
E
e
E
e
E
e
E
e
Front (Right)
Subwoofer
Center*
Front (Left)
Rear (Left)*
Rear (Right)*
loosen
tighten
5GB
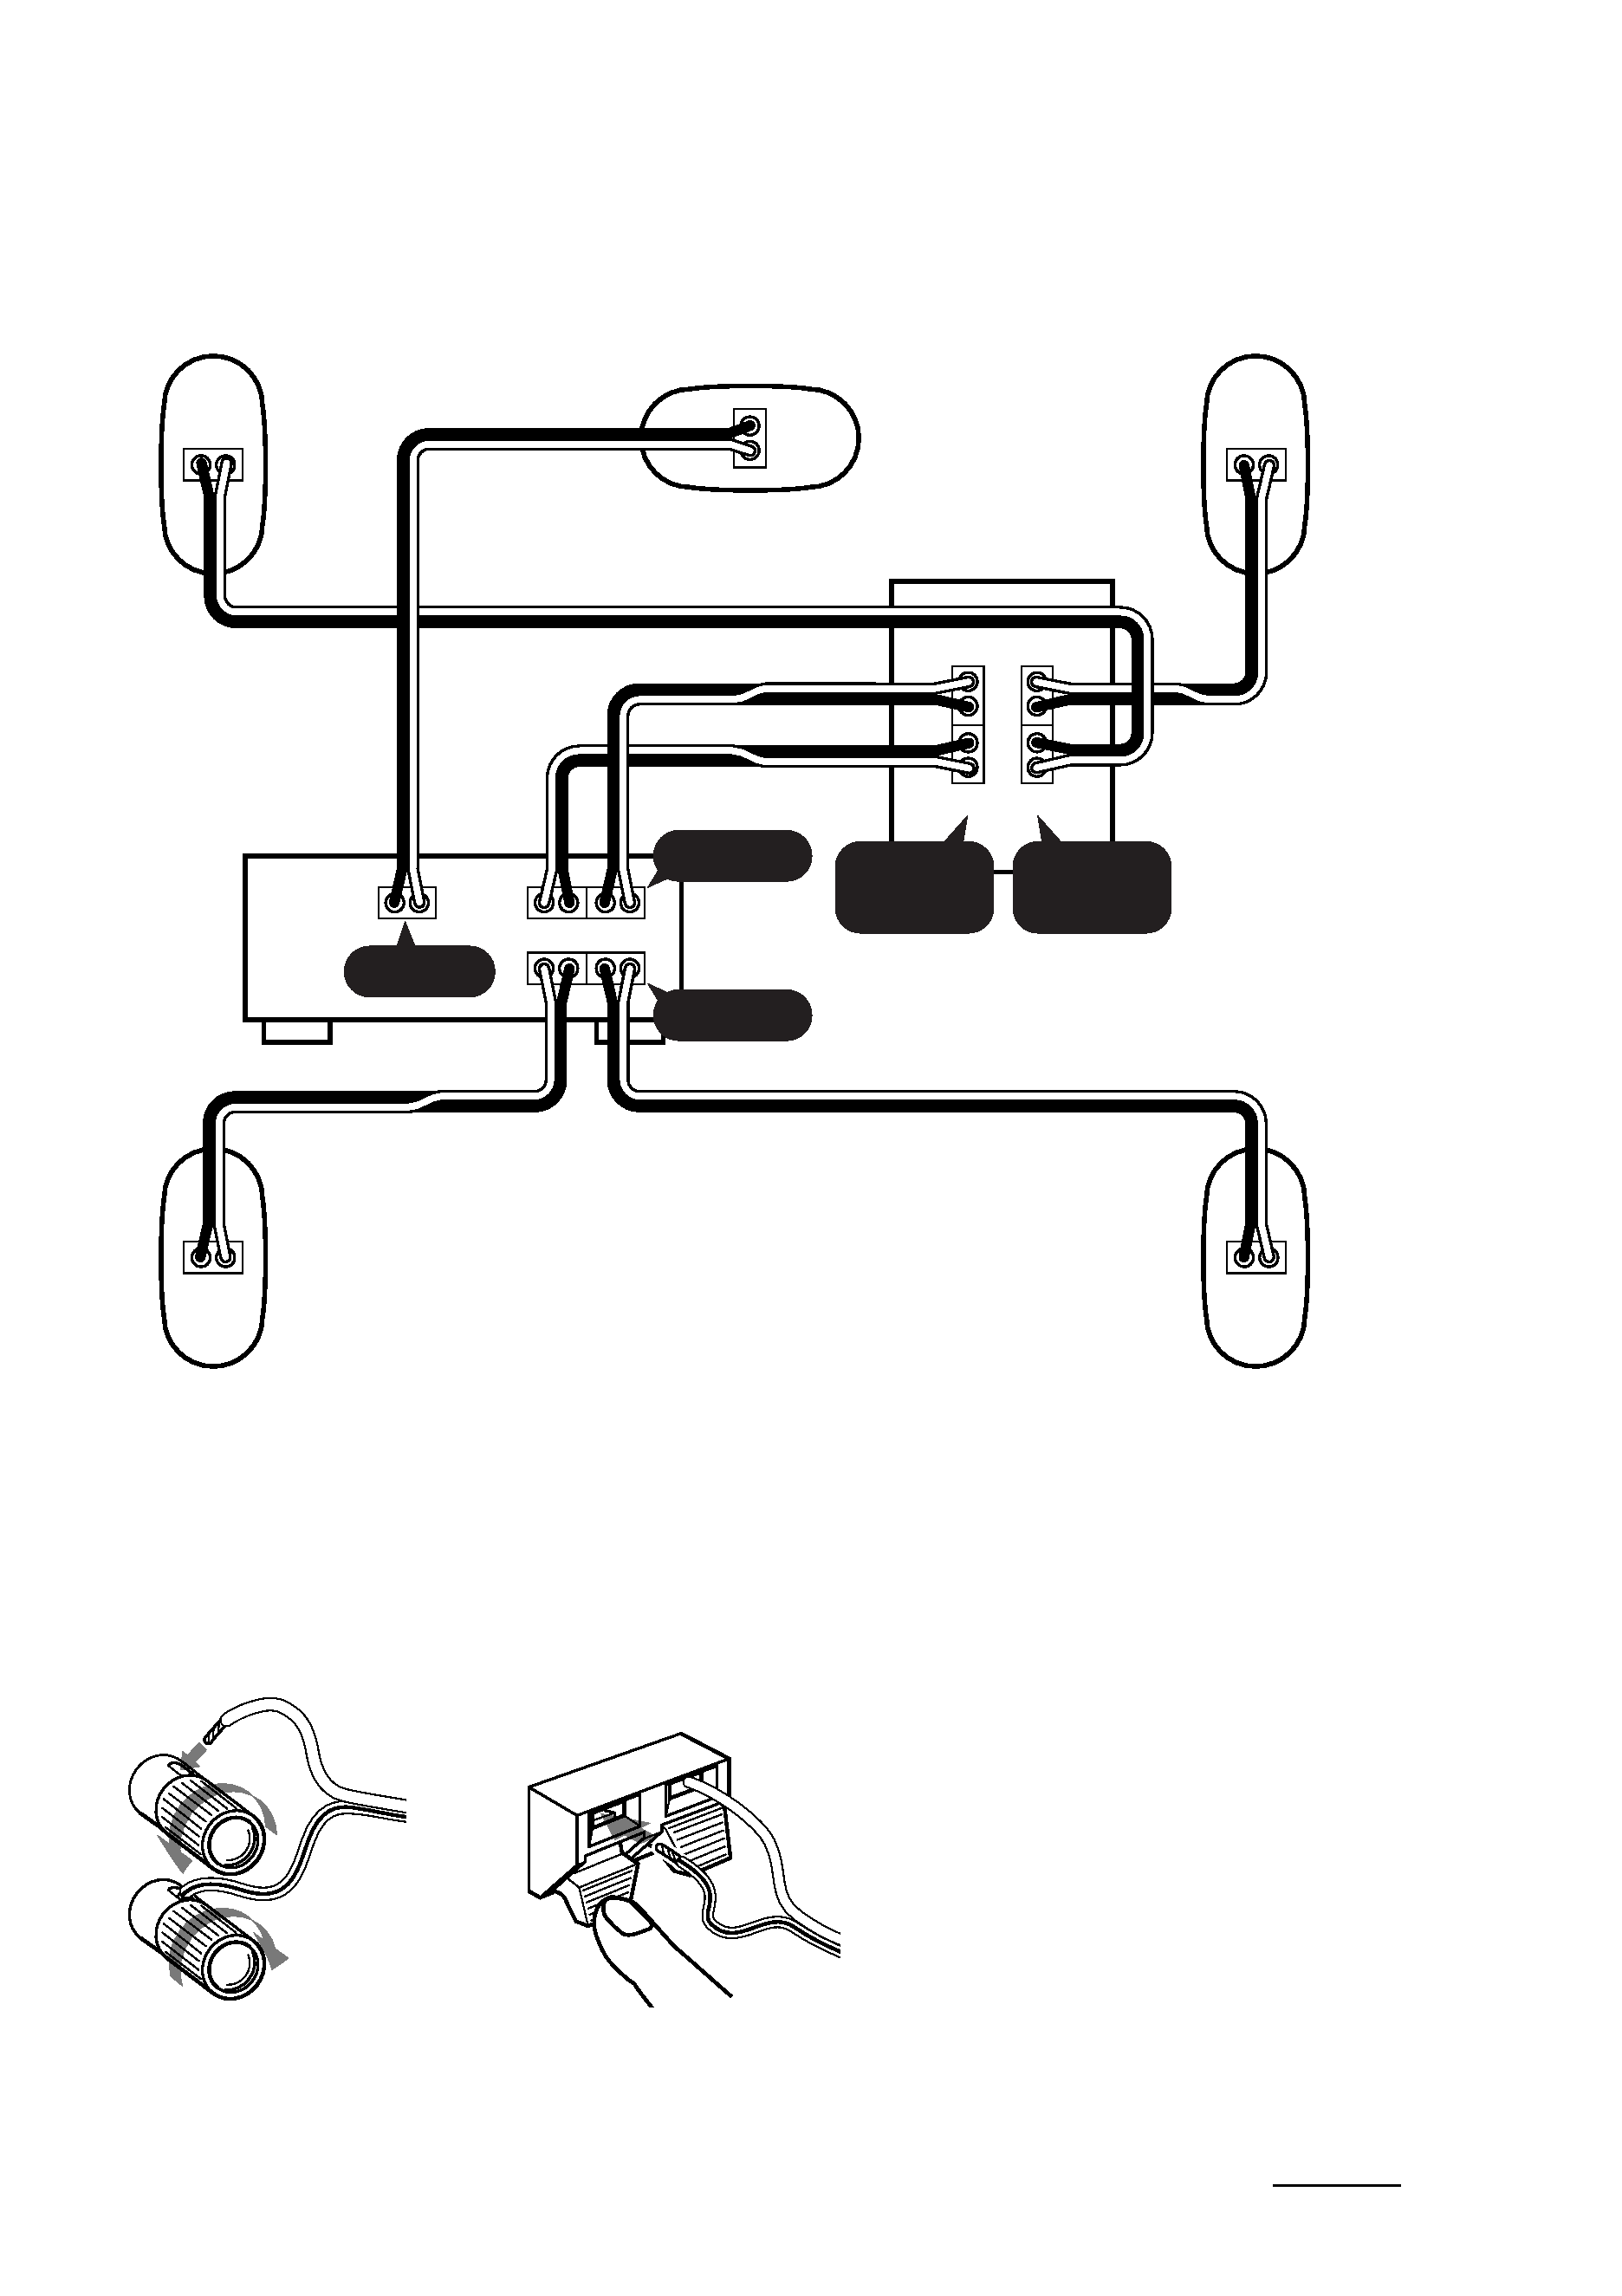
Hookup B (For the 5.1 channel)
Try this configuration instead of "Hookup A" in the following situations:
-- When there are no jacks on the amplifier for a subwoofer.
-- When you want stronger bass sound from the subwoofer.
R
L
R
L
Ee
Ee
SPEAKER
IN
SPEAKER
OUT
e
e
E
E
eE Ee
Ee
FRONT
CENTER
REAR
R
R
L
L
Ee
Ee
e
E
* SS-V703 (when used in combination with the SA-VE702)
Attach the satellite speakers (front, rear, and center speakers) to the supplied speaker stands for positioning.
For details, see "Positioning the front (and rear) speakers" on page 7 and "Positioning the center speaker
(SA-VE705 and SS-V703 only)" on page 8.
Terminal connections
E
e
E
e
E
e
E
e
continued
Front (Right)
Subwoofer
Center*
Front (Left)
Rear (Left)*
Rear (Right)*
Amplifier
loosen
tighten