GET0074-001A
[E/EX]
INSTRUCTIONS
BEDIENUNGSANLEITUNG
MANUEL D'INSTRUCTIONS
GEBRUIKSAANWIJZING
KS-LH6R/KS-LH4R
CASSETTE RECEIVER
CASSETTEN-RECEIVER
RADIOCASSETTE
RADIO/CASSETTESPELER
ENGLISH
DEUTSCH
NEDERLANDS
FRANÇAIS
For installation and connections, refer to the separate manual.
Für den Einbau und die Anschlüsse siehe das eigenständige Handbuch.
Pour l'installation et les raccordements, se référer au manuel séparé.
Bijzonderheden over de installatie en aansluiting van het apparaat vindt u in de desbetreffende
handleiding.
KS-LH4R
6
S
TAPE
SOUND
VOL
VOL
SOURCE
R
F
U
D
KS-LH6R
4
S
TAPE
coverKS-LH6R_001.pm5
1/29/02, 9:57 AM
3
2
ENGLISH
How to reset your unit
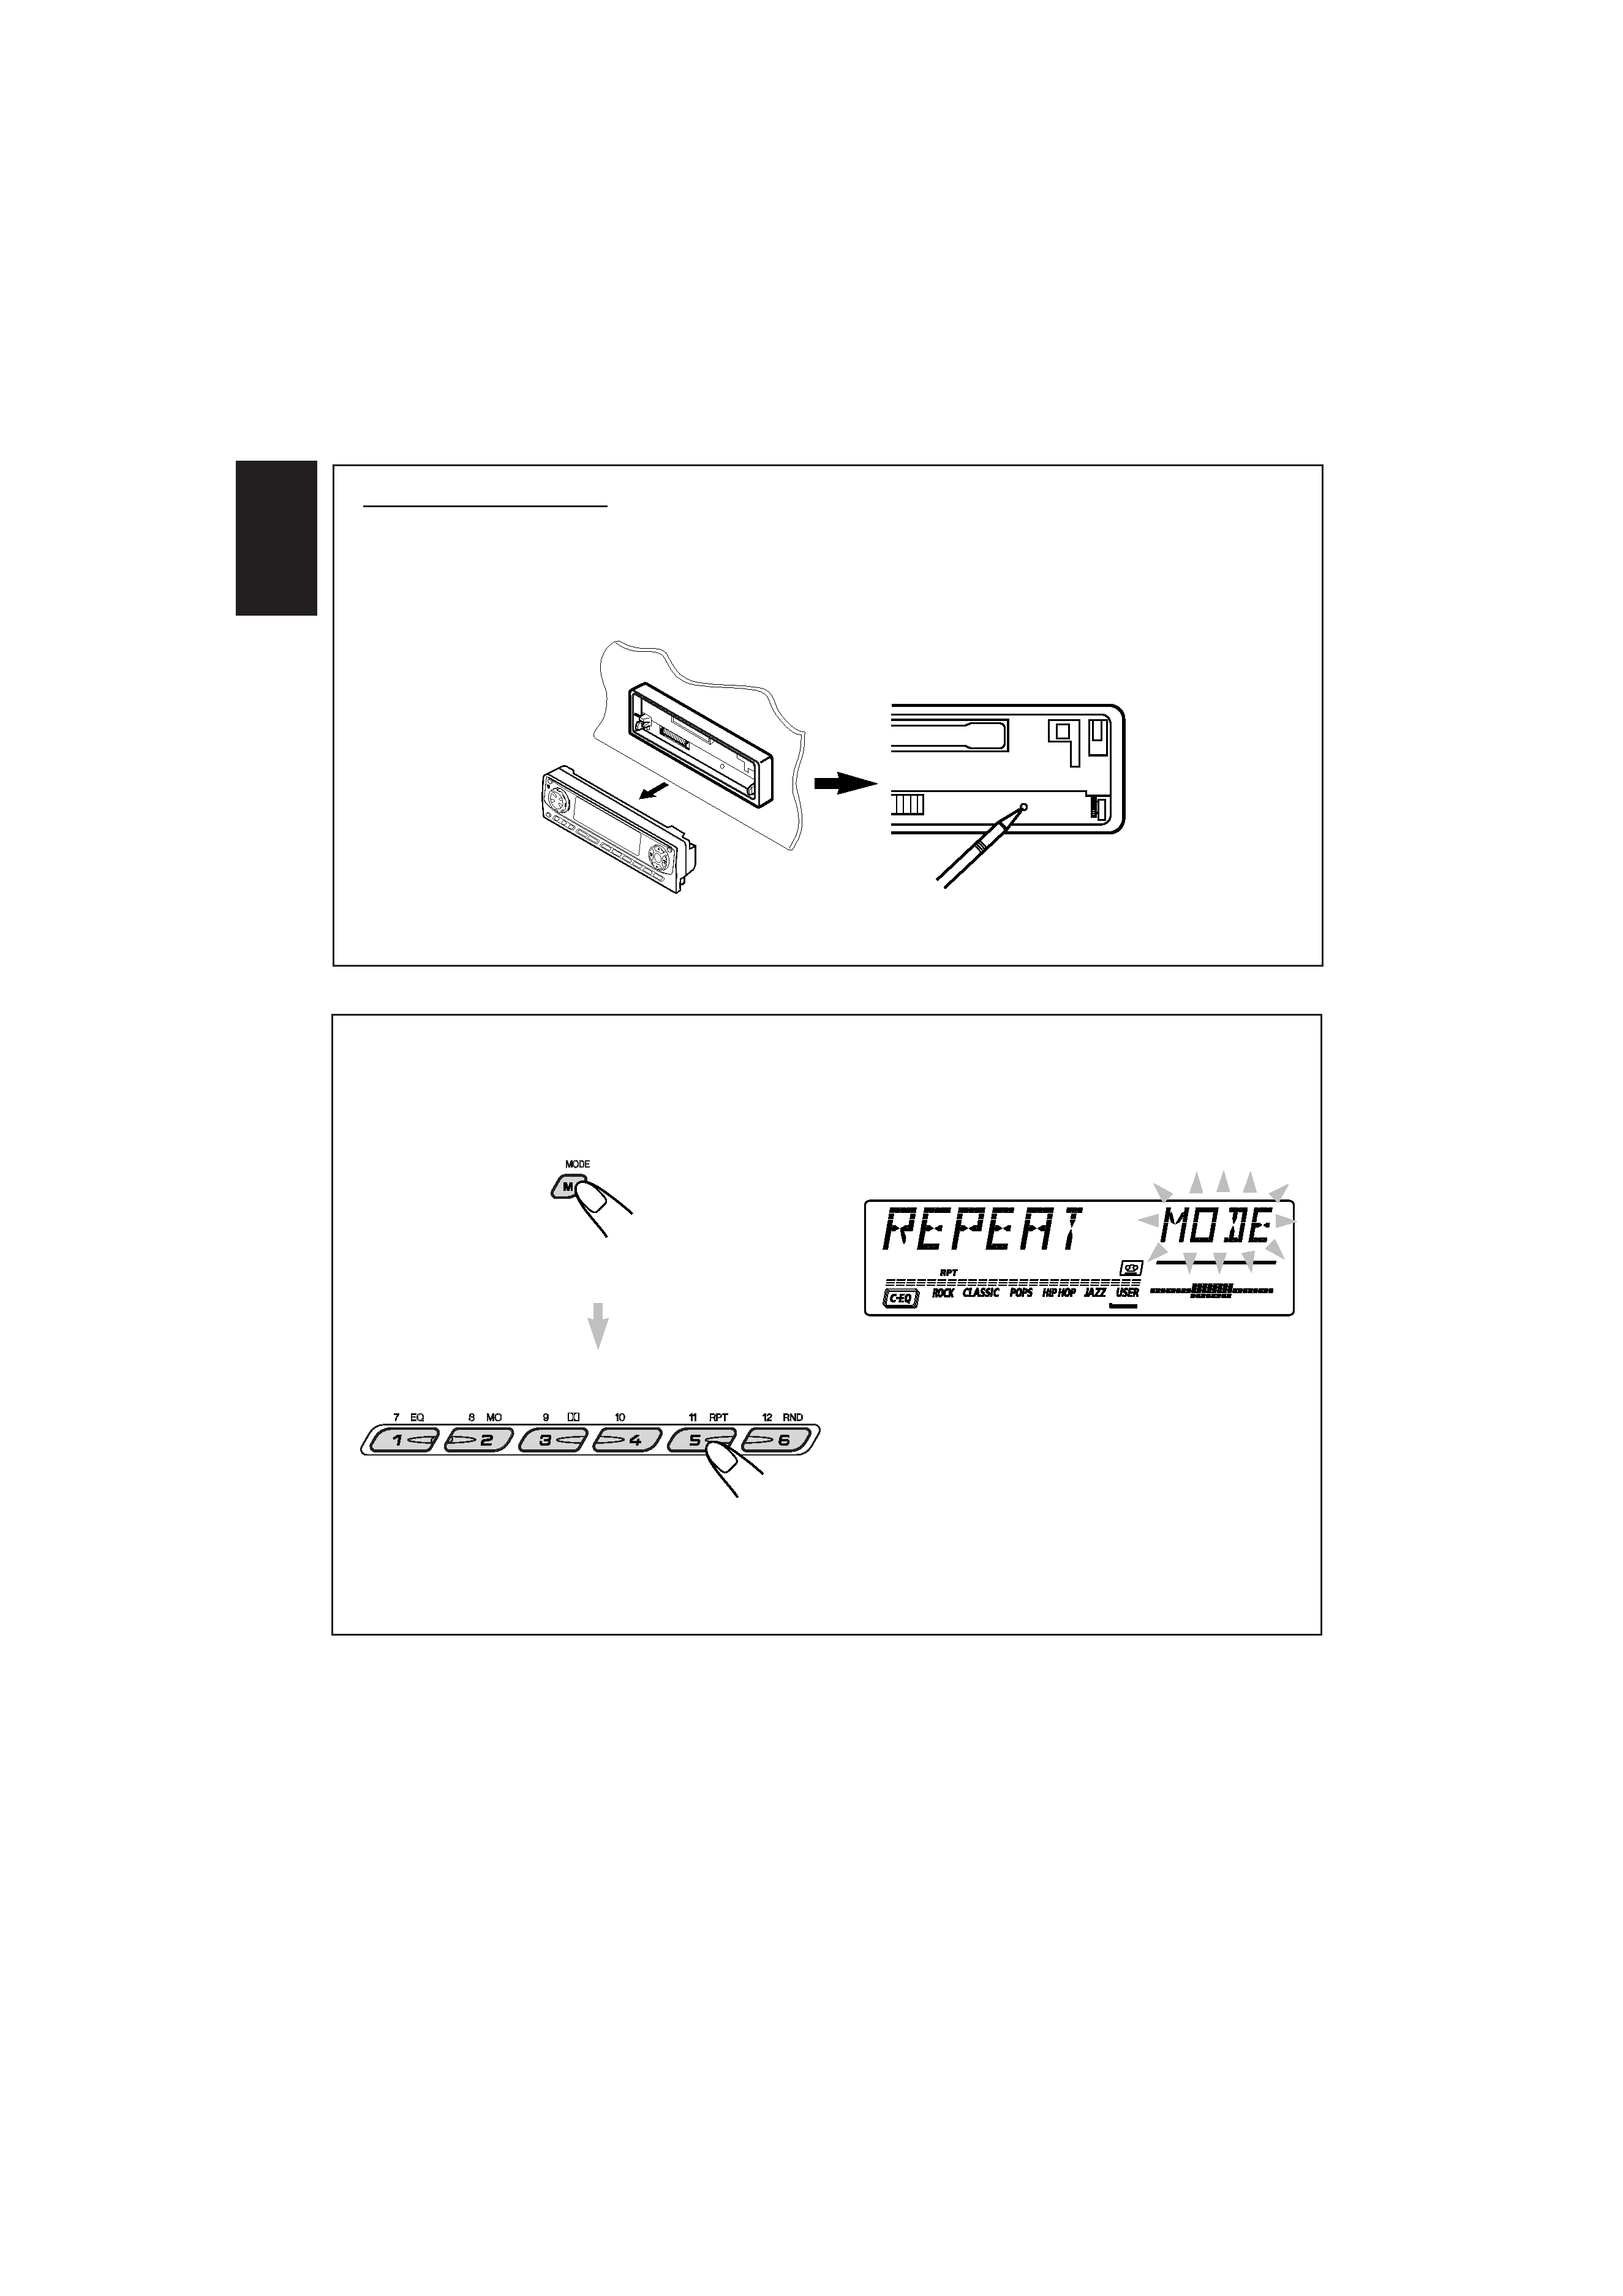
After detaching the control panel, press the reset button on the panel holder using a ball-point pen
or similar tool.
This will reset the built-in microcomputer.
Note:
· Your preset adjustments such as preset channels or sound adjustments will also be erased.
How to use the MODE (M):
If you press MODE (M), the unit goes into functions mode and the number buttons work as different
function buttons.
To use these buttons as number buttons again after pressing MODE (M), wait for 5 seconds
without pressing any number button until the functions mode is cleared.
· Pressing MODE (M) again also clears the functions mode.
Ex.: When you press button 5 to enter the RPT
function mode.
EN02-04KS-LH6R_LH4R[E]f.pm5
1/29/02, 9:56 AM
2
3
ENGLISH
CONTENTS
Thank you for purchasing a JVC product. Please read all instructions carefully before operation,
to ensure your complete understanding and to obtain the best possible performance from the unit.
How to reset your unit ...............................
2
How to use the MODE (M) .......................
2
LOCATION OF THE BUTTONS ............
4
Control panel ...........................................
4
Preparing the remote controller .................
5
Remote controller ....................................
6
BASIC OPERATIONS ......................
7
Turning on the power ................................
7
RADIO OPERATIONS ......................
8
Listening to the radio ................................
8
Storing stations in memory .......................
10
Tuning in to a preset station .....................
11
RDS OPERATIONS ........................ 12
What you can do with RDS .......................
12
Other convenient RDS functions and
adjustments ...........................................
16
TAPE OPERATIONS ....................... 19
Listening to a cassette ..............................
19
Finding the beginning of a tune ................
20
Other convenient tape functions ...............
21
SOUND ADJUSTMENTS .................. 22
Adjusting the sound .................................
22
Selecting preset sound modes
(C-EQ: custom equalizer) ......................
23
Storing your own sound adjustments .......
24
OTHER MAIN FUNCTIONS ............... 25
Setting the clock ......................................
25
Changing the general settings (PSM) ......
25
Detaching the control panel ......................
28
CD CHANGER OPERATIONS ............. 29
Playing CDs .............................................
29
Selecting CD playback modes ..................
31
EXTERNAL COMPONENT OPERATIONS .. 32
Playing an external component ................
32
DAB TUNER OPERATIONS ............... 33
Tuning in to an ensemble and
one of the services .................................
33
Storing DAB services in memory .............
35
Tuning in to a preset DAB service ............
36
What you can do more with DAB ..............
36
MAINTENANCE ............................ 37
TROUBLESHOOTING ...................... 38
SPECIFICATIONS .......................... 39
BEFORE USE
*For safety....
· Do not raise the volume level too much, as this will
block outside sounds, making driving dangerous.
· Stop the car before performing any complicated
operations.
*Temperature inside the car....
If you have parked the car for a long time in hot or
cold weather, wait until the temperature in the car
becomes normal before operating the unit.
Note:
For security reasons, a numbered ID card is provided with this unit, and the same ID number is imprinted on
the unit's chassis. Keep the card in a safe place, as it will help the authorities to identify your unit if stolen.
EN02-04KS-LH6R_LH4R[E]f.pm5
1/29/02, 9:57 AM
3
4
ENGLISH
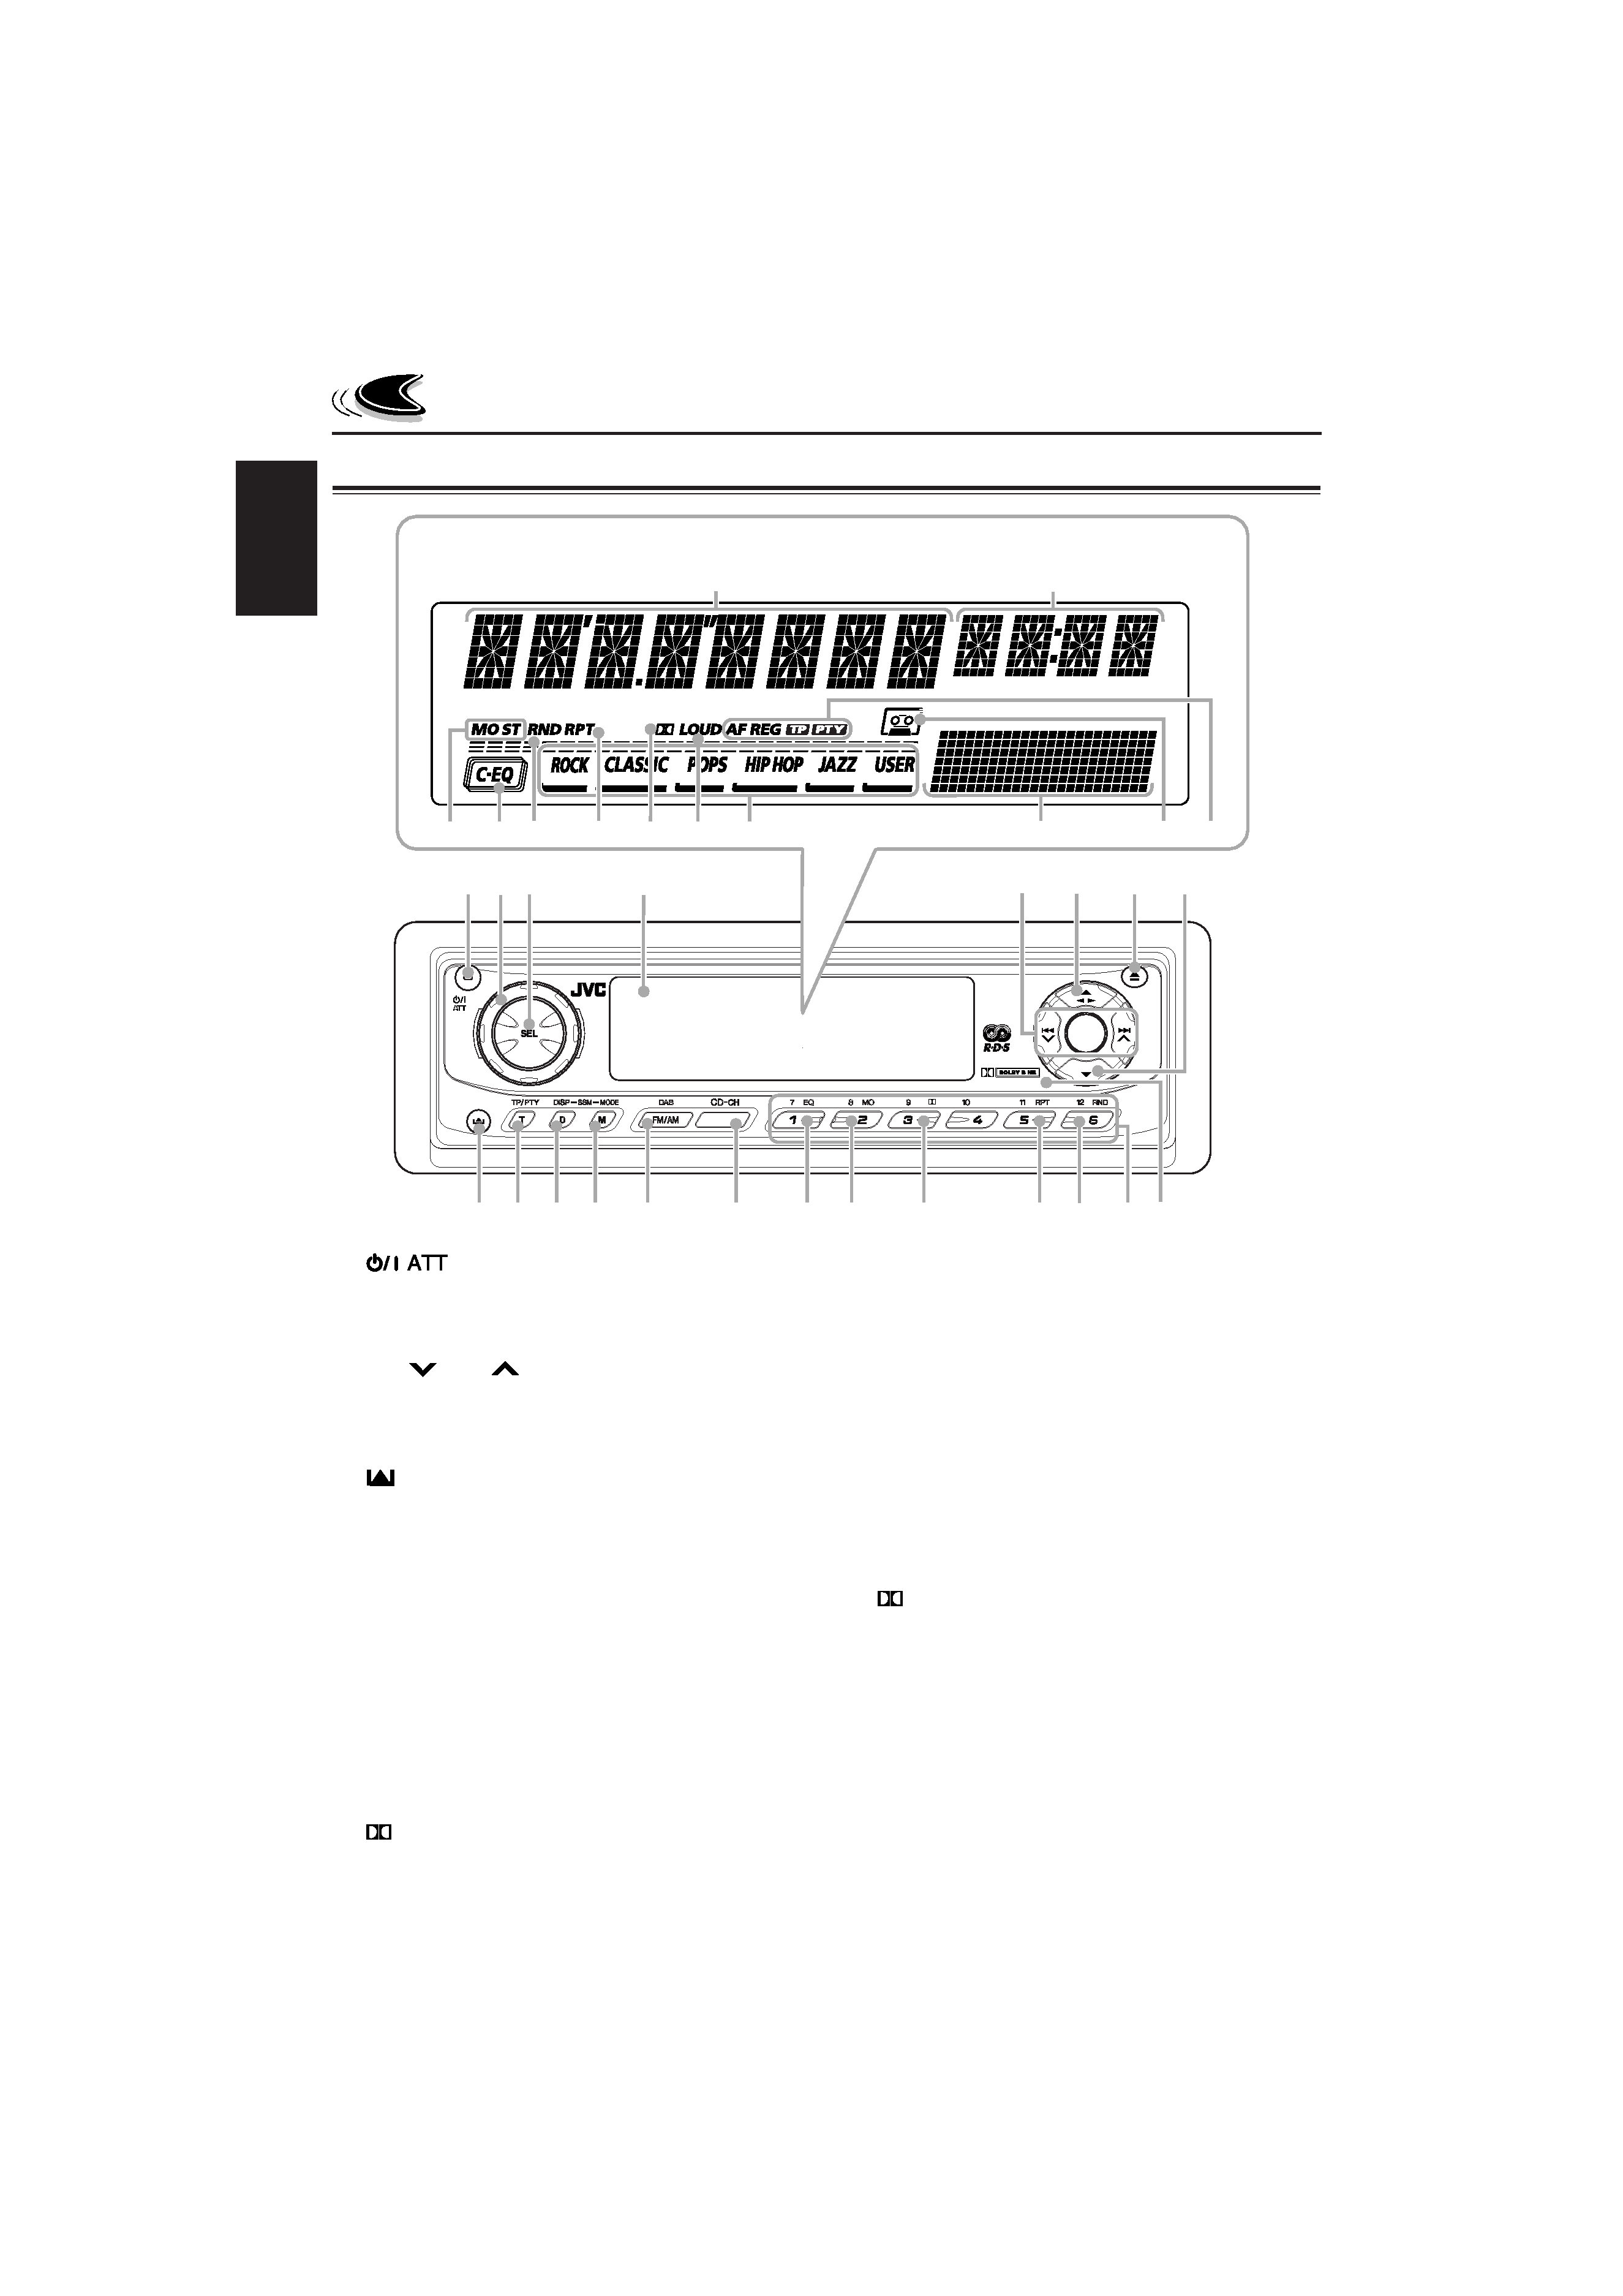
LOCATION OF THE BUTTONS
Control panel
1
4
9
6
2 3
8
7
p q w
e
s
d
g
f
h
5
j
k
/
t
a
z
TAPE
r
;
l
c
x
o
i
u
y
Display window
1
(standby/on/attenuator) button
2 Control dial
3 SEL (select) button
4 Display window
5
4
/
¢
buttons
6
5 23 (up/tape direction) button
7
0 (eject) button
8
(down) button
9
(control panel release) button
p TP/PTY (T) (traffic programme/programme
type) button
q DISP (D) (display) button
· Also functions as SSM buttons when pressed
together with MODE (M) button.
w MODE (M) button
· Also functions as SSM buttons when pressed
together with DISP (D) (display) button.
e FM/AM DAB button
r TAPE CD-CH button
t EQ (equalizer) button
y MO (monaural) button
u
(Dolby B) button
i RPT (repeat) button
o RND (random) button
; Number buttons
a Remote sensor
Display window
s Main display
d Source/clock display
f Tuner reception indicators
MO (monaural), ST (stereo)
g C-EQ (custom equalizer) indicator
h RND (random) indicator
j RPT (repeat) indicator
k
(Dolby B) indicator
l LOUD (loudness) indicator
/ Sound mode indicators
ROCK, CLASSIC, POPS, HIP HOP, JAZZ, USER.
z Volume (or audio) level meter
Equalization pattern indicator
x Tapein indicator
c RDS indicators
AF, REG, TP, PTY
EN02-04KS-LH6R_LH4R[E]f.pm5
1/29/02, 9:57 AM
4
ENGLISH
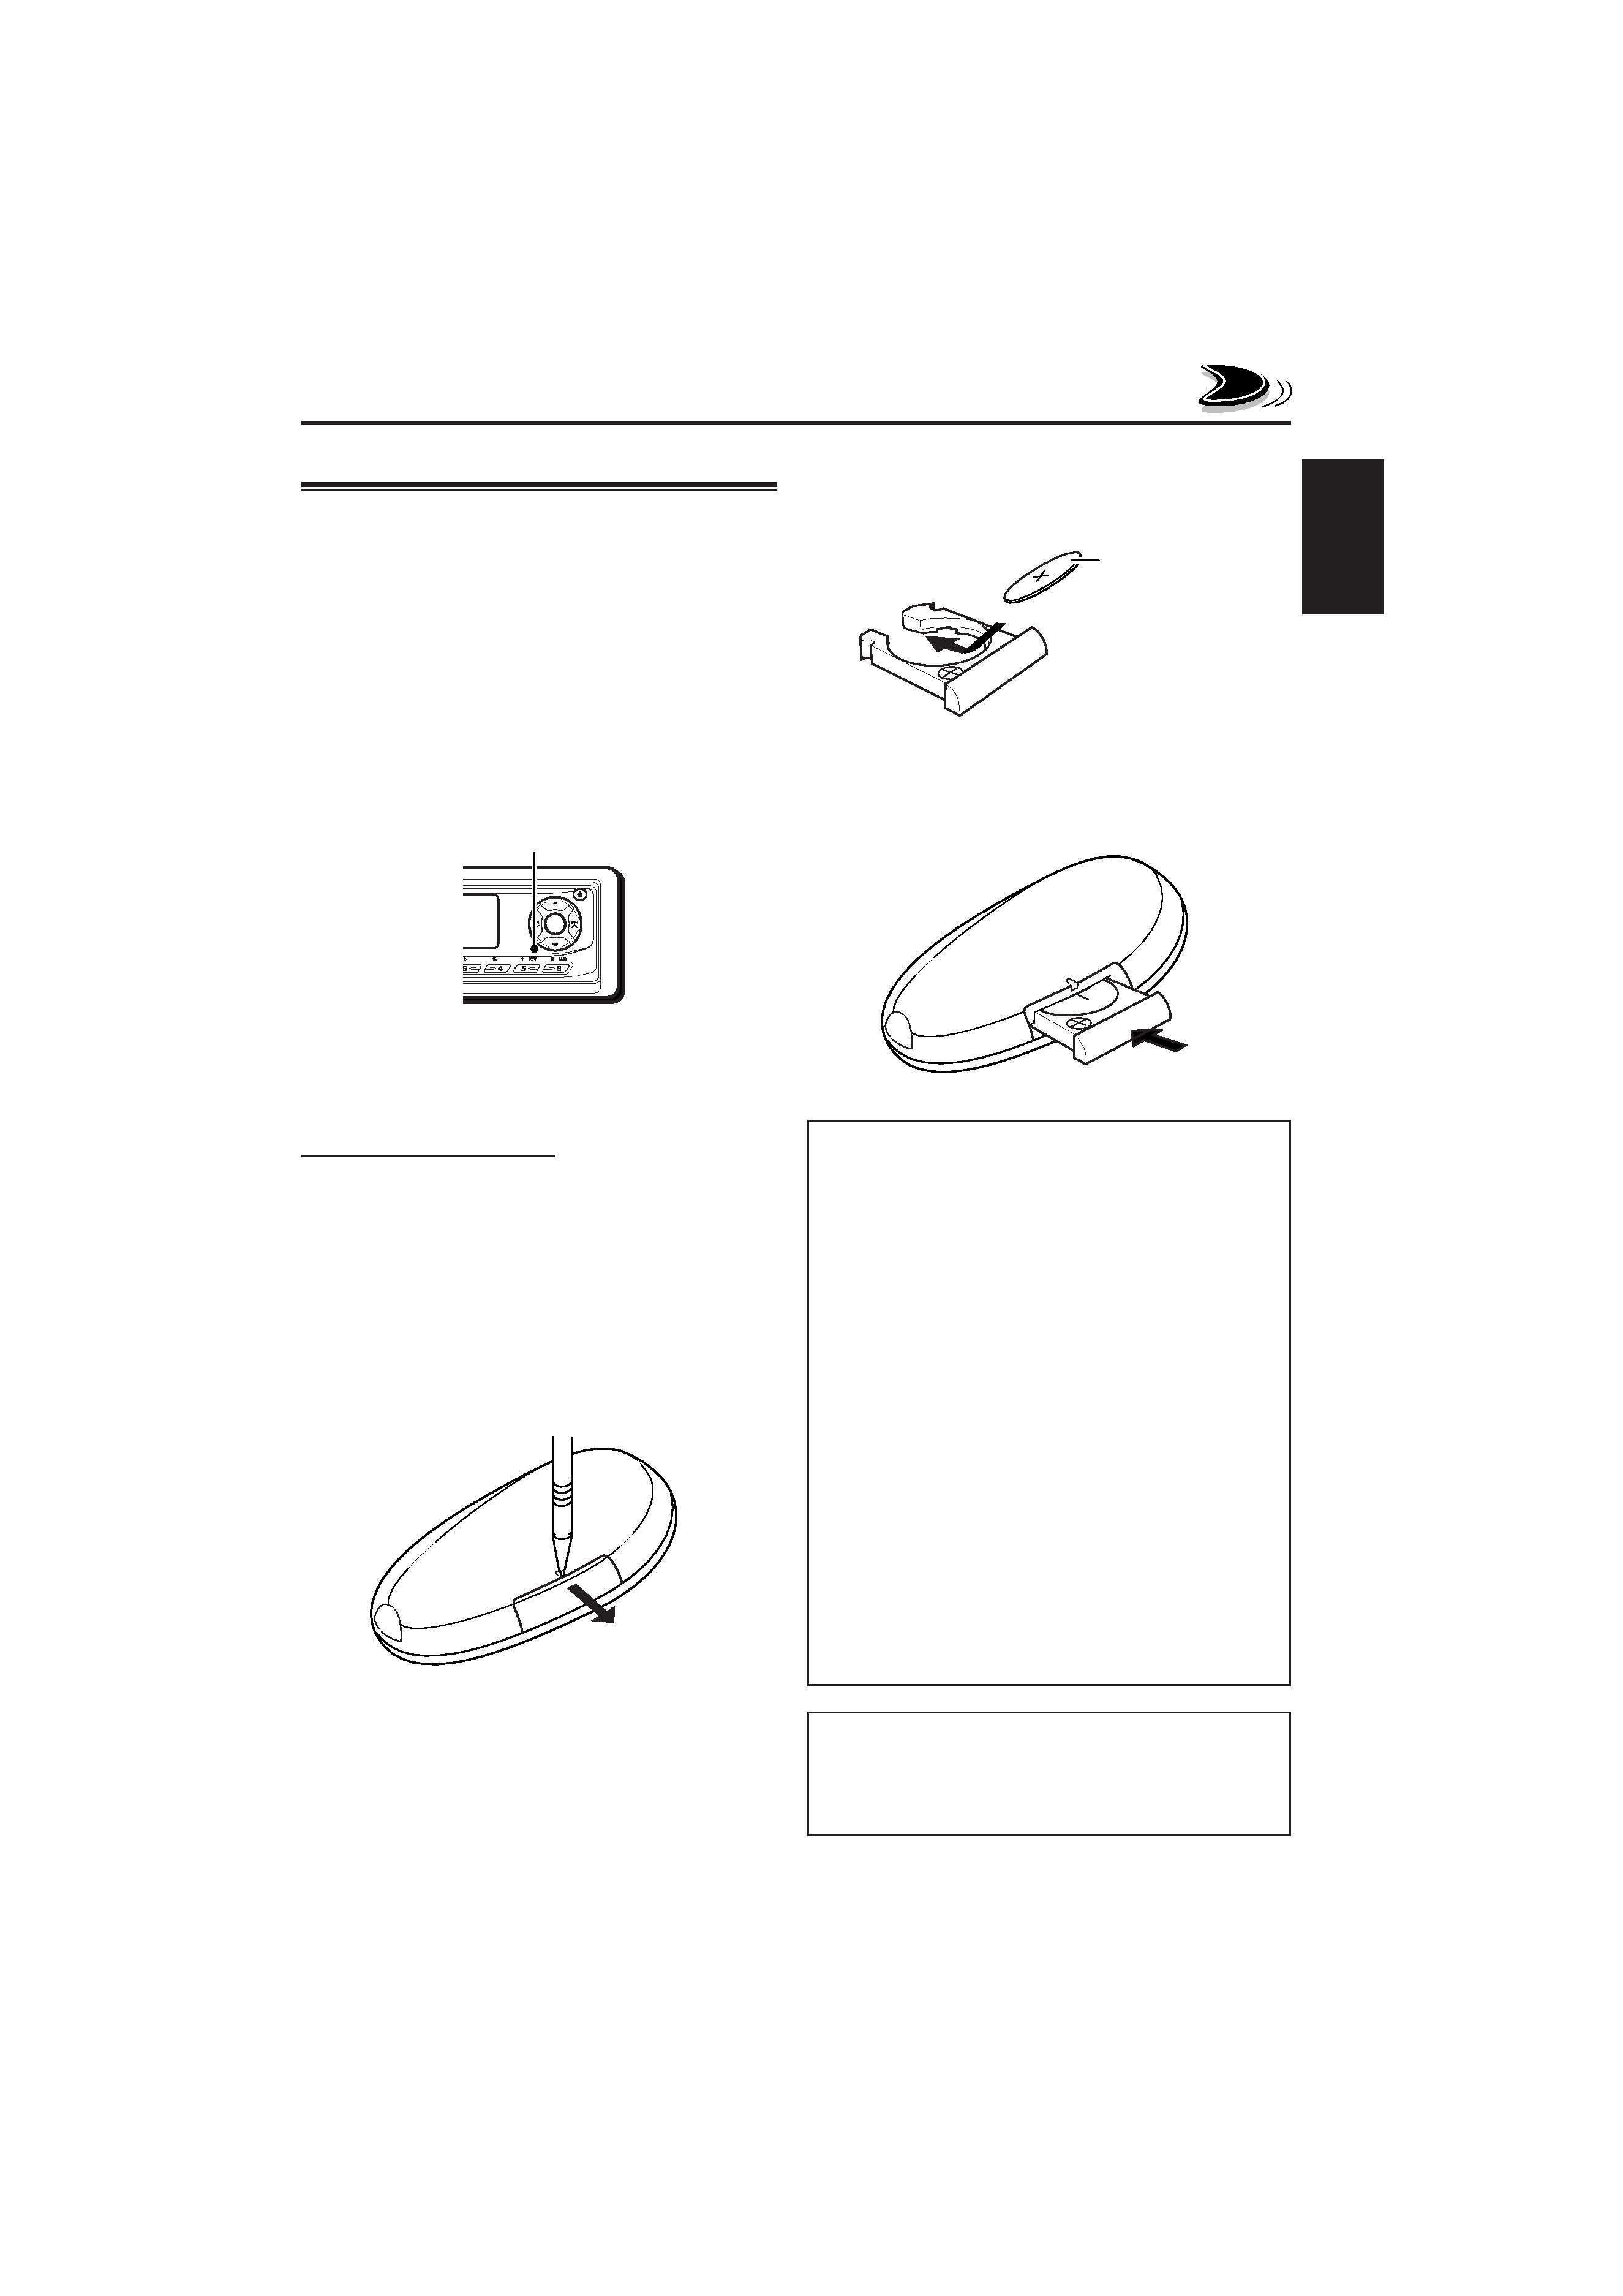
5
Preparing the remote controller 2. Place the battery.
Slide the battery into the holder with the + side
facing upwards so that the battery is fixed in
the holder.
Lithium coin battery
(product number:
CR2025)
3. Return the battery holder.
Insert again the battery holder pushing it until
you hear a clicking sound.
WARNING:
· Store the battery in a place where children cannot
reach.
If a child accidentally swallows the battery,
consult a doctor immediately.
· Do not recharge, short, disassemble or heat the
battery or dispose it in a fire.
Doing any of these things may cause the battery to
give off heat, crack or start a fire.
· Do not leave the battery with other metallic
materials.
Doing this may cause the battery to give off heat,
crack or start a fire.
· When throwing away or saving the battery, wrap it
in tape and insulate; otherwise, the battery may
start to give off heat, crack or start a fire.
· Do not poke the battery with tweezers or similar
tools.
Doing this may cause the battery to give off heat,
crack or start a fire.
(back side)
This section is only for KS-LH6R.
KS-LH4R can also be remotely controlled with an
optionally purchased remote controller. We
recommend that you use remote controller
RM-RK50 with your unit.
Before using the remote controller:
· Aim the remote controller directly at the remote
sensor on the main unit. Make sure there is no
obstacle in between.
· Do not expose the remote sensor to strong
light (direct sunlight or artificial lighting).
Installing the battery
When the controllable range or effectiveness of the
remote controller decreases, replace the battery.
1. Remove the battery holder.
1) Push out the battery holder in the direction
indicated by the arrow using a ball-point
pen or a similar tool.
2) Remove the battery holder.
Remote sensor
(back side)
CAUTION:
DO NOT leave the remote controller in a place (such
as dashboards) exposed to direct sunlight for a long
time. Otherwise, it may be damaged.
EN05-06KS-LH6R_LH4R[E]f.pm5
1/29/02, 9:56 AM
5