AV28WT5EI/AV24WT5EI
LCT0900-001A-U
1200-T-CR-JMUK
©2000 VICTOR COMPANY OF JAPAN, LIMITED
AV28WT5EI
AV24WT5EI
Contents
Safety precautions . . . . . . . . . . . . . . . . . . . . . . . . . . . 2
Setting up your TV . . . . . . . . . . . . . . . . . . . . . . . . . . . 4
T-V LINK functions. . . . . . . . . . . . . . . . . . . . . . . . . . . 7
Using your TVthe basics . . . . . . . . . . . . . . . . . . . . . 8
Remote control buttons and functions . . . . . . . . . . . . 11
Using the TV's menus . . . . . . . . . . . . . . . . . . . . . . . 16
Picture setting . . . . . . . . . . . . . . . . . . . . . . . . . . . . . 17
Picture features . . . . . . . . . . . . . . . . . . . . . . . . . . . . 18
Sound setting . . . . . . . . . . . . . . . . . . . . . . . . . . . . . . 19
EXT SETTING . . . . . . . . . . . . . . . . . . . . . . . . . . . . . 20
FEATURES . . . . . . . . . . . . . . . . . . . . . . . . . . . . . . . 22
INSTALL . . . . . . . . . . . . . . . . . . . . . . . . . . . . . . . . . 24
DEMO . . . . . . . . . . . . . . . . . . . . . . . . . . . . . . . . . . . 28
Other menus . . . . . . . . . . . . . . . . . . . . . . . . . . . . . . 29
Further preparation . . . . . . . . . . . . . . . . . . . . . . . . . 30
TV buttons and parts . . . . . . . . . . . . . . . . . . . . . . . . 32
Troubleshooting . . . . . . . . . . . . . . . . . . . . . . . . . . . . 33
Specifications. . . . . . . . . . . . . . . . . . . . . . . . . . . . . . 34
Colour Television
INSTRUCTIONS
AV32EK_cover.fm Page 1 Tuesday, December 19, 2000 9:17 AM
5
Thank you for buying this
colour television.
To make sure you fully understand how to use your new TV, please read this manual thoroughly before you begin.
6DIHW\#SUHFDXWLRQV
6DIHW\#SUHFDXWLRQV
6DIHW\#SUHFDXWLRQV
6DIHW\#SUHFDXWLRQV
s
s
s
s
:DUQLQJ
:DUQLQJ
:DUQLQJ
:DUQLQJ
To prevent fire or shock hazard, do not expose this
appliance to rain or moisture.
s
s
s
s
&DXWLRQ
&DXWLRQ
&DXWLRQ
&DXWLRQ
To ensure personal safety, observe the following rules
regarding the use of this unit.
1 Operate only from the power source specified (AC 220
240 V, 50 Hz) on the unit.
2 Avoid damaging the AC plug and power cord.
3 Avoid improper installation and never position the unit
where good ventilation is unattainable.
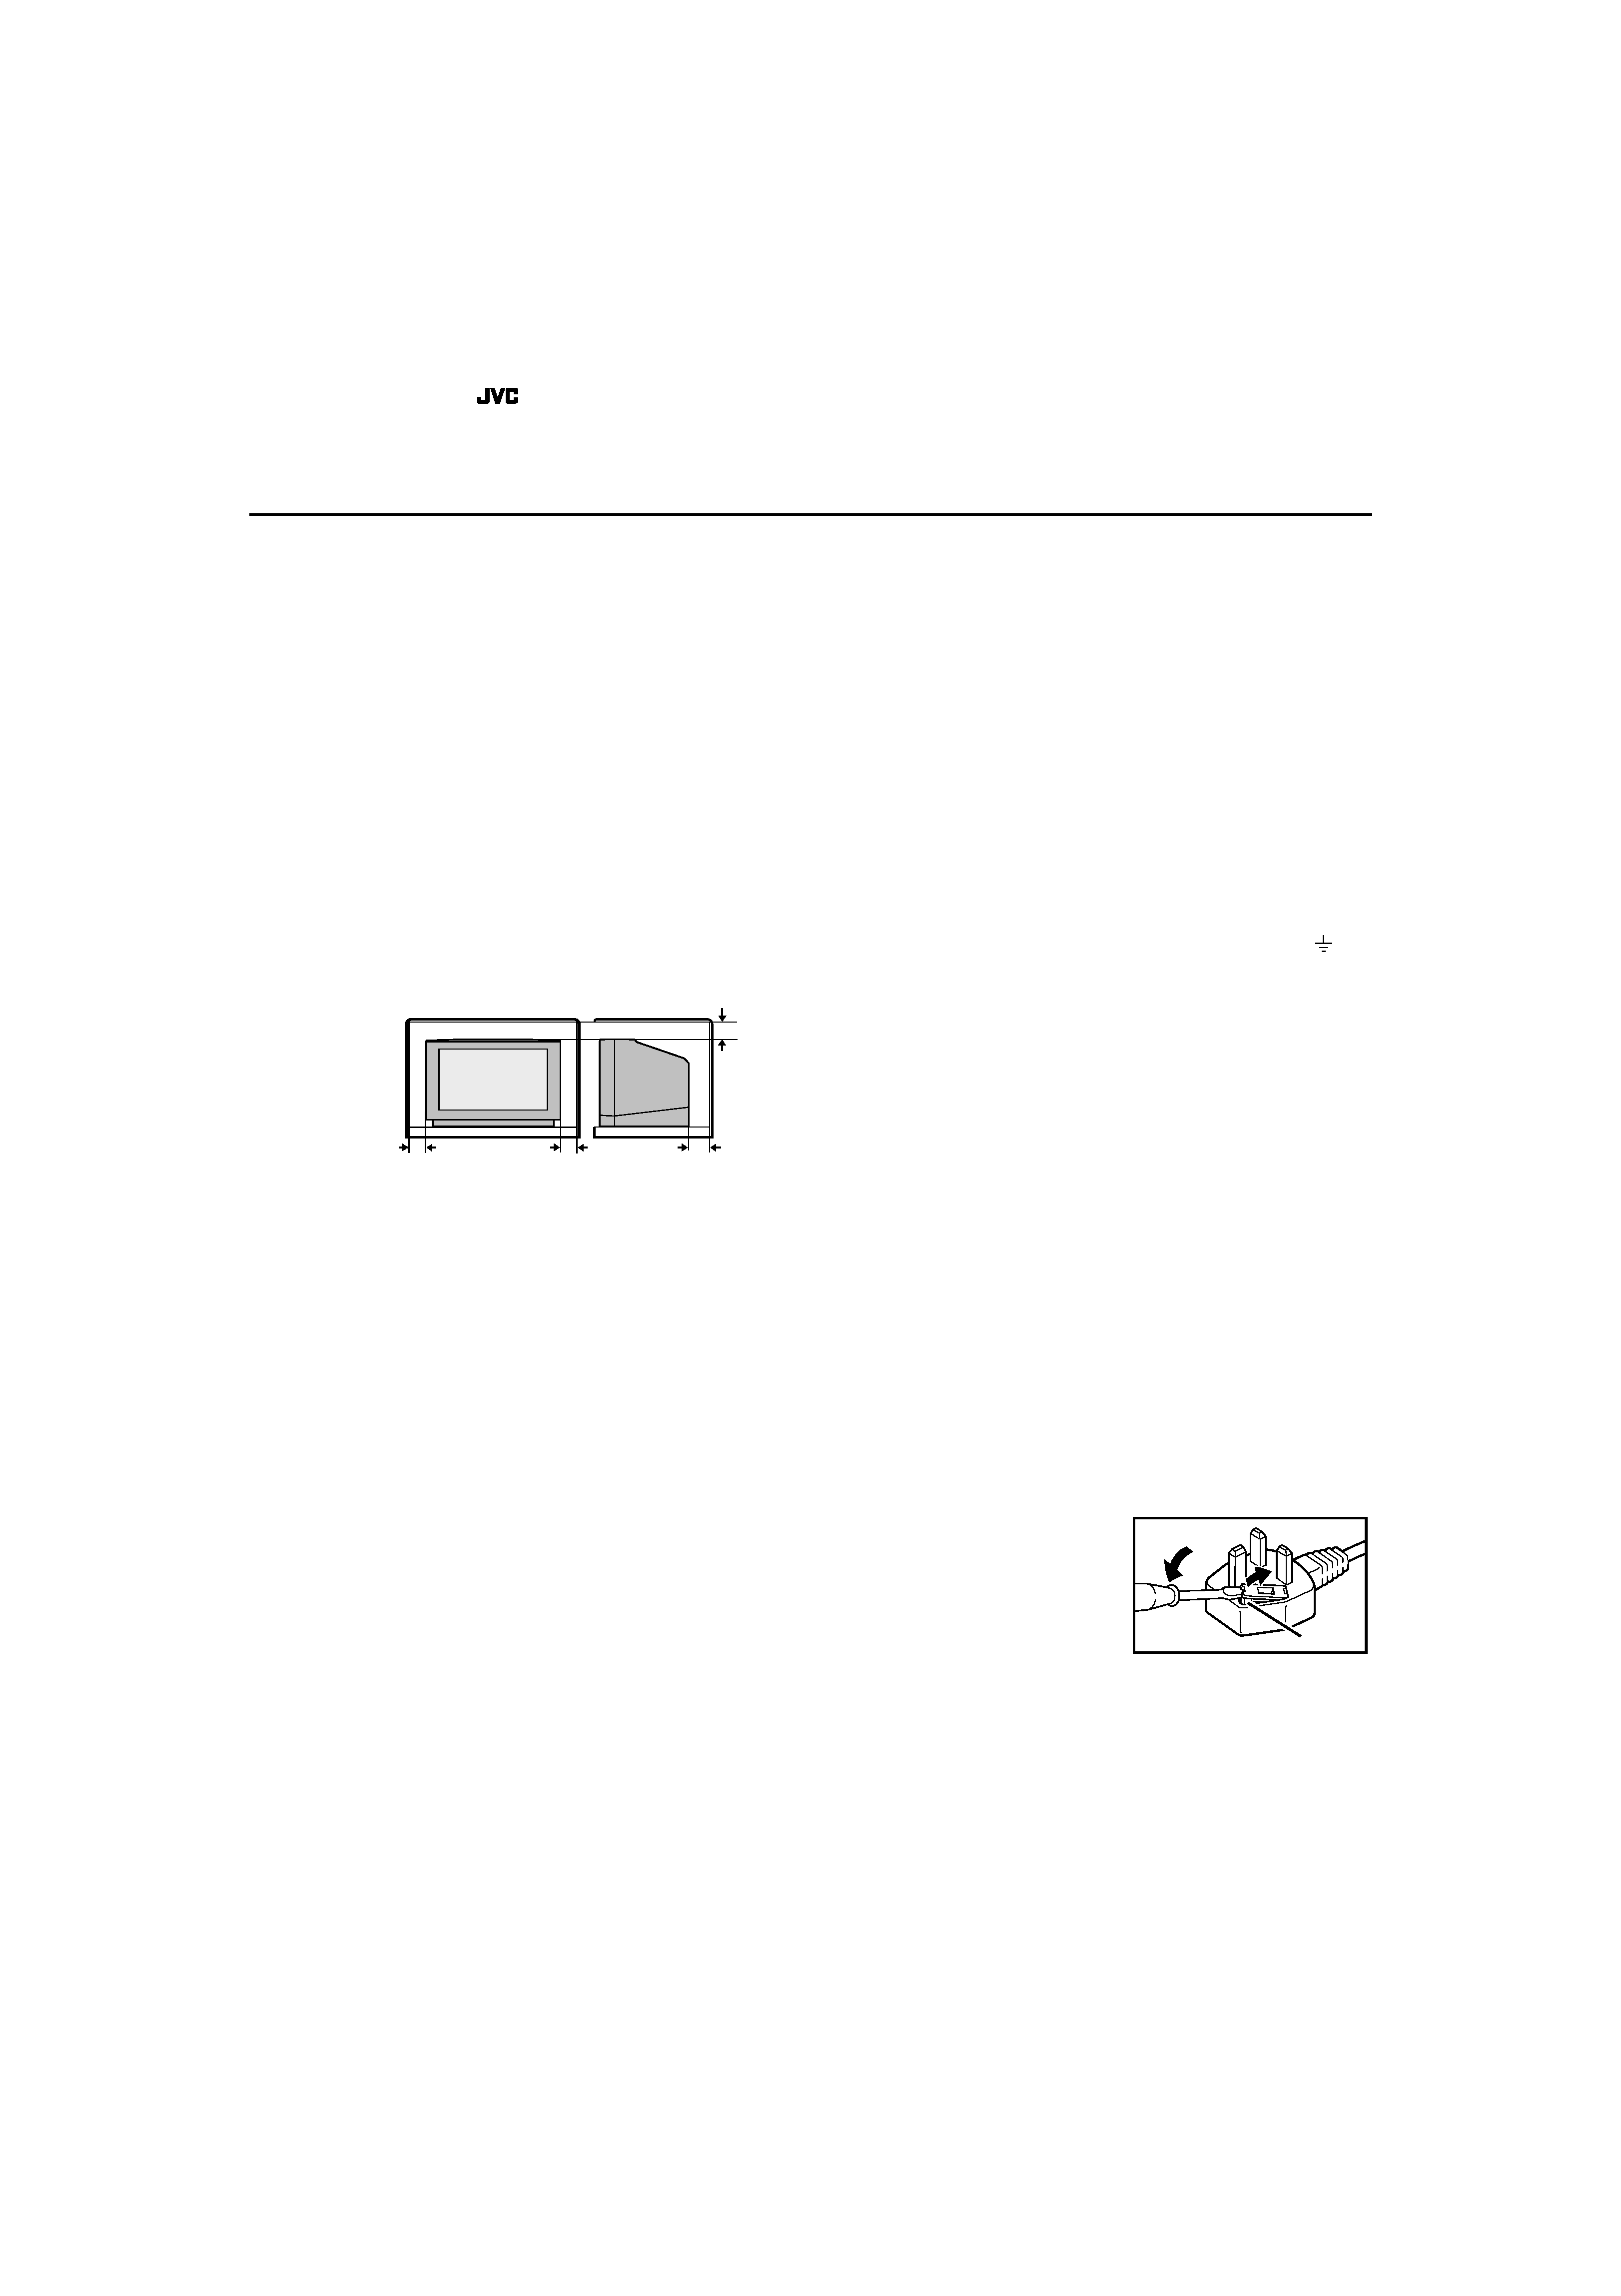
When installing this television, distance recommendations
must be maintained between the floor and wall, as well as
instalment in a tightly enclosed area or piece of furniture.
Please adhere to the minimum distance guidelines shown
for safe operation.
4 Do not allow objects or liquid into the cabinet openings.
5 In the event of a fault, unplug the unit and call a service
technician. Do not attempt to repair it yourself or remove
the rear cover.
6 The surface of the TV screen is easily damaged. Be very
careful with it when hendling the TV.
Should the TV screen become soiled, wipe it with a soft dry
cloth. Never rub it forcefully. Never use any cleaner or
detergent on it.
7 When you don't use this TV set for a long period of time, be
sure to disconnect the power plug from the AC outlet.
8 Do not hold the front panel door when moving the TV, if you
do you may break it.
s
s
s
s
:DUQLQJ
:DUQLQJ
:DUQLQJ
:DUQLQJ
DO NOT cut off the mains plug from this equipment. If the
plug fitted is not suitable for the power points in your home or
the cable is too short to reach a power point, then obtain an
appropriate safety approved extension lead or adaptor or
consult your dealer.
If nonetheless the mains plug is cut off, remove the fuse and
dispose of the plug immediately, to avoid a possible shock
hazard by inadvertent connection to the mains supply.
If a new mains plug has to be fitted, then follow the instruction
given below:
Important
Do not make any connection to the larger terminal which is
marked with the letter E or by the safety earth symbol
or
coloured green or green-and-yellow.
The wires in the mains lead on this product are coloured in
accordance with the following code:
Blue:
Neutral
Brown: Live
As these colours may not correspond with the coloured
marking identifying the terminals in your plug proceed as
follows:
The wire which is coloured blue must be connected to the
terminal which is marked with the letter N or coloured black.
The wire which is coloured brown must be connected to the
terminal which is marked with the letter L or coloured red.
When replacing the fuse only a correctly rated approved type
should be used and be sure to re-fit the fuse cover.
If in doubt -- consult a competent
electrician.
How to replace the fuse
Open the fuse compartment
with a blade screwdriver, and
replace the fuse.
15 cm
10 cm
10 cm
15 cm
Fuse
AV32EK_WARNING.fm Page 2 Tuesday, December 19, 2000 9:19 AM

6
s
s
s
s
*XLGHOLQHV#IRU#VDIH#RSHUDWLRQ
*XLGHOLQHV#IRU#VDIH#RSHUDWLRQ
*XLGHOLQHV#IRU#VDIH#RSHUDWLRQ
*XLGHOLQHV#IRU#VDIH#RSHUDWLRQ
This equipment has been designed and manufactured to comply with international safety standards. However, as with any
electrical appliance, care must be taken to ensure optimal results and operational safety.
· Before attempting to use this equipment, read the operating instructions thoroughly.
· Ensure that all electrical connections (including the mains plug, extension leads, etc.) have been made in accordance with the
manufacturer's instructions.
· If ever in doubt about the installation, operation or safety of this equipment, consult your dealer.
· Handle all glass panels or covers with care.
· Never operate this equipment if it appears damaged or operates abnormally. Turn the power off, disconnect the main power
plug and consult your dealer.
· Never remove any affixed panels or covers. Doing so may result in electrical shock.
· Never leave this equipment operating unattended unless otherwise specifically stated that it is designed to do so or in standby
mode. Only use the designated power switch to turn off the power and ensure that all potential users are instructed how to do
so. Make special arrangements for infirm or handicapped persons.
· Never watch TV while operating a motor vehicle. It is illegal to watch TV while driving.
· Never listen to headphones at high volume. Doing so may damage your hearing.
· Never obstruct the ventilation of this equipment. Doing so may cause overheating and result in a malfunction or damage.
· Never use makeshift stands or attempt to affix legs with wood screws. When using a manufacturer's approved stand or legs,
use only the fixtures provided and follow the installation instructions.
· Never allow this equipment to be exposed to rain or moisture.
· Never allow anyone, especially children, to insert anything into an opening in the case. Doing so may result in a fatal electrical
shock.
· Never guess or take chances with electrical equipment of any kind. It is better to be safe than sorry.
AV32EK_WARNING.fm Page 3 Tuesday, December 19, 2000 9:19 AM
7
6HWWLQJ#XS#\RXU#79
6HWWLQJ#XS#\RXU#79
6HWWLQJ#XS#\RXU#79
6HWWLQJ#XS#\RXU#79
s
s
s
s
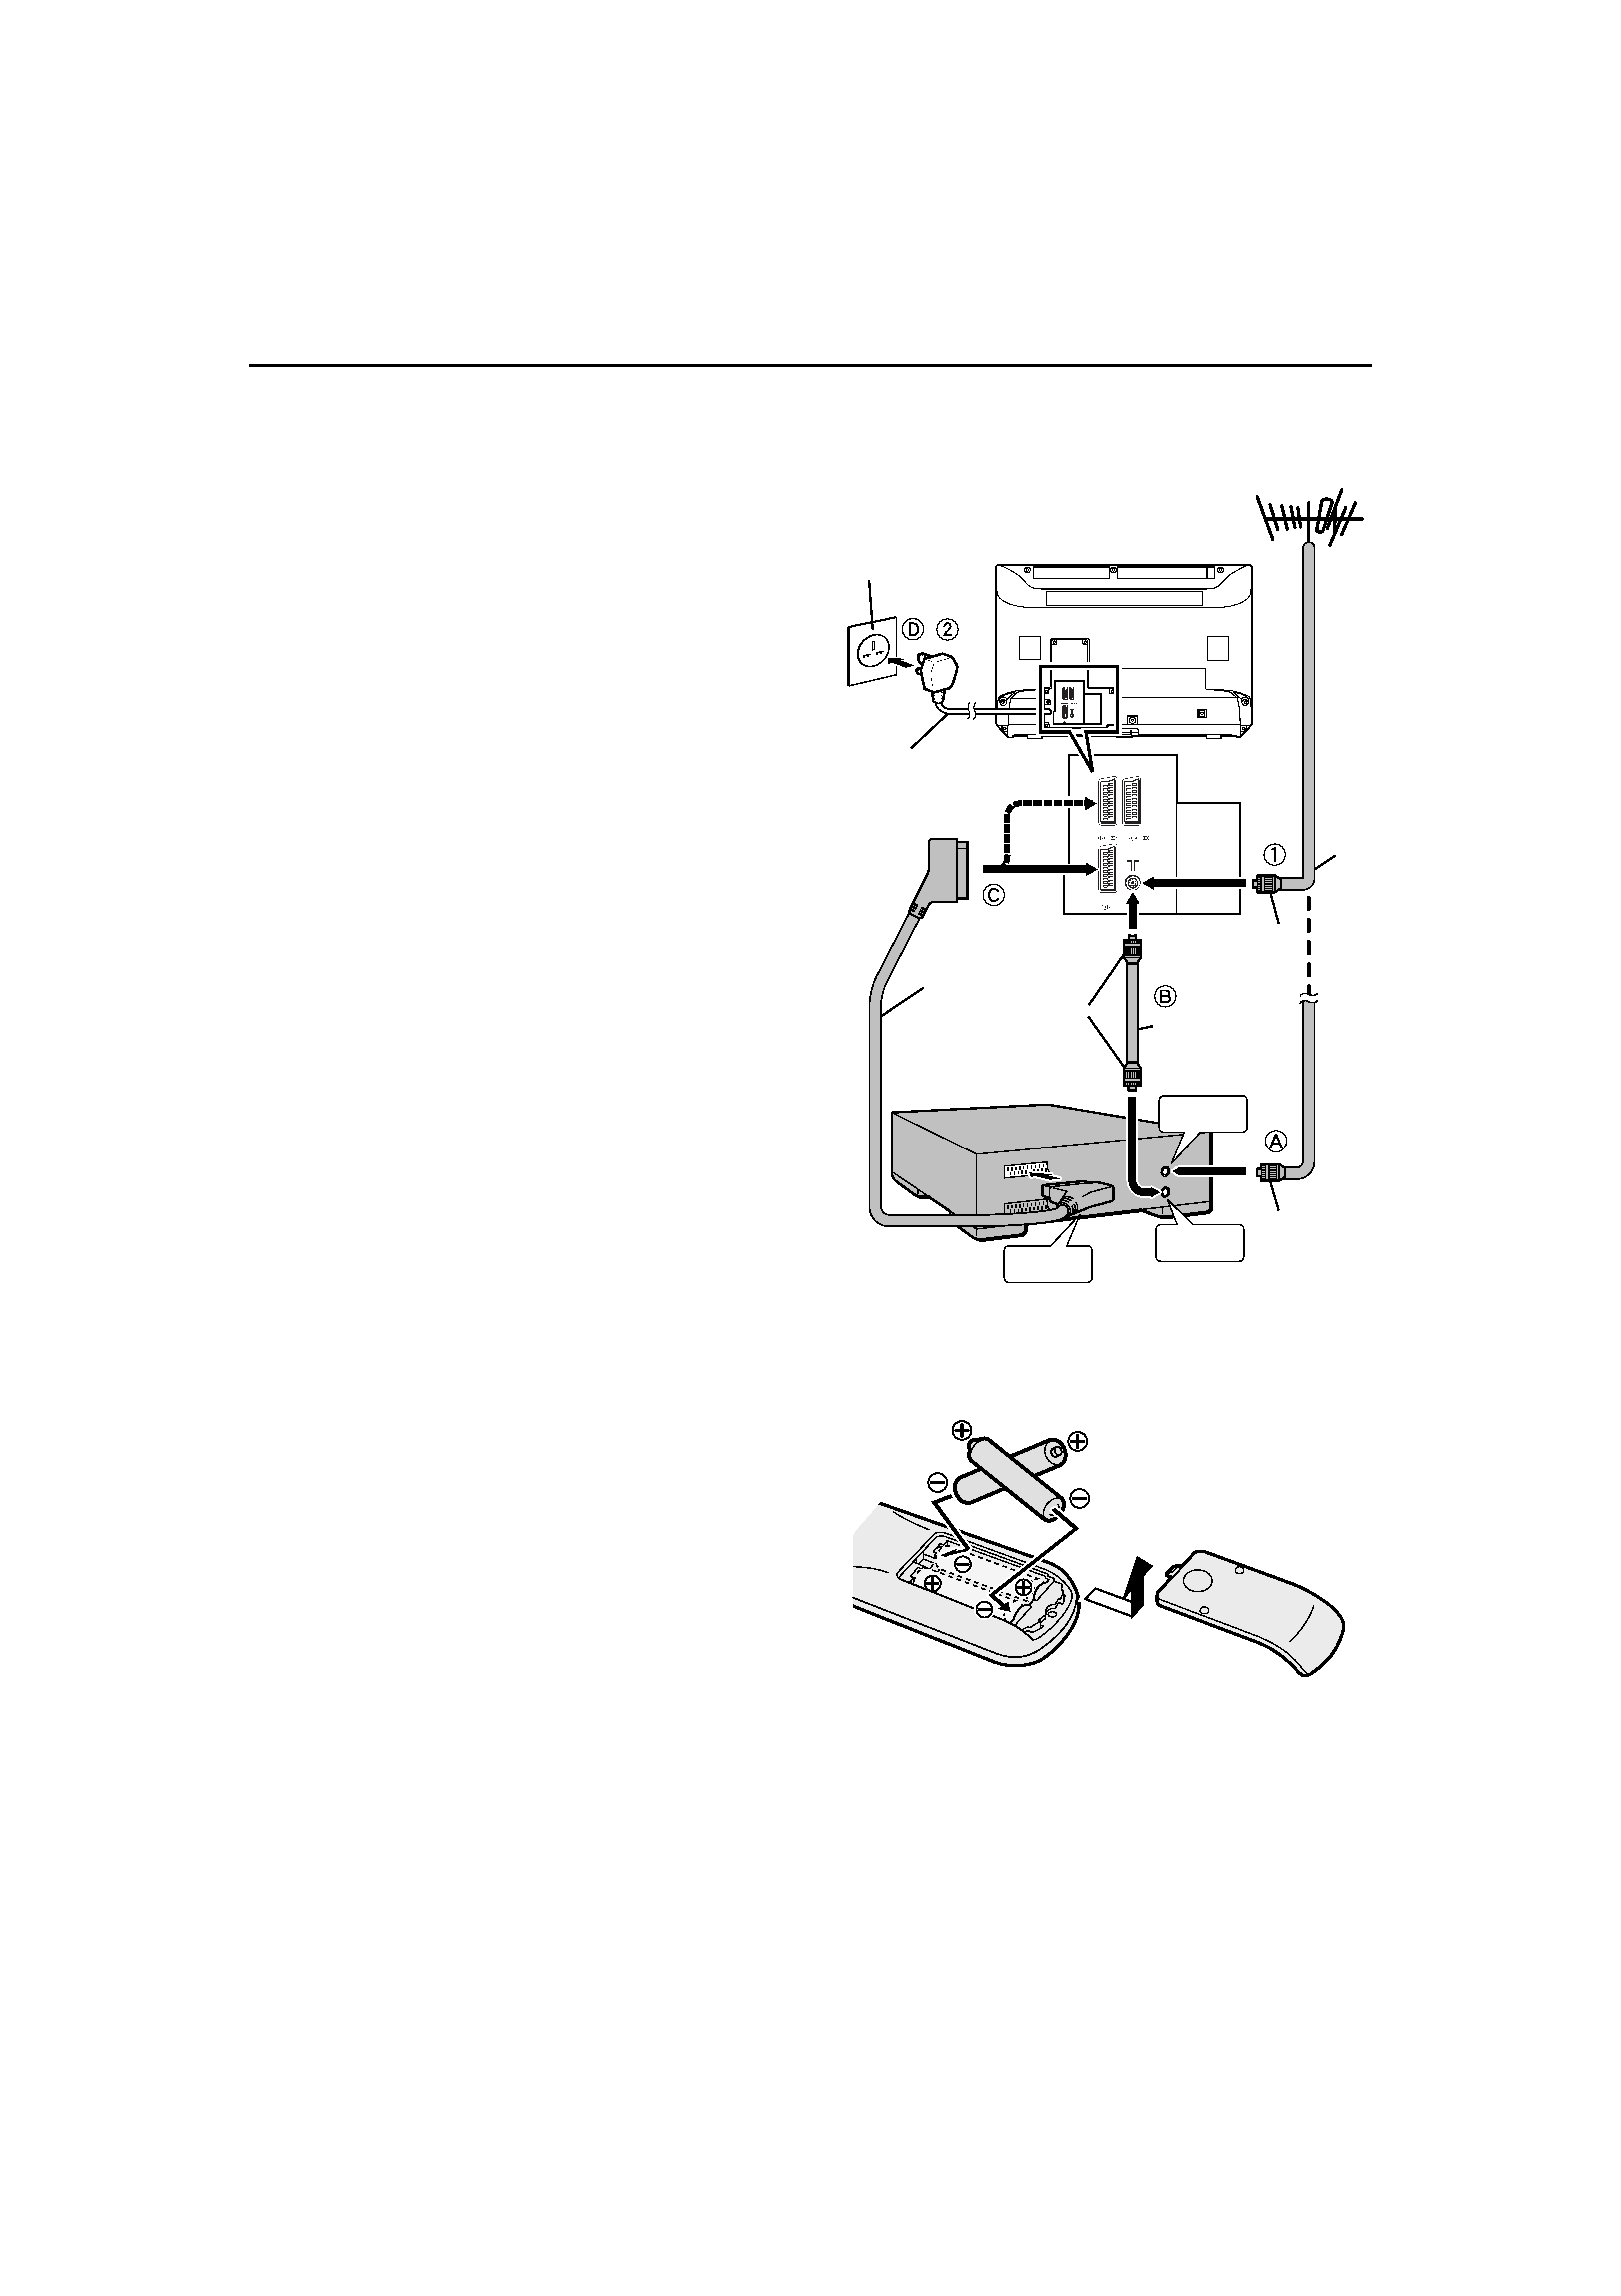
&RQQHFWLQJ#WKH#DHULDO#DQG#YLGHR#FDVVHWWH#UHFRUGHU#+9&5,
&RQQHFWLQJ#WKH#DHULDO#DQG#YLGHR#FDVVHWWH#UHFRUGHU#+9&5,
&RQQHFWLQJ#WKH#DHULDO#DQG#YLGHR#FDVVHWWH#UHFRUGHU#+9&5,
&RQQHFWLQJ#WKH#DHULDO#DQG#YLGHR#FDVVHWWH#UHFRUGHU#+9&5,
If you are connecting a VCR, follow
A B C D in the
diagram opposite.
If you are not connecting a VCR, follow
1 2.
· For more details, see the manuals that came with the
equipment you want to connect.
· The connecting cables are not provided.
· You can watch a video using the VCR without doing C.
For details, see your VCR instruction manual.
· To connect more equipment, please see "Further
preparation" on page 30.
· If you connect a decoder to a T-V LINK compatible VCR,
set the DECODER (EXT-2) function to ON. For details, see
"Using the DECODER (EXT-2) function" on page 29.
Otherwise, you will not be able to watch scrambled
channels.
To use the T-V LINK functions, you must have a T-V LINK
compatible VCR connected by a SCART cable
C to the EXT-
2 terminal on the TV. For details about T-V LINK functions,
see "T-V LINK functions" on page 7.
s
s
s
s
3XWWLQJ#EDWWHULHV#LQWR#WKH#UHPRWH#FRQWURO
3XWWLQJ#EDWWHULHV#LQWR#WKH#UHPRWH#FRQWURO
3XWWLQJ#EDWWHULHV#LQWR#WKH#UHPRWH#FRQWURO
3XWWLQJ#EDWWHULHV#LQWR#WKH#UHPRWH#FRQWURO
Use two AAA/R03 dry cell batteries.
Insert the batteries holding from the
ó end, making sure the
ô and ó terminals are correctly lined up.
To open the battery compartment, slide the door downwards
and lift off. Replace the door by sliding it upwards until it
fastens into place.
· Follow the warnings printed on the batteries.
· Battery life is about six months to one year, depending on
how much you use the remote control.
· If the remote control does not work properly, fit new
batteries.
· The batteries we supply are only for setting up and
testing your TV. Please replace them as soon as you
need to.
· Always use good-quality batteries.
EXT-
1
EXT-
2
EXT-
3
S
S
EXT-
1
EXT-
2
EXT-
3
S
S
VCR
Aerial
75-ohm coaxial
cable
aerial plug
Mains outlet
(AC 220 - 240 V,
50 Hz)
21-pin SCART Cable
aerial
plug
75-ohm
coaxial
cable
aerial plug
AV IN/OUT
terminal
to aerial
output
To Aerial
Input
power
Cord
WFT1EK_E1.fm Page 4 Tuesday, December 19, 2000 9:21 AM
8
Setting up your TV
s
s
s
s
,QLWLDO#VHWWLQJV
,QLWLDO#VHWWLQJV
,QLWLDO#VHWWLQJV
,QLWLDO#VHWWLQJV
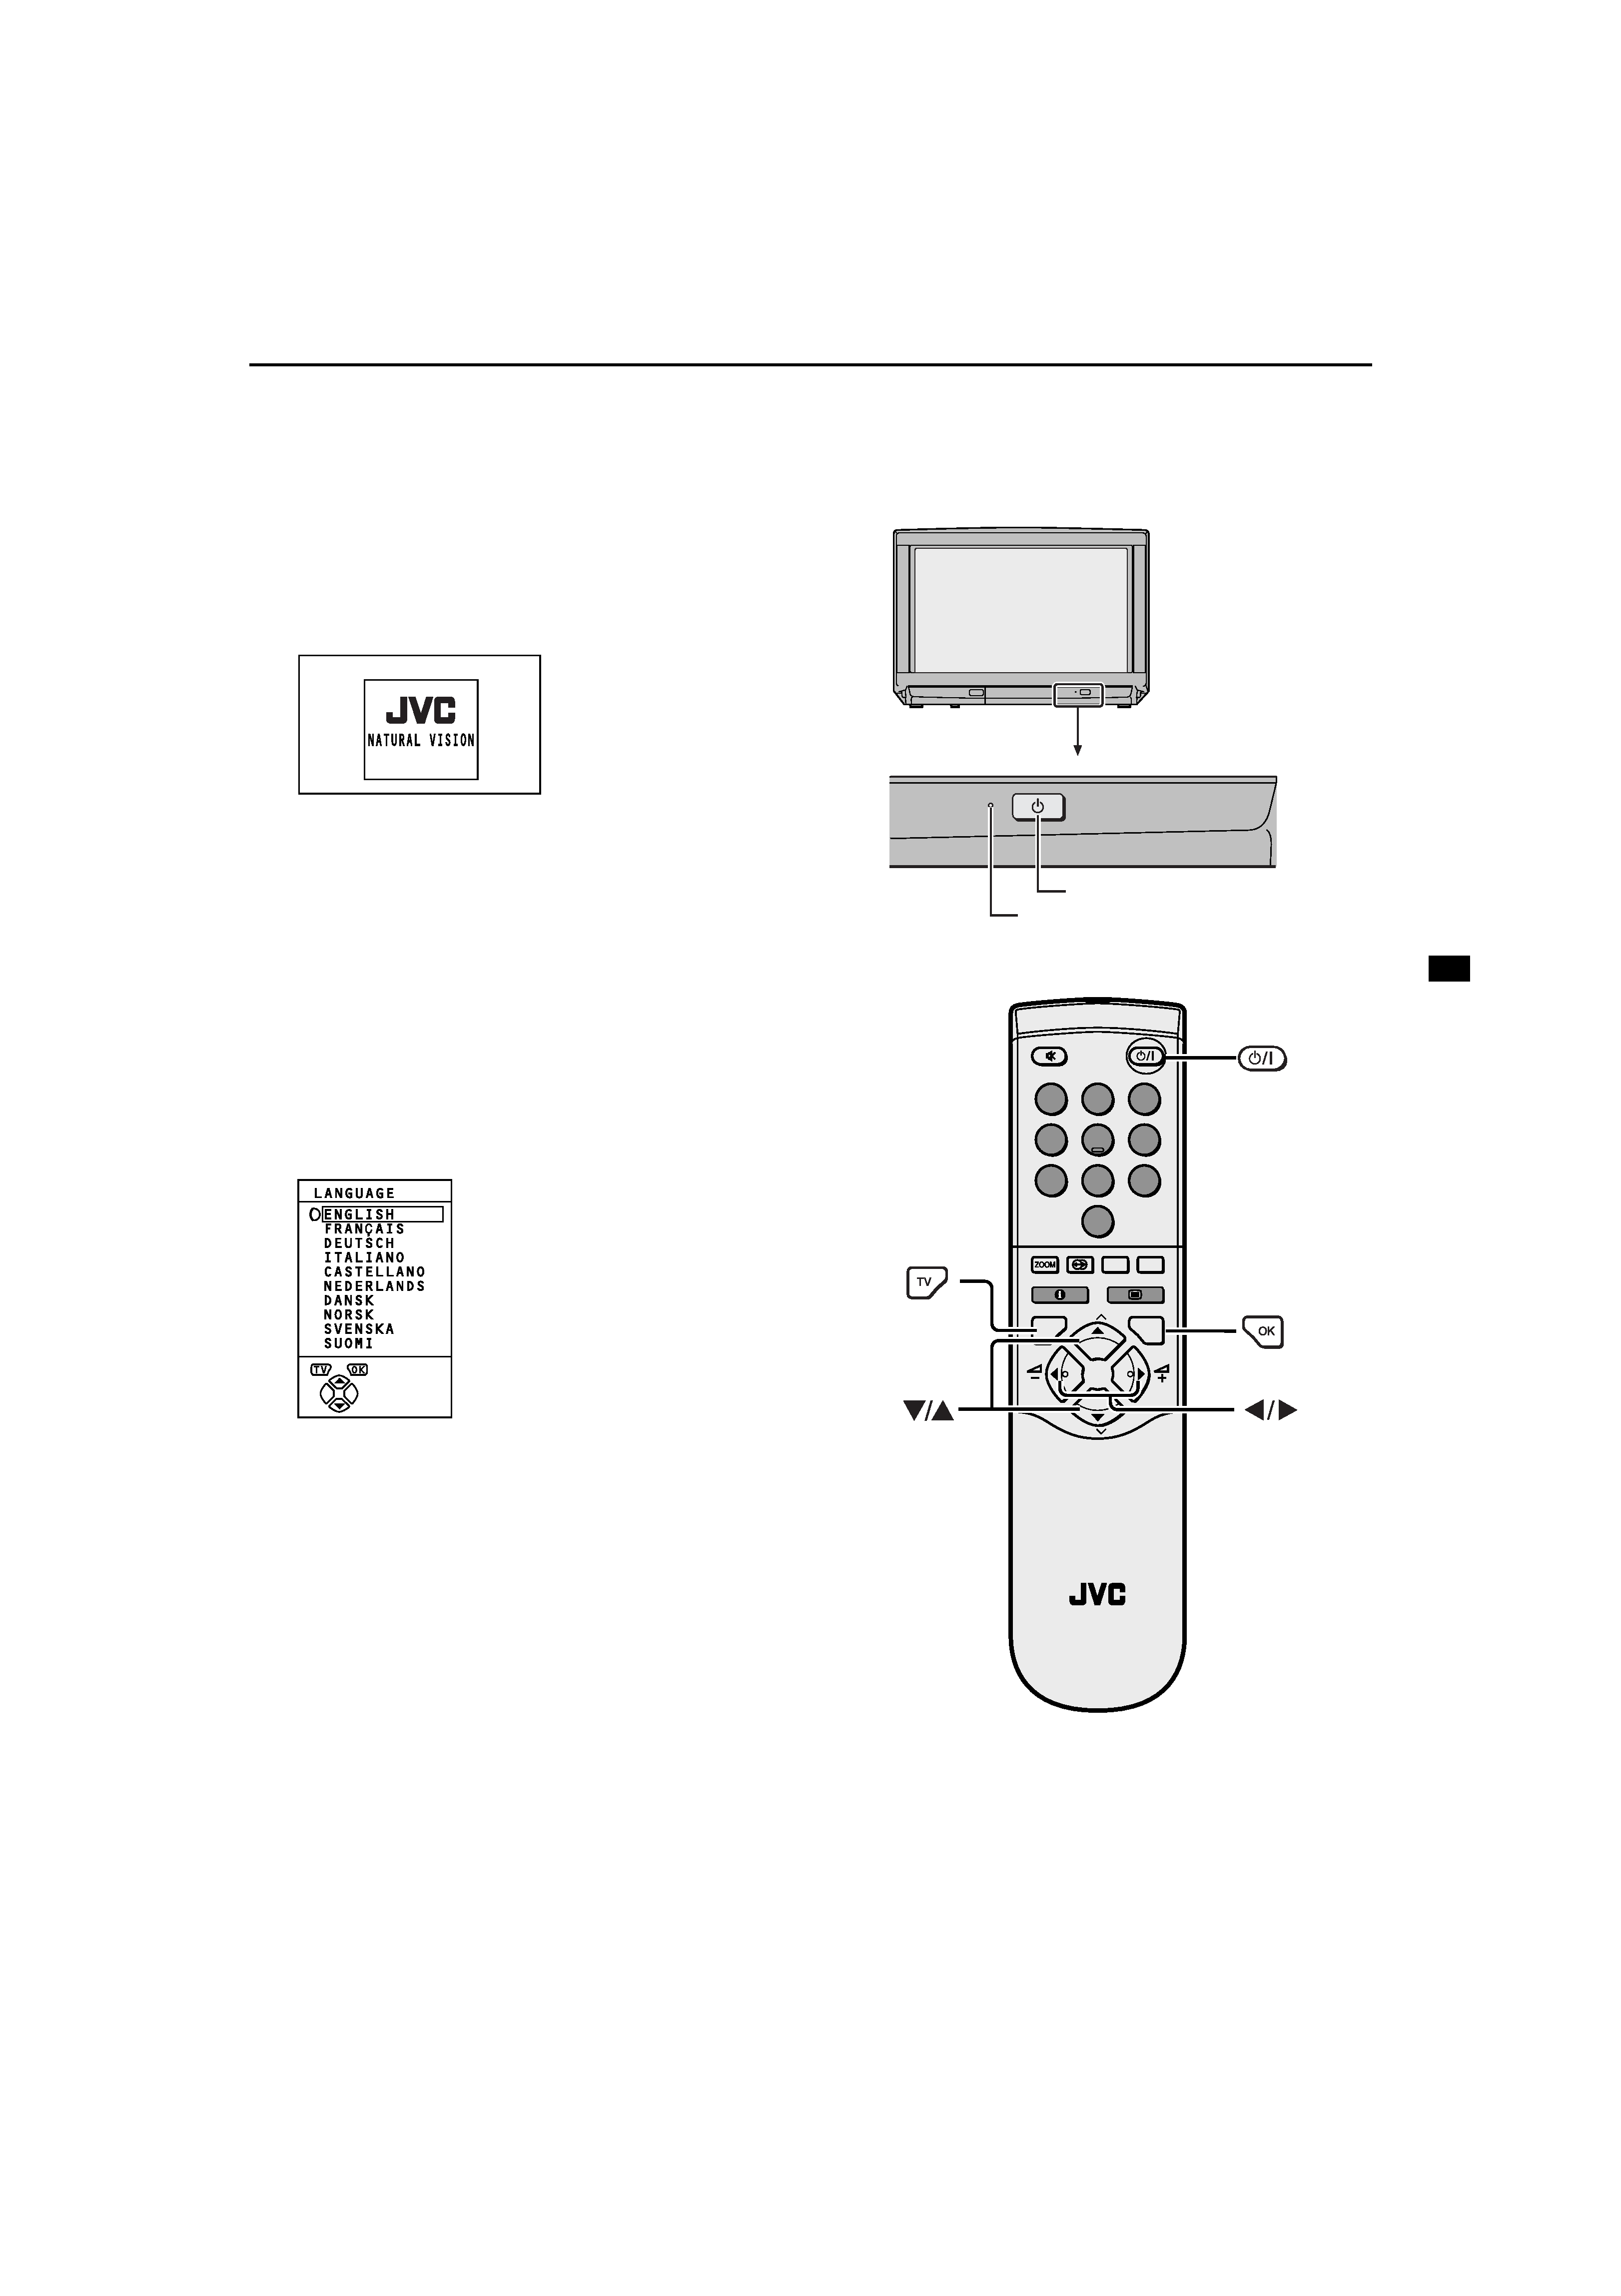
When the TV is first turned on, it goes into the initial setting
mode, and you will see the JVC logo. Follow the instructions
on the screen to make the initial settings.
1 Press the main power button on the TV
The power lamp lights red (for power on), then green (for
TV on) and the JVC logo is appears.
· If the power lamp stays red and does not change to
green:
your TV is in the standby mode. Press the
=
(standby) button on the remote control to turn your
TV on.
· If the JVC logo does not appear this is because your
TV has already been turned on for the first time:
use the "LANGUAGE" and "AUTO PROGRAM"
functions to make the initial settings. For details, see
"INSTALL" on page 24.
2 Press the
3
3
3
3 button
The LANGUAGE menu appears.
3 Press the
ë
ë
ë
ë buttons to choose
ENGLISH
The on-screen display will then be in English.
1
2
3
4
5
6
7
8
9
0
P
AV
TV
OK
MENU
P
RM-C55
TV
main power button
power lamp
WFT1EK_E1.fm Page 5 Wednesday, December 20, 2000 4:26 PM