
TOSHIBA
OWNER'S MANUAL
32ZD08B
32ZD09B
*
DIGIT AL
Nicam Stereo Flat Tube Colour Television with Fastext
DO
DO
...
...
2
Some "DOs" and "DON'Ts" for you
For your safety
DO
NO
DO
NO
T
T...
...
SAFETY
Air Circulation...
DO NOT...
Heat Damage...
Leave at least 10cm clearance around the television to
allow adequate ventilation. This will prevent the TV
from overheating and consequential possible damage
to the TV. Dusty places should also be avoided.
Damage may occur if you leave the TV in direct sunlight
or near a heater. Avoid places subject to extremely high
temperatures or humidity, or locations where the
temperature is likely to fall below 5°C (41°F).
Please read the points below for your own safety. They are of a general nature, intended to help you with all
your electronic consumer products and some points may not apply to the goods you have just purchased.
DON'T remove any fixed covers as this may expose
dangerous voltages.
DON'T continue to operate the equipment if you are in
any doubt about it working normally, or it is damaged
in any way switch off, withdraw the mains plug and
consult your dealer.
DON'T leave equipment switched on when it is
unattended, unless it is specifically stated that it is
designed for unattended operation or has a standby
mode. Switch off using the switch on the equipment
and make sure your family know how to do this.
Special arrangements may need to be made for infirm
or handicapped people.
DON'T listen to headphones at high volume, as such
use can permanently damage your hearing.
DON'T
obstruct the ventilation of the equipment for
example, with curtains or soft furnishings. Overheating
will cause damage and shorten the life of the
equipment.
DON'T place hot objects such as candles or nightlights
on, or close to the equipment. High temperatures can
melt plastic and lead to fires.
DON'T
use makeshift stands and NEVER fix legs with
wood screws to ensure complete safety always fit the
manufacturer's approved stand with the fixings
provided, according to the instructions.
DON'T allow electrical equipment to be exposed to rain
or moisture.
ABOVE ALL NEVER let anyone, especially
children, push anything into holes, slots or any
other openings in the case this could result in a
fatal electric shock.
NEVER guess or take chances with electrical
equipment of any kind it is better to be safe
than sorry.
Mains Supply...
DO...
The mains supply required for this equipment is
230v AC 50Hz. Never connect to a DC supply or any
other power source. DO ensure that the TV is not
standing on the mains lead. DO NOT cut off the mains
plug from this equipment, this incorporates a special
Radio Interference Filter, the removal of which will
impair its performance. In the UK, the fuse fitted in this
plug is 13A, and is approved by ASTA or BSI to
BS1362. It should only be replaced by a correctly rated
and approved type and the fuse cover must be refitted.
IF IN DOUBT PLEASE CONSULT A COMPETENT
ELECTRICIAN.
This equipment has been designed and manufactured
to meet international safety standards, but like any
electrical equipment, care must be taken if you are to
obtain the best results and safety is to be assured.
DO read the operating instructions before you attempt
to use the equipment.
DO ensure that all electrical connections, including the
mains plug, extension leads and inter connections,
between pieces of equipment, are properly made and
in accordance with the manufacturers' instructions.
Switch off and withdraw the mains plug when making
or changing connections.
DO consult your dealer if you are ever in doubt about
the installation, operation or safety of your equipment.
DO be careful with glass panels or doors on
equipment.

Contents
TELETEXT
FOR YOUR GUIDANCE
SAFETY
CONNECTING OTHER EQUIPMENT
SETTING UP
SPECIAL SOUND FEATURES
USING YOUR TV
ADDITIONAL FEATURES
3
For your safety
some DOs and DON'Ts for you to be aware of
2
Your new television's remote control an at-a-glance guide
4
Connecting the speakers
5
Connecting and turning on your new TV
6
Choosing the language
7
Auto tune
8
Swapping programme positions and programme skip
9
Manually tuning your TV an alternative to
Auto tune
10
General controls selecting and changing programme position, sound control, bass/treble/balance
11
Picture adjustments picture preferences, picture still, scan mode, DNR, blue screen
12
Widescreen viewing Super Live, Cinema, Subtitle, 14:9, Wide, 4:3
13
Picture position picture size/position settings, Widescreen Signalling
14
Dolby Digital
15
Dolby Pro Logic Surround Test Mode
16
Digital Surround Processor Surround Sound features
17
Teletext
setting up
18
Teletext Auto and List modes
19
Teletext control buttons
20
Timer, time display and panel lock
21
Stereo and bilingual transmissions
21
AV connections and input selection input and output sockets for connected equipment
22
Front connections and controls
23
Back connections
24
The Menus a display of the on-screen menus for your reference
25
Questions and Answers, care/disposal information
26
Index, Specifications and Accessories information on your television
28
P
P
VTR/DVD
VTR/DVD
CT-90042
SETTING UP
4
Carefully slide the back cover downwards to reveal the battery compartment and make
sure you insert the batteries the right way round.
All Toshiba batteries are Cadmium and Mercury free. Suitable battery types for
this remote are R03 or AAA.
Do not throw your old batteries into a fire, dispose of them in a designated disposal
area. Do not combine a used, old battery with a new one or mix battery types.
The performance of the remote control will deteriorate beyond a distance of
five metres or outside an angle of 30 degrees from the centre of the TV.
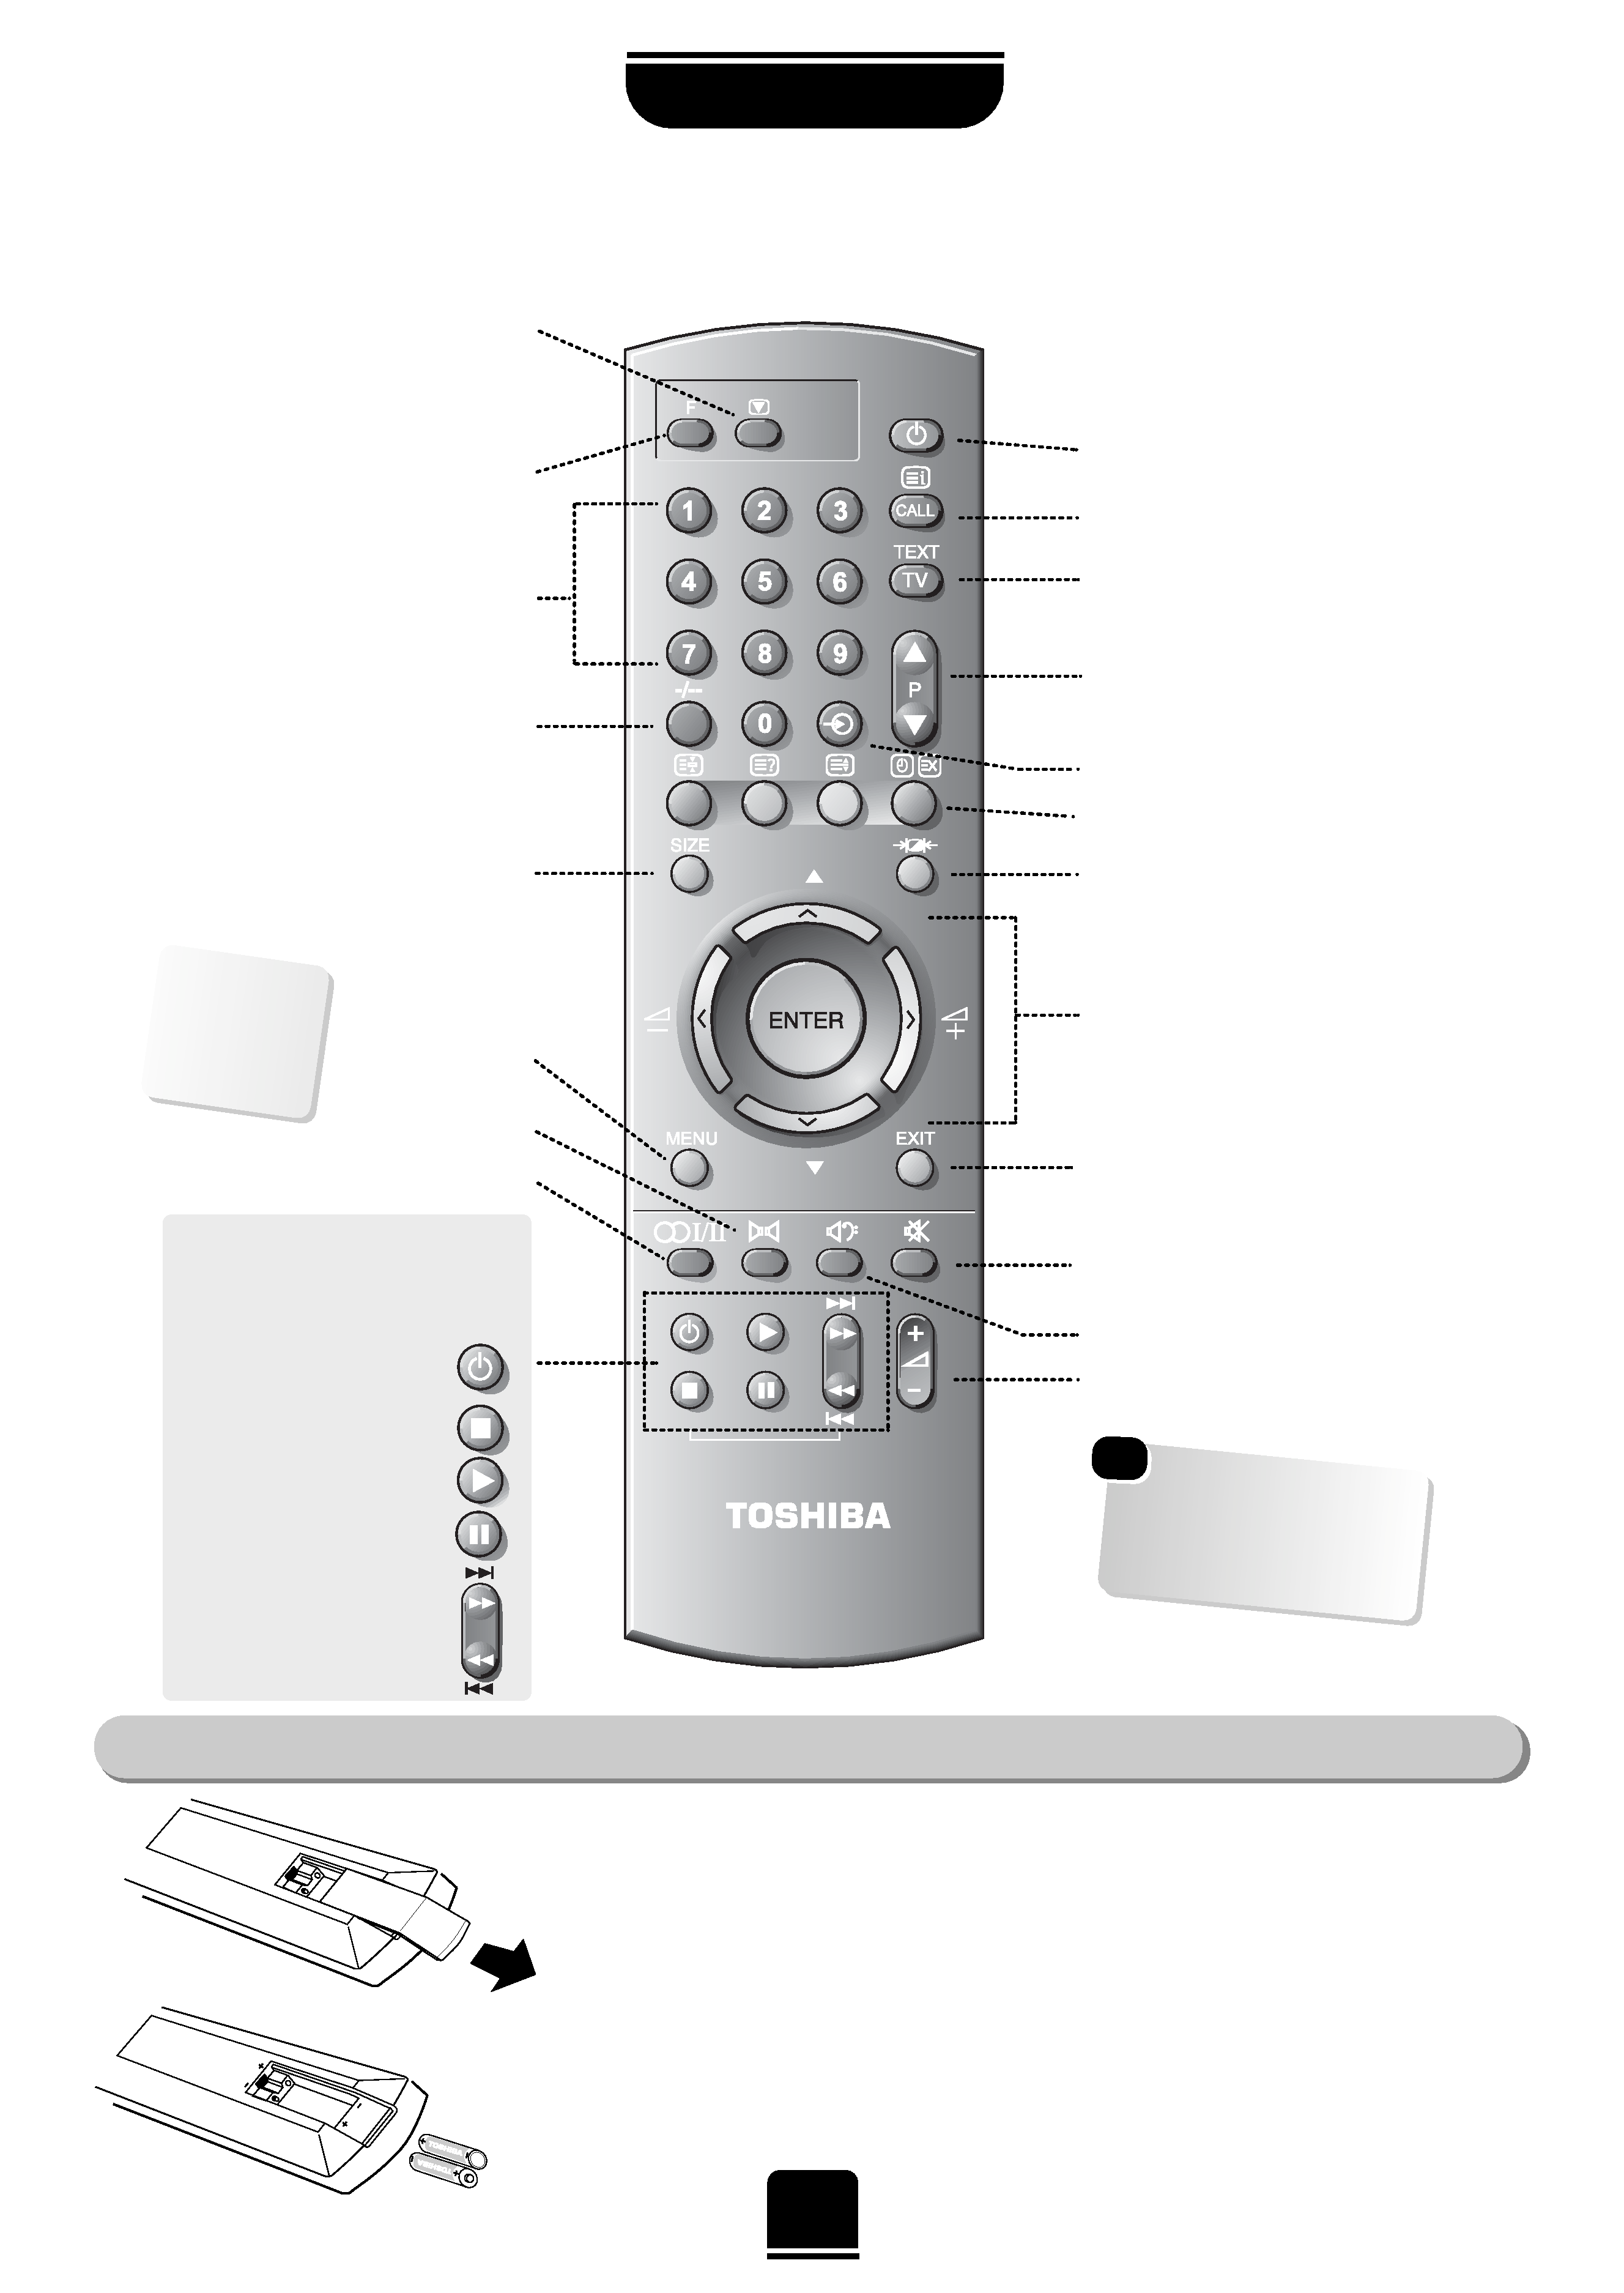
Simple, at-a-glance reference of your remote control's buttons...
For On/Standby mode
To display text services
Selectable picture presets
To mute the sound
To exit Menus
Bass Boost
To alter the volume
Dolby Surround
Teletext control buttons
To change programme positions,
up and down/teletext pages
To bring up on-screen information and
for the teletext initial/index function
Widescreen format
selection
To select external sources
Menu selection/confirmation buttons
the arrows to move the cursor on
the screen up, down, left or right and
ENTER
to confirm your selection.
Selecting teletext pages.
Stereo/bilingual reception
On-screen Menus
F
button for use with the buttons having
pale blue symbols/wording, the teletext
colour buttons and for increasing the speed
of user adjustments. Also for On/Standby
for a TOSHIBA DVD
Picture Still
Number buttons
1 or 2 digit
channel selection
Please see
page 25 for
the principal
on-screen
Menus
Your new television's remote control
... For quick reference
to topics, please
see
the INDEX at the end
of
this manual.
These buttons will operate your
TOSHIBA VIDEO and DVD
.
For the DVD you must press the
F button at the same time...
to switch ON/OFF,
press
to STOP,
press
to PLAY,
press
to PAUSE,
press
to FAST FORWARD/SKIP,
press
to REWIND/SKIP,
press
The batteries... and the effective range of the remote...
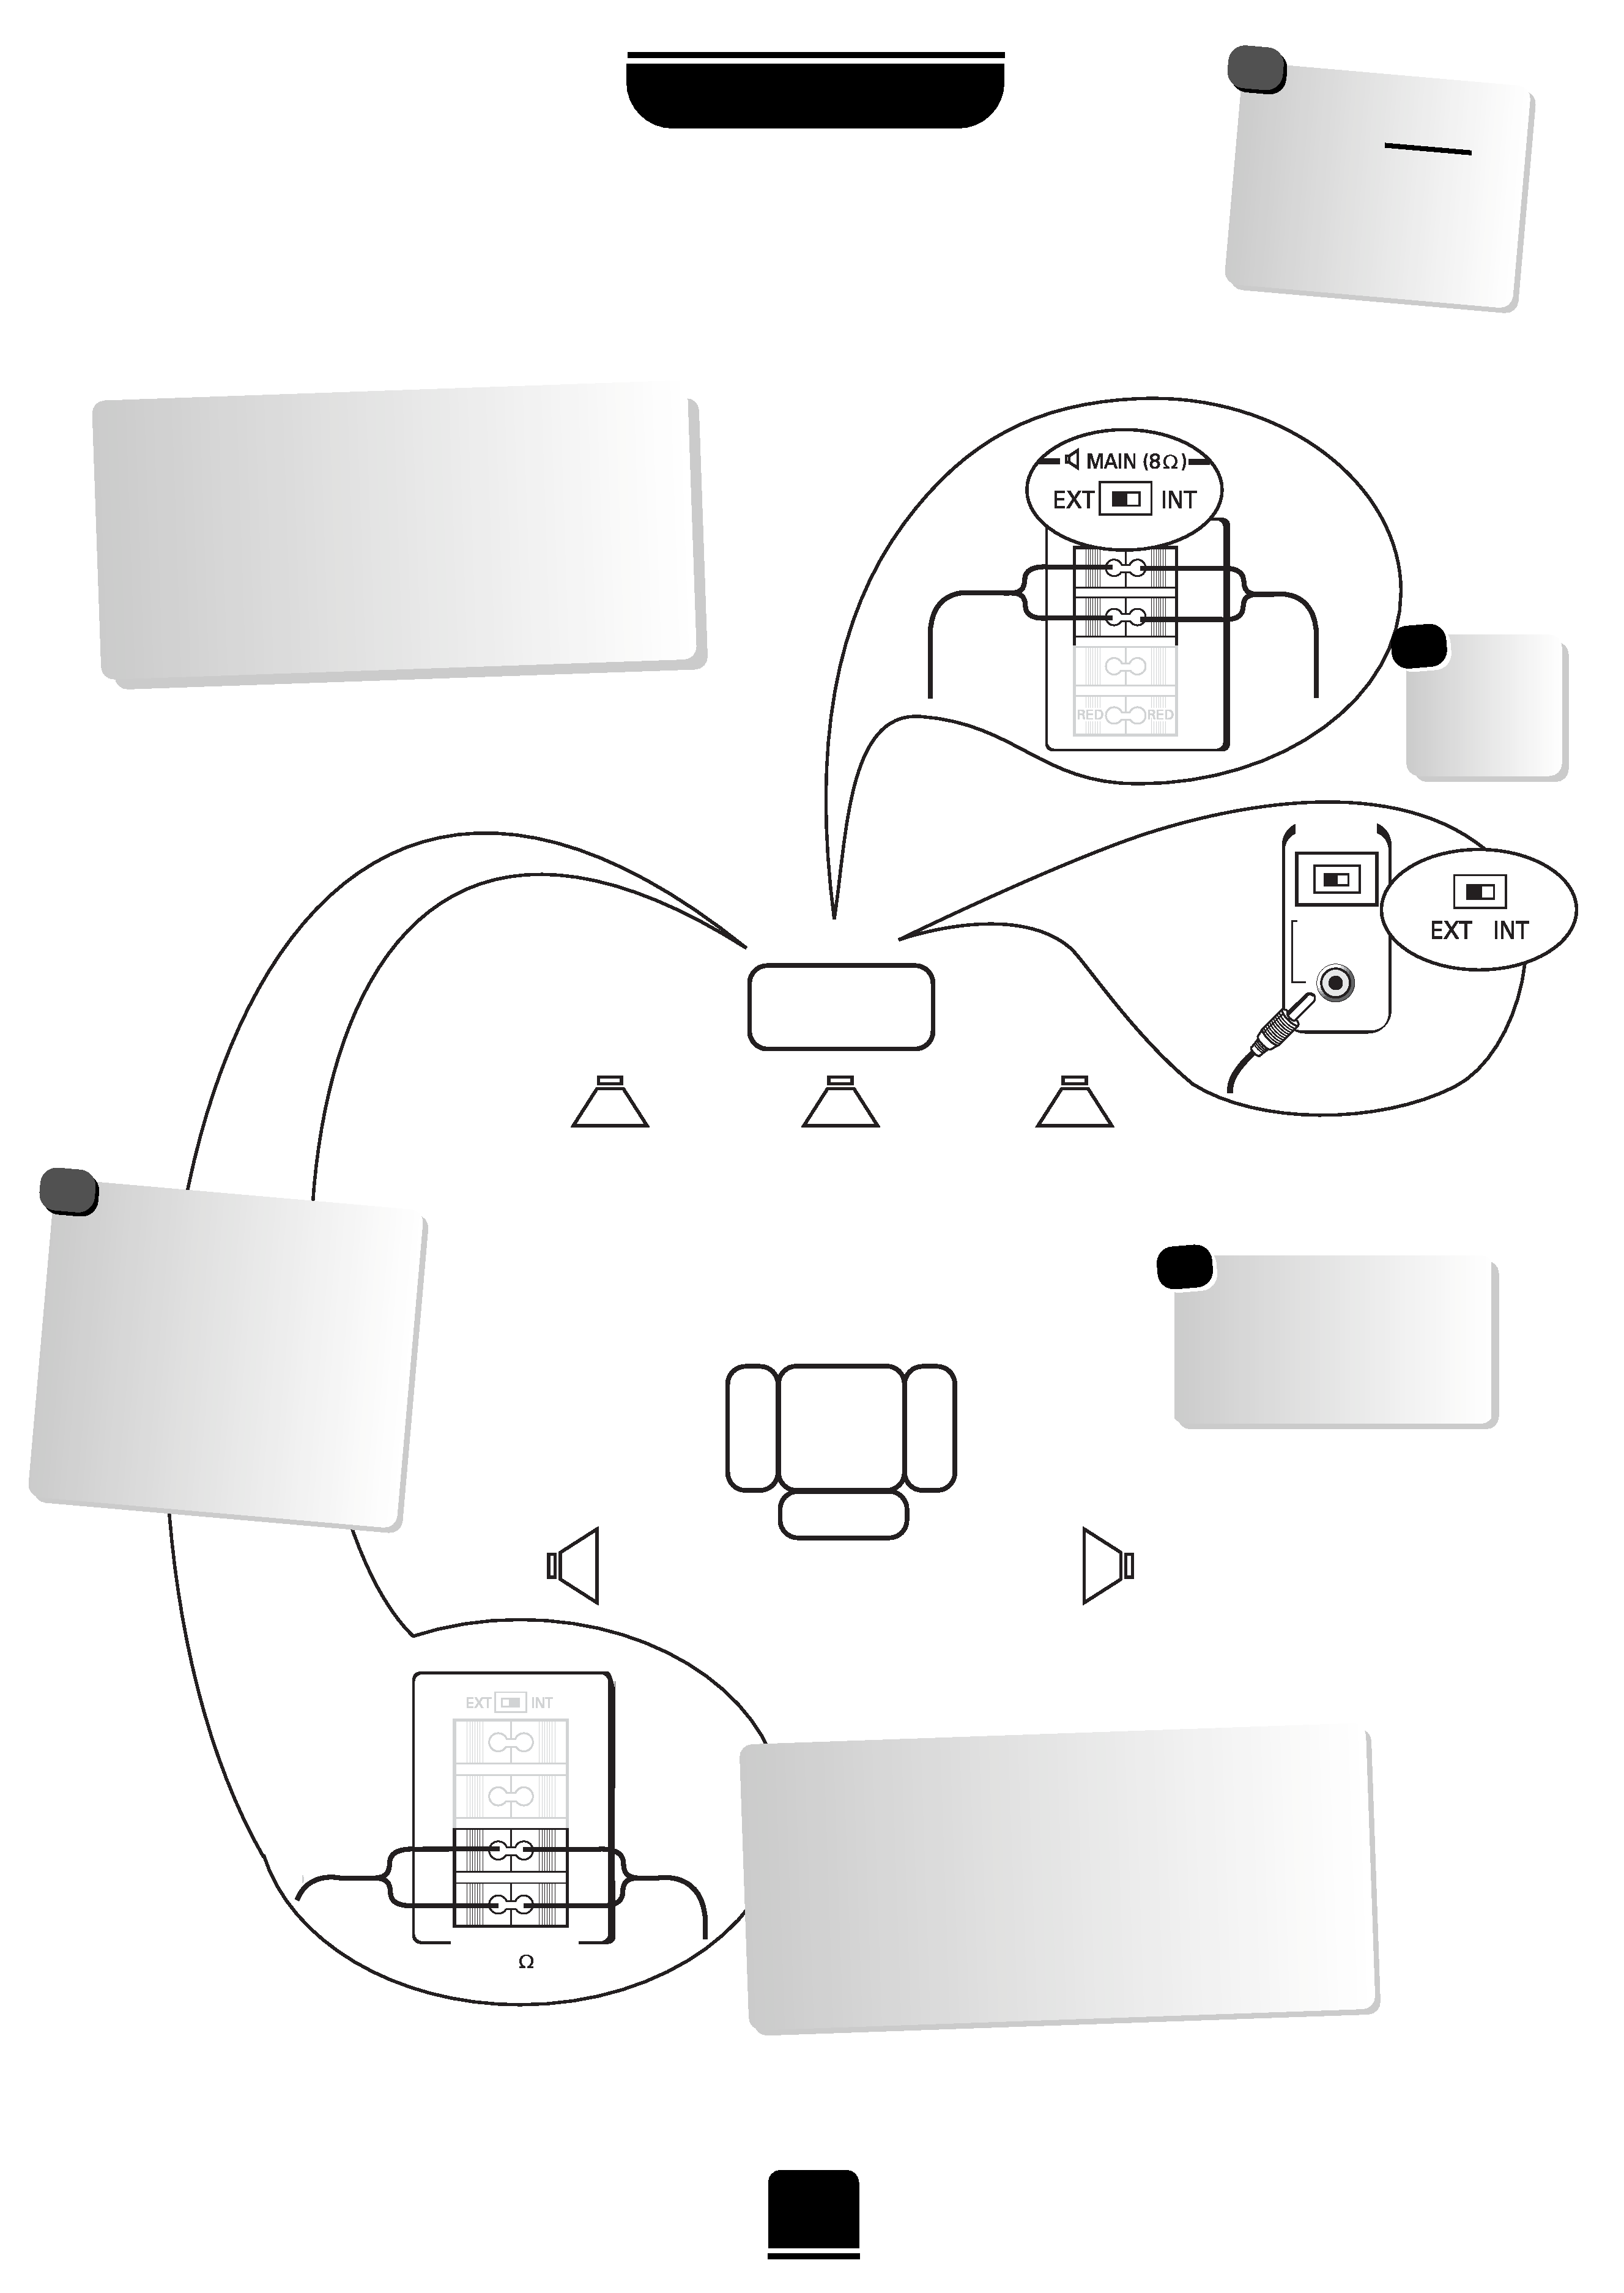
WOOFER
EXT
INT
SURROUND
8
K
When connecting external speakers always make sure that the power is OFF.
5
SETTING UP
Connecting the speakers
When connecting external Hi-Fi speakers
of your choice, they must be 8 ohm, 10W
minimum. These speakers should be
positioned either side of the TV and will
deliver the left and right sound. Simply press
the connector and insert the cable. You
must now set the switch to EXT as shown.
Main Speakers
Active Super Woofer
TV
WARNING: do not
attempt to share
external speakers
with your Hi-Fi as
serious damage
may
occur.
!
Always make sure
that the lead with the
stripe (or raised edge)
is
connected to
the RED terminal
and the
other (smooth) lead is
connected to the
BLACK terminal.
!
Surround Speakers
In order to enjoy the sensations of Surround
Sound TV it is necessary to connect the two
Surround Speakers. These speakers and cables
are included with the TV and should be sited
in line with the normal viewing position.
To connect the Surround Speakers simply press
the connector and insert the cable.
These are suggested
positions only.
Place your speakers to
suit and adjust the
balance as necessary.
Main
Speaker
Main
Speaker
Surround
Speaker
Surround
Speaker
Don't
forget to set
the switch
to EXT.