
Operating Instructions
Model No.
SL-1200MK5
SL-1210MK5
RQT7018-Y
Turntable System
PP
Before connecting, operating or adjusting this prod-
uct, please read these instructions completely.
Please keep this manual for future reference.
SL-1200MK5
RQT7018
2
Dear customer
Thank you for purchasing this product.
For optimum performance and safety, please read these instructions
carefully.
SL-1200MK5 : Silver model
SL-1210MK5 : Black model
Table of contents
Supplied accessories ................................................................... 2
IMPORTANT SAFETY INSTRUCTIONS ....................................... 3
Features ......................................................................................... 4
Preparation of the cartridge ........................................................ 4
Controls ......................................................................................... 4
Putting the player together ......................................................... 5
Connections and installation ...................................................... 5
Connecting to an amplifier and AC power supply cord ............. 5
Connecting to an Audio Mixer (not included) ............................ 6
Installation .................................................................................. 6
Preparatory adjustments ............................................................. 6
Horizontal balance and stylus pressure .................................... 6
Anti-skating ................................................................................ 7
Armlift height .............................................................................. 7
Tone arm height ......................................................................... 7
Fit the dust cover ....................................................................... 7
Playing records ............................................................................. 8
Adjustments while using the unit ............................................... 9
Pitch control ............................................................................... 9
Adjusting the turntable brake speed .......................................... 9
Maintenance ................................................................................ 10
Product service ........................................................................... 10
Troubleshooting guide ................................................................ 11
Specifications .............................................................................. 11
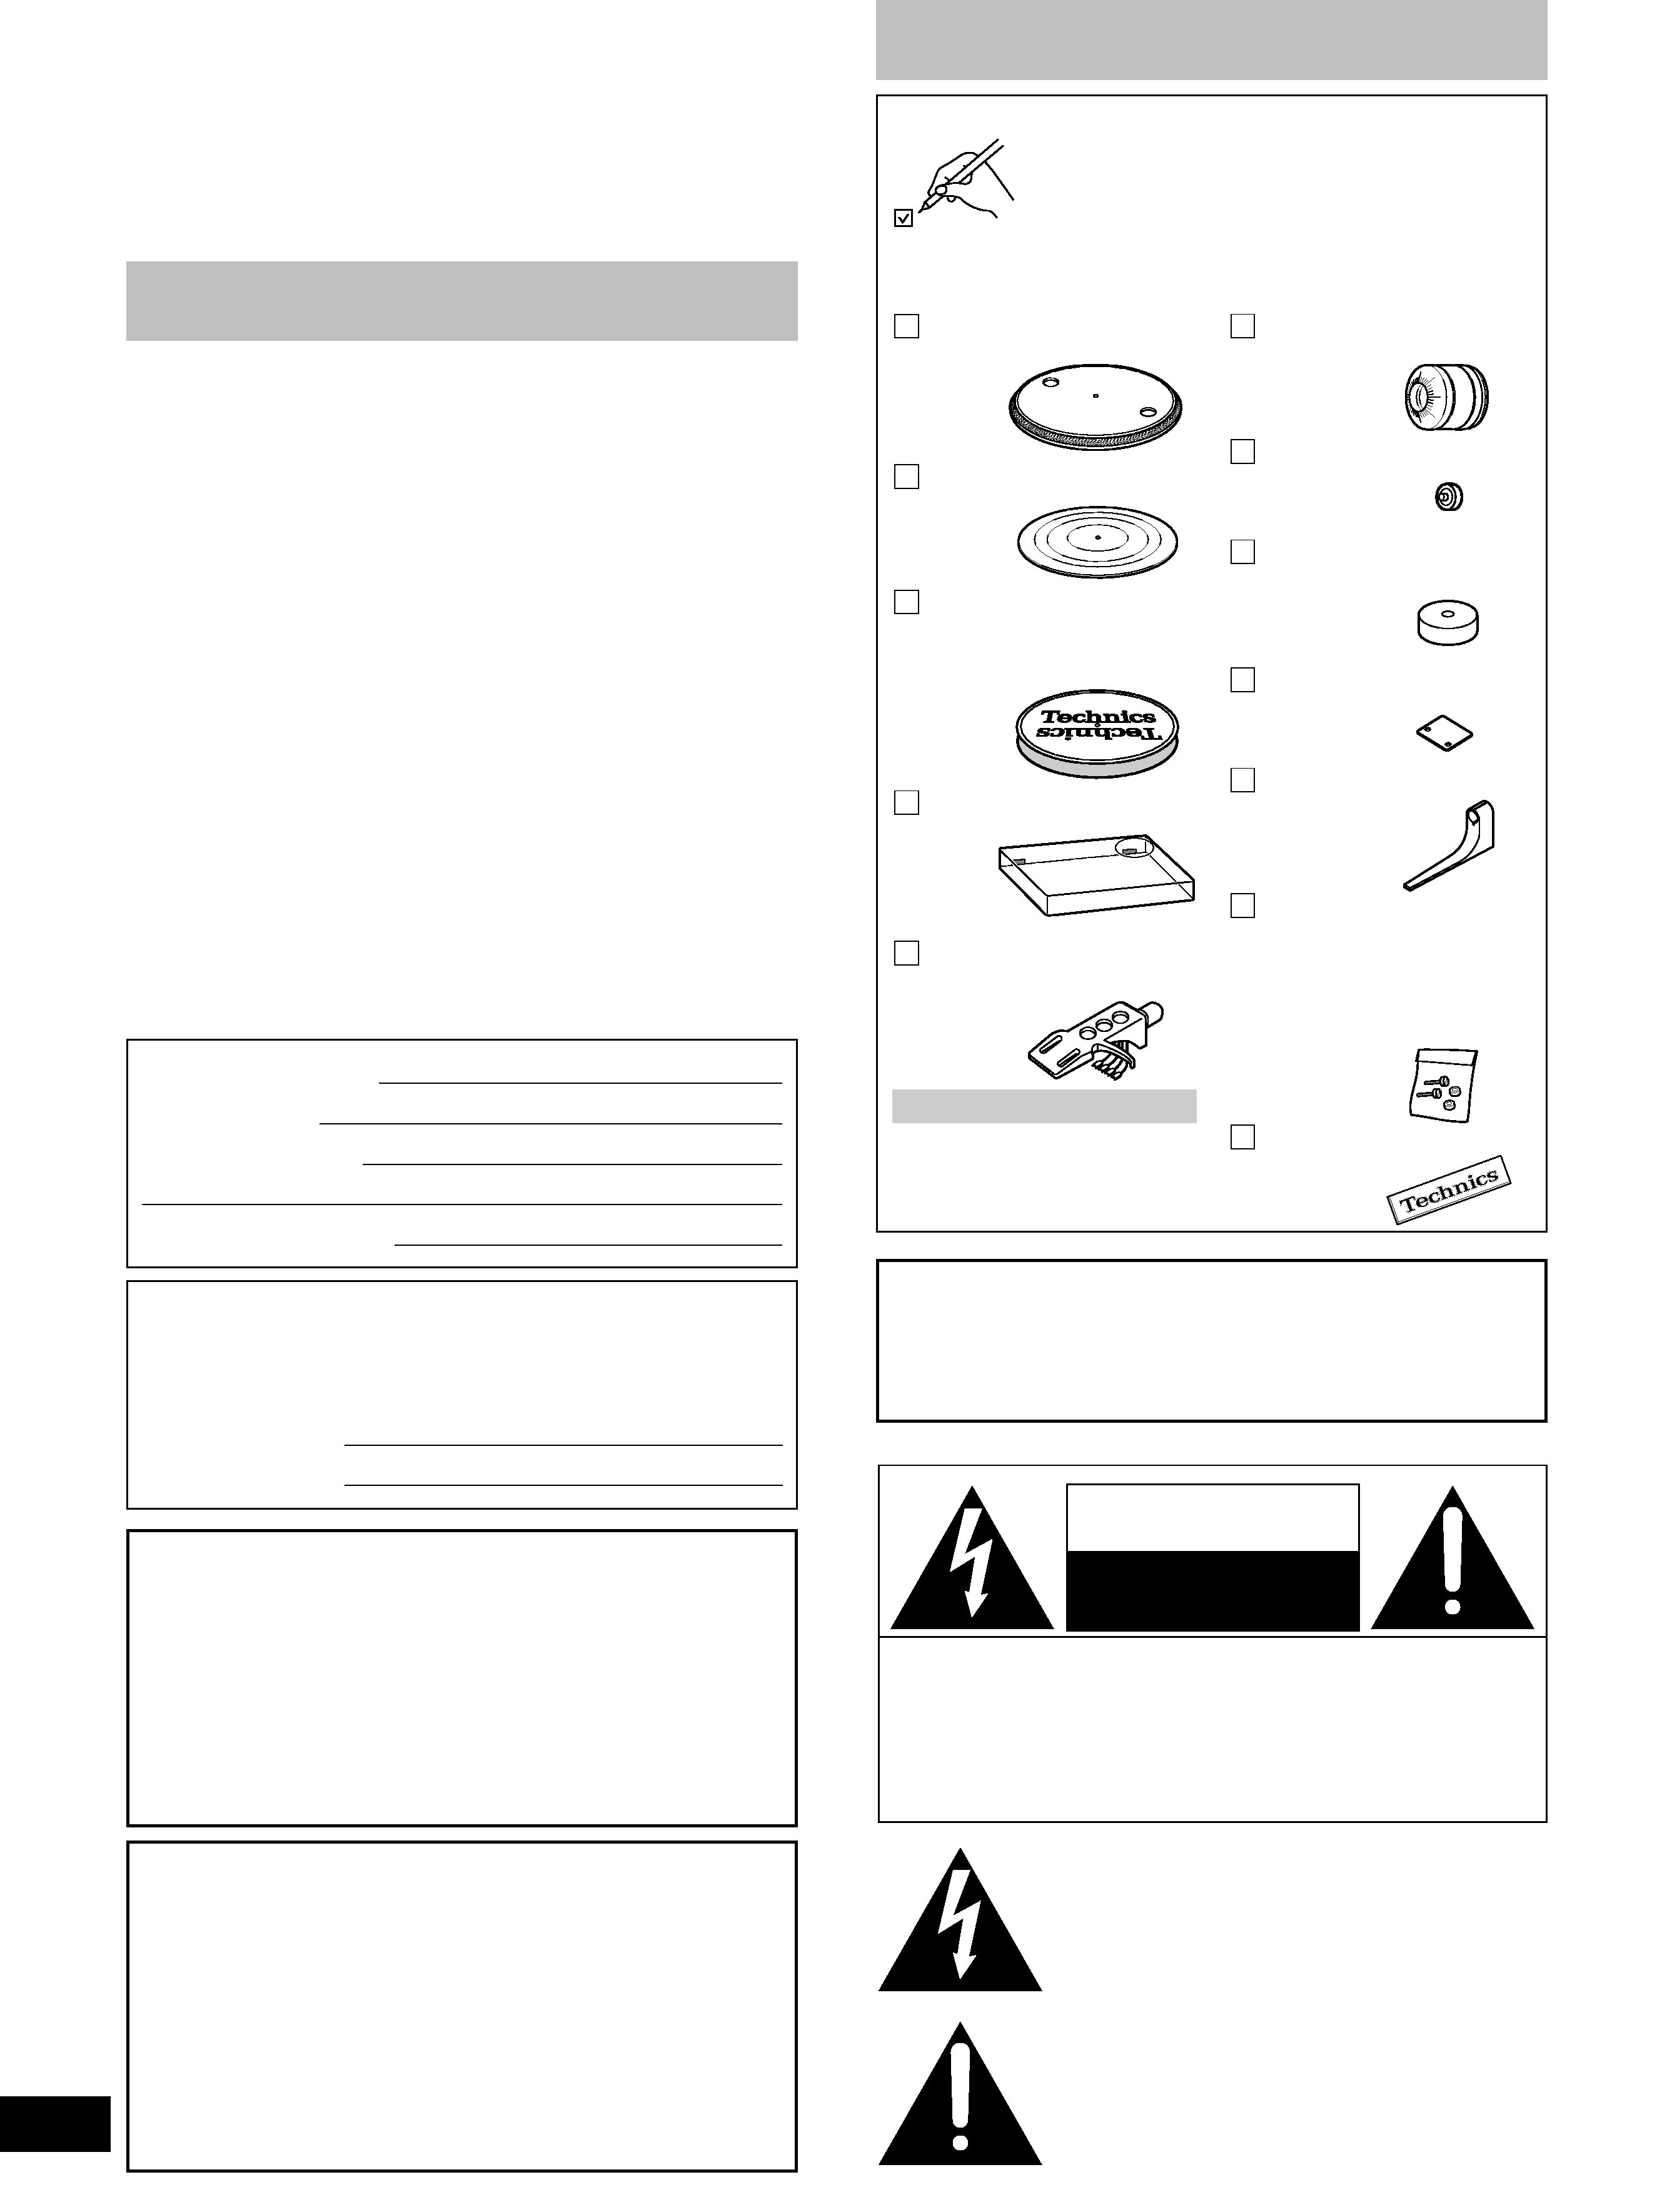
Supplied accessories
Please check and identify the supplied ac-
cessories.
Use numbers indicated in parentheses when
asking for replacements parts.
(Only for U.S.A.)
To order accessories contact 1-800-332-5368
or the website (http://www.panasonic.com).
Turntable ................. 1pc.
(SFTE172-01Z1)
Turntable mat .......... 1pc.
(RGS0008)
Disc slip sheet set
(RGS0005Z-1) ................ 1
·Disc slip sheet
·Transparent sheet
Dust cover ............... 1pc.
(RYF0370B-X)
Head shell
(SFPCC31001K) ...... 1pc.
A cartridge is not included.
Balance weight ....... 1pc.
(SFPWG17201K)
Auxiliary weight ...... 1pc.
(SFPWG17202)
EP record adaptor
(SFWE010) ............... 1pc.
Shell weight ............ 1pc.
(SFPZB3501)
Overhang gauge ..... 1pc.
(SFK0135-01)
Screw set for cartridge
........................................ 1
·Nuts(RHN26003)
·Screws-short(SFCZV8801-1)
·Screws-long(SFPEV9801-1)
·Washers(SFPEW9601)
Sticker ...................... 1pc.
(RQLC0142-1)
The model number and serial number of this product can be found
on either the back or the bottom of the unit.
Please note them in the space provided below and keep for future
reference.
MODEL NUMBER
SL-1200MK5 / SL-1210MK5
SERIAL NUMBER
CAUTION:
TO PREVENT ELECTRIC SHOCK MATCH WIDE
BLADE OF PLUG TO WIDE SLOT, FULLY
INSERT.
WARNING:
TO REDUCE THE RISK OF FIRE, ELECTRIC
SHOCK OR PRODUCT DAMAGE, DO NOT
EXPOSE
THIS
APPARATUS
TO
RAIN,
MOISTURE,
DRIPPING OR SPLASHING AND
THAT NO OBJECTS FILLED WITH LIQUIDS,
SUCH AS VASES, SHALL BE PLACED ON THE
APPARATUS.
CAUTION!
DO NOT INSTALL OR PLACE THIS UNIT IN A
BOOKCASE,
BUILT-IN
CABINET
OR
IN
ANOTHER CONFINED SPACE. ENSURE THE
UNIT IS WELL VENTILATED.
TO PREVENT
RISK OF ELECTRIC SHOCK OR FIRE HAZARD
DUE
TO
OVERHEATING,
ENSURE
THAT
CURTAINS AND ANY OTHER MATERIALS DO
NOT OBSTRUCT THE VENTILATION VENTS.
The lightning flash with arrowhead symbol, within
an equilateral triangle, is intended to alert the user
to the presence of uninsulated "dangerous voltage"
within the product's enclosure that may be of suffi-
cient magnitude to constitute a risk of electric shock
to persons.
CAUTION
CAUTION: TO REDUCE THE RISK OF ELECTRIC
SHOCK, DO NOT REMOVE SCREWS.
NO USER-SERVICEABLE PARTS
INSIDE.
REFER SERVICING TO QUALIFIED
SERVICE PERSONNEL.
The exclamation point within an equilateral triangle
is intended to alert the user to the presence of
important operating and maintenance (servicing)
instructions in the literature accompanying the
appliance.
RISK OF ELECTRIC SHOCK
DO NOT OPEN
User memo:
DATE OF PURCHASE
DEALER NAME
DEALER ADDRESS
TELEPHONE NUMBER
The following mark and symbols are located on the bottom of the unit.

RQT7018
3
Read these operating instructions carefully before using the unit. Follow the safety instructions on the unit and the applicable safety instructions
listed below. Keep these operating instructions handy for future reference.
1)
Read these instructions.
2)
Keep these instructions.
3)
Heed all warnings.
4)
Follow all instructions.
5)
Do not use this apparatus near water.
6)
Clean only with dry cloth.
7)
Do not block any ventilation openings. Install in accordance with
the manufacturer's instructions.
8)
Do not install near any heat sources such as radiators, heat reg-
isters, stoves, or other apparatus (including amplifiers) that pro-
duce heat.
9)
Do not defeat the safety purpose of the polarized or grounding-
type plug. A polarized plug has two blades with one wider than
the other. A grounding-type plug has two blades and a third
grounding prong. The wide blade or the third prong are provided
for your safety. If the provided plug does not fit into your outlet,
consult an electrician for replacement of the obsolete outlet.
10) Protect the power cord from being walked on or pinched particu-
larly at plugs, convenience receptacles, and the point where
they exit from the apparatus.
11) Only use attachments/accessories specified by the manufac-
turer.
12) Use only with the cart, stand, tripod, bracket, or
table specified by the manufacturer, or sold with
the apparatus. When a cart is used, use caution
when moving the cart/apparatus combination to
avoid injury from tip-over.
13) Unplug this apparatus during lightning storms or when unused
for long periods of time.
14) Refer all servicing to qualified service personnel. Servicing is
required when the apparatus has been damaged in any way,
such as power-supply cord or plug is damaged, liquid has been
spilled or objects have fallen into the apparatus, the apparatus
has been exposed to rain or moisture, does not operate normal-
ly, or has been dropped.
IMPORTANT SAFETY INSTRUCTIONS
THE FOLLOWING APPLIES ONLY IN THE U.S.A.
CAUTION:
This equipment has been tested and found to comply with
the limits for a Class B digital device, pursuant to Part 15 of
the FCC Rules.
These limits are designed to provide reasonable protection
against harmful interference in a residential installation.
This equipment generates, uses and can radiate radio
frequency energy and, if not installed and used in
accordance with the instructions, may cause harmful
interference to radio communications. However, there is no
guarantee that interference will not occur in a particular
installation.
If
this
equipment
does
cause
harmful
interference to radio or television reception, which can be
determined by turning the equipment off and on, the user is
encouraged to try to correct the interference by one or more
of the following measures:
¡Reorient or relocate the receiving antenna.
¡Increase the separation between the equipment and re-
ceiver.
¡Connect the equipment into an outlet on a circuit different
from that to which the receiver is connected.
¡Consult the dealer or an experienced radio/TV technician
for help.
Any
unauthorized
changes
or
modifications
to
this
equipment would void the user's authority to operate this
device.
This device complies with Part 15 of the FCC Rules.
Operation is subject to the following two conditions: (1) This
device may not cause harmful interference, and (2) this
device must accept any interference received, including
interference that may cause undesired operation.

RQT7018
4
52 mm
Features
A masterpiece amongst turntables with a worldwide repu-
tation.
Highly accurate turntable speed maintained continuously
with a quartz pitch control.
·The pitch can be varied throughout the range maintaining perfect
accuracy.
·Pitch can be instantly reset to the rated speed (33 1/3 or 45 r/min)
with the reset button.
The direct drive produces high torque.
·Wow and flutter below 0.01 %. Starting torque of 1.5 kg-cm en-
abling the turntable to reach 33 1/3 r/min in 0.7 seconds.
·Smooth stops are achieved with a fully electronic braking system.
The braking speed can be adjusted with the brake speed control
knob.
Tone arm with gimbal suspension
·Using the balance weight control measurement units on the tone
arm, you can quickly change stylus pressure settings to the appro-
priate pressure.
·Stylus skipping can be reduced using horizontal weight control for
scratch play.
·The tone arm can be finely adjusted in a range of 6 millimeters
with the lockable height control.
Anti-vibration design with 3 layer cabinet construction
and large insulating legs.
Pop-up stylus light.
·A light illuminates the stylus.
Preparation of the cartridge
1 Attach a cartridge (not included).
Follow the cartridge's instructions to correctly attach it to the
head shell.
·Use the included shell weight when using a light cartridge
(3.5 to 6.5 grams).
2 Adjust the overhang.
Fit the included overhang gauge to the head shell. Adjust the
overhang and facing of the cartridge and tighten the screws.
·Line the stylus tip up with the end of the gauge.
·The cartridge should be parallel on the shell head.
No.
Name
Reference page(s)
EP record adaptor . . . . . . . . . . . . . . . . . . . . . . . . . . . 8
Turntable base . . . . . . . . . . . . . . . . . . . . . . . . . . . . . . 4
Turntable mat (Or disc slip sheet) . . . . . . . . . . . . . . 5
Turntable . . . . . . . . . . . . . . . . . . . . . . . . . . . . . . . . . . . 5
Center spindle
. . . . . . . . . . . . . . . . . . . . . . . . . . . . . . 5
Strobe mirrors
. . . . . . . . . . . . . . . . . . . . . . . . . . . . . . 9
Power switch (power) . . . . . . . . . . . . . . . . . . . . . . . . 8
Strobe light, pilot lamp . . . . . . . . . . . . . . . . . . . . . . . 8
Start-stop button (start-stop) . . . . . . . . . . . . . . . . . . 8
Speed select buttons (33, 45) . . . . . . . . . . . . . . . . . . 8
Shell stand . . . . . . . . . . . . . . . . . . . . . . . . . . . . . . . . . 4
Arm-height control . . . . . . . . . . . . . . . . . . . . . . . . . . . 7
Balance weight . . . . . . . . . . . . . . . . . . . . . . . . . . . . . . 5
Stylus pressure control . . . . . . . . . . . . . . . . . . . . . . . 6
Arm lock . . . . . . . . . . . . . . . . . . . . . . . . . . . . . . . . . . . 7
Anti-skating control . . . . . . . . . . . . . . . . . . . . . . . . . . 6
Cue lever . . . . . . . . . . . . . . . . . . . . . . . . . . . . . . . . . . . 6
Arm clamp . . . . . . . . . . . . . . . . . . . . . . . . . . . . . . . . . . 6
Arm rest . . . . . . . . . . . . . . . . . . . . . . . . . . . . . . . . . . . . 6
Tone arm . . . . . . . . . . . . . . . . . . . . . . . . . . . . . . . . . . . 5
Pitch indicator
. . . . . . . . . . . . . . . . . . . . . . . . . . . . . . 9
Pitch control (pitch adj.) . . . . . . . . . . . . . . . . . . . . . . 9
Reset button (reset) . . . . . . . . . . . . . . . . . . . . . . . . . . 8
Locking nut . . . . . . . . . . . . . . . . . . . . . . . . . . . . . . . . . 5
Head shell . . . . . . . . . . . . . . . . . . . . . . . . . . . . . . . . . . 5
Stylus light switch . . . . . . . . . . . . . . . . . . . . . . . . . . . 8
Stylus light . . . . . . . . . . . . . . . . . . . . . . . . . . . . . . . . . 8
Controls
Screws
Stylus tip
Overhang
gauge
Screws
Head shell
Lead wire
Terminal
Shell
weight
Stylus
Cartridge
+8
+8
6
4
2
+8
2
4
6
-8
-8
RQT7018
5
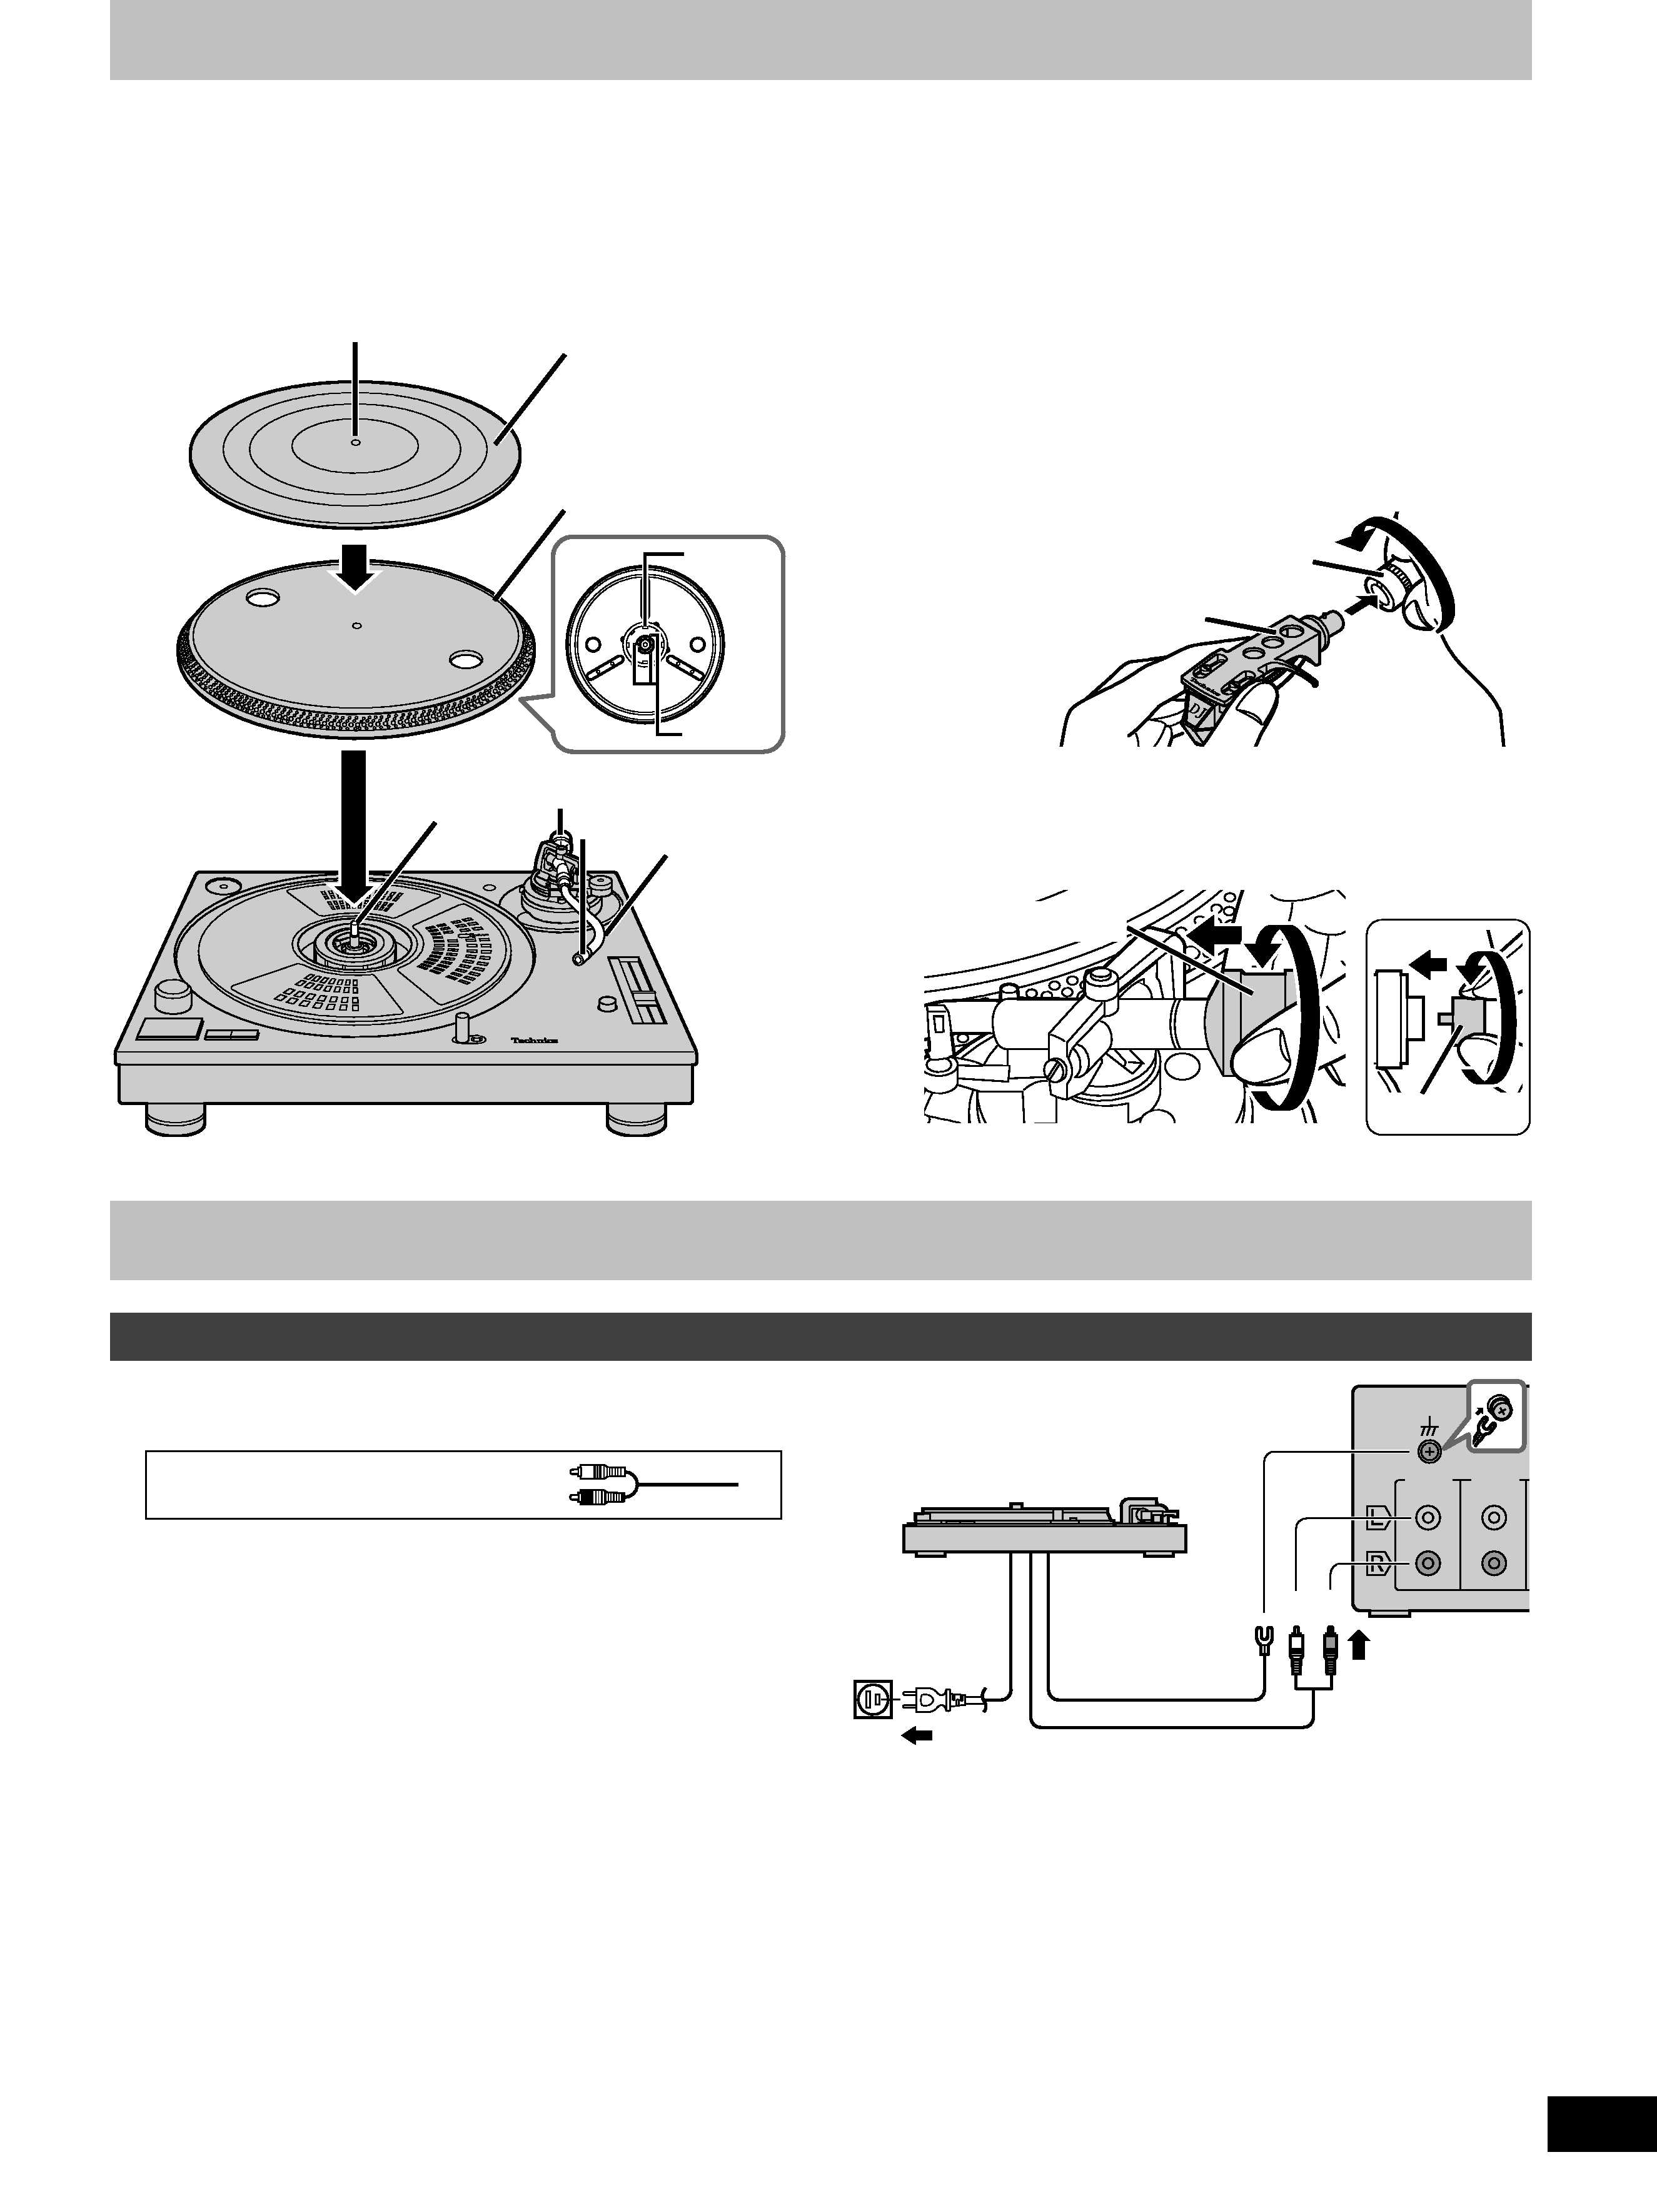
1 Fit the turntable and turntable mat.
Put the turntable on the center spindle and then lay the mat
on top.
·Be very careful when putting the turntable on the main unit.
The magnet on the bottom of the turntable is finely adjusted
and sharp contact can cause it to move and lead to poor
operation. Ensure the magnet remains free from dust and
iron particles.
·Do not adjust the screws attaching the magnet to the turn-
table. The rated performance of the unit cannot be guaran-
teed if the magnet is moved.
2 Attach the head shell.
Fit the head shell into the tone arm, keep it horizontal and
tighten the locking nut.
3 Attach the balance weight to the rear
of the tone arm.
If the cartridge weighs between 10 and 13 grams, attach the
included auxiliary weight to the main balance weight.
Balance weight
Putting the player together
In order to prevent damage during shipping some of the equipment
has been disassembled.
Put the player together in the following order.
·Do not connect the AC power supply cord until set up is complete.
·Leave the dust cover off until set up and adjustments are com-
plete.
1. Connect the PHONO earth lead and stereo PHONO
cables to the amplifier PHONO terminals.
White (L)
Stereo connection cable
Red (R)
·If the earth lead isn't connected, a hum will be heard from the
AC power source.
·You will not have adequate volume or sound quality if connect-
ing to an amplifier that has no PHONO terminals.
2. Connect the AC power supply cord.
·Connect this cord only after all other connections are complete.
·Confirm the wattage of AC outlets on amplifiers and receivers
before using them for this unit. This unit consumes 13.5 W.
Locking nut
Head shell
1
2
3
Magnet
Screws
Turntable mat
Turntable
Tone arm
Center spindle
TUNER
SIGNAL GND
PHONO
(L) (R)
1
1
2
Amplifier
(not included)
This unit
To household
AC outlet
Earth lead
Stereo connection cable
Connections and installation
Connecting to an amplifier and AC power supply cord
Auxiliary weight