
RQT5466
1
Speaker System
Operating Instructions
Instrucciones de funcionamiento
Mode d'emploi
Bruksanvisning
Bedienungsanleitung
Istruzioni per l'uso
Gebruiksaanwijzing
Betjeningsvejledning
Návod k obsluze
Instrukcja obslugi
Before connecting, operating or adjusting this product,
please read these instructions completely.
Please keep this manual for future reference.
Antes de conectar, operar o ajustar este producto,
sírvase leer estas instrucciones completamente.
Guarde este manual.
Avant de raccorder, faire fonctionner ou régler
l'appareil, lire attentivement tout ce mode d'emploi.
Conserver ce manuel.
Läs denna bruksanvisning helt innan du ansluter,
använder eller justerar denna produkt. Spara denna
bruksanvisning.
Bitte lesen Sie diese Bedienungsanleitung vor dem
Anschließen, Inbetriebnehmen oder Einstellen dieses
Gerätes vollständig durch.
Diese Anleitung bitte aufbewahren.
Prima di collegare, far funzionare o regolare l'appa-
recchio, leggere completamente queste istruzioni.
Conservare questo manuale.
Gelieve deze gebruiksaanwijzing volledig door te
lezen alvorens dit produkt aan te sluiten, te bedienen
of af te stellen. Bewaar deze gebruiksaanwijzing.
Læs venligst hele denne betjeningsvejledning, før du
tilslutter, betjener eller indstiller dette apparat. Gem
vejledningen til senere brug.
Dâíve ne zaçnete jakékoli zapojování, operace
nebo nastavování tohoto vÿrobku, prostudujte si
prosím celÿ tento návod. Uschovejte si prosím
tento návod k obsluze.
Przed uruchomieniem sprzètu prosimy o dokìadne
zapoznanie siè z treøcià niniejszej instrukcji. Prosimy
o zachowanie niniejszej instrukcji obsìugi.
Niniejsza instrukcja zostaìa opracowana na pod-
stawie oryginalnej publikacji firmy MATSUSHITA
ELECTRIC INDUSTRIAL CO., LTD.
Model No.
SB-HT140
E
RQT5466-1E

RQT5466
2
Estimado cliente
Muchísimas gracias por haber adquirido este aparato.
Lea con atención estas instrucciones para obtener las máximas
prestaciones y seguridad.
Verifique e identifique los accesorios suministrados.
Índice
Instalación de altavoces ............................................................... 4
Ubicación ..................................................................................... 6
Conexiones ................................................................................. 6
Notas .............................................................................................. 8
Mantenimiento ............................................................................... 8
Especificaciones técnicas ......................................................... 19
Cher client
Nous vous remercions pour votre achat de cet appareil.
Pour en obtenir des performances idéales et pour votre sécurité,
veuillez lire attentivement le présent manuel.
Cocher les accessoires pour vérifier qu'ils sont bien tous dans
l'emballage.
Table des matières
Installation des enceintes ............................................................ 5
Positionnement ............................................................................ 7
Raccordements ........................................................................... 7
Remarques .................................................................................... 9
Entretien ........................................................................................ 9
Données techniques ................................................................... 19
Kära kund
Tack för valet av denna apparat.
Läs lgenom bruksanvisningen noga för bästa resultat och för säkerhets
skull.
Kontrollera och identifiera de medföljande tillbehören.
Innehåll
Uppsättning av högtalarna ........................................................... 5
Placering ..................................................................................... 7
Anslutningar ................................................................................ 7
Anmärkningar ................................................................................ 9
Underhåll ....................................................................................... 9
Tekniska data ............................................................................... 19
Sehr geehrter Kunde
Wir möchten Ihnen dafür danken, daß Sie sich für diese Anlage
entschieden haben.
Für optimale Leistung und Sicherheit lesen Sie bitte diese Bedie-
nungsanleitung aufmerksam durch.
Bitte das mitgelieferte Zubehör auf Vollständigkeit überprüfen.
Inhalt
Aufstellung der Lautsprecher .................................................... 10
Aufstellung ................................................................................. 12
Anschlüsse ................................................................................ 12
Hinweise ...................................................................................... 14
Pflege und Instandhaltung ......................................................... 14
Technische Daten ........................................................................ 19
Caro cliente
La ringraziamo dell'acquisto di questo prodotto.
Per ottenerne le prestazioni migliori e per la sua sicurezza, legga
attentamente queste istruzioni.
Verificare e identificare gli accessori in dotazione.
Sommario
Sistemazione dei diffusori ......................................................... 10
Collocazione .............................................................................. 12
Connessioni ............................................................................... 12
Note .............................................................................................. 14
Manutenzione .............................................................................. 14
Dati tecnici ................................................................................... 19
Dear customer
Thank you for purchasing this product.
For optimum performance and safety, please read these instructions
carefully.
Please check and identify the supplied accessories.
Contents
Speaker Set-up .............................................................................. 4
Location ....................................................................................... 6
Connections ................................................................................ 6
Notes .............................................................................................. 8
Maintenance .................................................................................. 8
Technical specifications ............................................................. 19
Accessories
Accesorios
Accessoires
Tillbehör
Zubehör
Accessori
Accessoires
Tilbehør
Píslusenství
Wyposaenie
Speaker feet ..................................................... 1 sheet (20 feet)
Patas de los altavoces .................................... 1 hoja (20 patas)
Pieds d'enceintes .......................................... 1 feuille (20 pieds)
Högtalarfötter ..................................................... 1 ark (20 fötter)
Lautsprecher-Untersetzer .................. 1 Bogen (20 Untersetzer)
Piedini diffusori ............................................. 1 foglio (20 piedini)
Luidsprekervoetjes ............................................. 1 vel (20 stuks)
Højttalerfødder ................................................. 1 ark (20 fødder)
Nozky pod reproduktorové soustavy ........... 1 arch (20 kus)
Nóki do zestawów glonikowych .............. 1 arkusz (20 nóek)
RQT5466
3
Geachte klant
Hartelijk dank voor de aankoop van dit product.
Gelieve deze gebruiksaanwijzing aandachtig door te lezen voor een
optimale prestatie en een veilig gebruik van het systeem.
Controleer en identificeer de bijgeleverde accessoires.
Inhoud
Installeren van de luidsprekers ................................................. 11
Opstelling .................................................................................. 13
Aansluitingen ............................................................................. 13
Opmerkingen ............................................................................... 15
Onderhoud ................................................................................... 15
Technische gegevens ................................................................. 20
Kære kunde
Tak fordi du har købt dette apparat.
For at få fuldt udbytte af apparatet og af hensyn til din sikkerhed, bør
du læse denne betjeningsvejledning omhyggeligt.
Kontrollér venligst at du har modtaget det viste tilbehør sammen med
apparatet.
Indholdsfortegnelse
Højttaleropsætning ..................................................................... 11
Opstilling .................................................................................... 13
Tilslutninger ............................................................................... 13
Praktiske oplysninger ................................................................. 15
Vedligeholdelse ........................................................................... 15
Tekniske specifikationer ............................................................. 20
Drogi Kliencie
Dzikujemy Ci za zakupienie tego produktu.
Aby zapewni optymaln prac urzdzenia i bezpieczn obslug,
prosimy o uwane przeczytanie niniejszej instrukcji obslugi.
Prosimy o sprawdzenie i zidentyfikowanie wyposaenia urzdzenia.
Spis treci
Ustawienie zestawu glonikowego ........................................... 16
Ustawienie ................................................................................. 17
Polczenia ................................................................................. 17
Uwagi ........................................................................................... 18
Konserwacja ................................................................................ 18
Dane techniczne ......................................................................... 20
Vázený zákazníku
Dkujeme za zakoupení tohoto výrobku.
Abyste jej mohl optimálním zpsobem a bezpecn pouzívat, pectte
si prosím pozorn tento návod.
Zkontrolujte si prosím a identifikujte dodávané píslusenství.
Obsah
Instalace reproduktorových soustav ......................................... 16
Umístní soustav . . . . . . . . . . . . . . . . . . . . . . . . . . . . . . . . . . . 17
Pipojení . . . . . . . . . . . . . . . . . . . . . . . . . . . . . . . . . . . . . . . . . 17
Poznámky .................................................................................... 18
Údrzba pistroje .......................................................................... 18
Technické údaje .......................................................................... 20
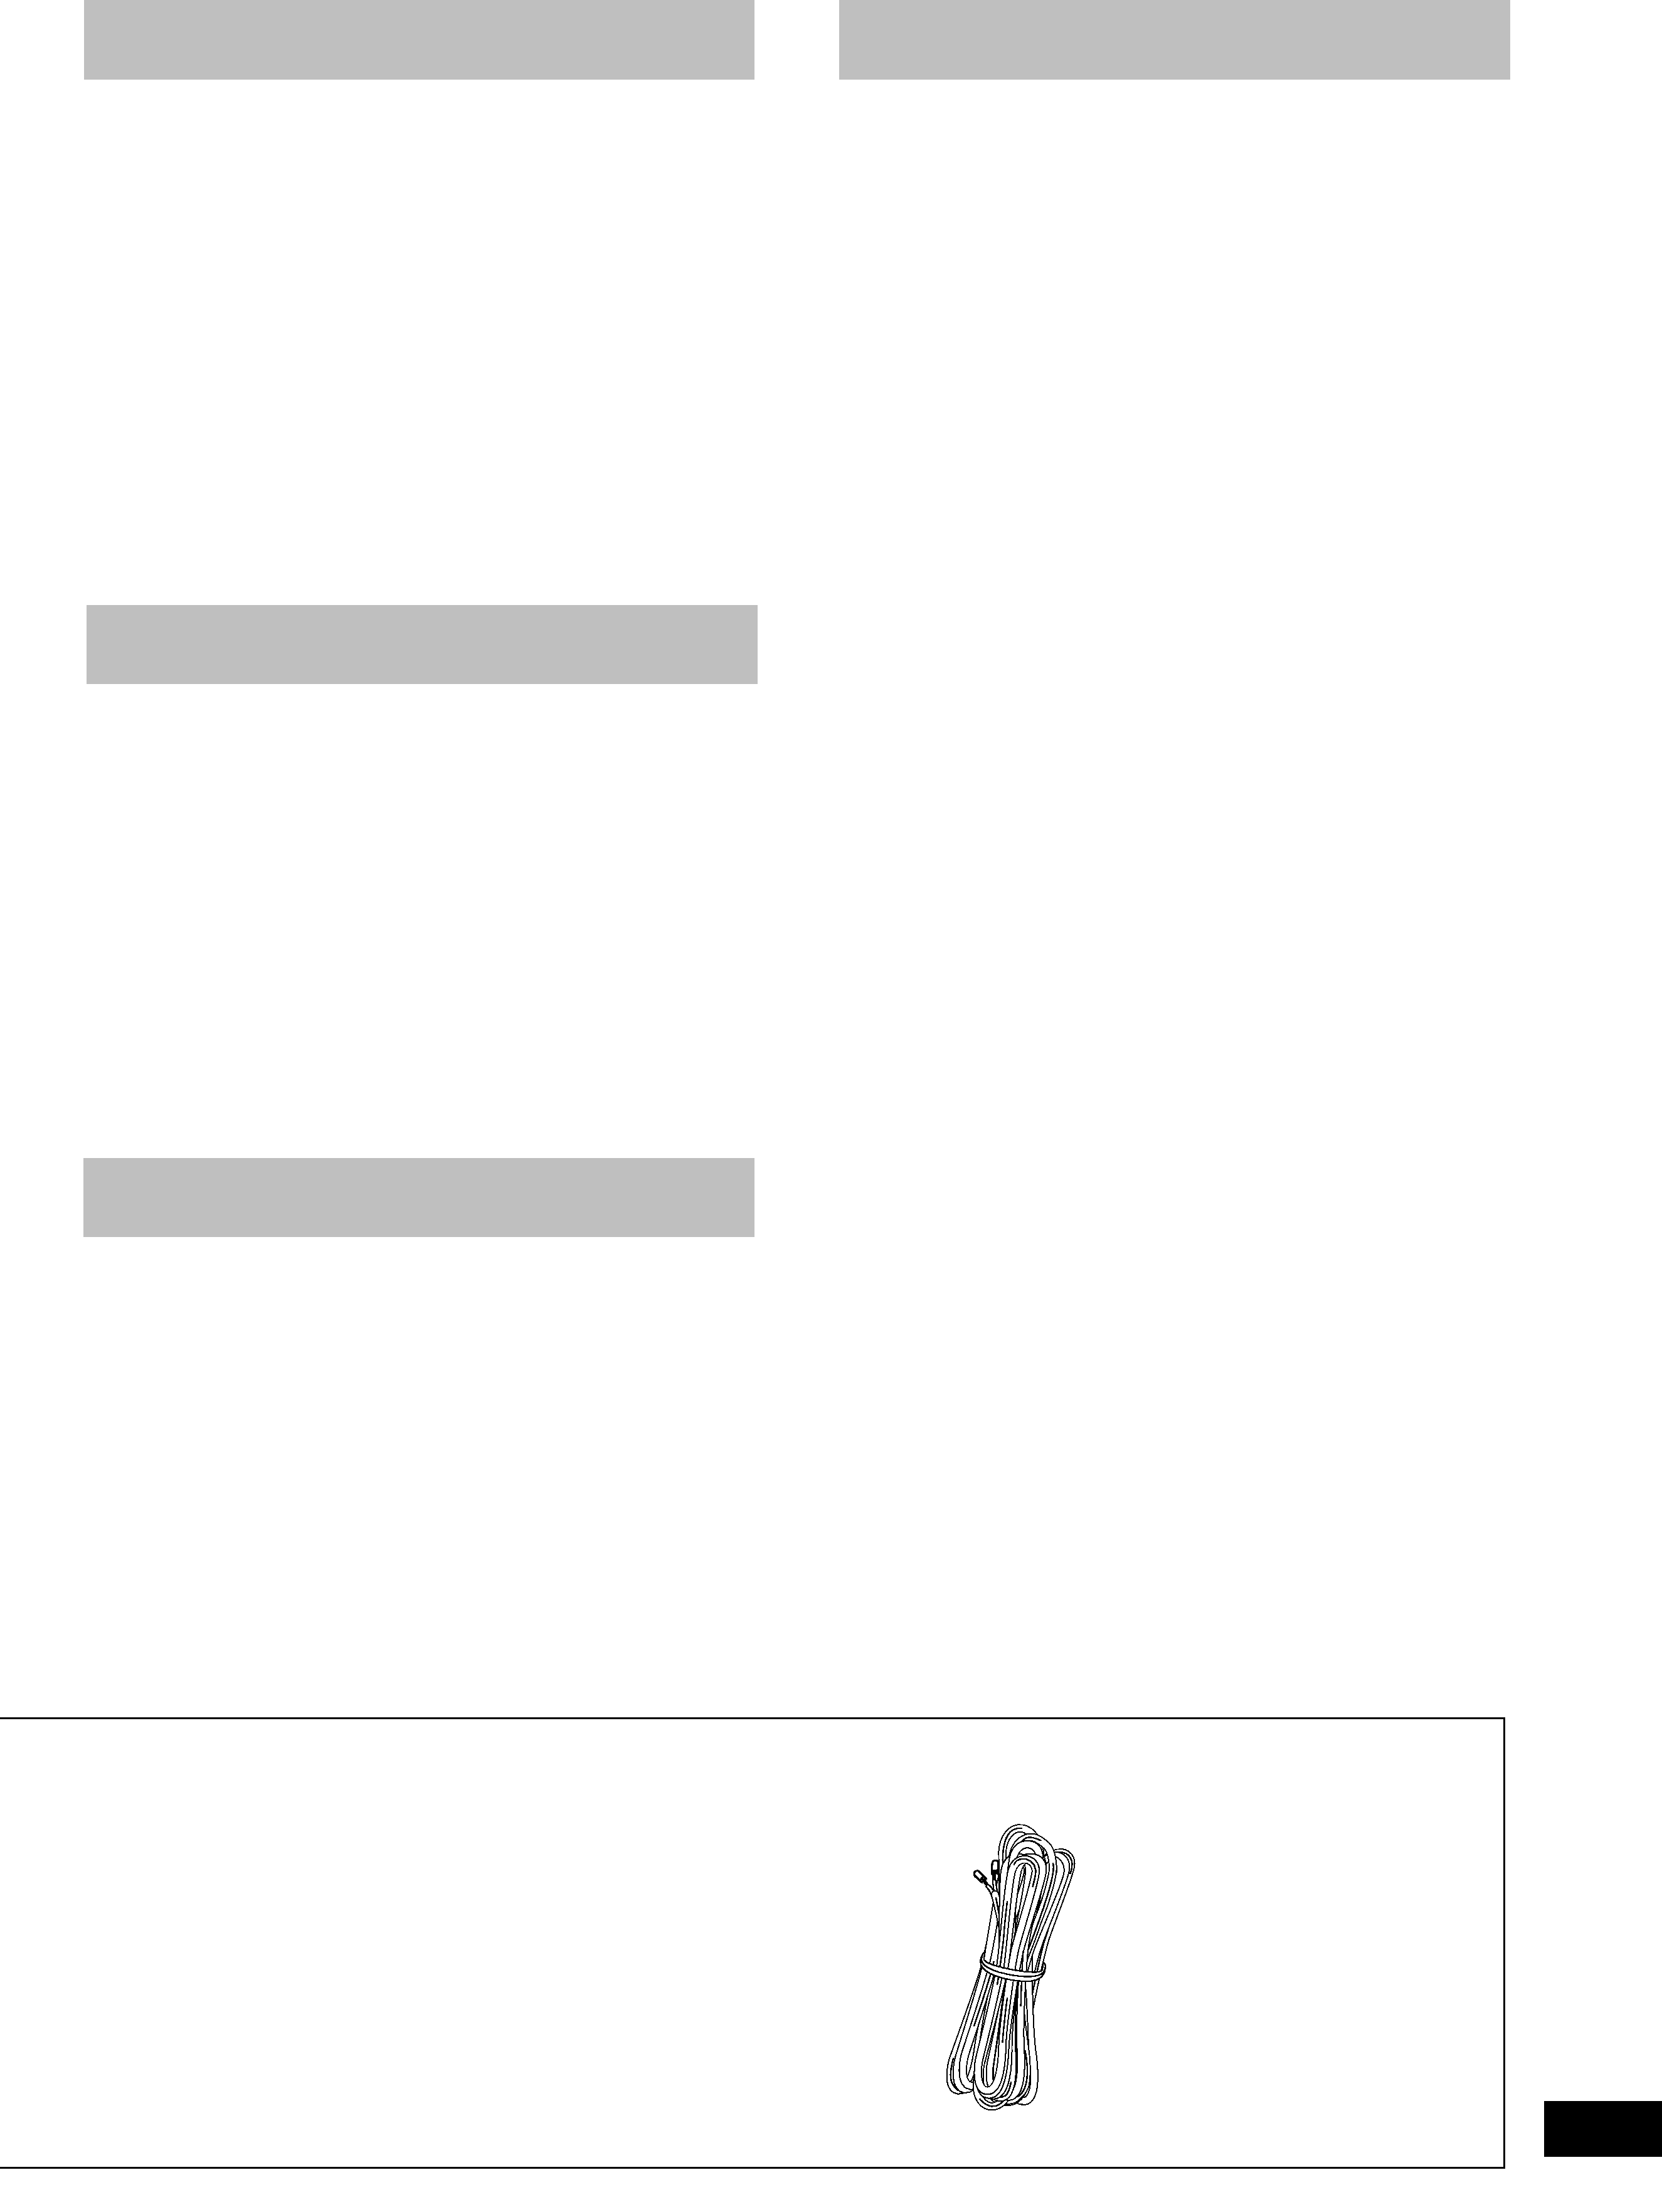
Speaker cables ..................................... 5 pcs.
Cables de altavoces ........................... 5 piezas
Câble d'enceintes ................................... 5 pc.
Kablar till högtalarna ................................ 5 st.
Lautsprecherkabel ............................... 5 Stck.
Cavo diffusori ................................................ 5
Luidsprekerkabels .................................... 5 st.
Højttaler-kabel ........................................ 5 stk.
Kabely reprosoustav ................................... 5 ks.
Kable glonika ........................................ 5 szt.
ENGLISH
ESP
AÑOL
FRANÇAIS
SVENSKA
RQT5466
4
,,
,,
,,
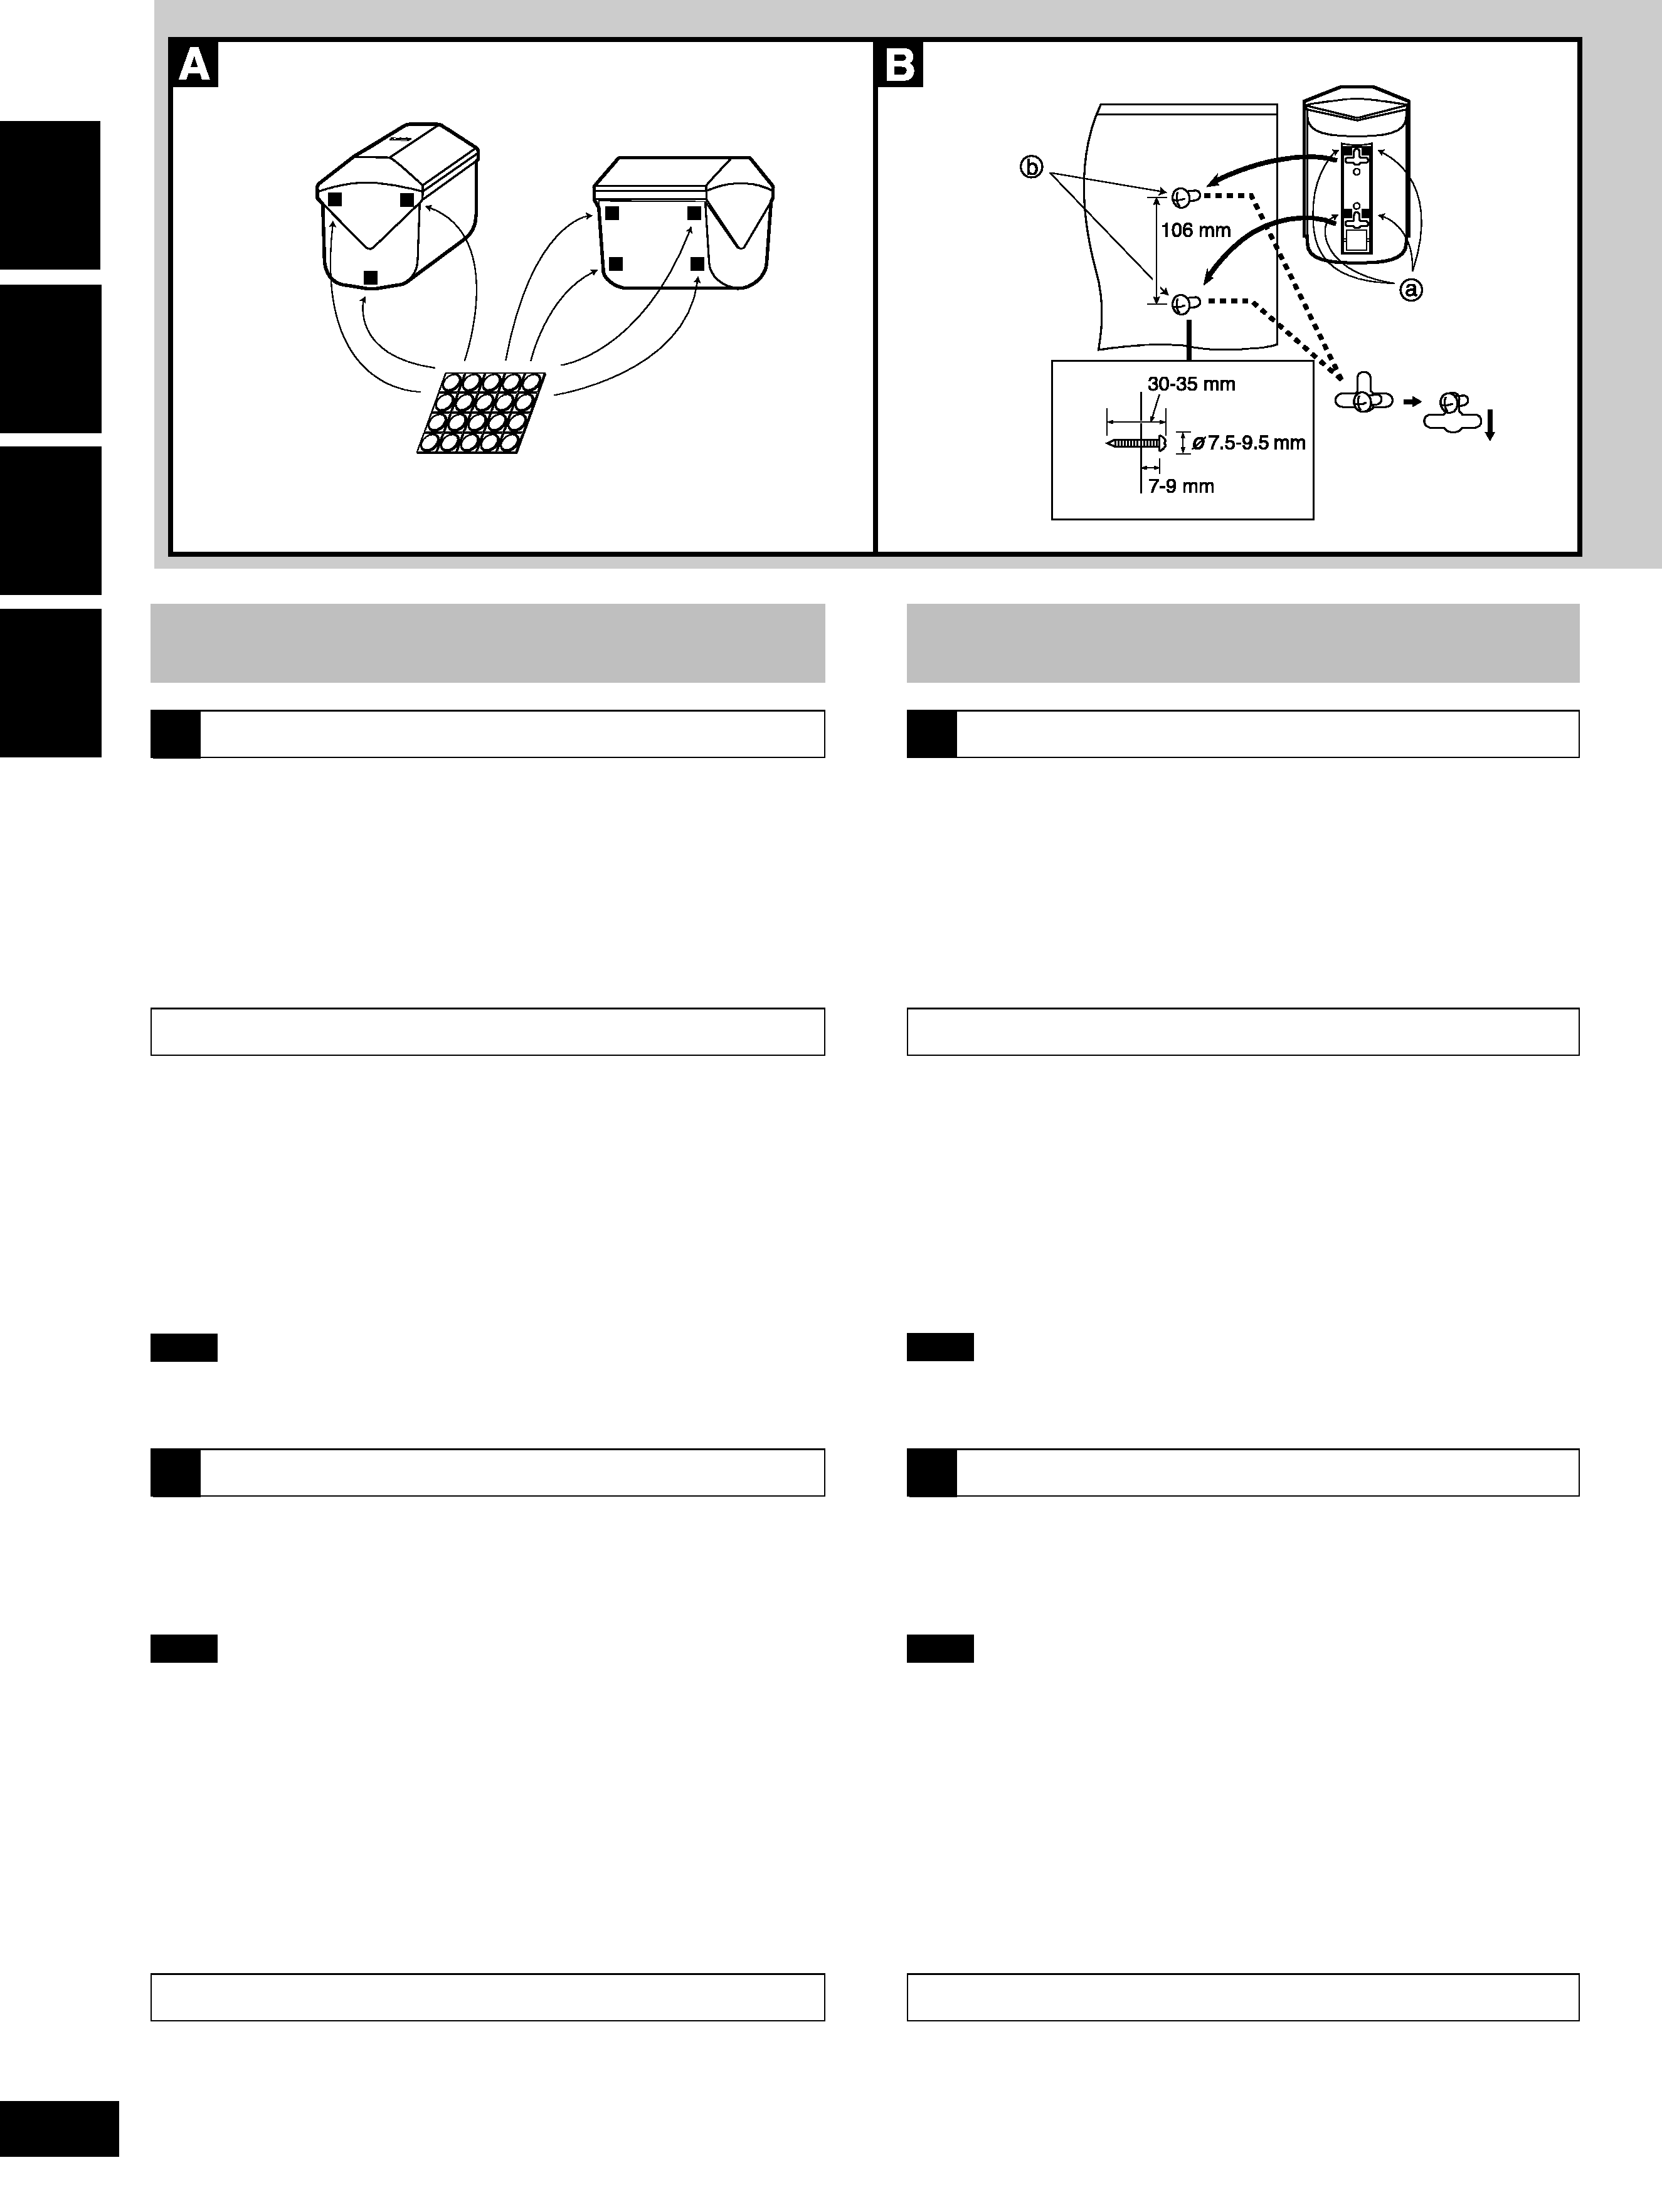
Speaker set-up
A
Attach the rubber feet to the speaker
The 5 speakers are the same.
The 5 speakers can be set-up either standing or lying down. Attach
these rubber feet to prevent vibration causing the speakers to move
or fall over.
One sheet of 20 rubber feet is included. Use 3 or 4 feet per speakers.
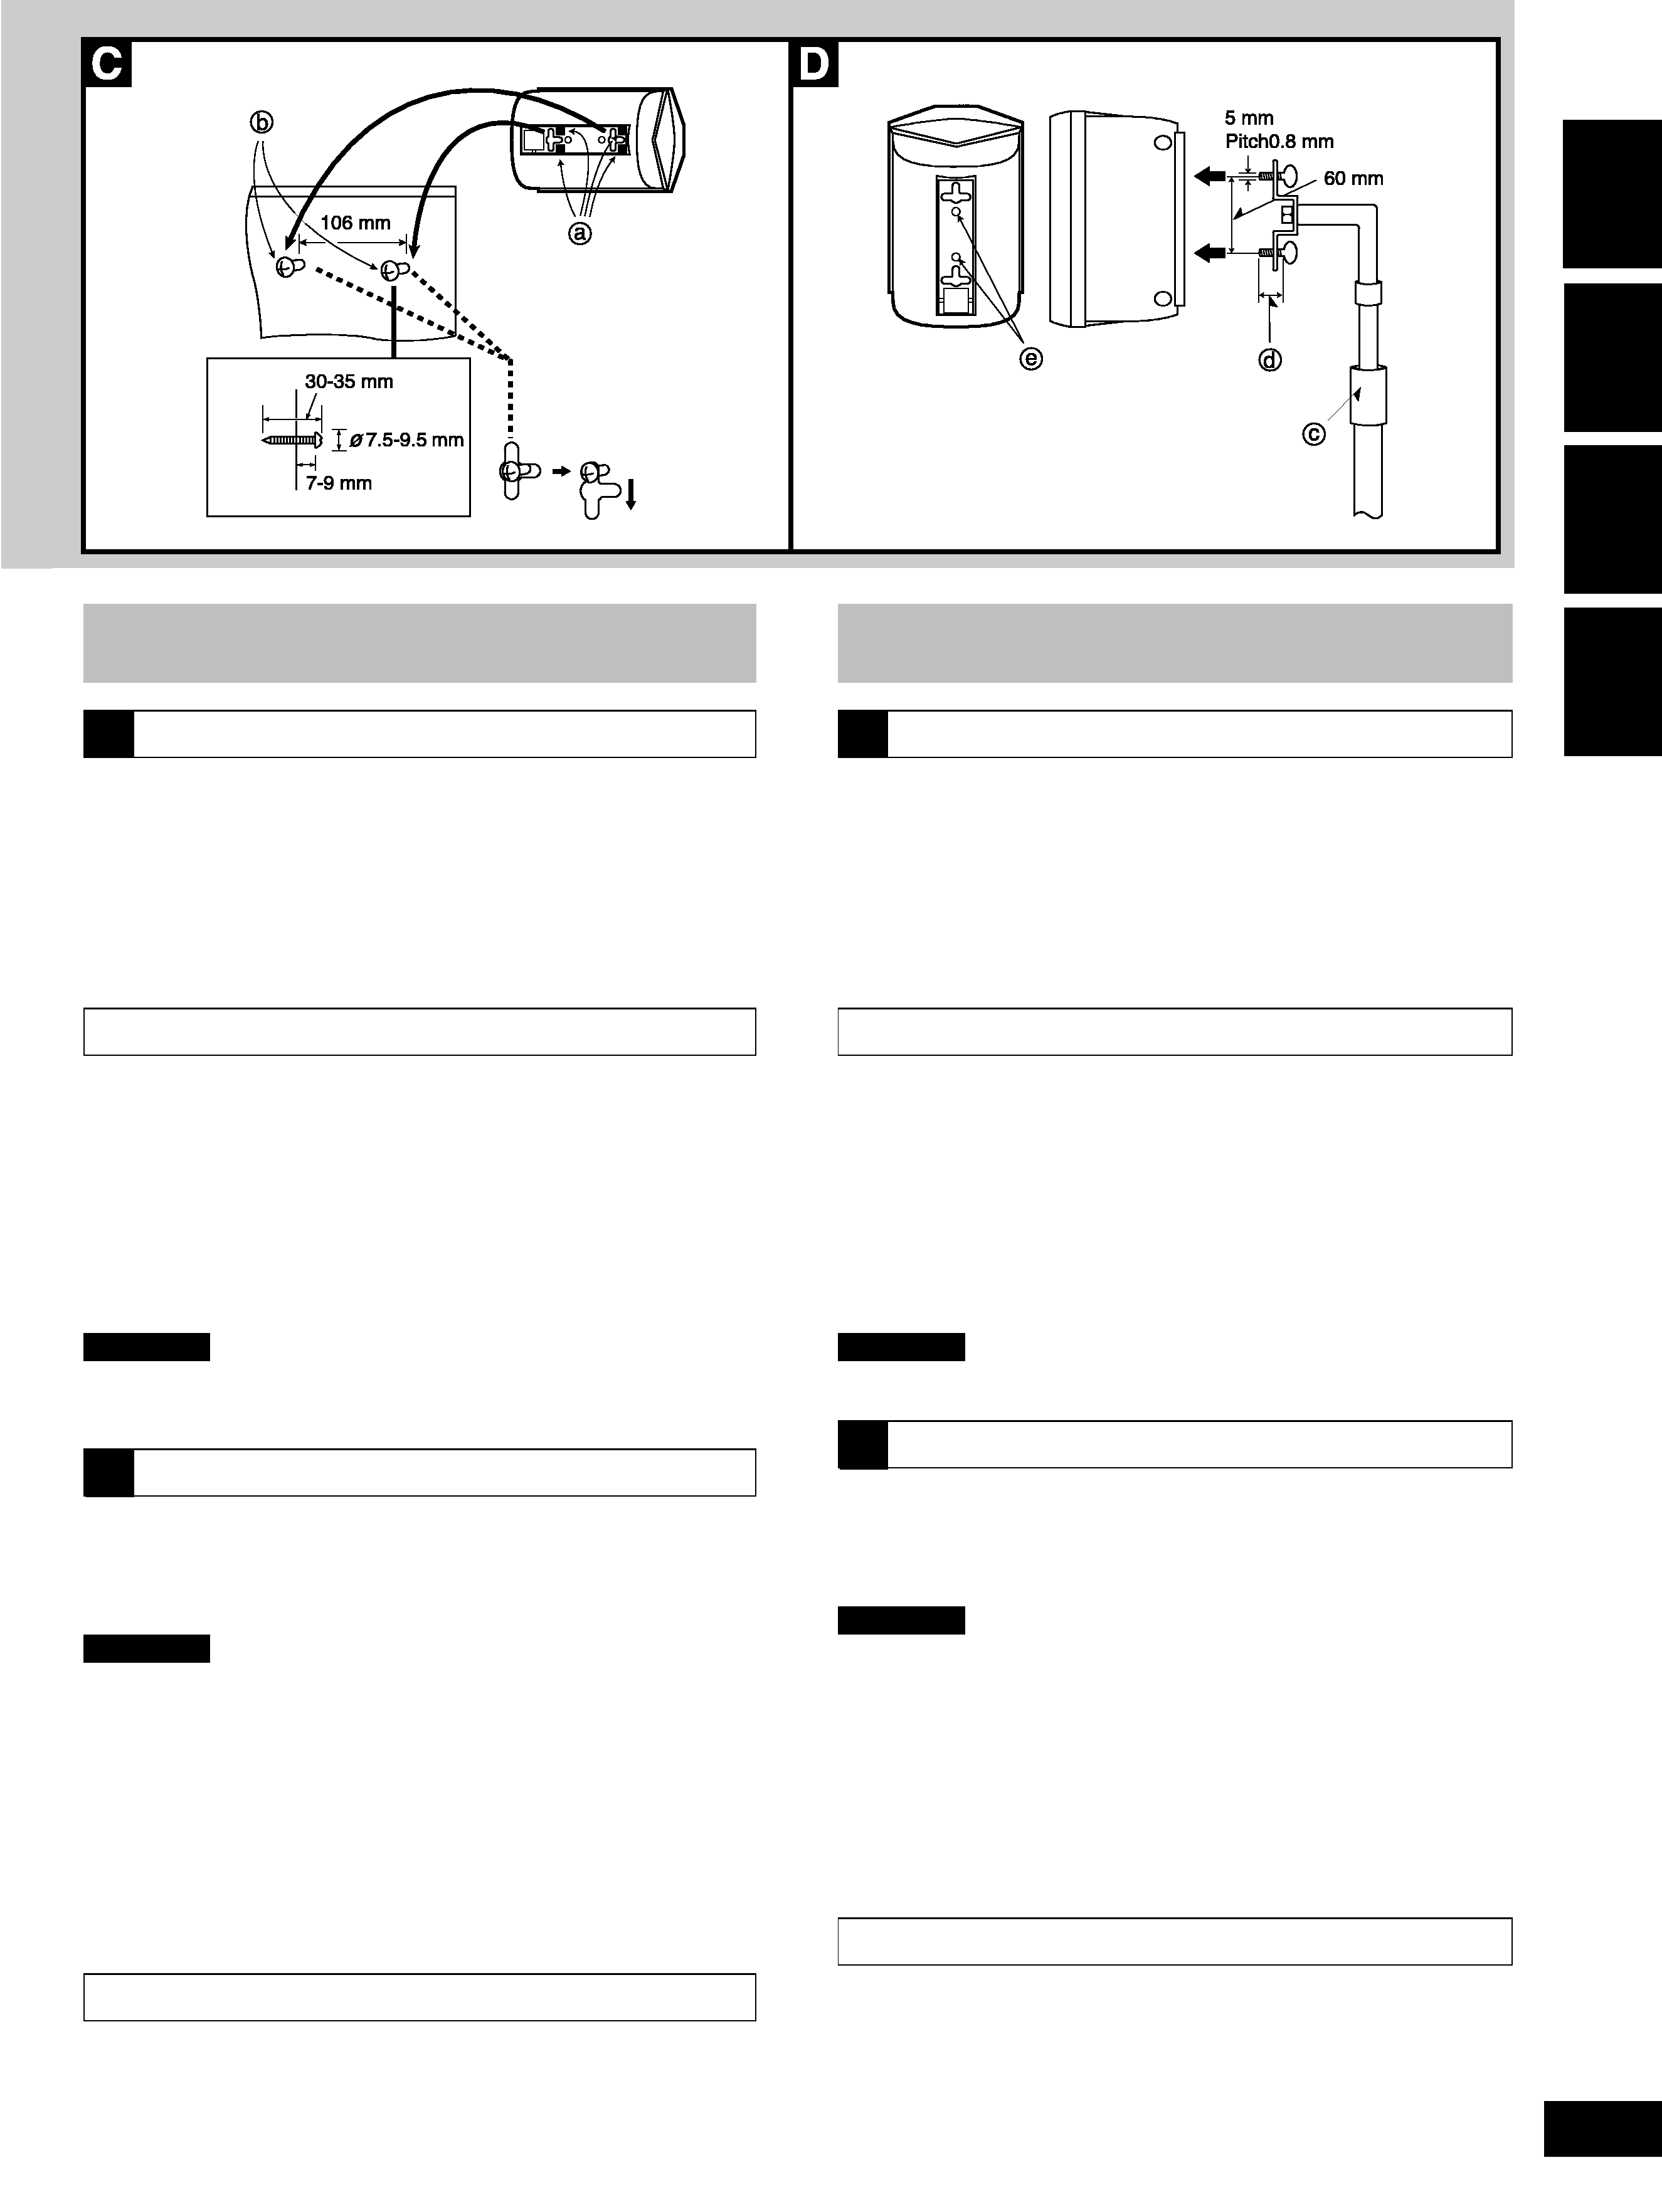
Attaching to the wall
a Rubber feet (included)
b Screw (not included)
B To attach vertically
C To attach horizontally
· Attach four rubber feet to each speaker, ensuring they do not cover
the holes.
Note
The surface you attach the speakers to must be able to support over
10 kg.
D
Attaching to speaker stands
c Speaker stands (not included)
d Plate thickness +7 to 10 mm
e Attach the stands with these holes.
Note
Ensure the following conditions are met when you purchase your
speaker stands.
· Observe the diameter and length of the screws and the distance
between screws as shown in the diagram.
Screw; diameter: 5 mm, pitch: 0.8 mm, length: thickness of stand
plate plus between 7 and 10 mm.
Distance between the centers of the holes: 60 mm
· The stands must be able to support over 10 kg.
· The stands must be stable even if the speakers are in a high posi-
tion.
Moving the brand badge
You can rotate the brand badge if you choose to set up the speakers
horizontally.
Rotate the badge to the required position.
Instalación de altavoces
A
Colocación de las patas de goma en los altavoces
Los 5 altavoces son idénticos.
Los 5 altavoces pueden instalarse en posición horizontal o vertical.
Coloque estas patas de goma para impedir la vibración que puede
ser la causa de que los altavoces se muevan o caigan.
Se incluye una hoja de 20 patas de goma. Utilice 3 ó 4 patas por
altavoz.
Colocación en una pared
a Patas de goma (incluidas)
b Tornillo (opcional)
B Para colocarlos verticalmente
C Para colocarlos horizontalmente
· Coloque las cuatro patas de goma en cada altavoz asegurándose
de que no tapen los agujeros.
Nota
La superficie en la que coloque los altavoces deberá ser capaz de
aguantar un peso superior a 10 kg.
D
Colocación en soportes de altavoces
c Soportes de altavoces (opcional)
d Grosor de la placa: +7 a 10 mm
e Coloque los soportes con estos agujeros.
Nota
Asegúrese de cumplir las condiciones siguientes cuando
adquiera sus soportes de altavoces.
· Tenga en cuenta el diámetro y la longitud de los tornillos, y a la
distancia entre los tornillos, como se muestra en el diagrama.
Diámetro del tornillo: 5 mm, paso: 0,8 mm, longitud: entre 7 y 10 mm
(grosor del soporte más el de la chapa)
Distancia entre los centros de los agujeros: 60 mm.
· Los soportes deben ser capaces de aguantar más de 10 kg.
· Los soportes deben ser estables aunque los altavoces se coloquen
en una posición alta.
Movimiento de la placa de la marca
Podrá girar la placa de la marca si así lo elige para poner los altavoces
en posición horizontal.
Gire la placa a la posición deseada.
ENGLISH
ESP
AÑOL
FRANÇAIS
SVENSKA
RQT5466
5
,,
,,
,,
Installation des enceintes
A
Fixez les pieds de caoutchouc aux enceintes
Les 5 enceintes sont identiques.
Les 5 enceintes peuvent être installées à la verticale ou à l'horizontale.
Fixez ces pieds afin d'empêcher les vibrations de causer le
déplacement ou la chute des enceintes.
Une feuille comportant 20 pieds est fournie. Utilisez 3 ou 4 pieds par
enceinte.
Fixation à un mur
a Pieds en caoutchouc (fournis)
b Vis (non fournie)
B Pour fixer à la verticale
C Pour fixer à l'horizontale
· Fixez 4 pieds en caoutchouc à chacune des enceintes, en vous
assurant qu'ils ne recouvrent pas les orifices.
Remarque
La surface à laquelle vous fixez les enceintes doit pouvoir supporter
plus de 10 kg.
D
Fixation à des bases d'enceintes
c Bases d'enceintes (non fournies)
d Épaisseur de la plaque + 7 à 10 mm
e Fixez les bases dans ces orifices.
Remarque
Lors de l'achat de vos bases d'enceintes, assurez-vous qu'elles
remplissent les conditions suivantes.
· Observez le diamètre et la longueur des vis, ainsi que la distance
entre les vis, tel qu'indiqué sur le diagramme.
Vis ; diamètre : 5 mm, pas de vis : 0,8 mm, épaisseur de la plaque
et du pied entre 7 et 10 mm.
Distance entre les centres des orifices : 60 mm.
· Les bases doivent pouvoir supporter plus de 10 kg.
· Les bases doivent être stables même lorsque les enceintes y sont
placées en position élevée.
Déplacement de la plaque logo
Vous pouvez faire pivoter la plaque logo si vous choisissez d'installer
les enceintes à l'horizontale.
Faites pivoter la plaque jusqu'à la position appropriée.
Uppsättning av högtalarna
A
Fäst gummifötterna på högtalarna
De 5 högtalarna är likadana.
De 5 högtalarna kan ställas upp antingen stående eller liggande. Fäst
dessa gummifötter på högtalarna för att förebygga vibrationer som
orsakar att högtalarna rör sig eller trillar omkull.
Ett ark med 20 gummifötter medföljer. Använd 3 eller 4 fötter per
högtalare.
Väggmontering
a Gummifötter (tillbehör)
b Skruv (extra tillbehör)
B Vertikal montering
C Horisontal montering
· Fäst fyra gummifötter på varje högtalare, och se till att de inte täcker
hålen.
Observera
Den yta som högtalarna fästs på måste kunna bära upp mer än 10 kg.
D
Montering på högtalarstativ
c Högtalarstativ (extra tillbehör)
d Plattans tjocklek 7 till 10 mm
e Fäst stativen i dessa hål.
Observera
Var noga med att se till att högtalarstativen uppfyller följande
villkor när du köper dem.
· Kontrollera skruvarnas diameter och längd, och avståndet mellan
skruvarna enligt figuren.
Skruv; diameter: 5 mm, gängavstånd 0,8 mm, stativets tjocklek plus
plattans tjocklek plus mellan 7 och 10 mm.
Avstånd mellan håens mitt: 60 mm
· Stativen måste kunna bära upp mer än 10 kg.
· Stativen måste stå stadigt även om högtalarna är i ett högt läge.
Att flytta märkesbrickan
Du kan vrida runt märkesbrickan om du väljer att sätta upp högtalarna
horisontalt.
Vrid runt brickan till önskat läge.