Z
9A10497600
AM/FM Stereo Receiver
OWNER'S MANUAL
MANUEL DU PROPRIÉTAIRE
MANUAL DEL USUARIO
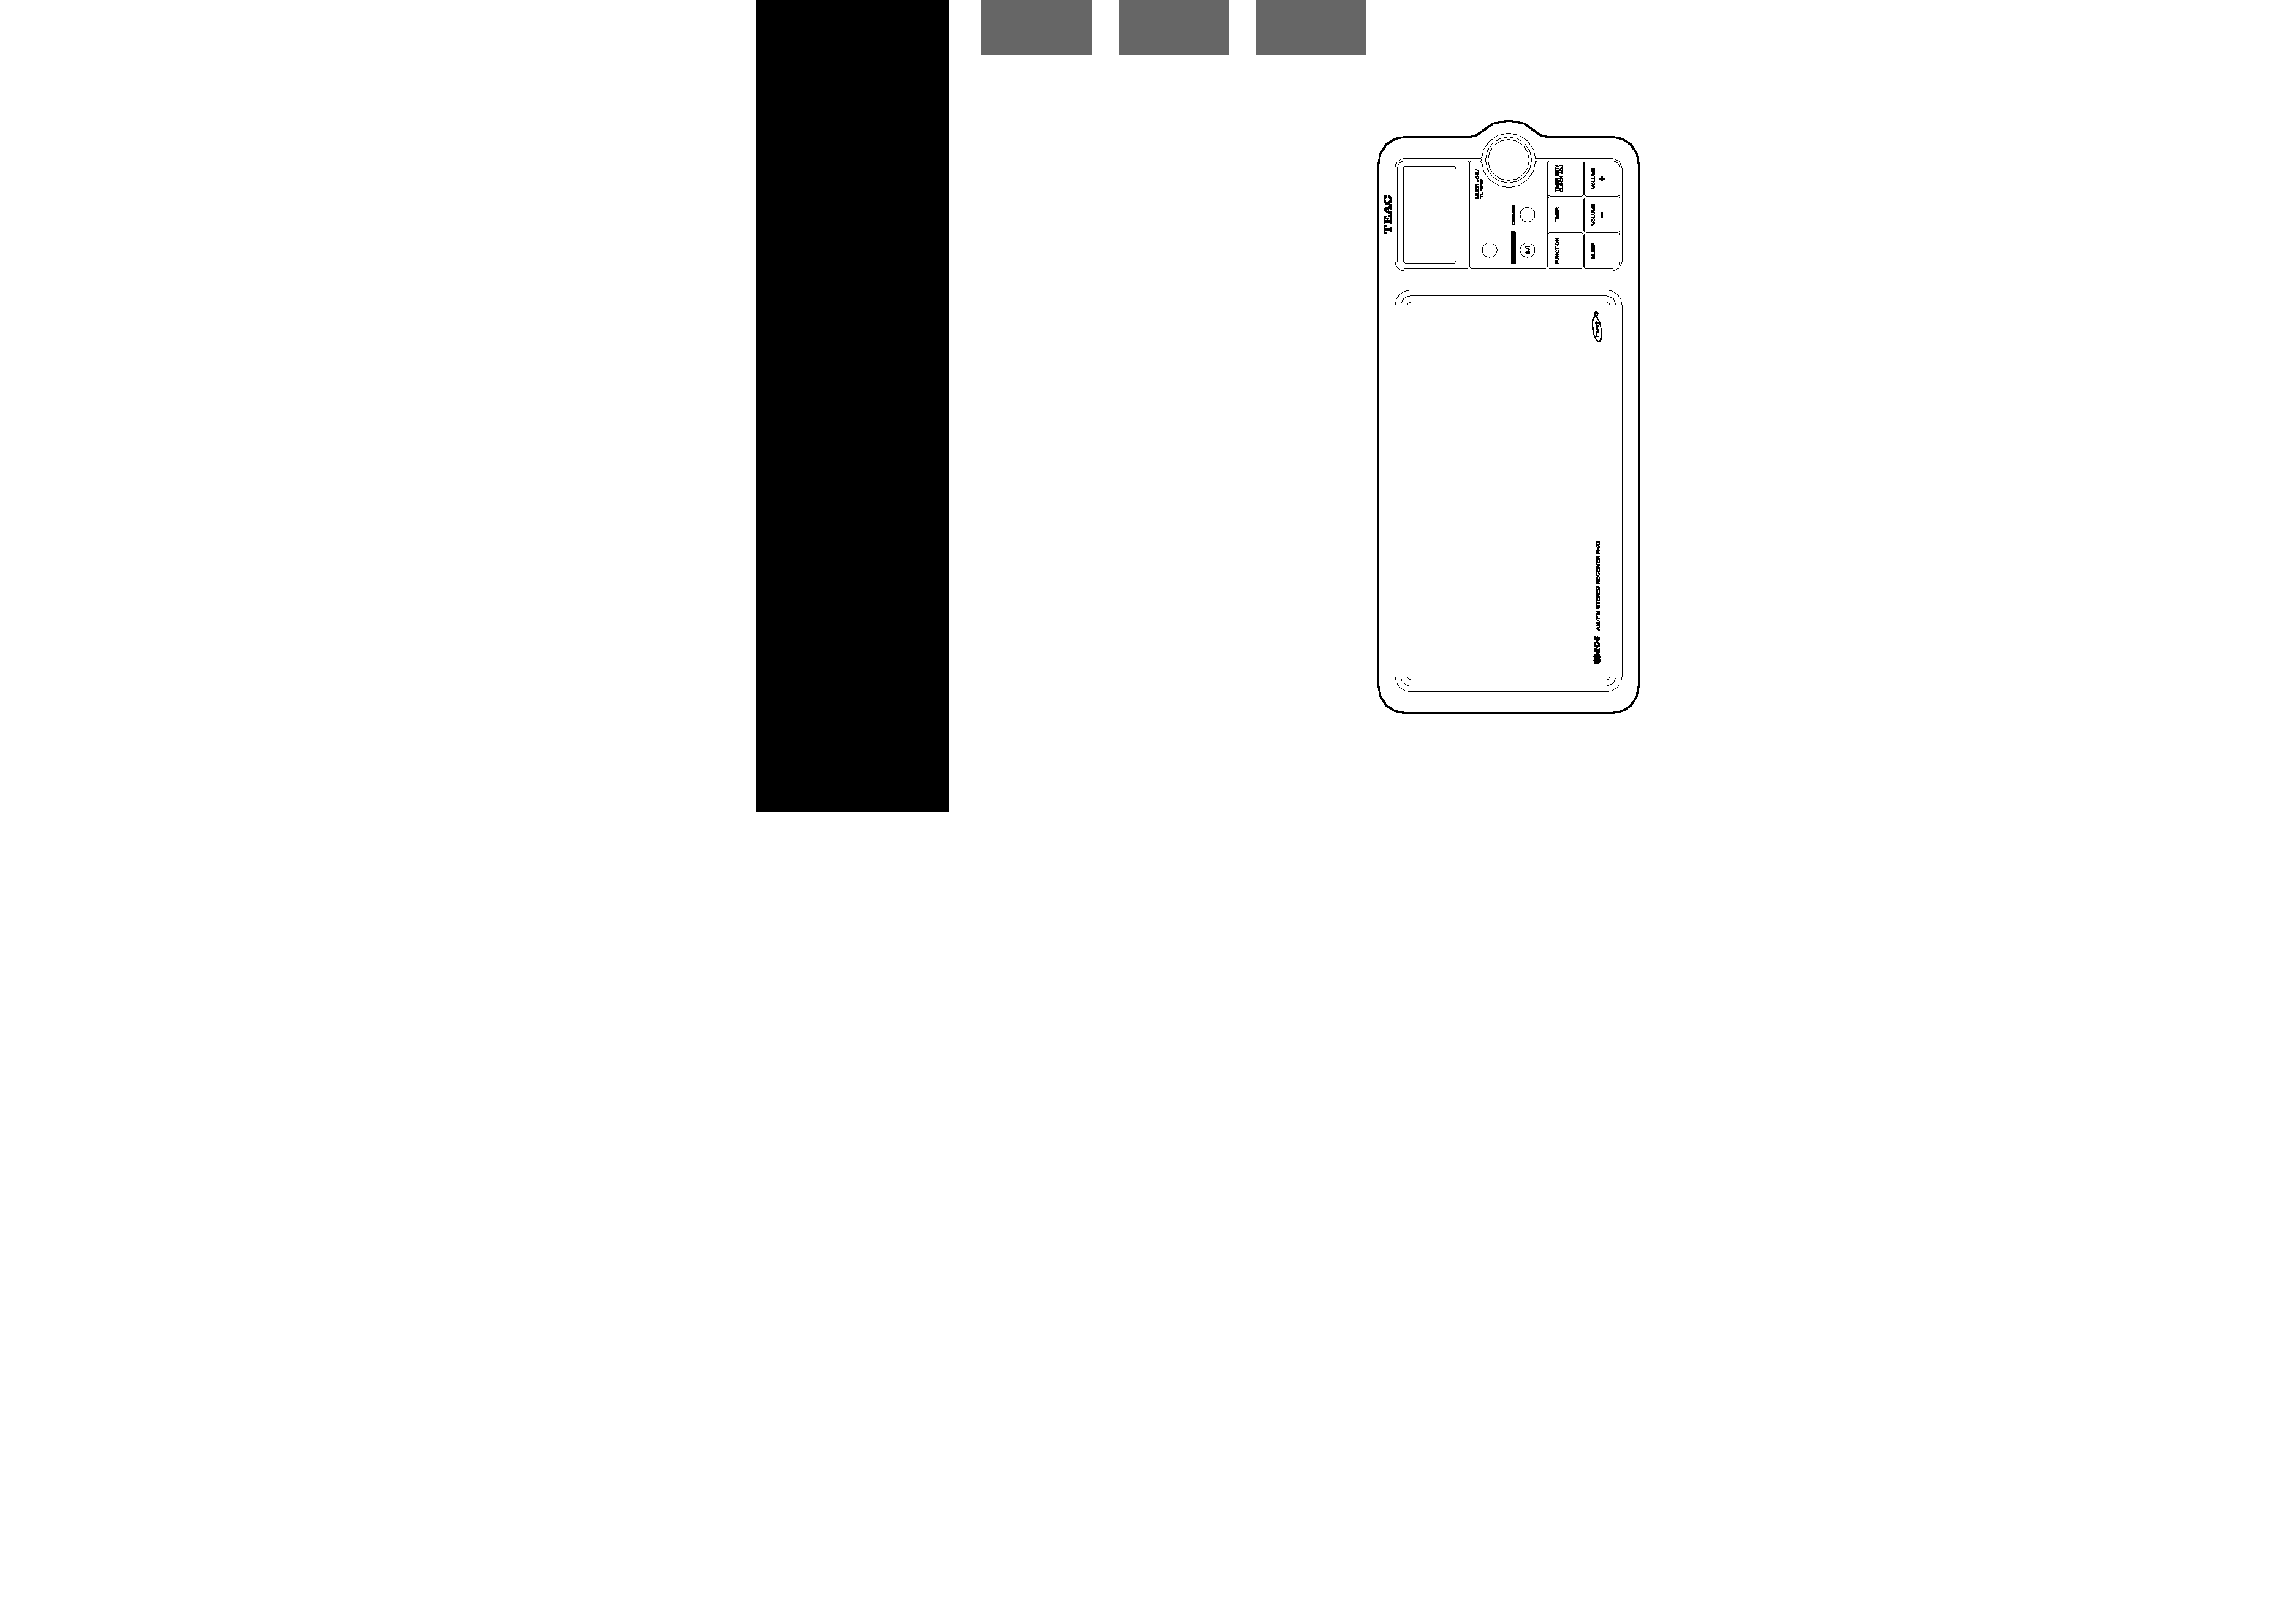
R-X1
FRANÇAIS
ENGLISH
ESPAÑOL
11) Only use attachments/accessories
specified by the manufacturer.
12) Use only with the cart, stand,
tripod, bracket, or table
specified by the manufacturer,
or sold with the apparatus.
When a cart is used, use caution when
moving the cart/apparatus combination
to avoid injury from tip-over.
13) Unplug this apparatus during lightning
storms or when unused for long periods
of time.
14) Refer all servicing to qualified service
personnel. Servicing is required when
the apparatus has been damaged in any
way, such as power-supply cord or plug
is damaged, liquid has been spilled or
objects have fallen into the apparatus,
the apparatus has been exposed to rain
or moisture, does not operate normally,
or has been dropped.
ENGLISH
3
CAUTION: TO REDUCE THE RISK OF
ELECTRIC SHOCK, DO NOT REMOVE
COVER
(OR
BACK).
NO
USER-
SERVICEABLE PARTS INSIDE. REFER
SERVICING TO QUALIFIED SERVICE
PERSONNEL.
The
lightning
flash
with
arrowhead symbol, within an
equilateral triangle, is intended to
alert the user to the presence of uninsulated
"dangerous voltage" within the product's
enclosure that may be of sufficient
magnitude to constitute a risk of electric
shock to persons.
The exclamation point within an
equilateral triangle is intended to
alert the user to the presence of
important operating and maintenance
(servicing) instructions in the literature
accompanying the appliance.
1) Read these instructions.
2) Keep these instructions.
3) Heed all warnings.
4) Follow all instructions.
5) Do not use this apparatus near water.
6) Clean only with dry cloth.
7) Do not block any ventilation openings.
Install
in
accordance
with
the
manufacturer's instructions.
8) Do not install near any heat sources such
as radiators, heat registers, stoves, or
other apparatus (including amplifiers)
that produce heat.
9) Do not defeat the safety purpose of the
polarized or grounding-type plug. A
polarized plug has two blades with one
wider than the other. A grounding type
plug has two blades and a third
grounding prong. The wide blade or the
third prong are provided for your safety.
If the provided plug does not fit into
your outlet, consult an electrician for
replacement of the obsolete outlet.
10) Protect the power cord from being
walked on or pinched particularly at
plugs, convenience receptacles, and the
point where they exit from the
apparatus.
IMPORTANT SAFETY
INSTRUCTIONS
CAUTION
<
DO NOT REMOVE THE EXTERNAL CASES
OR
CABINETS
TO
EXPOSE
THE
ELECTRONICS. NO USER SERVICEABLE
PARTS ARE WITHIN!
<
IF YOU ARE EXPERIENCING PROBLEMS
WITH THIS PRODUCT, CONTACT TEAC
FOR A SERVICE REFERRAL. DO NOT USE
THE PRODUCT UNTIL IT HAS BEEN
REPAIRED.
WARNING: TO PREVENT FIRE
OR SHOCK HAZARD, DO NOT
EXPOSE THIS APPLIANCE TO
RAIN OR MOISTURE.
<
Do not expose this apparatus to drips or
splashes.
<
Do not place any objects filled with
liquids, such as vases, on the apparatus.
<
Do not install this apparatus in a
confined space such as a book case or
similar unit.
<
The apparatus draws nominal non-
operating power from the AC outlet with
its STANDBY/ON switch in the standby
position.
<
The apparatus should be located close
enough to the AC outlet so that you can
easily grasp the power cord plug at any
time.
<
Batteries (battery pack or batteries
installed) shall not be exposed to
excessive heat such as sunshine, fire or
the like.
2
ENGLISH
4
5
Read this before attempting any
operations
<
As the unit may become warm during
operation, always leave sufficient space
around the unit for ventilation.
<
The voltage supplied to the unit should
match the voltage as printed on the rear
panel. If you are in any doubt regarding
this matter, consult an electrician.
<
Choose the installation location of your
unit carefully. Avoid placing it in direct
sunlight or close to a source of heat. Also
avoid locations subject to vibrations and
excessive dust, heat, cold or moisture.
<
Do not place the unit on any other
electronic components.
<
Do not open the cabinet as this might
result in damage to the circuitry or
electrical shock. If a foreign object should
get into the unit, contact your dealer or
service company.
<
When removing the power plug from a
wall outlet, always pull directly on the
plug. Do not pull on the line cord.
<
Do not attempt to clean the unit with
chemical solvents as this might damage
the finish. Use a clean, dry, lint-free
cloth.
<
Keep this manual in a safe place for
future reference.
Before Using the Unit
Maintenance
If the surface of the unit gets dirty, wipe
with a soft lint-free cloth or use diluted
neutral cleaning liquid. Be sure to remove
any fluid completely. Do not use thinner,
benzine or alcohol as they may damage
the surface of the unit. Allow the surface
of the unit to dry completely before
using.
Contents
Thank you for choosing TEAC. Read this manual carefully
to get the best performance from this unit.
Important Safety Instructions . . . . . . . . . . . . . . . . . . . . . . . . . . 2
Before Using the Unit . . . . . . . . . . . . . . . . . . . . . . . . . . . . . . . . 5
Connections . . . . . . . . . . . . . . . . . . . . . . . . . . . . . . . . . . . . . . . 6
Wall Mounting . . . . . . . . . . . . . . . . . . . . . . . . . . . . . . . . . . . . . 8
Remote Control Unit . . . . . . . . . . . . . . . . . . . . . . . . . . . . . . . . 9
Unit Functions . . . . . . . . . . . . . . . . . . . . . . . . . . . . . . . . . . . . 10
Display . . . . . . . . . . . . . . . . . . . . . . . . . . . . . . . . . . . . . . . . . . 12
Memory Backup . . . . . . . . . . . . . . . . . . . . . . . . . . . . . . . . . . . 12
Setting the Clock . . . . . . . . . . . . . . . . . . . . . . . . . . . . . . . . . . 13
Listening to the Radio . . . . . . . . . . . . . . . . . . . . . . . . . . . . . . . 14
Preset Tuning . . . . . . . . . . . . . . . . . . . . . . . . . . . . . . . . . . . . . 16
RDS . . . . . . . . . . . . . . . . . . . . . . . . . . . . . . . . . . . . . . . . . . . . 17
Listening to an External Source . . . . . . . . . . . . . . . . . . . . . . . . 18
Muting . . . . . . . . . . . . . . . . . . . . . . . . . . . . . . . . . . . . . . . . . . 19
Tone Control . . . . . . . . . . . . . . . . . . . . . . . . . . . . . . . . . . . . . 19
Dimmer . . . . . . . . . . . . . . . . . . . . . . . . . . . . . . . . . . . . . . . . . 20
Sleep Timer . . . . . . . . . . . . . . . . . . . . . . . . . . . . . . . . . . . . . . 20
Timer . . . . . . . . . . . . . . . . . . . . . . . . . . . . . . . . . . . . . . . . . . . 21
Troubleshooting . . . . . . . . . . . . . . . . . . . . . . . . . . . . . . . . . . . 24
Specifications . . . . . . . . . . . . . . . . . . . . . . . . . . . . . . . . . . . . . 25
NXT is a trademark of New Transducers Ltd.
Disposal of your old appliance
1. When this crossed-out
wheeled bin symbol is
attached to a product it
means the product is
covered by the European
Directive 2002/96/EC.
2. All electrical and electronic products
should be disposed of separately from
the municipal waste stream via
designated
collection
facilities
appointed by the government or the
local authorities.
3. The correct disposal of your old
appliance will help prevent potential
negative
consequences
for
the
environment and human health.
4. For more detailed information about
disposal of your old appliance, please
contact your city office, waste disposal
service or the shop where you
purchased the product.
6
7
ENGLISH
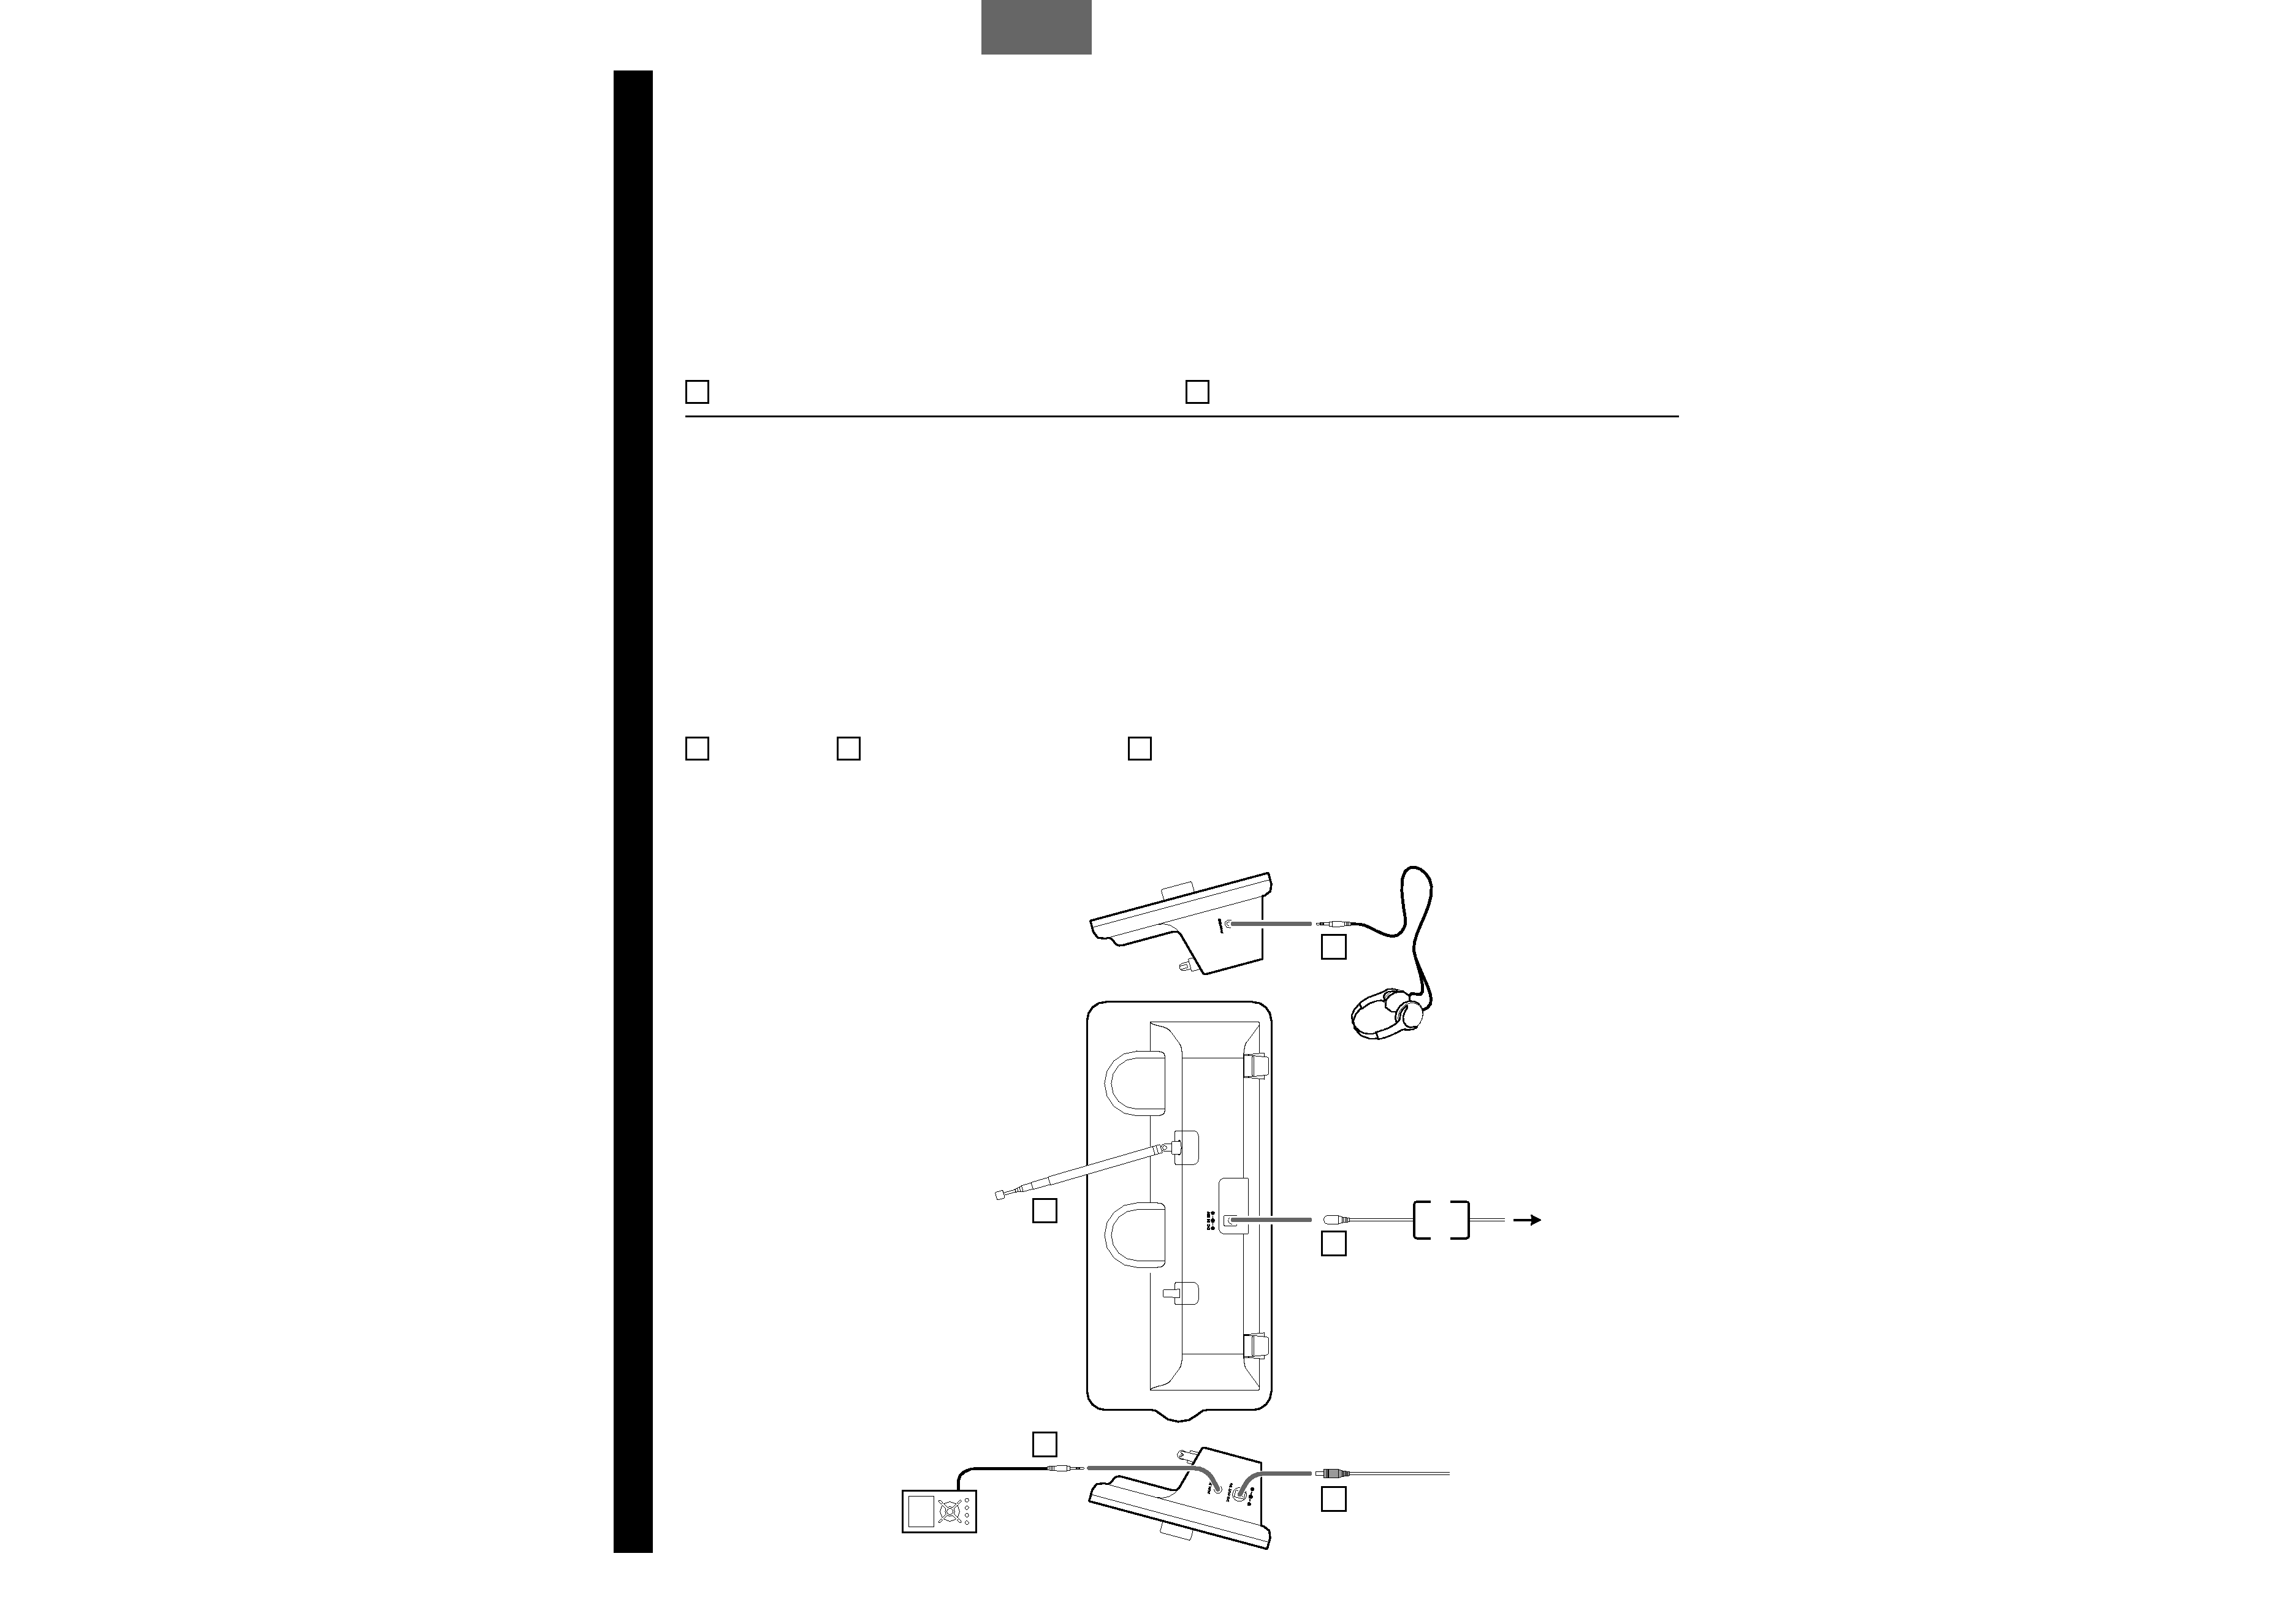
Connections
CAUTION:
<
Switch off the power before making connections.
<
Read the instructions of each component you intend to use with this unit.
<
Be sure to insert each plug securely. To prevent hum and noise, do not bundle the
connection cords.
FM Telescopic Antenna
Stretch the telescopic antenna to its
fullest length and rotate it to the
direction that gives the best reception.
DC IN
Connect the provided AC adaptor to
the DC IN jack. Then connect the AC
adaptor's plug to the AC wall socket.
<
Do not use any AC adaptors other than
the one included with this unit to avoid
fire, electric shock, etc. Be sure to
connect the adaptor to an AC outlet
that supplies the correct voltage.
PHONES
For private listening, insert the
headphone plug into this jack, and
adjust the volume using the VOLUME
buttons.
CAUTION
Always lower the volume level prior to
plugging in your headphones. TO
AVOID DAMAGING YOUR HEARING -
Do not place your headphones on your
head until after you have plugged them
in.
C
B
A
AUX IN jack
You can connect a portable audio
player to this jack.
Connect the LINE OUT or PHONES jack
(audio output jack) of the player using
the supplied stereo mini plug cable.
When using the PHONES jack of your
mini player, you must adjust the volume
of the mini-player or you may hear no
sound from your R-X1.
<
Turning the volume of the mini player
up too high may cause the sound from
your R-X1 to be distorted. If this is the
case, reduce the volume of the mini
player until the distortion stops and
then adjust the volume level of the R-
X1 to a comfortable listening level.
DC OUT 5V
An optional TEAC product for the R-X1
can be connected in the future.
Do not connect anything other than the
TEAC product especially made for the
R-X1.
E
D
C
A
B
D
E
Side
Side
AC Adaptor
AC wall socket
ENGLISH
9
8
You can mount the R-X1 on a wall.
Precautions
<
Be aware of the best possible direction
for receiving AM broadcasts (this unit has
no AM anntena you can turn around).
<
Leave sufficient space above the unit to
extend the FM telescopic antenna.
<
Pay attention to the length of the AC
adaptor.
<
Drill holes into solid wall support, such as
wooden frame or concrete wall.
<
TEAC supplies these brackets as a
convenience to the product owner.
Consult your local building codes and
exercise all necessary caution when
mounting these brackets. If you are
unsure how to use the supplied brackets,
consult with a local tradesmen or
building supply expert.
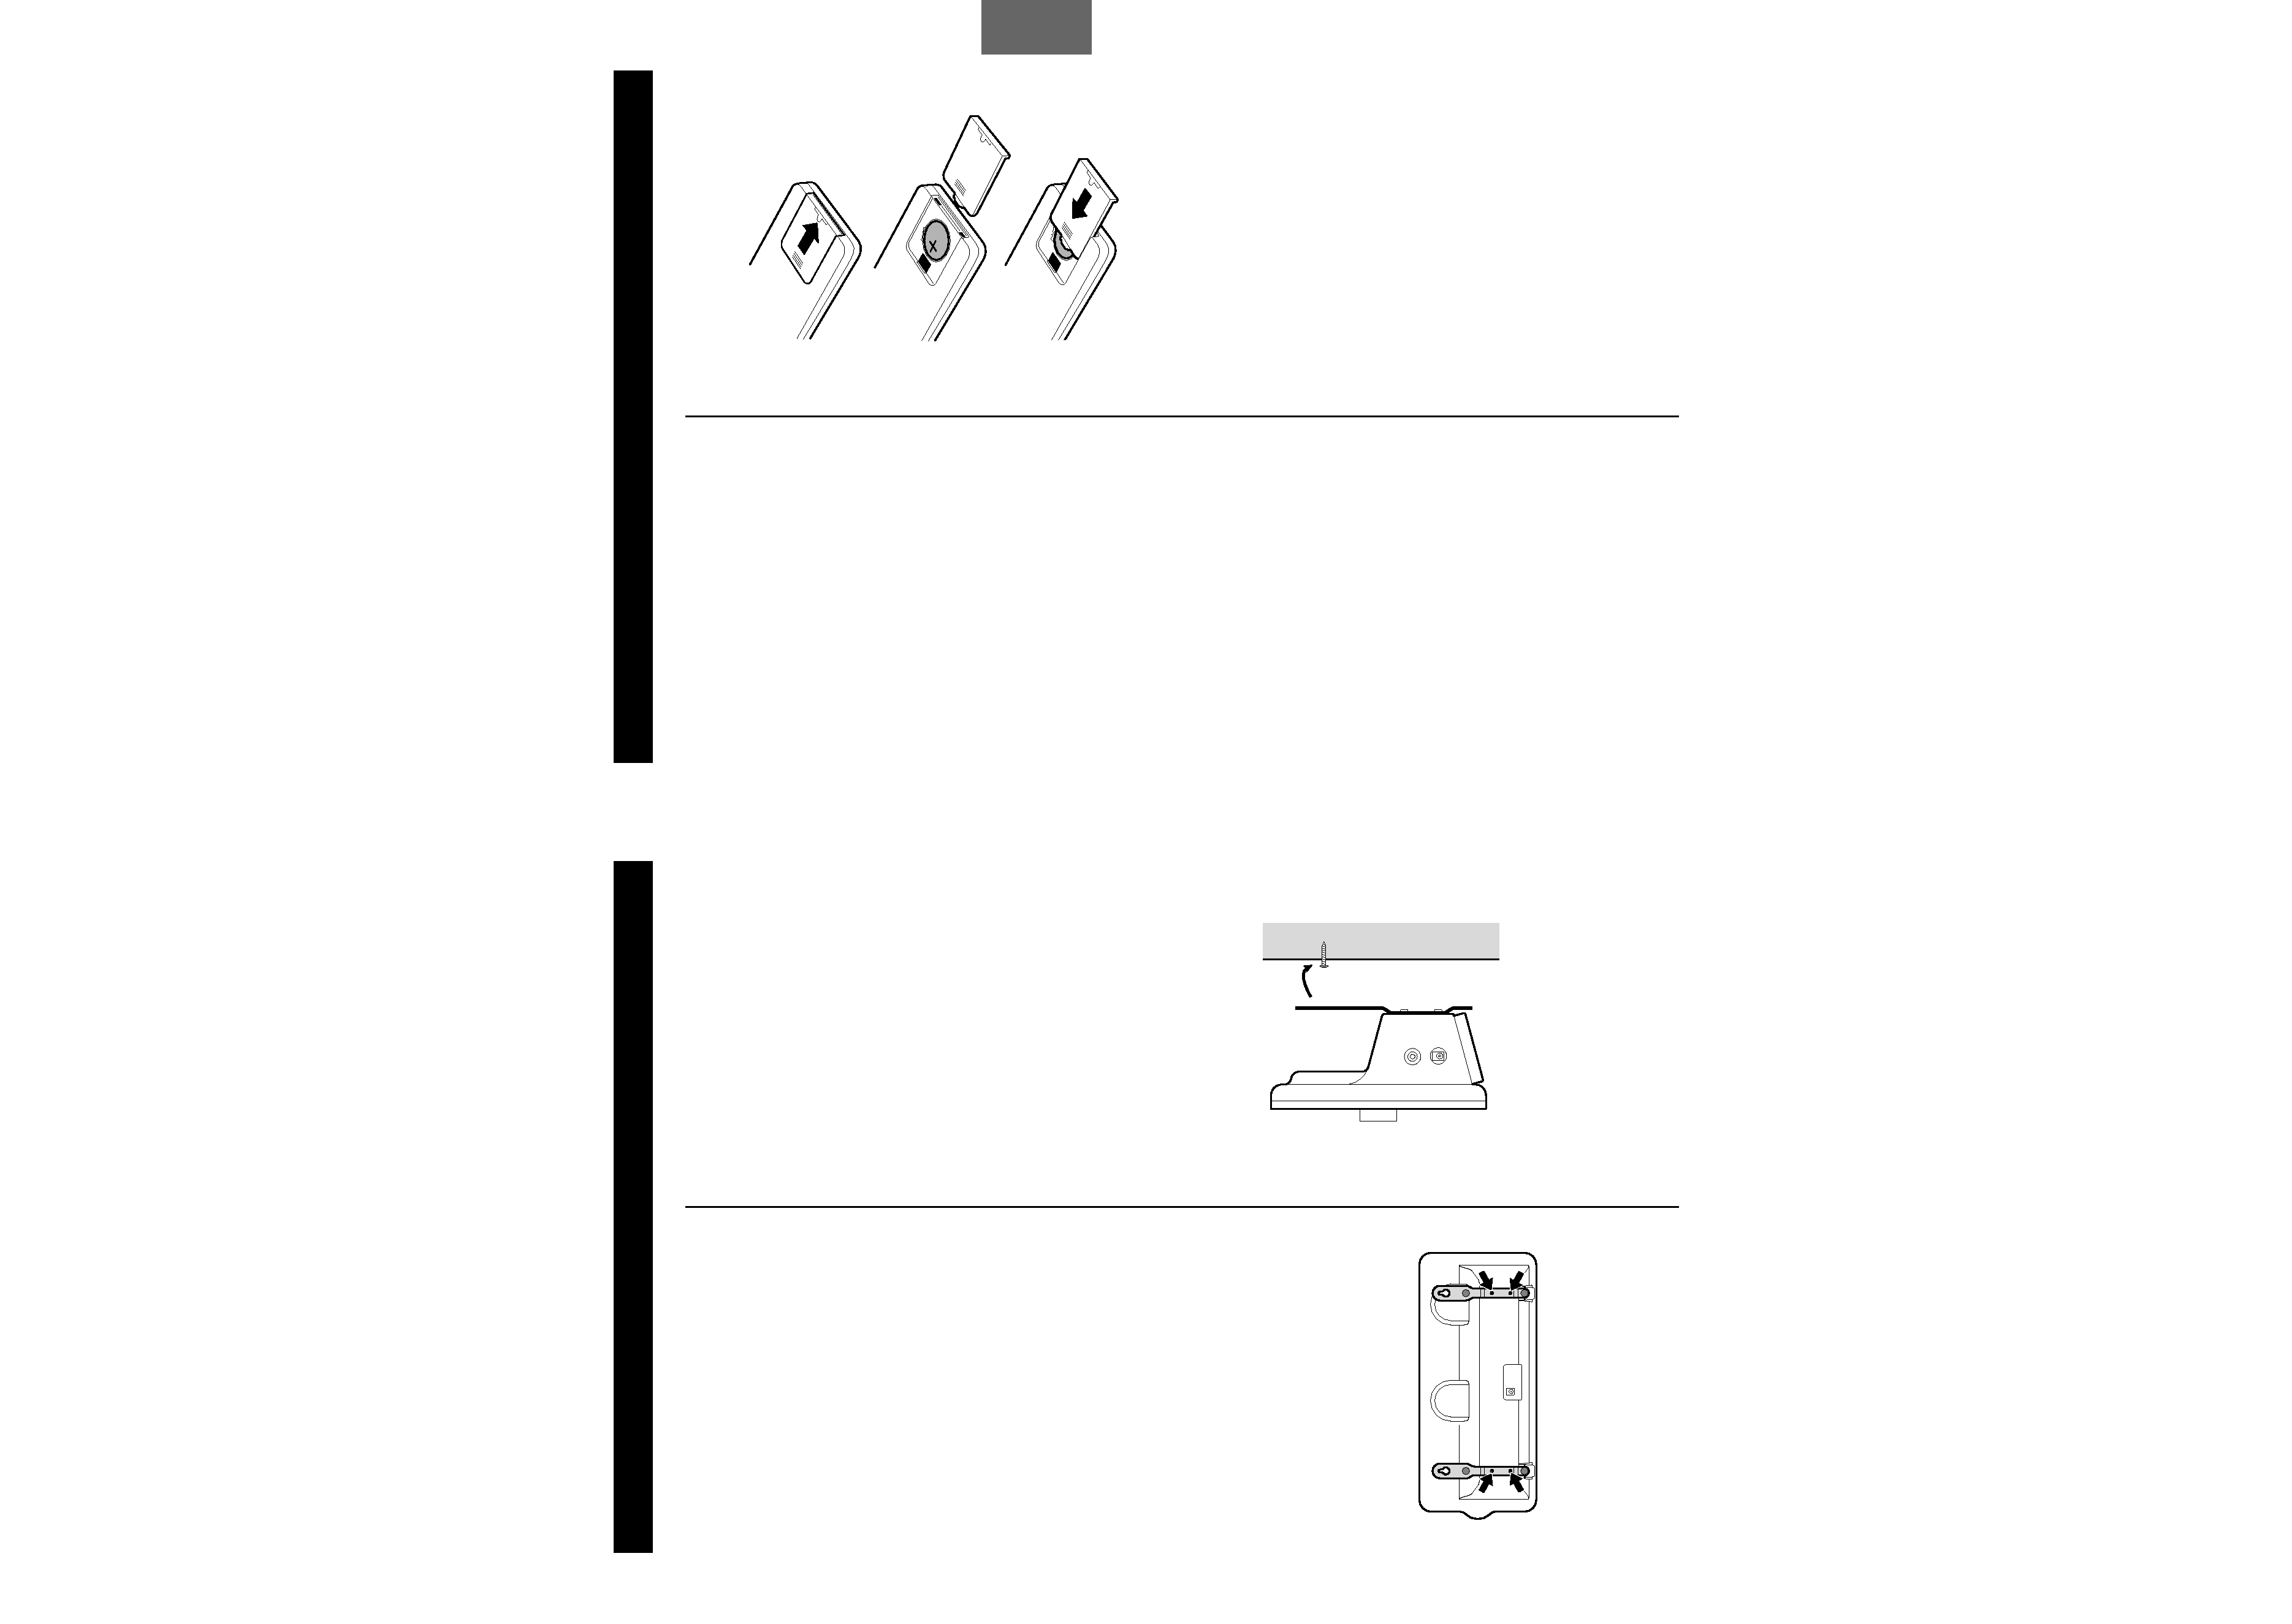
To hook on the wall
1. Fix the brackets on the rear panel of
the R-X1 using the supplied short
screws.
2. If the AC adapter has not been
connected, connect it to the DC IN
jack of the R-X1.
The provided Remote Control Unit allows
the unit to be operated from a distance.
When operating the remote control unit,
point it towards the remote sensor on the
front panel of the unit.
<
Even if the remote control unit is
operated within the effective range,
remote control operation may be
impossible if there are any obstacles
between the unit and the remote control.
<
If the remote control unit is operated near
other products which generate infrared
rays, or if other remote control devices
using infrared rays are used near the unit,
it may operate incorrectly. Conversely, the
other products may also operate
incorrectly.
1
2
3
1. Remove the battery compartment cover.
2. Put in the lithium battery (CR2032, 3V).
3. Close the cover.
Battery Replacement
If the distance required between the
remote control unit and main unit
decreases, the battery is exhausted. In this
case, replace the battery with a new one.
Precautions concerning batteries
Do not heat or disassemble batteries and
never dispose of old batteries by throwing
them in a fire.
Remote Control Unit
Battery Installation
Wall Mounting
3. Use the supplied guide sheet to mark
the exact drilling points on the wall.
4. Drill holes in the wall at the marked
points.
5. Screw the supplied long screws into
the wall.
Leave about 5 mm space between the
screw's head and the wall.
<
As a convenience, a set of tapered plastic
anchors is supplied. If you chose to use
these anchors, drill a pilot hole using a 6
mm drill bit then tap the anchor into the
pilot hole.
Only use these anchors if they are
appropriate for the materials onto which
the unit is to be mounted. Consult your
local hardware store if you are uncertain.
6. Carefully hang the R-X1 onto the
screws.
Note:
<
Ensure that the unit locks onto the hooks
and that the hooks are strong enough to
support the weight before removing your
hands.