AC POWER CORD CONNECTION
CAUTION:
TO PREVENT ELECTRIC SHOCK, MATCH WIDE
BLADE OF PLUG TO WIDE SLOT, FULLY INSERT.
CORDE DE CONNEXION CA
ATTENTION:
POUR ÉVITER LES CHOCS ÉLECTRIQUES,
INTRODUIRE LA LAME LA PLUS LARGE DE LA
FICHE DANS LA BORNE CORRESPONDANTE DE
LA PRISE ET POUSSER JUSQU'AU FOND.
For CANADA
TEAC CORPORATION
3-7-3, Nakacho, Musashino-shi, Tokyo 180-8550, Japan Phone: (0422) 52-5082
TEAC AMERICA, INC.
7733 Telegraph Road, Montebello, California 90640 Phone: (213) 726-0303
TEAC CANADA LTD.
5939 Wallace Street, Mississauga, Ontario L4Z 1Z8, Canada Phone: 905-890-8008 Facsimile: 905-890-9888
TEAC MEXICO, S.A. De C.V
Privada De Corina, No.18, Colonia Del Carmen Coyoacon, Mexico DF 04100 Phone: 5-658-1943
TEAC UK LIMITED
5 Marlin House, Marlins Meadow, The Croxley Centre, Watford, Herts. WD1 8YA, U.K. Phone: 01923-819699
TEAC DEUTSCHLAND GmbH
Bahnstrasse 12, 65205 Wiesbaden-Erbenheim, Germany Phone: 0611-71580
TEAC FRANCE S. A.
17 Rue Alexis-de-Tocqueville, CE 005 92182 Antony Cedex, France Phone: 01.42.37.01.02
TEAC BELGIUM NV/SA
P.A. TEAC Nederland BV, Perkinsbaan 11a, 3439 ND Nieuwegein, Netherlands Phone: 0031-30-6048115
TEAC NEDERLAND BV
Perkinsbaan 11a, 3439 ND Nieuwegein, Netherlands Phone: 030-6030229
TEAC AUSTRALIA PTY., LTD.
106 Bay Street, Port Melbourne, Victoria 3207, Australia Phone: (03) 9644-2442
A.C.N. 005 408 462
TEAC ITALIANA S.p.A.
Via C. Cantù 11, 20092 Cinisello Balsamo, Milano, Italy Phone: 02-66010500
Printed in China MA-0484
»
MD-350
Minidisc Deck
ESPAÑOL
ITALIANO
DEUTSCH
FRANÇAIS
ENGLISH
This appliance has a serial number located
on the rear panel. Please record the model
number and serial number and retain them
for your records.
Model number
Serial number
WARNING: TO PREVENT FIRE OR SHOCK
HAZARD, DO NOT EXPOSE THIS
APPLIANCE TO RAIN OR MOISTURE.
The exclamation point within an equilateral triangle is intended to alert the user to the
presence of important operating and maintenance (servicing) instructions in the literature
accompanying the appliance.
The lightning flash with arrowhead symbol, within an equilateral triangle, is intended to alert
the user to the presence of uninsulated "dangerous voltage" within the product's enclosure
that may be of sufficient magnitude to constitute a risk of electric shock to persons.
CAUTION: TO REDUCE THE RISK OF ELECTRIC SHOCK, DO NOT
REMOVE COVER (OR BACK). NO USER-SERVICEABLE PARTS INSIDE.
REFER SERVICING TO QUALIFIED SERVICE PERSONNEL.
Ü
ÿ
Y
OWNER'S MANUAL / MANUEL DU PROPRIETAIRE
BEDIENUNGSANLEITUNG / MANUALE DI ISTRUZIONI
MANUAL DEL USUARIO / GEBRUIKSAANWIJZING
D00602210A
IMPORTANT SAFETY INSTRUCTIONS
2
CAUTION:
GRead all of these Instructions.
GSave these Instructions for later use.
GFollow all Warnings and Instructions marked on the audio
equipment.
1) Read Instructions -- All the safety and operating instructions should
be read before the product is operated.
2) Retain Instructions -- The safety and operating instructions
should be retained for future reference.
3) Heed Warnings -- All warnings on the product and in the operating
instructions should be adhered to.
4) Follow Instructions -- All operating and use instructions should be
followed.
5) Cleaning -- Unplug this product from the wall outlet before
cleaning. Do not use liquid cleaners or aerosol cleaners. Use a damp
cloth for cleaning.
6) Attachments -- Do not use attachments not recommended by the
product manufacturer as they may cause hazards.
7) Water and Moisture -- Do not use this product near water _ for
example, near a bath tub, wash bowl, kitchen sink, or laundry tub; in a
wet basement; or near a swimming pool; and the like.
8) Accessories -- Do not place this product on an unstable cart,
stand, tripod, bracket, or table. The product may fall, causing serious
injury to a child or adult, and serious damage to the product. Use only
with a cart, stand, tripod, bracket, or table recommended by the
manufacturer, or sold with the product. Any mounting of the product
should follow the manufacturer's instructions, and should use a
mounting accessory recommended by the manufacturer.
9) A product and cart combination should be moved with care. Quick
stops, excessive force, and uneven surfaces may cause the product
and cart combination to overturn.
10) Ventilation -- Slots and openings in the cabinet are provided for
ventilation and to ensure reliable operation of the product and to
protect it from overheating, and these openings must not be blocked or
covered. The openings should never be blocked by placing the product
on a bed, sofa, rug, or other similar surface. This product should not be
placed in a built-in installation such as a bookcase or rack unless
proper ventilation is provided or the manufacturer's instructions have
been adhered to.
11) Power Sources -- This product should be operated only from the
type of power source indicated on the marking label. If you are not sure
of the type of power supply to your home, consult your product dealer
or local power company. For products intended to operate from battery
power, or other sources, refer to the operating instructions.
12) Grounding or Polarization -- This product may be equipped with
a polarized alternating-current line plug (a plug having one blade wider
than the other). This plug will fit into the power outlet only one way.
This
is a safety feature. If you are unable to insert the plug fully
into the outlet, try reversing the plug. If the plug should still fail to fit,
contact your electrician to replace your obsolete outlet. Do not defeat
the safety purpose of the polarized plug.
13) Power-Cord Protection -- Power-supply cords should be routed
so that they are not likely to be walked on or pinched by items placed
upon or against them, paying particular attention to cords at plugs,
conve-nience receptacles, and the point where they exit from the
product.
14) Outdoor Antenna Grounding -- If an outside antenna or cable
system is connected to the product, be sure the antenna or cable
system is grounded so as to provide some protection against voltage
surges
and built-up static charges. Article 810 of the National
Electrical Code, ANSI/NFPA 70, provides information with regard to
proper grounding of the mast and supporting structure, grounding of
the lead-in wire to an antenna discharge unit, size of grounding
conductors, location of antenna-discharge unit, connection to
grounding electrodes, and re-quirements for the grounding electrode.
"Note to CATV system installer:
This reminder is provided to call the CATV system installer's attention
to Section 820-40 of the NEC which provides guidelines for proper
grounding and, in particular, specifies that the cable ground shall be
connected to the grounding system of the building, as close to the point
of cable entry as practical.
grounding and, in particular, specifies that the cable ground shall be
connected to the grounding system of the building, as close to the point
of cable entry as practical.
ANTENNA
LEAD IN
WIRE
ANTENNA
DISCHARGE UNIT
(NEC SECTION 810-20)
G
ROUNDING CONDUCTORS
(NEC SECTION 810-21)
GROUND CLAMPS
POWER SERVICE GROUNDING
ELECTRODE SYSTEM
(NEC ART 250. PART H)
NEC - NATIONAL ELECTRICAL CODE
ELECTRIC
SERVICE
EQUIPMENT
Example of Antenna Grounding as per
National Electrical Code, ANSI/NFPA 70
GROUND
CLAMP
15) Lightning -- For added protection for this product during a
lightning storm, or when it is left unattended and unused for long
periods of time, unplug it from the wall outlet and disconnect the
antenna or cable system. This will prevent damage to the product due
to lightning and power-line surges.
16) Power Lines -- An outside antenna system should not be located
in the vicinity of overhead power lines or other electric light or power
circuits, or where it can fall into such power lines or circuits. When
installing an outside antenna system, extreme care should be taken to
keep from touching such power lines or circuits as contact with them
might be fatal.
17) Overloading -- Do not overload wall outlets, extension cords, or
integral convenience receptacles as this can result in risk of fire or
electric shock.
18) Object and Liquid Entry -- Never push objects of any kind into
this product through openings as they may touch dangerous voltage
points
or short-out parts that could result in a fire or electric shock.
Never spill liquid of any kind on the product.
19) Servicing -- Do not attempt to service this product yourself as
opening or removing covers may expose you to dangerous voltage or
other hazards. Refer all servicing to qualified service personnel.
20) Damage Requiring Service -- Unplug this product from the wall
outlet and refer servicing to qualified service personnel under the
following conditions:
a) when the power-supply cord or plug is damaged.
b) if liquid has been spilled, or objects have fallen into the product.
c) if the product has been exposed to rain or water.
d) if the product does not operate normally by following the operating
instructions. Adjust only those controls that are covered by the
operating instructions as an improper adjustment of other controls may
result in damage and will often require extensive work by a qualified
technician to restore the product to its normal operation.
e) if the product has been dropped or damaged in any way.
f ) when the product exhibits a distinct change in performance _ this
indicates a need for service.
21) Replacement Parts -- When replacement parts are required, be
sure the service technician has used replacement parts specified by
the manufacturer or have the same characteristics as the original part.
Unauthorized substitutions may result in fire, electric shock, or other
hazards.
22) Safety Check -- Upon completion of any service or repairs to this
product, ask the service technician to perform safety checks to
determine that the product is in proper operating condition.
23) Wall or Ceiling Mounting -- The product should be mounted to a
wall or ceiling only as recommended by the manufacturer.
24) Heat -- The product should be situated away from heat sources
such as radiators, heat registers, stoves, or other products (including
amplifiers) that produce heat.
111
MEMO
110
Localización de averías
Especificaciones
Formato: Sistema de audio digital MiniDisc
Sistema de grabación:
Sistema de sobreescritura con modu-
lación archivada magnéticamente
Tiempo de grabación/reproducción:
SP, 80 minutos máximo.
LP2, 160 minutos máximo.
LP4, 320 minutos máximo.
Mono: 160 minutos máximo.
Frecuencia de muestreo: 44,1 kHz
Sistema de compresión: ATRAC (Adaptive
TRansform Acoustic Coding)
(codificación acústica de
transformación adaptiva)
Gama dinámica: Superior a 94 dB
(reproducción, 1 kHz, filtro A)
Distorsión armónica total: Inferior a 0,013%
Números de canales:
2 (estereofónicos), 1 (monofónico)
Respuesta de frecuencia:
20 Hz 20 kHz ±0,5 dB
(reproducción)
Relación señal a ruido:
Superior a 94 dB (reproducción,
filtro A )
Conectores analógicos de entrada/salida:
Entrada:
Equilibrada: XLR, +4 dBu (ref.),
10 kohms
Desequilibrada: RCA, 10 dBV (ref.),
`
50 kohms
Salida:
Equilibrada: XLR, +4 dBu (ref.),
150 ohms
Desequilibrada: RCA, 10 dBV (ref.),
600 ohms
Alimentación:
120 V CA, 60 Hz
(modelo EE.UU./Canadá),
230 V CA, 50 Hz (modelo Europa/
Exportación general),
240 V CA, 50 Hz
(modelo para Australia)
Salida de auriculares: Máx. 25 mW +
25 mW, 32 ohms
Conectores digitales de entrada y salida:
Entrada 1, 2:
TOS (EIAJ RC-5720), IEC60958
Tipo II (S/PDIF)
Salida:
TOS (EIAJ RC-5720), IEC60958
Tipo II (S/PDIF)
Conector remoto:
Conector KEYBOARD: Mini DIN 6
clavijas
Consumo de energía: 13 W
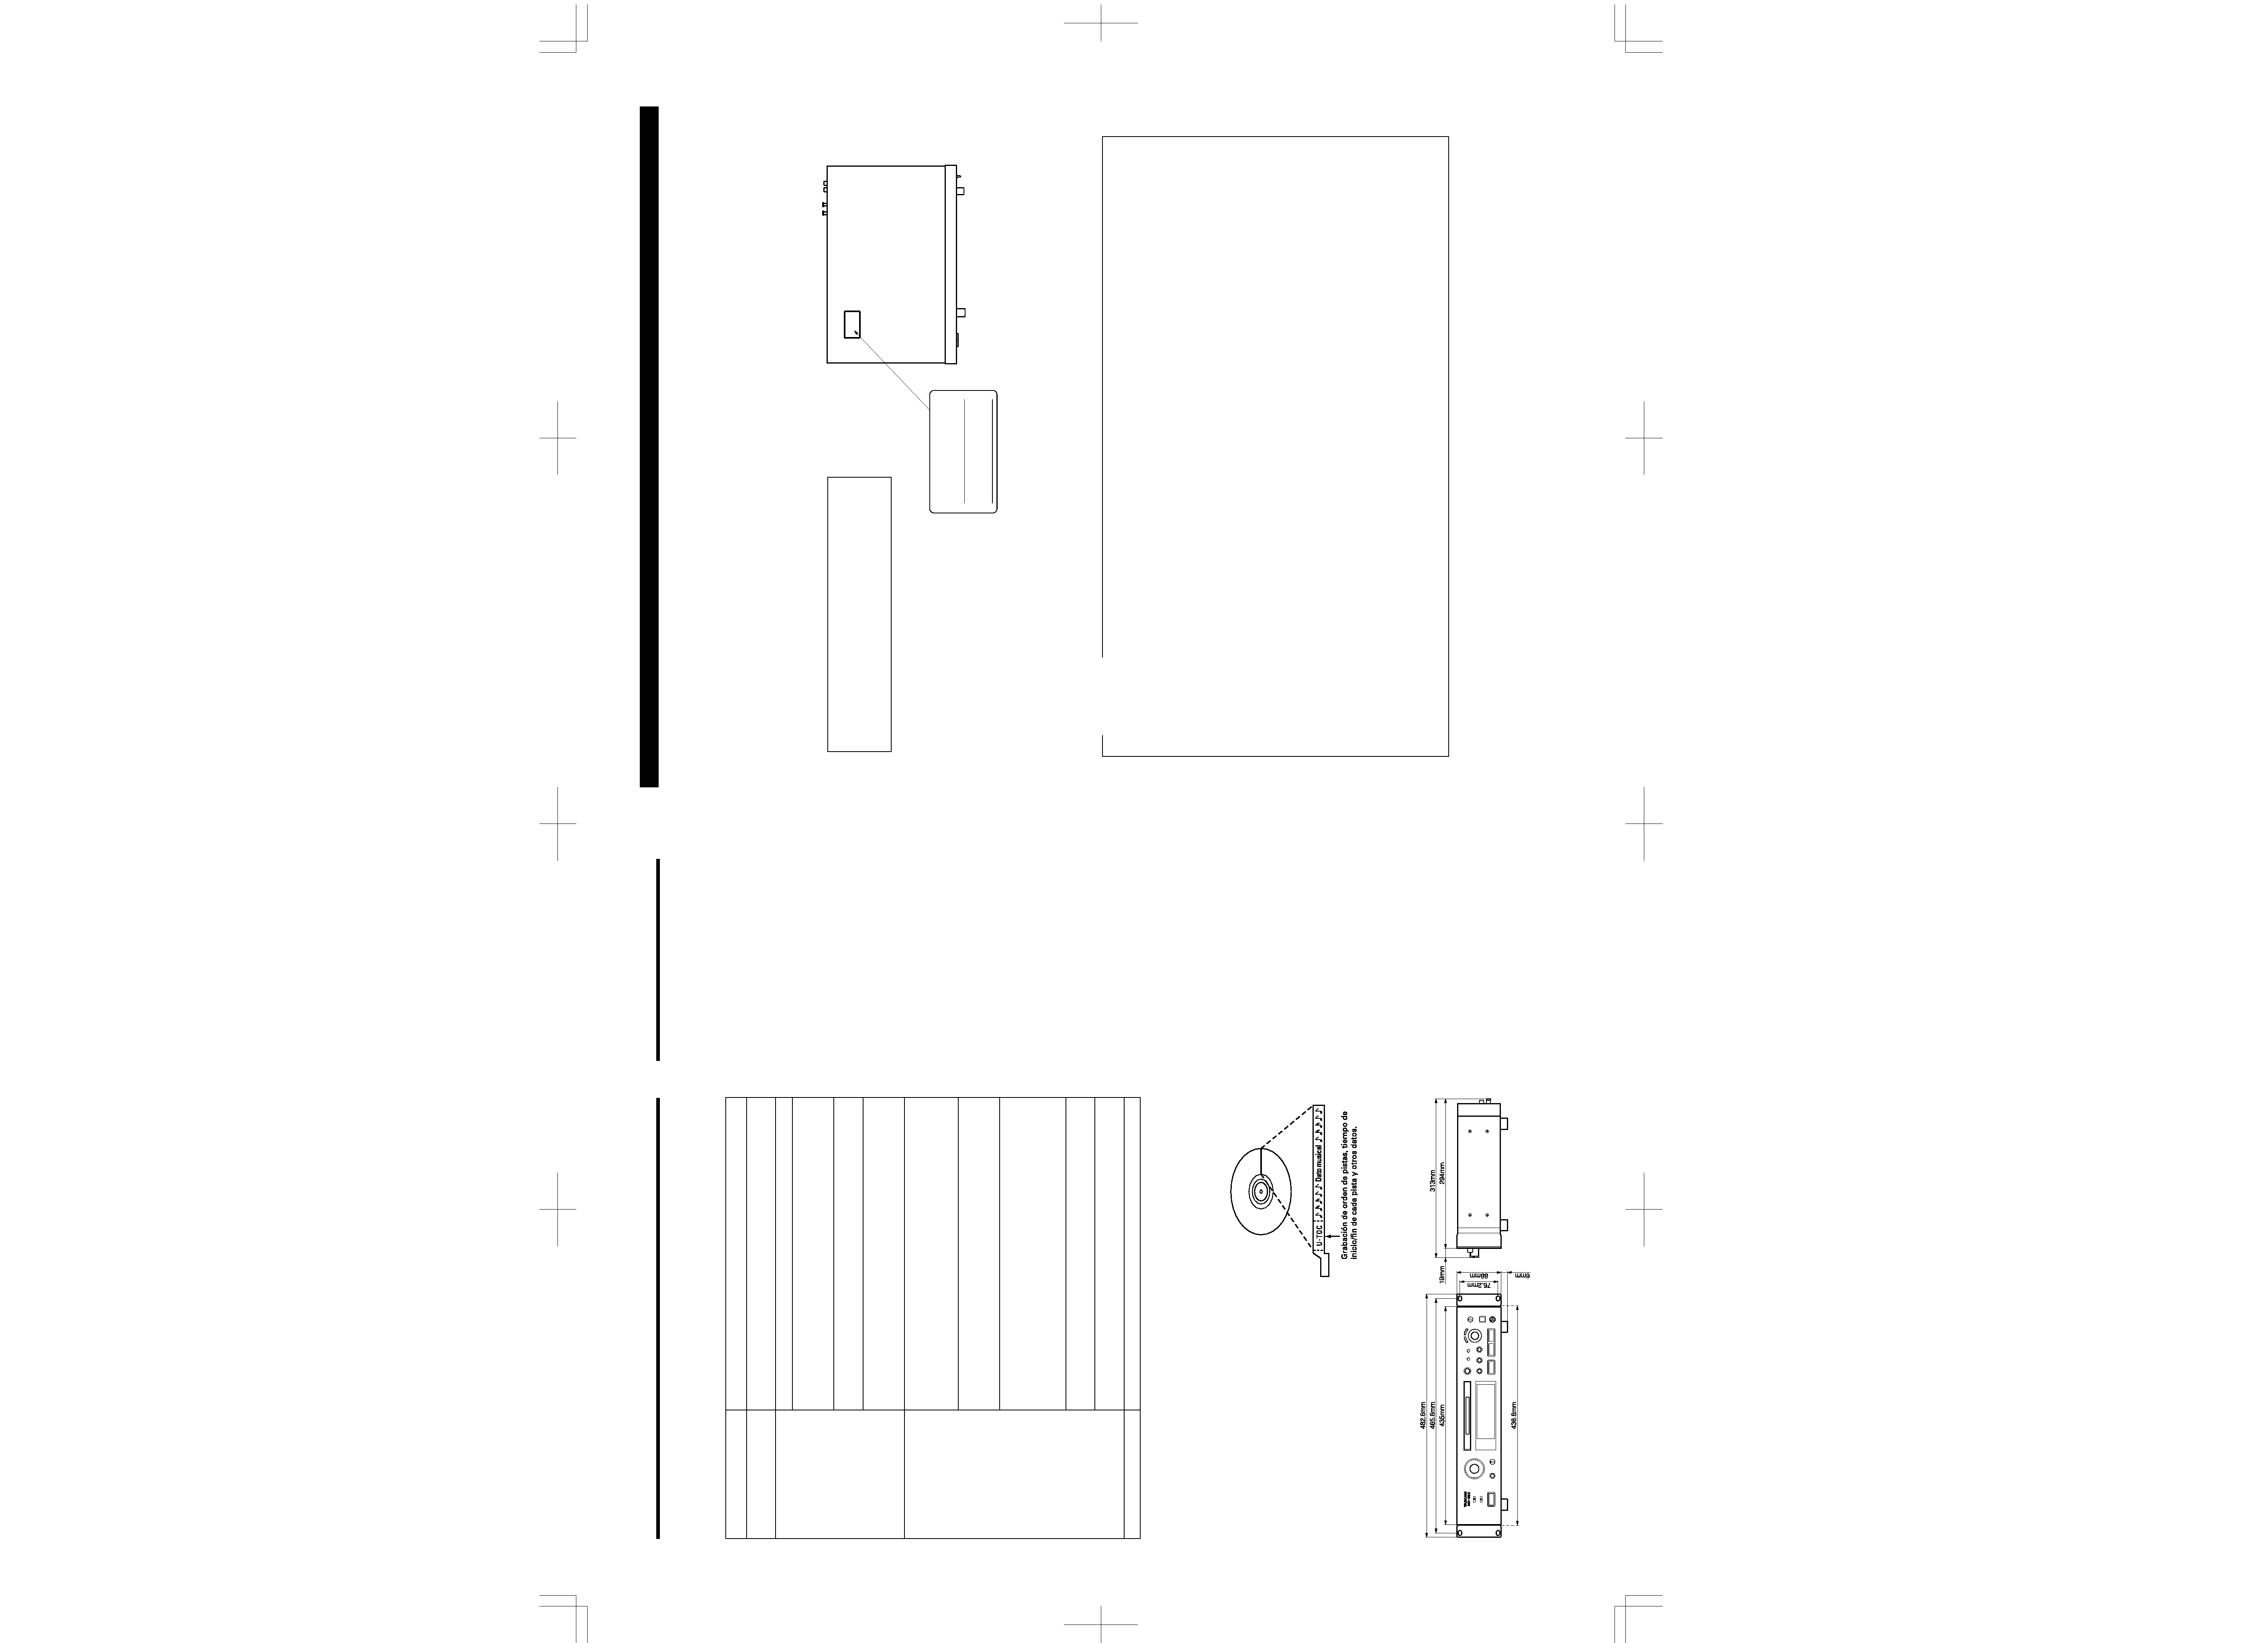
Dimensiones (A x Alt. x P):
482,6 x 94 x 313 (mm)
Peso: 5,5 kg
Accesorios:
Unidad de control remoto (RC-32) x 1
Pila (tipo SUM-3, "AA", "R6") x 2
Guía de letras x 1
Juego de tornillos para instalación
en estante x 1
... Las mejoras pueden resultar en
modificaciones de especificaciones o de
funciones sin aviso.
... Las fotografías e ilustraciones pueden
ser levemente diferentes a los modelos
de producción.
* Las patentes EE.UU. y extranjeras han
sido otorgadas por Dolby Laboratories
Licensing Corporation.
ª U-TOC
La edición de las pistas grabadas es fácil
con los MiniDisc grabables. La información
acerca de las pistas grabadas (dirección
de inicio, dirección de fin, título,etc.), son
grabados en el área U-TOC (índice de la
tabla del usuario). Usted puede editar las
pistas simplemente reescribiendo estos
datos.
Si usted encuentra cualquier problema en la platina, verifique lo siguiente antes de llamar al
servicio de reparación. Si el problema persiste, consulte con su agente o con el agente de
servicio TEAC más cercano.
... Si no es posible volver al funcionamiento normal, desenchufe el cordón de alimentación del
tomacorriente y enchúfelo otra vez.
Problema
Remedio
No es posible realizar
El MD está sucio o dañado. Si "Disc Error !" aparece indicado,
ninguna operación.
reemplace el MD por otro disco.
No se reinicia la
Verifique que la alimentación esté conectada.
reproducción.
"Blank Disc" aparece indicado si el MD no contiene datos
grabados. "No Track !!" aparece indicado si no se ha grabado ninguna
pista en el disco. Reemplace el MD por un MD grabado.
Cuando aparece indicado "UTOC Error !" reemplace el MD por
otro disco.
Puede haber condensación dentro de la platina. En este caso
eyecte el MD y deje la alimentación de la platina conectada durante
unas pocas horas.
No se inicia la grabación.
Cuando aparece indicado "Protected !!" el MD está protegido
contra borrado accidental. Deslice la lengüeta de protección contra
borrado para cerrar el orificio. Un MD que sólo reproduce está
insertado. Reemplace el MD con uno grabable.
Cuando aparece indicado "D-IN UNLOCK !" y no entra audio de
la fuente, conecte la fuente a través de una conexión digital o grabe
el audio empleando una entrada digital.
La grabación por temporizador no está disponible.
Después de la grabación por temporizador, active nuevamente la
alimentación dentro de 3 ó 4 días y extraiga el MD. Si la platina es
mantenida desactivada por un período prolongado, el contenido de
la grabación puede desaparecer.
Cuando aparece indicado "Disc Full !!" el disco no tiene espacio
para la grabación. Borre las pistas innecesarias o emplee otro MD.
Cuando aparece indicado "Rec Error !!", hay un error en la
grabación. Reinicie la grabación desde el principio.
Demasiada interferencia.
No opere esta platina cerca de un TV.
SAFETY INFORMATION
3
This product has been designed and manufactured according to FDA regulations "title 21, CFR, chapter 1, subchapter J, based on the Radiation
Control for Health and Safety Act of 1968", and is classified as class 1 laser product. There is no hazardous invisible laser radiation during
operation because invisible laser radiation emitted inside of this product is completely confined in the protective housings.
The label required in this reguration is shown 1.
... CAUTION
- DO NOT REMOVE THE PROTECTIVE HOUSING USING SCREWDRIVER.
- USE OF CONTROLS OR ADJUSTMENTS OR PERFORMANCE OF PROCEDURES OTHER THAN THOSE SPECIFIED HEREIN MAY RESULT IN
HAZARDOUS RADIATION EXPOSURE.
- IF THIS PRODUCT DEVELOPS TROUBLE, MAKE A CONTACT WITH OUR SERVICEMAN, AND DO NOT USE THE PRODUCT IN A
TROUBLED STATE.
CERTIFICATION
THIS PRODUCT COMPLES WITH DHHS
RULES 21 CFR SUBCHAPTER J APPLI-
CABLE AT DATE OF MANUFACTURE
TEAC CORPORATION
3-7-3 NAKA-CHO, MUSASHINO-SHI, TOKYO, JAPAN
MANUFACTURED
TIF
1
Optical pickup:
Type : KMS-260A
Manufacturer : SONY Corporation
Laser output
: 4.55 mW
Wavelength
: 785±20 nm
For U.S.A.
TO THE USER
This equipment has been tested and found to
comply with the limits for a Class B digital
device, pursuant to Part 15 of the FCC Rules.
These limits are designed to provide
reasonable protection against harmful
interference in a residential installation. This
equipment generates, uses, and can radiate
radio frequency energy and, if not installed
and used in accordance with the instruction
manual, may cause harmful interference to
radio communications. However, there is no
guarantee that interference will not occur in a
particular installation. If this equipment does
cause harmful interference to radio or
television reception, which can be determined
by turning the equipment off and on, the user
is encouraged to try to correct the interference
by one or more of the following measures.
a) Reorient or relocate the receiving antenna.
b) Increase the separation between the
equipment and receiver.
c) Connect the equipment into an outlet on a
circuit different from that to which the
receiver is connected.
d) Consult the dealer or an experienced
radio/TV technician for help.
CAUTION
Changes or modifications to this equipment
not
expressly
approved
by
TEAC
CORPORATION for compliance could void the
user's authority to operate this equipment.
For U.S.A
Before Use
Contents
... Place the unit on a hard flat surface.
... Avoid placing it in direct sunlight or
close to a source of heat. Also avoid
locations subject to vibrations and
excessive dust, heat, cold or moisture.
... Do not open the cabinet, as this might
result in circuitry damage or electrical
shock.
... Do not attempt to clean the unit with
chemical solvents, as this might
damage the finish. Use a clean, dry
cloth.
... When removing the power plug from the
wall outlet, always pull directly on the
plug, never yank the cord.
... Keep this manual in a safe place for
future reference.
IMPORTANT SAFETY INSTRUCTIONS ................................................................ 2-3
Before Use ................................................................................................................ 4
Read This Before Operating .............................................................................. 4
Handling MDs .............................................................................................. 5
Memory back-up function ........................................................................... 5
When "Protected !!" is displayed................................................................ 5
While "UTOC Writing" is blinking............................................................... 5
When "D-IN UNLOCK !" blinks.................................................................... 5
Remote Control Unit........................................................................................... 5
Rack Mounting. ................................................................................................... 6
Voltage Conversion (For general export models)............................................ 6
Connections .............................................................................................................. 6
Connection .................................................................................................. 6
Name of Each Control .............................................................................................. 7
Recording .................................................................................................................. 8
Recording an MD ............................................................................................... 8
Notes on Recording ........................................................................................... 9
Playback .................................................................................................................. 10
Normal Playback .............................................................................................. 10
Useful Tips for Recording ...................................................................................... 11
Monitoring the Input Signal ............................................................................ 11
Adjusting the Recording Level ....................................................................... 11
Assigning Track Numbers During Recording ................................................ 11
Recording Over Existing Tracks (Over Write) ................................................ 11
Sync Recording ................................................................................................ 12
Checking the Remaining MD Recording Time .............................................. 12
Checking the Recorded Tracks ....................................................................... 12
Timer Recording .............................................................................................. 12
Useful Tips for Playback ........................................................................................ 13
Using the Display Window ............................................................................. 13
Selecting the Desired Track ............................................................................. 13
Playing Tracks in Random Order (Shuffle Playback) .................................... 13
When Recording to Analog Tape .............................................................. 13-14
Playing Tracks in the Desired Order (Program Playback) ....................... 14-15
Repeating Track(s) (Repeat Playback) ............................................................ 15
Timer Playback ................................................................................................ 15
Pitch control ..................................................................................................... 15
Play modes ....................................................................................................... 15
Editing Recorded MDs ........................................................................................... 16
Notes on Editing .............................................................................................. 16
Erasing Track(s) (ERASE Function) ............................................................... 16
Dividing a Track (DIVIDE Function) ................................................................ 17
Combining Tracks (COMBINE Function) ........................................................ 17
Moving a Track (MOVE Function) .................................................................. 17
Assigning Titles (TITLE Function) ................................................................... 18
Assigning Titles to the Disc and All Tracks Successively
(TITLE AUTO INC Function) ........................................................................ 18-19
Changing entered characters.................................................................... 19
Copying a Title (TITLE COPY Function) .......................................................... 19
Canceling the Last Operation (UNDO Function) ............................................ 19
Optional Functions.................................................................................................. 20
Correspondence between deck buttons and keyboard keys.................. 20
Editing keys ................................................................................................ 20
Title entry keys ........................................................................................... 20
System Restrictions .......................................................................................... 20-21
Display Messages ................................................................................................... 21
Guide to the Serial Copy Management System .................................................. 22
Serial Copy Management System .................................................................. 22
Troubleshooting ..................................................................................................... 23
Specifications ......................................................................................................... 23
4
IMPORTANT (for U.K. Customers)
DO NOT cut off the mains plug from this
equipment. If the plug fitted is not
suitable for the power points in your
home or the cable is too short to reach
a power point, then obtain an
appropriate safety approved extension
lead or consult your dealer.
If nonetheless the mains plug is cut off,
remove the fuse and dispose of the plug
immediately, to avoid a possible shock
hazard by inadvertent connection to the
mains supply.
If this product is not provided with a
mains plug, or one has to be fitted, then
follow the instructions given below:
IMPORTANT. DO NOT make any
connection to the larger terminal which
is marked with the letter E or by the
safety earth symbol
ç or coloured
GREEN or GREEN-and-YELLOW.
The wires in the mains lead on this
product are coloured in accordance
with the following code:
BLUE:
NEUTRAL
BROWN:
LIVE
As these colours may not correspond
with the coloured markings identifying
the terminals in your plug proceed as
follows:
The wire which is coloured BLUE must
be connected to the terminal which is
marked with the letter N or coloured
BLACK.
The wire which is coloured BROWN
must be connected to the terminal
which is marked with the letter L or
coloured RED.
When replacing the fuse only a
correctly rated approved type should
be used and be sure to re-fit the fuse
cover.
IF
IN
DOUBT
--
CONSULT
A
COMPETENT ELECTRICIAN.
Read This Before Operating
109
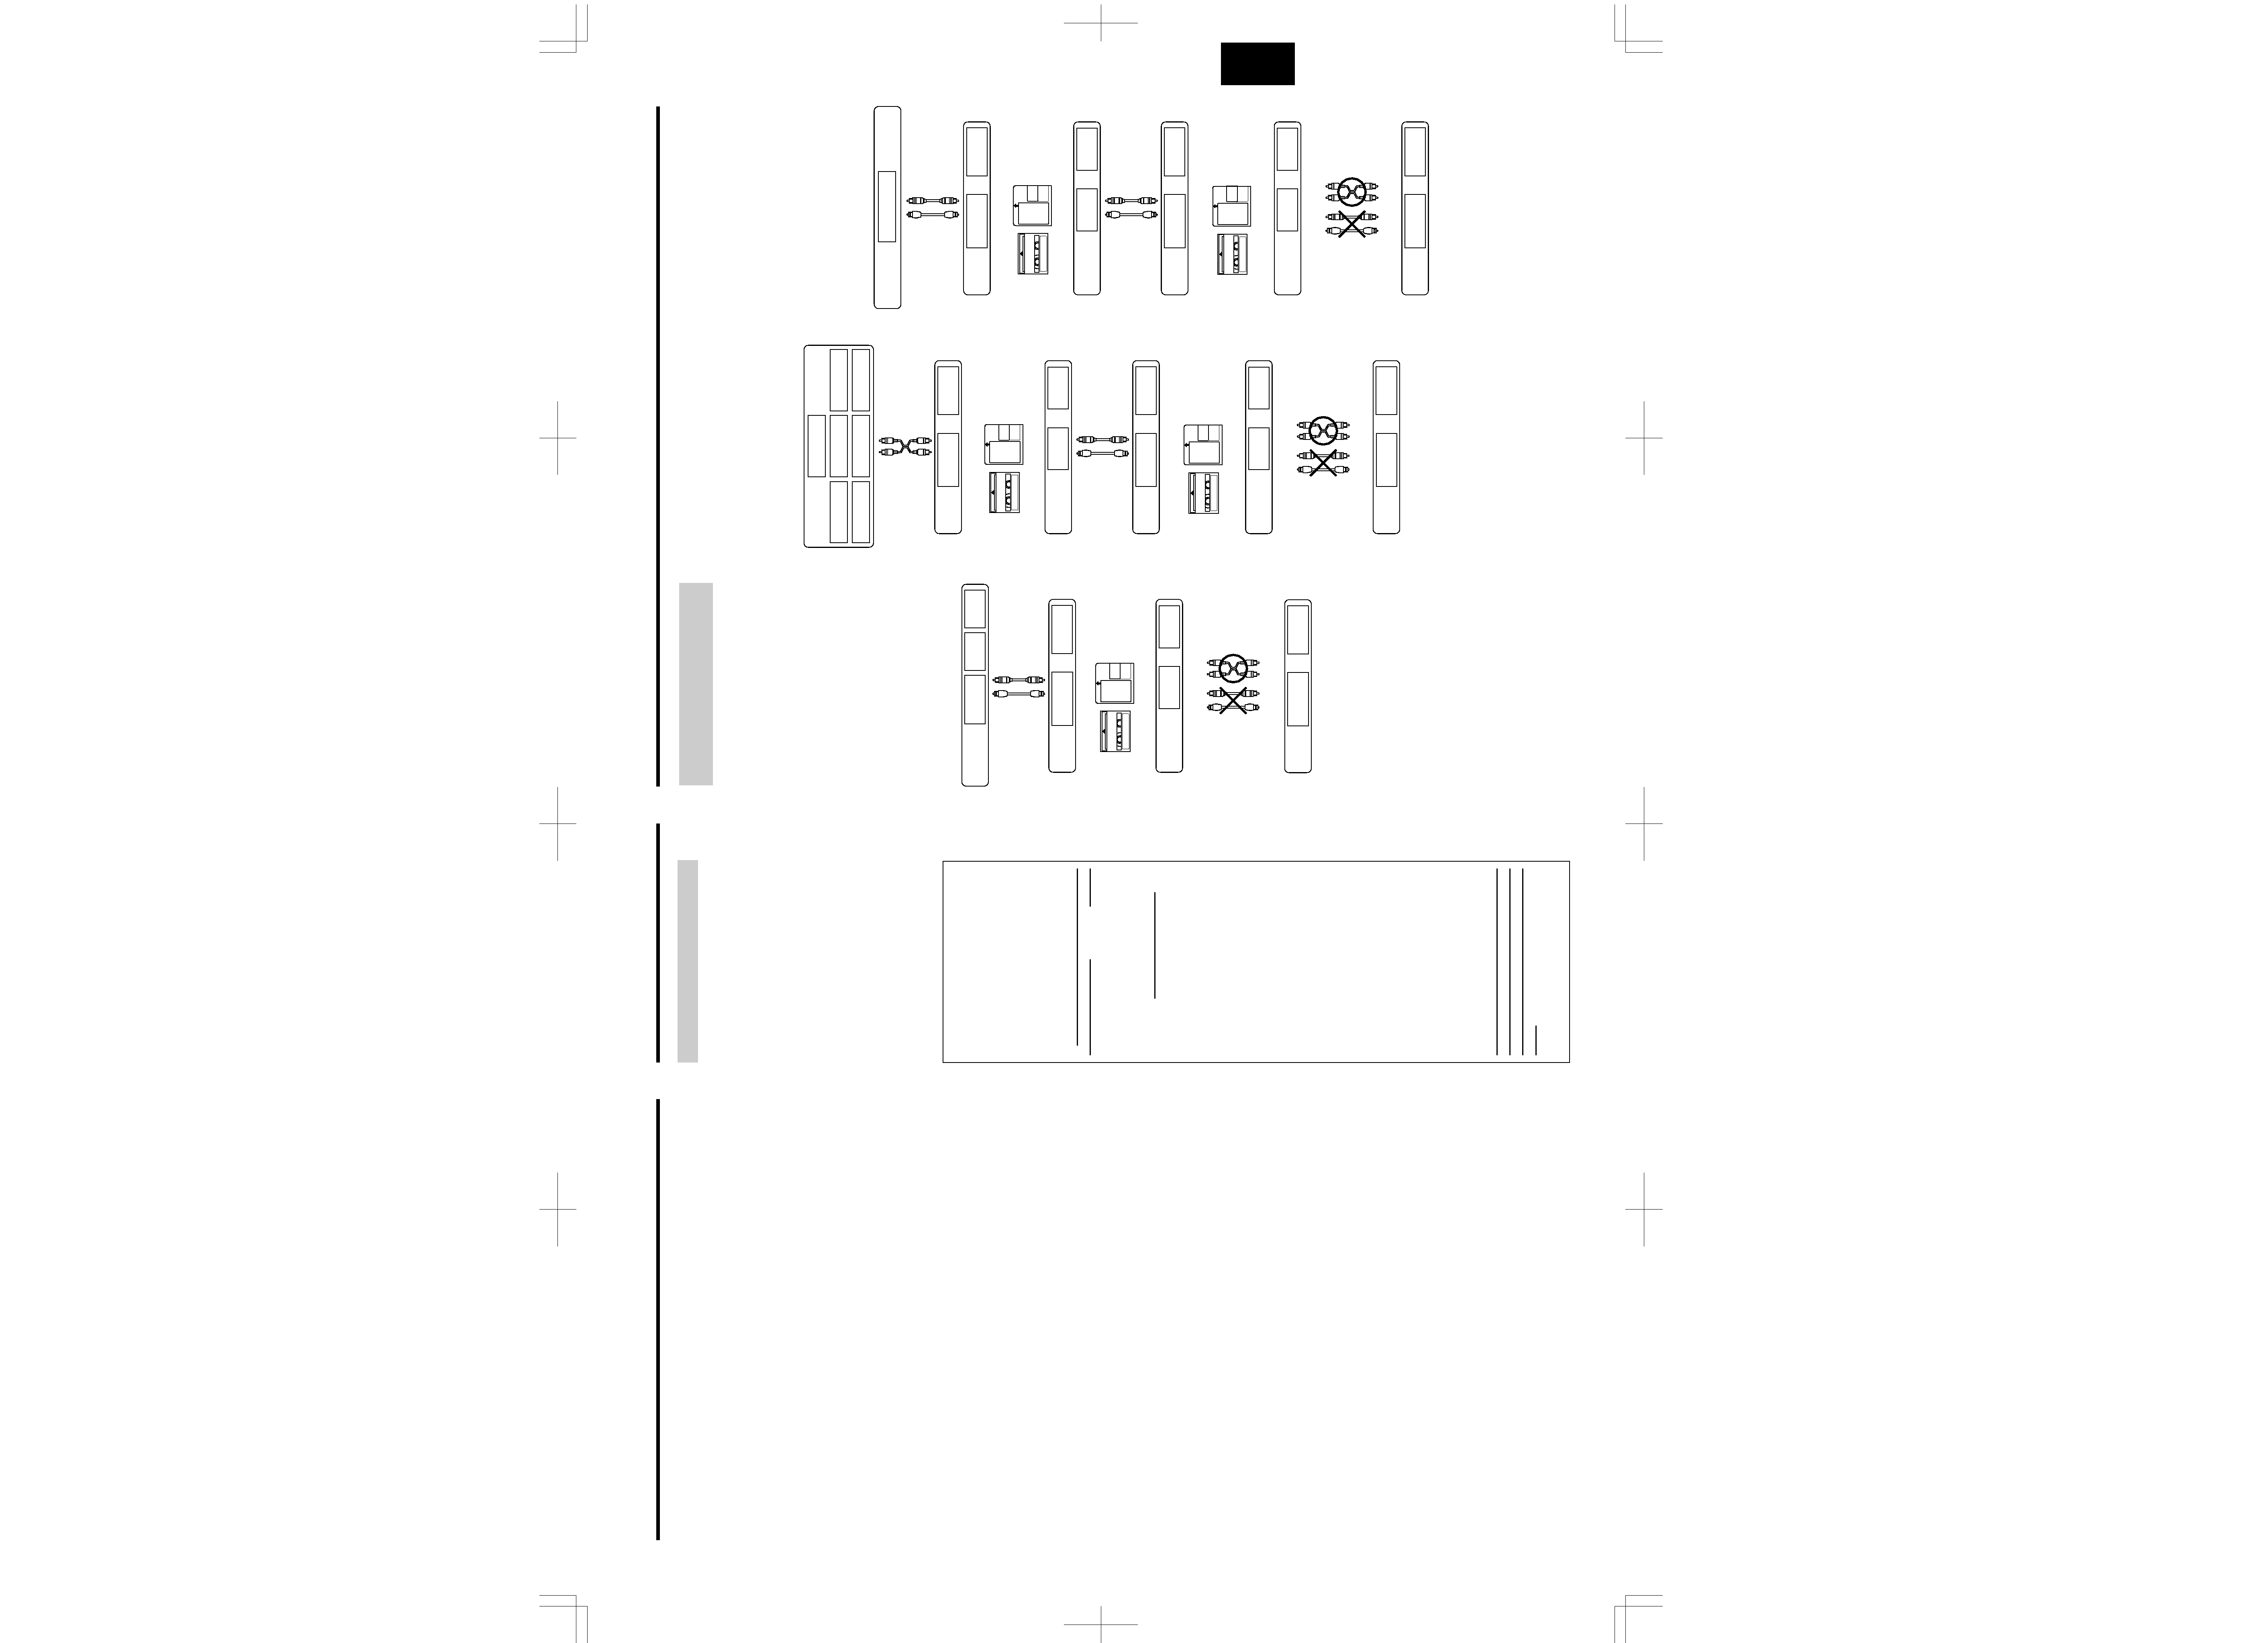
Guía para el sistema de manejo de copia en serie
Esta platina de MD cumple con el estándar
Serial Copy Management System. Este
estándar ha sido elaborado para limitar la
copia digital a digital a la primera
generación
exclusivamente.
Las
regulaciones básicas que gobiernan este
sistema están descritas a continuación.
... Regla 1
La copia digital desde una fuente digital tal
como CD, DAT o MD grabado en un DAT o
MD grabado es posible a través de una
conexión de entrada digital. Sin embargo,
se prohiben las copias de segunda y
subsecuentes generaciones de digital a
digital.
Sistema de manejo de copia en
serie
Reproduciendo
Reproductor
de CD
Platina
DAT
Platina
MD
Platina
DAT
Platina
MD
Platina DAT
Platina MD
o
o
Cable óptico o
digital coaxial de
conexión
Cable óptico o
digital coaxial de
conexión
Jack de salida digital
Jacks de salida
(analógica) de
línea
Cordón de
conexión de audio
Jacks de entrada
(analógica) de
línea
Cinta DAT de
primera generación
o MD grabado vía
conexión digital a
digital
DAT
o
MD
Jack de entrada digital
Jack de salida digital
Grabando
Platina DAT
Platina MD
o
Grabando
Reproduciendo
Jack de entrada
digital
... Regla 2
Cuando una fuente analógica tal como
disco analógico o radiodifusión de FM son
grabadas digitalmente empleando un DAT
o MD, esta fuente grabada puede ser
digitalmente grabada en otro DAT o MD.
Sin embargo la copia digital posterior está
prohibida.
Cinta DAT de
primera generación
o MD grabado vía
conexión digital a
digital
Jack de
salida digital
Jacks de salida
(analógica) de
línea
Cordón de
conexión de
audio
Jacks de entrada
(analógica) de
línea
Jack de entrada
digital
Jack de
entrada digital
Reproduciendo
Sintonizador
Tocadiscos
Platina de
cassette
Micrófono
amplificador
Reproductor de
CD
Platina DAT
Platina MD
Jacks de salida
(analógica) de línea
Jacks de entrada
(analógica) de línea
Cinta DAT o MD
grabado vía
conexión
analógica - digital
DAT
o
MD
DAT
o
MD
Platina DAT
Platina MD
o
Grabando
Platina DAT
Platina MD
o
Grabando
Platina DAT
Platina MD
o
Grabando
Platina
DAT
Platina
MD
o
Reproduciendo
Platina
DAT
Platina
MD
o
Reproduciendo
Cordón de
conexión de audio
Cable óptico o
digital coaxial de
conexión
Jack de salida
digital
Cable óptico o
digital coaxial
de conexión
... Regla 3
Una platina DAT o una platina de MD que
es compatible con las frecuencias de
muestreo de 32 kHz y 48 kHz, puede grabar
el audio digital de un programa de
transmisión satelital digitalmente (digital a
digital). Un DAT o MD de primera
generación grabado en esta forma, puede
ser grabado nuevamente en otro DAT o
MD digitalmente (digital a digital). Sin
embargo, el DAT o MD de segunda
generación no es posible grabar con
ciertos modelos de sintonizadores BS.
Cinta DAT o MD
de segunda
generación
grabado vía
conexión digital
- digital
Jack de
salida digital
Jacks de salida
de línea
(analógica)
Cordón de
conexión de
audio
Jacks de entrada
de línea
(análogica)
Jack de entrada
digital
Jack de
entrada digital
Reproduciendo
Sintonizador BS
DAT o MD de
primera
generación
grabado vía
conexión digital -
digital
DAT
o
MD
DAT
o
MD
Platina DAT
Platina MD
o
Grabando
Platina DAT
Platina MD
o
Grabando
Platina DAT
Platina MD
o
Grabando
Platina
DAT
Platina
MD
o
Reproduciendo
Platina
DAT
Platina
MD
o
Reproduciendo
Cable óptico o
cable de conexión
coaxial digital
Jack de salida
digital
Jack de entrada
digital
Cable óptico o
cable de conexión
digital coaxial
Jack de salida
digital
Cable óptico o
cable de
conexión
coaxial digital
ESPA
Ñ
OL
108
... El audio se interrumpe durante la
búsqueda.
Cuando busca una pista creada por
medio de una operación de edición, el
audio se interrumpe algunas veces.
... Los números de pista no son
correctamente asignados.
Cuando graba un CD por medio de una
conexión digital, pistas cortas pueden
ser
grabadas
dependiendo
del
contenido del CD. También, cuando el
marcado de pista automática es
efectuado, los números de pista pueden
no ser correctamente asignados en
algunos casos.
... La indicación "TOC Reading" no se
borra.
"TOC Reading" aparece indicado
durante un tiempo mayor que el usual
cuando se coloca un disco MD grabable
nuevo.
... Note lo siguiente cuando intenta
efectuar la grabación mientras borra
(sobreescritura)
una
grabación
anterior:
El tiempo de grabación restante del
MD puede no ser indicado correcta-
mente.
Después de repetidas operaciones
de sobreescritura, puede no ser
posible
la
grabación
por
sobreescritura. En este caso, primero
edite la grabación anterior (borrando
pistas, etc.), luego proceda con la
operación de sobreescritura.
El tiempo de grabación restante es
más corto después de grabar que lo
era antes de grabar.
No se recomienda la operación de
sobreescritura si la pista que va a ser
sobreescrita contiene interferencia.
Como la grabación se efectúa en
base a 6 bloques (12 segundos
aprox.), la pista con interferencia
puede borrar parte de la pista.
... No es posible asignar un título de
pista durante la grabación por
sobreescritura.
... Algunas veces el tiempo máximo de
grabación no estará disponible aun
después de la ejecución de "ERASE
DISC".
En este caso, intente ejecutar
nuevamente "ERASE DISC". Aunque, no
será posible anularlo posteriormente.
... Aunque el modo LP4 (cuádruple larga
duración) le ofrece una excepcional
cantidad de tiempo para la grabación
gracias a una avanzada tecnología de
compresión, algunas veces puede que
escuche algunos pequeños ruidos,
dependiendo del material que esté
grabando.
Por
ese
motivo
le
recomendamos que si la calidad de
sonido es más importante para su
proyecto de grabación que el tiempo de
grabación total, utilice mejor los modos
SP (stereo) o LP2 (doble larga
duración).
Mensajes de indicación
Los siguientes mensajes aparecen indicados dependiendo de las condiciones de operación.
Mensaje
Descripción
Blank Disc
El MD grabable no contiene datos grabados.
Cannot Copy !
Es imposible copiar.
Cannot EDIT !
Es imposible editar.
Disc Error !
Los datos en el MD son anormales.
Disc Full !!
No hay lugar para continuar grabando.
D-IN UNLOCK !
No se ha realizado la conexión de entrada digital.
ERASE DISC ?
¿Se pueden borrar los datos grabados del MD?
ERASE TRK ?
¿Se puede borrar esta pista?
Name Full !!
La memoria de títulos está llena.
NO DISC !!
No se ha colocado un MD.
No Track !!
No hay pista grabada.
PGM Empty !!
No se han programado las pistas.
PGM Full !!
No hay lugar para programar pistas.
Play Mode !!
El modo de reproducción seleccionado es incorrecto.
Protected !!
El MD está protegido contra borrado accidental.
Un MD que sólo reproduce está insertado.
Rec Error !!
Ha ocurrido un error de grabación.
Track Full !!
El MD ha completado todos sus números de pista.
UNDO ?
¿Se puede cancelar la última operación?
UTOC Writing
Los datos grabados están siendo escritos en el MD.
Restricciones del sistema
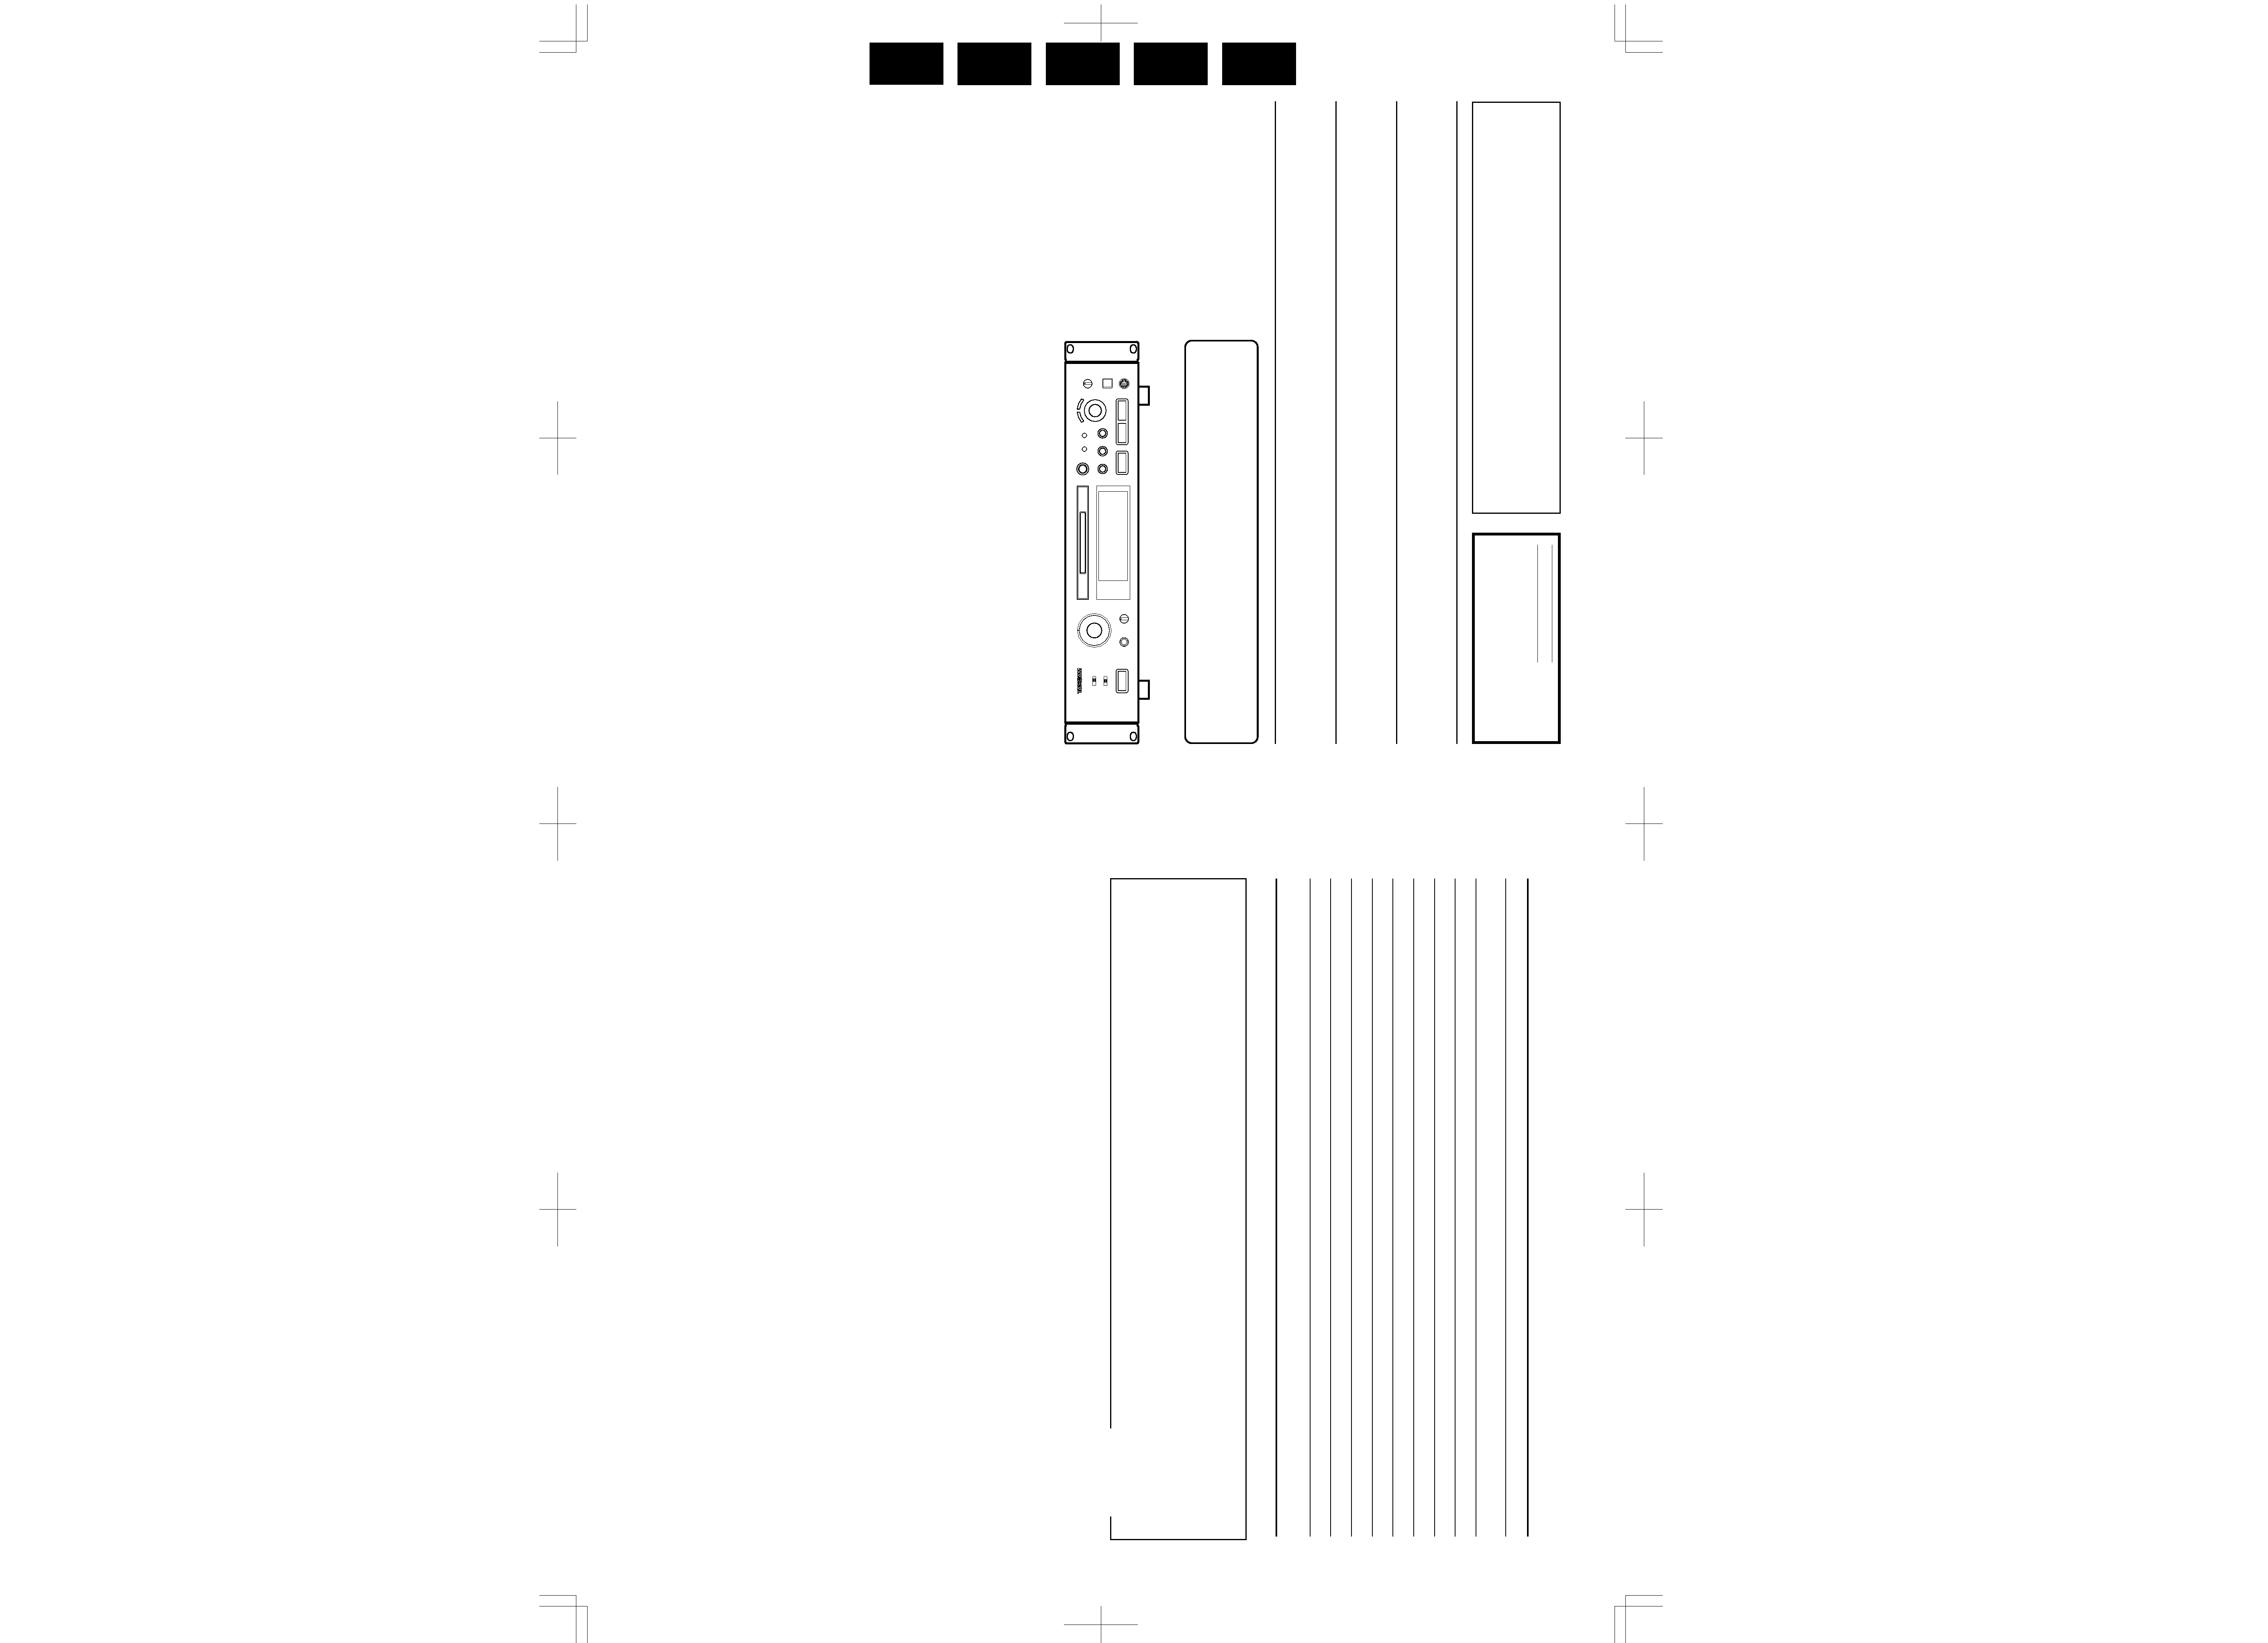
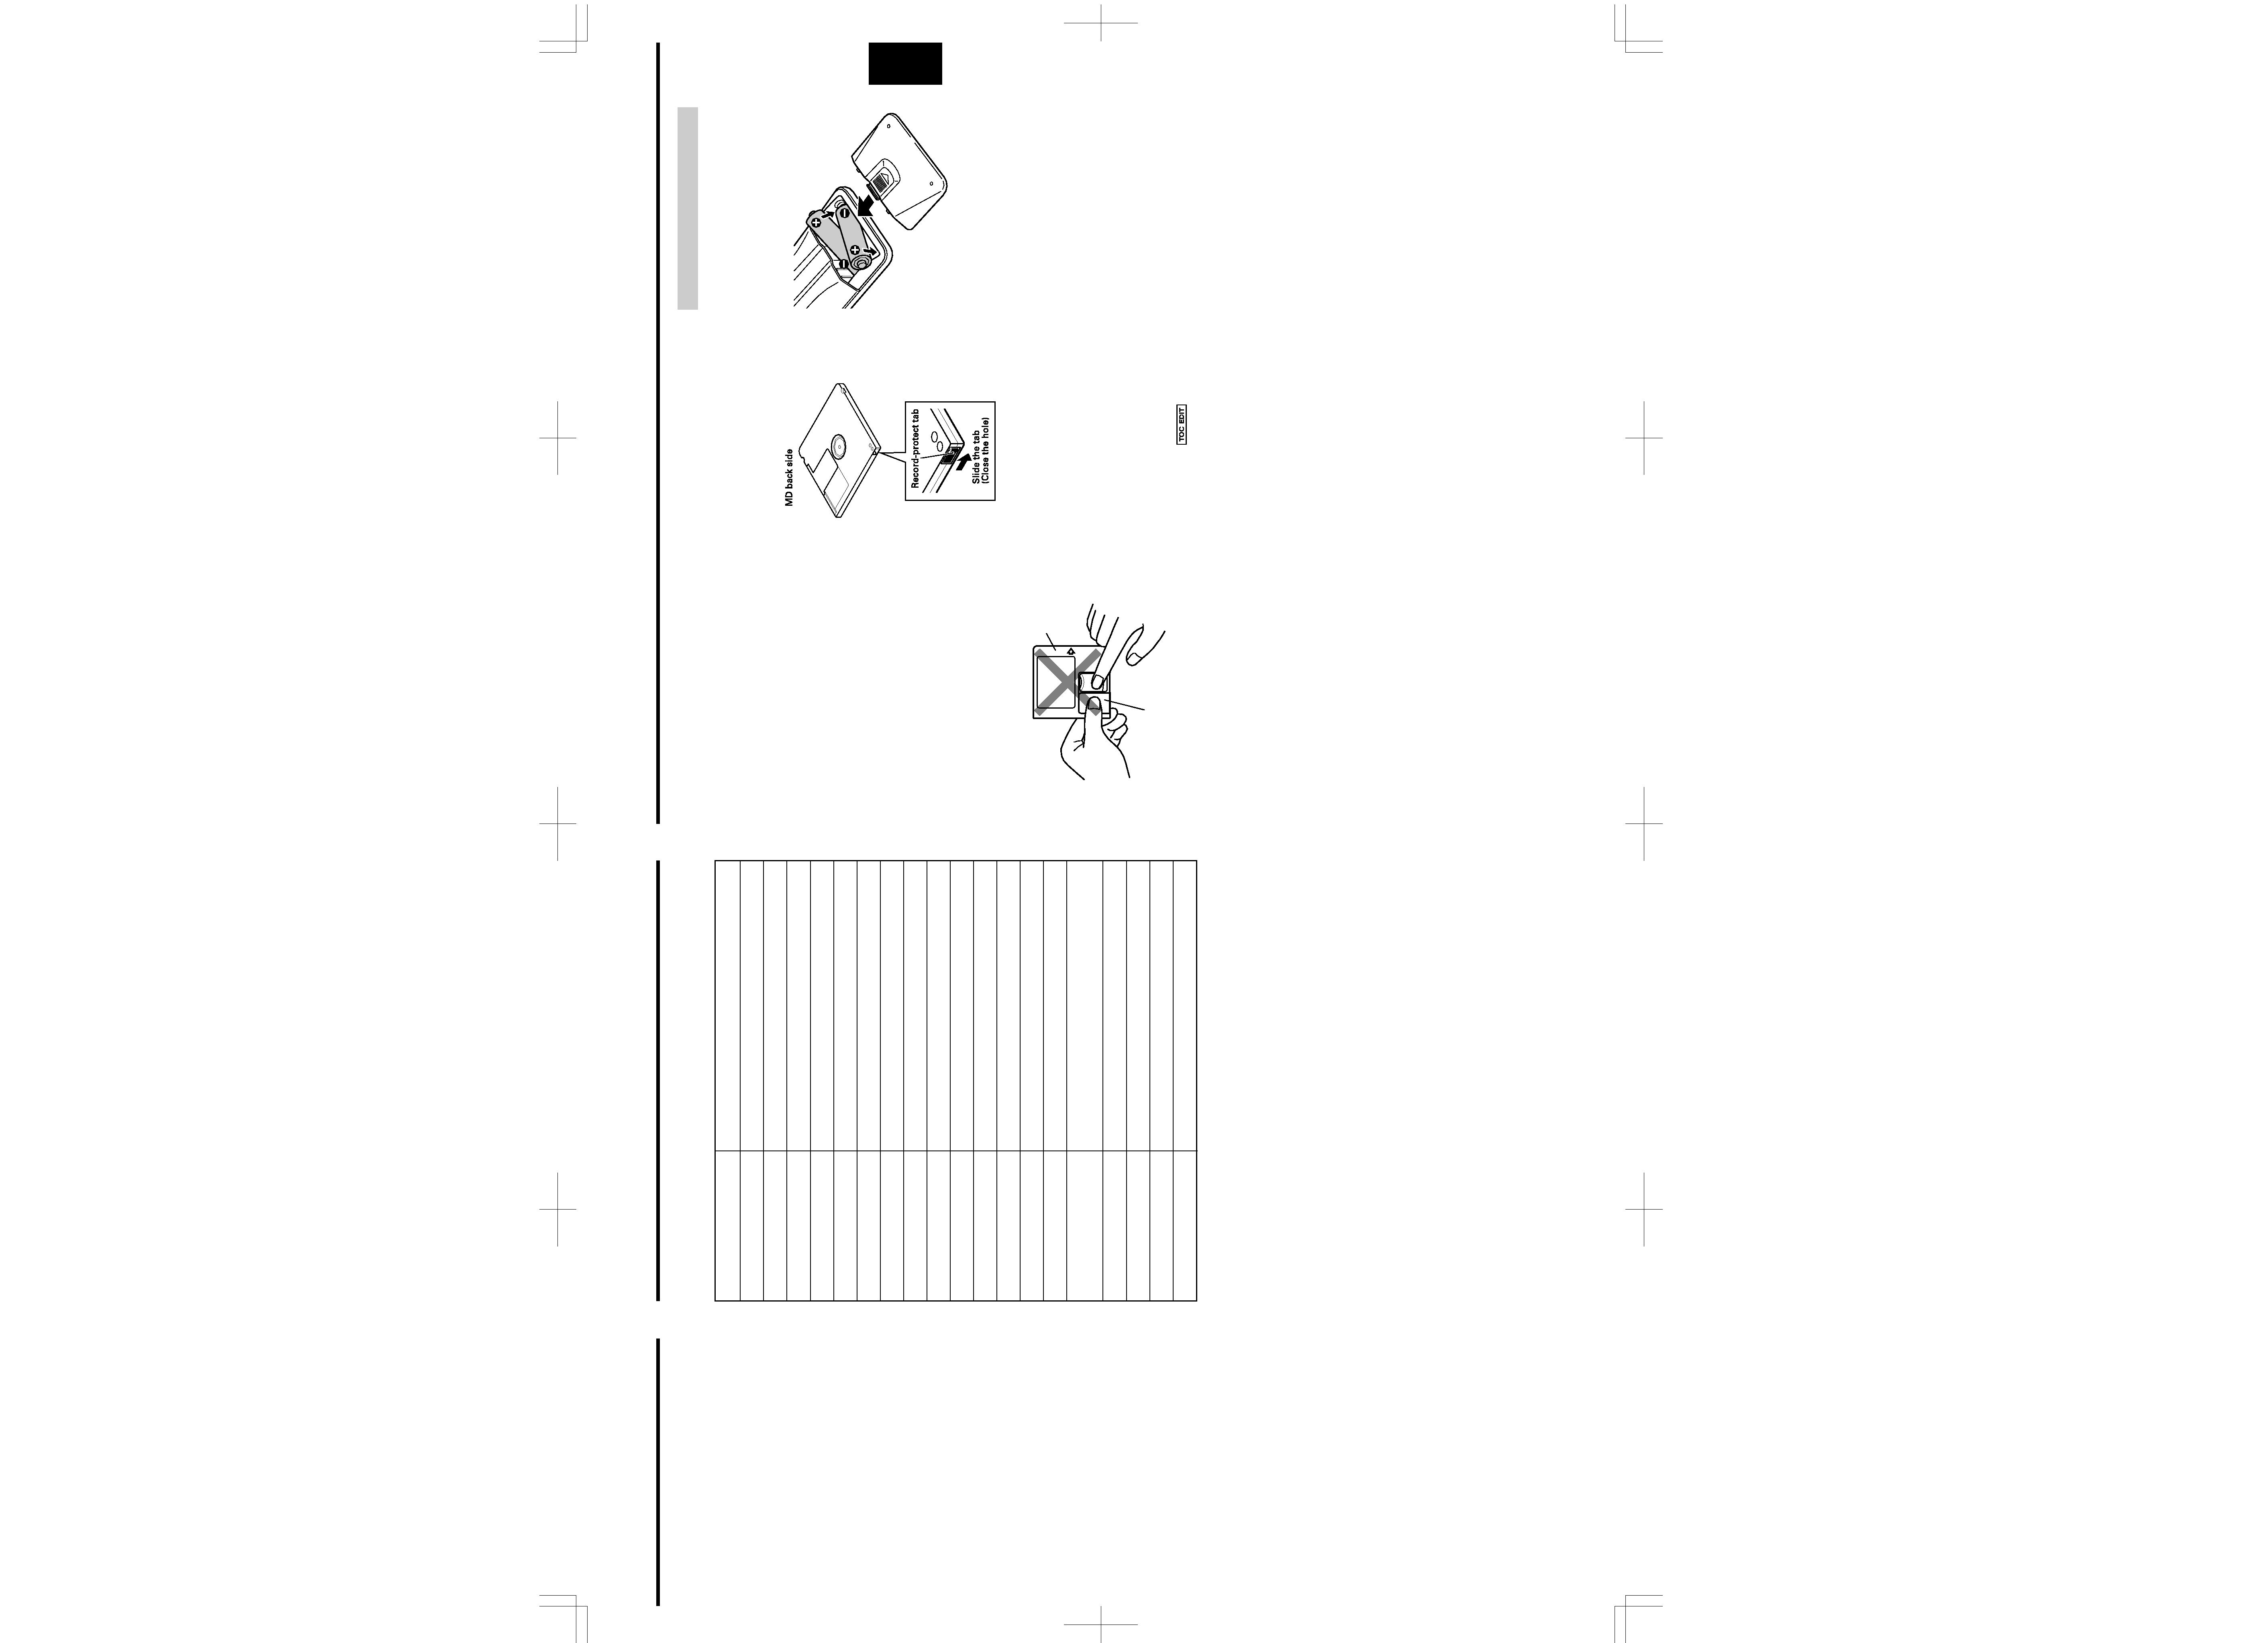
ª Handling MDs
The MiniDisc (MD) measures 64 mm in
diameter. Although the MD is housed in a
protective cartridge (68 mm x 72 mm x 5
mm) and can be handled easily, deck
malfunc-tions may result if the cartridge
gets dust on it or is damaged. To protect
the disc, always take the following
precautions:
... Be sure that the MD is taken out of the
deck and put back in its MD case after
using it.
... Do not touch the disc inside the
cartridge. Do not open the shutter to
expose the MD.
... Do not place MDs in direct sunlight, high
temperatures, or high levels of humidity.
... Use a dry, soft cloth to clean the
cartridge.
... When attaching a label to the MD
cartridge, be sure to apply it correctly to
the specified position. If the label is
rolled up or partially detached, the MD
cartridge may get stuck inside the deck.
... Do not place one label on top of another.
ª Memory back-up function
This unit is provided with a memory back-
up function. When you use the deck for the
first time, leave it on for about 5 minutes to
allow the back-up circuit to be charged
and become operational. When not using
the deck for a while, try to turn the power
on every 3 or 4 days.
ª Serial Copy Management System
This deck complies with the SCMS (Serial
Copy Management System). As a result, it
is not possible to digitally record from a
source MD which has been recorded
digitally.
Cartridge
Shutter
ª When "Protected !!" is
displayed
... A playback-only MD is loaded.
... The MD is record-protected against
accidental erasure. To make recording
(or editing) possible, slide the record-
protect tab to close the hole.
ª While "UTOC Writing" is
blinking:
"UTOC Writing" blinks while the MD is
being ejected after recording (or
editing). While it is blinking, the recorded
data is being written on the MD. Do not
pull out the power cord or vibrate the
deck. Otherwise the recorded data may
not be written correctly on the MD.
If the power is turned off with the MD
left in the deck ("
" lights up)
after recording, the UTOC cannot be
recorded. Turn the power back on
within 3 or 4 days and eject the MD. The
recorded data might be lost if the MD is
left in the deck for a long time.
ª When "D-IN UNLOCK !" blinks
... The program source is not connected to
the [DIGITAL INPUT 1] or [DIGITAL IN 2]
terminal even though you have selected
[DIGITAL 1] or [DIGITAL 2] with the
[INPUT SELECTOR]. Either make the
digital connection or select [ANALOG]
with the [INPUT SELECTOR] and perform
analog recording.
... This message also appears when the
digital signal input is interrupted during
digital recording. To continue recording,
restart the digital program source.
5
When operating the remote control unit,
point it towards the remote sensor on the
front panel of the unit.
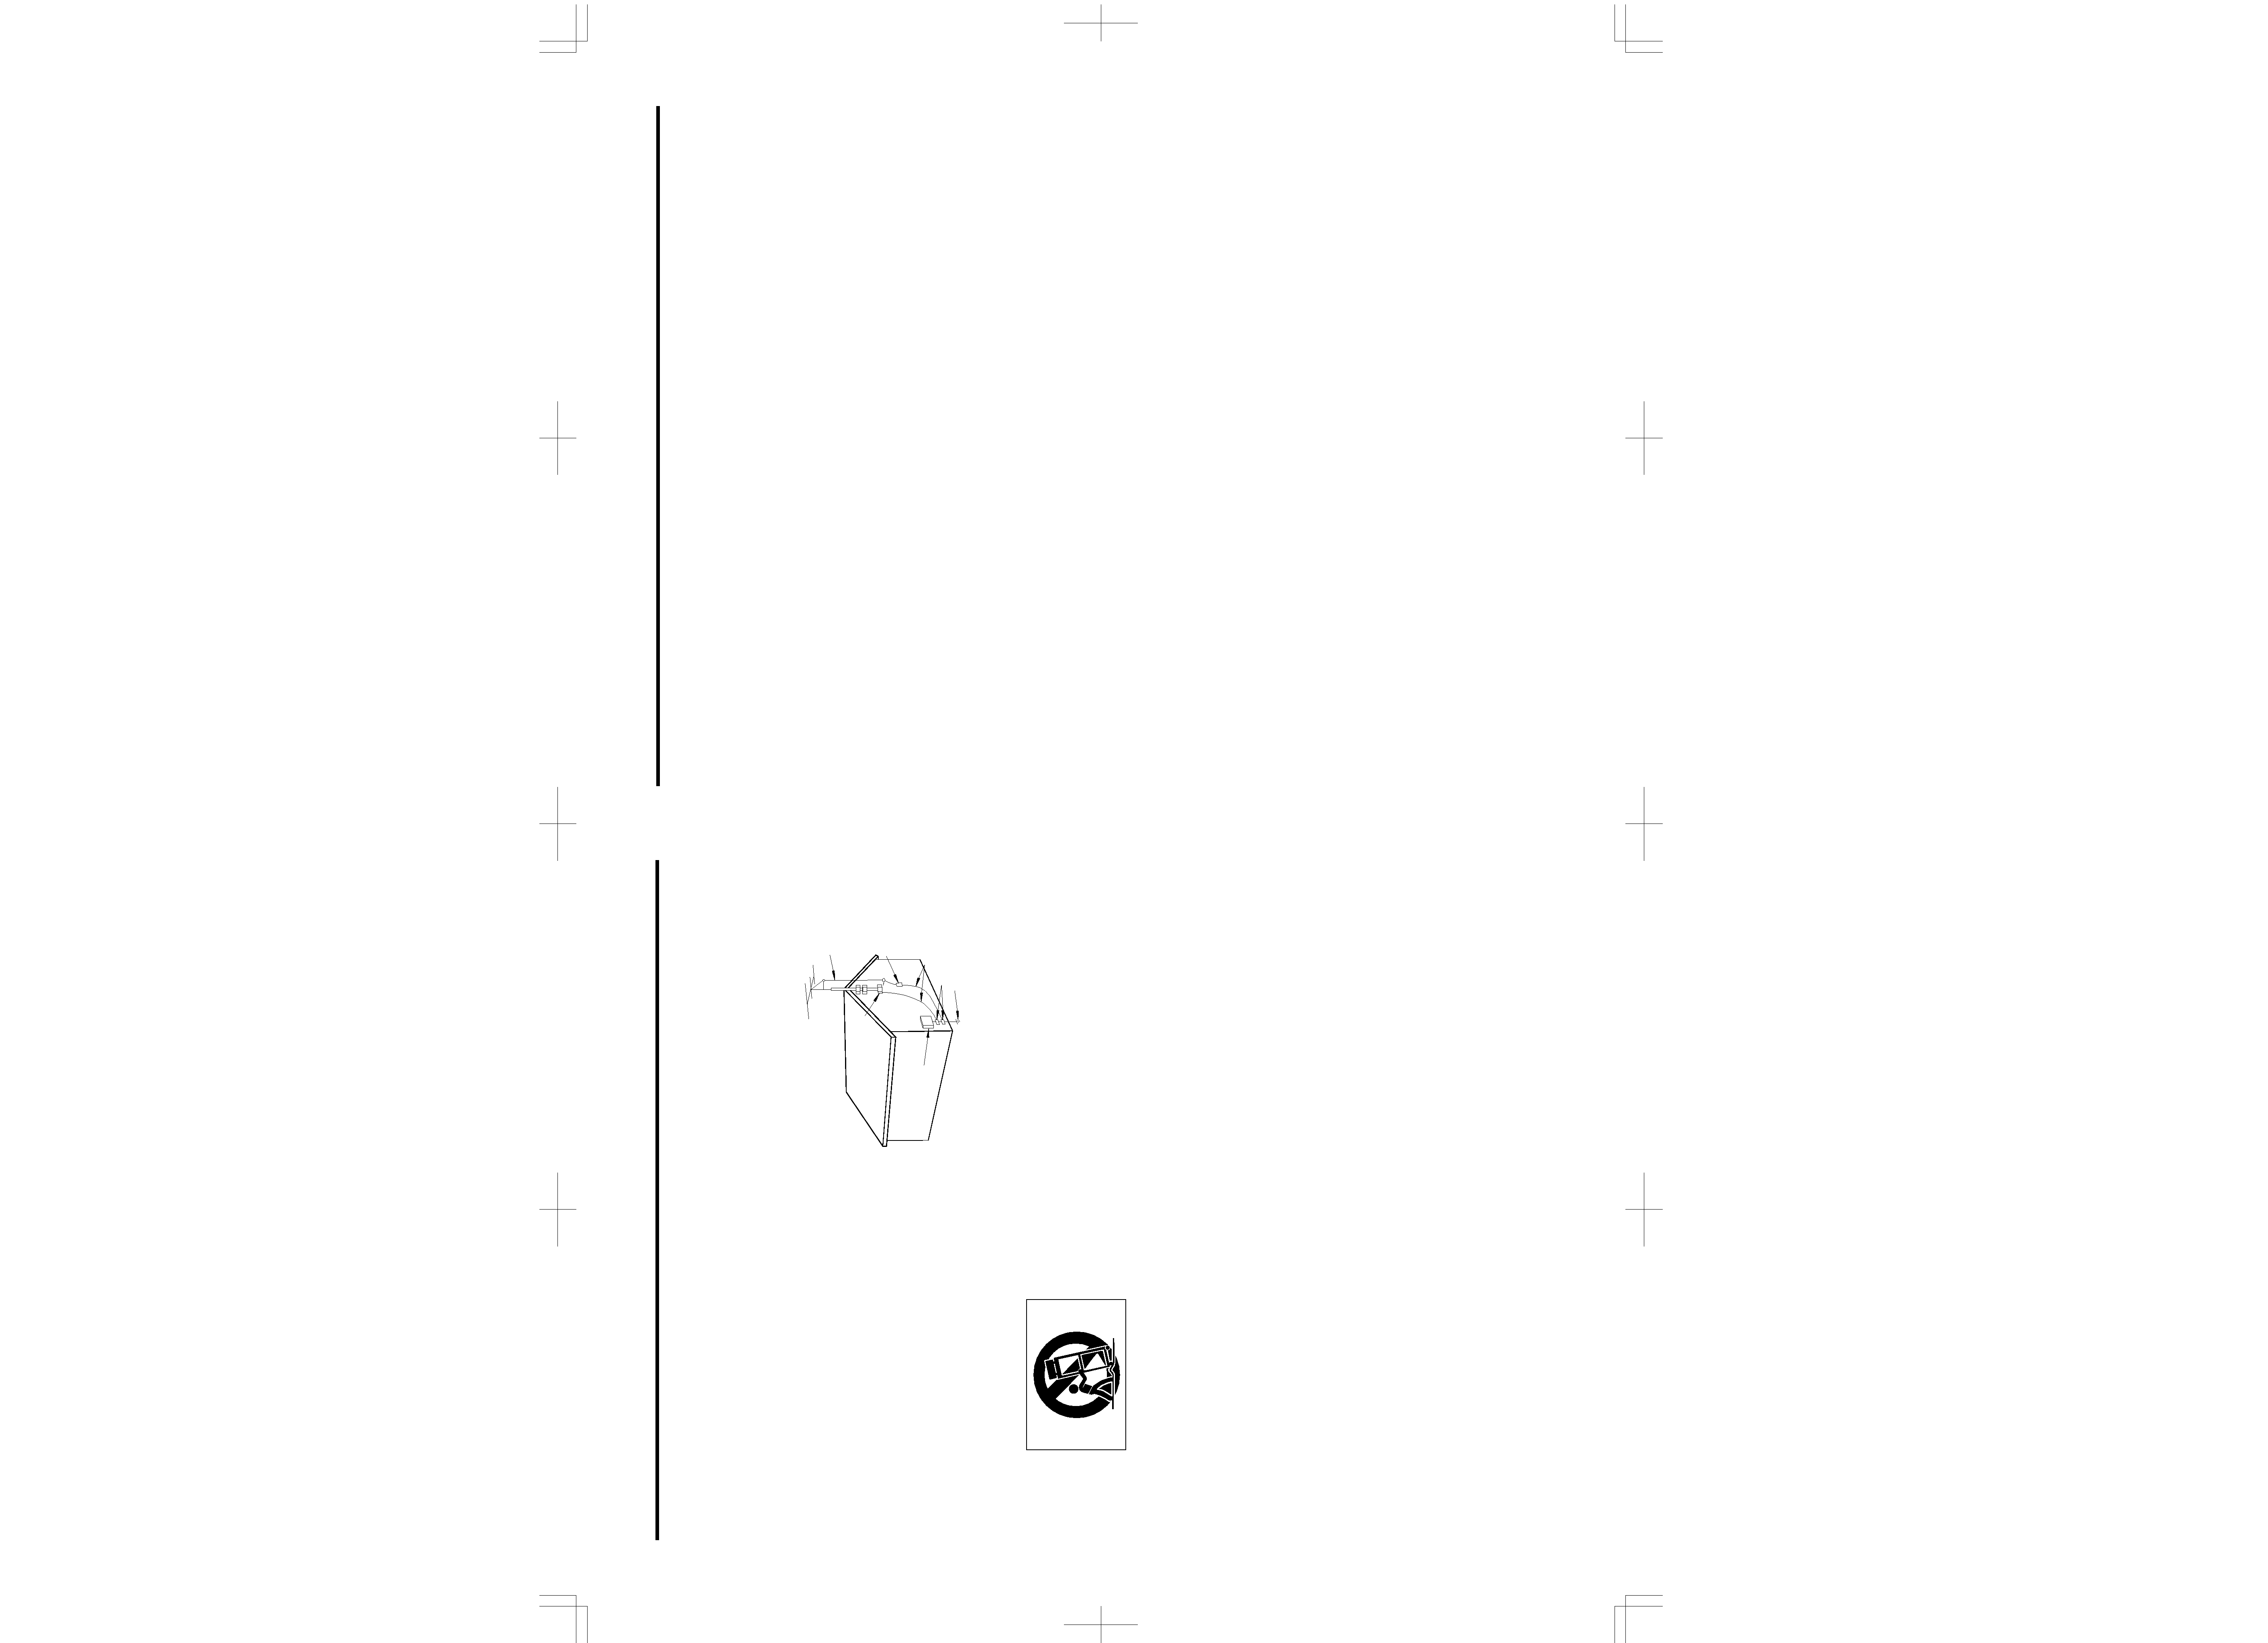
ª Battery installation
1. Remove the battery compartment
cover.
2. Insert two "AA" (R6, SUM-3) dry
batteries.
Make sure that the batteries are
inserted with their positive
± and
negative
-- poles positioned correctly.
3. Close the cover until it clicks.
Battery replacement
If you notice that the distance between
the remote control unit and the player for
correct operation becomes shorter, it
indicates that the batteries are exhaust-
ed. In this case replace the batteries with
new ones.
Precautions concerning batteries
... Be sure to insert the batteries with
correct positive
± and negative --
polarities.
... Use batteries of the same type. Never
use different types of batteries
together.
... Rechargeable and non-rechargeable
batteries can be used. Refer to the
precautions on their labels.
... When the remote control unit is not to
be used for a long time (more than a
month), remove the batteries from the
remote control unit to prevent them from
leaking. If they leak, wipe away the
liquid inside the battery compartment
and replace the batteries with new
ones.
... Do not heat or disassemble batteries
and never dispose of old batteries by
throwing them in fire.
Remote Control Unit
ENGLISH