Z
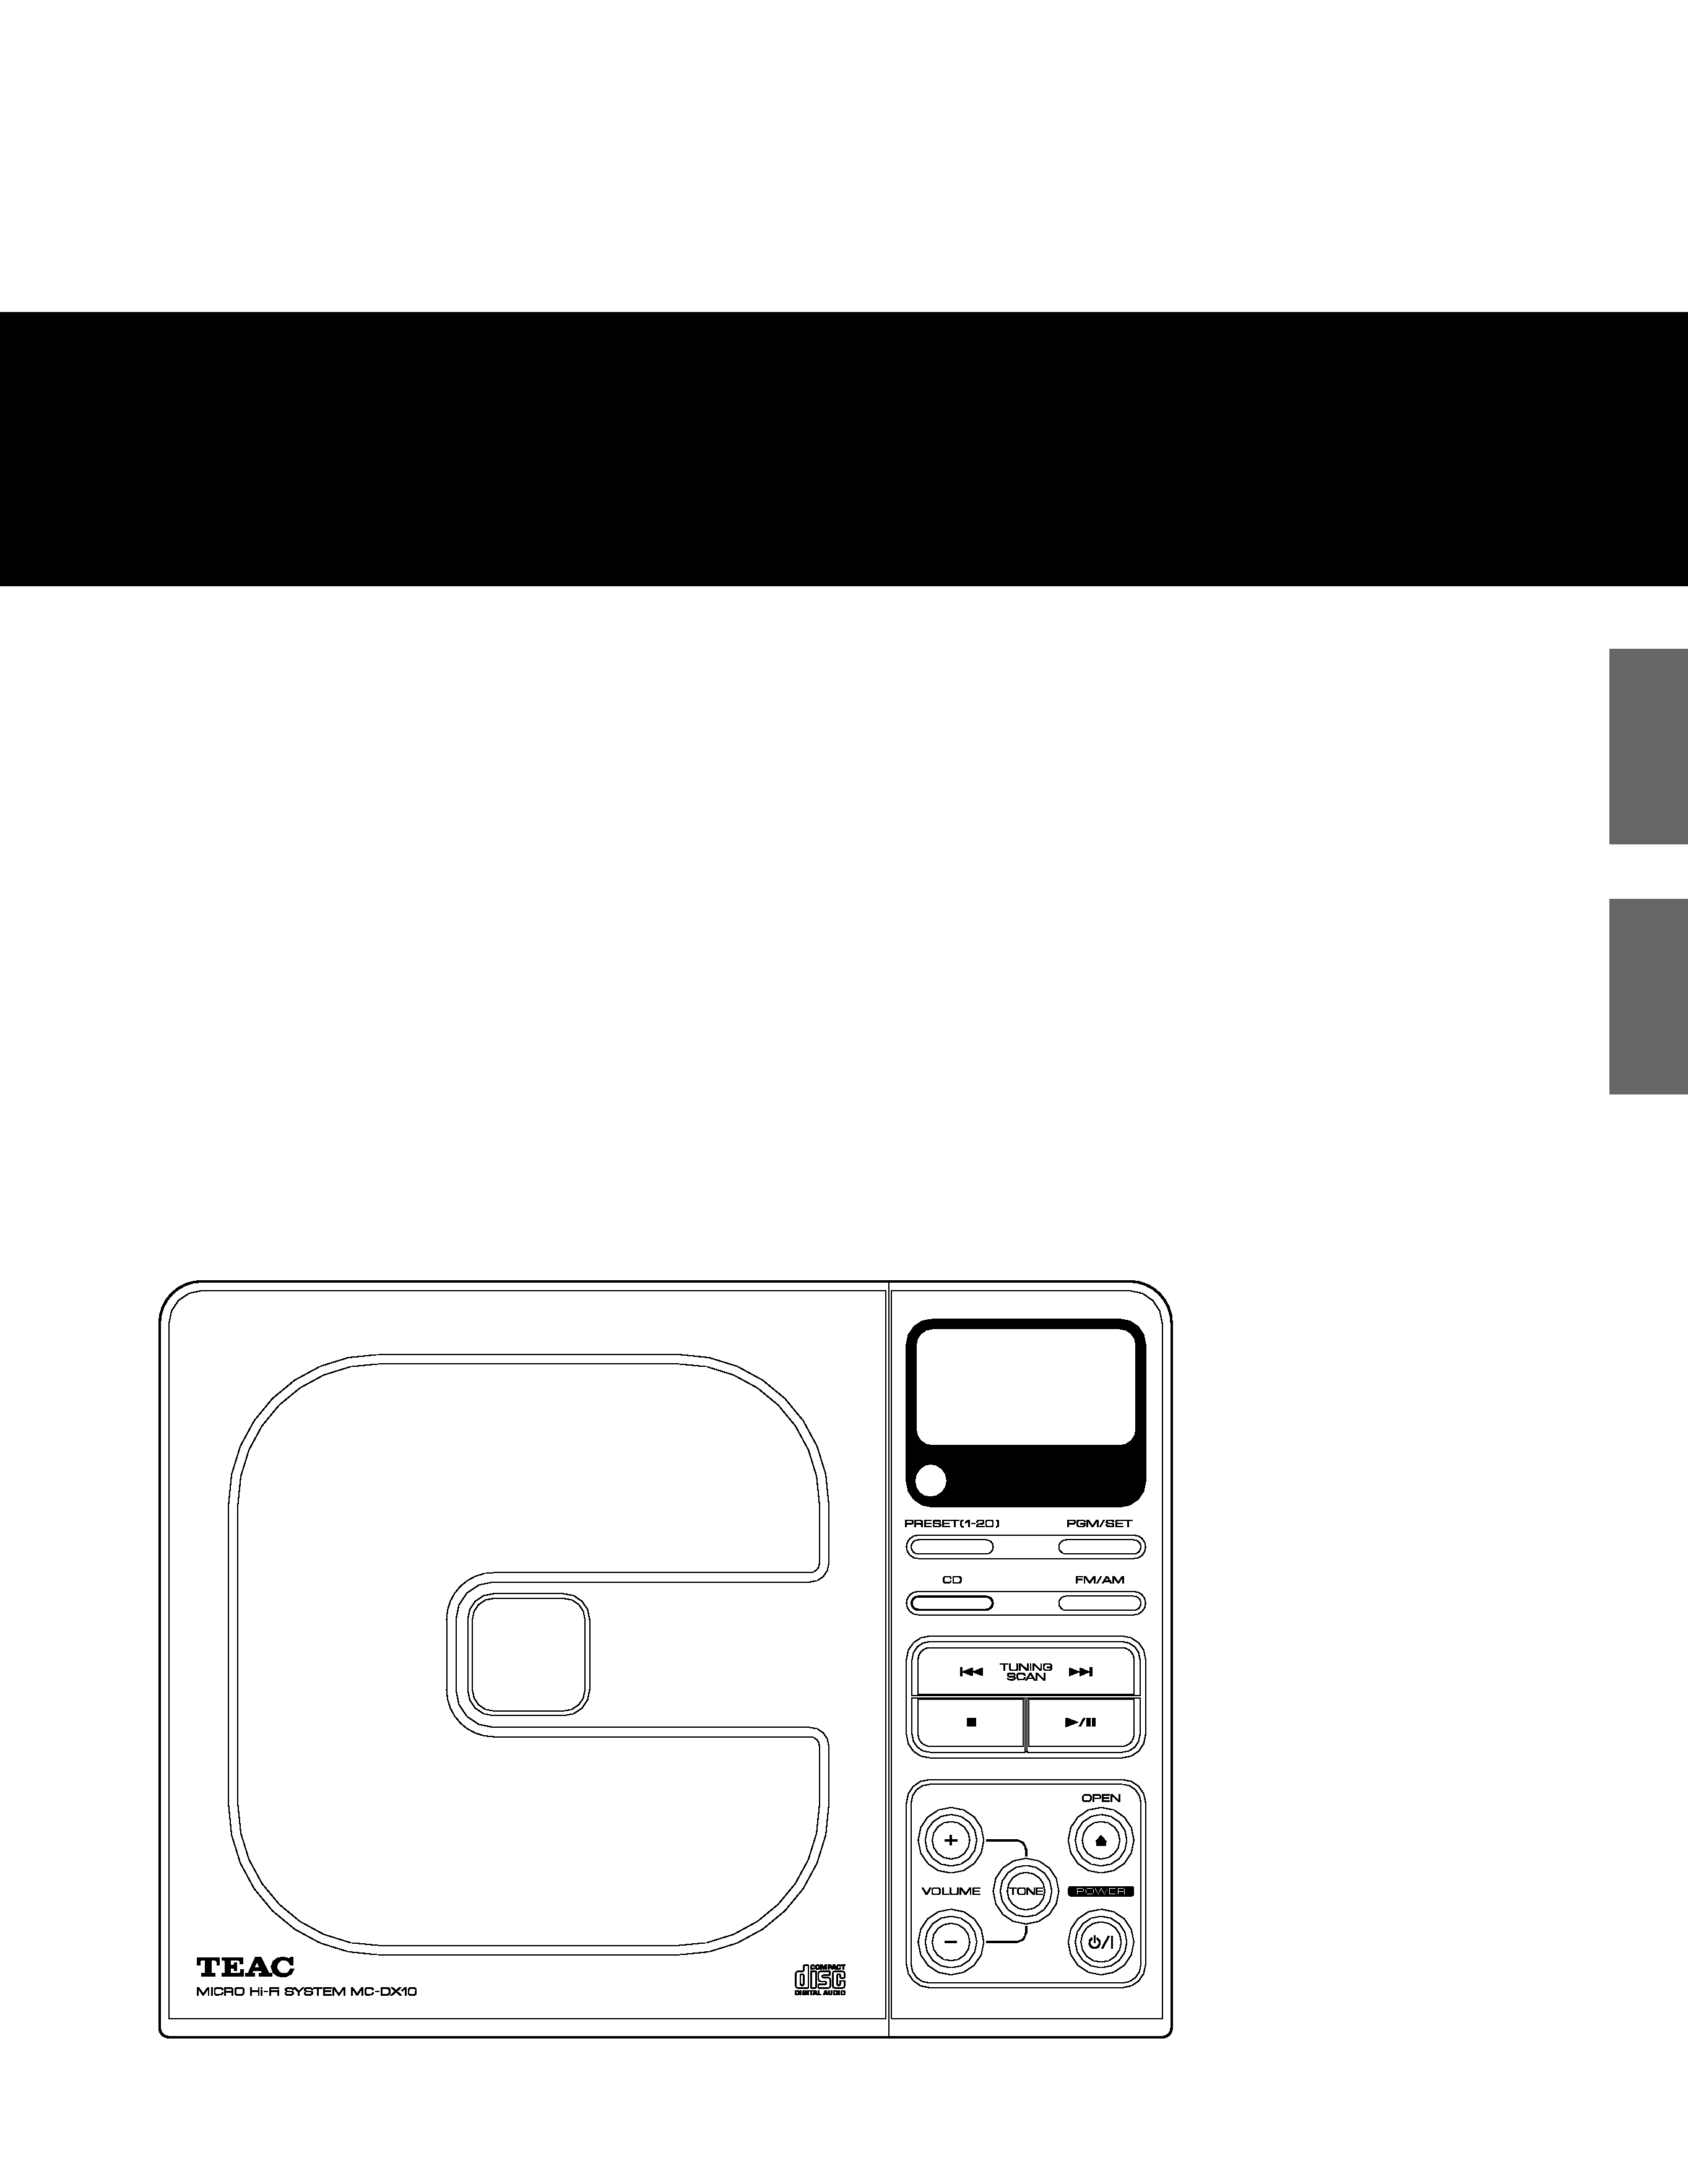
MC-DX10
9A09899100
IT
ALIANO
ENGLISH
MICRO Hi-Fi SYSTEM
OWNER'S MANUAL
MANUALE D'ISTRUZIONI
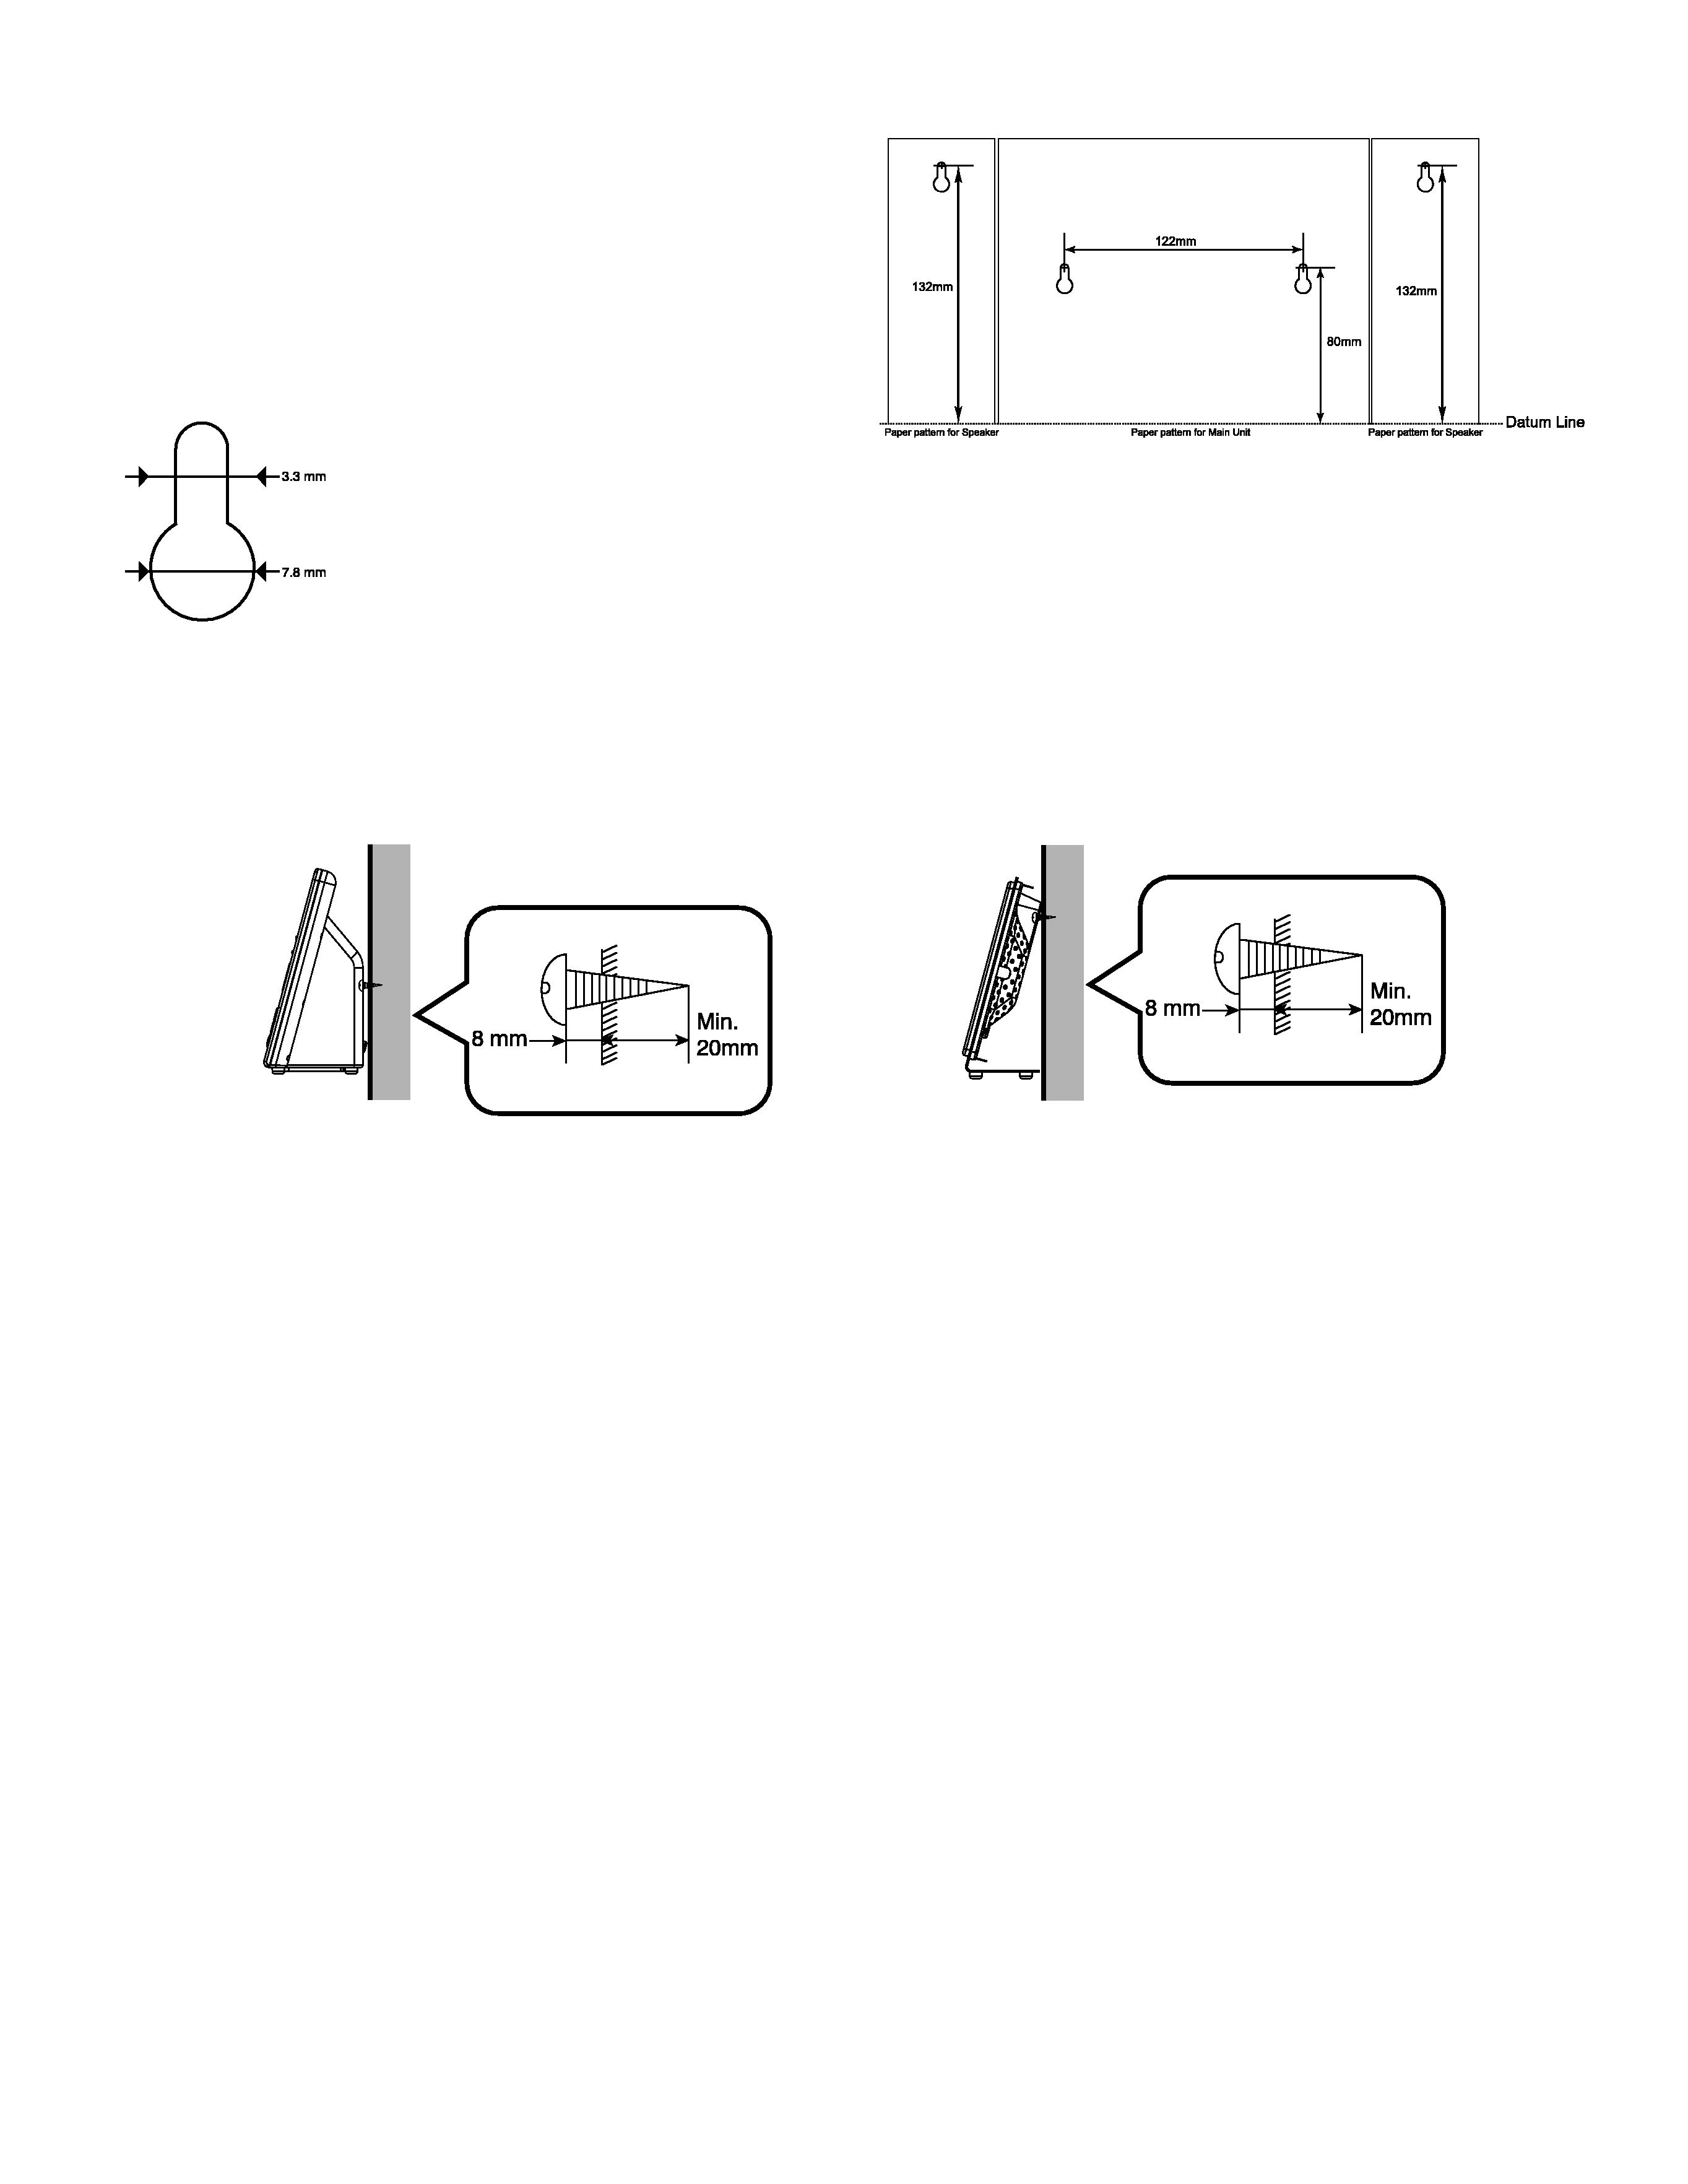
MOUNTING THE SYSTEM ON THE WALL
The supplied paper pattern helps you to align the main with
the speakers properly.
1.
Mark where to fasten the screws on the wall using the
paper pattern.
*Wall mounting screws are not sup-
plied with this system. Use screws suit-
able for the wall material. Also, select
the screws of appropriate size for the holes size as illustrated below.
2. Drive the screws into the wall.
3.
Hang the main unit/ speaker using the holes on the back on the protruding screws.
Make sure that the screws securely connect with the narrow parts of the holes.
IMPORTANT
The wall on which the unit and speakers are to be attached should be capable of supporting 15 kg (33 lb.) per screw.
When in doubt, consult qualified service personnel.
Confirm that all screws are fastened tightly and the wall mounting screws are properly fitted into the holes of the bracket
and the speakers.
Mounting Speaker on the wall
Mounting the unit on the wall
2

3
ENGLISH
CLEANING AND MAINTENANCE
CD LENS
When the lens gets dirty, malfunctions may occur. The lens should be cleaned using a commercially available camera lens
cleaner.
MAIN UNIT
Clean with a soft, dry cloth. If the unit is heavily stained and soiled, wipe with a moistened cloth.
Donít use benzine or thinner.
PLUG
Wipe the headphone plug with a soft cloth to keep it clean. A dirty plug may cause interference or malfunction.
CAUTION
Don't put anything except a compact disc into the compartment. Other objects can damage the mechanism.
Don't force compartment open.
Keep compartment closed when not in use to prevent dirt and dust from settling inside.
Never place multiple discs into compartment at same time.
USING THE REMOTE CONTROL
To use the remote, point it at the REMOTE SENSOR window on unit to control stereo from your listening
position.
NOTE: Even if remote control is within effective range, operation may be compromised by obstacles between remote and unit.
If remote is operated near other appliances which generate infrared rays, or if other remote control devices using infrared rays
are used near the unit, it may operate incorrectly. Conversely, this remote might make other appliances operate incorrectly.
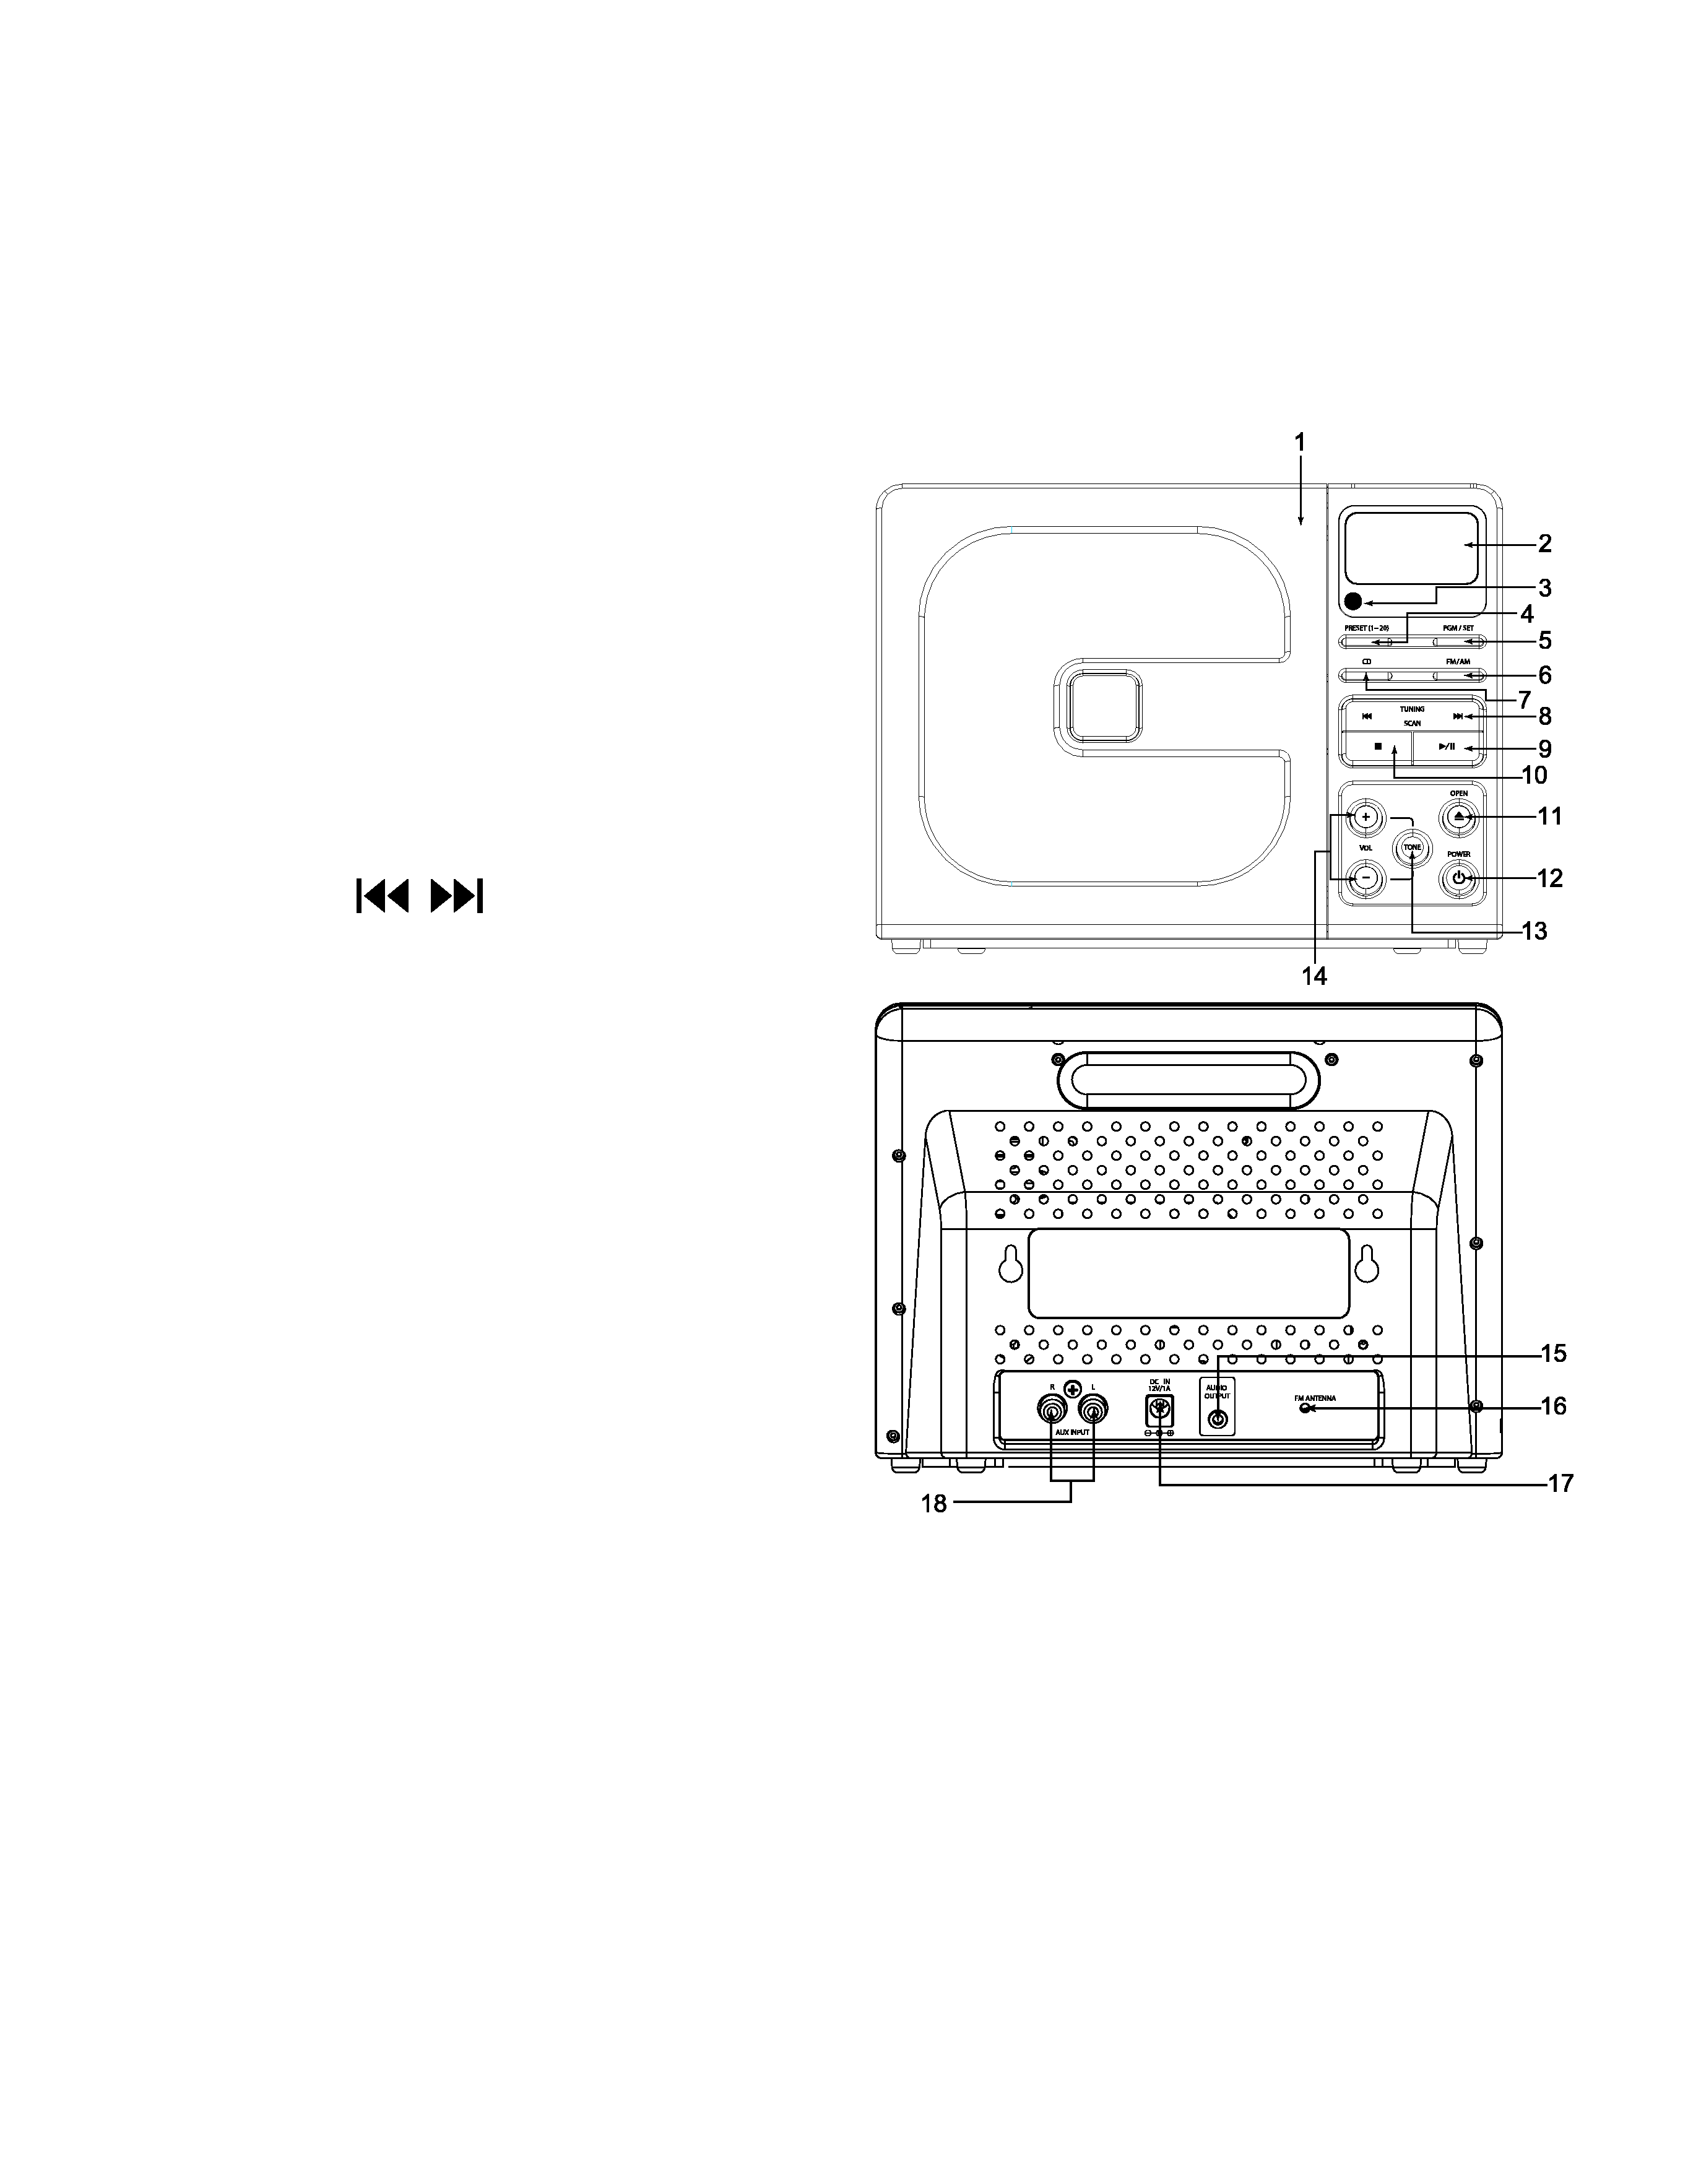
MAIN UNIT DESCRIPTION
1.
CD Compartment - Holds CD disc.
2.
Display - Displays information regarding the status of the disc.
3.
Remote Sensor -Receives the signals from the remote control. Aim the remote control at the sensor to perform
functions.
4.
PRESET (1-20) button - Program 20 favorite AM and
FM radio stations in Radio mode.
5.
PGM/SET button - From OFF state, into clock mode.
On CD mode Stop state, into CD Program mode. On
Tuner mode, into tuner preset mode. On playing disc,
show the clock time.
6.
FM/AM button - Switches to RADIO AM/FM mode.
7.
CD button - Switches to CD mode.
8.
TUNING SCAN
buttons - Skip/search
backward or forward in CD mode, turn down or up for
a certain radio station in Tuner mode; set time for
clock in Clock mode.
9.
PLAY/PAUSE button - Plays and pauses playing a
disc in the CD mode.
10.
STOP button - Stops disc play or clears program
setting the total number of tracks and the total playing
time will appear on the display panel to indicate that
the player in Stop mode.
11.
OPEN button - Opens or closes CD compartment.
12.
POWER button - Switches the power ON/OFF.
13.
TONE + (+/-) buttons - Selects the Bass, Treble,
Volume mode.
14.
+/- buttons - Adjusts the volume level.
15.
Audio Output - Connects to AUDIO INPUT jack of the Subwoofer.
16.
FM Antenna - Extends the wire antenna and position it for the best sound.
17.
DC In - Connects to DC OUT jack of the Subwoofer.
18.
Aux In - Connects to Audio Output of the other audio source (Portable CD Player or PC computer). DO NOT connect
it to the amplifier's PHONO jacks.
4

5
ENGLISH
REMOTE CONTROL DESCRIPTION
1.
POWER button - Switches the power ON/OFF.
2.
CD button - Switches to CD mode.
3.
OPEN button - Opens or closes CD compartment.
4.
PLAY/PAUSE button - Plays and pauses playing a disc in the CD mode.
5.
SKIP/SEARCH BACKWARD or FORWARD buttons - Skip/search
backward or forward in CD mode; turn down or up for a certain
radio station in Tuner mode; set time for clock in Clock mode.
6.
INTRO button - Press it to scan 10 seconds of each track and
then automatically move to the next track.
7.
DISP button - Switches time display to either remaining playing
time of current track, total remaining play time, or elapsed time of
playing track.
8.
FM/AM button - Selects FM/AM mode.
9.
AUX button - Selects AUX input.
10.
RPT/PRESET + button - Act as a repeat button in CD mode.
Tunes up the preset station in RADIO mode.
11.
RDM/PRESET - button - Playing the entire disc in random order
in CD mode.
Tunes down the preset station in RADIO mode.
12.
TREBLE +/- buttons - To adjust the high frequencies.
13.
BASS +/- buttons - To adjust the low frequencies.
14.
VOLUME +/- buttons - To adjust the sound level.
15.
MUTE button - To silence audio output.
16.
EQ button - Selects equalizer mode (Classic, Pop, Flat, Rock).
17.
SET/PGM button - From OFF state, into Clock mode. On CD mode stop state, into CD Program mode. On Tuner
mode, into Tuner Preset mode. On playing disc, show the clock time.
18.
STOP button - Stops disc play or clears program setting the total number of tracks and the total playing time will
appear on the display panel to indicate that the player in Stop mode.