
9A08936800
MC-D76
CD/Receiver Micro-System
OWNER'S MANUAL
MANUEL DU PROPRIETAIRE
BEDIENUNGSANLEITUNG
MANUALE DI ISTRUZIONI
MANUAL DEL USUARIO
ENGLISH
FRANÇAIS
2
IMPORTANT
(for U.K.Customers)
DO NOT cut off the mains plug from this
equipment. If the plug fitted is not suitable
for the power points in your home or the
cable is too short to reach a power point,
then obtain an appropriate safety approved
extension lead or consult your dealer.
If nonetheless the mains plug is cut off,
remove the fuse and dispose of the plug
immediately, to avoid a possible shock
hazard by inadvertent connection to the
mains supply.
If this product is not provided with a mains
plug, or one has to be fitted, then follow the
instructions given below:
IMPORTANT. DO NOT make any connection
to the larger terminal which is marked with
the letter E or by the safety earth symbol |
or coloured GREEN or GREEN-and-YELLOW.
The wires in the mains lead on this product
are coloured in accordance with the
following code:
BLUE
: NEUTRAL
BROWN : LIVE
As these colours may not correspond with
the coloured markings identifying the
terminals in your plug proceed as follows:
The wire which is coloured BLUE must be
connected to the terminal which is marked
with the letter N or coloured BLACK.
The wire which is coloured BROWN must
be connected to the terminal which is
marked with the letter L or coloured RED.
When replacing the fuse only a correctly
rated approved type should be used and be
sure to re-fit the fuse cover.
IF IN DOUBT -- CONSULT A COMPETENT
ELECTRICIAN.
The
equipment
draws
nominal
nonoperating power from the AC outlet
with its POWER switch in the STANDBY
position.
Obs! nätströmställaren skiljer ej hela
apparaten fran nätet.
Sommaire
Contents
Before Use ......................................................4
Remote Control Unit ......................................6
Compact Disc..................................................8
Connection ....................................................10
Connection of antenna and speakers ......13
Basic Operation .....................................18~20
Listening to CD .......................................22~24
Repeat Playback ..........................................26
Shuffle Playback ..........................................28
Program Playback .................................30~32
Listening to External Sources ...................32
Listening to Radio ........................................34
How to Preset Broadcast Automatically
...................................................................36
How to Preset Broadcast Manually .........36
RDS(Radio Data System) ......................38~40
Setting the Clock..........................................42
Sleep Timer ...................................................42
Setting the Timer..........................................44
Troubleshooting ...........................................46
Specifications ..............................................46
Nous vous remercions pour l'achat d'un
appareil TEAC.
Lire ce manuel avec attention pour obtenir
les meilleures performances possibles de
cet appareil.
Thanks for buying a TEAC.
Read this manual carefully to get the best
performance from this unit.
Avant Utilisation ............................................4
Télécommande ...............................................6
Disques Compacts .........................................8
Connexions ...................................................11
Connexion de antennes et haut-parleurs
...................................................................14
Fonctionnement de base ......................18~20
Lecture des disques compacts ...........22~24
Lecture répétée ............................................26
Lecture aléatoire..........................................28
Lecture programmée .............................30~32
Ecoute à partir d'une source externe.......32
Ecoute radio ..................................................34
Préréglage automatique des stations ......36
Préréglage manuel des stations ...............36
RDS ...........................................................38~40
Réglage de l'horloge ...................................42
Temporisation de veille ..............................42
Réglage de la temporisation (Timer)........44
Guide de Dépannage ...................................47
Spécifications ..............................................47

ITALIANO
DEUTSCH
ESPAÑOL
3
Indice
Prima dell'Uso................................................5
Telecomando ..................................................7
Compact Disc..................................................9
Collegamenti.................................................12
Collegamento di antenne e diffusori ........16
BFunzionamento di Base......................19~21
Ascolto dei CD........................................23~25
Wiederholte Abspielung ............................27
Playback a Caso...........................................29
Playback Programmato ........................31~33
Ascolto di sorgenti audio esterne ............33
Ascolto della Radio .....................................35
Come Preimpostare Automaticamente le
Trasmissioni ...........................................37
Come Predisporre Manualemente le
Trasmissioni ...........................................37
RDS ...........................................................39~41
Come impostare l'Orologio ........................43
Timer di Spegnimento .................................43
Come Impostare il Timer ............................45
Ricerca dei Guasti .......................................49
Specifica .......................................................49
Indice
Antes de poner el equipo en funcionamiento
.....................................................................5
Mando a distancia .........................................7
Disco compacto .............................................9
Conexión........................................................12
Conexión de antenas y altavoces .............17
Instrucciones básicas ..........................19~21
Escucha de CD .......................................23~25
Repetición de la reproducción..................27
Reproducción aleatoria ..............................29
Reproducción Programada ..................31~33
Escucha de fuentes externas ....................33
Escucha de la Radio ....................................35
Cómo preajustar automáticamente la
emisión de radio ....................................37
Cómo preajustar manualmente la emisión
de radio....................................................37
RDS ...........................................................39~41
Ajuste del reloj .............................................43
Temporizador de desconexión ..................43
Ajuste del temporizador .............................45
Localización de averías..............................50
Especificaciones .........................................50
Inhalt
Enhorabuena por la adquisición de un TEAC.
Lea detenidamente este manual a fin de
obtener el mejor rendimiento de esta unidad.
Grazie per aver acquistato un prodotto TEAC.
Leggere attentamente questo manuale per
ottenere le migliori prestazioni da questo
apparecchio.
Vielen Dank für den Kauf dieses TEAC-
Geräts.
Bitte lesen Sie diese Anleitung sorgfältig
durch, um die Leistungs-fähigkeit dieses
Geräts optimal nutzen zu können.
Vor der Benutzung .........................................5
Fernbedienung................................................7
Compact Disc..................................................9
Anschluß .......................................................11
Anschluß von Antennen und Lautsprechern
...................................................................15
Einfache Bedienung ..............................19~21
Abspielen von CDs ................................23~25
Wiederholte Abspielung ............................27
Abspielen in beliebiger Reihenfolge .......29
Abspielen eines Programms ...............31~33
Abspielen einer externen Quelle..............33
Radio hören ...................................................35
Automatische Vorwahl von Sendern .......37
Mauelle Vorwahl von Sendern .................37
RDS ...........................................................39~41
Einstellen der Uhr ........................................43
Einschlaf-Timer ............................................43
Einstellen des Timers..................................45
Fehlersuche ..................................................48
Spezifikationen ............................................48
ENGLISH
FRANÇAIS
4
Before Use
Avant Utilisation
Read this before operation
< Place the amplifier on a hard flat surface.
< The ventilation holes should not be
covered. Make sure there is at least 50 cm
(20 inches) of space above and at least
10cm (4 inches) of space besides the
amplifier. Do not place MD player or other
equipment on top of the amplifier.
< Choose unit installation location carefully.
Avoid placing it in direct sunlight or close
to a source of heat. Also avoid locations
subject to vibrations and excessive dust,
heat, cold or moisture. Keep away from
sources that hum, such as transformers or
motors.
< Do not open the cabinet as this might
result in damage to the circuitry or
electrical shock. If a foreign object should
get into the set, contact your dealer.
< When removing the power plug from the
wall outlet, always pull directly on the
plug, never yank the cord.
< Do not attempt to clean the unit with
chemical solvents as this might damage
the finish. Use a clean, dry cloth.
< Keep this manual in a safe place for future
reference.
Lire ceci avant de faire fonctionner
l'appareil
< Placer l'amplificateur sur une surface
plate rigide.
< Les trous de ventilation ne doivent pas
être couverts. S'assurer qu'il y a un
espace d'au moins 50 cm au dessus et
d'au moins 10 cm à côté de l'amplificateur.
Ne pas placer un lecteur MD ou un autre
appareil sur le dessus de l'amplificateur.
< Choisir avec soin l'endroit où vous
placerez votre appareil. Eviter de le placer
directement au soleil ou près d'une
source de chaleur. Eviter aussi les
endroits sujets à des vibrations, à de la
poussière excessive, à la chaleur, au froid
ou à l'humidité. Toujours le garder éloigné
de sources de bourdonnements telles que
des transformateurs ou moteurs.
< Ne pas ouvrir le coffret car ceci risquerait
de provoquer des dommages aux circuits
ou des chocs électriques. Si un objet
rentre dans l'appareil, contacter votre
revendeur.
< Lors du débranchement du cordon
d'alimentation de la prise murale, toujours
tirer sur la fiche et non sur le cordon.
< Ne pas essayer de nettoyer l'appareil
avec des solvants chimiques car ceci
pourrait endommager le fini de l'appareil.
Utiliser un chiffon propre et sec.
< Garder soigneusement ce manuel
d'instructions pour une référence
ultérieure.
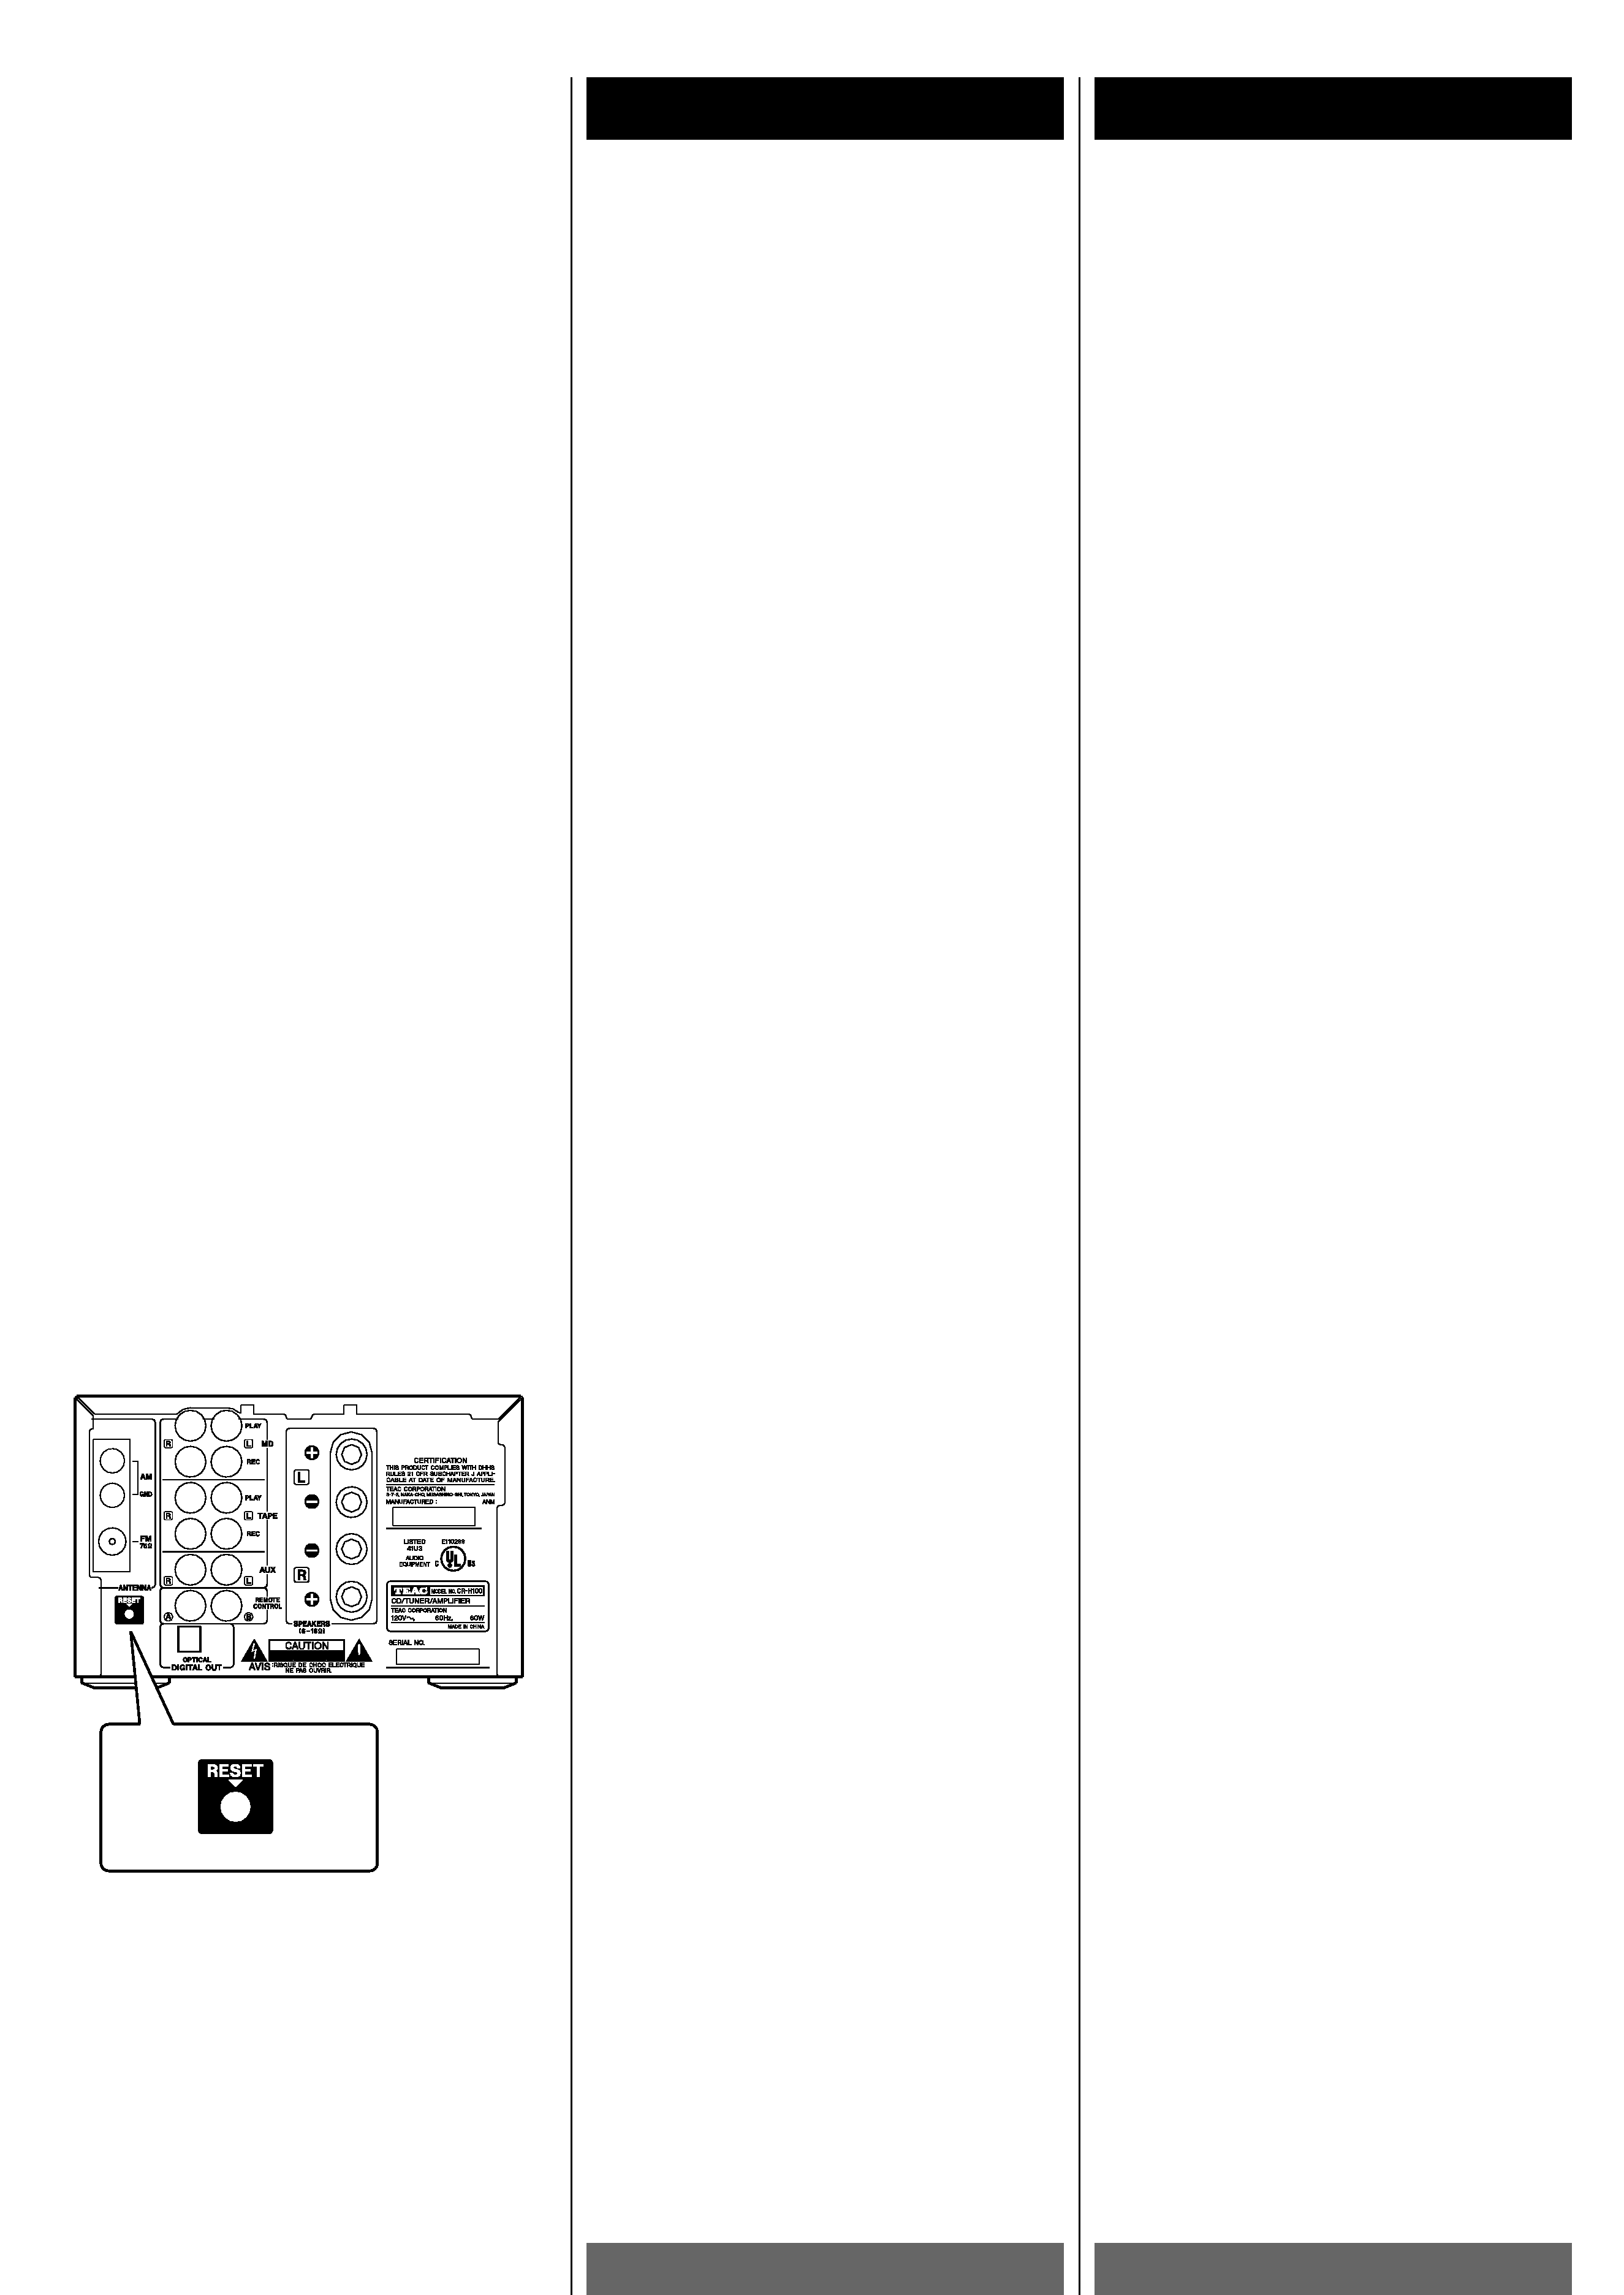
RESET Switch
In the following cases, function buttons may
not work properly.
1) When the system is damaged by some
electrical shock.
2) When the power is irregular or has
electrical noises.
In these cases, press the RESET switch once
or twice with a pencil or a ball-point pen
lightly.
*If you press this RESET switch, all the
memories will be erased. In this case, please
preset stations again.
Commutateur RESET
Dans les cas suivants, les boutons de
fonctions peuvent ne pas fonctionner
correctement
1) Quand le système est endommagé par un
choc électrique.
2) Quand l'alimentation est irrégulière ou
bruyante
Dans ces cas, appuyer la touche RESET une
ou deux fois avec un crayon ou un stylo.
Memory Backup
The typical period for which the preset
memory can be backed up while the power
cord is unplugged or the POWER button is
set to the STANDBY position is about 4
weeks subject to the surrounding
environment. In case of long hours of
power failure or slipping out of the power
cord, the data may be cleared.
Mémoire interne
Quand l'appareil n'est plus alimenté
(débranché ou bouton POWER à STANDBY),
la mémoire(PRESET STATIONS) interne
conserve ses informations pendant environ
4 semaines, selon les circonstances. En
cas de panne prolongée ou si le cordon est
accidentellement débranché, les données
risquent d'être perdues.

5
ITALIANO
DEUTSCH
ESPAÑOL
Prima dell'Uso
Vor der Benutzung
Antes de poner el equipo en
funcionamiento
Lea estas instrucciones antes de poner el
equipo en funcionamiento
< Coloque el amplificador sobre una
superficie dura y plana.
< Los orificios de ventilación no deben
taparse. Compruebe que quedan al menos
50 cm (20 pulg.) de espacio libre por
encima del amplificador y al menos 10 cm
(4 pulg.) en torno a él. No coloque el
reproductor de MD ni otros equipos
encima del amplificador.
< Escoja cuidadosamente el lugar donde va
a instalar el equipo. Evite colocarlo en un
lugar expuesto a la luz solar directa o
próximo a una fuente de calor. Evite
también lugares expuestos a vibraciones y
a una cantidad excesiva de polvo, calor,
frío o humedad. Mantenga el equipo
alejado de fuentes que produzcan
zumbidos, como transformadores o
motores.
< No abra la caja, pues podrían producirse
desperfectos en los circuitos o descargas
eléctricas. Si en el equipo se introdujese
algún tipo de materia extraña, póngase en
contacto con el distribuidor.
< Al retirar el conector del cable de
alimentación de la toma de corriente, tire
siempre directamente del conector; nunca
dé tirones al cable.
< No limpie el equipo con disolventes
químicos, pues podría dañar el acabado.
Emplee un paño limpio y seco.
< Guarde este manual en un lugar seguro
para futuras consultas.
Interruptor RESET
Los botones de las funciones pueden no
responder correctamente en los siguientes
casos.
1) Cuando alguna descarga eléctrica haya
dañado el sistema.
2) Cuando la corriente sea irregular o
experimente perturbaciones eléctricas.
En estos casos, pulse ligeramente una o dos
veces el interruptor RESET con un lápiz o
bolígrafo.
*Al pulsar este interruptor RESET se borran
todas las memorias. En ese caso, preajuste
de nuevo las emisoras.
Conservación de la memoria
El período habitual durante el cual puede
mantenerse la memoria preajustada con el
cable de alimentación desconectado o con
el botón POWER ajustado en la posición
STANDBY es de unas cuatro semanas, en
función de las condiciones existentes. Si
no hay corriente, o el cable de
alimentación permanece desconectado,
durante muchas horas, los datos pueden
borrarse.
Si prega di leggere prima di porre in funzione
pog
< Appoggiare l'amplificatore su una
superficie dura e in piano.
< Non coprire le aperture di ventilazione.
Accertarsi di lasciare uno spazio di
almeno 50 cm sopra l'amplificatore e di
almeno 10cm ai lati. Non porre il lettore
per MD o altri apparecchi sopra
all'amplificatore.
< Scegliere con attenzione la posizione in
cui installare l'amplificatore. Evitare di
collocarlo esposto alla luce diretta del sole
o in prossimità di una sorgente di calore.
Evitare anche posizioni soggette a
vibrazione o livelli eccessivi di polvere,
calore, freddo od umidità. Tenere lontano
da sorgenti di ronzio quali trasformatori o
motori.
< Non aprire l'armadietto, altrimenti si
rischia di danneggiare i circuiti o di
prendere una scossa elettrica. Se un
corpo estraneo penetra nell'apparecchio,
rivolgersi al rivenditore.
< Nel togliere la spina dalla presa a muro,
tirare dalla spina stessa, non dal cavo.
< Non cercare di pulire l'unità usando
solventi chimici, altrimenti si danneggia il
rivestimento di finitura. Usare invece un
panno asciutto pulito.
< Conservare questo manuale in un luogo
sicuro, per riferimento.
Interruttore RESET
Nei casi seguenti i tasti di funzione
potrebbero non funzionare correttamente.
1) Quando il sistema ha subito danni a causa
di shock elettrico.
2) Quando la corrente erogata è irregolare o
contiene disturbo elettrico.
In tutti questi casi, premere l'interruttore
RESET una o due volte, usando la punta di
una matita o di una penna a sfera e facendo
lieve pressione.
*Se premete questo interruttore RESET
l'intera memoria viene cancellata. In questo
caso
sarà
necessario
preimpostare
nuovamente le stazioni.
Backup della Memoria
Il periodo di tempo tipico per cui è
possibile fare il backup della memoria
preimpostata mentre l'unità è staccata
dalla presa di corrente oppure il tasto
POWER è sulla posizione STANDBY è pari
a circa 4 settimane, salvo l'ambiente di
installazione. Nell'eventualità di lunghi
blackout elettrici o di disinserimento del
cavo elettrico, i dati potranno andare
perduti.
Lesen Sie dies vor der Benutzung
< Stellen Sie den Verstärker auf eine solide,
glatte Oberfläche.
< Die Lüftungslöcher dürfen nicht abgedeckt
werden. Stellen Sie sicher, daß über dem
Verstärker wenigstens 50 cm und an den
Seiten mindestens 10 cm Platz ist. Stellen
Sie den MD-Player oder andere Geräte
nicht auf den Verstärker.
< Wählen Sie den Aufstellungsort des
Geräts sorgfältig aus. Stellen Sie das Gerät
nicht an einem Ort auf, an dem es direkter
Sonneneinstrahlung ausgesetzt ist oder
von einer Wärmequelle beeinflußt wird.
Halten Sie das Gerät von Störungsquellen
wie z.B. Transformatoren oder Motoren
fern.
< Öffnen Sie das Gehäuse nicht, da dies zu
Schäden an der Elektronik führen kann
und die Gefahr des elektrischen Schlages
besteht. Kontaktieren Sie Ihren Händler,
wenn ein Fremdkörper in das Gerät
gelangt ist.
< Ziehen Sie immer direkt am Stecker, nie
am Kabel, wenn Sie den Netzstecker aus
der Steckdose ziehen wollen.
< Versuchen Sie nicht , das Gerät mit
chemischen Lösungsmitteln zu reinigen,
da dies zu einer Beschädigung der
Oberfläche führen könnte. Benutzen Sie
ein sauberes, trockenes Tuch.
< Bewahren Sie dieses Handbuch für
zukünftige Zwecke an einem sichern Platz
auf.
RESET-Schalter
In den folgenden Fällen kann es sein , daß
Funktionstasten nicht einwandfrei
funktionieren.
1) Wenn das System durch einen
elektrischen Spannungsstoß beschädigt
wurde.
2) Wenn die Stromversorgung schwankt oder
elektrische Störfrequenzen enthält.
Betätigen Sie in diesen Fällen ein- oder
zweimal den RESET-Schalter vorsichtig mit
einem Bleistift oder einem Kugelschreiber.
*Wenn Sie den RESET-Schalter betätigen,
werden alle Speicher gelöscht. In einem
solchen Fall müssen Sie die Sender neu
einstellen.
Speichersicherung
Der typische Zeitraum, für den der
Speicher gesichert werden kann, während
das Stromkabel aus der Steckdose
gezogen ist oder die POWER-Taste auf
STANDBY
steht,
beträgt
je
nach
Umgebungsbedingungen etwa 4 Wochen.
Bei
längerem
Stromausfall
oder
Herausrutschen des Stromkabels können
die Informationen verlorengehen.