© 1999 by Sony Corporation
FM/MW/LW
Cassette
Car Stereo
XR-C6220R
3-865-678-41 (1)
For installation and connections, see the supplied installation/connections
manual.
Szczególy dotyczce instalacji i podlcze, prosz sprawdzi w dostarczonym,
osobnym podrczniku
Informace o instalaci a zapojení naleznete v pilozené pírucce Instalace /
zapojení.
,
/.
Kurma ve balanti ilemleri için ünite beraberindeki Kurma/Balantilar kilavuzuna
bakiniz.
Operating Instructions
Instrukcje Obslugi
Návod k obsluze
Kullanim kilavuzu
GB
PL
GR
CZ
TR

2
Table of Contents
This Unit Only
With Optional Equipment
Location of controls ............................................ 3
Getting Started
Resetting the unit ................................................ 4
Detaching the front panel .................................. 4
Setting the clock .................................................. 5
Cassette Player
Listening to a tape ............................................... 6
Playing a tape in various modes ....................... 7
Radio
Memorizing stations automatically
-- Best Tuning Memory (BTM) .................... 7
Memorizing only the desired stations ............. 8
Receiving the memorized stations .................... 8
RDS
Overview of the RDS function .......................... 9
Displaying the station name .............................. 9
Retuning the same programme automatically
-- Alternative Frequencies (AF) .................. 9
Listening to traffic announcements ................. 11
Presetting the RDS stations
with the AF and TA data .............................. 11
Locating a station by programme type .......... 12
Setting the clock automatically ....................... 13
Other Functions
Labelling the rotary commander .................... 14
Using the rotary commander .......................... 14
Adjusting the sound characteristics ............... 16
Attenuating the sound ..................................... 16
Changing the sound and display settings ..... 16
Boosting the bass sound
-- D-bass ....................................................... 17
CD/MD Unit
Playing a CD or MD ......................................... 17
Playing tracks repeatedly
-- Repeat Play .............................................. 19
Playing tracks in random order
-- Shuffle Play .............................................. 19
Labelling a CD
-- Disc Memo ............................................... 19
Locating a disc by name
-- List-up ...................................................... 21
Selecting specific tracks for playback
-- Bank .......................................................... 21
Additional Information
Precautions ......................................................... 22
Maintenance ....................................................... 23
Dismounting the unit ....................................... 24
Specifications ..................................................... 25
Troubleshooting guide ..................................... 26
Thank you for purchasing this Sony Cassette
Player. This unit lets you enjoy a variety of
features as well as a supplied rotary
commander.
In addition to the cassette playback and radio
operations, you can expand your system by
connecting an optional CD/MD unit*1.
When you operate this unit or a connected
optional CD unit with the CD TEXT function,
the CD TEXT information will appear in the
display when you play a CD TEXT disc*2.
*1 You can connect a CD changer, an MD changer,
a CD player, or an MD player.
*2 A CD TEXT disc is an audio CD that includes
information such as the disc name, artist name
and track names.
This information is recorded on the disc.
Welcome !
3
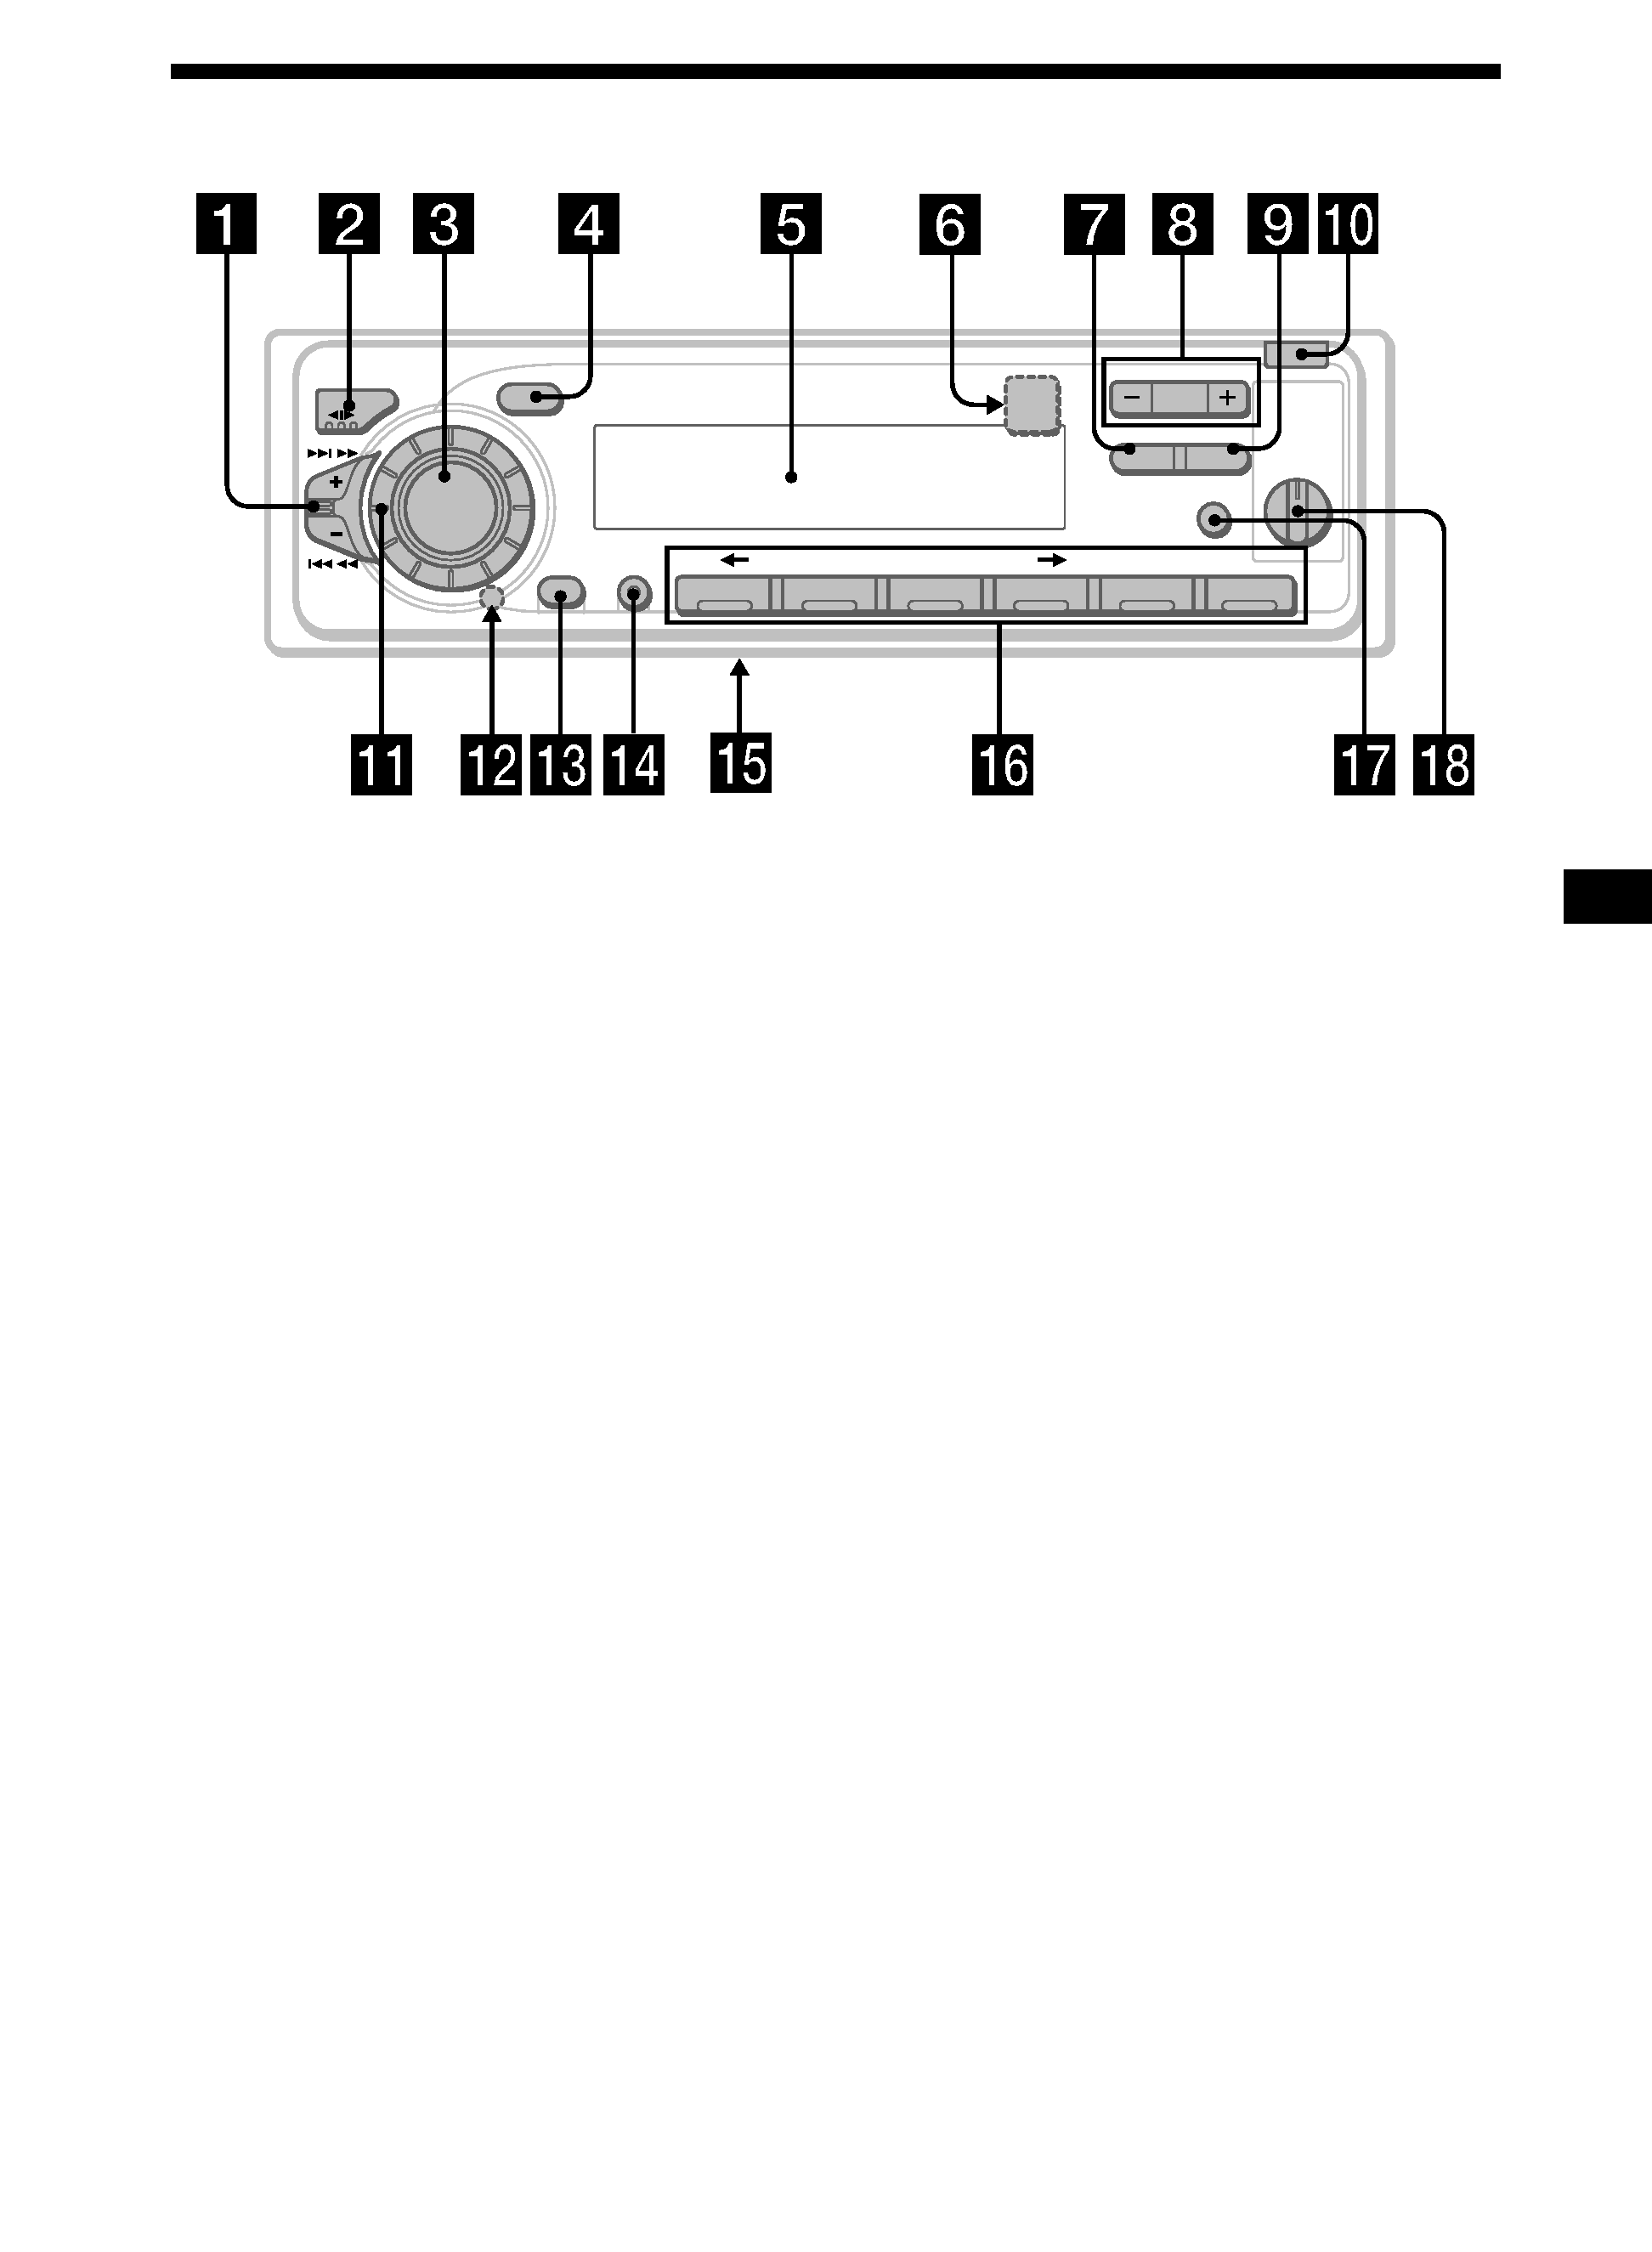
Location of controls
Refer to the pages listed for details.
1 SEEK/AMS (seek/Automatic Music
Sensor/manual search) control
6, 8, 10, 13, 18, 21
2 MODE (*)button
During tape playback:
Playback direction change 6
During radio reception:
BAND select 7, 8
During CD or MD playback:
CD/MD unit select 17, 20
3 SOURCE (TAPE/TUNER/CD/MD) button
6, 7, 8, 11, 17, 20
4 SOUND button 16
5 Display window
6 6 (eject) button (located on the front
side of the unit behind the front panel)
6
7 PTY/LIST button
RDS Programme 13
Disc Memo 19, 20
List-up 21
8 PRESET/DISC button
During radio reception:
Preset stations select 8
During CD/MD playback:
Disc change 18
9 AF/TA button 9, 10, 11, 12
0 OPEN (front panel release) button
4, 6, 24
!¡ Dial (volume/bass/treble/left-right/rear-
front control) 5, 16, 19, 20
!TM Reset button (located on the front side
of the unit behind the front panel) 4
!£ OFF button 4, 6
!¢ SHIFT button
PLAY MODE 7, 8, 10, 12, 19, 21, 22
SET UP 5, 13, 16, 18
! POWER SELECT switch
(located on the bottom of the unit)
See "POWER SELECT switch" in the
Installation/Connections manual.
!§ Number buttons 8, 10, 12, 21
!¶ DSPL (display mode change) button
6, 8, 9, 17, 18, 20, 21
!· D-BASS control 17
D-BASS
AF/TA
PTY
LIST
DISC
PRESET
+
OFF
1
2
3
SOURCE
MODE
SEEK / AMS
SOUND
OFF
SHIFT
SET UP
PLAY MODE
ENTER
OPEN
1
6
2
3
4
5
6
DSPL
XR-C6220R
4
Attaching the front panel
Place the hole a in the front panel onto the
spindle b on the unit as illustrated, then push
the left side in.
Notes
· Be sure not to attach the front panel upside
down.
· Do not press the front panel too hard against the
unit when attaching it.
· Do not press too hard or put excessive pressure
on the display window of the front panel.
· Do not expose the front panel to direct sunlight
or heat sources such as hot air ducts, and do not
leave it in a humid place. Never leave it on the
dashboard of a car parked in direct sunlight or
where there may be a considerable rise in
temperature.
Caution alarm
If you turn the ignition key switch to the OFF
position without removing the front panel, the
caution alarm will beep for a few seconds
(only when the POWER SELECT switch on the
bottom of the unit is set to the A position).
If you connect an optional power amplifier and
do not use the built-in amplifier, the beep
sound will be deactivated.
Getting Started
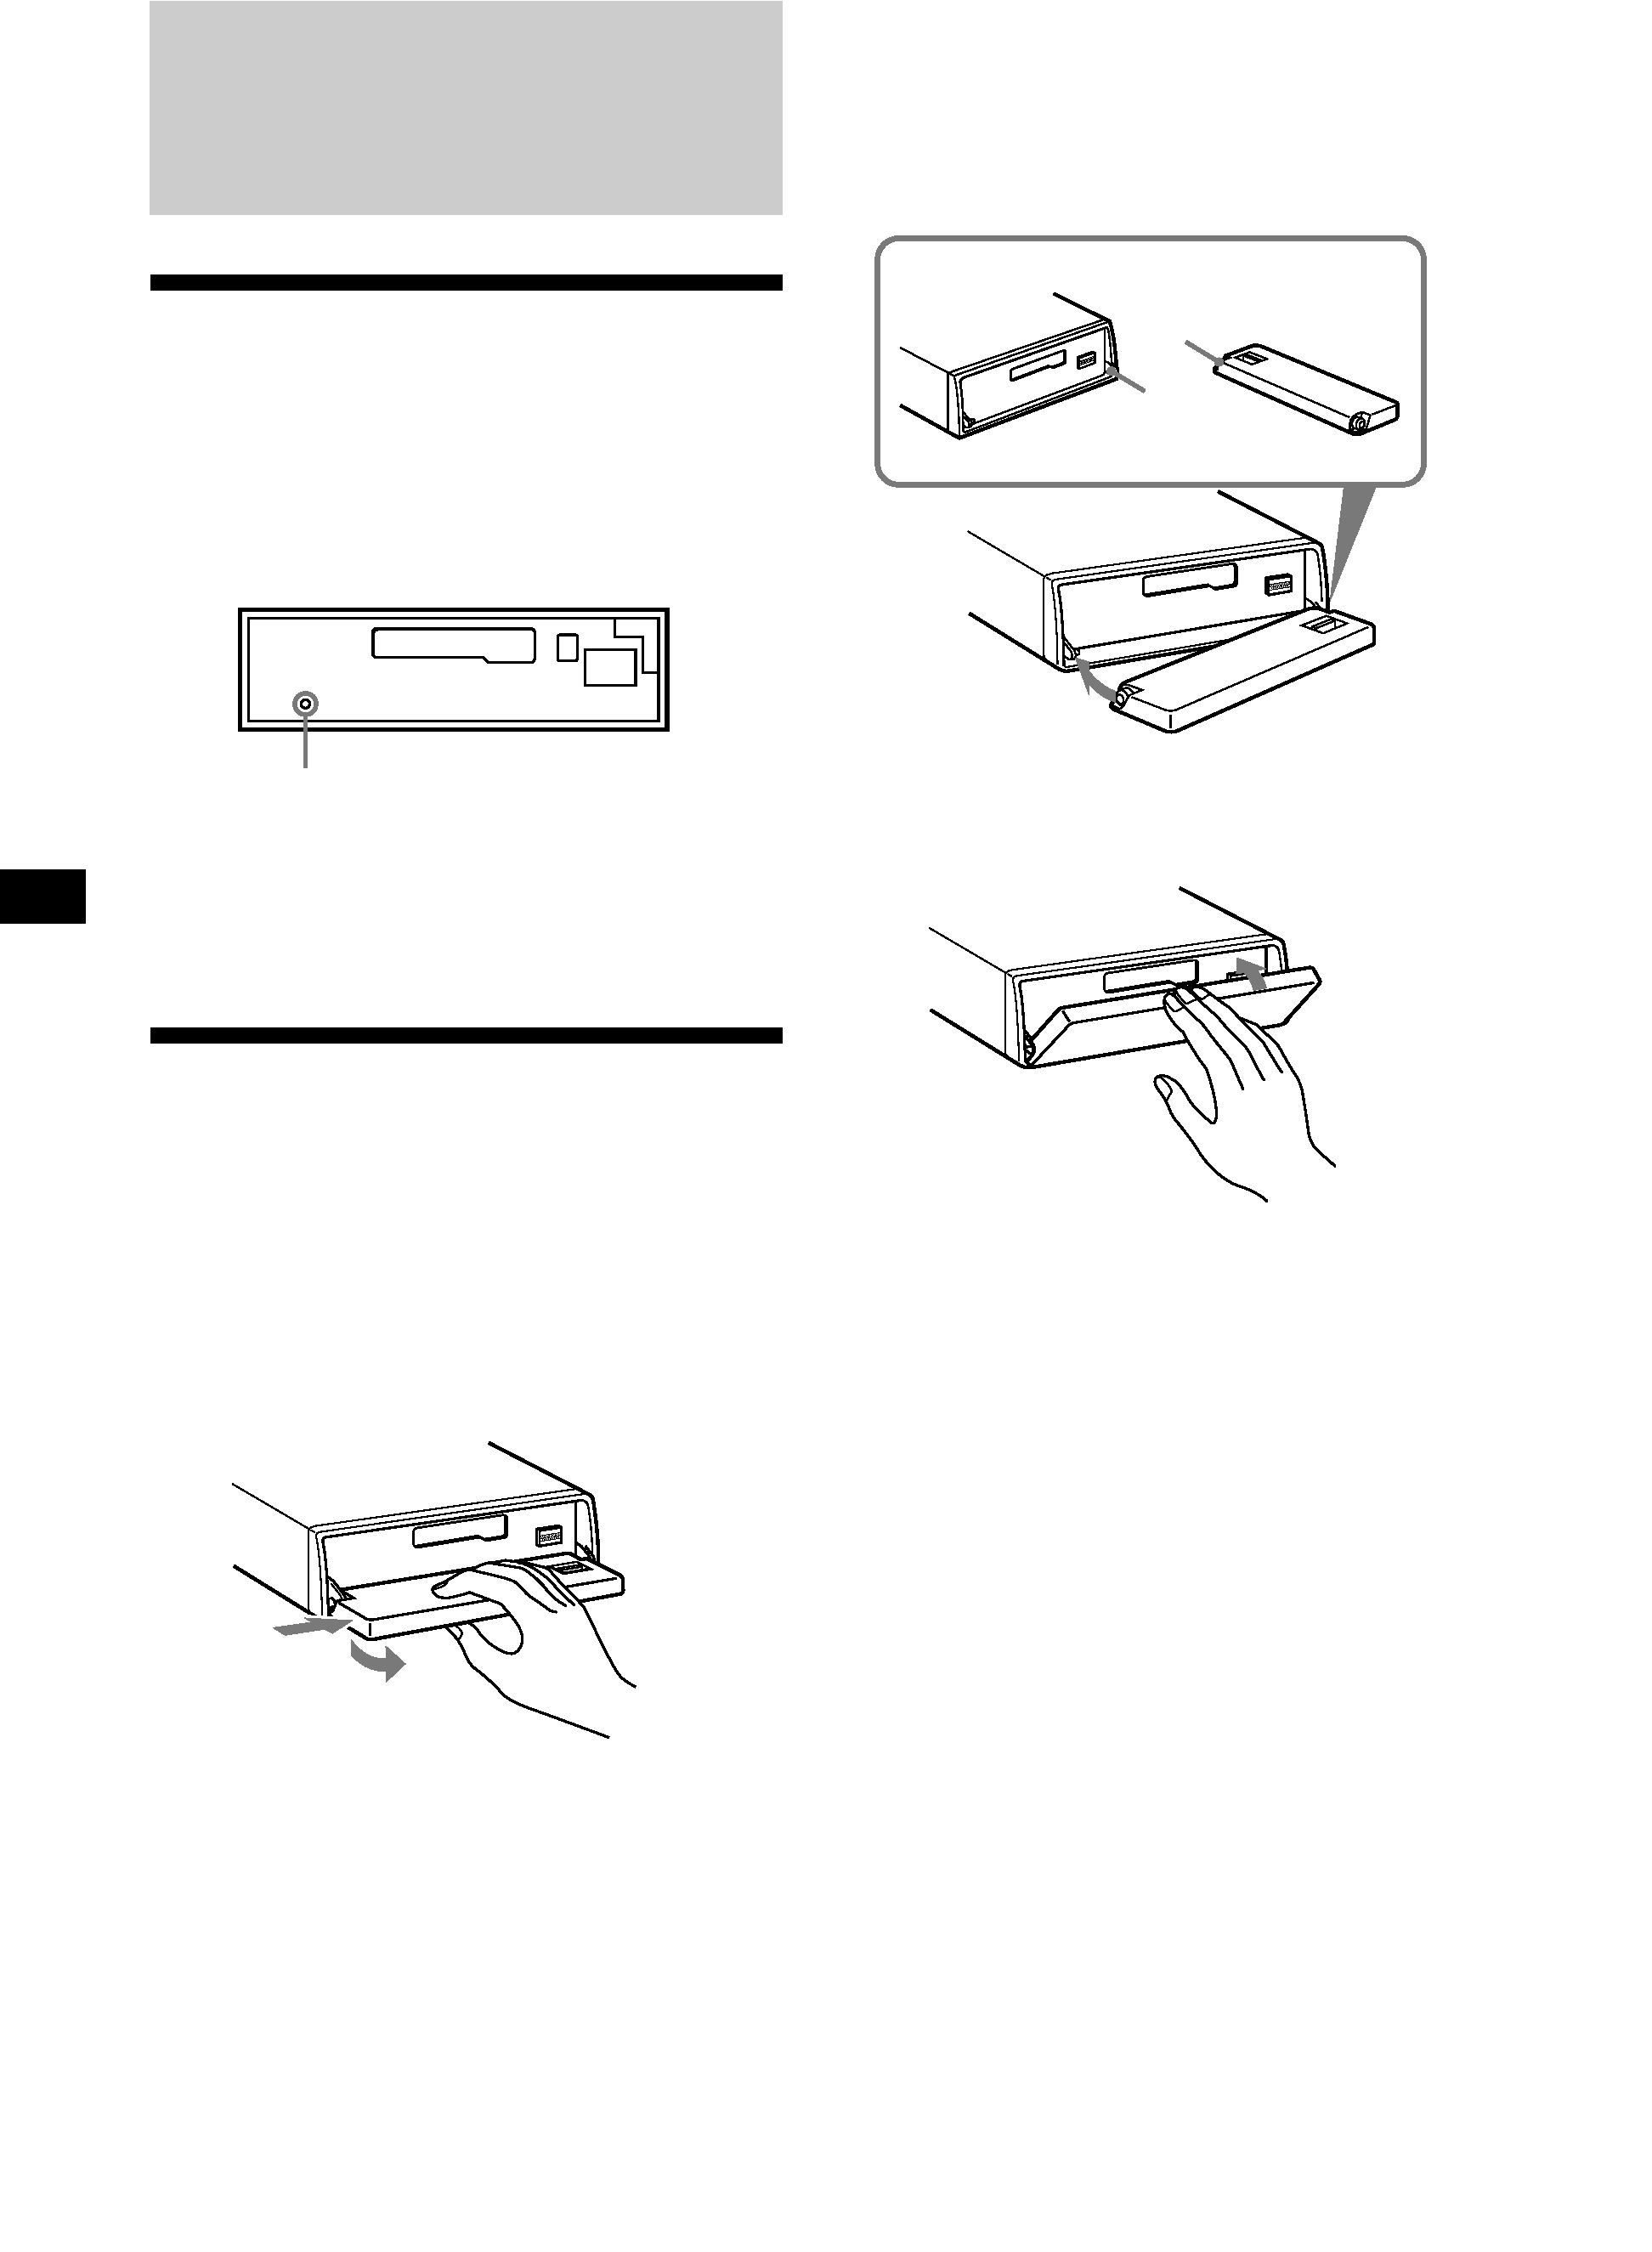
Resetting the unit
Before operating the unit for the first time or
after replacing the car battery, you must reset
the unit.
Remove the front panel and press the reset
button with a pointed object, such as a
ballpoint pen.
Note
Pressing the reset button will erase the clock
setting and some memorized functions.
Detaching the front panel
You can detach the front panel of this unit to
protect the unit from being stolen.
1 Press (OFF).
2 Press (OPEN), then slide the front panel
to the right side, and pull out from the
left side.
Notes
· Be sure not to drop the panel when detaching it
from the unit.
· If you detach the panel while the unit is still
turned on, the power will turn off automatically
to prevent the speakers from being damaged.
· When carrying the front panel with you, use the
supplied front panel case.
Reset button
1
2
b
a
µ

5
Setting the clock
The clock uses a 24-hour digital indication.
Example: To set the clock to 10:08
1 Press (SHIFT), then press (2) (SET UP)
repeatedly until "CLOCK" appears.
1 Press (4) (n).
The hour indication flashes.
2 Set the hour.
3 Press (4) (n).
The minute indication flashes.
4 Set the minute.
to go forward
to go backward
to go forward
to go backward
2 Press (SHIFT).
The clock starts.
3 Press (SHIFT).
After the clock setting is complete, the
display returns to normal playback mode.
Note
If the POWER SELECT switch on the bottom of the
unit is set to the B position, turn the power on
first, then set the clock.