3-866-957-12(1)
Stereo Power
Amplifier
© 1999 by Sony Corporation
TA-N1
Operating Instructions
Mode d'emploi
GB
FR
2GB
WARNING
To prevent fire or shock
hazard, do not expose the
unit to rain or moisture.
To avoid electrical shock,
do not open the cabinet.
Refer servicing to qualified
personnel only.
Do not install the
appliance in a confined
space, such as a bookcase
or built-in cabinet.
For the customers in United States
This symbol is intended to alert the user to
the presence of uninsulated "dangerous
voltage" within the product's enclosure
that may be of sufficient magnitude to
constitute a risk of electric shock to
persons.
This symbol is intended to alert the user to
the presence of important operating and
maintenance (servicing) instructions in the
literature accompanying the appliance.
CAUTION
You are cautioned that any changes or
modification not expressly approved in
this manual could void your authority to
operate this equipment.
Owner's Record
The model and serial numbers are located
on the rear of the unit. Record the serial
number in the space provided below.
Refer to them whenever you call upon
your Sony dealer regarding this product.
Model No. TA-N1
Serial No.
For the customers in Canada
CAUTION
TO PREVENT ELECTRIC SHOCK, DO
NOT USE THIS POLARIZED AC PLUG
WITH AN EXTENSION CORD,
RECEPTACLE OR OTHER OUTLET
UNLESS THE BLADES CAN BE FULLY
INSERTED TO PREVENT BLADE
EXPOSURE.

3GB
GB
About This Manual
The instructions in this manual are for model TA-N1.
Check your model number by looking at the front panel.
In this manual, the European model is used for
illustration purposes unless stated otherwise. Any
difference in operation is clearly indicated in the text, for
example, "USA/Canada only."
Convention
The following icon is used in this manual:
z Indicates hints and tips for making the task easier.
TABLE OF CONTENTS
Hooking Up the Components
4
Unpacking 4
Preamplifier Hookups
(Unbalanced Connections) 5
Preamplifier Hookups (Balanced Connections) 6
Speaker Hookups (Standard Connections) 7
Speaker Hookups (Bi-wired connections) 8
Power Connections 9
Location of Parts and Basic
Operations
10
Front Panel Parts Description 10
Rear Panel Parts Description 12
Additional Information
13
Precautions 13
Troubleshooting 14
Specifications 15

4GB
Hooking Up
the
Components
This chapter describes how to connect
a Sony TA-E1 preamplifier, your
speakers, and your other audio
components to the power amplifier.
Be sure to read this section before
making any connections.
Unpacking
Check that you received the following items:
· AC power cord (1)
· AC power plug adapter (3 to 2 prong polarized type) (1)
(USA/Canada only)
Before you get started
· Turn off the power to all components before making
any connections.
· Do not connect the AC power cord until all of the
connections are completed.
· Be sure to make connections firmly to avoid hum and
noise.
· When connecting an audio cord, be sure to match the
color-coded pins to the appropriate jacks on the
components: white (left) to white; and red (right) to
red.
5GB
Hooking
Up
the
Components
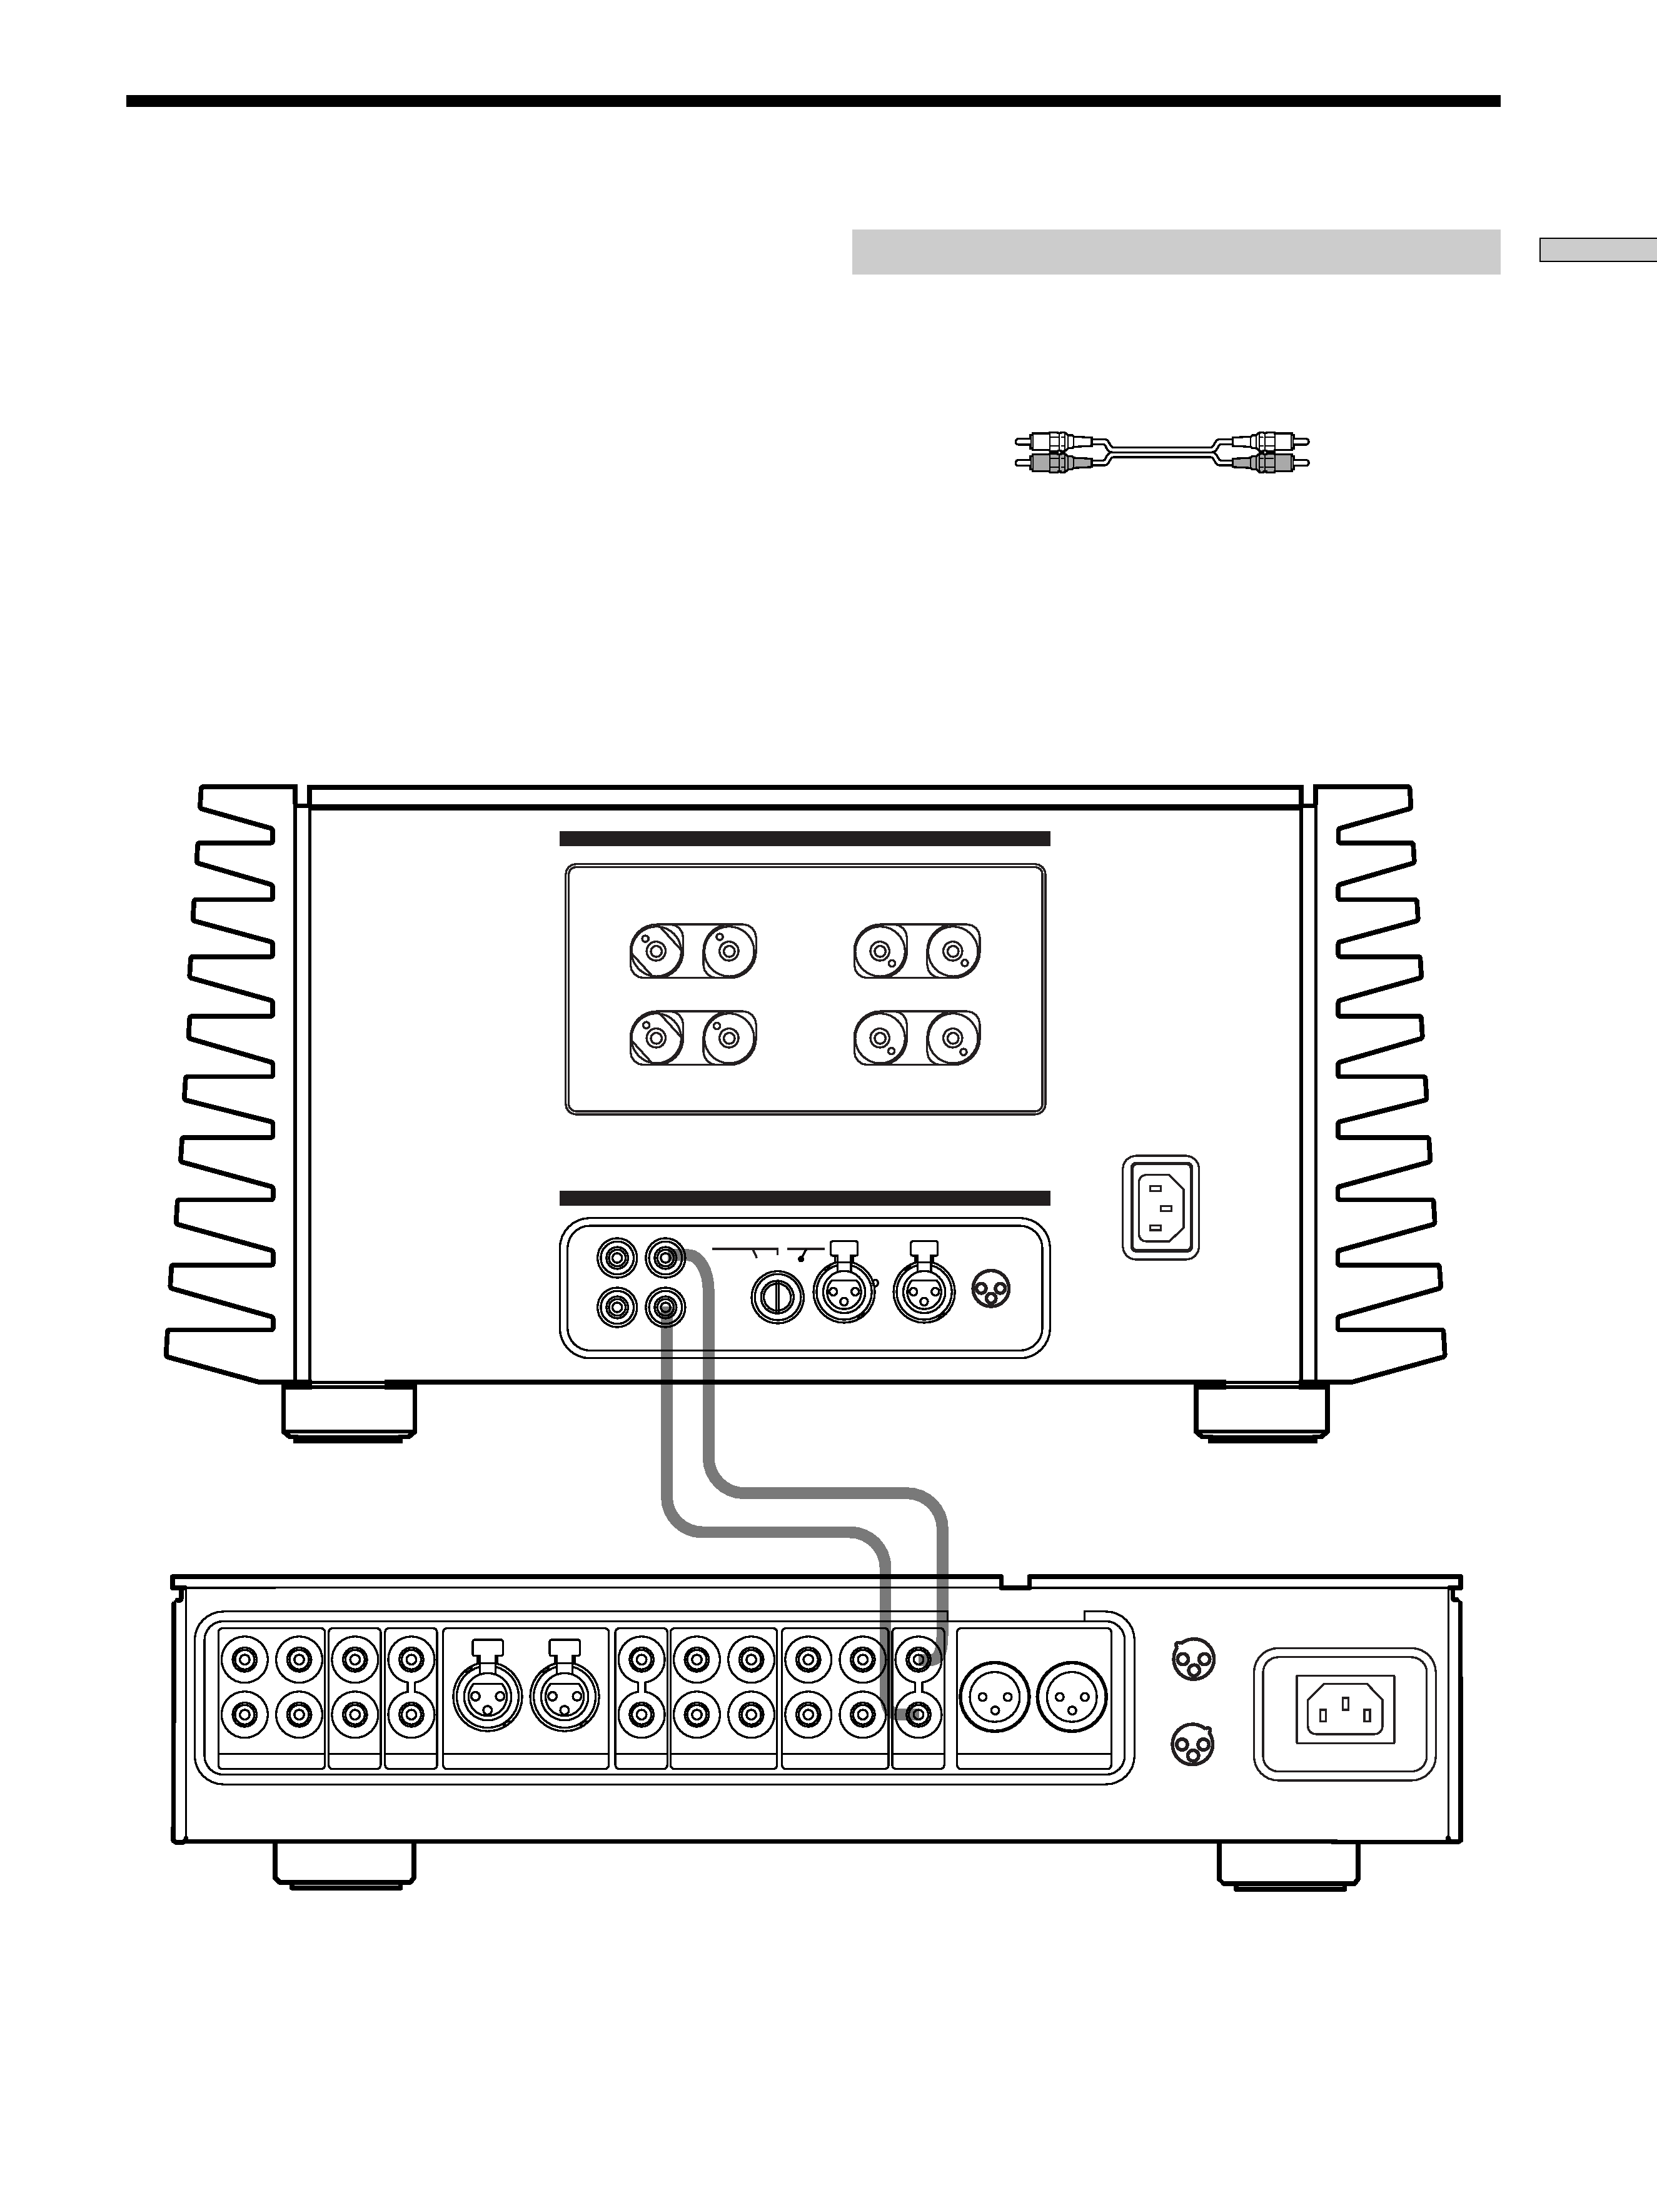
Preamplifier Hookups (Unbalanced Connections)
Connect the preamplifier you are using (Sony TA-E1, etc.)
to the power amplifier's UNBALANCED 1 or
UNBALANCED 2 input jacks. For details, refer to the
instructions supplied with the preamplifier.
L
R
L
R
2
R
1
SACD
CD
LINE
BALANCED LINE
OUT
I N
T APE2/MD
DIRECT
PRE OUT
L
OUT
I N
T APE1/DA T
R
BALANCED OUT
L
1
3
1 :GROUND
2 :HOT ( + )
3 :COLD ( )
2
CONNECTION
ASSIGNMENT
2
3
1 :GROUND
2 :HOT ( + )
3 :COLD ( )
1
1
1
2
3
2
CONNECTION
ASSIGNMENT
BALANCED
INPUT SELECTOR
IMPEDANCE USE
4~16
L
L
+
+
R
R
+
+
BALANCED
UNBALANCED
L
L
R
R
UNBALANCED
1
2
1 : GROUND
2 : HOT(+)
3 : COLD()
INPUT
SPEAKERS
A
+ B USE
8~16
A
B
Required cords
Audio cords (not supplied)
When connecting a cord, be sure to match the color-coded pins to
the appropriate jacks on the components.
White (L)
White (L)
Red (R)
Red (R)
TA-E1, etc.
TA-N1