Operating Instructions
FM Stereo/AM Radio
3-231-764-21(1)
SRF-86
Sony Corporation © 2001 Printed in China
FM/AM WALKMAN
size AA (R6)
× 1
A
B
C
a
b
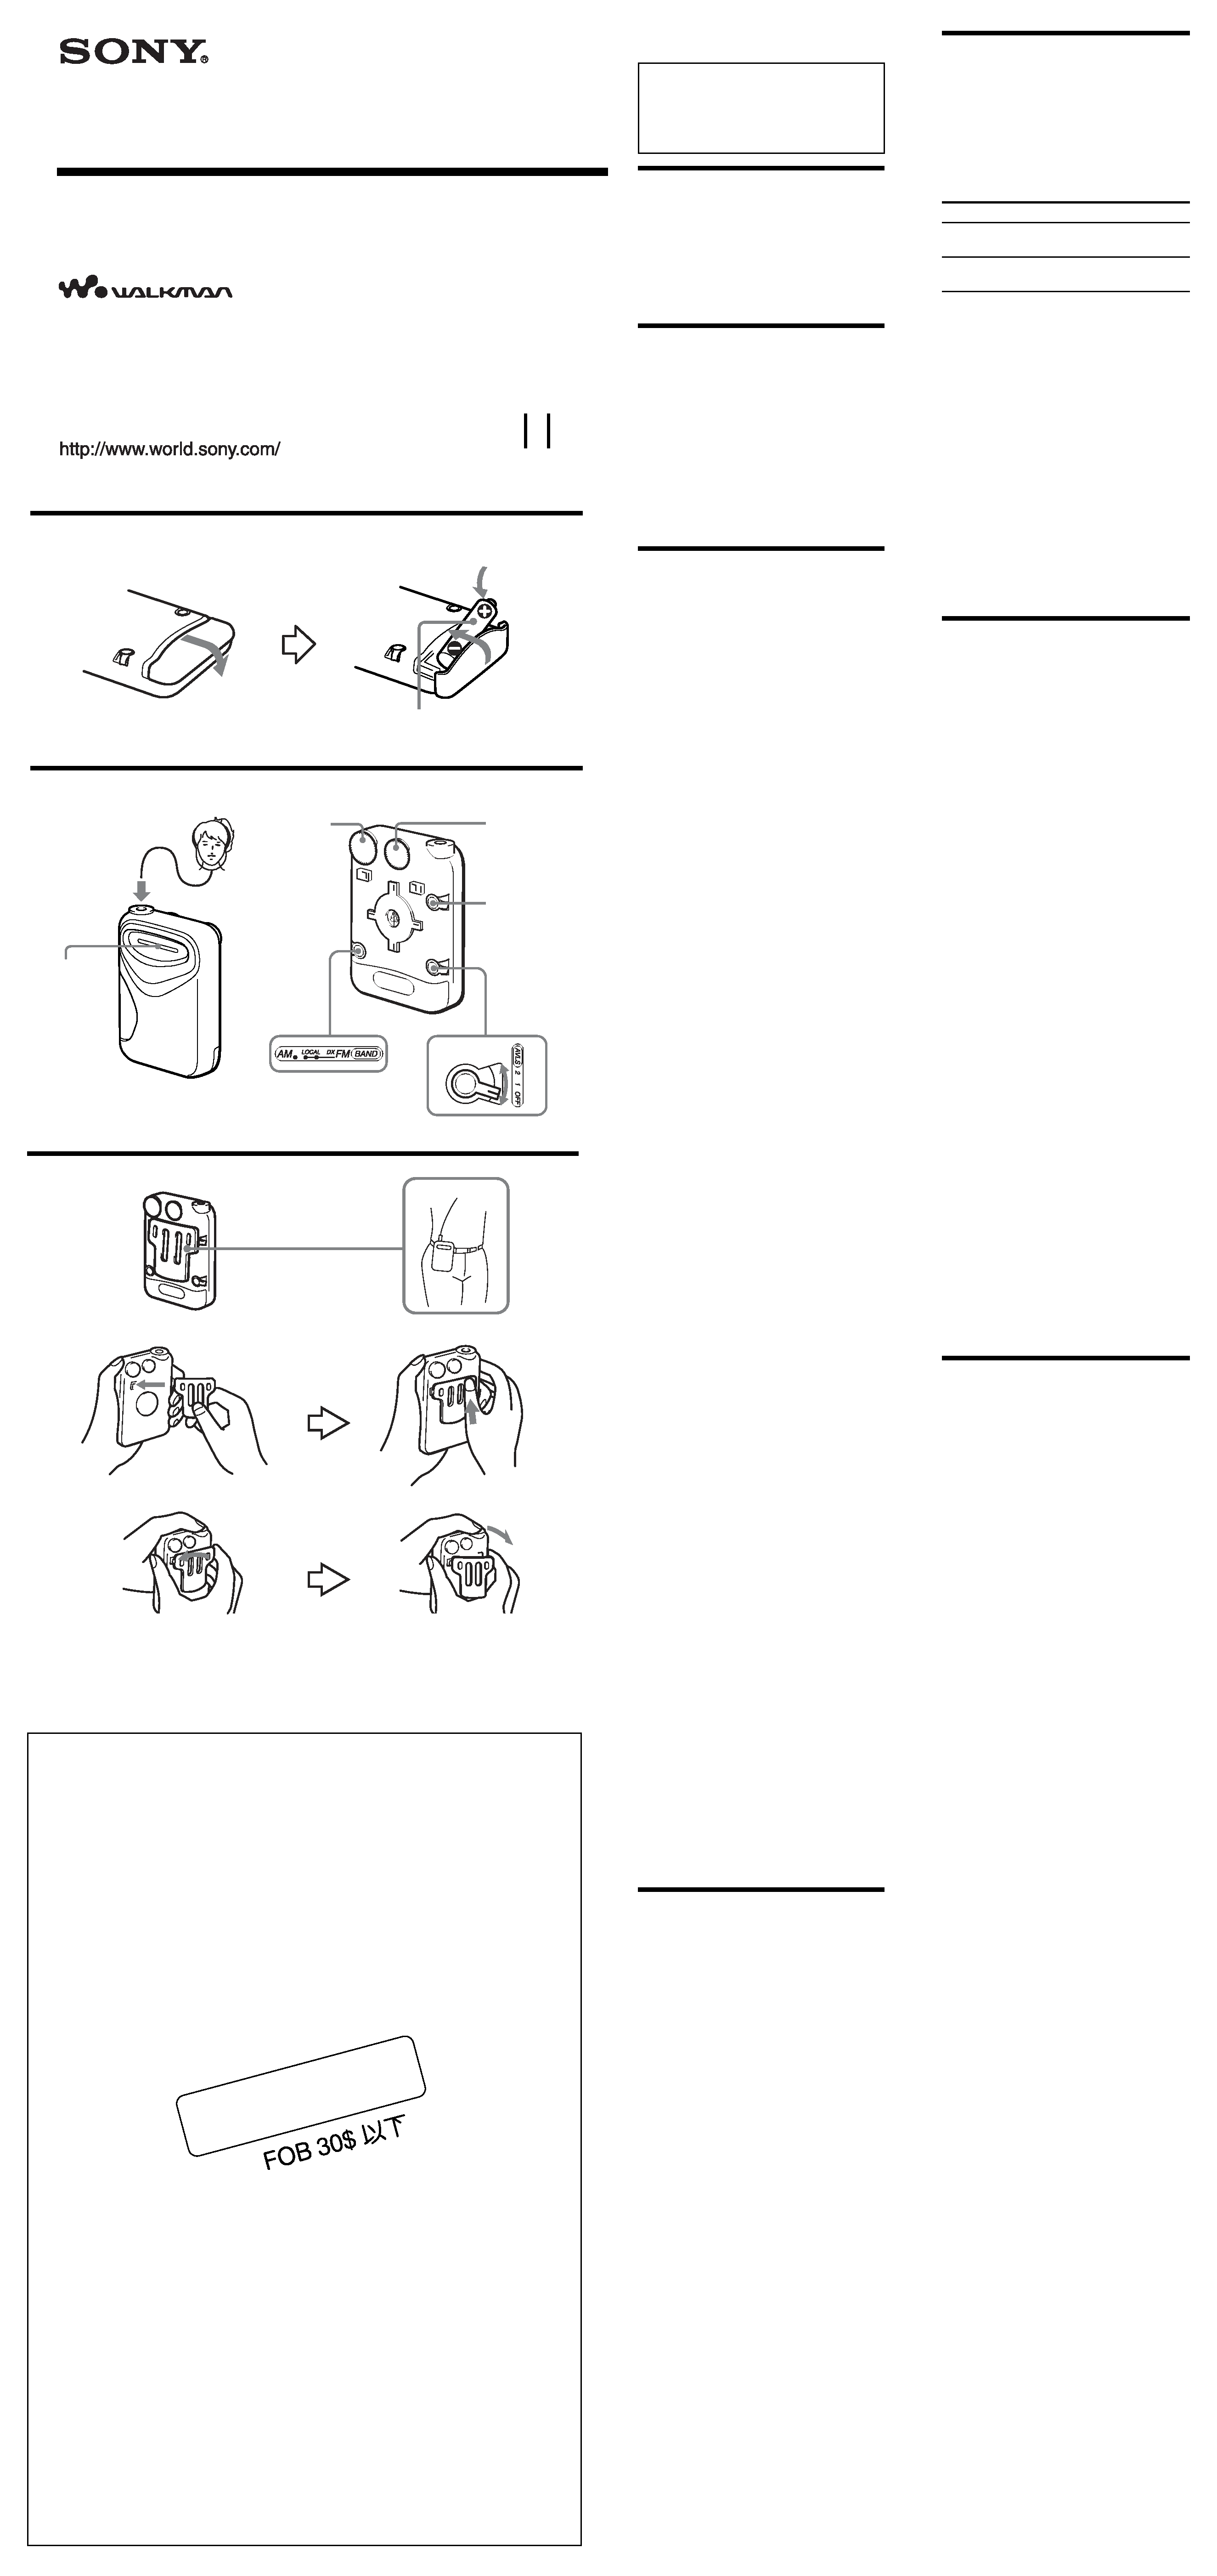
Insert the # side of the battery first.
Dial scale
Front
Rear
VOL
TUNE
POWER
LIMITED
WARRANTY
(Portable
Audio)
You are cautioned that any
changes or modifications not
expressly approved in this manual
could void your authority to
operate this equipment.
Before You Begin
Thank you for choosing the Sony
Radio! It will give you many hours of
reliable service and listening pleasure.
Before operating the unit, please read
these instructions thoroughly and
retain them for future reference.
Features
· Water-resistant for all-weathers
· Can be attached to your hand, arm,
or your waist
· Requires only 1.5 V DC from one
size AA (R6) battery
· The AVLS (Automatic Volume
Limiter System) selector to allow
you to limit the maximum volume
without degrading the sound
quality
Precautions
· Operate the unit only on 1.5 V DC
with one size AA (R6) battery.
· Avoid exposure to temperature
extremes, direct sunlight, moisture,
sand, dust or mechanical shock.
Never leave in a car parked in the
sun.
· Should any solid object or liquid fall
into the unit, remove the battery
and have the unit checked by a
qualified personnel before operating
it any further.
· In vehicles or buildings, radio
reception may be difficult or noisy.
Try listening near a window.
· To clean the casing, use a soft cloth
dampened with a mild detergent
solution.
Notes on Headphones
Road safety
Do not use headphones while driving,
cycling, or operating any motorized
vehicle. It may create a traffic hazard
and is illegal in many areas. It can also
be potentially dangerous to play your
headphones at high volume while
walking, especially at pedestrian
crossings. You should exercise
extreme caution or discontinue use in
potentially hazardous situations.
Preventing hearing damage
Avoid using headphones at high
volume.
Hearing experts advise against
continuous, loud and extended play. If
you experience a ringing in your ears,
reduce the volume or discontinue use.
Caring for others
Keep the volume at a moderate level.
This will allow you to hear outside
sounds and to be considerate to
people around you.
Cautions on Water-resistance
This radio is designed so that it can be
used with slight exposure to rain,
snow and other forms of moisture, but
there are several points on which
caution should be observed.
· Do not allow it to come in contact
with large amounts of water.
· Do not immerse it in water.
· If water should get on it or if it
should fall into water, take it out
immediately and wipe it off with a
dry cloth. The interior of the
battery compartment has no
water-resistance. The battery may
corrode, so wipe out the interior of
the battery compartment as follows.
Open or close the battery
compartment with dry hands in a
place without exposure to any
water.
Wipe off the battery and the
inside of the battery compart-
ment. Give special attention to the
contacts so that no water remains
on them.
Warning
If there is lightning when you are
using the unit, take off the head-
phones immediately.
If you have any questions or problems
concerning your unit, please consult
the nearest Sony dealer.
Specifications
Frequency range:
FM: 87.6 - 108 MHz
AM: 530 - 1 710 kHz
Power output:
Headphones: 3.6 mW + 3.6 mW
(at 10 % harmonic distortion)
Output:
Headphones jack (ø 3.5 mm stereo
minijack) load impedance 16
Power requirements:
1.5 V DC, one size AA (R6) battery
Dimensions:
Approx. 65 × 96.8 × 26 mm (w/h/d)
(2 5/8 × 3 7/8 × 1 1/16 inches) excl.
projecting parts and controls
Mass:
Approx. 95.8 g (3.4 oz) incl. battery
Supplied accessories
Stereo headphones (1, Vertical-in-the-
ear type), Belt Clip (1), Arm band (1),
Mount (1)
Design and specifications are subject
to change without notice.
Installing the Battery
(See Fig. A)
1 Open the battery compartment
lid and install one battery.
2 Close the lid.
Battery Life
(Approx. hours)
(EIAJ*)
FM
AM
Sony alkaline
95
130
size AA (LR6)
Sony
35
45
size AA (R6)
* Measured value by the standard of EIAJ
(Electronic Industries Association of
Japan)
The battery life may shorten depending
on the operation of the unit.
When replacing the battery
Replace the battery when the sound
becomes weak or distorted. Remove
the old battery and insert a new one.
Notes on Battery
· Insert the battery with correct
polarity.
· The battery can not be charged.
· Remove the battery when the unit is
not to be used for a long time.
· Should any battery leakage occur,
wipe the battery case well and
install a new battery.
Playing the radio
(See Fig. B)
1 Connect the supplied
headphones to i
(headphones) jack.
2 Set the POWER switch to ON
to turn on the radio.
3 Select the BAND.
FM
DX : for FM reception, normally
set it to DX.
LOCAL : if a very strong signal
causes noise, set it to
LOCAL.
AM : for AM reception.
4 Adjust the volume with VOL.
5 Tune in the desired station.
To turn off the radio
Set the POWER switch to OFF.
To improve the reception
FM : The headphones cord serves as
the antenna, so extend it as long as
possible.
AM : A ferrite bar antenna is built into
the radio for AM reception. Rotate the
radio horizontally for optimum
reception.
Using the AVLS function
When the AVLS selector (see fig.
B-a) is set to either position 1 or 2,
(around 95 dB, 85 dB respectively) the
volume will be kept at a moderate
level without degradation of the sound
quality, even if you attempt to turn the
volume up higher.
When the AVLS selector is turned off,
you will be able to enjoy the full
volume capability of your radio.
Attaching to your belt
(See Fig. C)
Use the belt clip when attaching the
unit to your belt.
To attach the belt clip, see fig. C-a.
To detach the belt clip, see fig. C-b.
WARNING
a
i
2
D 1
A side
Pull
2
1
A side
B side
34
E 1
2
12
B side
A side
Lower side
Upper side
Pull
Upper side
Lower side
F
G
H 1
Lower side
2
B side
3
A side
B side
I 1
Upper side
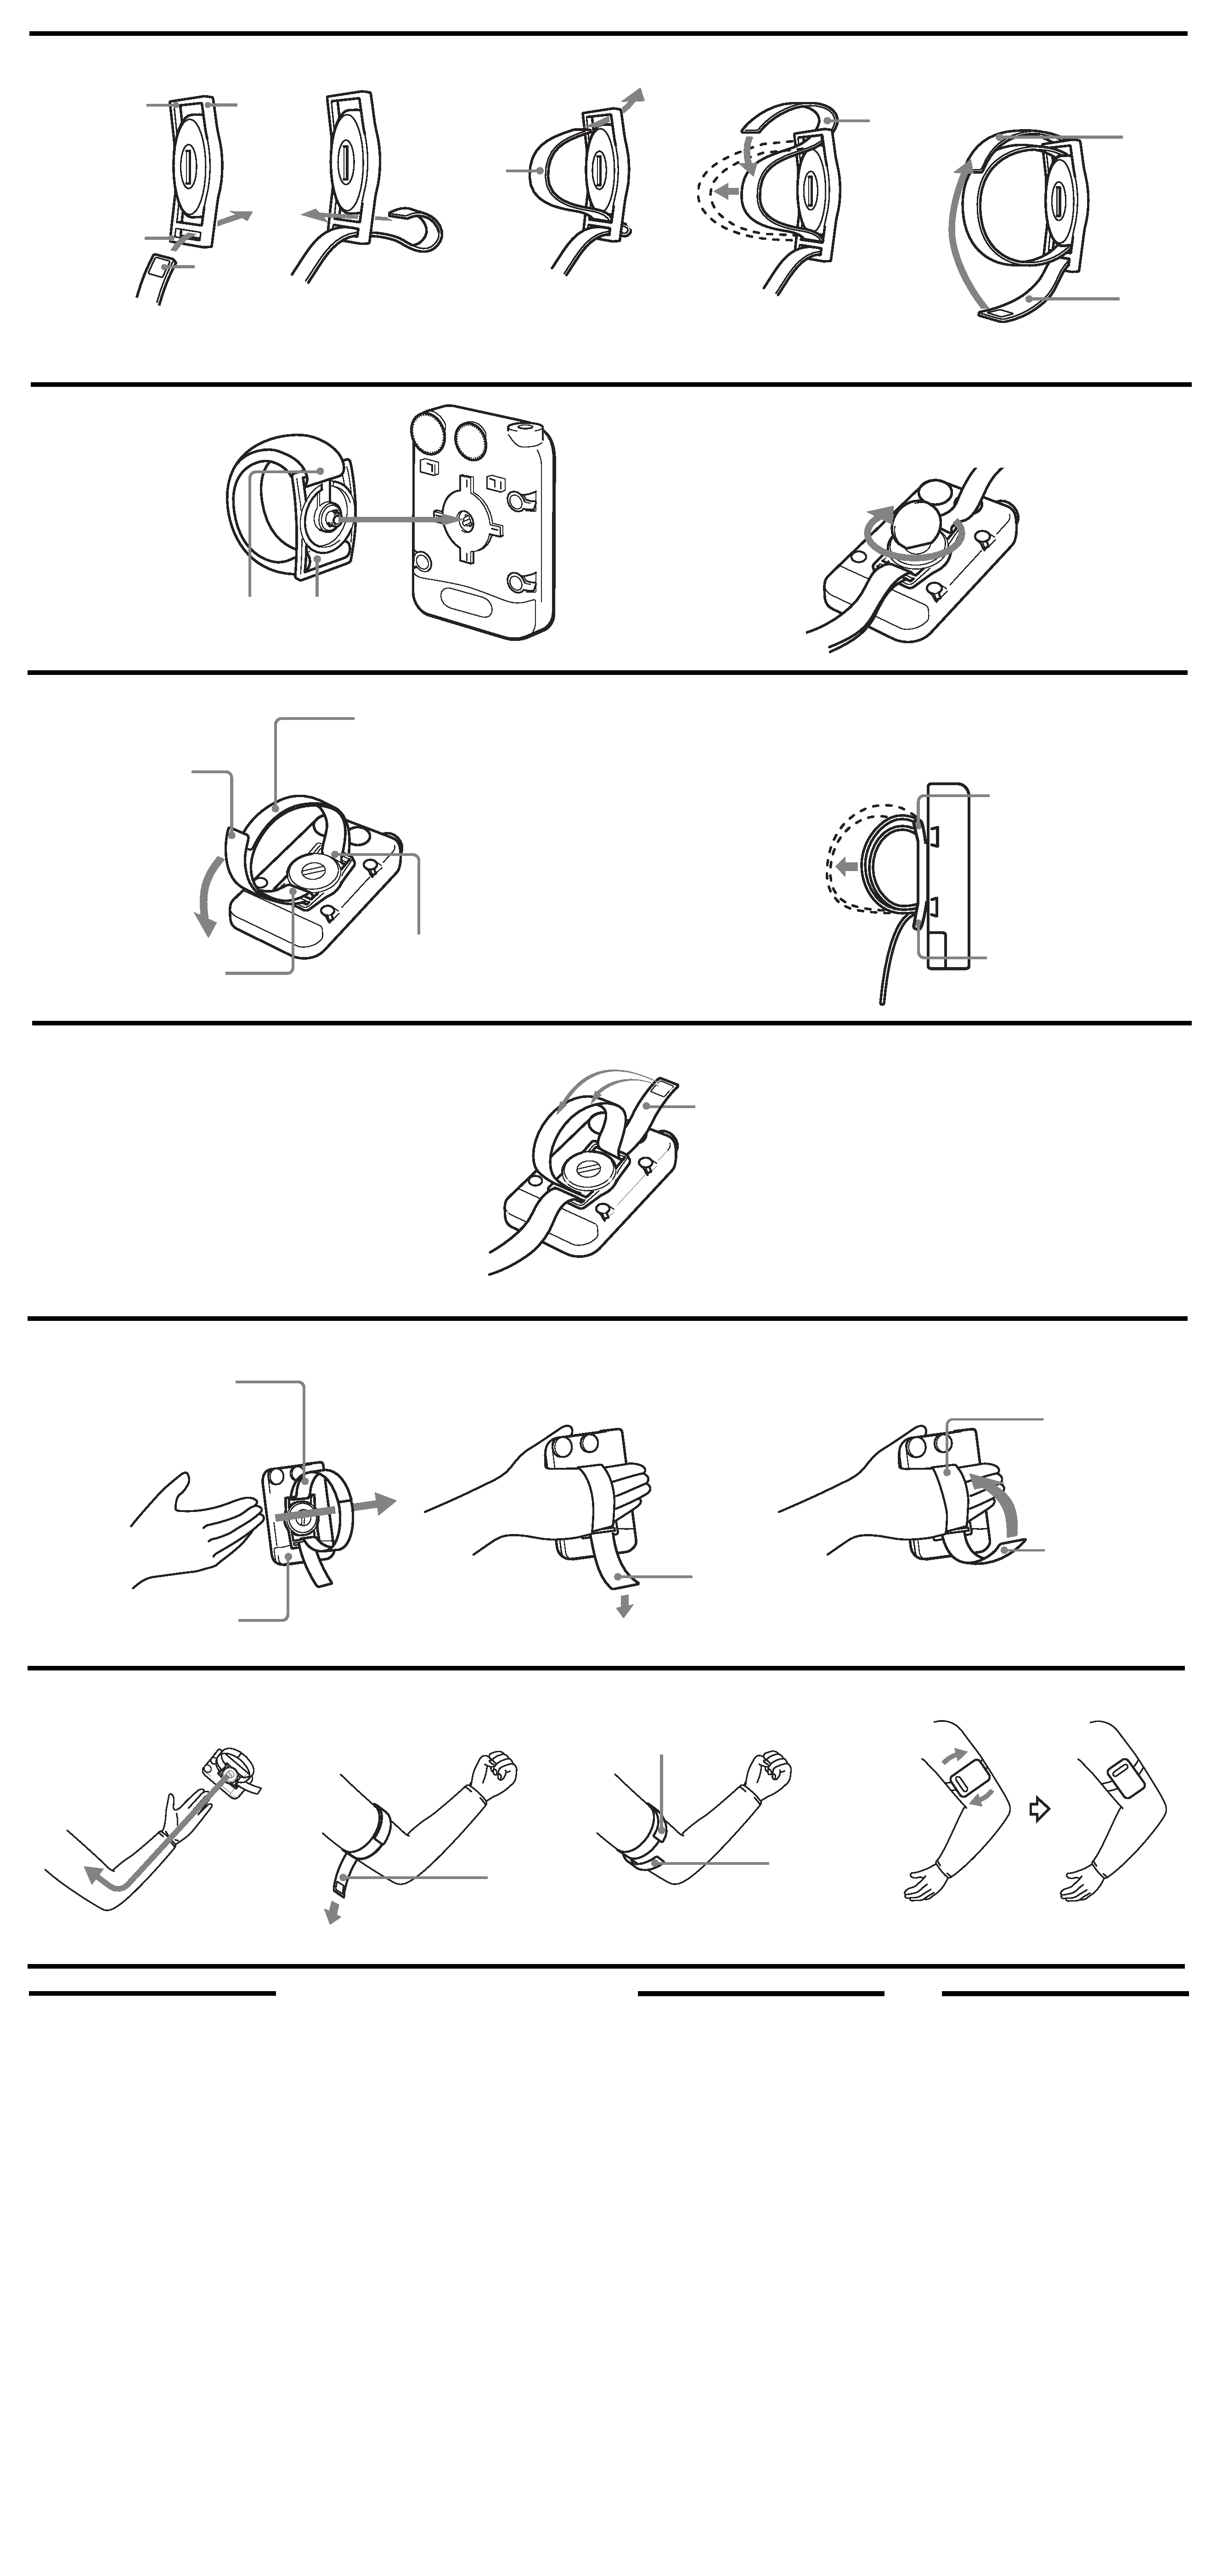
Before attaching to
your hand or arm
When you use the unit while doing
sports, use the arm band to attach the
unit to your hand or arm.
Threading the arm band
to the mount (See Fig. D)
1 Thread the arm band to the
lower side of the mount. The
arm band which has Velcro
tape must be above.
2 Thread the A side to the upper
side of the mount.
3 Attach the A side to the band
1
and pull the band 2 to
extend the loop.
4 Attach the B side to the A side.
Connecting the mount to
the unit (See Fig. E)
1 Connect the mount that is
attached the arm band to the
knob of the unit.
2 Fasten the shaft using a coin.
Adjusting the length of
the band (See Fig. F)
1 Detach the B side from the A
side.
2 Extend the loop to be able to
insert your hand or arm.
To adjust more tightly (or
loosely) (See Fig. G)
Change the position of the A side and
reattach to the band.
Attaching to your
hand (See Fig. H)
1 Put your hand into the loop.
2 Pull the B side.
3 Attach the B side to the A side.
A side
Upper side
Lower side
A side
Upper
side
Lower
side
Velcro tape
Mount
4
3
A side
B side
2
B side
Attaching to your
arm (See Fig. I)
1 Put your arm into the loop.
2 Pull the B side.
3 Attach the B side to the A side.
4 Rotate the unit.