Operating Instructions
Sony Corporation
2001 Printed in Korea
RM-XM10
Marine Remote
Commander
3-225-765-11 (1)
Specifications
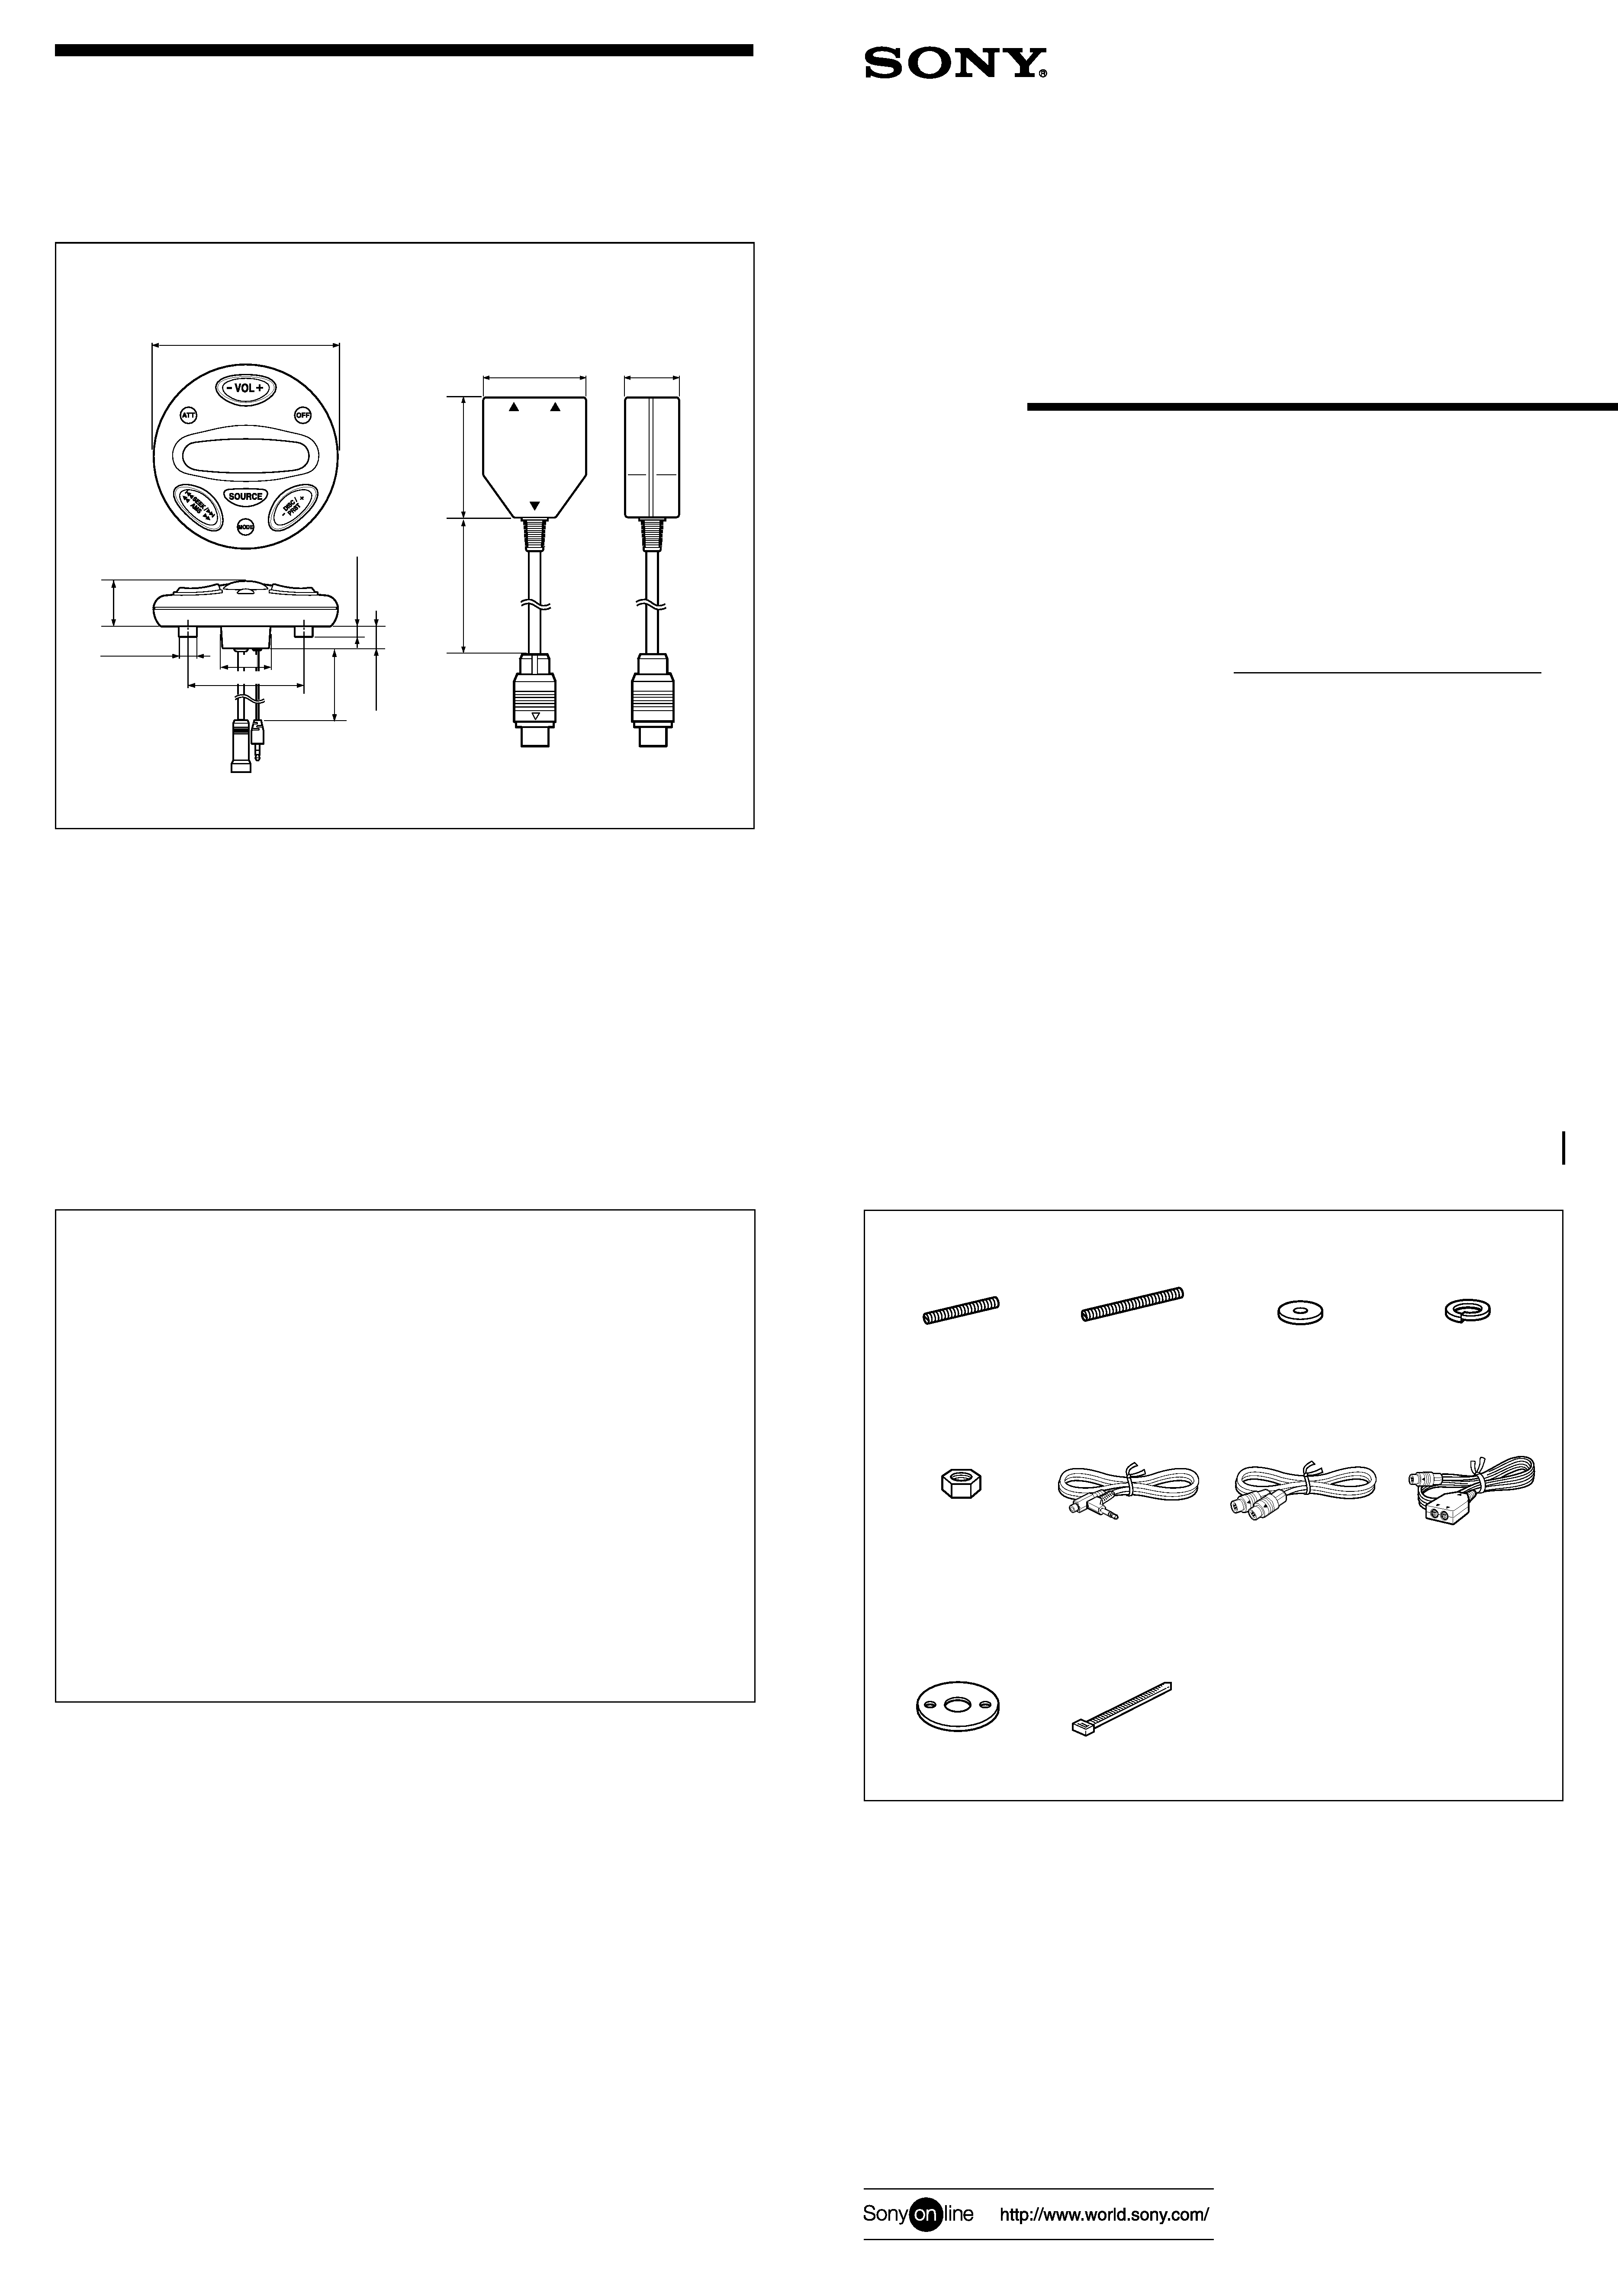
Dimensions
84.9
× 18.8 × 84.9 mm (w/h/d) (3 3/8 × 3/4 × 3 3/8 in.)
Mass
Approx. 113 g (4 oz.)
Supplied accessories
Parts for installation and connections (1 set)
Design and specifications are subject to change without notice.
1
Parts list
23
56
M4
(
× 2)
M4
(
× 2)
M4
× 65
(
× 2)
Dimensions
Unit: mm (in.)
7
4
8
M4
× 45
(
× 2)
M4
(
× 2)
MASTERUNIT
CHANGER
COMMANDER/
DISPLAY
59
(2
3 /
8)
50 (2)
25 (1)
84.9 (3 3/8)
* 23.9 (31/32)
8 (11/32)
4.8
(
7 /
32
)
15
(
19
/32
)
5 m (196 7/8 in.)
5 m (196 7/8 in.)
Owner's Record
The model and serial numbers are located on the bottom of the unit.
Record these numbers in the space provided below.
Refer to these numbers whenever you call upon your Sony dealer regarding this
product.
Model No. RM-XM10 Serial No.
500
(19
3 /
4)
18.8
(3
/
4)
200
(7
7 /
8)
90
54 (2 1/4)
*
For the customers in the USA
WARNING
This equipment has been tested and found to comply with the limits for a Class B digital
device, pursuant to Part 15 of the FCC Rules. These limits are designed to provide reasonable
protection against harmful interference in a residential installation. This equipment generates,
uses, and can radiate radio frequency energy and, if not installed and used in accordance with
the instructions, may cause harmful interference to radio communications. However, there is
no guarantee that interference will not occur in a particular installation. If this equipment does
cause harmful interference to radio or television reception, which can be determined by
turning the equipment off and on, the user is encouraged to try to correct the interference by
one or more of the following measures:
--
Reorient or relocate the receiving antenna.
--
Increase the separation between the equipment and receiver.
--
Connect the equipment into an outlet on a circuit different from that to which the receiver
is connected.
--
Consult the dealer or an experienced radio/TV technician for help.
This device complies with Part 15 of the FCC Rules. Operation is subject to the following two
conditions: (1) This device may not cause harmful interference, and (2) this device must accept
any interference received, including interference that may cause undesired operation.
You are cautioned that any changes or modifications not expressly approved in this manual
could void your authority to operate this equipment.
Features
With this remote commander, you can control your car audio equipment easily.
Use this remote commander with master units equipped with the special input jack for the rotary
commander and the Sony Bus system control.
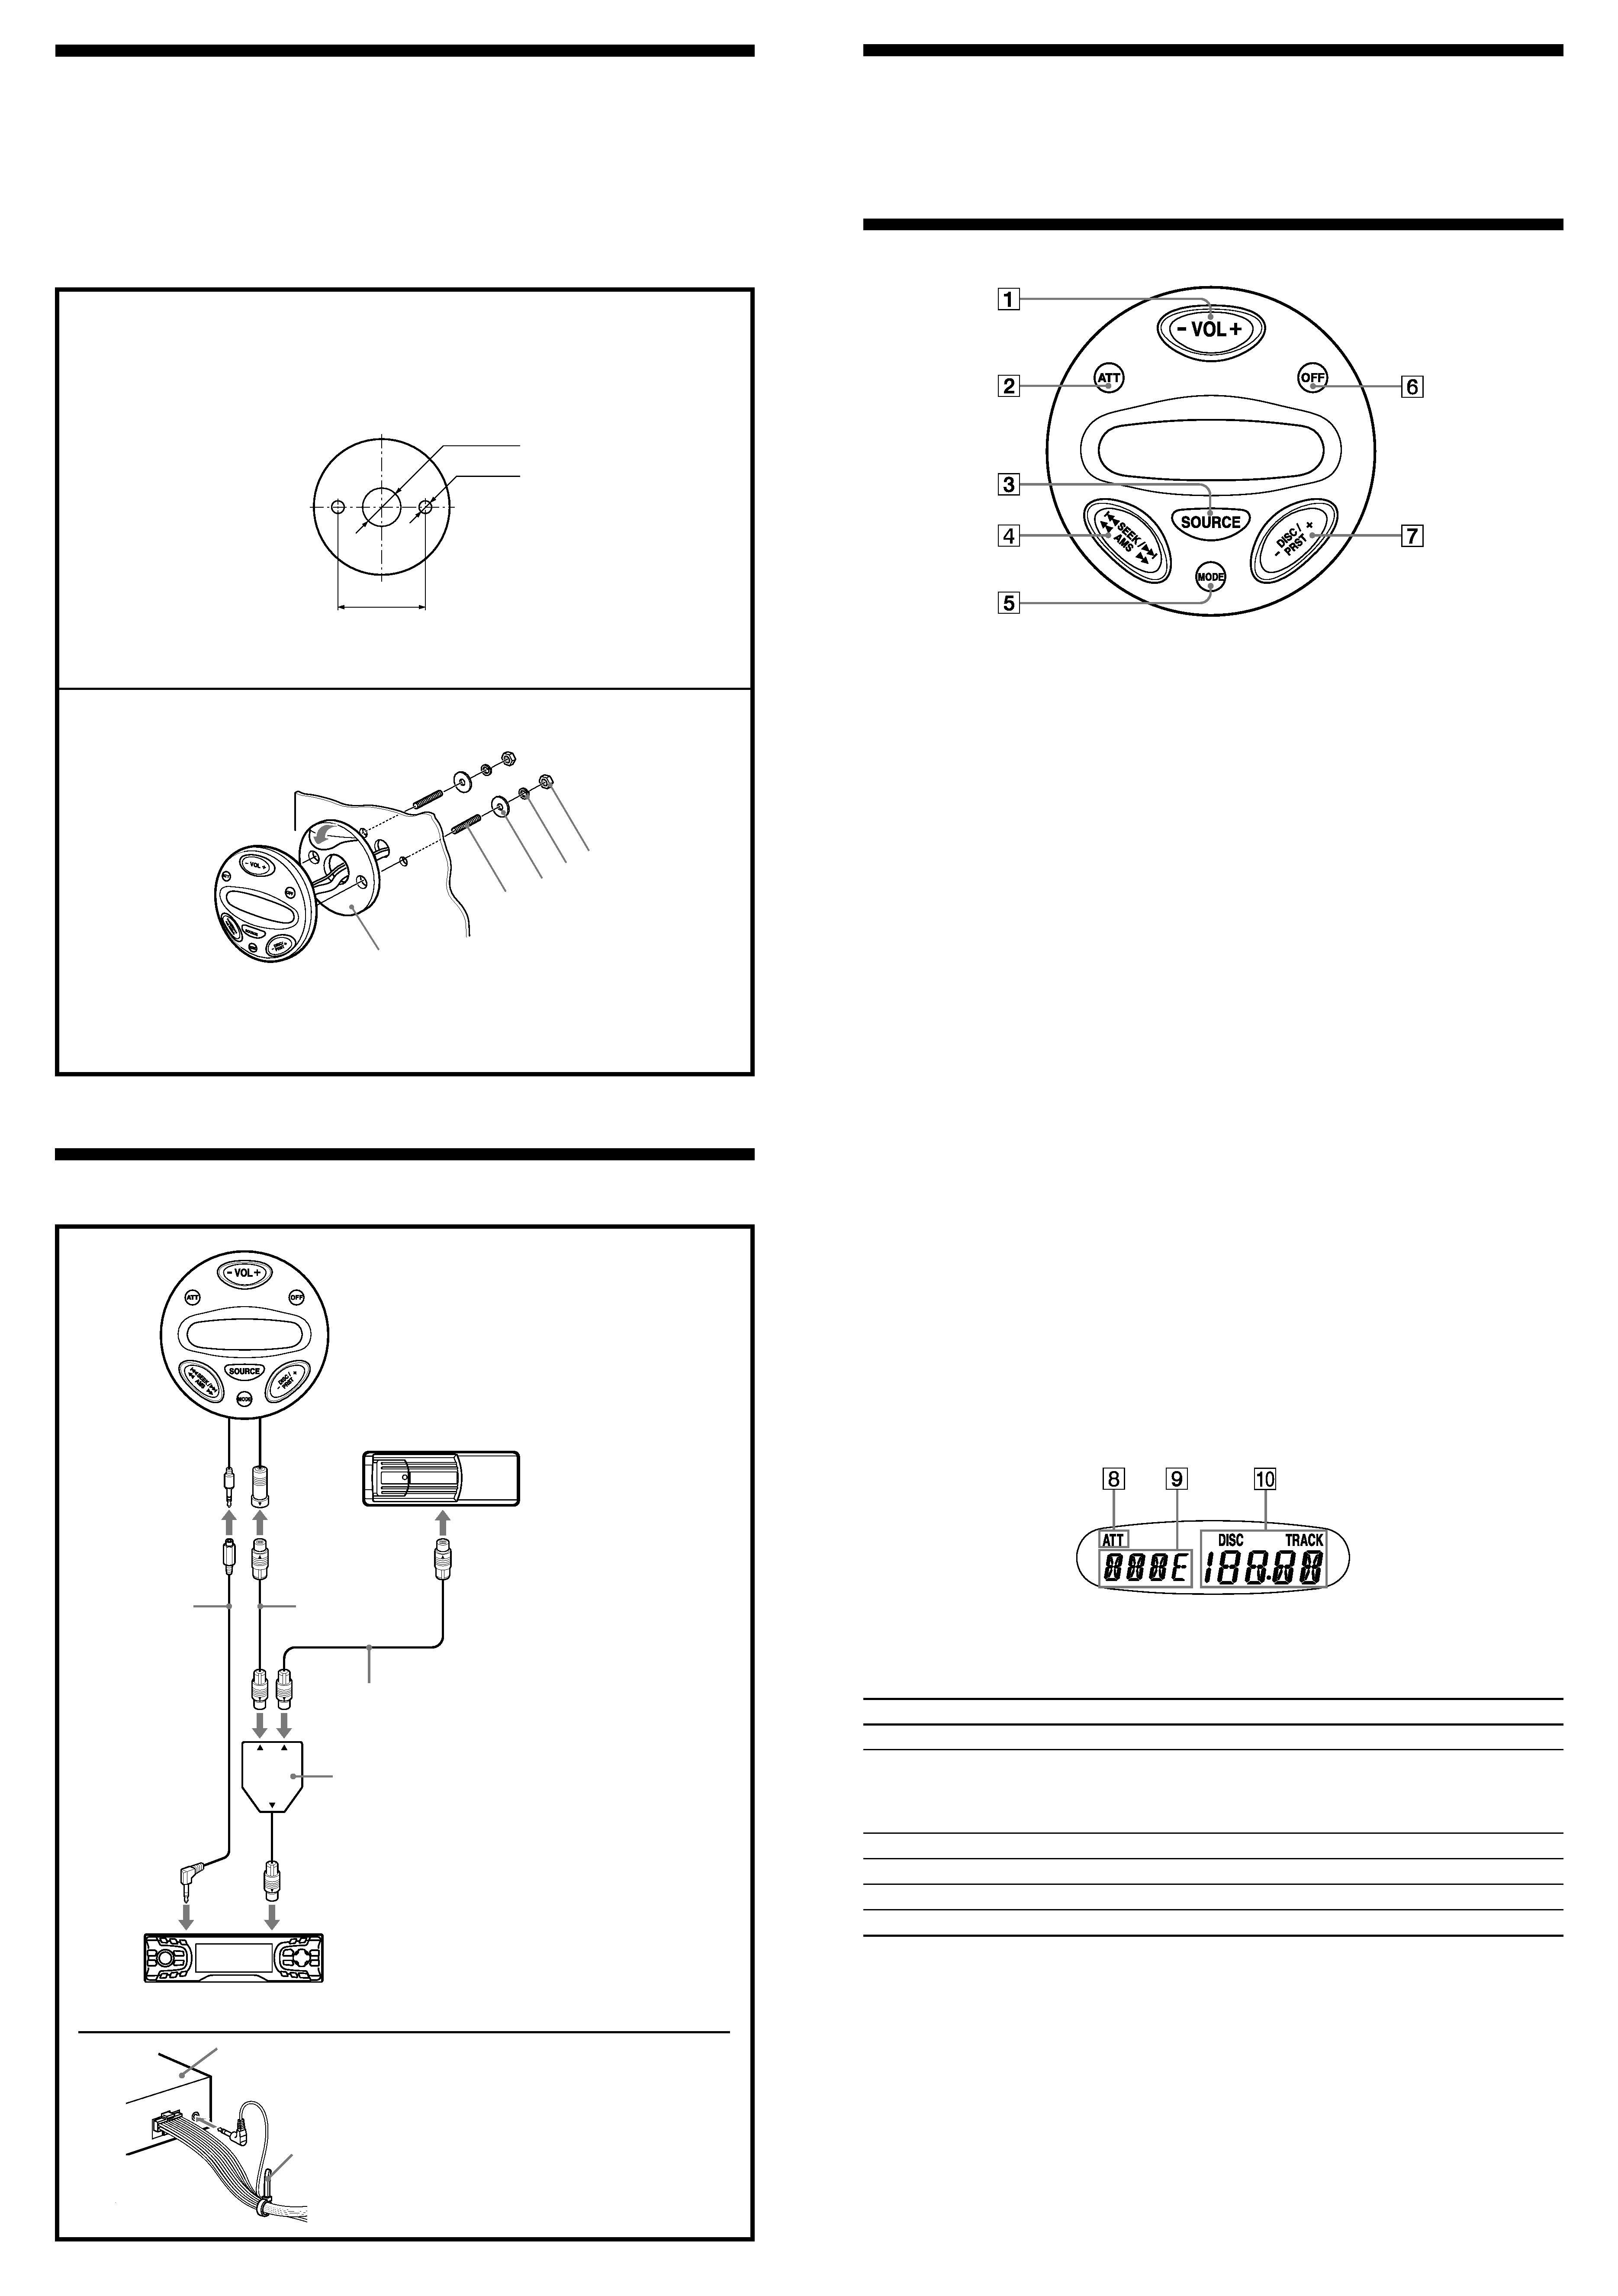
Location and function of controls
The following buttons (except the SOURCE and MODE button) share the same functions as those on
the master unit or the wireless remote commander.
For more information about the functions of each button or control, refer to the operating instructions
of your Sony car audio equipment.
1
VOL (volume) + button
2
ATT (attenuate) button
Press to attenuate the sound momentarily.
3
SOURCE button
Press to select program sources.
4
SEEK/AMS button
During tape or CD/MD playback:
·AMS* function: Locates the beginning of tracks. Each time you press either side of the button a
track is skipped.
To skip several tracks at once, press either side of the button momentarily and release. Within one
second, press it again and hold it.
* Automatic Music Sensor.
·Manual search: Locates the desired part of a track. Press and hold either side of the button until
the desired part is located. When the desired track is reached, release.
During radio/TV reception:
·Automatic tuning: Automatically tunes in to a station. When a station is tuned in, the search stops
automatically. Press either side of the button momentarily several times until a desired station is
tuned in.
·Manually searches for a station. Press either side of the button until the desired station is tuned
in. If you press again within one second, you can continue manually search for another station.
5
MODE button
·Changes the playback side of the cassette.
·Selects CD units when several CD units are connected.
For example: CD1
t CD2 t ···
·Selects MD units when several MD units are connected.
For example: MD1
t MD2 t ···
·Changes the preset groups.
For example: FM1
t FM2 t AM t ···
·Changes the TV/AUX (video) mode.
6
OFF button
Press to turn off the unit.
7
DISC/PRST button
·Fast-winds the tape. To resume normal playback, press the MODE button.
·Changes the disc when one or more CD/MD units are connected.
·Receives the stations memorized on the preset number buttons on the master unit.
8
ATT (attenuate) indicator
When the ATT function is on, the ATT indicator blinks.
9
Source information
0
Mode information
Source
Source information (9)
Mode information (0)
Tuner
FM1, FM2, AM
Frequency
Tape
TAPE
· FWD (Forward)
· REV (Reverse)
· FF (Fast-forward)
· REW (rewind)
CD/MD
CD, MD
Disc number (with the CD/MD units) and Track number
TV
TV
Channel number
Video
AUX
Volume
VOL
Volume level
Installation
Notes
· Choose the mounting location carefully so that the remote commander:
-- will not interfere with driving the motorboat.
-- can easy of operate the remote commander and the display is to see.
-- will not get wet or dirty from sea water, rain, dust, etc.
-- is not subject to high temperatures, such as from direct sunlight.
· Be sure to use only the supplied mounting hardware for a safe and secure installation.
· When installing the remote commander, be sure not to damage the electrical cables etc., on the other side
of the mounting surface.
1 Makethemountingholesasfollows.
2
Connection
MASTERUNIT
CHANGER
COMMANDER/
DISPLAY
1 or 2
3
4
5
ø 8.5 (11/32)
ø 24.5 (31/32)
54 (2 1/4)
Unit: mm (in.)
CD/MD changer
8
67
Not supplied
(supplied with CD/MD changer)
Master unit with Sony BUS system
Notes
· Be sure all the cords, connection plugs, and the
divide box are located and fixed in position so that
they are not subjected to high temperatures,
vibration, sea water, rain, dust, etc.
· When finished making all the connections, press
the RESET button of the master unit.
· When you connect the remote commander to the
master unit and other units (CD/MD changer etc.),
refer also to the Installation/Connections manual of
the master unit and other units.
· You cannot connect more than two CD/MD
changers.
Master unit
After connecting, bundle up the connecting
cords of the remote commander with other
connecting cords of the audio equipment by
attaching the supplied clamp 0. Be sure to
leave some slack in the connecting cord
between the plug and the clamp as
illustrated.
9
0