model name1[RM-LJ312]
[4-247-235-11(1)]
filename[\\Nas-data-server\SONY Current jobs\SONY RM-
LJ312\DTP\4247235111\424723511RMLJ312U\GB01COV_RM-LJ312-U.fm]
masterpage:Right
©2003 Sony Corporation
4-247-235-11(1)
Remote
Commander
Operating Instructions
RM-LJ312

masterpage:Left
filename[\\Nas-data-server\SONY Current jobs\SONY RM-
LJ312\DTP\4247235111\424723511RMLJ312U\GB02REG_RM-LJ312-U.fm]
2GB
model name1[RM-LJ312]
[4-247-235-11(1)]
Precautions
On safety
Should any solid object or liquid fall into the cabinet,
unplug the receiver and have it checked by qualified
personnel before operating it any further.
On operation
Before connecting other components, be sure to turn
off and unplug the receiver.
On cleaning
Clean the cabinet, panel and controls with a soft cloth
slightly moistened with a mild detergent solution. Do
not use any type of abrasive pad, scouring powder or
solvent such as alcohol or benzine.
If you have any question or problem concerning your
remote, please consult your nearest Sony dealer.
Before you use your remote
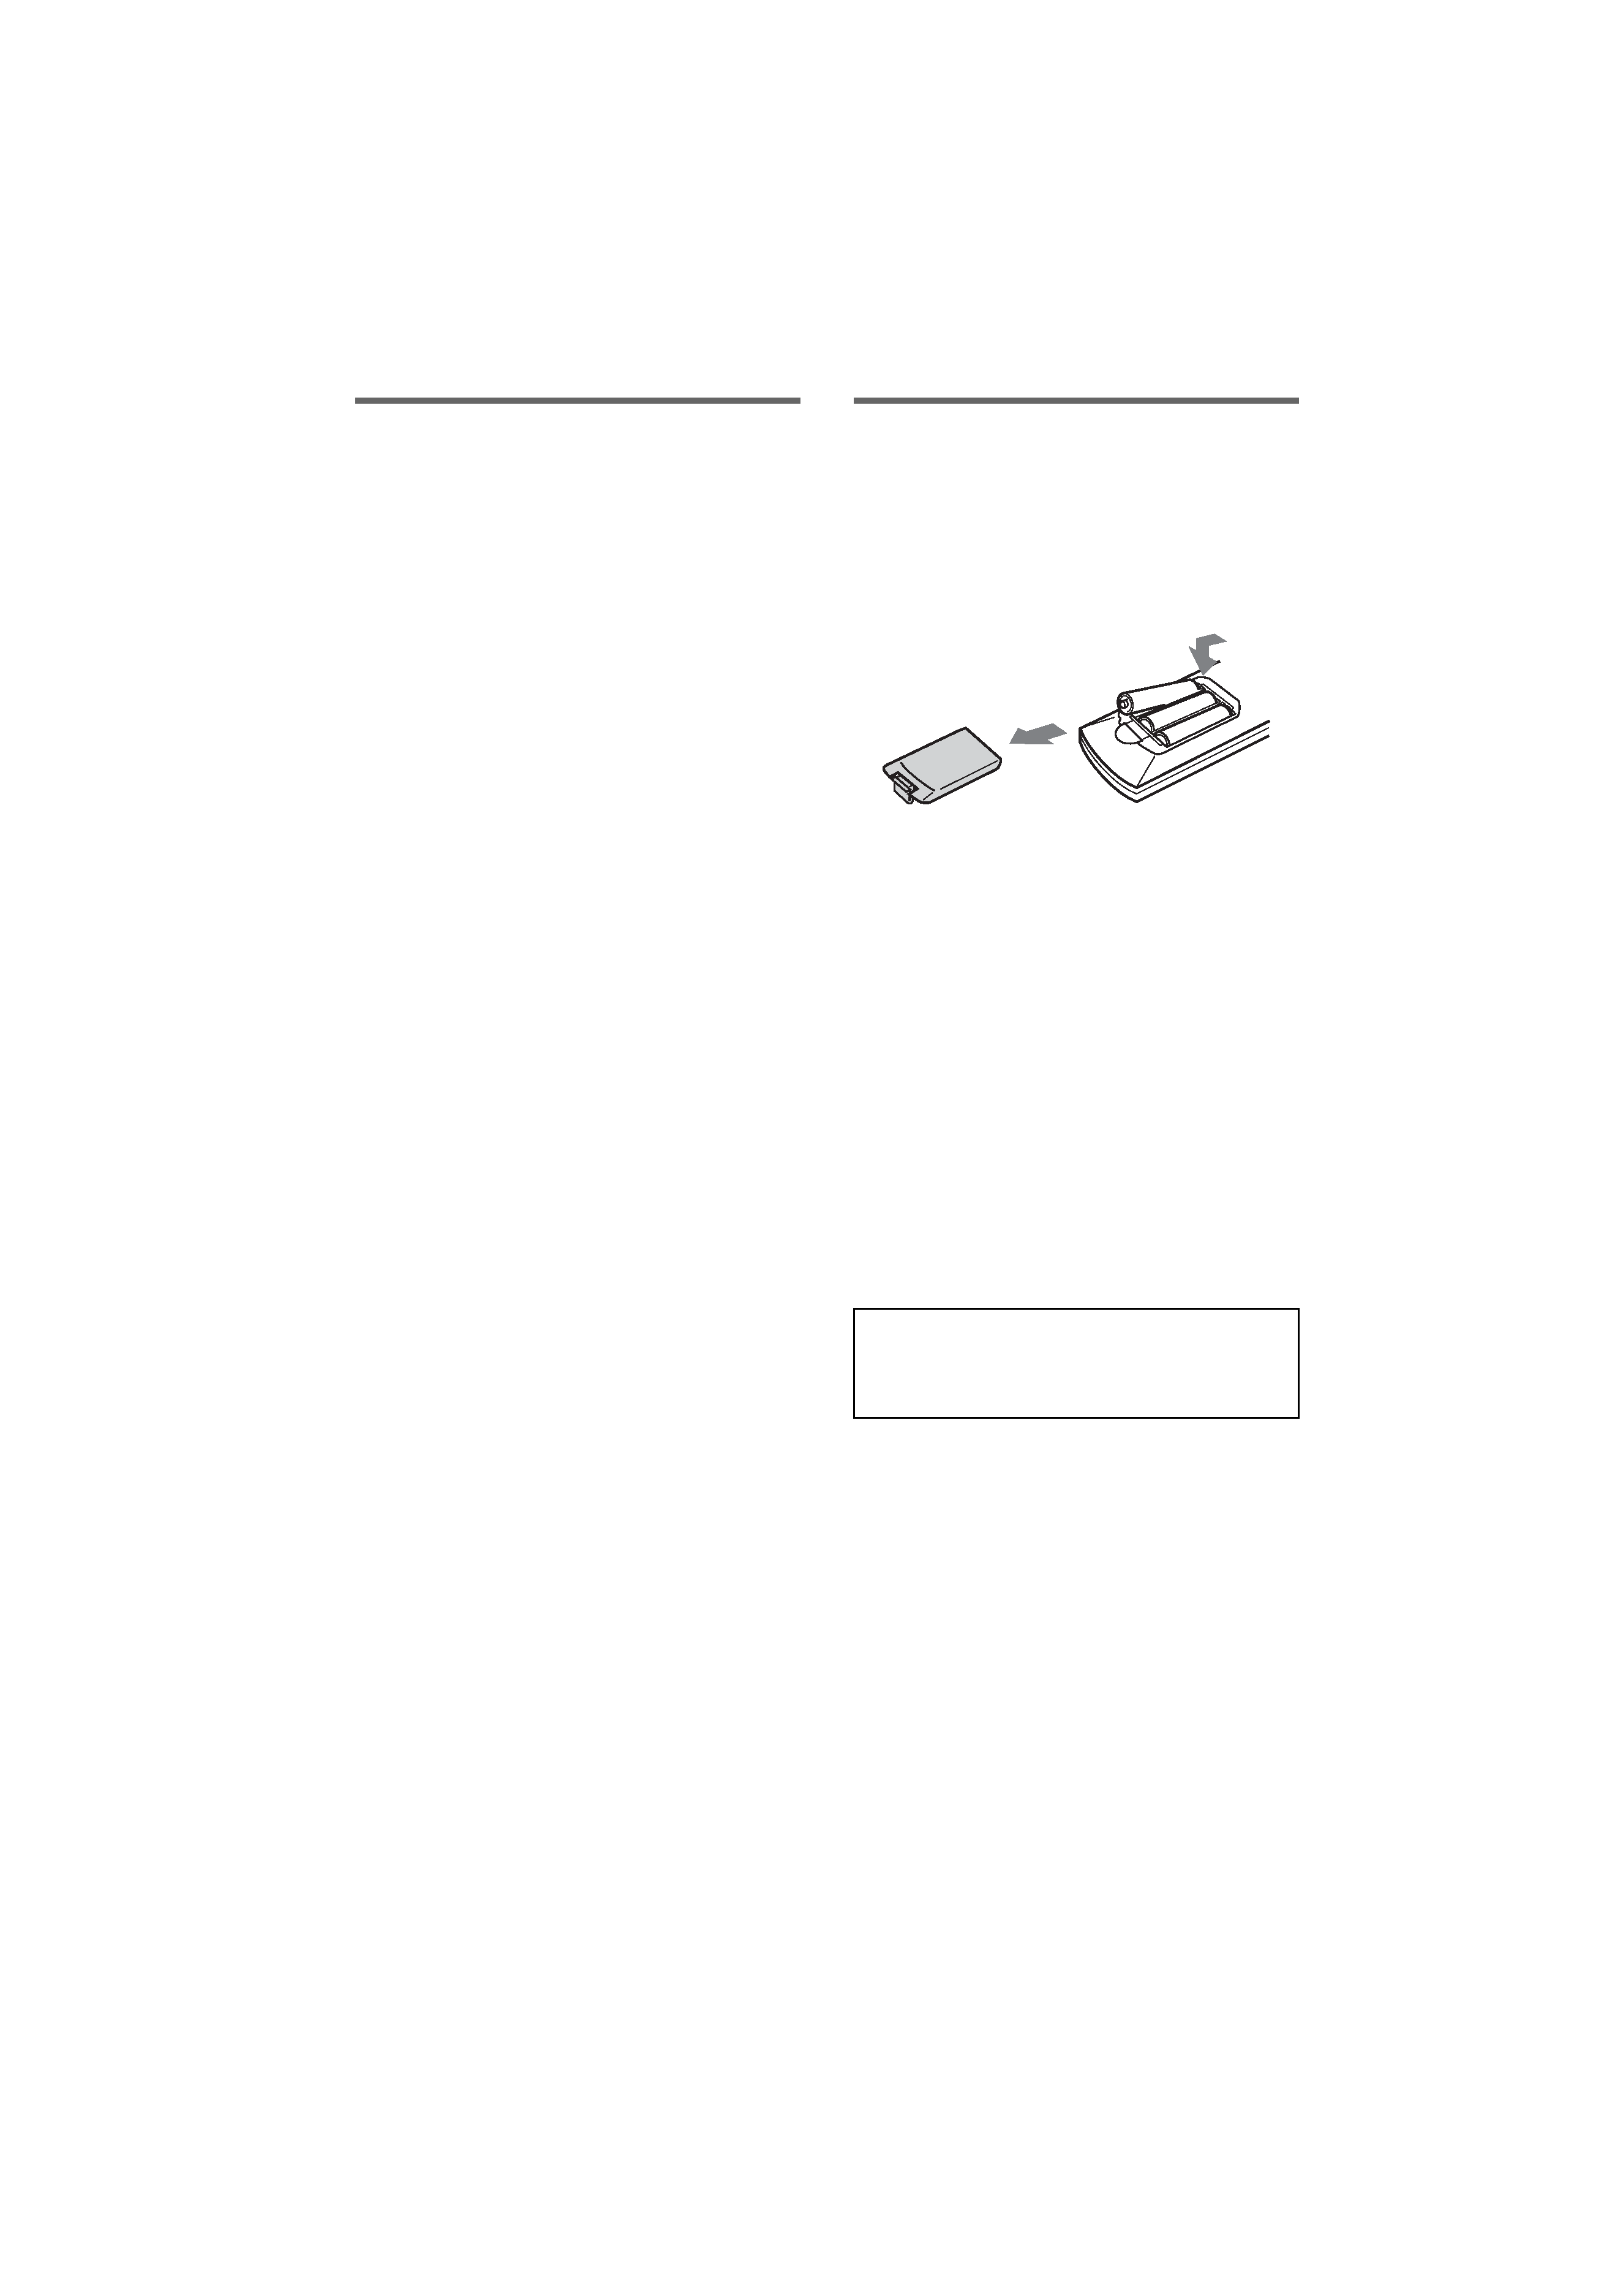
Inserting batteries into the
remote
Insert three R6 (size-AA) batteries with the +
and properly oriented in the battery
compartment.
Tip
Under normal conditions, the batteries should last for
about 3 months. When the remote no longer operates
the receiver, replace all the batteries with new ones.
Notes
· Do not leave the remote in an extremely hot or humid
place.
· Do not use a new battery with old ones.
· Do not mix the alkaline batteries and other kinds of
batteries.
· Do not expose the remote sensor of the receiver to
direct sunlight or lighting apparatuses. Doing so may
cause a malfunction.
· If you do not use the remote for an extended period
of time, remove the batteries to avoid possible
damage from battery leakage and corrosion.
When you use the remote for the first time, be sure to
perform the AMP REGIST operation (page 6). Some
functions may not be displayed depending of the
model.
E
e
e
E
E
e

masterpage:Right
filename[\\Nas-data-server\SONY Current jobs\SONY RM-
LJ312\DTP\4247235111\424723511RMLJ312U\GB02REG_RM-LJ312-UTOC.fm]
model name1[RM-LJ312]
[4-247-235-11(1)]
3GB
Location of parts and basic
remote operations
Parts description...................................... 4
Table of buttons used to control each
component ........................................ 7
Using the lists
Chart of lists .......................................... 11
Selecting a component .......................... 13
Listening to multi channel sound .......... 14
-- MULTI CH IN
Selecting a sound field .......................... 15
Enjoying Dolby Pro Logic II and DTS
NEO:6 ............................................. 15
Programming the remote....................... 16
Performing several commands in
sequence automatically................... 17
-- Macro Play
Using the RECEIVER menu................. 20
Learning the commands of your
components ..................................... 20
Downloading data from the receiver..... 22
Other operations.................................... 24
Additional Information
Troubleshooting ......................Back cover
Specifications ..........................Back cover
Table of Contents

masterpage:Left
filename[\\Nas-data-server\SONY Current jobs\SONY RM-
LJ312\DTP\4247235111\424723511RMLJ312U\GB03BSC_RM-LJ312-U.fm]
4GB
model name1[RM-LJ312]
[4-247-235-11(1)]
This chapter provides information on the
location of buttons and how to use them to
perform basic operations.
However, some functions explained in this
section may not operate depending on the
receiver.
For the functions of the receiver you purchased,
refer to the Operating Instructions supplied with
the receiver.
.
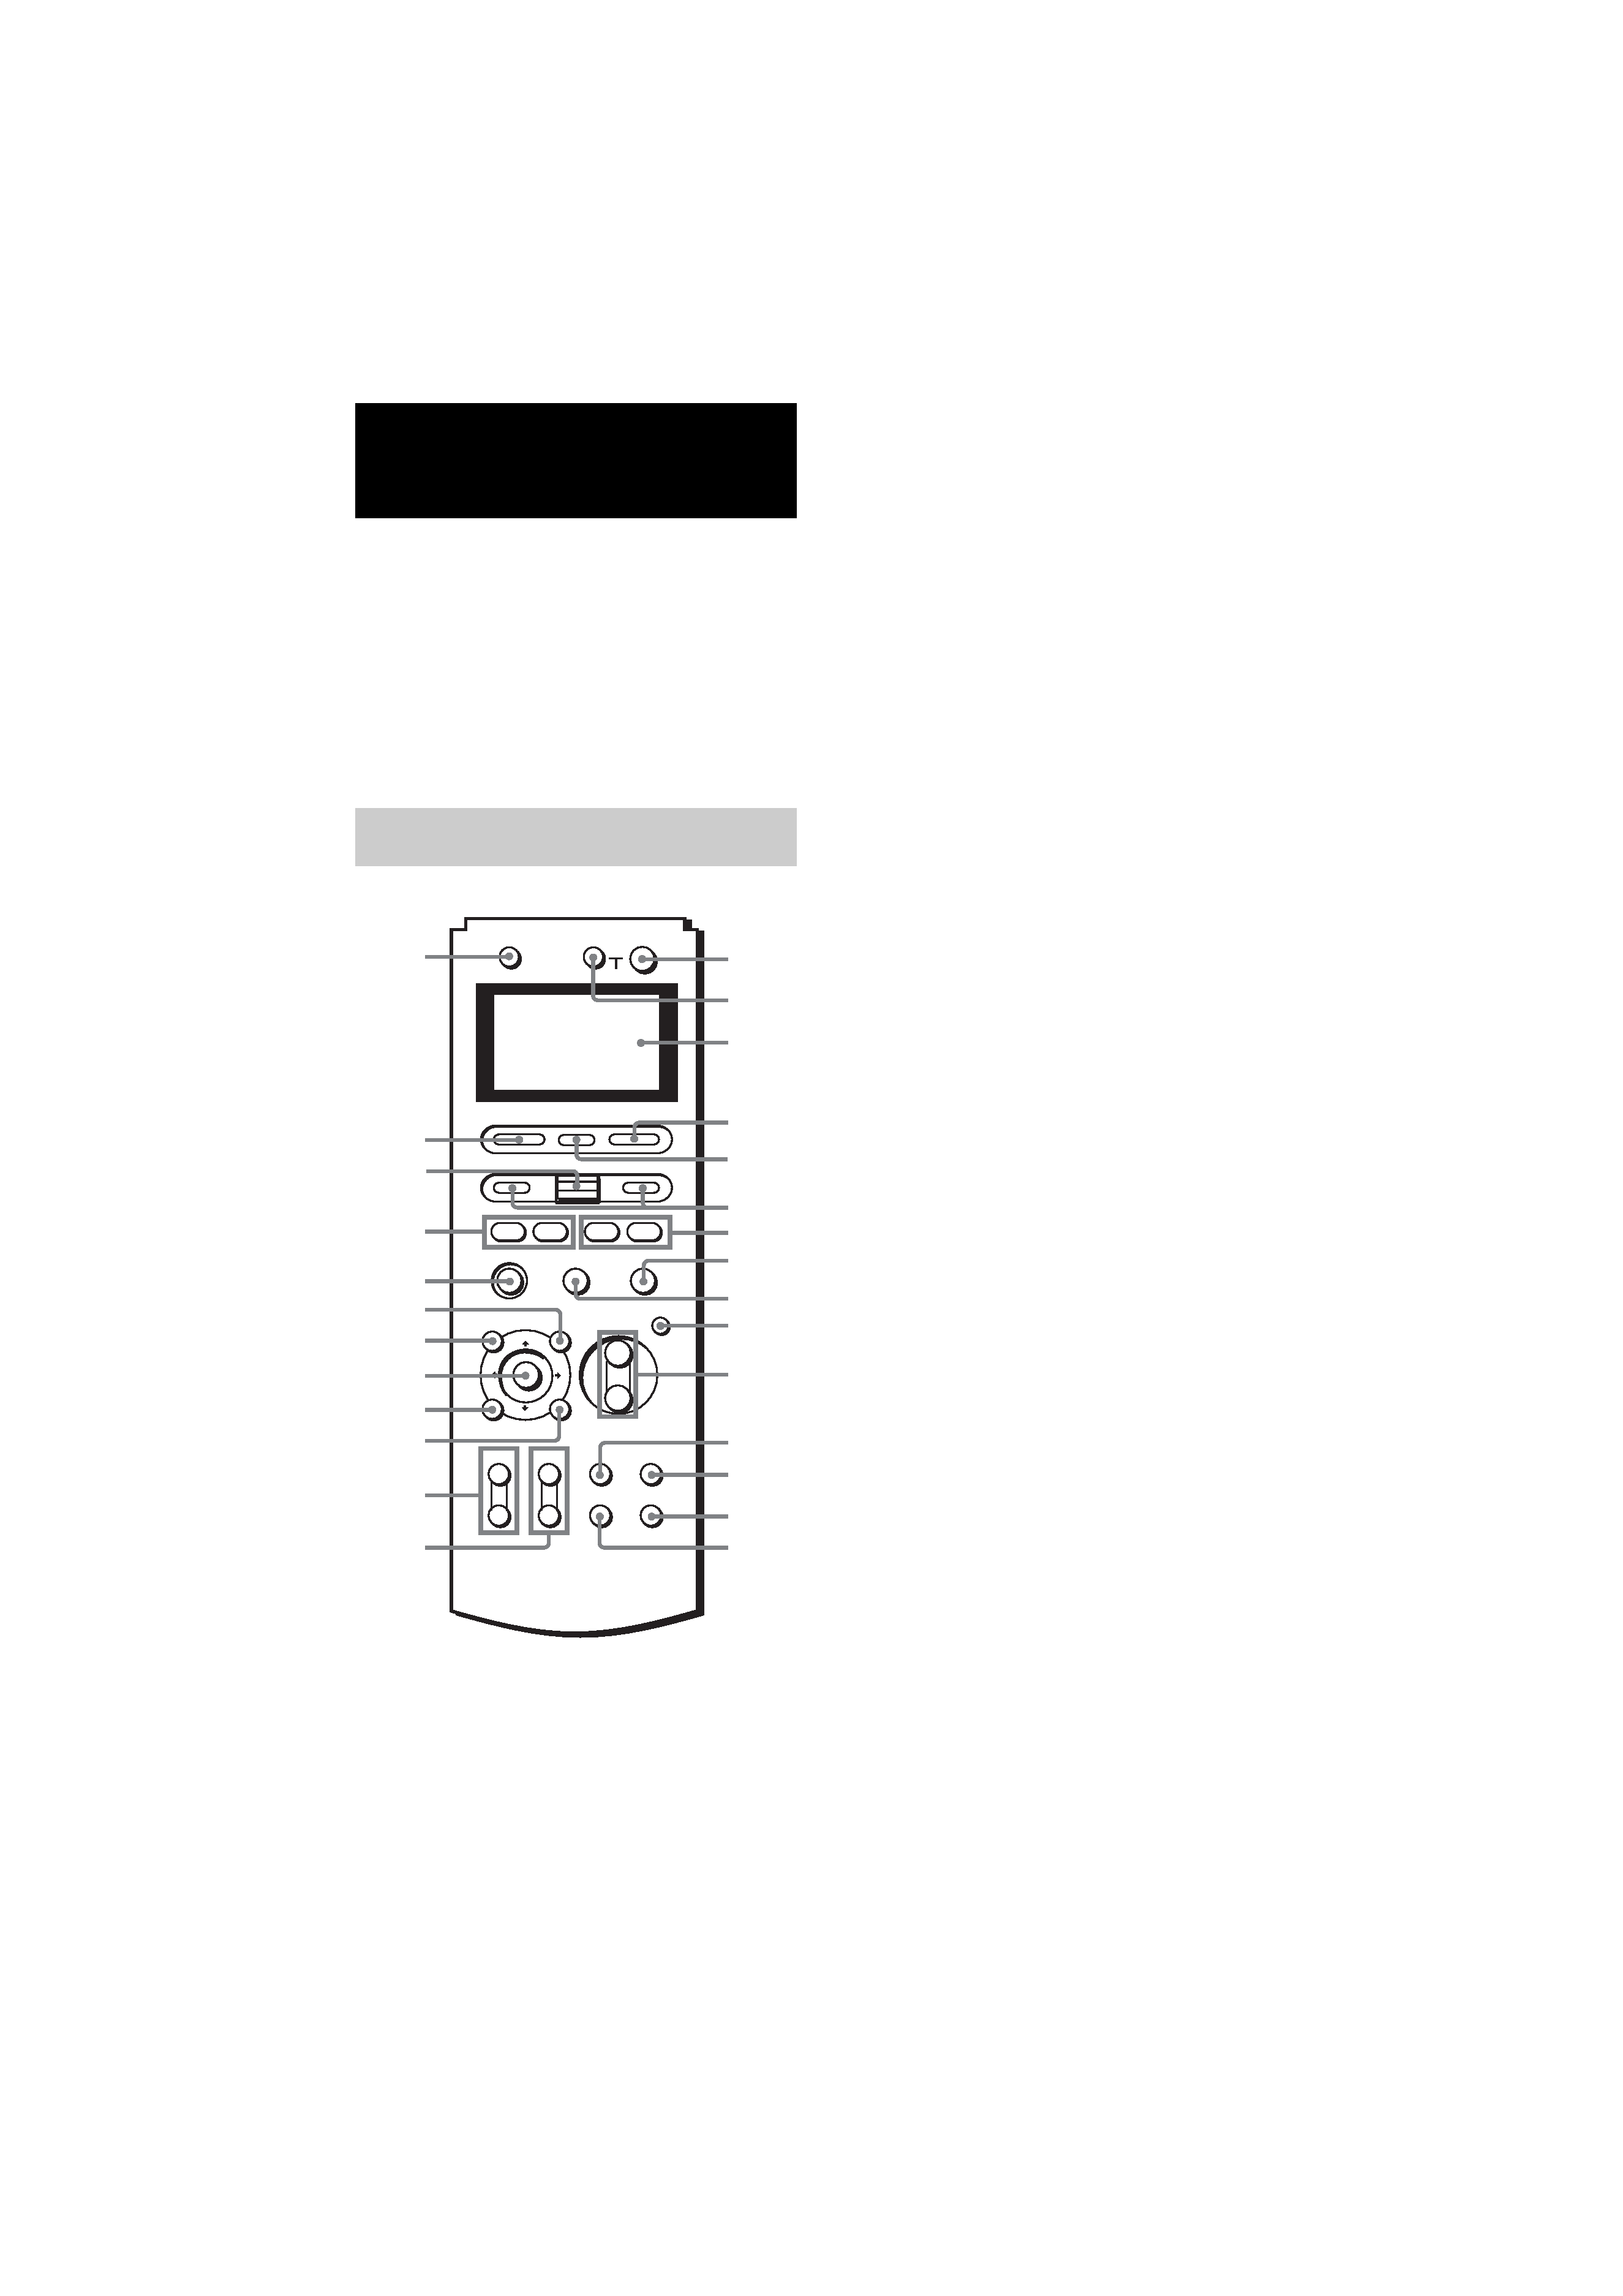
?/1 1
Press to turn the receiver on or off.
For STR-DA5000ES, if the 2ND ZONE or
3RD ZONE is selected, only the main
receiver is turned on or off with this button.
To turn off all components including the
amplifier in the 2nd or 3rd zone, press ?/1
and AV ?/1 (2) at the same time
(SYSTEM STANDBY).
AV ?/1 2
Press to turn on or off the components that
the remote is programmed to operate. For
details on programming procedure, see
"Programming the remote" on page 16.
If you press the ?/1 switch (1) at the
same time, it will turn off the main
component and other Sony audio/video
components (SYSTEM STANDBY).
Note
The function of the AV ?/1 switch changes
automatically each time you press INPUT
SELECTOR (4). Depending on the component,
the above operation may not be possible or may
operate differently than described.
AV MENU ws
Press to display the menus of the VCR,
DVD player, or satellite tuner on the TV
screen. Then use the control button to
perform the menu operations.
Control button w;
After pressing MAIN MENU, TOP
MENU/GUIDE, or AV MENU, move the
control button up, down, left or right to
select the settings. When you press TOP
MENU/GUIDE or AV MENU, press the
button to enter the selection.
To perform menu operations on the VCR,
DVD player, or SAT tuner, do the
procedure below. If you do not do this, the
cursor buttons merely operate the receiver.
1
Press INPUT SELECTOR and move the
easy scroll key to select the input, then
press the key to enter the selection.
2
Press MAIN MENU, TOP MENU/
GUIDE, or AV MENU.
The CURSOR TYPE list appears. If the
list has disappeared before you go on to
step 3, press any of the cursor buttons to
restore the list.
3
Move the easy scroll key to select the
component that you selected in step 1,
then press the key to enter the selection.
Location of parts and basic remote
operations
Parts description
+
+
+
O
AV ?/1
TV ?/1
SOUND FIELD
TOP MENU/GUIDE
AV MENU
DISPLAY
TV VOL
TV CH
TV/VIDEO
WIDE
MAIN
MENU
ON SCREEN
RETURN/EXIT
MASTER
VOL
MUTING
INPUT SELECTOR
SYSTEM STANDBY
RM SET UP
?/1
HX
x
.>
m
M
Ii
wj
wa
8
qa
0
wg
wf
9
qg
wd
wh
ql
qk
qf
qj
w;
qs
7
qh
qd
ws
4
1
5
6
3
2

Loc
a
tion
of
par
ts
and
ba
sic
remote
opera
tions
masterpage:Right
filename[\\Nas-data-server\SONY Current jobs\SONY RM-
LJ312\DTP\4247235111\424723511RMLJ312U\GB03BSC_RM-LJ312-U.fm]
5GB
model name1[RM-LJ312]
[4-247-235-11(1)]
DISPLAY ql
Press to select information displayed on the
TV screen.
Display window 3
The current status of the selected
component or a list of selectable items
appears here.
Note
Characters other than letters of the alphabet or
numbers may be displayed incorrectly on the
remote, even if they appear correctly in the
display window on the main unit.
Easy scroll key wg
While displaying a list, move up or down to
select an item from the list, and then press
to enter the selection.
INPUT SELECTOR 4
Press to display the input (component) list.
See the table on page 7 for information on
the buttons you can use to control each
component.
If you want to change the contents of the
input list to match your particular
components, see "Programming the
remote" on page 16.
MAIN MENU qd
Press repeatedly to select a menu
(SURROUND, etc.) for the receiver.
MASTER VOL +/ qa
Press to adjust the volume level of all
speakers at the same time.
MUTING q;
Press to mute the sound.
ON SCREEN qf
Press to display the menus of the receiver
on the TV screen.
RETURN O/EXIT qk
Press to return to the previous menu or exit
the menu while the menu or guide of the
VCR, DVD player, or satellite tuner is
displayed on the TV screen.
RM SET UP 5
Press to display the set up list.
SOUND FIELD wh
Press to display the sound field list.
For details, see page 15.
TOP MENU/GUIDE wa
Press to display the menu or guide of the
DVD player or satellite tuner on the TV
screen. Then use the control button to
perform the menu operations.
TV ?/1 wj
Press to turn TV on or off.
TV/VIDEO qs
Press to change the input mode of the TV.
TV CH +/ qh
Press to switch the channel of TV.
TV VOL +/ qj
Press to adjust the volume of TV.
WIDE qg
Press to switch the TV to the wide mode.
I/i 6
Press to change the information displayed
on the display. Press the
I button
repeatedly to display the RECEIVER
menu, press the
i button repeatedly to
display the SUB menu (page 8) or NUM
menu.
In the NUM menu, move the easy scroll key
to select the numeric value, then press the
key to enter the selection.
H* wd
Press to start play of the playback medium.
X* 9
Press to pause play or recording, or press to
start recording when the component is in
recording standby.
x* 8
Press to stop play.
./>* wf
Press to skip tracks.
m/M* 7
Press to fast-forward or rewind, or search
tracks in the forward or backward direction.
continued
