1GB
© 1999 Sony Corporation
PS-LX350H
Stereo
Turntable System
3-864-750-23(1)
Operating Instructions
Mode d'emploi
Bedienungsanleitung
Manual de instrucciones
Gebruiksaanwijzing
Bruksanvisning
Istruzioni per l'uso
Manual de instruções
GB
FR
NL
SE
DE
ES
IT
PT

2GB
Precautions
On safety
· Before operating the unit, check that
the operating voltage of your unit is
identical with that of your local
power supply.
· Should any solid object or liquid fall
into the cabinet, unplug the unit and
have it checked by qualified
personnel before operating it any
further.
· Unplug the unit from the wall outlet
if it is not to be used for an extended
period of time. To disconnect the
cord, pull it out by the plug. Never
pull the cord itself.
· The nameplate indicating operating
voltage, power consumption, etc. is
located on the rear exterior.
On placement
· Place the unit on a level surface.
· Avoid placing the unit near electrical
appliances (such as a television, hair
dryer, or fluorescent lamp) which
may cause hum or noise.
· Place the unit where it will not be
subject to any vibration, such as from
speakers, slamming of doors, etc.
· Keep the unit away from direct
sunlight, extremes of temperature,
and excessive dust and moisture.
On repacking
Keep the carton and packing materials.
They provide an ideal container to
transport the unit.
If you have any question or problem
concerning your unit that is not covered
in this manual, please consult your
nearest Sony dealer.
WARNING
To prevent fire or shock
hazard, do not expose
the unit to rain or
moisture.
Do not install the
appliance in a confined
space, such as a bookcase
or built-in cabinet.

3GB
TABLE OF CONTENTS
Getting Started
Unpacking 3
Assembling the Turntable 4
Hooking up the Turntable 5
Adjusting the Turntable 6
Operations
Playing a Record 7
Additional Information
Maintenance 8
Troubleshooting 9
Specifications 9
Parts and Controls 10
Welcome!
Thank you for purchasing the Sony
Stereo Turntable System. Before
operating the unit, please read this
manual thoroughly and retain it for
future reference.
Convention
The following icon is used in this
manual:
Indicates hints and tips for
making the task easier.
Unpacking
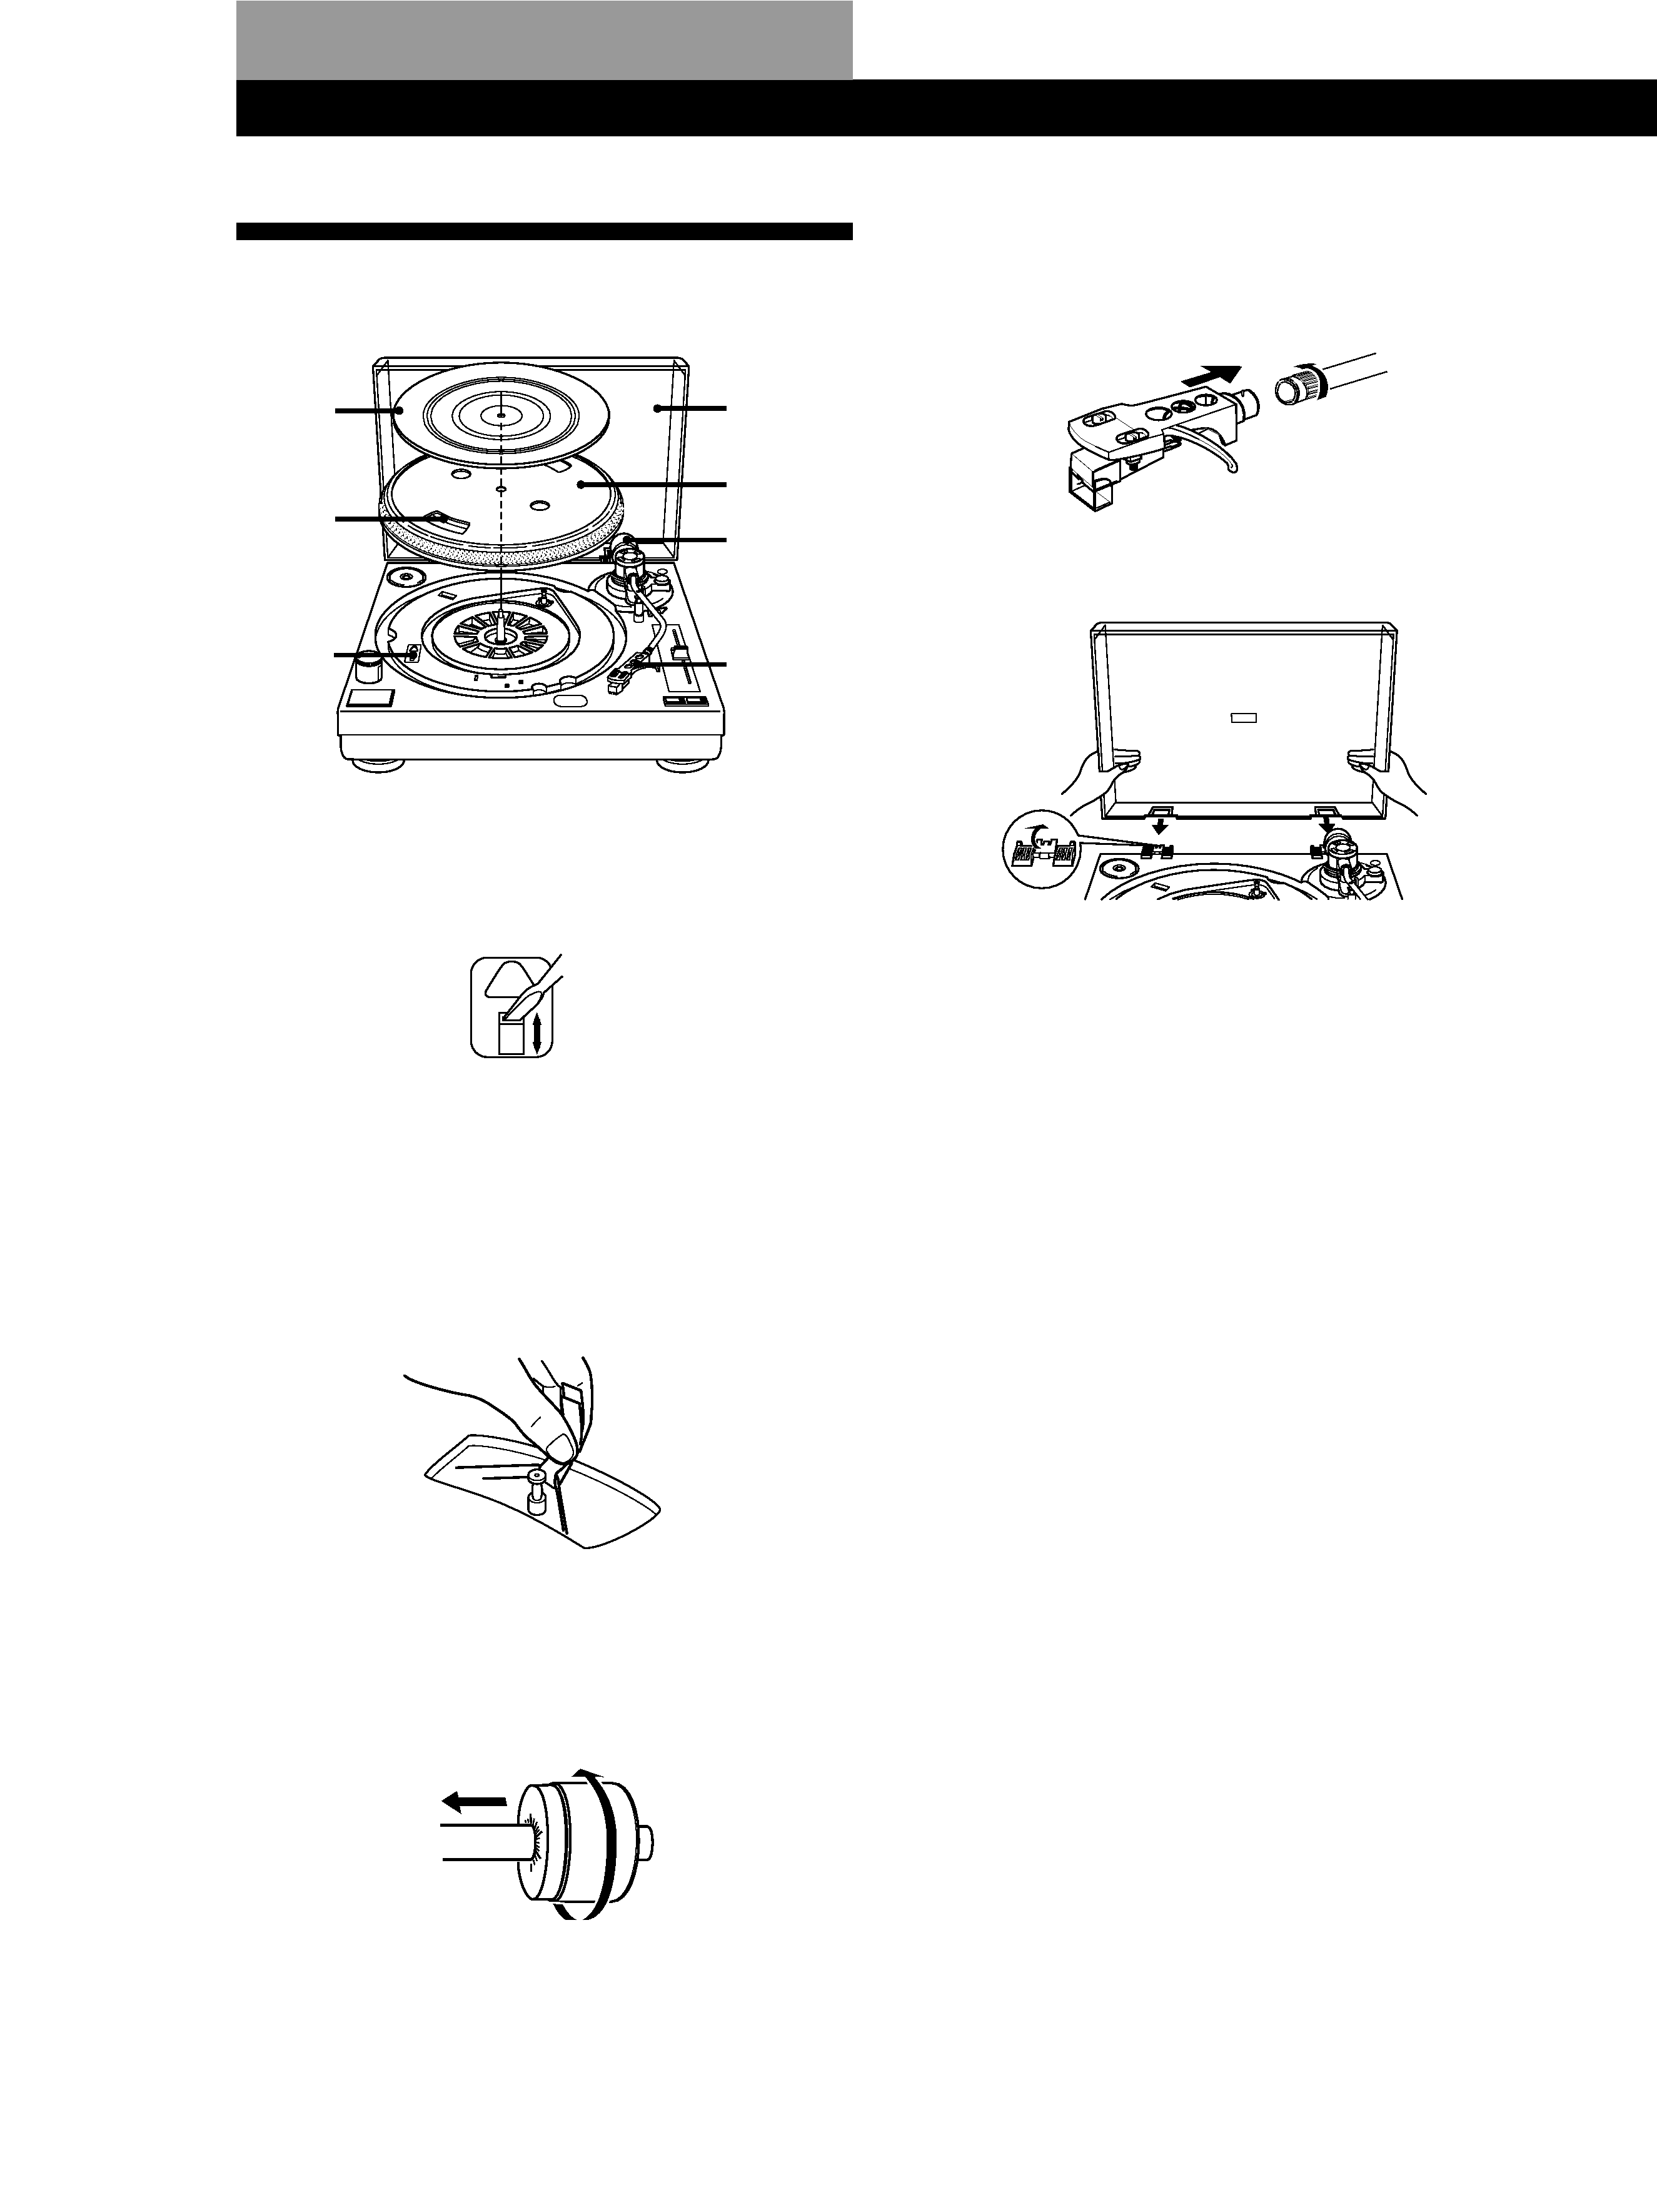
Check that you received the following items with your turntable:
· Platter (with drive belt) (1)
· Rubber mat (1)
· Dust cover (with hinges) (1)
· Counter weight (1)
· Cartridge and headshell (1)
· 45 r/min adaptor (1)
· Audio connecting cord (1)

4GB
3
4
7
5
6
1
2
Assembling the Turntable
1 If your turntable is equipped with a voltage
selector, be sure to set the selector to your line
voltage.
2 Carefully, place the platter on the spindle.
3 Using the ribbon, loop the drive belt around the
motor pully. After looping the belt, do not forget
to remove the ribbon.
4 Place the rubber mat on the platter.
5 Slide the counter weight onto the shaft at the rear
of the tone arm and turn 3 or 4 times in the
direction of the arrow.
Getting Started
6 Insert the headshell into the front of the tone arm.
Turn the locking collar in the direction of the
arrow until the headshell is secure.
7 Insert the hinges on the dust cover into the hinge
pockets on the rear of the cabinet.
110V·120V
220V·240V

5GB
PHONO
IN
R
L
Hooking up the Turntable
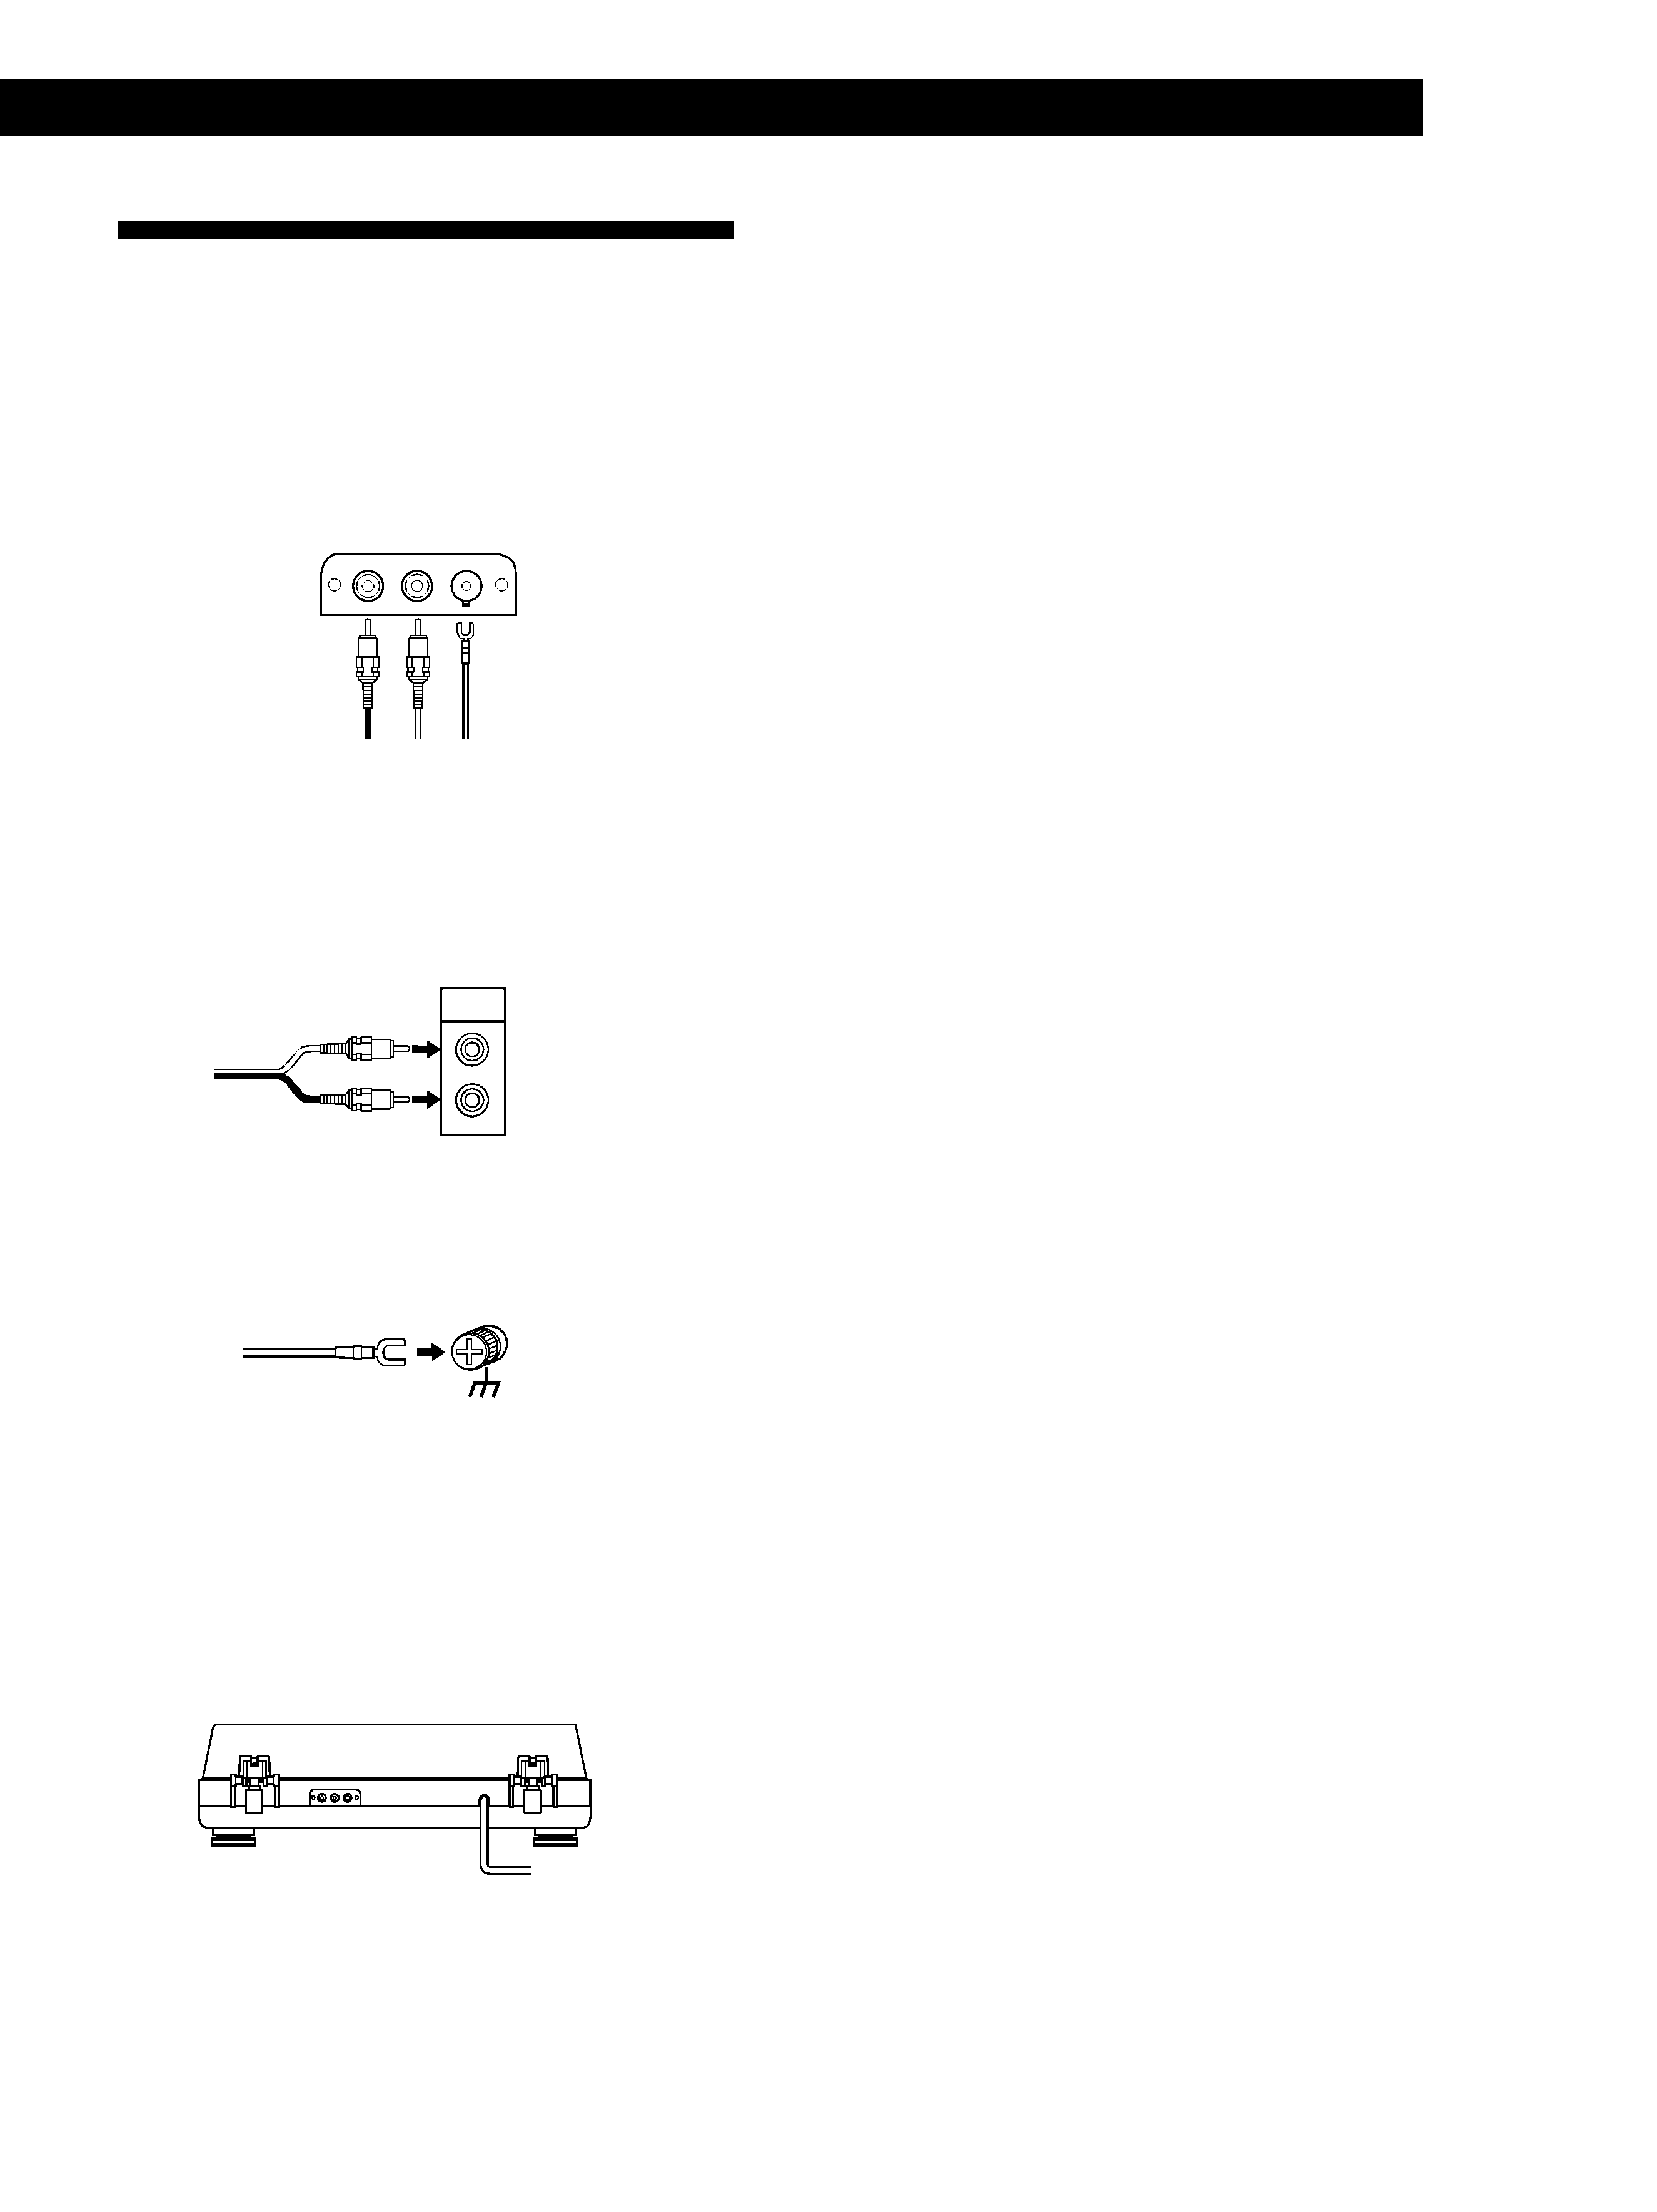
1 Connect the supplied audio connecting cord and
earth lead to the output terminals and GND
terminal at the rear. Be sure to connect the red
plug to the R output jack and the white plug to
the L output jack.
2 Connect the cord with the red plug to the lower
PHONO IN R input jack on the amplifier and
connect the cable with the white plug to the upper
PHONO IN L input jack.
3 Connect the earth lead to the earth terminals on
the amplifier.
Note
Be sure to connect the earth lead. Failure to do so will result
in a humming noise from the turntable.
Mains lead hookups
Connect the mains lead to an AC wall outlet after
completing all of the previous connections.
/ to a wall outlet
Amplifier
Amplifier
RL
GND
Getting Started
