C:32:
3-866-612-12(1)
Digital Photo Frame
WARNING
This symbol is intended to alert the user to
the presence of uninsulated "dangerous
voltage" within the product's enclosure
that may be of sufficient magnitude to
constitute a risk of electric shock to persons.
This symbol is intended to alert the user to
the presence of important operating and
maintenance (servicing) instructions in the
literature accompanying the appliance.
To prevent fire or shock hazard,
do not expose the unit to rain or moisture.
CAUTION
TO PREVENT ELECTRIC SHOCK, DO NOT USE THIS POLARIZED AC PLUG WITH AN EXTENSION
CORD, RECEPTACLE OR OTHER OUTLET UNLESS THE BLADES CAN BE FULLY INSERTED TO
PREVENT BLADE EXPOSURE.
You are cautioned that any changes or modifications not expressly approved in this manual could void
your authority to operate this equipment.
Note:
This equipment has been tested and found to comply with the limits for a Class B digital device, pursuant
to Part 15 of the FCC Rules. These limits are designed to provide reasonable protection against harmful
interference in a residential installation. This equipment generates, uses, and can radiate radio frequency
energy and, if not installed and used in accordance with the instructions, may cause harmful interference
to radio communications. However, there is no guarantee that interference will not occur in a particular
installation. If this equipment does cause harmful interference to radio or television reception, which can
be determined by turning the equipment off and on, the user is encouraged to try to correct the
interference by one or more of the following measures:
Reorient or relocate the receiving antenna.
Increase the separation between the equipment and receiver.
Connect the equipment into an outlet on a circuit different from that to which the receiver is connected.
Consult the dealer or an experienced radio/TV technician for help.
The supplied AC power cord must be used with the equipment in order to comply with the limits for a
digital device pursuant to Subpart B of Part 15 of FCC Rules.
Use a commercially available AC plug adaptor, if necessary,
depending on the design of the wall outlet.
NOTICE FOR THE CUSTOMERS IN THE UNITED KINGDOM
A moulded plug complying with BS 1363 is fitted to this equipment for your safety and convenience.
Should the fuse in the plug supplied need to be replaced, a 5 AMP fuse approved by ASTA or BSI to
BS 1362, (i.e., marked with 2 or @ mark) must be used.
If the plug supplied with this equipment has a detachable fuse cover, be sure to attach the fuse cover
after you change the fuse. Never use the plug without the fuse cover. If you should lose the fuse cover,
please contact your nearest Sony service station.
For the customers in Germany
Directive: EMC Directive 89/336/EEC.
92/31/EEC
This equipment complies with the EMC regulations when used under the following circumstances:
· Residential area
· Business district
· Light-industry district
(This equipment complies with the EMC standard regulations EN55022 Class B.)
ATTENTION
The electromagnetic fields at the specific frequencies may influence the picture and sound of this digital
photo frame.
Precautions
When images recorded with DCR-TRV890E/TRV900/TRV900E or DSC-D700 and images recorded with
the other units are on the same Memory Stick, the images recorded with DCR-TRV890E/TRV900/
TRV900E or DSC-D700 are not played back.
The images processed with a computer may not be played back.
You cannot display INDEX screen, rotate images, and write print marks on the Memory Sticks
recorded with DSC-D700.
To prevent warping or other damage to the digital photo frame, do not operate, place, or store the unit in
any of the following locations:
· Areas subject to extreme heat.
Do not leave the unit in a car parked in direct sunlight where a considerable rise in temperature
could occur.
Do not leave the unit in other areas subject to direct sunlight or sources of high temperature, such as
near a heating device.
· Areas subject to strong vibrations.
· Areas subject to strong magnetic fields or near magnets.
Keep the unit away from speakers, television sets, etc. as permanent erasure of Memory Stick data
may result.
Notes on use
· Do not operate the unit in locations where strong radio signals or other radiation is generated as
displayed images may be adversely affected.
· Do not drop or otherwise allow any mechanical shock to the unit.
· Do not operate the unit near television sets or AM radio receivers as this unit may cause interference.
· Do not allow metal objects to make contact with the metal parts of the unit or connecting plate as a
short may occur resulting in damage to the unit.
· Do not operate the unit in areas subject to direct sunlight as the touchless sensor may not operate
correctly.
On cleaning
· Clean the unit with a soft cloth or tissue.
· Wipe the screen surface with an LCD cleaning kit (not supplied) to remove fingerprints, dust, etc.
· Clean the unit with a soft cloth slightly moistened with a mild detergent solution.
· Do not use any type of solvent such as alcohol, benzine or thinner as it may mar the finish of the
casing.
About LCD screen
The LCD screen is manufactured using high-precision technology. However, there may be some tiny black
points and/or bright points (red, blue or green in color) that constantly appear on the LCD screen. These
points are normal in the manufacturing process. Over 99.99% are operational for effective use.
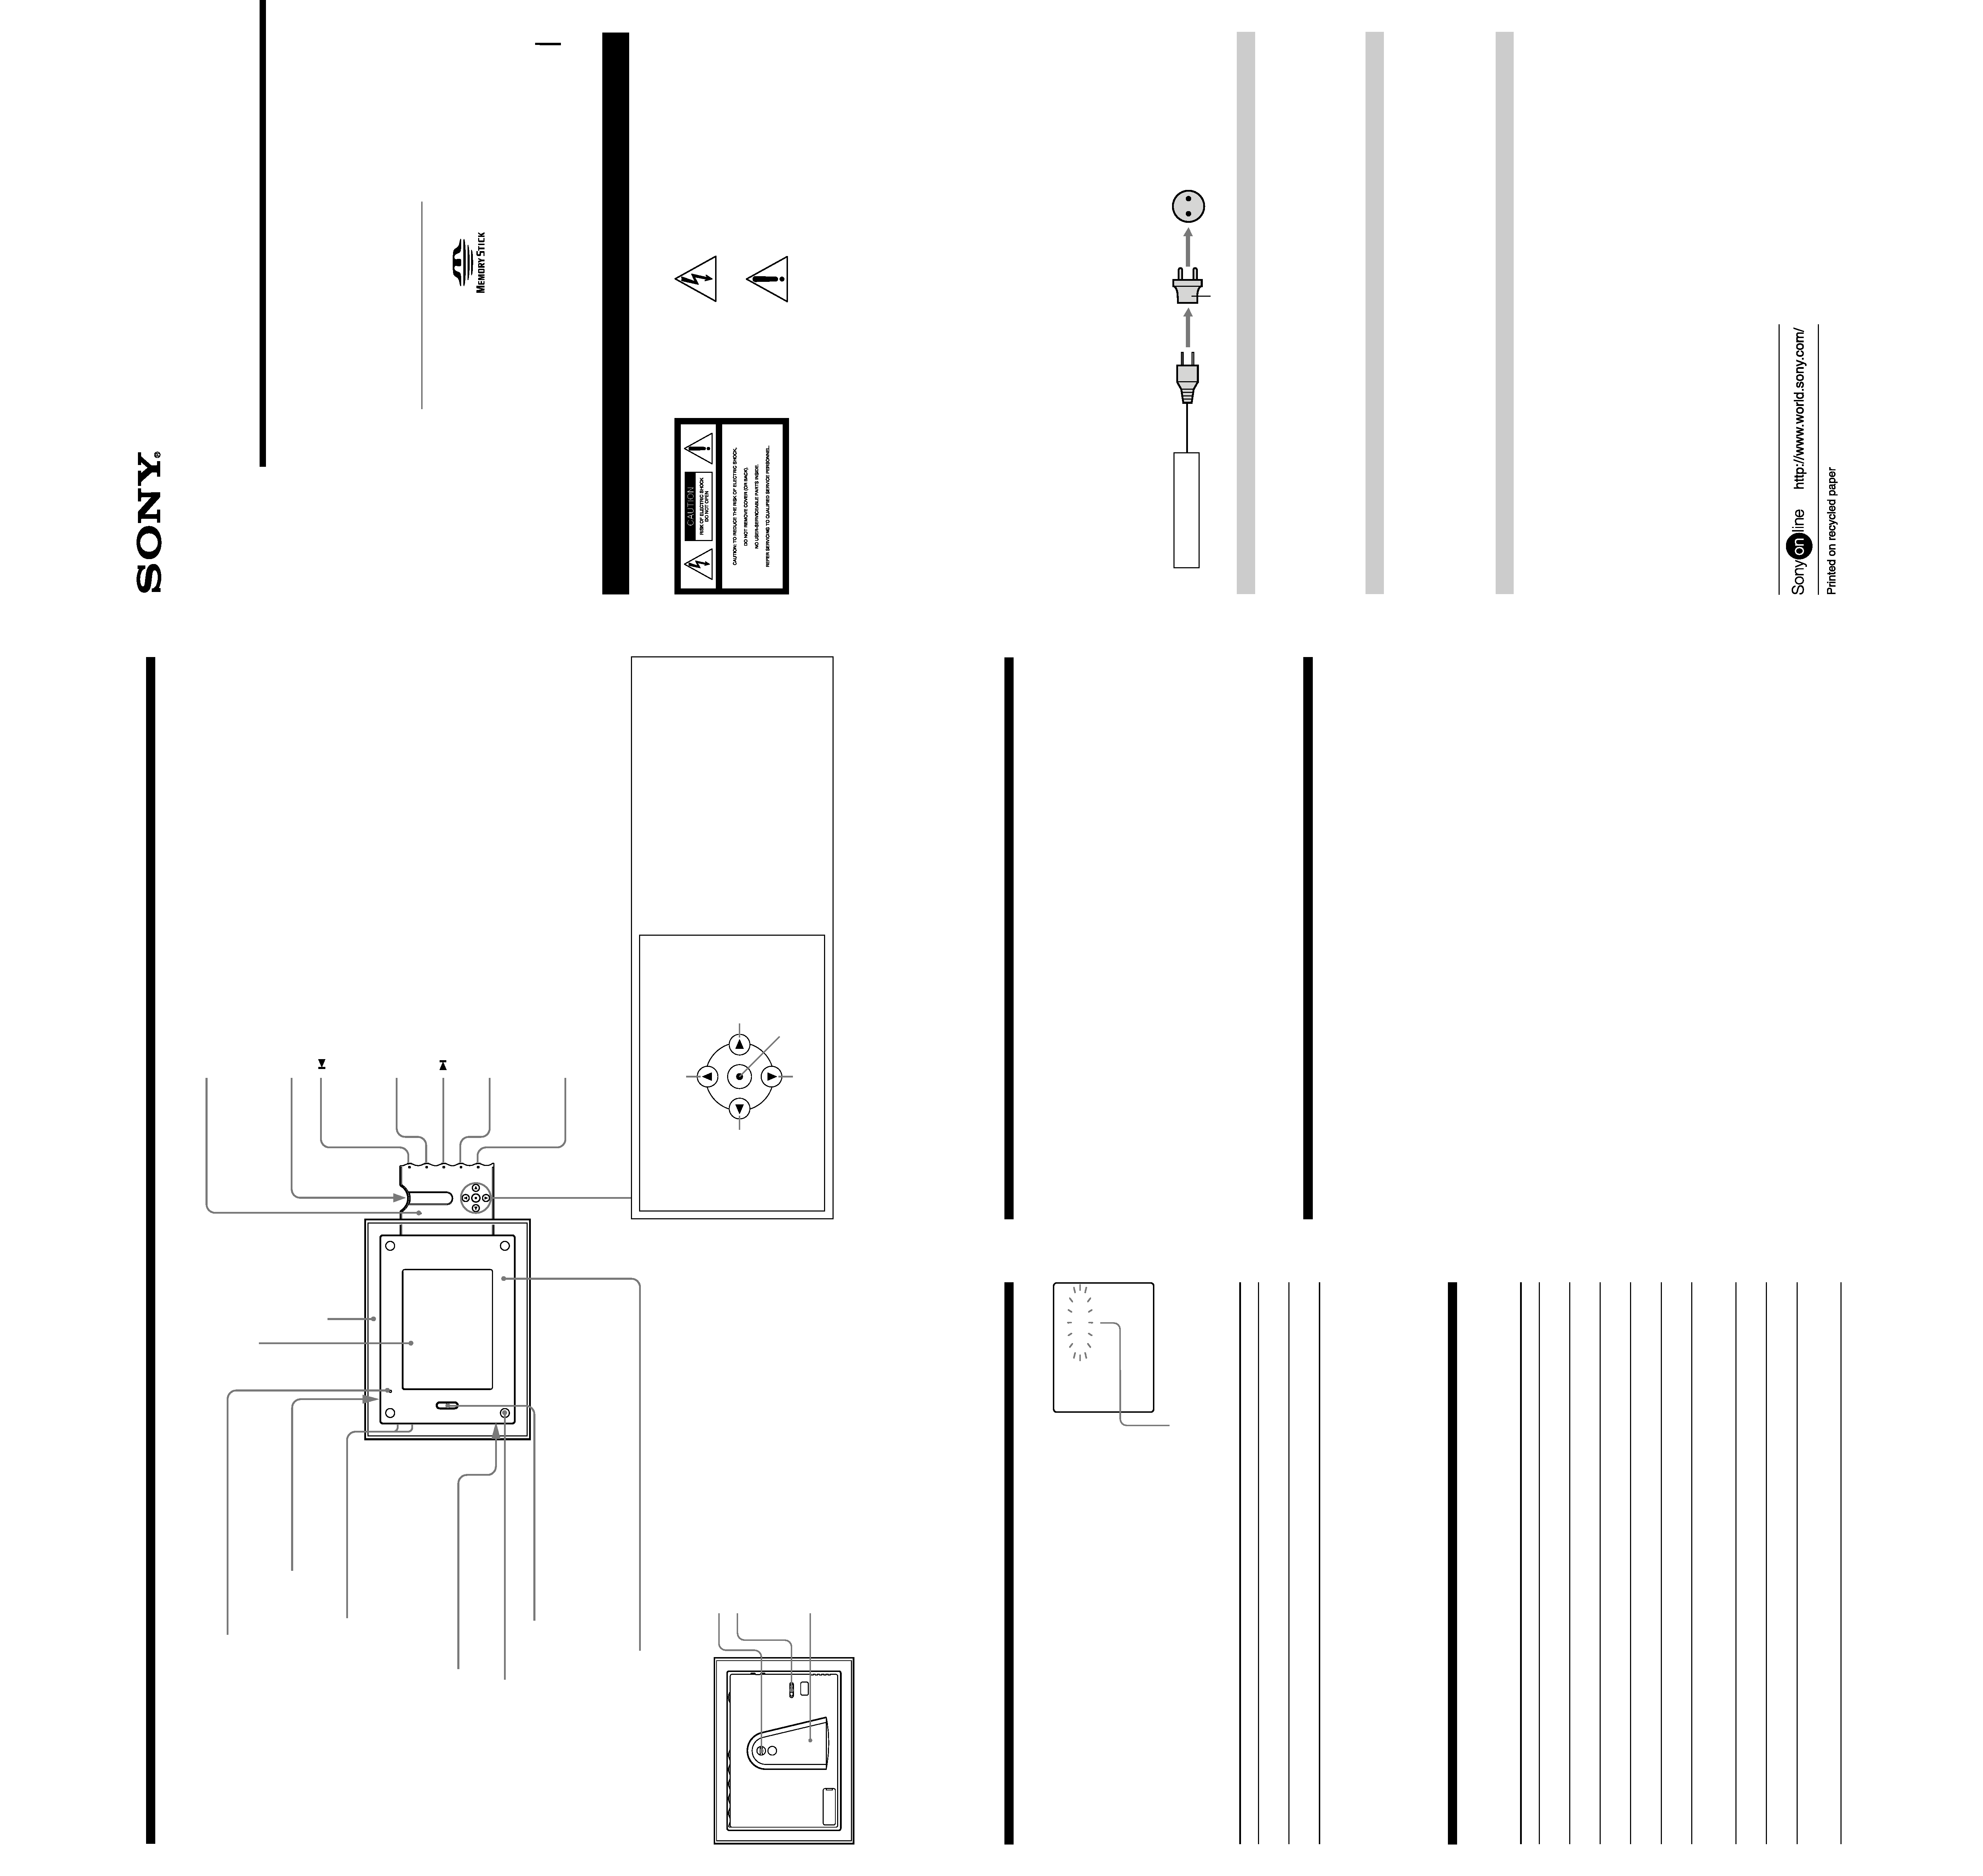
Parts identification
System
Memory
Memory Stick
LCD screen
Screen size
5.5 inch
LCD panel
TFT
Total dot number
224640 dots
General
Power requirements
8.4 V
Power consumption
During playback: 8.6 W
During standby: 1.7 W
Operation temperature
32°F to + 104°F
(0°C to + 40°C)
Specifications
Storage temperature
4°F to + 140°F
( 20°C to + 60°C)
Dimensions
Approx. 8 1/2
× 6 1/2 ×
1 5/8 in. (215
× 162 × 40
mm) (w/h/d)
Mass
Approx. 2 lb. (900 g)
Speaker
Dynamic Speaker
Supplied accessories
AC power adaptor,
AC-PLM3 (1)
Color frame (1)
Operating Instructions
(1)
Design and specifications are subject to change
without notice.
Functions of the control buttons
You can execute the settings by pressing the
control buttons. When an item is selected in
the menu, the color of the item changes from
blue to yellow. To enter your selection, press
the control button z.
Control buttons
b
(Left button)
V
(Lower button)
z
(Press to execute.)
B
(Right button)
v
(MENU)
(Upper button)
Screw
Rear
SLEEP switch
The sleep function is activated and the LCD screen turns off
automatically at the predetermined set time as long as you do not
perform any additional operation.
Set the operating time of playback (OFF, 30 MIN. or 60 MIN.).
ACCESS lamp
The ACCESS lamp lights up red while the unit is accessing the Memory Stick.
Caution
When the ACCESS lamp is flashing, never remove the Memory Stick.
Memory Stick slot
DISPLAY button
Press to display or turn off the indicators on the LCD screen. Each time you press this
button, the indicators on the LCD screen change as follows:
Off
t Current date and time t Information of the displayed image t Off
Nx
button
Starts or pauses the slide show.
button
Displays the next image.
ROTATE button
When playing back lengthwise or sideways images, rotate the image 90° clockwise to fit
them on the LCD screen.
Note
When playing back the slide show or INDEX screen, you cannot rotate the images.
button
Displays the preceding image.
Stand
When using the digital photo frame lengthwise, loosen the fixing
screw, then rotate the stand 90° clockwise.
Change the angle of the digital photo frame using the two screws.
Wall outlet
AC plug adaptor
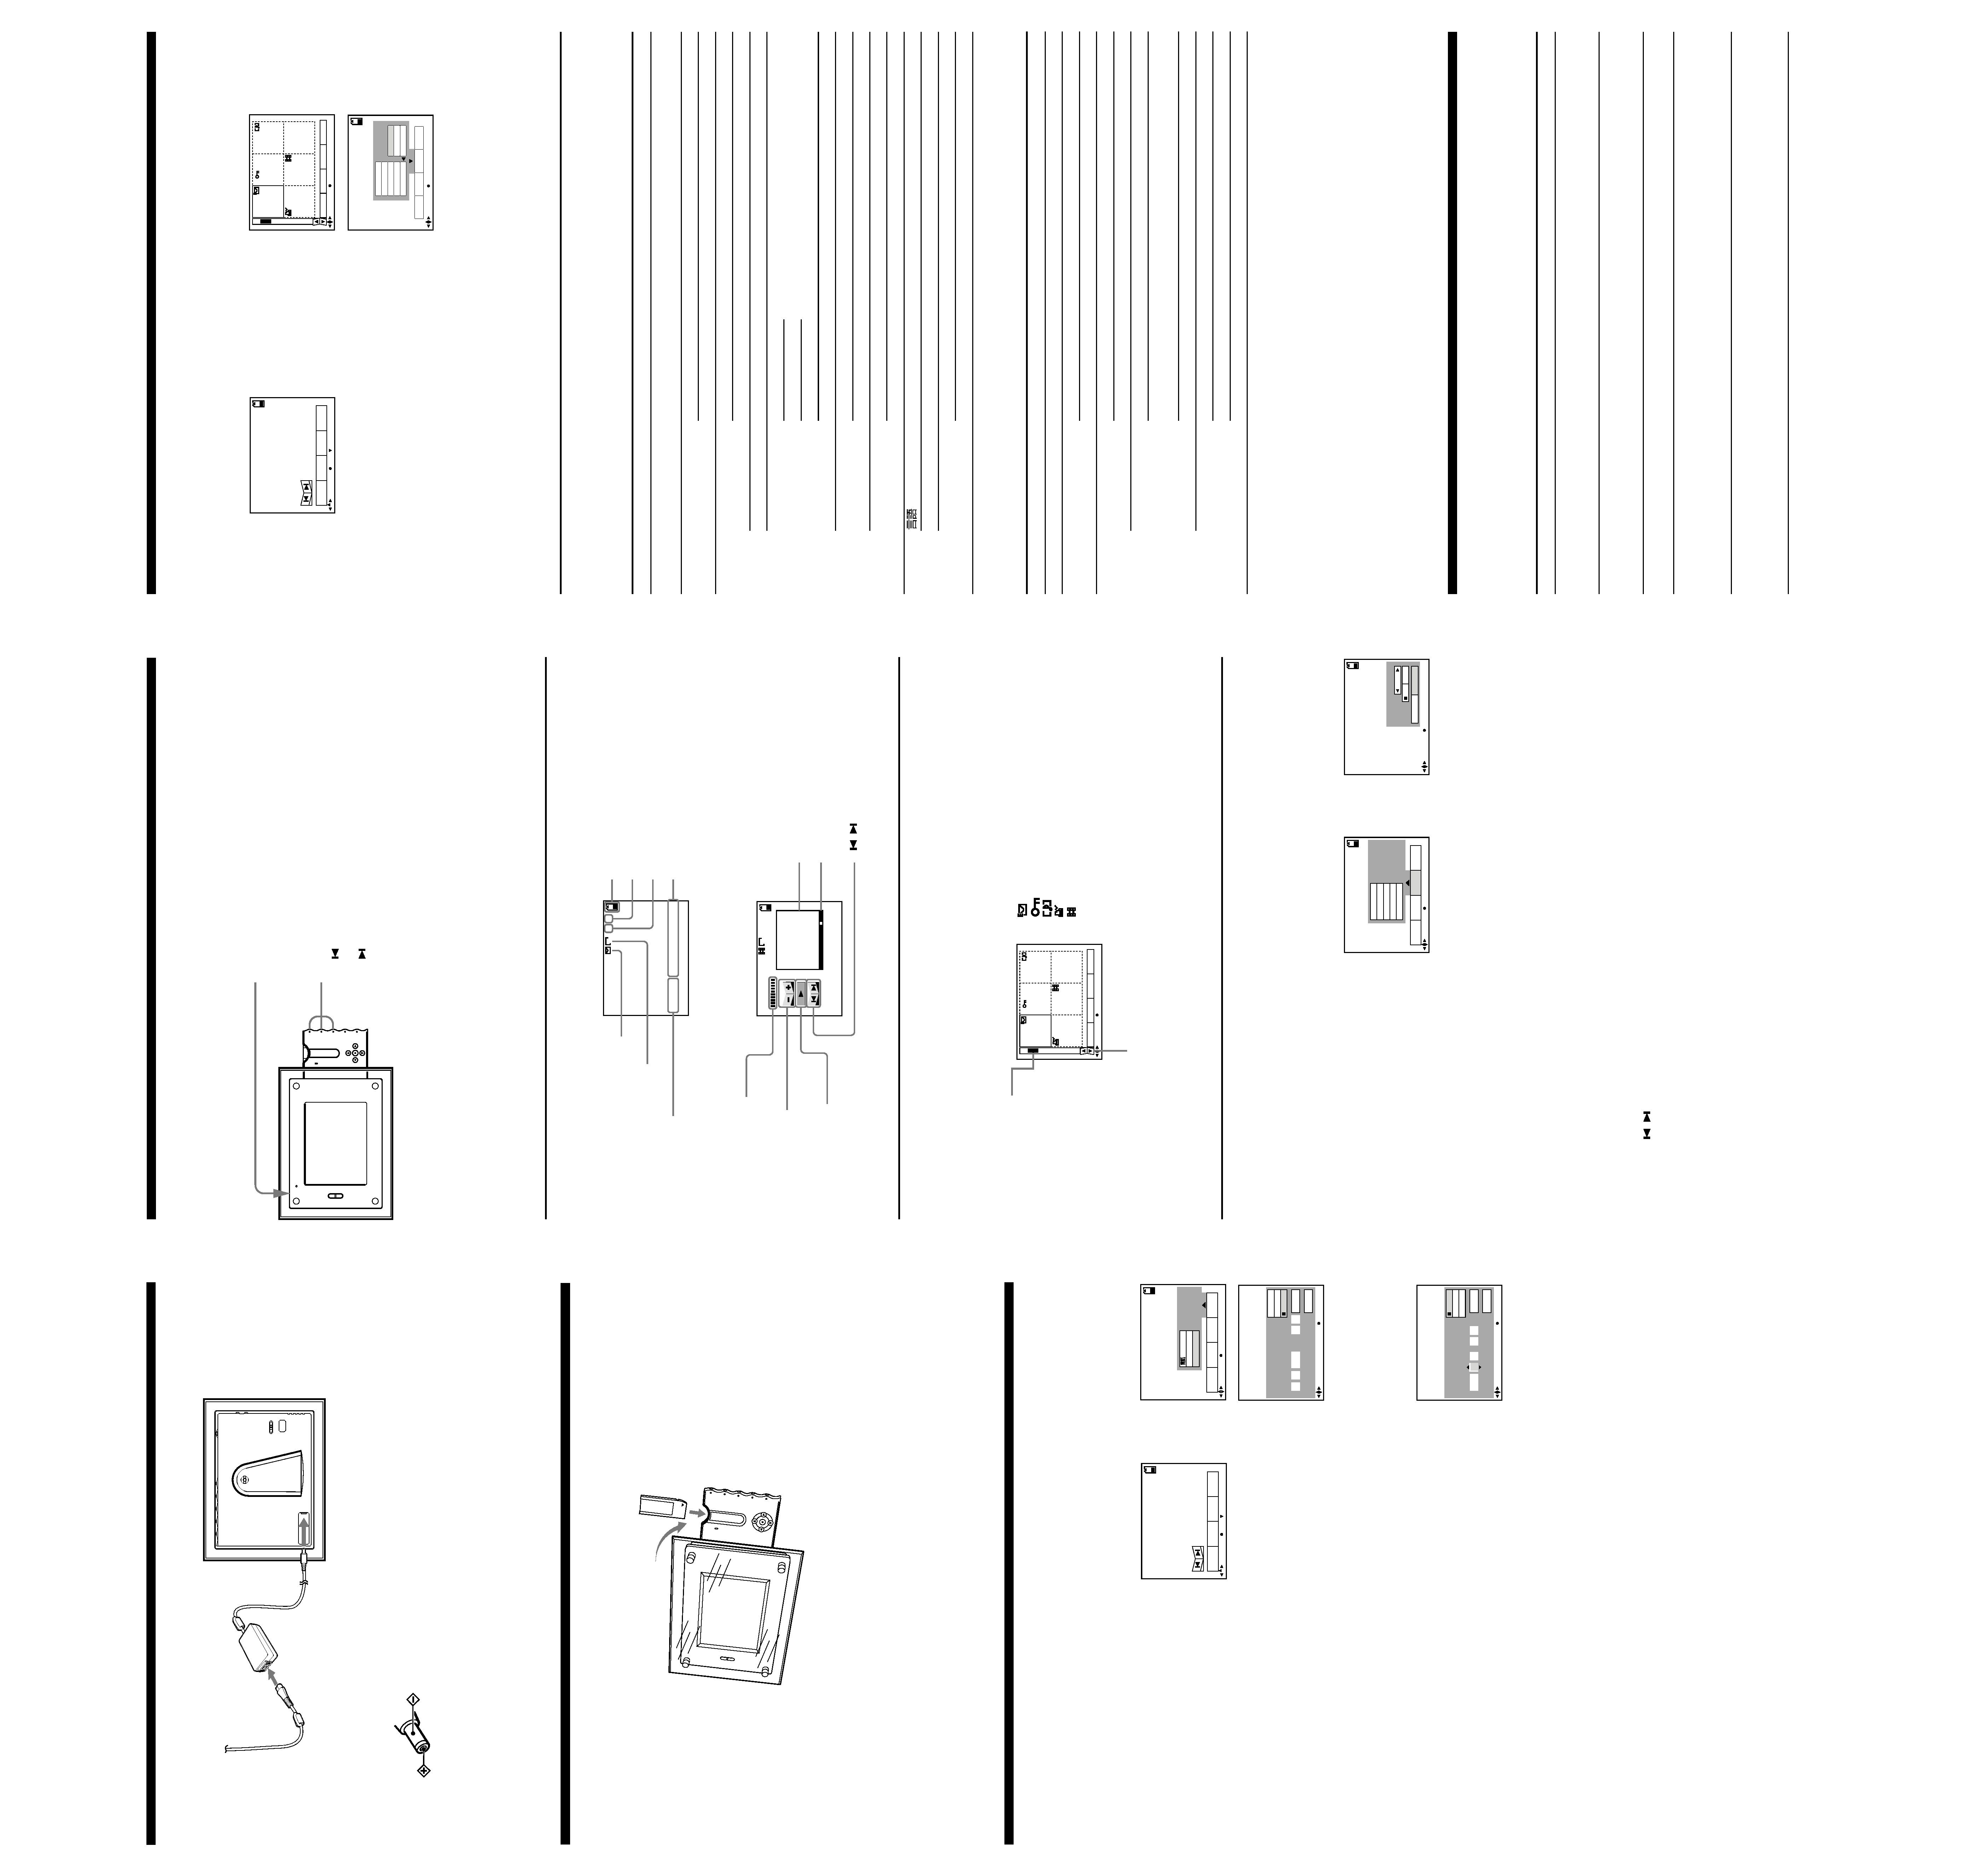
Self-diagnosis display
The digital photo frame has a self-diagnosis display. This
function displays the digital photo frame condition with
five-digits (a combination of a letter and figures) on the
LCD screen. If this occurs check the following code chart.
The five-digits display informs you of the digital photo
frame's current condition. The last two digits (indicated
by ss) will differ depending on the state of the digital
photo frame.
Self-diagnosis display
· C: ss: ss
You can reverse the digital photo frame
malfunction yourself.
First three digits
Cause and/or Corrective Action
· Trouble is with the hardware.
t Turn the power off and on again.
· An unformatted Memory Stick is installed.
t Format the Memory Stick.
C:32:ss
C:13:ss
Message
Meaning/Remedy
·No Memory Stick has been inserted.
t Insert a Memory Stick.
·Trouble is with the hardware.
t Turn on the power again.
·Trouble is with the Memory Stick.
t Insert another Memory Stick.
·Failed to format the Memory Stick.
t Insert the proper Memory Stick.
·The tab on the Memory Stick is set to LOCK position.
t Set it to recording position.
·The Memory Stick is full, and cannot write the print
marks.
t Delete images you do not want to keep.
·Failed in playing back images.
t Delete the file.
·The image is protected.
t Release protection of the image.
·No image has been recorded on the Memory Stick.
t Insert the recorded Memory Stick.
t Insert the proper Memory Stick.
NO MEMORY STICK
SYSTEM ERROR
MEMORY STICK ERROR
FORMAT ERROR
MEMORY STICK
LOCKED
NO MEMORY SPACE
FILE ERROR
FILE PROTECT
NO FILE
Warning and notice messages
Various messages appear on the LCD screen. Check them with the following list.
Note on the function of touchless sensor
You can set up this unit to turn off the LCD screen with the touchless sensor. While pressing the Nx
button, press the power switch.
If you place your palm within 3 inch (about 7 cm) in front of the sensor for more than 3 seconds, when you
remove your palm, the LCD screen will turn off.
Auto LCD screen off
If a image is constantly played back for more than 12 hours, and you do not perform any additional
operation on the unit in that time, the LCD screen turns off automatically to prevent the image burn-in on
the screen.
To change the color frame
1
Remove the 4 screws.
2
Remove the acrylic board.
3
Remove the color frame and replace with the other supplied color frame.
(Control panel)
Acrylic board
LCD screen
AC-PLM3
Operating Instructions
PHD-A55
Sony Corporation © 1999 Printed in Japan
Owner's Record
The model and serial numbers are located on the rear. Record the serial number in the space
provided below. Refer to these numbers whenever you call upon your Sony dealer regarding
this product.
Model No. PHD-A55
Serial No.
Surface
Color frame
The color frame can be switched to the other supplied color frame.
Touchless sensor*
When the LCD screen is off and the STANDBY lamp lights
up, you can turn the LCD screen on by placing your palm in
front of the touchless sensor within 3 inch (about 7 cm).
When you remove your palm, the LCD screen turns on.
* If you place your palm in front of the touchless sensor for
more than 10 seconds, the sensor does not work.
Screw
Speaker
BRIGHT +/ button
Press to adjust the brightness of the LCD screen.
Press + to brighten the picture.
Press to darken the picture.
POWER switch/POWER lamp
Press to turn ON/OFF the power.
STANDBY lamp
The STANDBY lamp lights up while the power is
turning on and when the display is turned off.
11:25AM
1999
7
4
DSC0XXXX
11/15
1600
VOL
11:25AM
1999
7
4
10/15
DSC0XXXX
1600
1
Press the POWER switch to turn on the power.
2
Press v of the control button.
The menu bar appears on the LCD screen.
3
Select "SETUP" with the control button,
then press z.
Setting the date and time
When you use the digital photo frame first, set the date and time. If they are not set, the CLOCK SET
screen in step 4 appears whenever you turn the unit on.
7
Select "ENTER" with the control button, then press z to start the clock.
To cancel setting the date and time
Select "CANCEL" with the control button, then press z.
5
Select the desired display of the date with the control button, then
press z.
Y/M/D (year/month/day)
M/D/Y (month/day/year)
D/M/Y (day/month/year)
6
Select the date and time with the control button, then press z.
The item to be changed is indicated with v/V. Select the number by
pressing the control button, then press z to execute.
When "D/M/Y" is selected, set the time on a 24-hour cycle.
4
Select "CLOCK SET" with the control button, then press z.
: E-mail mode file
: Protected image file
: Image with sound file
: Image with print mark
: Moving image file
Playing back moving images
1
Select the desired moving image with the control button.
2
Select N on the LCD screen with the control button, then press z.
The moving image and sound start.
X
: To pause.
VOL. +: To turn the volume up.
VOL. : To turn the volume down.
1
Press the POWER switch to turn on the power.
The power lamp lights up and the last recorded image is
played back.
Playing back images
Insert a Memory Stick with recorded images.
Playing back still images
2
Select the desired image with the control button.
: To display the preceding image.
Nx
: To play back the slide show.
: To display the next image.
During playback moving images (MOVIE)
Playback image
Volume indicator
The indicators during playback
During playback still images (STILL)
4
Enter each item with the control button, then press z.
INTERVAL: 3 seconds, 10 seconds, one minute, 15 minutes or one day.
REPEAT ON: Plays back images in a continuous loop until "CANCEL" is selected.
OFF: After all images are played back, the slide show ends.
5
Select "START" with the control button, then press z.
Slide show starts.
To turn off the indicators on the LCD screen, press V of the control button or DISPLAY.
To cancel the setting
Select "CANCEL" with the control button in the step 5, then press z.
To operate the slide show
Pause: Select "X" with the control button, then press z.
Start: Select "N" with the control button, then press z.
Search: Select " / "on the LCD screen with the control button, then press b or B.
About the time of INTERVAL
The time of interval is approximately estimated.
To return to the normal playback screen (Single screen)
Select the desired image or select "RETURN" with the control button, then press z.
Setting the slide show
Playing back all still images one after another automatically.
1
Press v of the control button.
The menu bar appears on the LCD screen.
2
Select "FILE" with the control button, then press z.
3
Select "SLIDE SHOW" with the control button, then press z.
In INDEX screen
1
Press v of the control button.
The menu bar appears on the LCD screen.
2
Select "INDEX" with the control button, then press z.
Six images are displayed at a time.
Shows the position of the
displayed image in the
Memory Stick.
Menu
Item
Mode Setting
Meaning
Return to the SINGLE screen.
Delete all images.
Delete the selected images.
Format a Memory Stick.
Cancel formatting a Memory Stick.
Choose OFF to remove all the print marks.
Choose ON/OFF to write/remove the print mark on a
selected image.
Cancel writing the print mark.
Choose ON/OFF to protect/unprotect all images.
Choose ON/OFF to protect/unprotect selected images.
Cancel protecting the image.
----
FORMAT
PRINT MARK
PROTECT
RETURN
DELETE
FILE
ALL
SELECT
OK
· CANCEL
ALL
SELECT
· CANCEL
ALL
SELECT
· CANCEL
INDEX mode
Menu
Item
Mode Setting
Meaning
Select this item to display six recorded images at a
time.
Delete displayed image.
Cancel deleting image.
Format a Memory Stick.
Cancel formatting a Memory Stick.
Select this item to rotate images.
Select this item to play back images in a continuous loop.
Cancel setting the slide show.
To write the print mark on the image.
Remove the print mark.
Protect displayed image.
Release protection of the image.
Select the language of the display on the LCD screen.
Set the date and time.
Normally set to ON.
Turn off the beep sound.
----
FORMAT
ROTATE (90°)
SLIDE SHOW
PRINT MARK
PROTECT
/LANGUAGE*
CLOCK SET*
BEEP*
INDEX
DELETE
FILE
SETUP
OK
· CANCEL
OK
· CANCEL
INTERVAL
REPEAT
START
· CANCEL
ON
OFF
ON
OFF
ON
OFF
Setting the mode of each item
· is set at the factory
SINGLE mode
2
Select the desired item with the control
button, then press z.
The color of the item changes from blue to yellow.
Changing the menu setting
1
Press v of the control button.
The menu bar appears on the LCD screen.
SINGLE mode
INDEX mode
"SETUP" menu is the same as SINGLE mode.
3
Select the desired item with the control button, then press z.
Return to the menu bar in the step 1 after setting ends.
To cancel the menu setting
Press V of the control button repeatedly until the menu bar disappears.
File name
Volume button
Play bar
To display the other six images
Select "v/V" in the lower left corner of the LCD screen with the control button, then press v or V of the control button.
Prepare the Memory Stick
Open the control panel and insert a Memory Stick with recorded images with the V mark facing front.
Note on the AC power adaptor
Use only the AC-power adaptor supplied. Do not use any other AC power adaptor.
Prepare the power source
Polarity of the plug
Recording mode indicator
Remaining Memory Stick capacity indicator
Recording date of the playback image
Image number
Number of stored images in the Memory Stick
Symptom
Cause and/or Solution
·No Memory Stick has been installed.
·No image has been recorded on the Memory Stick.
t Install a Memory Stick with recorded images.
·The digital photo frame is placed near a TV or other equipment that uses strong
magnets.
t Place the digital photo frame away from the TV, etc.
·You are shooting a subject with the light source behind the subject.
t Adjust brightness of the LCD screen.
·The write protect tab on the Memory Stick is set to LOCK.
t Set it to the recording position.
·The image is protected.
t Cancel the protection of the image.
·The sleep switch is set to 30 MIN. or 60 MIN..
t Turn off the sleep switch.
·A single image has constantly played back for more than 12 hours.
t Perform any operation to automatically turn the screen back on.
You cannot play back
the images.
The picture is noisy.
The picture is too
dark.
You cannot rotate or
delete an image.
The LCD screen turns
off automatically.
Troubleshooting
Should any problem persist after you have made those checks, consult your nearest Sony
dealer.
You can use the buttons on the edge of the control panel when the panel is closed.
* These settings are held in memory even when the AC power adaptor is removed.
"
/
" button
Displays a preceding or a following image.
Image size indicator
"N/X" switch
Starts or pauses playback of
moving images.
Either N or X is displayed on
the LCD screen.
INDEX
FILE
DELETE
SETUP
SELECT
MENU BAR OFF
OK
BEEP
/LANGUAGE
CLOCK SET
INDEX
FILE
DELETE
SETUP
SELECT
OK
23:59
1/ 1/1999
ENTER
CANCEL
D/M/Y
M/D/Y
Y/M/D
CLOCK SET
SELECT/ADJUST
OK
11:59PM
1999/ 1/ 1
ENTER
CANCEL
D/M/Y
M/D/Y
Y/M/D
CLOCK SET
SELECT/ADJUST
OK
FILE
DELETE
SETUP
1999 12 12
DSC00100
RETURN
SELECT
SINGLE DISPLAY
INDEX
FILE
DELETE
SETUP
PROTECT
PRINT MARK
SLIDE SHOW
ROTATE(90°)
FORMAT
SELECT
OK
CANCEL
START
OFF
ON
SLIDE SHOW
3sec
REPEAT
INTERVAL
SELECT
OK
INDEX
FILE
DELETE
SETUP
SELECT
MENU BAR OFF
OK
FILE
DELETE
SETUP
1999 12 12
DSC00100
RETURN
SELECT
SINGLE DISPLAY
INDEX
DELETE
FILE
SETUP
FORMAT
ROTATE(90°)
SLIDE SHOW
PRINT MARK
PROTECT
ALL
SELECT
CANCEL
SELECT
OK
,
,
to a wall outlet