Setup Procedures
Unpacking
When you unpack the unit, make sure that all the following are accounted for.
· Router Unit
· Wireless Unit
(Broadband Router Unit PCWA-R1)
(Wireless LAN Access Point PCWA-A320)
* The Wireless Unit has Access Point functions.
· AC Adapter
· Power cord
· Read This First
· Quick Start Guide (this manual)
· Troubleshooting Guide
· Limited Warranty
· Other documentation
Continued on next page
Confirm the connection method of the wireless connection on
the computer.
Refer to the instructions for your Wireless LAN PC Card or Wireless LAN Converter to
confirm the connection method of the computer to the Access Point when using a
Wireless LAN PC Card or Wireless LAN Converter.
If using a Wireless LAN PC Card with the Windows XP operating system, connect to the
network using the Windows XP Wireless Network function.
Configure the TCP/IP settings for the Wireless Network
connection on the computer.
Configure the TCP/IP settings on the computer as follows.
· IP address setting: Select "Obtain an IP address automatically".
· DNS setting: Select "Disable DNS" in the Windows Me operating system.
Select "Obtain a DNS server address automatically" in the Windows 2000
and Windows XP operating systems.
Prepare the Ethernet cable to connect the Router Unit and
ADSL or cable modem.
z Hint
Use a straight-through or cross-over Ethernet cable.
Configure the computer firewall settings
If you are using the Windows XP Internet Connection Firewall or another personal
firewall, you may need to change the security level setting. Refer to the Note below about
Computer Firewall Functions for details.
Note
Computer Firewall Functions
When using the Windows XP "Internet Connection Firewall"
function
Enabling the Windows XP "Internet Connection Firewall" function may prevent the
computer from being accessed externally (this function is disabled by default). This
function can prevent connection to your network when you change your Wireless
Broadband Router settings. If this happens, disable the "Internet Connection Firewall"
function, connect to the network, and then re-enable the function. Refer to Windows XP
Help for details (you can search from "Help and Support" on the "Start" menu).
Note
Make sure that you take appropriate security measures when the "Internet Connection Firewall"
function is disabled.
When using personal firewall software provided standalone
or as part of anti-virus or network security software
Antivirus scanning and network security software sometimes includes a function called
a "personal firewall", intended to prevent unauthorized access by other computers.
Depending on the software, the security level of this function may initially be set to a
high level. If this high security level setting is left enabled, other computers may be
unable to access your computer. This can cause problems such as not being able to
connect to the network when changing the Wireless Broadband Router settings. In this
event, lower the security level to allow the network connection. While the security level
is lowered, pay special attention to security. We highly recommend returning to the
original setting after setting up the Wireless Broadband Router. Refer to the software
instructions or Help for details.
Notes
· Pay appropriate attention to security issues.
· For questions about firewall functions, please contact your firewall software manufacturer.
Procedure
2
Check
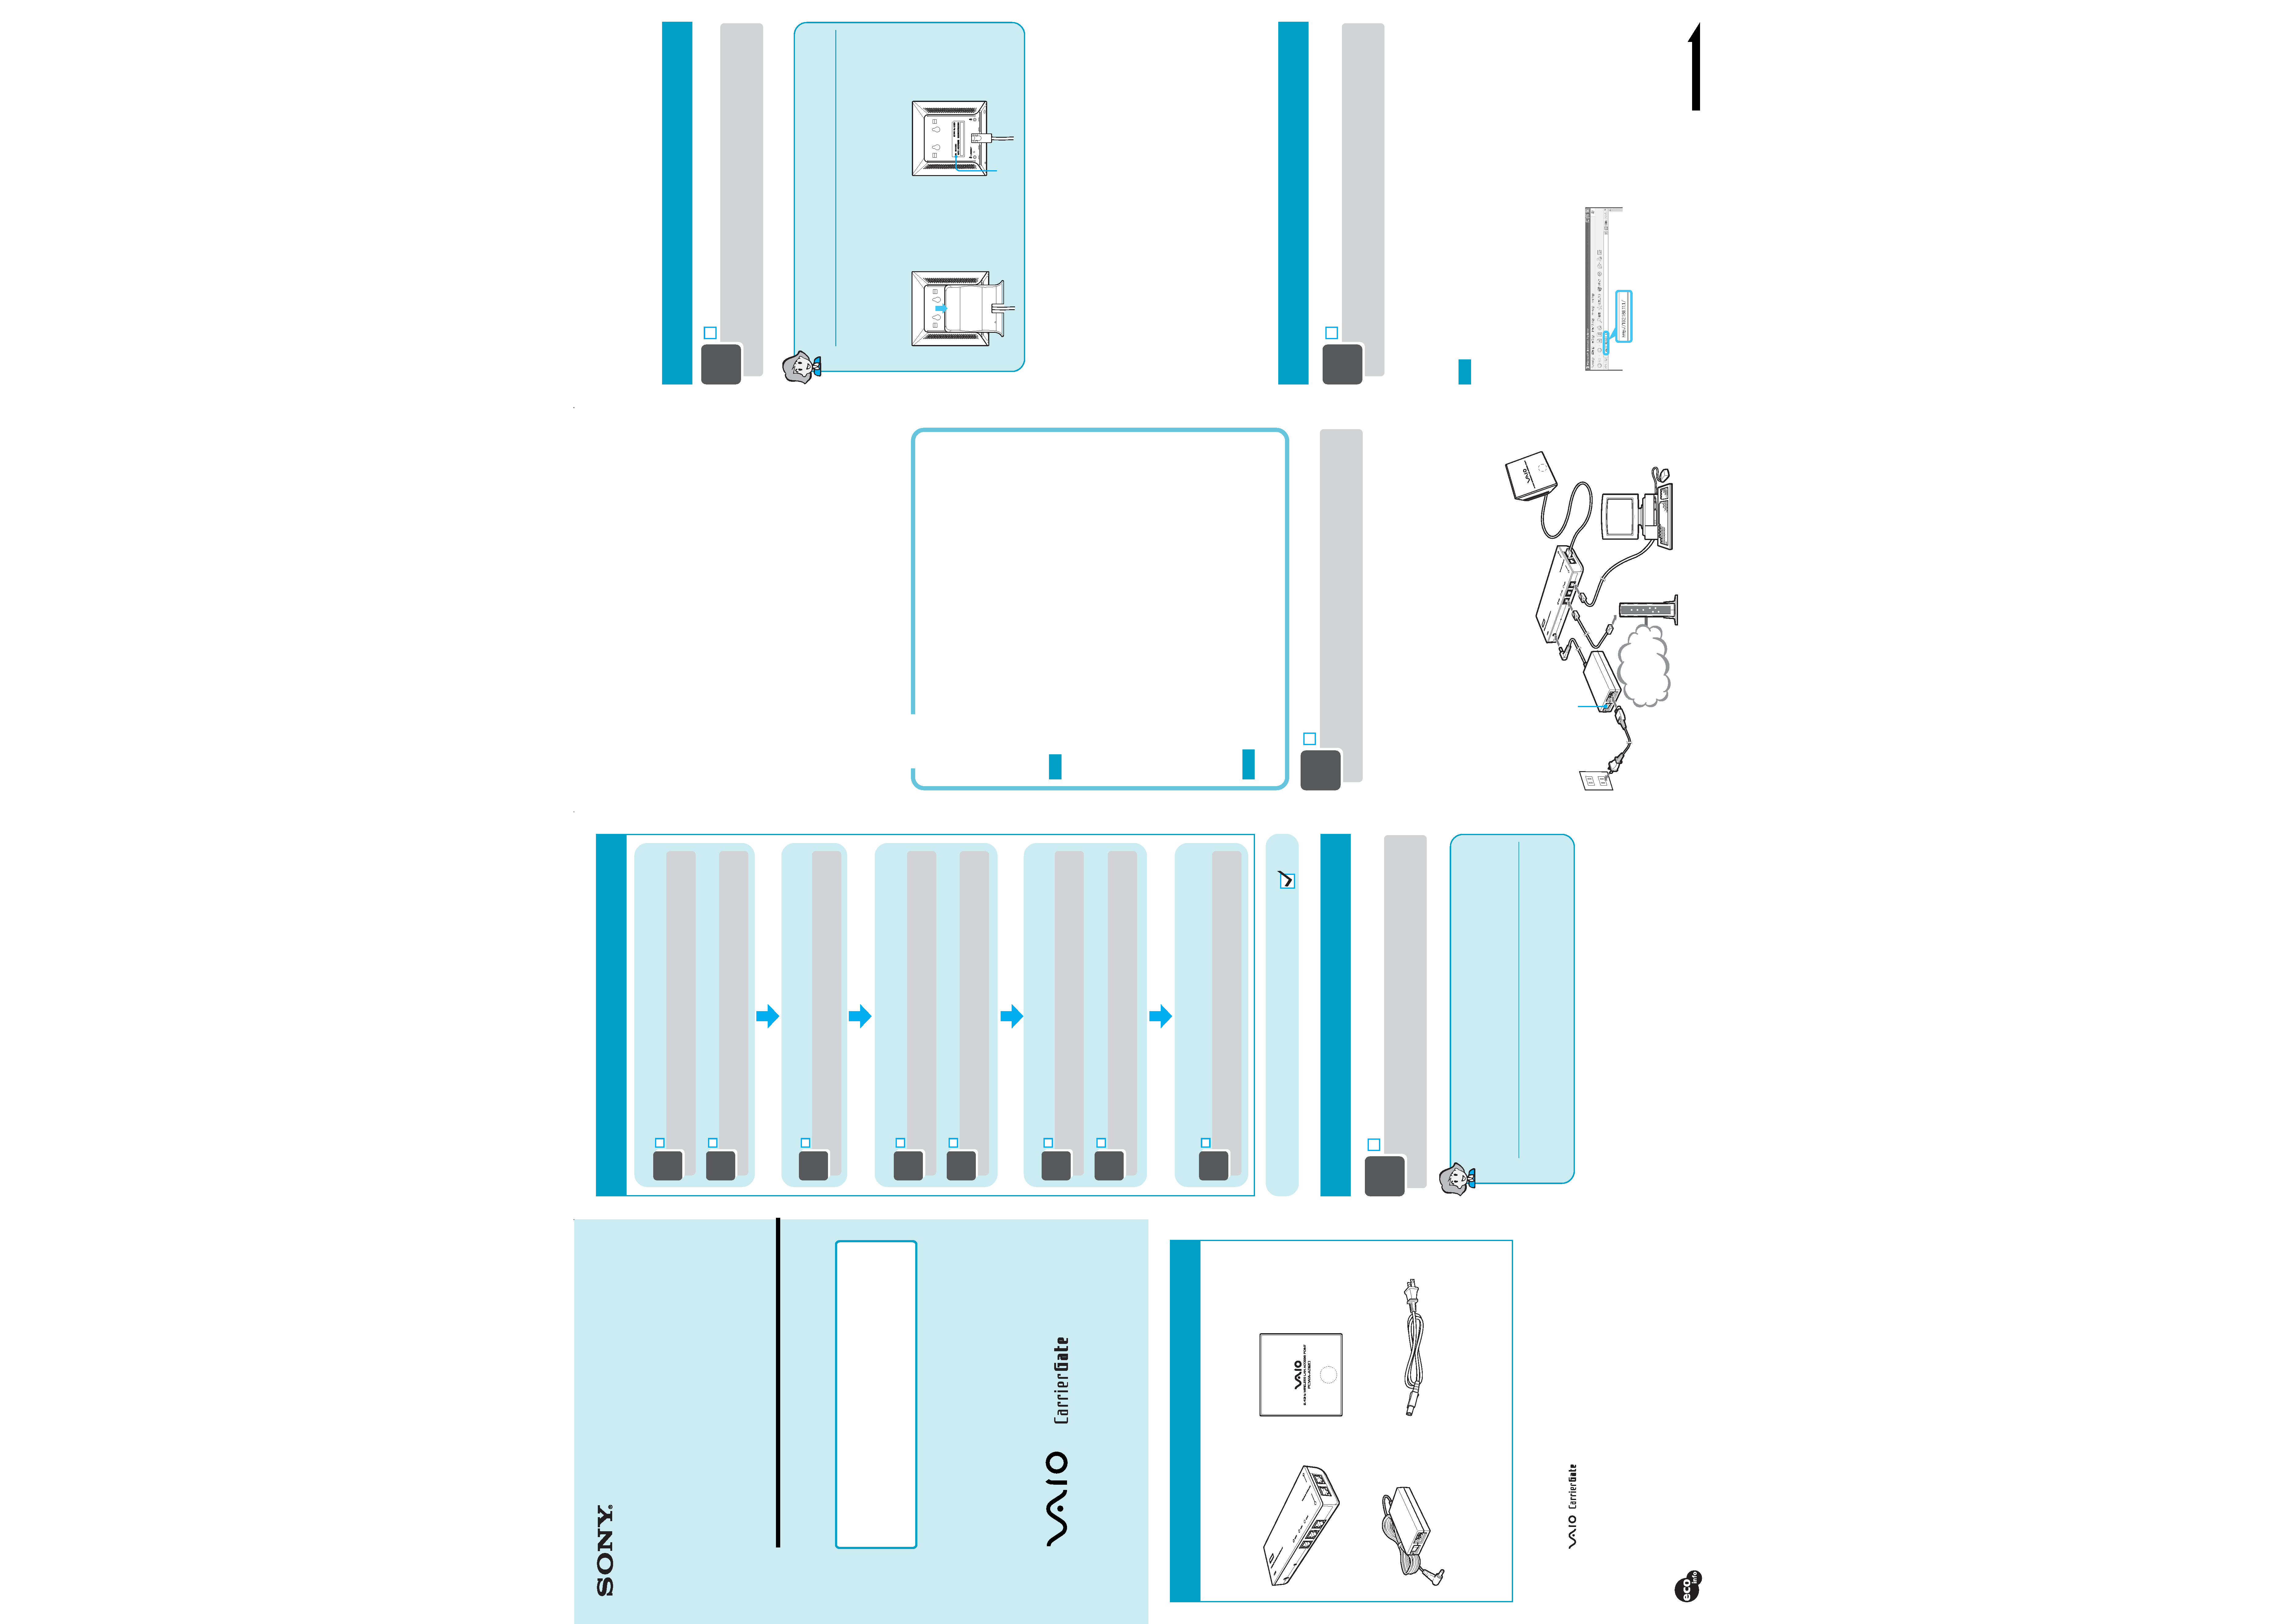
Connect each unit and turn the power on
Connect each unit as shown in the next figure, and turn the power on.
1 Use an Ethernet cable to connect the cable or DSL modem to the WAN connector of the
Router Unit.
2 Connect the Wireless Unit to a Wireless Unit/LAN connector.
z Hint
There are two Wireless Unit/LAN connectors. Use either one.
3 Connect the AC Adapter to the Router Unit, and turn the AC Adapter on.
4 Connect an end of the Ethernet cable to a LAN connector of the Router Unit.
5 Connect the other end of the Ethernet cable to your computer.
z Hint
The Ethernet port of your computer is on its back panel.
Internet
When you turn the power on, confirm that the Status indicators on the Wireless Unit and
Router Unit change as follows before proceeding to Procedure 3.
Wireless Unit: Changes from a quickly flashing white light to a slowly flashing one.
Router Unit: Change from flashing white light to a steadily lit one.
Establish wireless connections
Procedure
3
Check
Establish communications between
the computer and the Access Point
This description assumes that the connection is
established with factory default settings.
Access Point factory default settings
Network Name (SSID):
The 6-character identifier printed on the label inside the rear
cover of the Wireless Unit
Encryption (WEP):
Disabled
Confirming the Network Name (SSID)
Configure the wireless communication settings on the computer, and then establish
communications between the computer and the Access Point.
Refer to the instructions for your Wireless LAN PC Card or Wireless LAN Converter for the
setting method.
z Comments
· The Network Name (SSID) may also be called something like the "ESSID" or "Network ID", depending on
the particular device.
· Encryption may also be called something like "encoding" or "security", depending on the particular device.
· When using the Windows XP operating system with a Wireless LAN PC Card, on the "Start" menu, click
"Connect to" "Wireless Network Connection", and make the communications settings that affect
connection to the Access Point from the dialog box that appears.
If no "Wireless Network Connection" item can be found on the "Start" menu, on the "Start" menu click
"Control Panel" "Network and Internet Connections" "Network Connection", and double-click
"Wireless Network Connection".
When you are done, verify that an IP address is assigned to the computer.
Although communication is possible from this state, for security reasons, be certain to
perform the subsequent procedures to change the factory default settings. Also refer to the
instructions for your Wireless LAN PC Card or Wireless LAN Converter.
Router Unit Setup
Procedure
4
Check
Display the Router Unit Setup Page
Access the Access Point from a Web browser to display the Router Unit Setup Page.
Compatible browsers:
Internet Explorer 5.5 or later
Netscape 6.1 or later
Note
Configure the browser's proxy settings so that the IP address of the Router Unit (factory default 192.168.11.1)
bypasses the proxy server. Refer to "Case 1: Cannot display the Setup Page (error message appears)" in the
separate Troubleshooting Guide for details about bypassing the proxy server.
z Hint
The Setup Page of this device is stored in the internal memory of the Router Unit.
1 Launch the Web browser.
2 Enter http://192.168.11.1 in the Address field, and press the Enter key.
Preparation
Procedure
1
Check
Perform the necessary preparations and
confirmations for connections
Procedure
2
Check
Connect each unit and turn the power on
Establish wireless connections
Procedure
3
Check
Establish communications between a computer and
the Access Point
Router Functions Setup
Procedure
4
Check
Display the Router Unit Setup Page
Procedure
5
Check
Configure the Router functions
Each procedure is preceded by a check box. Before proceeding to the next step,
confirm that you have completed all necessary tasks by ticking the box.
Check
Access Point Functions Setup
Procedure
7
Check
Configure the Access Point functions
Preparation
Procedure
1
Check
Perform the necessary preparations
and confirmations for connections
Obtain the information required to make the computer
connections.
The procedure in this guide describes the connection process using the factory
default settings.
The factory default settings of the Access Point function are:
Network Name (SSID):
The 6-character identifier printed on the label inside the rear
cover of the Wireless Unit
Encryption (WEP):
Disabled
Before setting up the Broadband Router, perform the following.
Set up the Wireless LAN PC Card or Wireless LAN Converter
Perform the required software installation and settings according to the instructions
provided with your Wireless LAN PC Card or Wireless LAN Converter to make it
operational.
Ethernet
cable
1
2
Switch`
3
Cable modem or DSL modem
Use either connector.
Configure the Wireless Communication Settings
on the computer
Sony Corporation ©2003 Printed in Japan
4-674-608-11 (1)
Wireless
Broadband Router
Quick Start Guide
Before reading this guide, be sure to read the "Read This
First" supplement.
This guide describes the preparations and settings
required to connect to the Internet using the Wireless
Broadband Router.
The PCWA-AR300 consists of:
·Broadband Router Unit
PCWA-R1
·Wireless LAN Access Point
PCWA-A320
In this document, we refer to the Broadband Router Unit as the
Router Unit and to the Wireless LAN Access Point as the
Wireless Unit.
· Sony, VAIO,
,
, and the Eco Info logo are trademarks of Sony Corporation.
· Microsoft and Windows are registered trademarks of Microsoft Corporation in the United States and/or
other countries.
· In this manual, Microsoft® Windows® XP Home Edition and Microsoft® Windows® XP Professional are
referred to as Windows XP.
· Netscape is a registered trademark of Netscape Communications Corporation.
· All other names of systems, products and services are trademarks of their respective owners. In the manual,
the TM or ® marks are not specified.
Printed on 100% recycled paper using VOC (Volatile Organic Compound)-free vegetable oil
based ink.
Procedure
6
Check
Display the Access Point Setup Page
Procedure
8
Check
Configure computer settings
PCWA-AR300
4
5
Remove the rear cover
by sliding it in the
direction of the arrow.
This ID is used as the
default Network Name
(SSID).
SSID
z Hint
The IP address 192.168.11.1 is the Router Unit
factory default. If the Router's IP address has
been changed, contact your network
administrator.
Procedure
7
Check
Configure the Access Point functions
The wireless functions are set in the Wireless Unit. The basic wireless connection settings are
described here. For details about the settings, refer to Help the Access Point Setup Page.
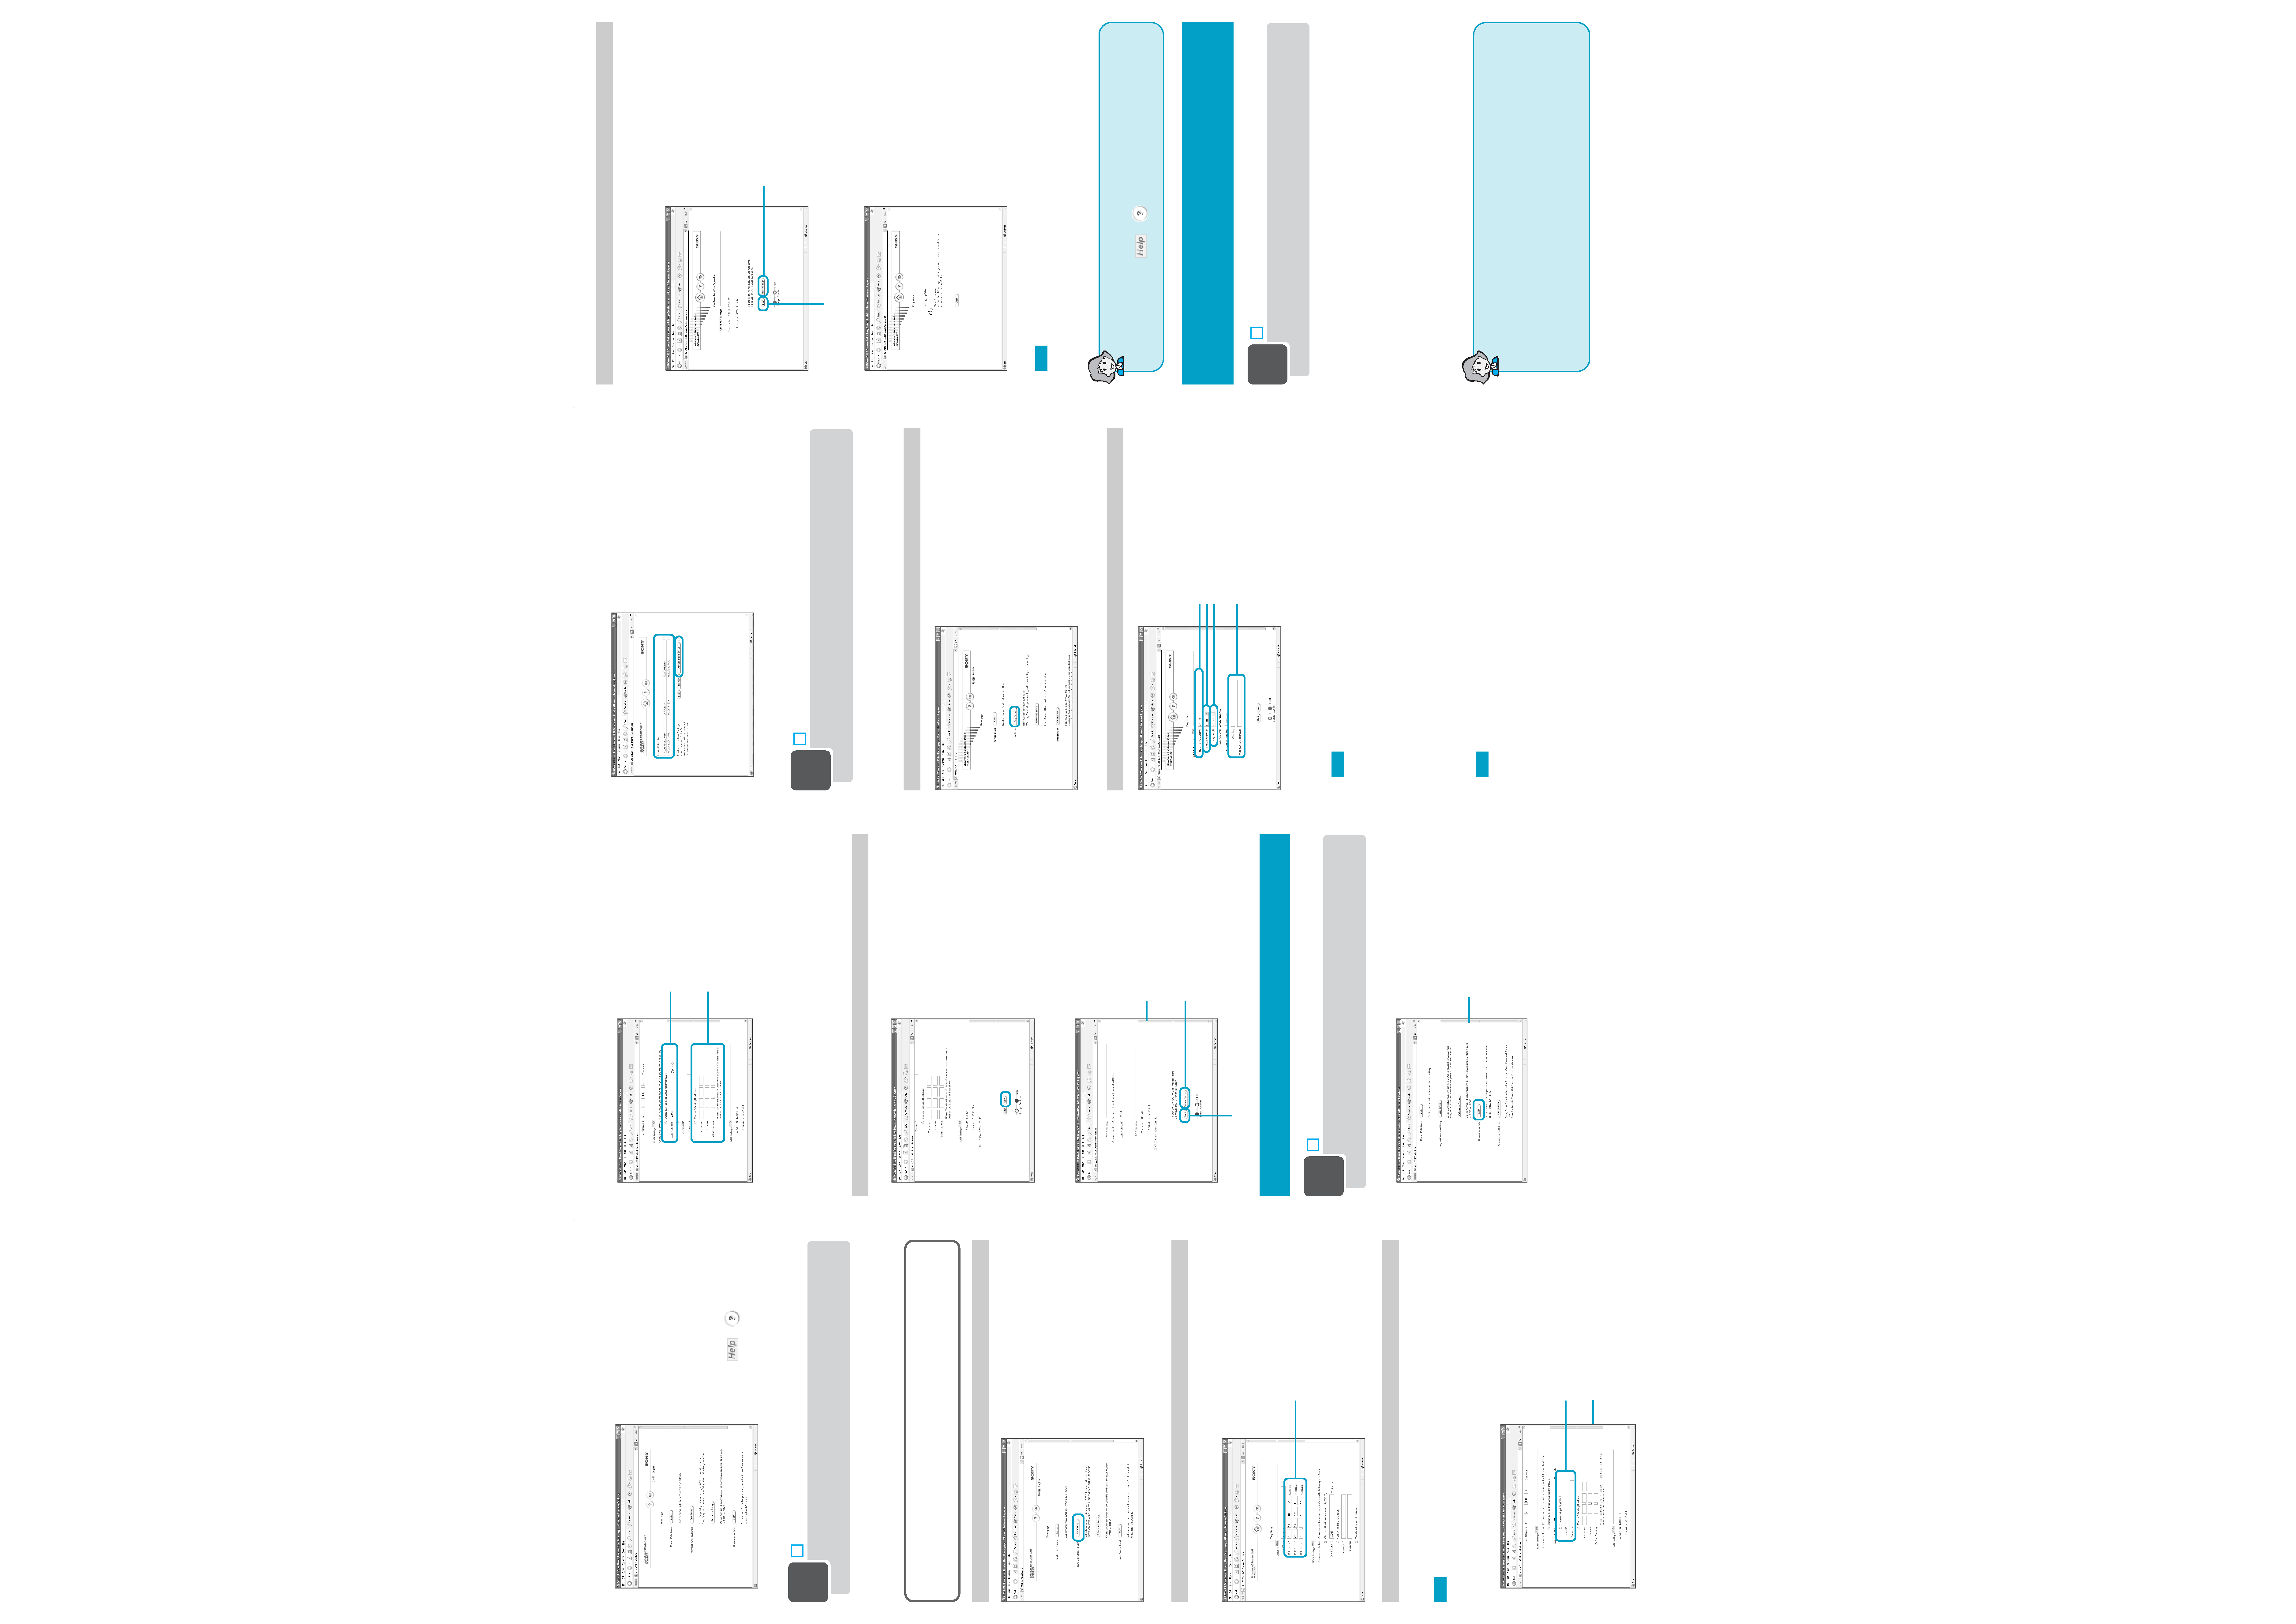
Click "Easy Setup".
1
The Easy Setup page appears.
Configure settings.
2
1
Enter the Network Name (SSID).
The Network Name (SSID) is an ID that serves to identify the wireless network. You should enter
up to 32 characters. Permissible characters are letters, numbers, and symbols.
Note
We recommend that you note the Network Name (SSID).
2
Set "Encryption (WEP)" to "Enable".
z Hint
Encryption (WEP) encodes wireless communications and prevents unauthorized access to the network.
The "Encryption Key" is the password required for WEP communications on an encrypted network.
3
Select "Key Length".
4
Enter the encryption key, and re-enter it again at "WEP Key (confirmation)"
If you select "40-bit" for the "Key Length", enter up to five letters, numbers and symbols. If you
select "104-bit" for the "Key Length", enter up to 13 letters, numbers and symbols.
Note
We recommend that you note the Encryption Key.
The Router Unit Setup Page appears.
· Connection with a cable modem
z Hint
Select from the following depending on the connection method specified by your provider.
· When connecting by DHCP (having an IP address assigned to the computer automatically), select
"Obtain an IP address automatically". In this case, please confirm the DHCP client ID (in cases where
it is particularly specified).
· When connecting by a fixed IP address (manually assigning the computer IP address), select "Use the
following IP address". In this case, enter the IP address for your computer specified by your provider.
Check that the settings are correct, and click "Execute Setup"
4
1
When finished making settings, click "Next".
The Setup Confirmation window appears.
2
Check that the settings are correct, and click "Execute Setup".
Access Point Function Setup
Procedure
6
Check
Display the Access Point Setup Page
1
Click "Scan".
Access Points are searched for, and any discovered Access Points are displayed in the list.
2
Select the Access Point to configure, and click the "Access Point Setup" button.
The Access Point Setup page appears.
Move the slider to display the hidden
part of the window.
Check that the settings are correct, and click "Execute Setup".
3
1
When finished making settings, click "Next".
The Setup Confirmation window appears.
2
Check that the settings are correct, and click "Execute Setup".
The Setup Completed window appears.
3
Close the Web browser.
Note
When you change the wireless settings, the connection to the Access Point is servered. After performing
Procedure 7, make sure that you perform Procedure 8 to reestablish the connection.
Refer to Help for details about Wireless Broadband
Router settings.
To display Help, click
or
on the Router Unit Setup Page or the
Access Point Setup Page.
Configure the Wireless Communication
Settings on the computer
Procedure
8
Check
Configure computer settings
Configure the wireless communication settings on the computer used for the setup to match
the Access Point settings.
Configure the Network Name (SSID) and Encryption (WEP) wireless
communication settings on the computer to match those set in Procedure 7.
z Hint
Refer to the instructions of your Wireless LAN PC Card or Wireless LAN Converter for the setting method.
This completes the configuration.
Refer to the Read This First supplement for the following
information:
· Installation
· Ethernet cable connection method
· Reset to factory defaults
· Factory default settings
· Status Indicator indications
1
2
3
4
When satisfied with the displayed
settings, click here.
If you want to modify the settings, click here to return to the previous window.
z Hints
· The Router Unit Setup Page provides both an
Easy Setup and an Advanced Setup.
We recommend performing the Easy Setup if
you are unfamiliar with networks.
· The Router Unit functions as a NAT router.
· When making PPPoE connections to a service
provider with a DSL modem, or when using a
cable modem, all the required settings can
usually be performed with Easy Setup.
· Clicking
or
displays Help.
The following procedures describe the setup process using "Easy Setup".
Procedure
5
Check
Configure the Router functions
Configure the Router functions of the Router Unit.
The basic settings to connect to the Internet are described here. For details about the settings,
refer to Help on the Router Unit Setup Page.
Specific information required to establish an Internet connection is
normally provided by your Internet service provider when making the
service contract. You may have to refer to this information when setting up
the connection, so have the information at hand.
Click "Easy Setup".
1
The Easy Setup page appears.
Make basic settings.
2
Enter a DNS server address if necessary.
The DNS server address setting is determined by your Internet service provider.
Configure your WAN settings (for connection to the Internet).
3
The entry field to use depends on your Internet service provider, so refer to the information
supplied from your provider to make this entry.
Note
Your Internet service provider may not permit the connection of the DSL or cable modem to a router. Please
refer to the clauses of your service contract.
· PPPoE connection with a DSL modem
Refer to the information supplied
from your provider to make these
entries.
Select "Connect using DSL (PPPoE)",
and enter your account information.
Move this slider to view the hidden
part of the window.
Referring to your provider's information,
select "Obtain an IP address automatically",
or select "Use the following IP address" and
enter the information specified by your
provider.
When satisfied with the displayed
settings, click here.
If you want to modify the settings, click here to return to the previous window.
Move this slider to check the
settings.
z Hints
· If multiple Access Points are found, verify the
Access Point to configure by the MAC address
printed on the label inside the rear cover of the
Wireless Unit.
· If no Access Points are found, click "Refresh".
· If there are several Access Points and you do
not know which one to select, consult your
network administrator.