
VAIO® COMPUTERS
IMPORTANT INFORMATION
Hard Disk Drive Recovery Options
Your VAIO® computer is equipped with the VAIO Recovery Wizard, a fast and easy-to-use system recovery utility.
The VAIO® Recovery Wizard enables you to recover preinstalled software and the operating system. The VAIO
Recovery Wizard enables you to reclaim all of your computer's hard disk drive space, restore your computer to
normal operation, and create a Recovery Media Kit.
To reclaim the recovery partition on your hard disk drive, you must create or order the Recovery Media Kit.
To create a Recovery Media Kit
You can create your Recovery Media Kit using CD and DVD media.* If you wish to reclaim the space reserved for
the recovery partition (approximately 5 GB), use only CD media, not DVDs, to create your kit.
A kit created using both CD and DVD media supports the recovery option of restoring your computer to normal
operations.
A kit created using only CD media supports the recovery options of restoring your computer to normal
operations and reclaiming all of your computer's hard disk drive space.
Before you begin creating your Recovery Media Kit, confirm that you have the appropriate media available for the
desired recovery options.
For details on creating the Recovery Media Kit, see the VAIO Recovery Options online guide:
1Click Start in the Windows® taskbar, and then click Help and Support.
2From the VAIO Help and Support Center, click VAIO Recovery Options.
For more information about using the VAIO Recovery Wizard and the Recovery Media Kit,
go to: http://www.ita.sel.sony.com/support/news/hddrecovery.html
Your new computer is not supplied with System or Application Recovery CDs. Sony recommends that you create or order a
Recovery Media Kit
*
The number of CDs and DVDs required to create a Recovery Media Kit may vary, depending on the computer
purchased.
If your computer is running under the Microsoft® Windows® XP Professional Edition operating system, you can restore your
computer and reclaim all of your hard disk drive space, using a Recovery Media Kit created with both CD and DVD media.

VAIO® COMPUTERS
To order the Recovery Media Kit
1
Connect to the Internet.
2
Go to the Sony Direct Accessories and Parts Center Web site at http://servicesales.sel.sony.com.
3
In the section, Search by Model for Accessories, type in your computer model (for example, PCV-XXX or
PCG-XXX).
4
Click List Parts and accessories.
5
From the list of accessories, locate the Partition Recovery ASSY/Recovery Media Kit.
6
Select Add to Cart.
7
Click Continue to Check Out, and follow the on-screen instructions to complete your purchase.
To access the VAIO Recovery Options online
For more information about using the VAIO Recovery Wizard, see the VAIO® Computer Quick Start or the online
VAIO Recovery Options.
1
Click Start in the Windows® taskbar.
2
Click Help and Support. The VAIO Help and Support Center menu appears.
3
From the VAIO Help And Support Center menu, click VAIO Recovery Options.
Replacing the primary hard disk drive
Use the Recovery Media Kit to recover your primary hard disk drive's operating system and software when you
replace it.
To recover the new, primary hard disk drive:
1
Once you have replaced the primary hard disk drive, press the power switch on the computer to turn on the
power.
2
Open the optical drive, and place the Startup Recovery Disc in the optical drive.
3
Close the drive.
4
Turn off your computer.
5
Wait for approximately 30 seconds, and then turn on the computer.
6
When you see the message No system drive found, click OK.
7
Follow the on-screen instructions to proceed with the recovery.
If you are not able to access the Sony Direct Accessories and Parts Center Web site, contact a customer service representative
at 1-800-488-7669.
The message, No system drive found, does not indicate a problem with your system or the new hard disk drive.
VAIO® COMPUTERS
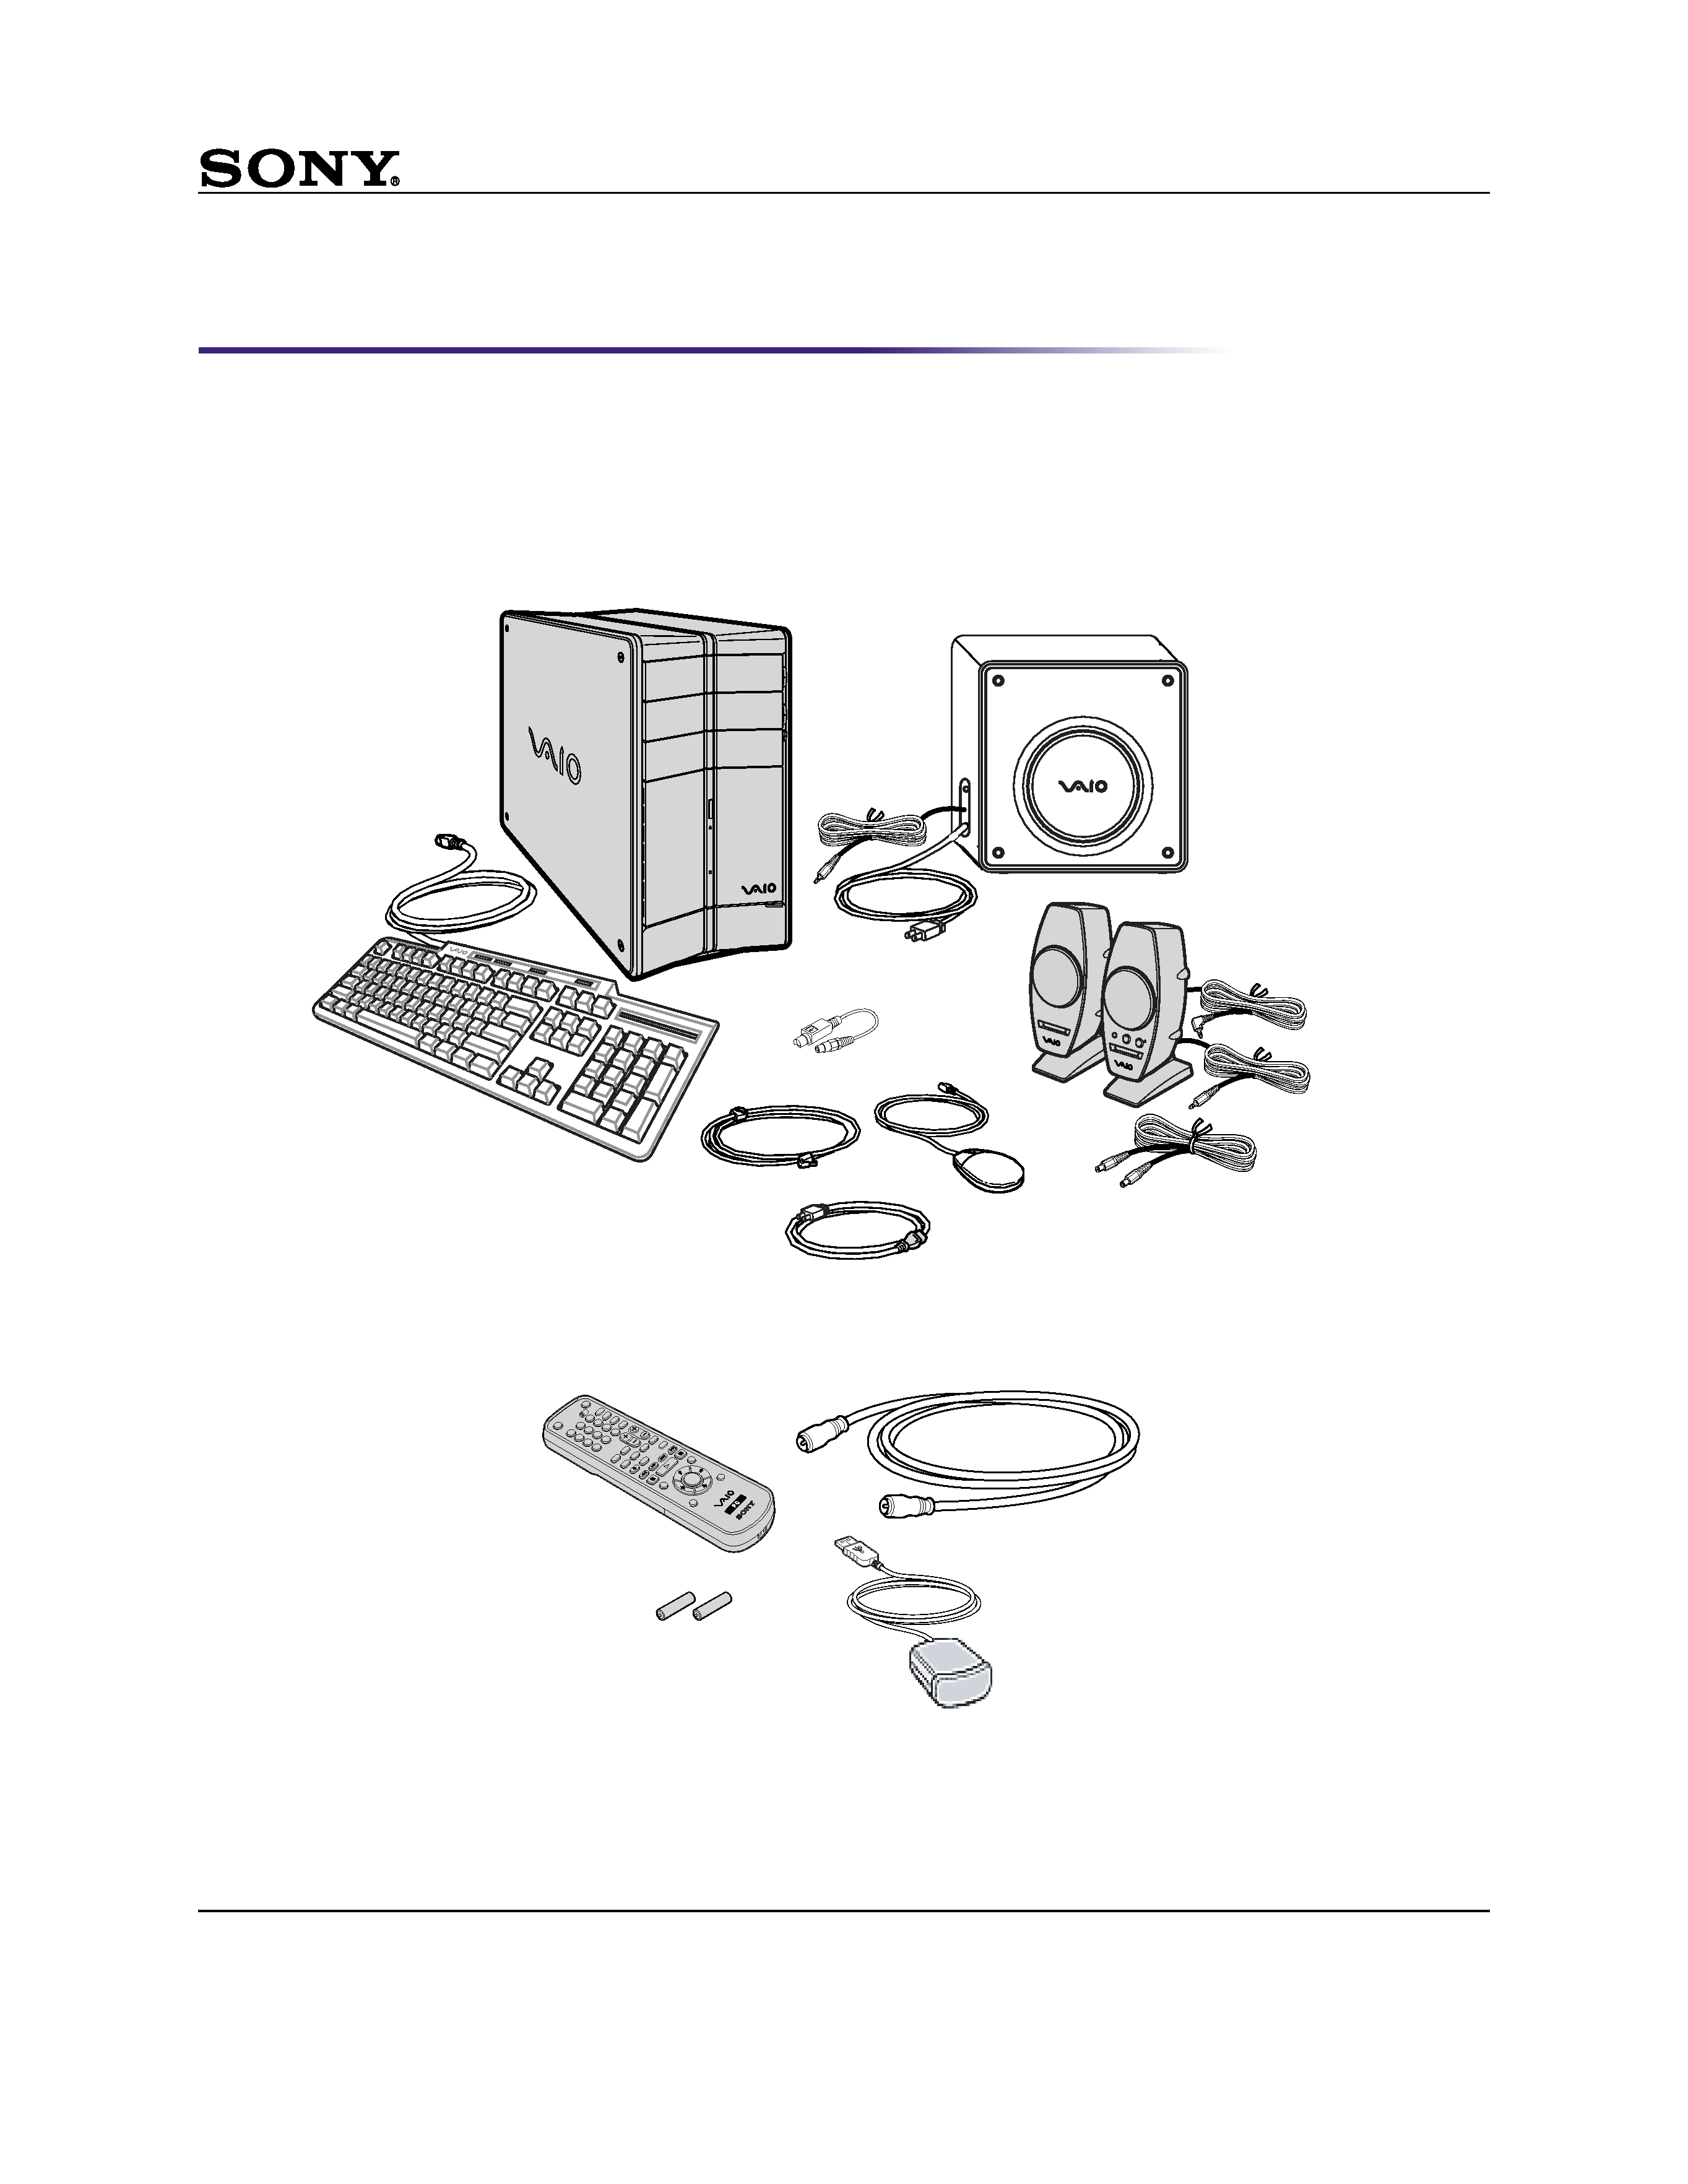
Unpacking your computer and supplied accessories
Your VAIO Digital Studio® computer may not be supplied with all of the accessories shown, depending on the
system configuration you purchased. For details on the specific accessories supplied with your computer, see the
online Specifications sheet.
Computer and supplied accessories
Giga PocketTM Personal Video Recorder accessories
System unit
Modem cable
Power cord
Mouse
Keyboard
Video adapter
Sub woofer unit
Speakers (PCVA-SP4)
Speaker power cable
TV coaxial cable (1)
Infrared receiver (1)
Remote control (1)
AA batteries (2)
VAIO® COMPUTERS
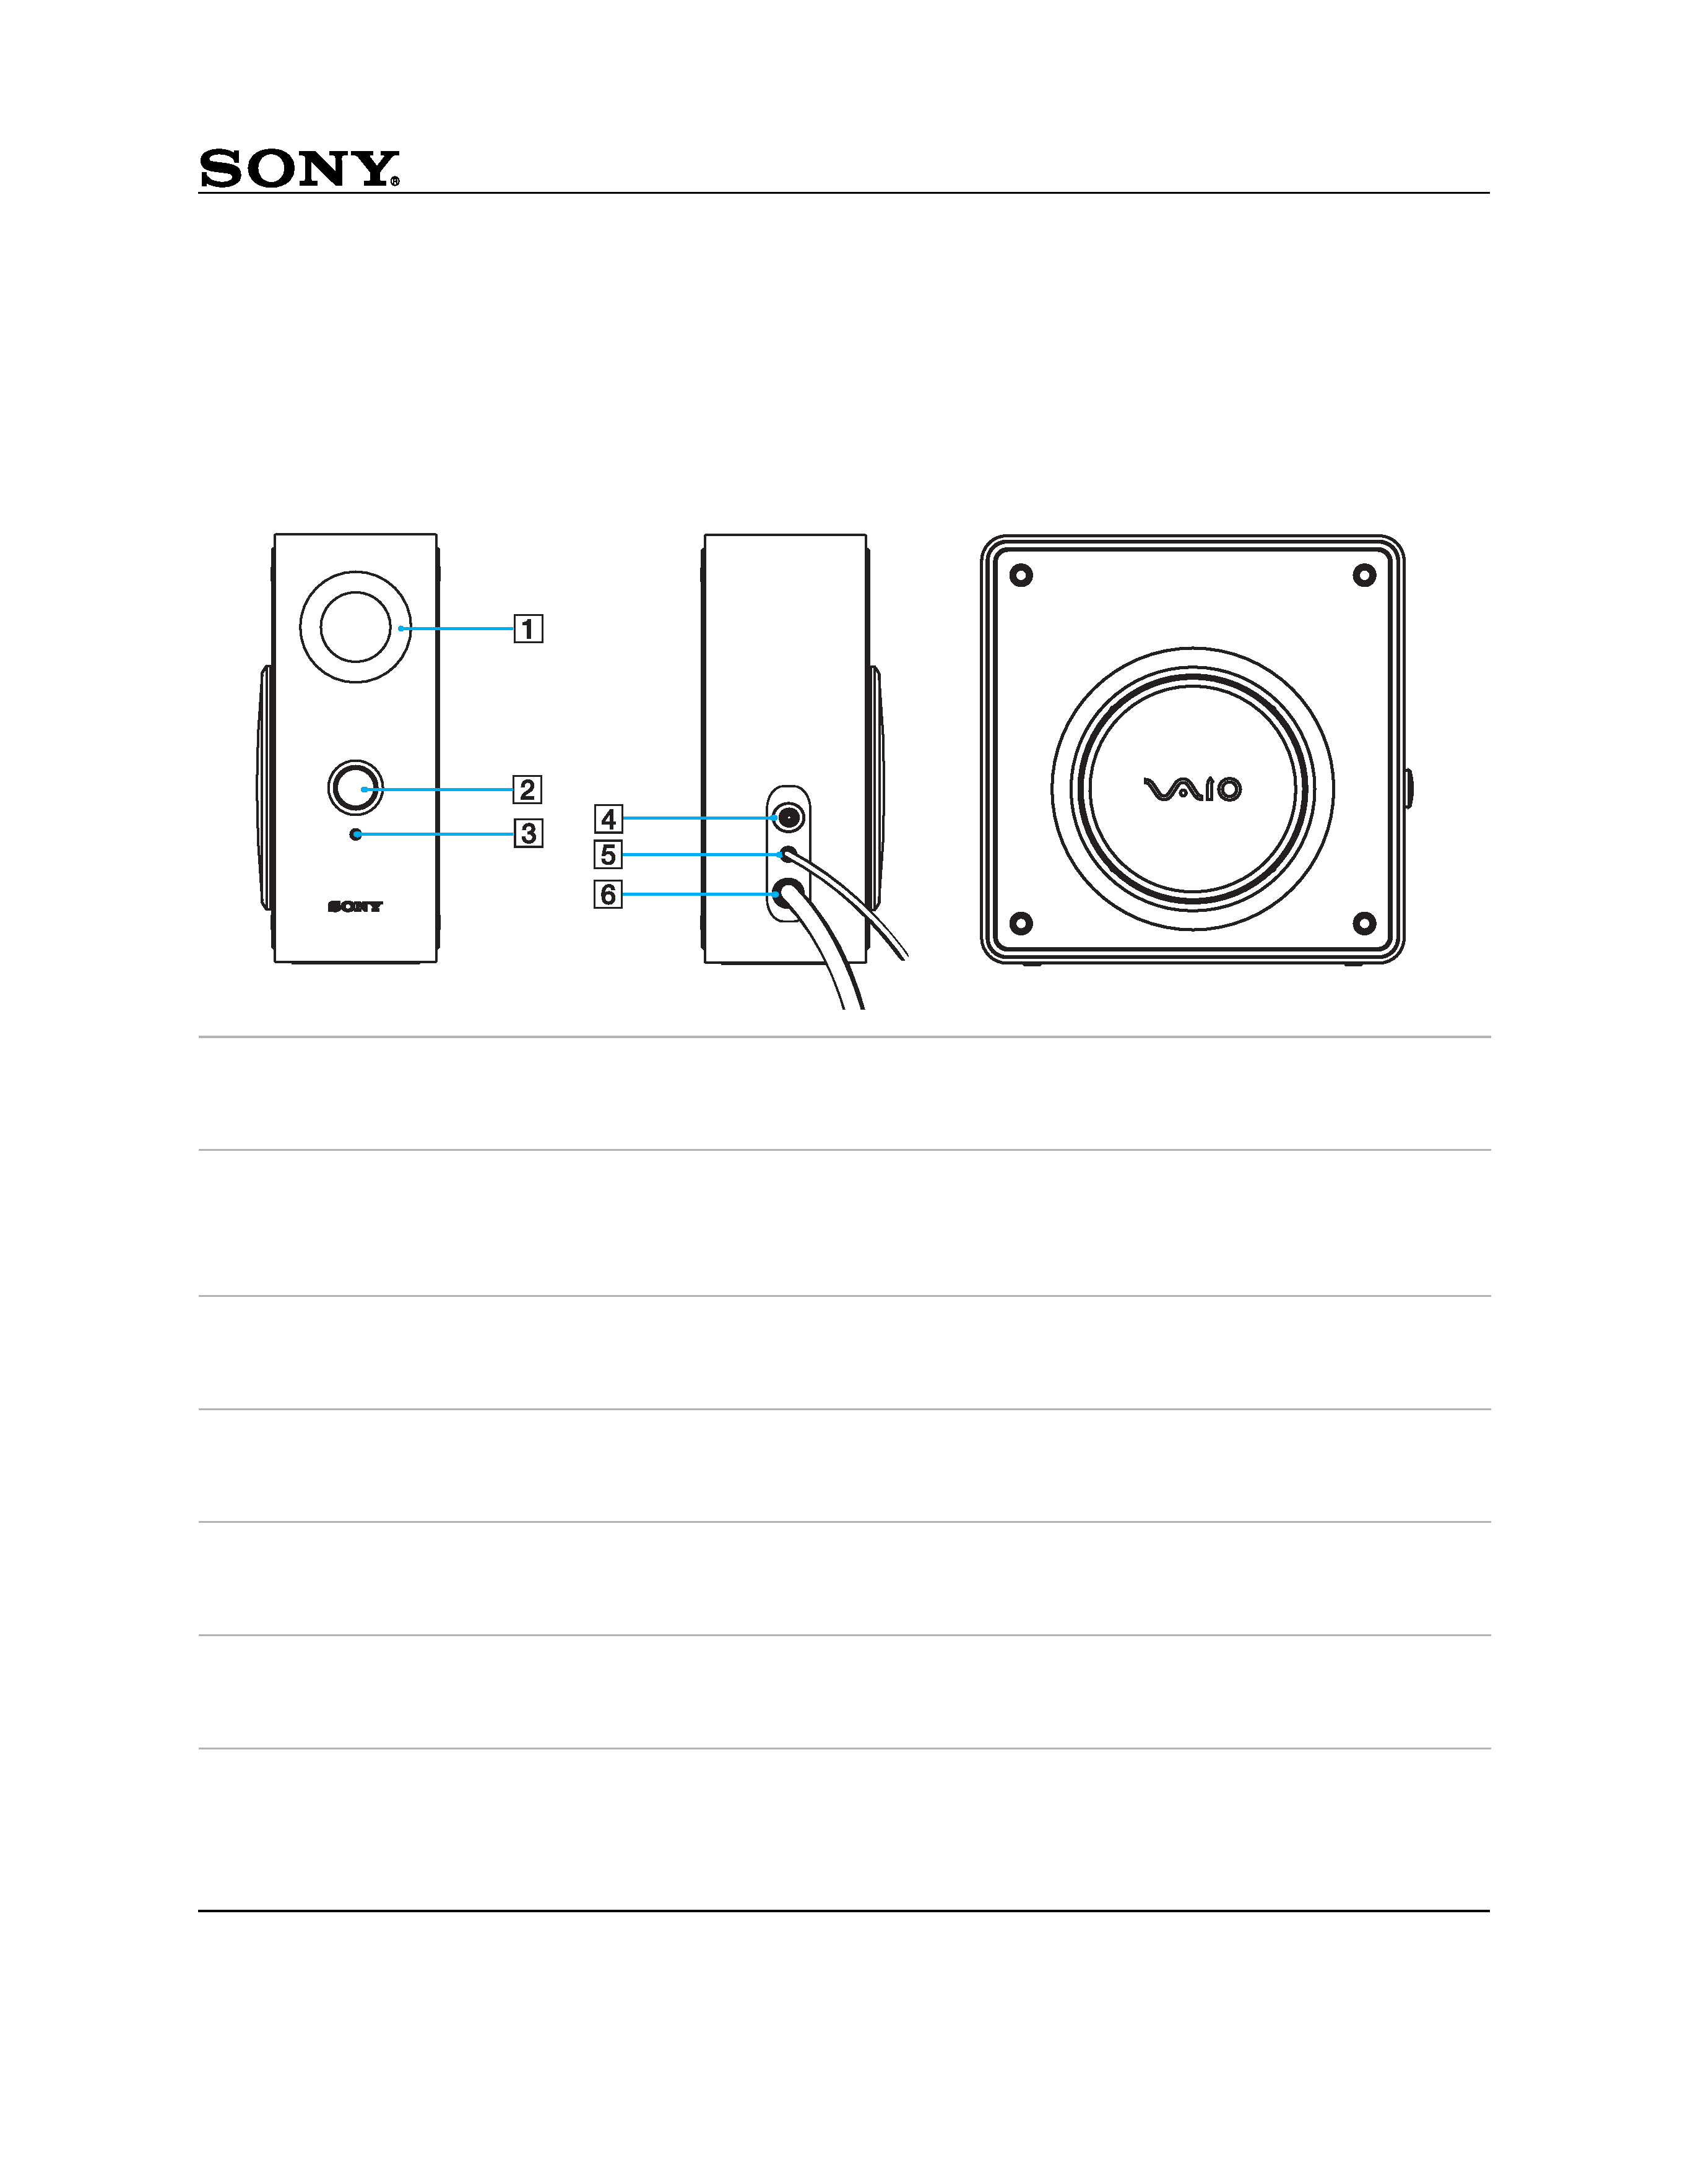
About the sub woofer unit
Your VAIO Digital Studio® computer is supplied with a sub woofer unit to enhance your system's sound capability.
Sub woofer unit
1
Port
The port extends the low frequency response to extend the volume output of the sub woofer unit.
2
Power knob/volume control
Rotate the knob clockwise to turn on the sub woofer unit. Volume is controlled by rotating the knob until
the desired volume is reached. Rotate the knob counter-clockwise to turn off the sub woofer unit.
3
Power indicator
Light is green, while the power is on.
4
Speaker jack
Connection for the speaker cable (RCA plug)*.
* See the next section, "Connecting the computer, speakers, and sub woofer unit" for details on connecting the speakers to the sub woofer
unit.
5
Sub woofer unit cable
Connects the sub woofer unit to the computer's headphones jack.
6
AC power cord
Connects the sub woofer unit to a grounded AC wall outlet or power strip.
Right side
Left side
Front panel
VAIO® COMPUTERS
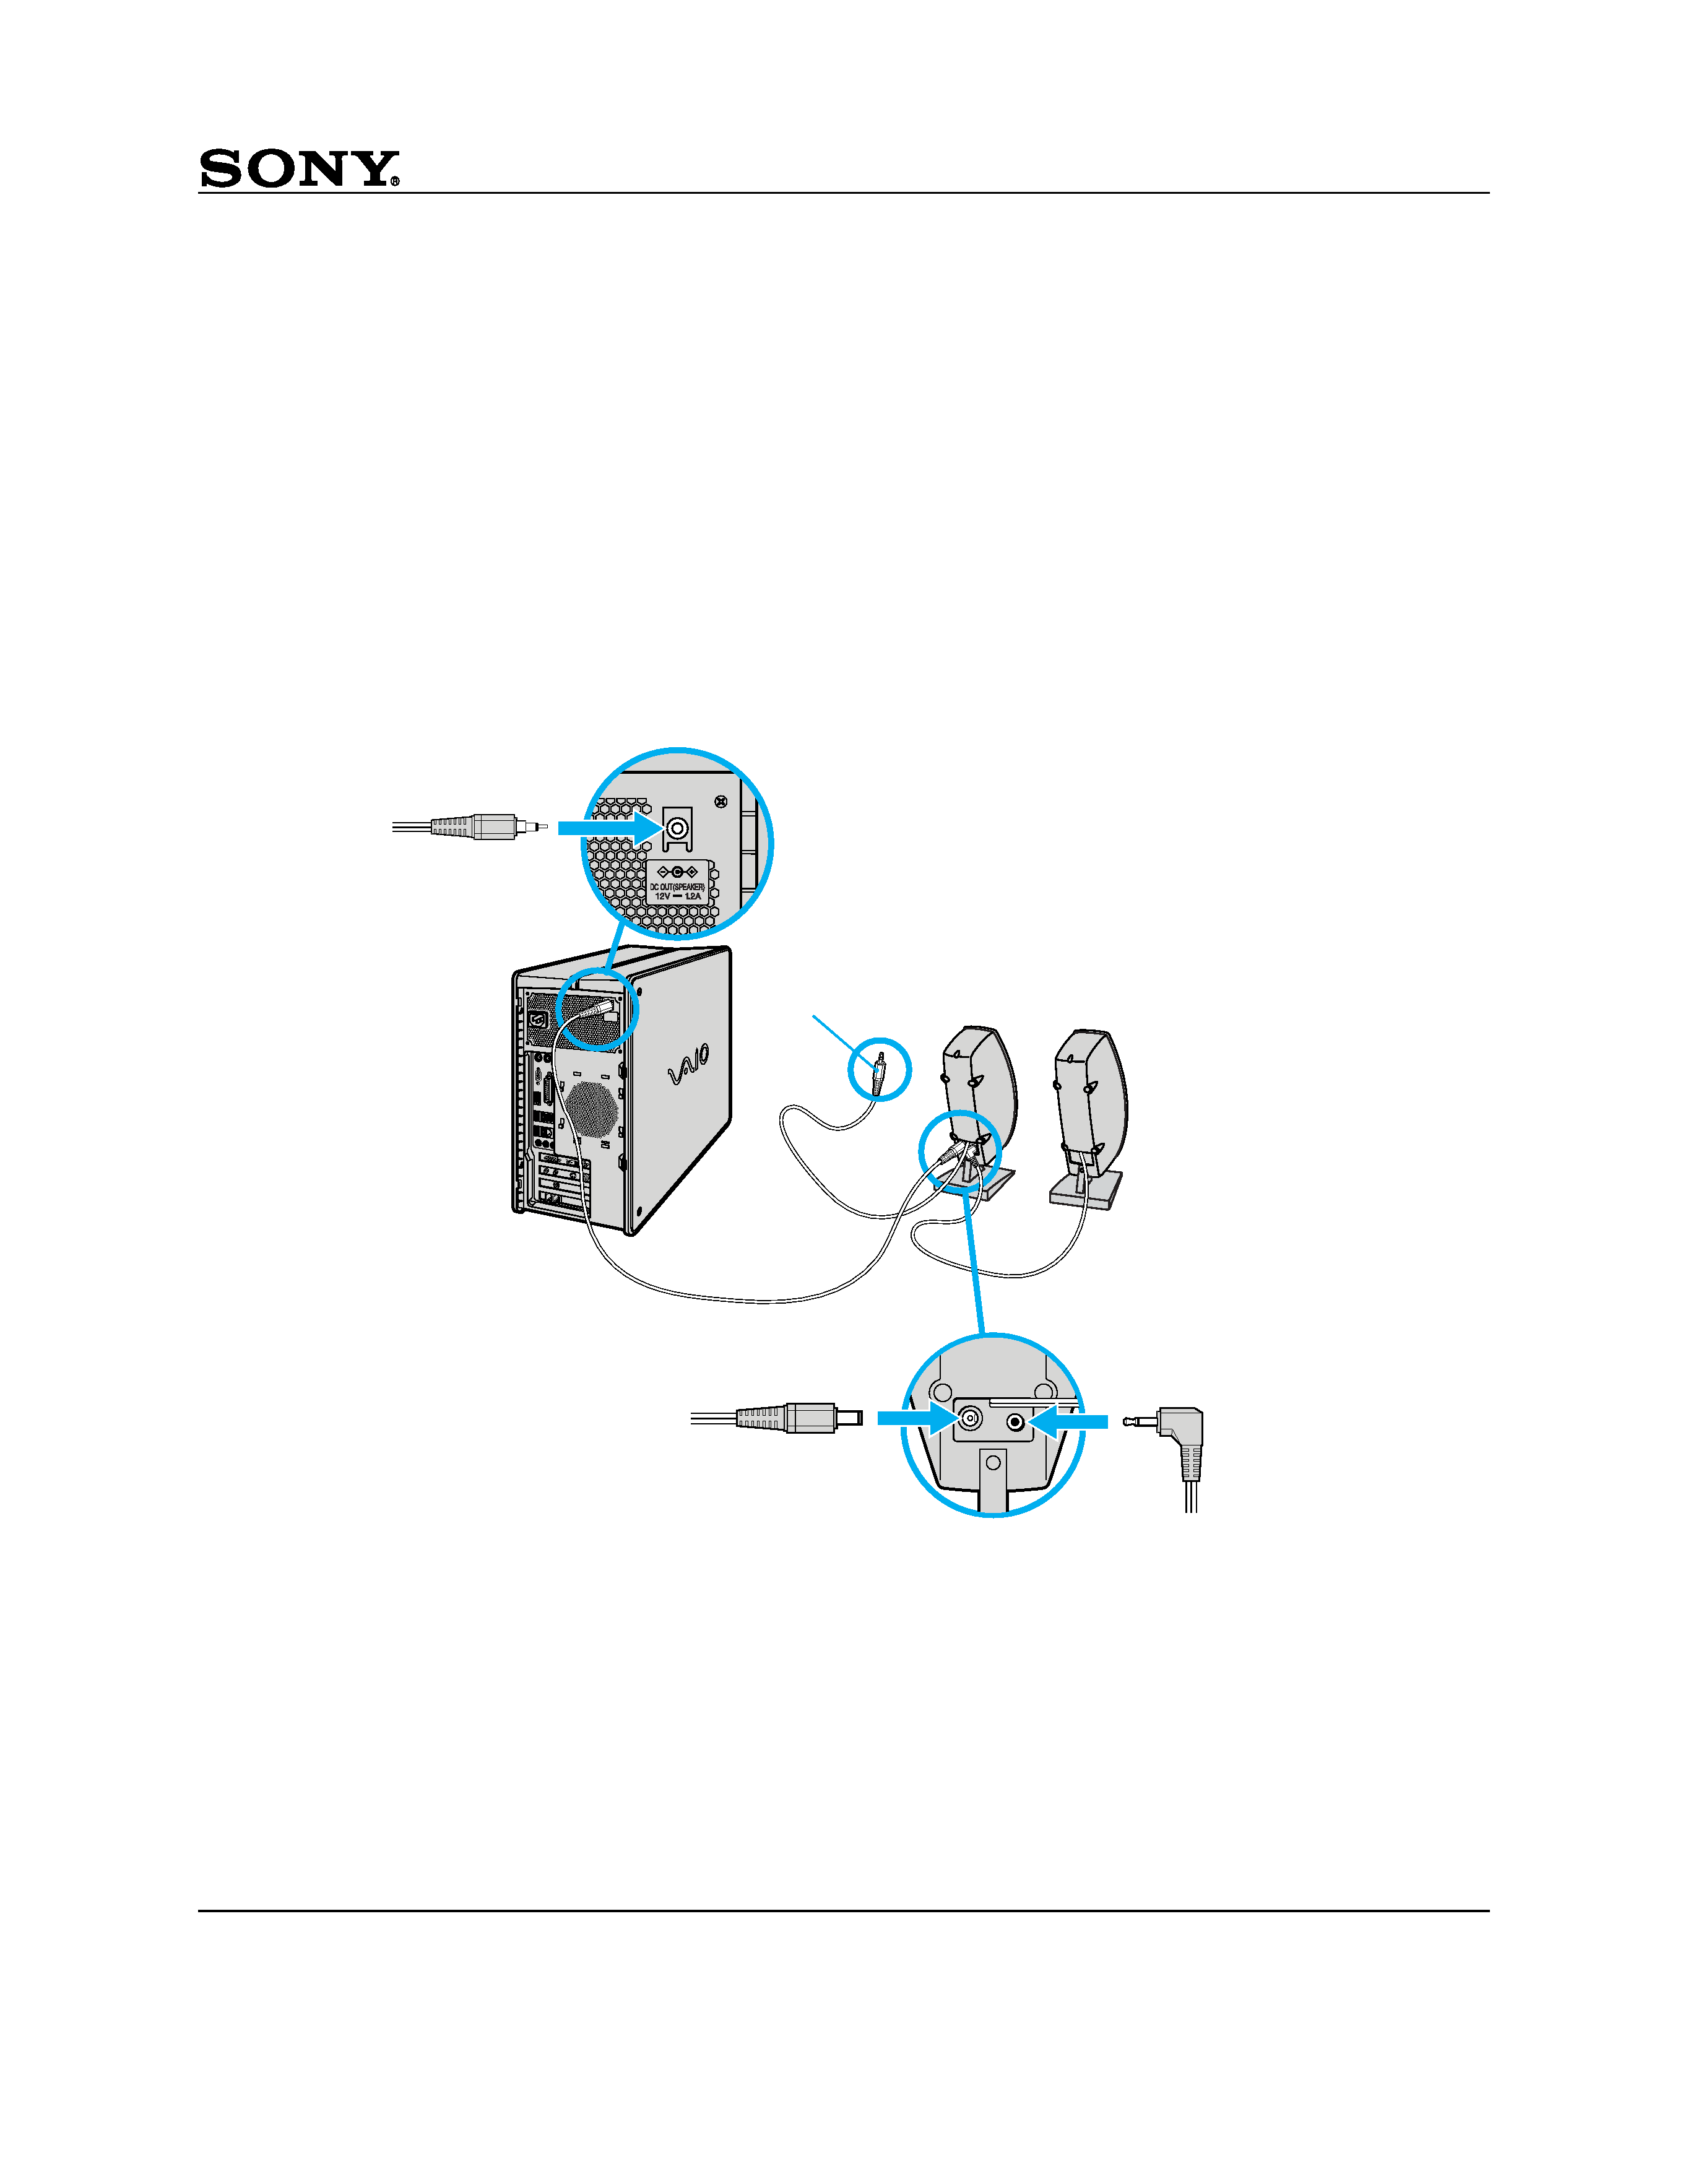
Connecting the computer, speakers, and sub woofer unit
These connection instructions replace the information provided in your computer's online User Guide and the VAIO
Digital Studio® Computer Quick Start.
1
Plug the cable attached to the back of the left speaker into the L Out jack on the back of the right speaker.
2
Insert the yellow RCA plug of the speaker power cable into the DC In jack (yellow) on the back of the right
speaker.
3
Insert the black RCA plug of the speaker power cable into the DC Out jack located on the back panel of your
computer.
To connect the speakers
L-speaker
R-speaker
Connect to
Sub woofer
Speaker power cable
(yellow RCA plug)
Speaker power cable
(black RCA plug)
System unit
L-speaker cable