
1
Oxford R3 EQ Plug-in Manual
For

2
Oxford EQ Plug-in Operation Manual
1 Introduction.
Congratulations on acquiring the OXF-R3 EQ for TC PowerCore. This application draws on the
considerable experience of the Oxford Team in professional audio and studio systems, the team that
designed the OXF-R3 console system. The Oxford EQ plug-in is based on the OXF-R3 EQ section and
provides a truly professional EQ processor for the VST and AudioUnit user.
It is a fully functional 5-band application with selectable shelf settings on LF and HF sections.
Additionally, separate variable slope low pass and high pass filters are provided. The EQ also features 4
different selectable EQ types that cover most of the EQ styles currently popular amongst professional
users, including some legacy styles, which are renowned for their artistic capability. The use of novel
coefficient generation and intelligent processing design provides unparalleled performance that
surpasses analogue EQ in both sound quality and artistic freedom.
2 Included Plugins.
Three separate plugin types are provided in this package to enable the user to optimise processing load
depending on requirements during session:
·
5 band EQ with Filters.
·
5 band EQ without Filters
·
Filter section only.
Mono and stereo versions of each type are also provided, for a total of six plugins.
3 System Requirements.
·
Approved TC Works CPU and hardware configuration
·
OSX 10.2 or higher (Macintosh version)
·
Windows XP (Windows version)
·
800x600 minimum display
·
A VST or AudioUnit compliant host application (e.g. Cubase / Logic / Nuendo / Spark /
Digital Performer)
·
One or more TC Works PowerCore devices (PCI or FireWire) with driver version 1.7 or
higher.

3
4 Installation.
All versions of the plug-in can be obtained by purchase from www.sonyplugins.co.uk or
www.sonyplugins.com websites.
When purchasing from the website, after entering your details and credit card number, a download link
will be displayed (and also emailed to you). When the link is followed, you will be prompted to enter
your PowerCore authentication ID and select the platform you require. To obtain your ID, see the
information below.
Once submitted, you will be issued a download link via email for your plugins, which are now uniquely
locked to your PowerCore. NOTE: If you have multiple PowerCores, ensure you enter the
authentication ID for a device that is installed in the system used with your plugins, as this cannot be
changed after it is submitted!
You may re-request your software from this link at any time. This allows you to easily obtain future
updates. Additionally, this allows you to (for example) request a PC rather than Macintosh version (or
vice versa - remember, your software is locked to your PowerCore, not your computer).
The installer file is in .zip format which can be extracted using (for example) Stuffit Expander on the
Macintosh, and by WinZip or the operating system for PC versions.
Obtaining your PowerCore Authentication ID
Macintosh
Click the Apple icon at the top left of your screen, then select `System Preferences...' from the drop
down menu which appears. When the Preferences window is displayed, click `POWERCORE'
(normally at the bottom left), `Configure', and then the `Information' tab in the PowerCore control
panel. Your authentication ID is now displayed (in the form XXXXXXX-XXXXXX-XX).
Windows
Click the `Start' icon at the bottom left of your screen, then `Settings'->'Control Panel'. When the
Control Panel is displayed, double click the `POWERCORE' icon, and select the `Information' tab.
Your authentication ID is now displayed (in the form XXXXXXX-XXXXXX-XX).
Macintosh Installation
Double click the `Setup' icon to begin. Follow the onscreen prompts.
The installer will install your plugins into the `/Library/Audio/Plug-Ins/VST/Sony' folder, and register
them for use as AudioUnits.
Windows Installation
If any older versions of the plugins are installed, remove them via the `Add or Remove Programs'
control panel before continuing.
Double click the `Setup' icon to begin. Follow the onscreen prompts.
The installer will attempt to detect your shared `VSTPlugins' directory, but you may also select
another location if desired.
Revision History
·
8th September 2003 PowerCore update for v1.7 drivers
4
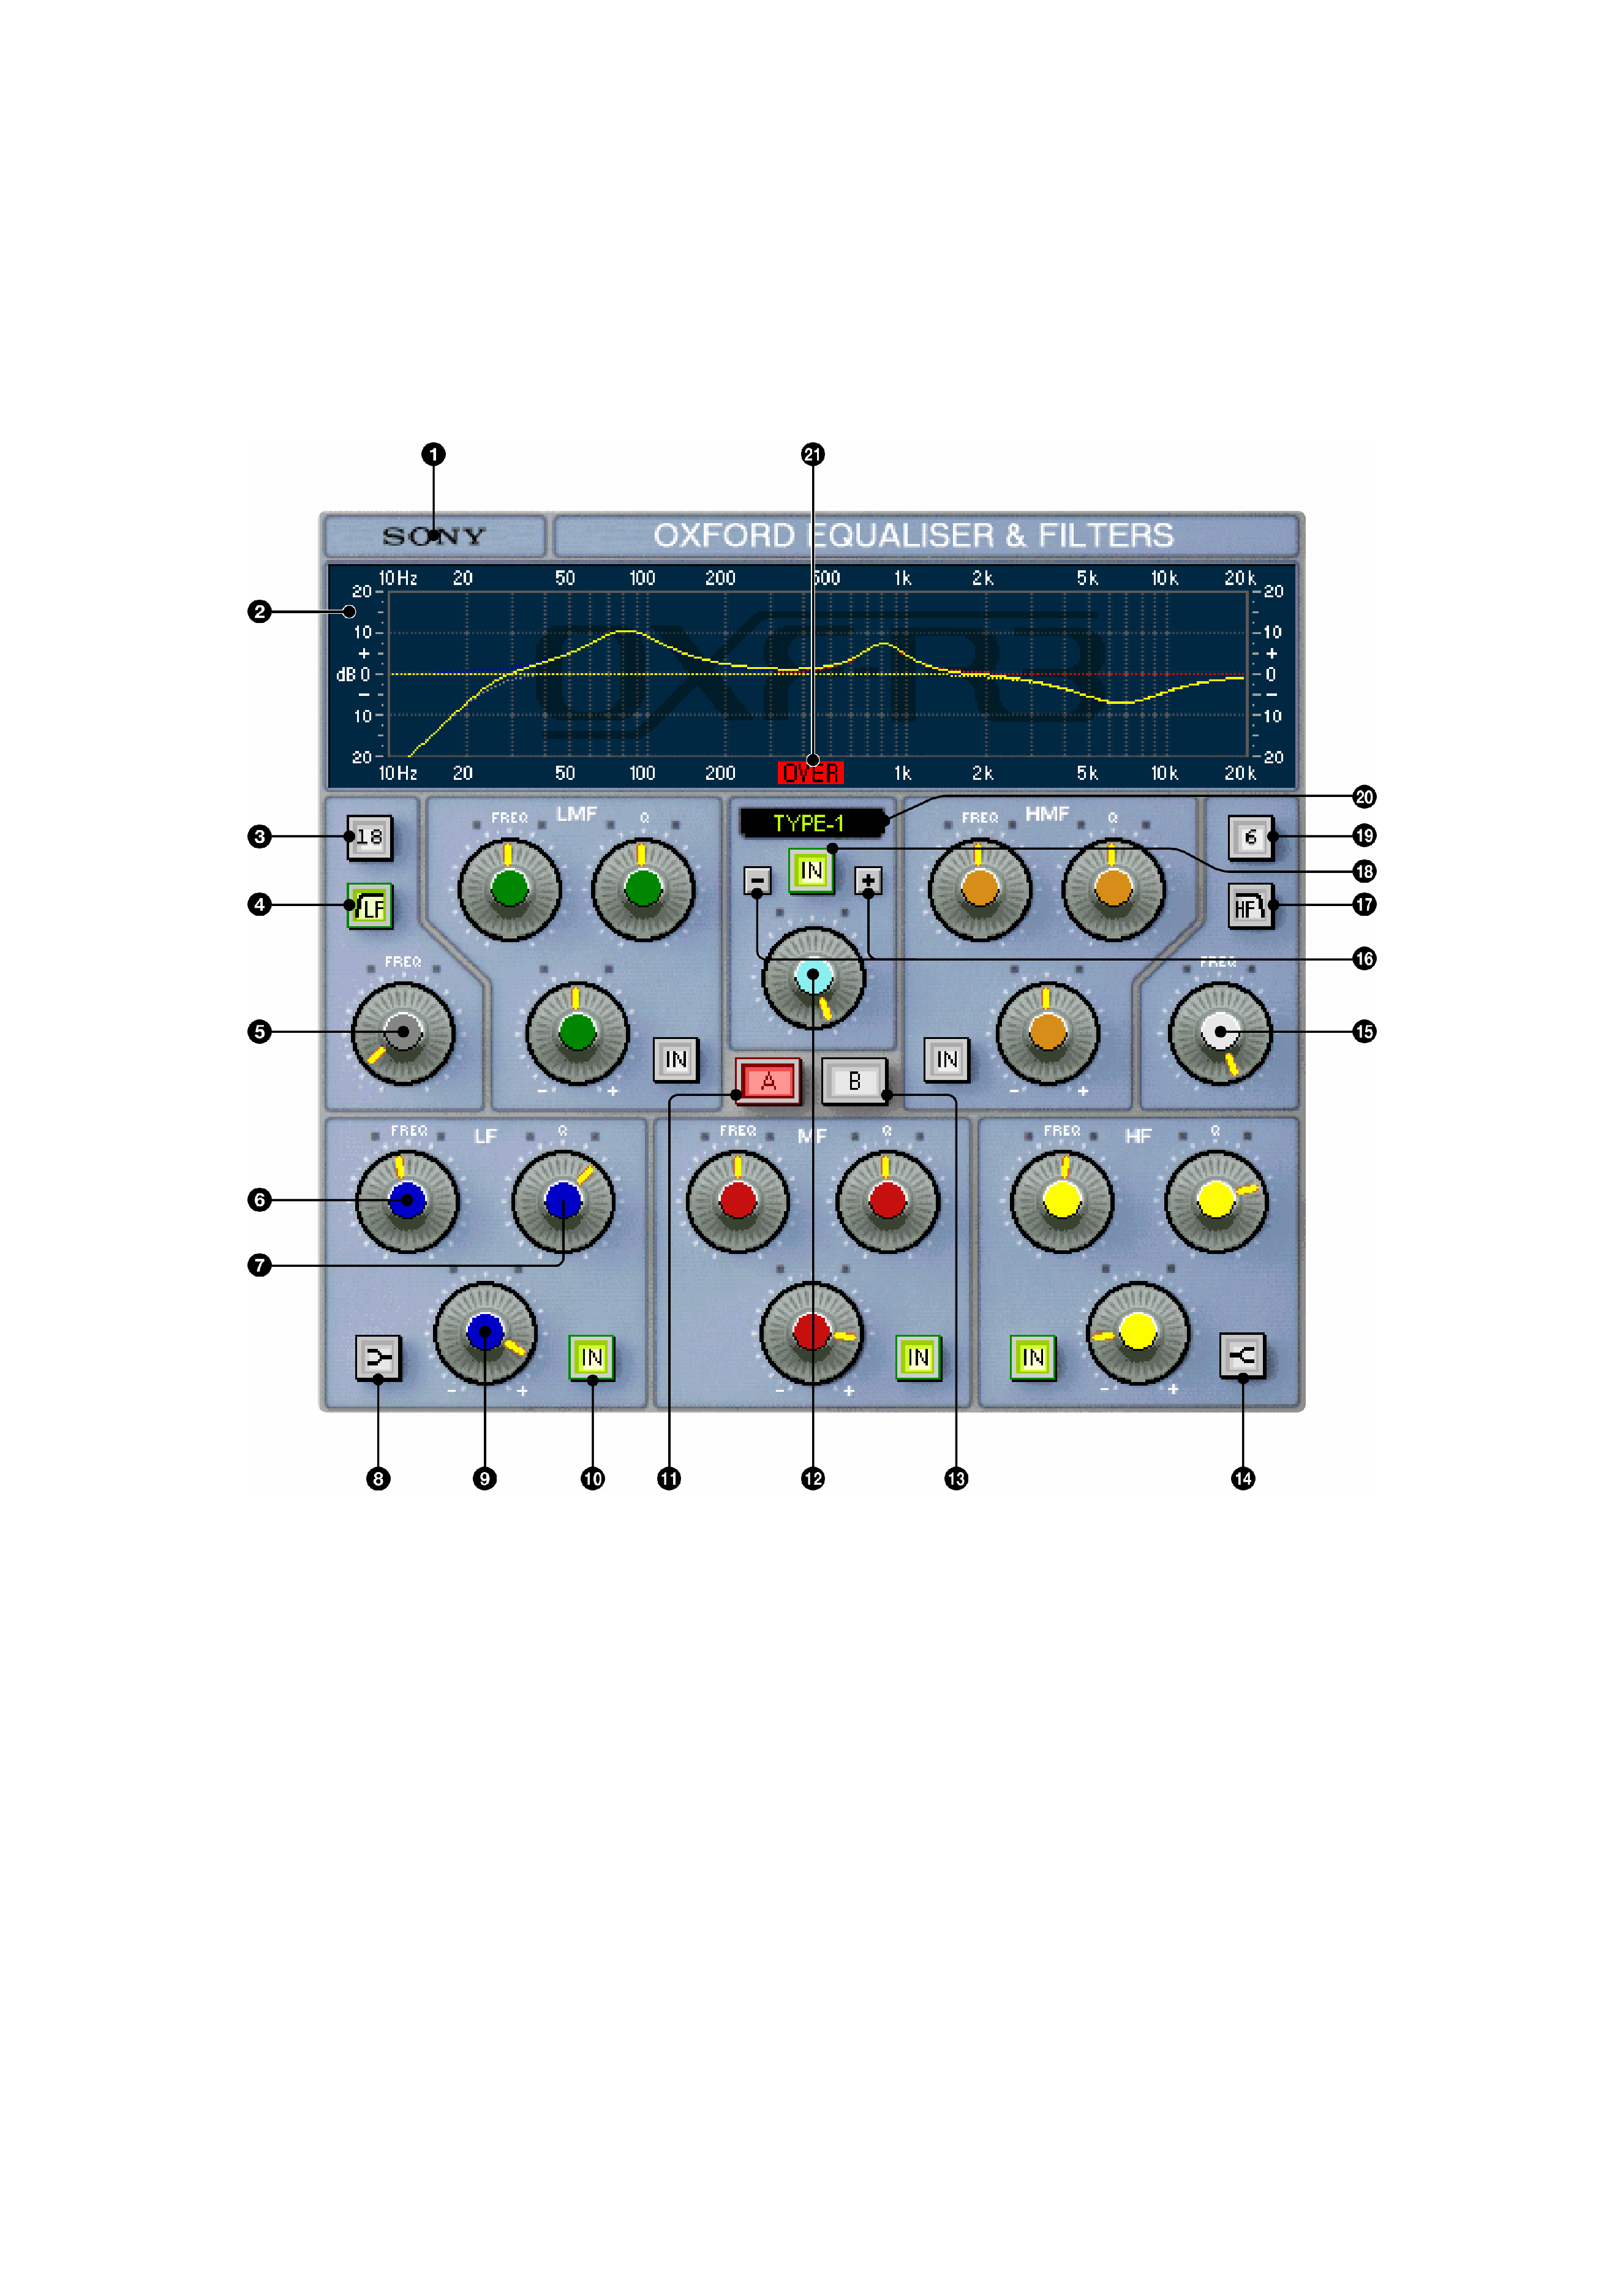
5 Control list and functions.
The Plug-in user interface consists of two sections for EQUALISATION and FILTERING functions.
The filter section controls, included in the EQ GUI, are greyed out when the filter is not in use, and vice
versa. Note that placing the pointer over any rotary control will indicate the current value without
parameter change.
1. About.
Click the Sony logo to display registration and version information.
2. Response display.
Displays current active EQ and filter response curves. The graph will rescale to match the current
sample rate.
3. LF and HF (19.) SLOPE button.
Selects LF and HF filter Slopes 6dB 36dB/oct in 6dB/oct steps.
4. / LF and HF \ (17.) button.
Switches low pass and high pass filters in/out.
5. LF and HF (15.) FILTER FREQ controls.
Sets LF and HF filter turnover frequencies.

5
6. FREQ controls.
Sets the centre frequencies or turnover frequencies for shelf curves.
7. Q controls.
Sets bandwidth of EQ curves. Sets amount of overshoot function in shelving sections.
8. LF and HF (14.) Shelving buttons.
Select shelving function for high and low EQ sections.
9. +/- controls.
Sets Boost or cut gains.
10. IN buttons.
Allow individual EQ sections to be switched in/out.
11. A & B (13.) buttons.
Two complete EQ / filter settings can exist simultaneously. The A&B buttons allow toggling between
them for comparison purposes.
12. Gain control.
Sets the attenuation level to the EQ section to avoid clipping signals when in boost.
13. A & B buttons (as 10.)
14. LF and HF Shelving buttons (as 8.)
15. LF and HF FILTER FREQ controls (as 5.)
16. +/- buttons
Selects EQ function types. Four types are offered on the Oxford R3 EQ plug-in.
18. IN button.
Applies the EQ function type selected by +/- push buttons in (22.) The IN button light will go out if
another EQ type is selected, indicating that the EQ remains unchanged until the IN button is depressed.
20. 8 Character display.
Displays the graph type selected by +/- buttons in (22.).
21. Overload indicator.
Displays signal overload at the output of the EQ and Filter sections. The default mode for this function
is latching, requiring a click to reset. Clicking and holding on the overload area produces a pop-down
menu that enables selection of either 2 or 5 second time out settings to facilitate initial EQ adjustment.
No Latency mode
No Latency mode can be switched on or off from the menu which appears when the top left of a plugin
is clicked.
Mouse rate control
In linear mode (see below), fine adjustments to any control setting can be achieved by pressing the
`Apple command' (Macintosh version) or `Shift' (PC version) key before clicking on the control to be
adjusted and holding this key down during the operation.
This rescales the control rate with the mouse movement so that very fine adjustments can be made.