© 1999 by Sony Corporation
FM/MW/LW
MiniDisc Player
MDX-C8970R
Operating Instructions
Manual de instrucciones
Manual de instruções
Bruksanvisning
GB
ES
PT
SE
For installation and connections, see the supplied installation/connections
manual.
Para obtener información sobre la instalación y las conexiones, consulte el manual
de instalación/conexiones suministrado.
Para a instalação e as ligações, consulte o manual de instalação/ligações
fornecido.
Vi hänvisar till det medföljande häftet angående montering/anslutningar.
MDX-C8970R

2
Welcome !
Thank you for purchasing this Sony MiniDisc
Player. This unit lets you enjoy a variety of
features by using either a supplied rotary
commander or an optional wireless remote.
In addition to the MD playback and radio
operations, you can expand your system by
connecting an optional CD/MD unit*1.
When you operate this unit with a connected
optional CD unit compatible with the CD
TEXT function, the CD TEXT information will
appear in the display when you play back a
CD TEXT disc*2.
*1 You can also connect a CD changer or an MD
changer.
*2 A CD TEXT disc is an audio CD that includes
information such as the disc name, artist name,
and track names.
This information is recorded on the disc.
You can select for the display language and
vocalised comments of the voice guide in
either English or Spanish.
Voice Drive
Sony has developed a new function which
contributes to safer driving.
In addition to our unique rotary commander,
we now introduce a voice sensitive operating
system Voice Drive which gives the driver
voice control of the car audio.
Now, while keeping your eyes on the road,
you can command operations with Voice Drive
and confirm results with Voice Guide.
And you can also record your voice with the
voice memo function. It will take a note for
you when you see or think of something while
you are driving.
Voice guide for safe driving
This unit has a voice guide function*. When
the voice guide function is on, the unit gives
vocalised comments on functions
corresponding to the relevant button pushed.
These comments can be vocalised in either
English or Spanish.
* Some optional power amplifiers may cause a
break at the beginning of vocalised comments.
When you connect an optional MD changer, the
sound from the first MD may continue for a short
time even after the vocalised comments about
the second MD are announced.

3
Table of Contents
This Unit Only
With Optional Equipment
Notes on MDs ........................................................... 4
Location of controls .................................................. 5
Getting Started
Resetting the unit ................................................. 7
Detaching the front panel ................................... 7
Preparing the rotary commander ...................... 8
Setting the clock ................................................... 8
MD Player
Listening to an MD .............................................. 9
Playing an MD in various modes .................... 11
Creating a programme
-- MD Programme Memory ....................... 12
Radio
Memorising stations automatically
-- Best Tuning Memory (BTM) ................... 14
Memorising only the desired stations ............. 15
Receiving the memorised stations ................... 15
RDS
Overview of the RDS function ......................... 16
Displaying the station name ............................. 16
Re-tuning the same programme automatically
-- Alternative Frequencies (AF) ................. 17
Listening to traffic announcements ................. 18
Presetting the RDS stations with the AF and
TA data ........................................................... 19
Recording the traffic announcements
--Traffic Information Replay (TIR) ............ 20
Locating a station by programme type ........... 21
Setting the clock automatically ........................ 22
Voice Drive
Selecting a "V Drive" box for registration ...... 23
Registering a vocal phrase ................................ 23
Requesting a registered source ........................ 24
Voice Memo
Recording a voice memo ................................... 25
Playing back the voice memo ........................... 25
Erasing the voice memo .................................... 26
DSP
Setting the equalizer .......................................... 26
Selecting the listening position ........................ 27
Selecting a soundstage menu
-- Dynamic Soundstage Organizer
(DSO) ......................................................... 28
Adjusting the balance (BAL) ............................ 29
Adjusting the fader (FAD) ................................ 29
Adjusting the volume of the subwoofer(s) ..... 30
Listening to each program source in its
registered DSO
-- Source Sound Memory (SSM) ................ 31
Other Functions
Using the rotary commander ........................... 31
Attenuating the sound ...................................... 33
Changing the sound and display settings ...... 33
Changing the equalizer display ....................... 34
CD/MD Unit
Playing a CD or MD .......................................... 34
Playing tracks repeatedly
-- Repeat Play ............................................... 36
Playing tracks in random order
-- Shuffle Play ............................................... 36
Creating a programme
-- Programme Memory (CD/MD unit with
the programme memory function) ....... 36
Labelling a CD
-- Disc Memo (CD unit with the custom
file function) ............................................. 39
Locating a disc by name
-- List-up (CD unit with the custom file
function or MD unit) ............................... 40
Selecting specific tracks for playback
-- Bank (CD unit with the custom file
function) .................................................... 41
Additional Information
Precautions .......................................................... 42
Maintenance ........................................................ 42
Dismounting the unit ........................................ 43
Specifications ...................................................... 44
Troubleshooting guide ...................................... 45
4
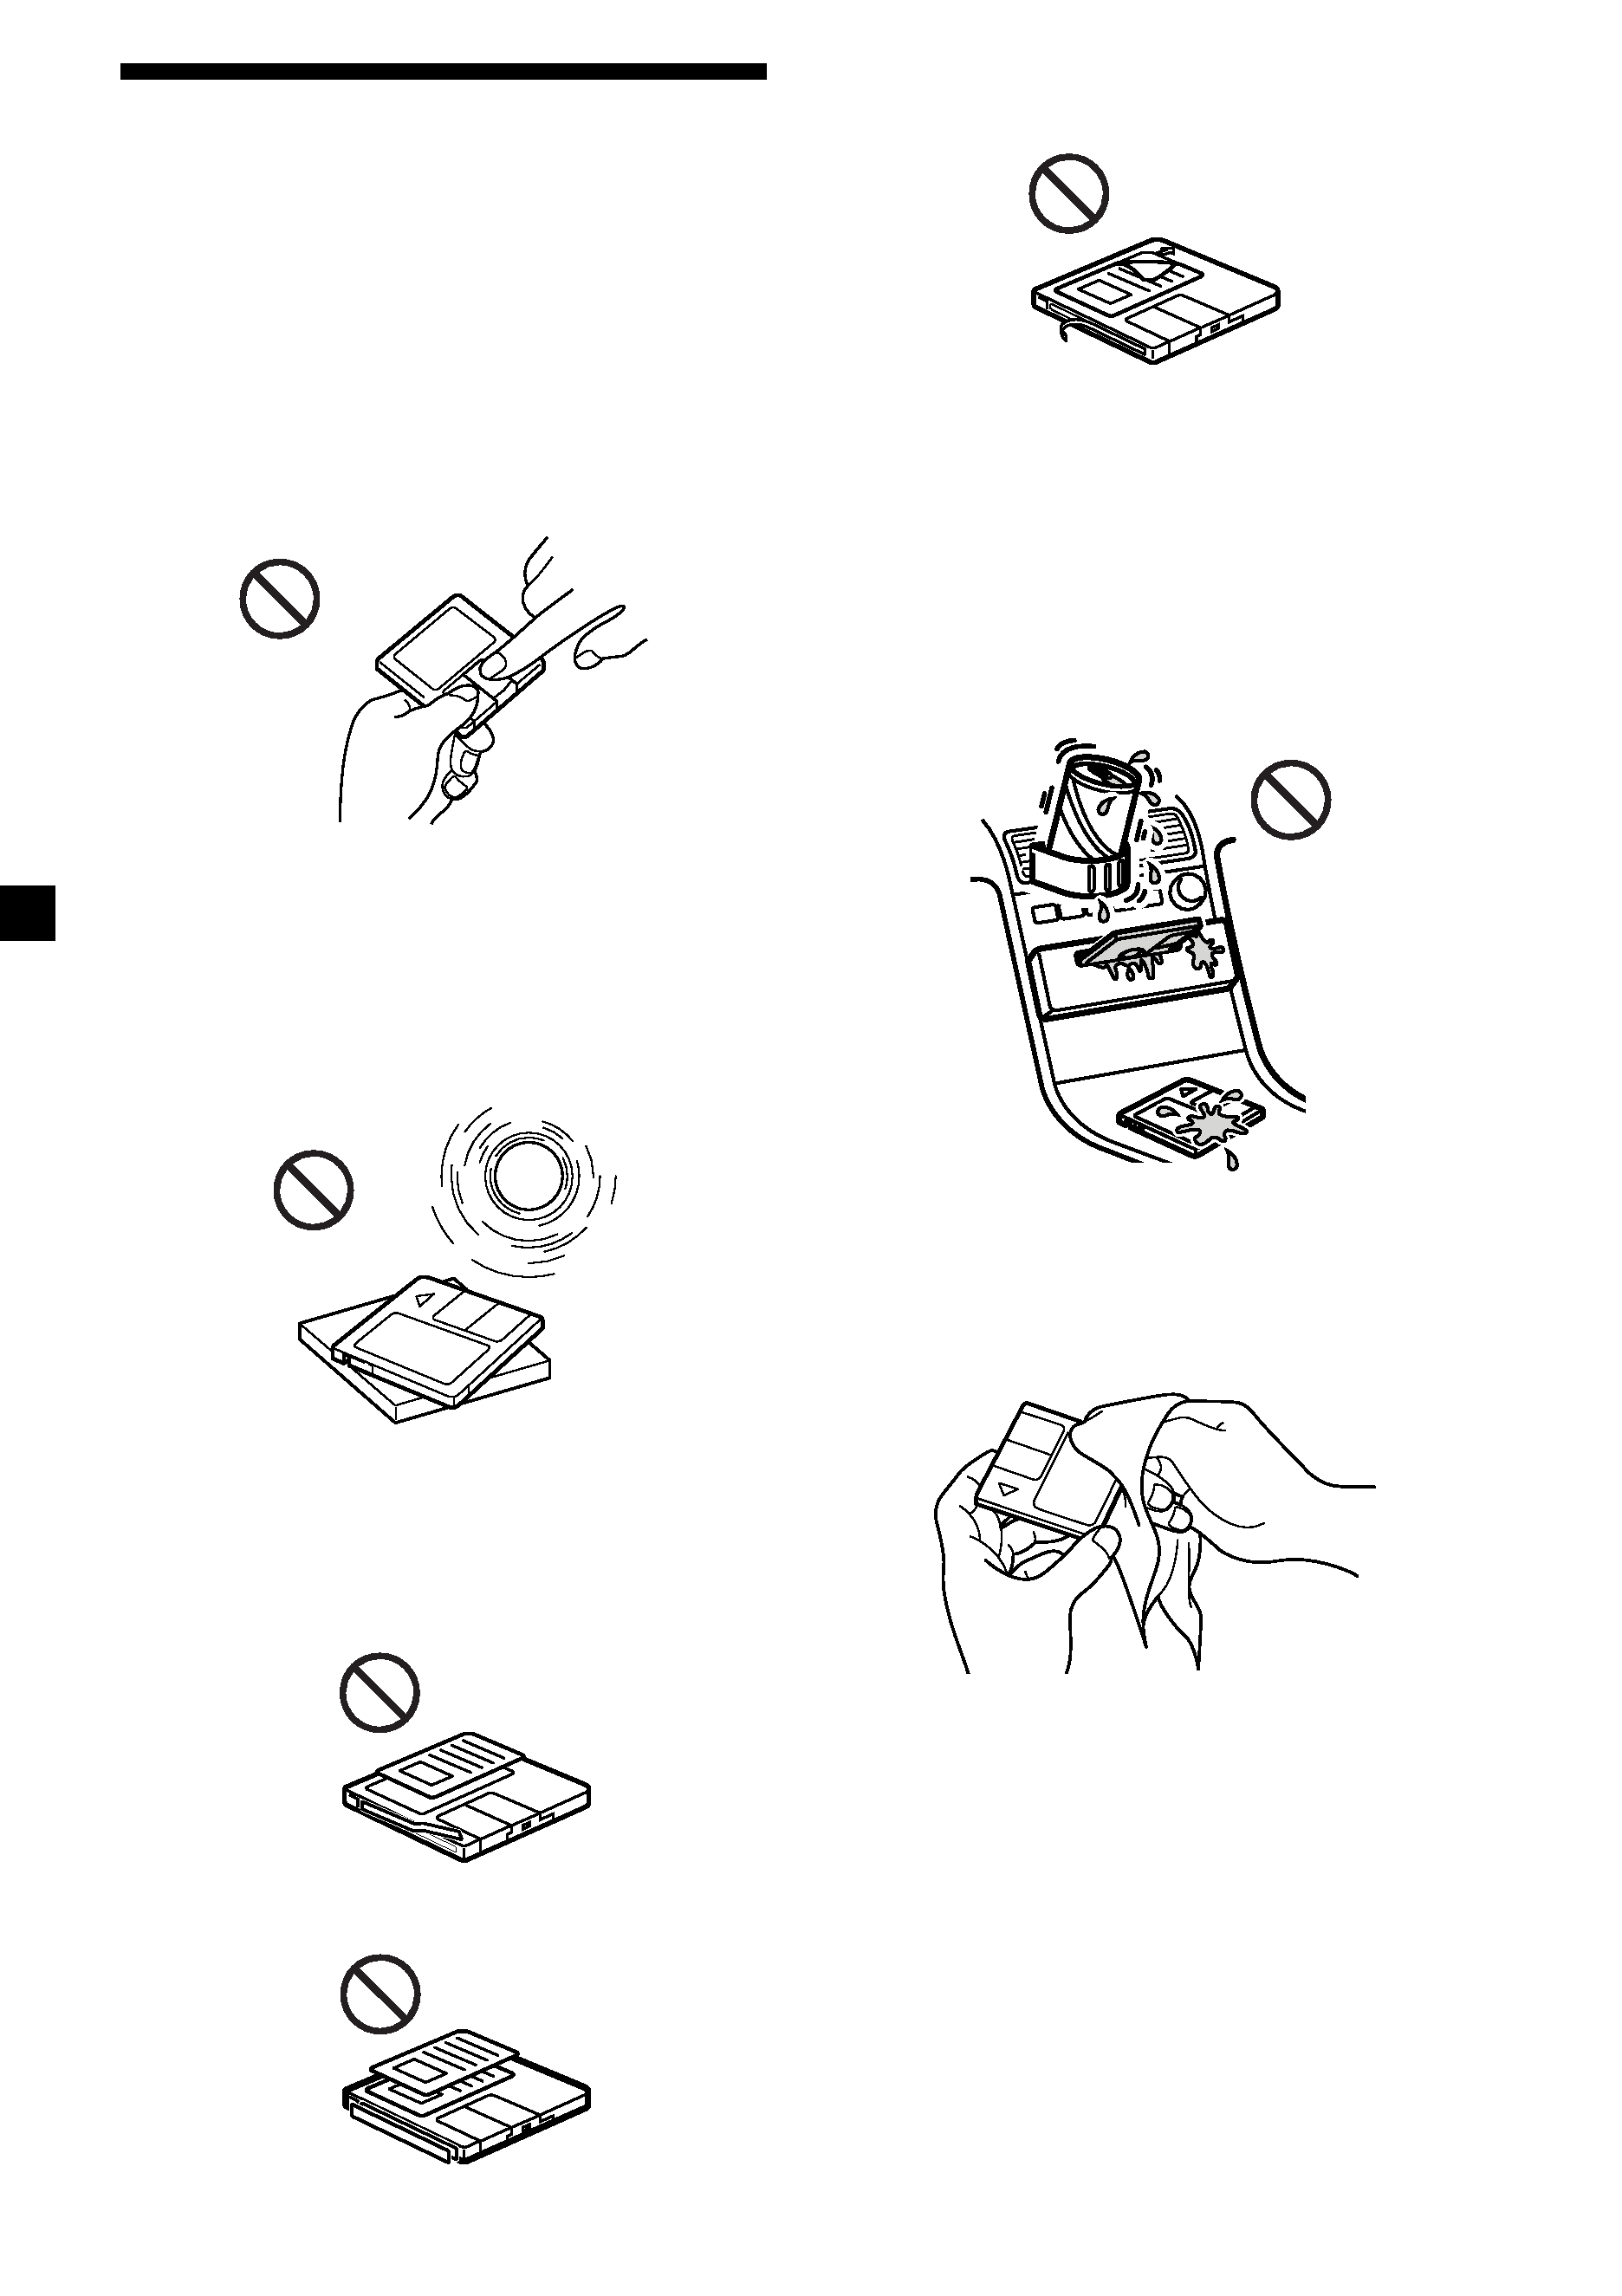
Notes on MDs
Since an MD itself is housed in a cartridge, free
from accidental contact with your fingers and
dust, etc. it can withstand a certain degree of
the rough handling. However, dirt or dust on
the surface of the cartridge or a warped
cartridge may cause a malfunction, observe the
following.
Never touch the surface of the MD itself by
deliberately opening the shutter on the
cartridge.
Do not expose the MD to direct sunlight or
heat sources such as hot air-ducts. Do not leave
it in a car parked in the direct sunlight where
there can be a considerable rise in temperature.
Make sure that it is not left on the dashboard
or rear tray of a car, etc. where the temperature
can also be excessive.
Notes on mounting labels
Be sure to mount labels on cartridges correctly,
as failing to do so may cause an MD to become
stuck in the unit.
·Mount the label in a suitable position.
·Remove old labels before putting new ones
on.
·Replace labels that are beginning to peel
away from the MD.
Note on using MDs
If you have drink holders near your audio
equipment, be careful not to splash juice or
other soft drinks onto the car audio and MDs.
Sugary residues spilt on this unit or on the
MDs may contaminate the unit and MDs,
reduce the sound quality, or prevent sound
reproduction altogether.
Cleaning
Wipe the surface of the MD cartridge from
time to time with a soft dry cloth.
5
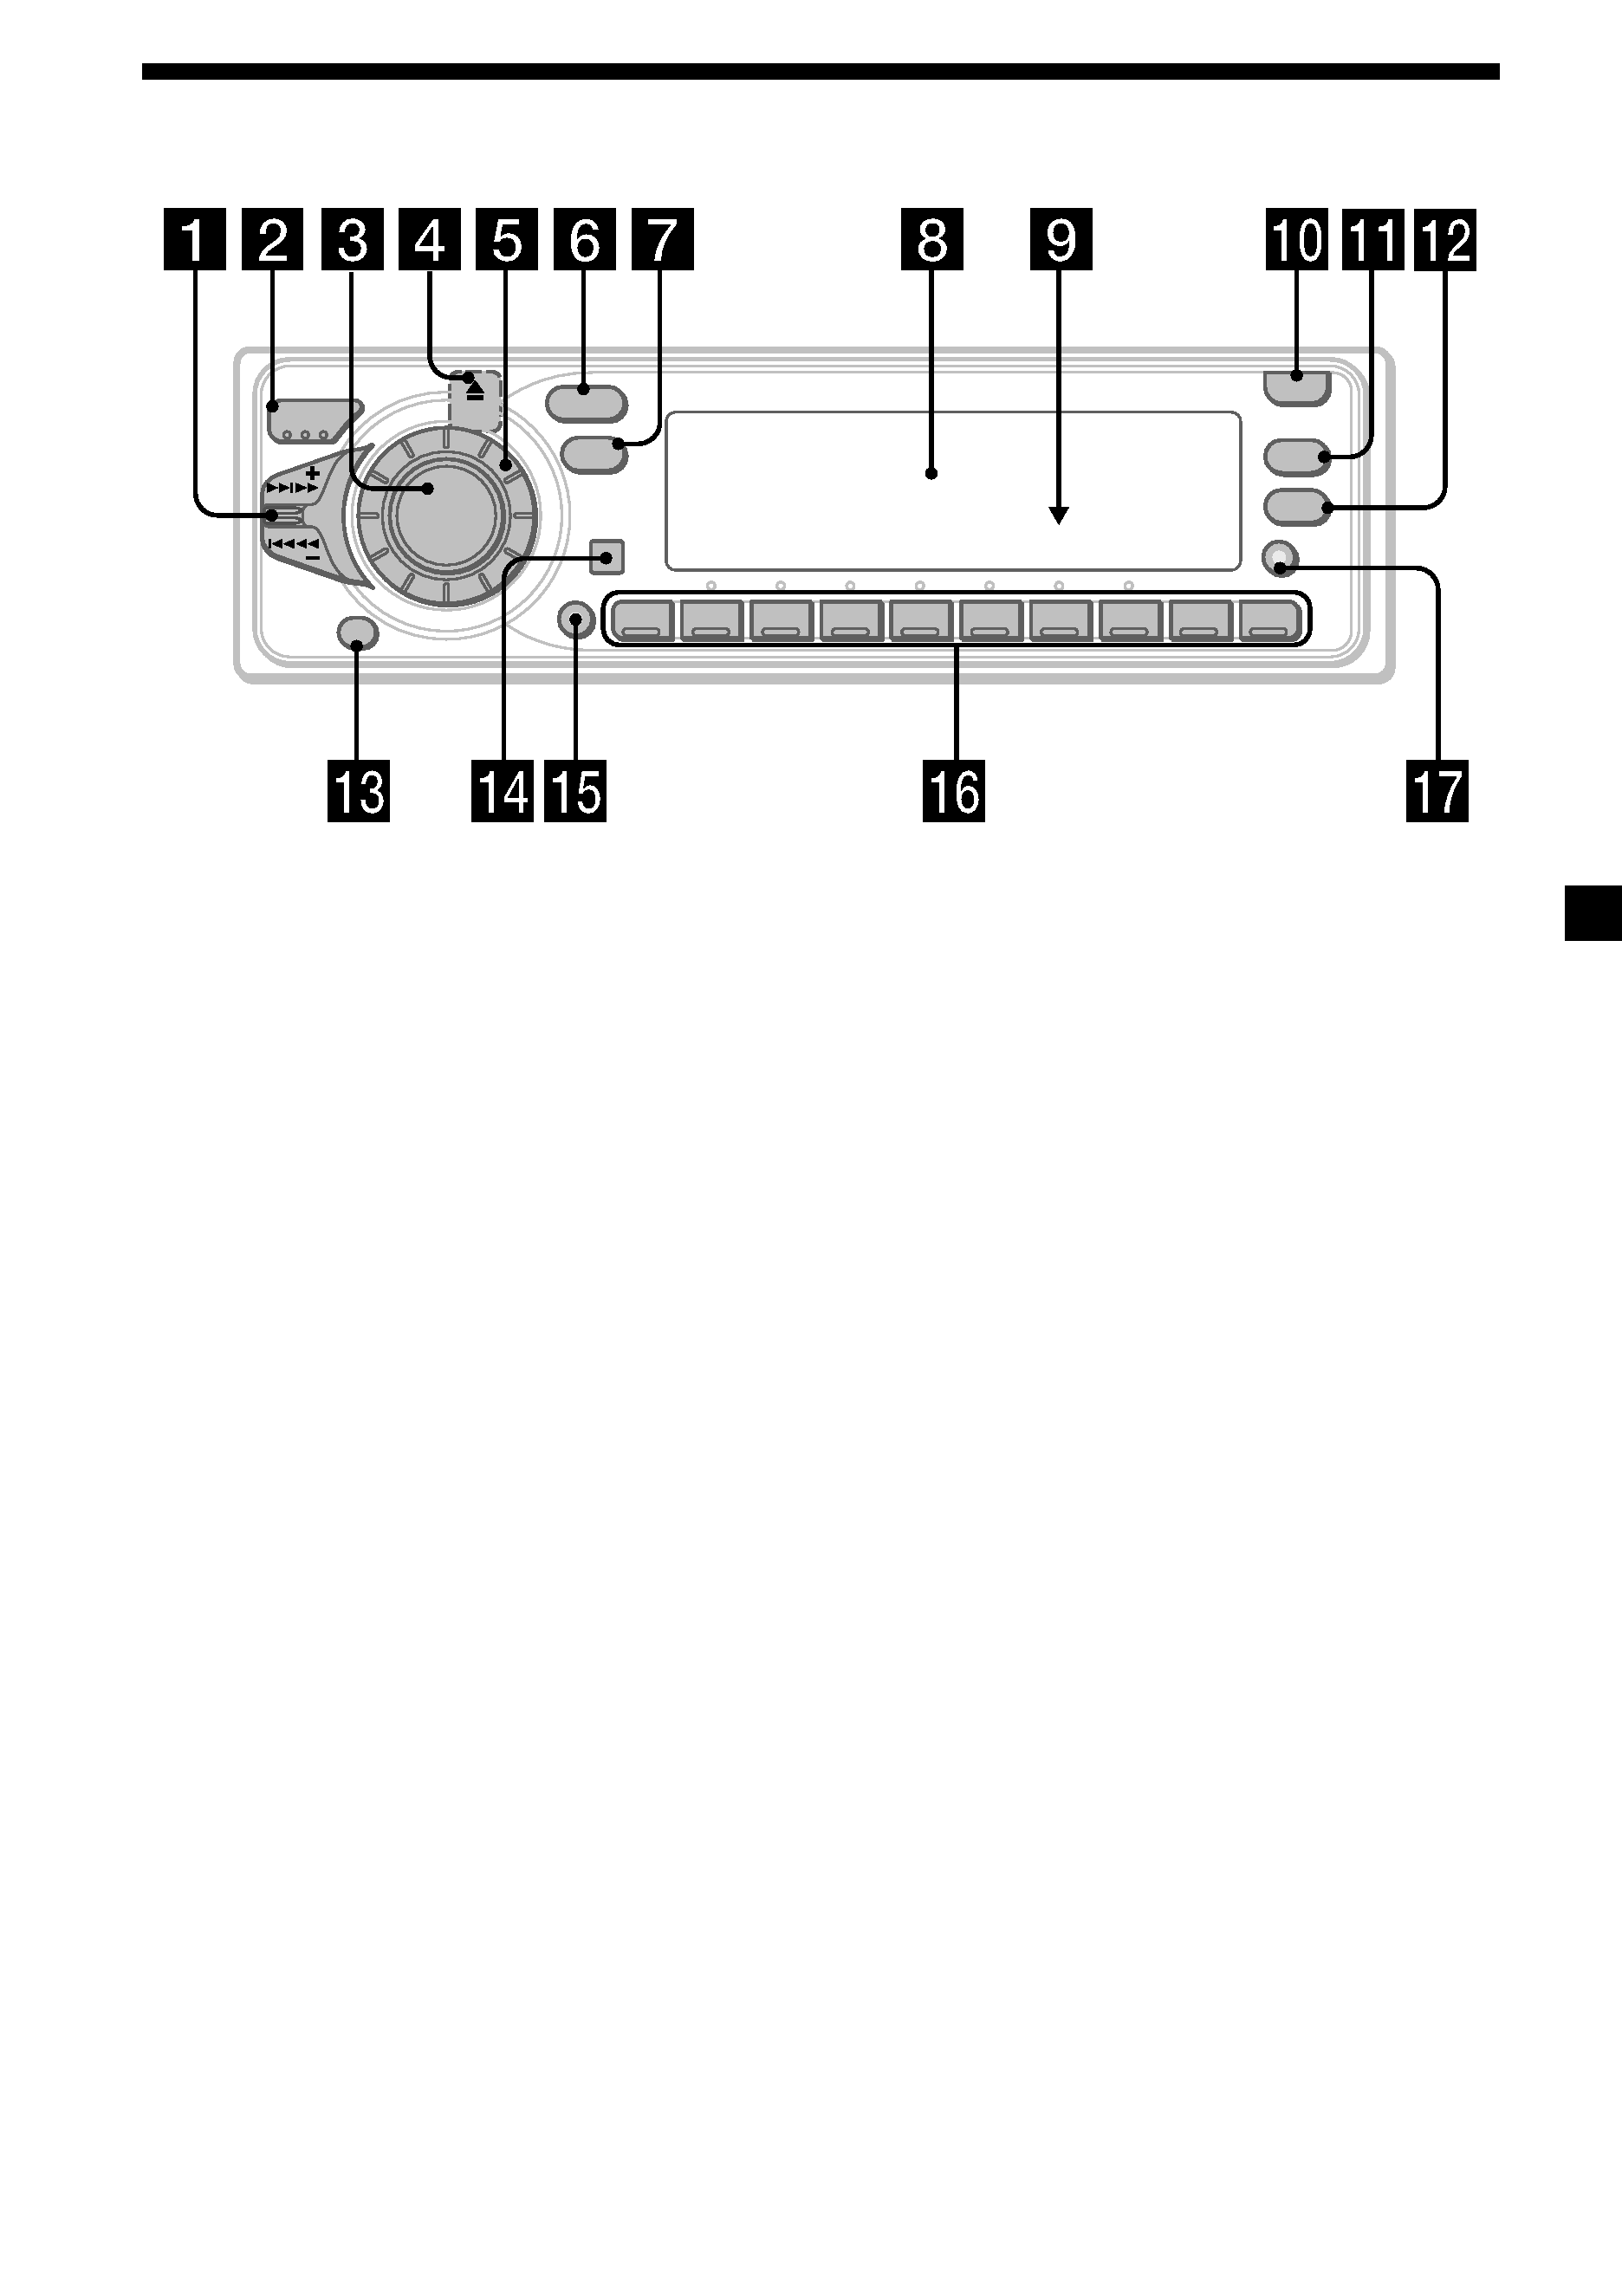
Location of controls
Refer to the pages for details.
1 SEEK/AMS (seek/Automatic Music
Sensor/manual search/voice drive/voice
memo select) control 10, 12, 13, 15, 20,
21, 22, 23, 25, 35, 36, 38, 41
2 MODE (band/unit select) button
14, 15, 34, 36, 40
3 SOURCE (TUNER/MD/CD) button
9, 14, 15, 18, 26, 27, 28, 29, 30, 34, 36, 40
4 Z (eject) button (located on the front
side of the unit behind by the front
panel) 9
5 Dial (volume/DSO level/equalizer level/
listening position/front or rear speaker
volume/subwoofer volume/balance)
8, 19, 20, 25, 26, 27, 28, 29, 30, 31, 39, 40
Dial usually functions as a volume control
except in some adjusting modes.
6 SOUND button 26, 27, 28, 29, 30, 31
7 DSPL/SA (display mode/spectrum
analyzer change) button
10, 16, 17, 34, 35, 39, 40
8 Display window
9 Reset button (located on the front side
of the unit behind by the front panel) 7
0 OPEN button 7, 9, 43
qa PTY/LIST button
Disc Memo 39, 40
List-up 40
RDS Programme 22
qs AF/TA button 17, 18, 19
qd OFF button* 7, 9
qf Sensor for the optional wireless remote
qg SHIFT button
PLAY MODE 12, 13, 14, 15, 18, 19, 36,
37, 38, 41
REP 11, 36
SET UP 8, 10, 22, 33, 35
SHUF 11, 36
qh During radio reception:
Number buttons 15, 18, 19
During CD/MD playback:
Direct disc selection buttons 35, 36
qj TIR button 20, 21
* Warning when installing in a car
without ACC (accessory) position
on the ignition key switch
Be sure to press (OFF) on the unit for two
seconds to turn off the clock display after
turned off the engine.
When you press (OFF) momentarily, the
clock display does not turn off and this
causes battery wear.
SEE
K/AMS
MODE
OFF
SOUND
DSPL
PTY
LIST
OPEN
AF/TA
SOURCE
SHIFT
12
3
4
5
6
7
8
9
10
TIR
MDX-C8970R
SA