Do not expose the MD to
direct sunlight or heat
sources such as hot air-ducts.
Do not leave it in a car
parked in direct sunlight
where there can be a
considerable rise in
temperature.
Make sure that it is not left on
the dashboard or the rear tray
of a car etc. where the
temperature can also be
excessive.
Cleaning
Wipe the surface of the
MD cartridge from time
to time with a soft dry
cloth.
Moisture condensation
On a rainy day or in a very damp area, moisture may
condense on the lenses inside the unit. Should this occur,
the unit will not operate properly. In this case, remove
the MD and wait for about an hour until the moisture
evaporates.
To maintain high sound
quality
Be careful not to splash juice
or other soft drinks onto the
unit or discs.
Since the MD itself is housed in a cartridge, free from
accidental contact with your fingers and dust etc., it can
withstand a certain degree of rough handling. However,
dirt or dust on the surface of the cartridge or a warped
cartridge may cause a malfunction in the unit.
To enjoy optimum sound quality, observe the following.
Never touch the surface of the
MD itself by deliberately
opening the shutter on the
cartridge.
Notes on mounting labels
Be sure to mount labels on cartridges correctly, as failing
to do so may cause an MD to become stuck in the
changer.
· Mount the label in a suitable
position.
· Remove old labels before putting
new ones on.
· Replace labels that are begining to
peel away from the MD.
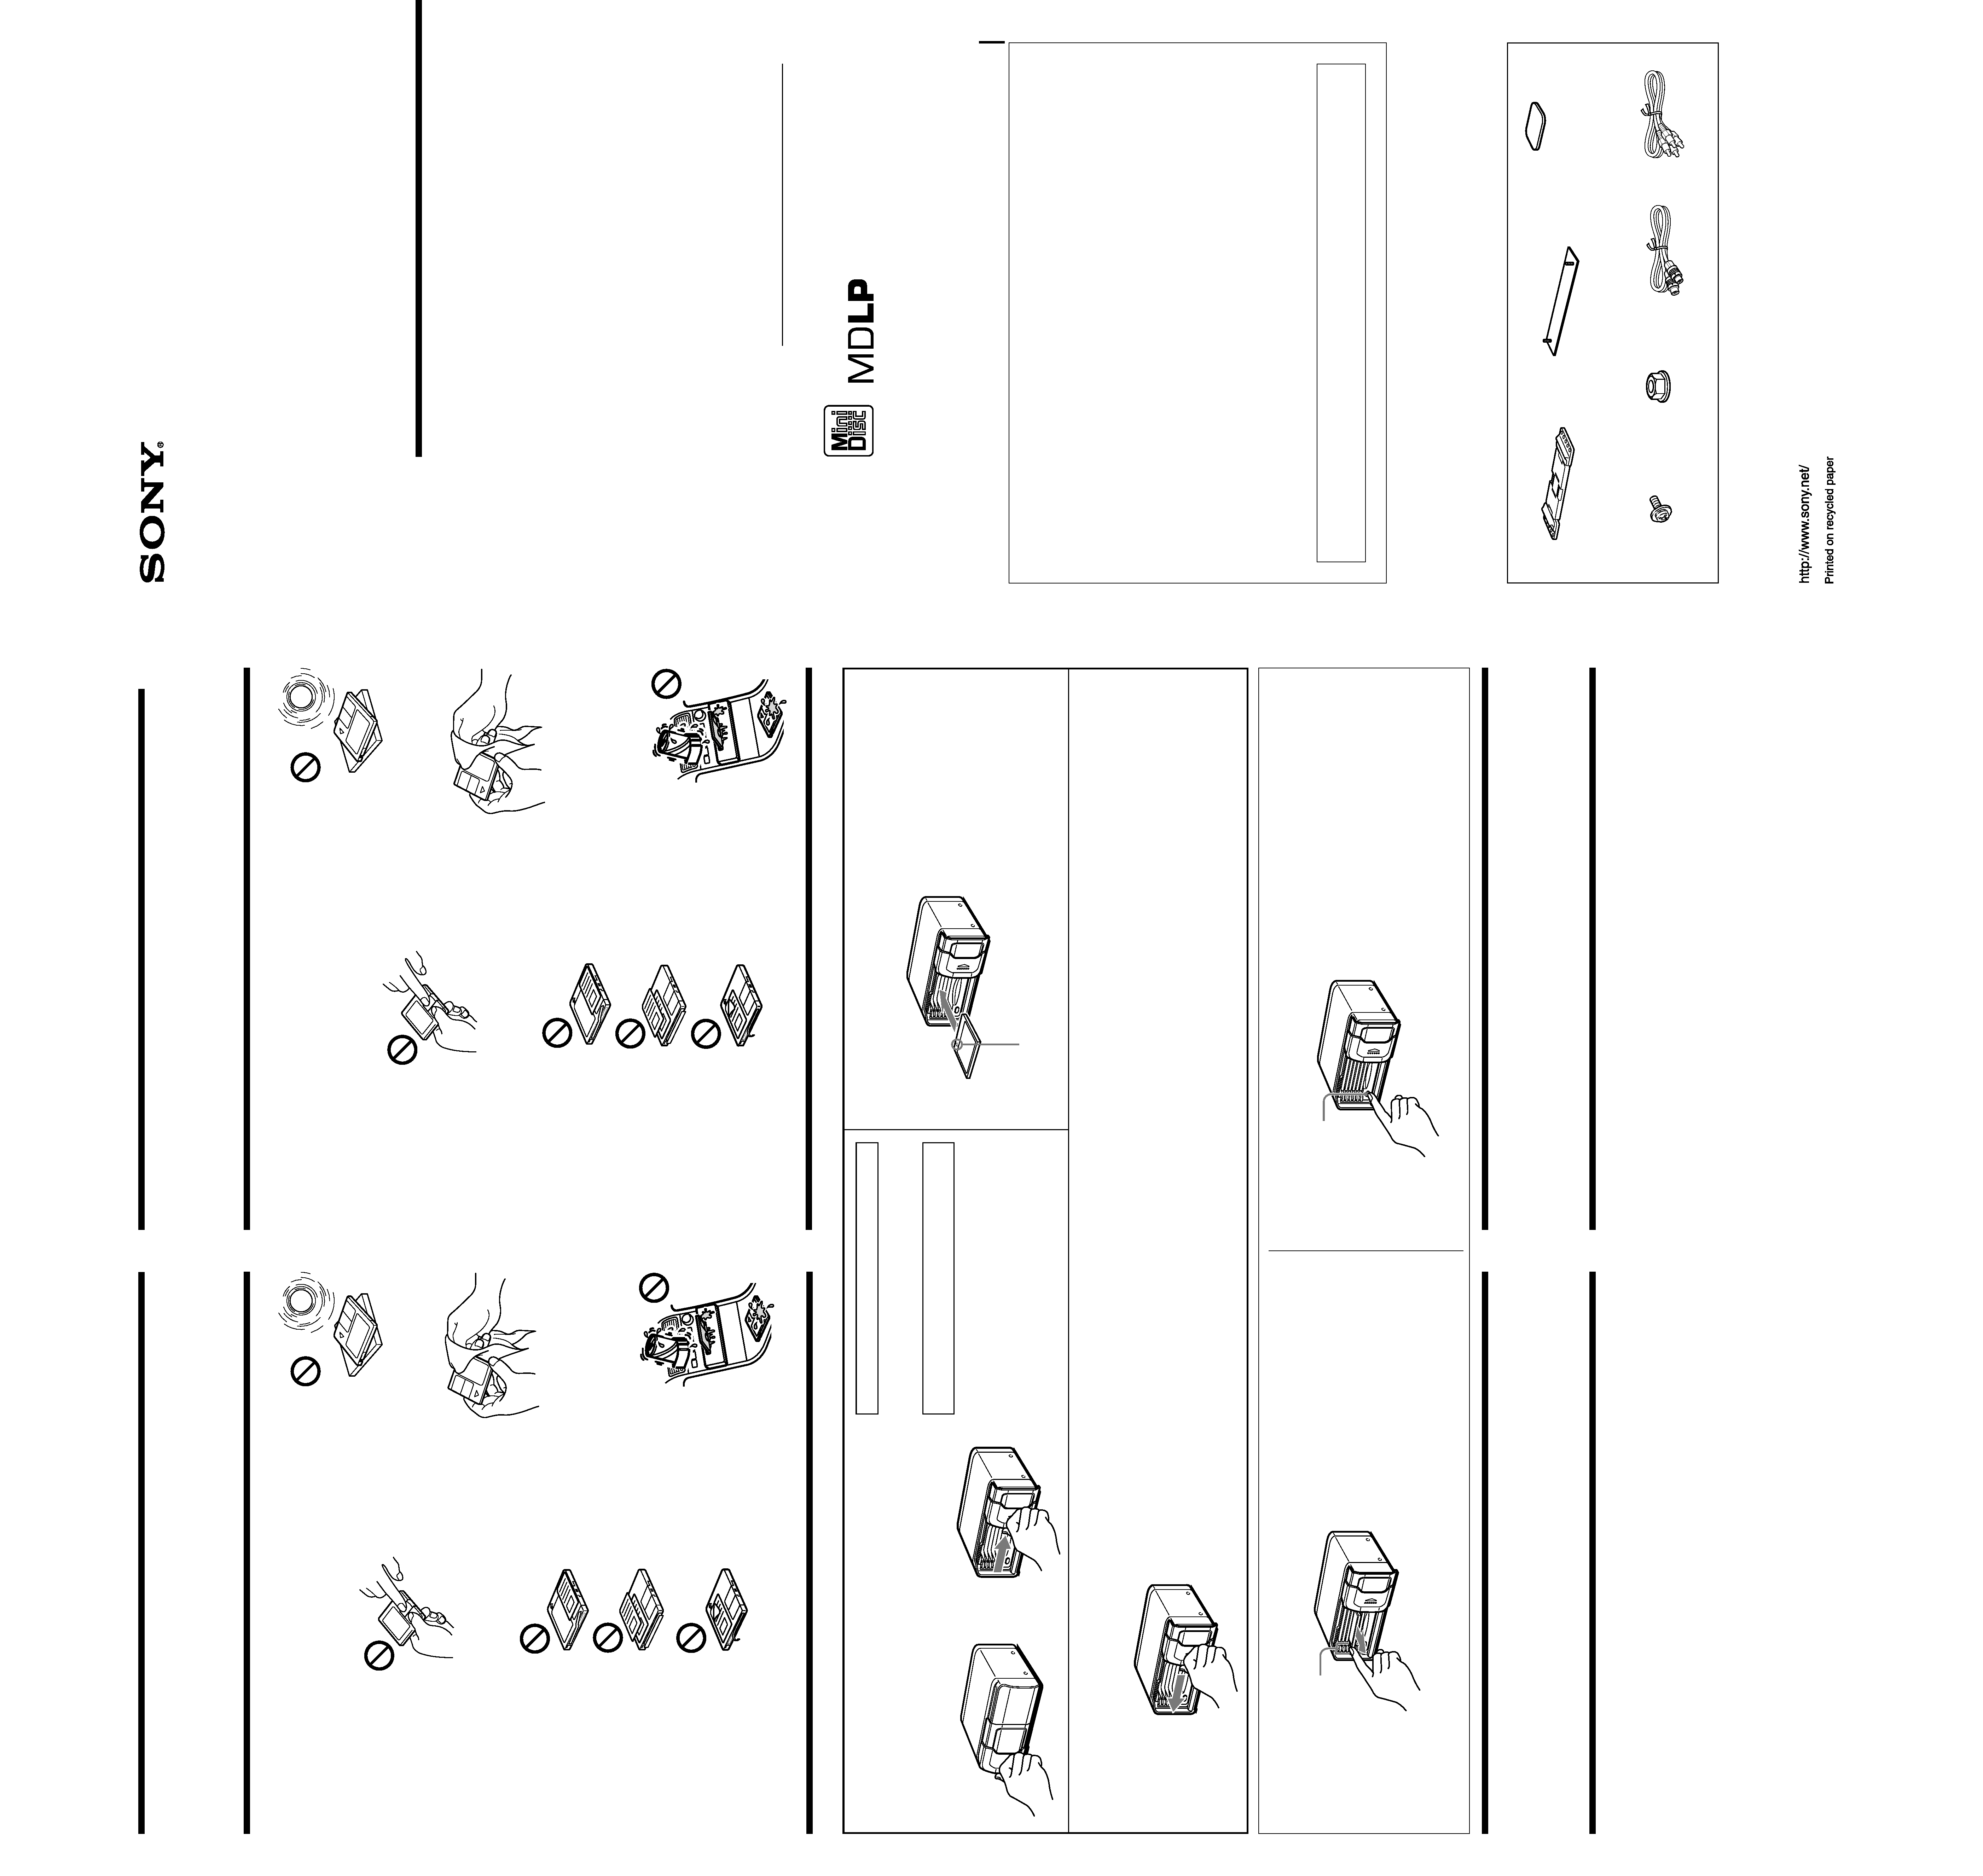
3 Slidethedoorcloseduntilitclicks.
Refermez le panneau frontal en le faisant coulisser
jusqu'à ce qu'il s'encliquette.
Always use the unit with the door closed.
Otherwise, foreign matter may enter the unit and contaminate the lenses
inside the changer.
Note
When an MD is inserted and the door is closed, or the reset button of the connected
car audio is pressed, the unit will be automatically activated and read the
information on the MDs. After the information on all of the MDs has been read, the
unit is ready to play.
Le panneau frontal doit toujours être fermé en cours d'utilisation.
Sinon, des corps étrangers risquent de pénétrer à l'intérieur et de souiller les
lentilles du changeur.
Remarque
Lorsqu'un MD est inséré et le volet refermé ou que la touche de réinitialisation de
l'autoradio connecté est enfoncée, l'appareil est automatiquement activé et entame
la lecture des informations contenues sur les MD. Lorsque les informations de tous
les MD ont été lues; l'appareil est prêt pour la lecture.
1
Preparations
Préparation
2
Slide the door open until it clicks.
The built-in light inside the compartment will be lit. (If the ignition key is in the
OFF position, the light automatically goes out after one minute.)
Ouvrez le panneau frontal en le faisant coulisser jusqu'à ce qu'il
s'encliquette.
L'éclairage intégré s'allume à l'intérieur du compartiment. (Si la clé de contact
est en position OFF, l'éclairage s'éteint automatiquement au bout d'une
minute).
Insert an MD until it clicks.
Introduisez un MD jusqu'à ce qu'il
s'encliquette.
Insert an MD with the arrow and label facing up.
Introduisez un MD avec la flèche et l'étiquette
orientées vers le haut.
Notes on MDs
Remarques sur les MD
Notes
· Do not insert an MD with the label
facing downwards.
· Make sure the MD's shutter is closed
before inserting it into the magazine.
Remarques
· N'introduisez pas un MD avec
l'étiquette vers le bas.
· Assurez-vous que le volet du MD est
fermé avant de l'introduire dans le
magasin.
Press the EJECT button.
Appuyez sur la touche EJECT.
You can remove MDs anytime except while one is playing.
Vous pouvez retirer des MD à tout moment sauf en cours de
lecture.
To remove the MD in the play position / Pour retirer le MD en position de lecture
Press the stop button.
Appuyez sur la touche
STOP.
The MD goes to the loading position.
Press the EJECT button, and remove the MD.
You can remove an MD in this way while it's playing or in
the play position.
Le MD se met en position de chargement.
Appuyez sur la touche EJECT et retirez le MD.
Vous pouvez retirer un MD de cette façon lorsqu'il est en
cours de lecture ou dans la position de lecture.
To remove an MD / Pour retirer un MD
Do not reach into the changer to avoid injury.
Cautionary notice for opening and closing the door
If you press on the transparent window too hard, it may break or
cause injury.
N'introduisez pas les doigts à l'intérieur du changeur
de manière à éviter tout risque de blessure.
Précaution pour l'ouverture et la fermeture du panneau frontal
Si vous appuyez trop fort sur la fenêtre transparente, vous risquez
de la briser ou de vous blesser.
c
Notes
· When removing two or more MDs, remove them in
order from the upper tray.
· Never press the EJECT button for the MD which is in
the play position.
Remarques
· Si vous retirez deux MD ou plus, commencez par le
plateau supérieur.
· N'appuyez jamais sur la touche EJECT pour le MD qui
se trouve en position de lecture.
Specifications
Spécifications
Listening to MDs
Ecoute d'un MD
MiniDisc Changer
Operating Instructions
Mode d'emploi
MDX-66XLP
For the customers in the USA
WARNING
This equipment has been tested and found to comply with the limits for a Class B digital
device, pursuant to Part 15 of the FCC Rules. These limits are designed to provide
reasonable protection against harmful interference in a residential installation. This
equipment generates, uses, and can radiate radio frequency energy and, if not installed and
used in accordance with the instructions, may cause harmful interference to radio
communications. However, there is no guarantee that interference will not occur in a
particular installation. If this equipment does cause harmful interference to radio or
television reception, which can be determined by turning the equipment off and on, the user
is encouraged to try to correct the interference by one or more of the following measures:
--
Reorient or relocate the receiving antenna.
--
Increase the separation between the equipment and receiver.
--
Connect the equipment into an outlet on a circuit different from that to which the
receiver is connected.
--
Consult the dealer or an experienced radio/TV technician for help.
You are cautioned that any changes or modifications not expressly approved in this manual
could void your authority to operate this equipment.
CAUTION
The use of optical instruments with this product will increase eye hazard.
Sony Corporation
2002 Printed in Japan
Owner's Record
The model and serial numbers are located at the bottom of the MD changer.
Record the serial number in the space provided below.
Refer to these numbers whenever you call upon your Sony dealer regarding this
product.
Model No. MDX-66XLP
Parts for Installation and Connections
Pièces de montage et de raccordement
The numbers in the list are keyed to those in the instructions.
Les numéros de la liste correspondent à ceux des instructions.
12
3
× 3 (incl. 1 reserve)
(1 réserve comprise)
4
5
67
5.3 m
5,3 m
5.3 m
5,3 m
× 2
× 4
3-240-563-11 (1)
N'exposez pas les MD au
rayonnement direct du soleil
ni à des sources de chaleur
telles que des conduits d'air
chaud. Ne les laissez pas
dans une voiture parquée en
plein soleil, où la température
peut augmenter
considérablement à
l'intérieur de l'habitacle.
Veillez à ne pas en laisser sur le tableau de bord ni sur la
lunette arrière d'une voiture, etc., là où la température
risque également d'être excessive.
Nettoyage
Essuyez de temps à
autre la surface des
cartouches de MD à
l'aide d'un chiffon
doux et sec.
Condensation d'humidité
Les jours de pluie ou dans les régions très humides, de
l'humidité risque de se condenser sur les lentilles à
l'intérieur de l'appareil. Si cela se produit, l'appareil ne
fonctionnera pas correctement. Dans ce cas, retirez le MD
et attendez environ une heure que l'humidité se soit
évaporée.
Pour conserver un son de
haute qualité
Veillez à ne pas renverser de
jus de fruit ou de boissons
sucrées sur l'appareil ou sur
les disques.
Le minidisque proprement dit est logé dans une
cartouche qui le protège des contacts accidentels avec les
doigts, de la poussière, etc., et pouvant résister à des
manipulations assez brusques. Cependant, la présence
de poussière ou de souillures sur la cartouche ou une
déformation de la cartouche peuvent entraîner un
dysfonctionnement de l'appareil.
Pour obtenir un son d'une qualité optimale, veuillez
vous conformer aux précautions suivantes.
Ne touchez jamais la surface
sensible du minidisque en
ouvrant délibérément le volet
de la cartouche.
Remarques sur les étiquettes
Veuillez appliquer correctement les étiquettes sur les
cartouches, faute de quoi un MD risque de rester coincé à
l'intérieur du changeur.
· Appliquez l'étiquette dans une
position appropriée.
· Enlevez les anciennes étiquettes
avant d'en appliquer de nouvelles.
· Remplacez les étiquettes
lorsqu'elles commencent à se
décoller du MD.
System
Mini disc digital audio system
Frequency response 10 20,000 Hz
Wow and flutter
Below measurable limit
Signal-to-noise ratio 95 dB
Outputs
Bus control output (8 PIN)
Analog audio output (RCA PIN)
Current drain
300 mA (MD playback)
600 mA (during loading or ejecting a
disc)
Dimensions
Approx. 176
× 83.5 × 142 mm
(7
× 3 3/8 × 5 18/32 in.) (w/h/d) not incl.
projecting parts and controls
Mass
Approx. 1.1 kg (2 lb. 7 oz.)
Power requirement
12 V DC car battery (negative ground)
Supplied accessories Mounting hardware (1 set)
Bus cable 5.5 m (1)
RCA pin cord 5.5 m (1)
Optional accessories Source selector XA-C30
·U.S. and foreign patents licensed from Dolby Laboratories.
·Design and specifications subject to change without notice.
Features
Caractéristiques
Système
Système audionumérique à
minidisques
Réponse en fréquence
10 20.000 Hz
Pleurage et scintillement
En-deçà de la limite mesurable.
Rapport signal/bruit
95 dB
Sorties
Sortie de commande de bus
(8 broches)
Sortie audio analogique (broche RCA)
Consommation électrique
300 mA (lecture MD)
600 mA (chargement ou éjection d'un
disque)
Dimensions
Approx. 176
× 83,5 × 142 mm
(7
× 3 3/8 × 5 18/32 pouces) (l/h/p)
parties saillantes et commandes non
comprises
Masse
Approx. 1,1 kg (2 livres 7 onces)
Puissance de raccordement
Batterie de voiture 12 V CC (masse
négative)
Accessoires fournis
Matériel de montage (1 jeu)
Câble de bus 5,5 m (1)
Cordon à broche RCA 5,5 m (1)
Accessoires optionnels
Sélecteur de source XA-C30
·Les brevets aux Etats-Unis et à l'étranger sont autorisés par
Dolby Laboratories.
·La conception et les spécifications sont sujettes à
modifications sans préavis.
· MDLP (MiniDisc Long Play) playback.
· Sony BUS system compatible with mobile MD
changers.
· Direct-in system for inserting and removing MDs
easily.
· The MD changer compartment has a built in light for
easy use even in the dark.
· 1 bit Digital/Analog converter for high quality sound
reproduction.
· Lecture MDLP (MiniDisc Long Play).
· Système BUS Sony compatible avec les changeurs MD
mobiles.
· Système de montage direct pour une introduction et
un retrait simplifiés des MD.
· Le compartiment du changeur MD est doté d'un
éclairage intégré destiné à en faciliter l'utilisation dans
le noir.
· Convertisseur numérique/analogique à 1 bit pour une
restitution sonore de haute qualité.
Operate the master unit. See the operating instructions of
the master unit for details. When you select another disc
to play, the volume of the MD that's playing goes down,
and the discs change.
Utilisez l'appareil principal. Pour plus de détails,
consultez le mode d'emploi de l'appareil principal.
Si vous sélectionnez la reproduction d'un autre disque, le
volume du MD en cours de lecture baisse et les disques
sont changés.
Note
The unit does not have the custom file function.
Remarque
L'appareil ne possède pas la fonction de fichier d'utilisateur.

Précautions
· Choisir l'emplacement de montage en tenant compte des
observations suivantes :
-- n'installez pas l'appareil dans un endroit :
· où il gênera la conduite ;
· où il blessera le conducteur ou les passagers ;
· où la température ambiante dépasse 55 °C (131 °F) ;
· exposé en plein soleil ou à l'air chaud d'un
radiateur ;
· exposé à la pluie, l'eau ou une forte humidité ;
· exposé à une grande quantité de poussière ;
· où il sera magnétisé ;
· soumis à des vibrations excessives ;
· se trouvant au-dessus de faisceaux électriques ou de
pipelines ;
· où il bloquera les pièces mobiles de la voiture ;
· où il bloquera les fils sous une vis ou les coincera
sous des pièces mobiles.
· Pour garantir la sécurité de l'installation, utiliser
uniquement le matériel de montage fourni.
· Utiliser uniquement les vis fournies.
Precautions
· Choose the mounting location carefully, observing the
following:
-- Do not install the unit where;
· it will interfere with normal driving operations.
· it will injure driver or passengers.
· the ambient temperature exceeds 55 °C (131 F°).
· it will be exposed to direct sunlight or hot air from a
heater.
· it will be exposed to rain, water, or high humidity.
· it will be exposed to a lot of dust.
· it will become magnetized.
· it will be subject to excessive vibration.
· there are wire harnesses or pipelines under the place.
· it will jam any working parts of the car.
· it will get the wires under a screw, or caught in
moving parts.
· Be sure to use only the supplied mounting hardware for a
safe and secure installation.
· Use only the supplied screws.
Installation
Installation
Under the passenger's seat or floor installation /
Installation sous le siège du passager ou sur le plancher
1 Attachpart1totheunitwiththesuppliedscrews4.
Fixez l'élément 1 sur l'appareil à l'aide des vis 4 fournies.
Horizontal installation
Installation horizontale
2 Decideontheinstallationposition,andremoveanydirtor
stains from that surface. Place the changer onto the
mounting pad 2, then peel the backing and stick 2 to the
floor.
Choisissez la position d'installation et nettoyez la surface de
montage de toute trace de poussière ou de souillures.
Placez le changeur sur le support de montage 2, décollez-
en la protection et fixez-le 2 sur le plancher.
3
Remove the MD changer.
Retirez le changeur de MD.
4
Make cuts in the carpet with a box knife.
Découpez le tapis de sol à l'aide d'un cutter.
c
5 Mountfirmlywiththenuts5.
Fixez l'ensemble solidement au moyen des écrous 5.
Vertical installation
Installation verticale
5
2
Glove box or console box installation /
Installation dans une boîte à gants ou sur un boîtier de console
2 Removeanydirtorstainsfromthesurfaceyou'regoing
to mount the unit on, then attach the unit.
Eliminez la poussière ou les souillures de la surface de
montage de l'appareil et fixez ensuite l'appareil dessus.
Notes
· Before attaching the unit, be sure that nothing interferes with the operation
of the unit, and that the unit does not interfere with the glove box or console
box cover.
· When you install the main unit in a glove box, be sure to install the unit at a
positive angle.
Remarques
· Avant de fixer l'appareil, assurez-vous que rien ne puisse gêner son
fonctionnement et que l'appareil n'entrave pas l'ouverture du couvercle de la
boîte à gants ou du boîtier de console.
· Si vous installez l'appareil principal dans une boîte à gants, montez-le suivant
un angle positif.
1 Tearoffthebacking,andattachthedouble-sidedadhesive
tapes 3 to the bottom of the unit.
Décollez la protection et appliquez les bandes adhésives
double face 3 sur le fond de l'appareil.
3
Mounting angle adjustment / Réglage de l'angle de montage
You may install the unit at any positive angle as
long as it is attached to a secure part of the car.
Vous pouvez installer l'appareil sous n'importe
quel angle positif, pour peu qu'il soit fixé à un
endroit sûr de la voiture.
Do not install the unit on a detached mounting
board for placement on uneven surfaces or upside
down.
N'installez pas l'appareil sur une plaque de
montage amovible en vue d'une installation sur
un support inégal ou à l'envers.
Use the supplied screws / Utilisez les vis fournies
Be sure to install this unit with the supplied screws 4. If you have to find
replacement screws, use screws with the following specifications.
Installez cet appareil à l'aide des vis fournies 4. Si vous étiez amené à utiliser des
vis de remplacement, sélectionnez des vis satisfaisant aux spécifications suivantes.
To prevent damage to the unit, do not
use screws longer than 6 mm (1/4 in).
Pour éviter d'endommager l'appareil,
n'utilisez pas de vis d'une longueur
supérieure à 6 mm (1/4 pouces).
Replacement screw
max. size M4
× 6 mm
Tornillo de repuesto
Tamaño máx.: M4
× 6 mm
6 mm
(1/4 in.)
(1/4 pouces)
4 mm
(1/4 in.)
(1/4 pouces)
1
4
1
4
For details, refer to the Installation/Connections manual of
each product.
Pour plus de détails, consulter le manuel d'installation/
connexions de chaque produit.
Connections
Connexions
Schéma de connexions
Connection diagram
Push in and slide the protection cover off.
Enfoncez et retirez le couvercle de
protection en le faisant glisser.
How to detach and attach the
protection cover
Before connecting the cords, detach the protection cover.
Comment déposer et installer le
couvercle de protection
Avant de brancher les câbles, retirez le couvercle de
protection.
To detach
Pour enlever
To attach
Pour installer
MDX-66XLP
7
Sony BUS compatible car audio
Autoradio compatible BUS Sony
BUS AUDIO IN
6
*
BUS CONTROL IN
To the floor under the carpet
Sous le tapis du plancher
To the surface
A la surface
* Connect the Bus cable to
its terminal with unit's V
mark and Bus cable's v
mark aligned.
* Raccordez le câble Bus à
son terminal en alignant
le repère V de l'appareil
sur le repère v du câble
Bus.
Notes
· Be sure to insert each connector securely, as vibration through driving may
cause a poor connection.
· Insert the Bus cable until you hear a click.
· When removing the cable, hold the connector.
If you pull out by the cable, the cable may become loose.
· For connecting two or more changers, the source selector XA-30 (optional) is
necessary.
Remarques
· Assurez-vous d'insérer correctement chaque connecteur, les vibrations lors de
la conduite pouvant entraîner un mauvais contact.
· Insérez le câble Bus jusqu'à ce qu'il s'encliquette.
· Lorsque vous retirez le câble, maintenez le connecteur. Si vous tirez sur le
câble, ce dernier peut lâcher.
· Pour connecter deux ou plusieurs changeurs, le sélecteur de source XA-30 (en
option) est requis.