
Operating Instructions
MiniDisc Deck
4-230-236-12(1)
©2000 Sony Corporation
MDS-SP55
2
Do not install the appliance in a confined space,
such as a bookcase or built-in cabinet.
This appliance is classified as
a CLASS 1 LASER product.
The CLASS 1 LASER
PRODUCT MARKING is
located on the rear exterior.
The following caution label is located inside of the
unit.
US and foreign patents licensed from Dolby
Laboratories.
The MDS-SP55 MD deck is
designed only for the
CMT-SP55TC Micro Hi-Fi
component system
Here are some of the features you can use with
this MD deck when connected with the
CMT-SP55TC Micro Hi-Fi component system
(see page 4).
Auto Power On/Off
The MD deck power is tied with the
CMT-SP55TC Micro Hi-Fi component system.
Synchro Recording
You can easily record a CD onto an MD (see
pages 12 and 15).
Automatic Source Selection
You can switch from another source to the MD
deck and start playing an MD just by pressing H
on the MD deck (see page 6).
Timer
You can wake up to music or record a radio
programme at a preset time. For details, refer to
"Falling asleep to music" and "Waking up to
music" in the CMT-SP55TC Operating
Instructions, and "Timer recording radio
programmes" on page 20.
Remote Control
You can operate the MD deck using the remote
supplied with CMT-SP55TC.

3
Table of Contents
Getting Started
Hooking up the system .............................. 4
Playback
Playing an MD .......................................... 6
Playing MD tracks in random order
-- Shuffle Play ................................... 7
Programming MD tracks
-- Programme Play ............................ 8
Playing MD tracks repeatedly
-- Repeat Play .................................... 9
Using the MD display ............................. 10
Recording
Before you start recording ....................... 11
Recording a CD on an MD
-- CD-MD Synchro Recording ........ 12
Recording a tape on an MD .................... 13
Recording your favourite CD tracks
on an MD
-- CD-MD Synchro Recording ........ 15
Recording your favourite portions
on an MD
-- Manual Recording ....................... 16
Recording an MD on a tape .................... 17
Recording from the radio
-- Manual Recording ....................... 19
Timer recording radio programmes ........ 20
Making a space between tracks 3 seconds
long -- Smart Space ......................... 22
Starting recording with 6 seconds of
prestored audio data
-- Time Machine Recording ............ 23
Marking track numbers ........................... 24
Adjusting the recording level .................. 26
Monaural recording ................................. 27
Editing
Before you start editing ........................... 28
Labelling an MD -- Name Function ...... 29
Erasing recordings -- Erase Function .... 31
Moving recorded tracks
-- Move Function ............................ 34
Dividing recorded tracks
-- Divide Function ........................... 35
Combining recorded tracks
-- Combine Function ....................... 37
Undoing the last edit
-- Undo Function ............................. 38
Optional Components
Connecting a digital component ............. 39
Additional Information
Precautions .............................................. 41
System limitations of MDs ..................... 42
Troubleshooting ...................................... 43
Self-diagnosis Display ............................ 44
Messages ................................................. 45
Specifications .......................................... 46
Index .......................................... Back cover
4
Getting Started
Hooking up the system
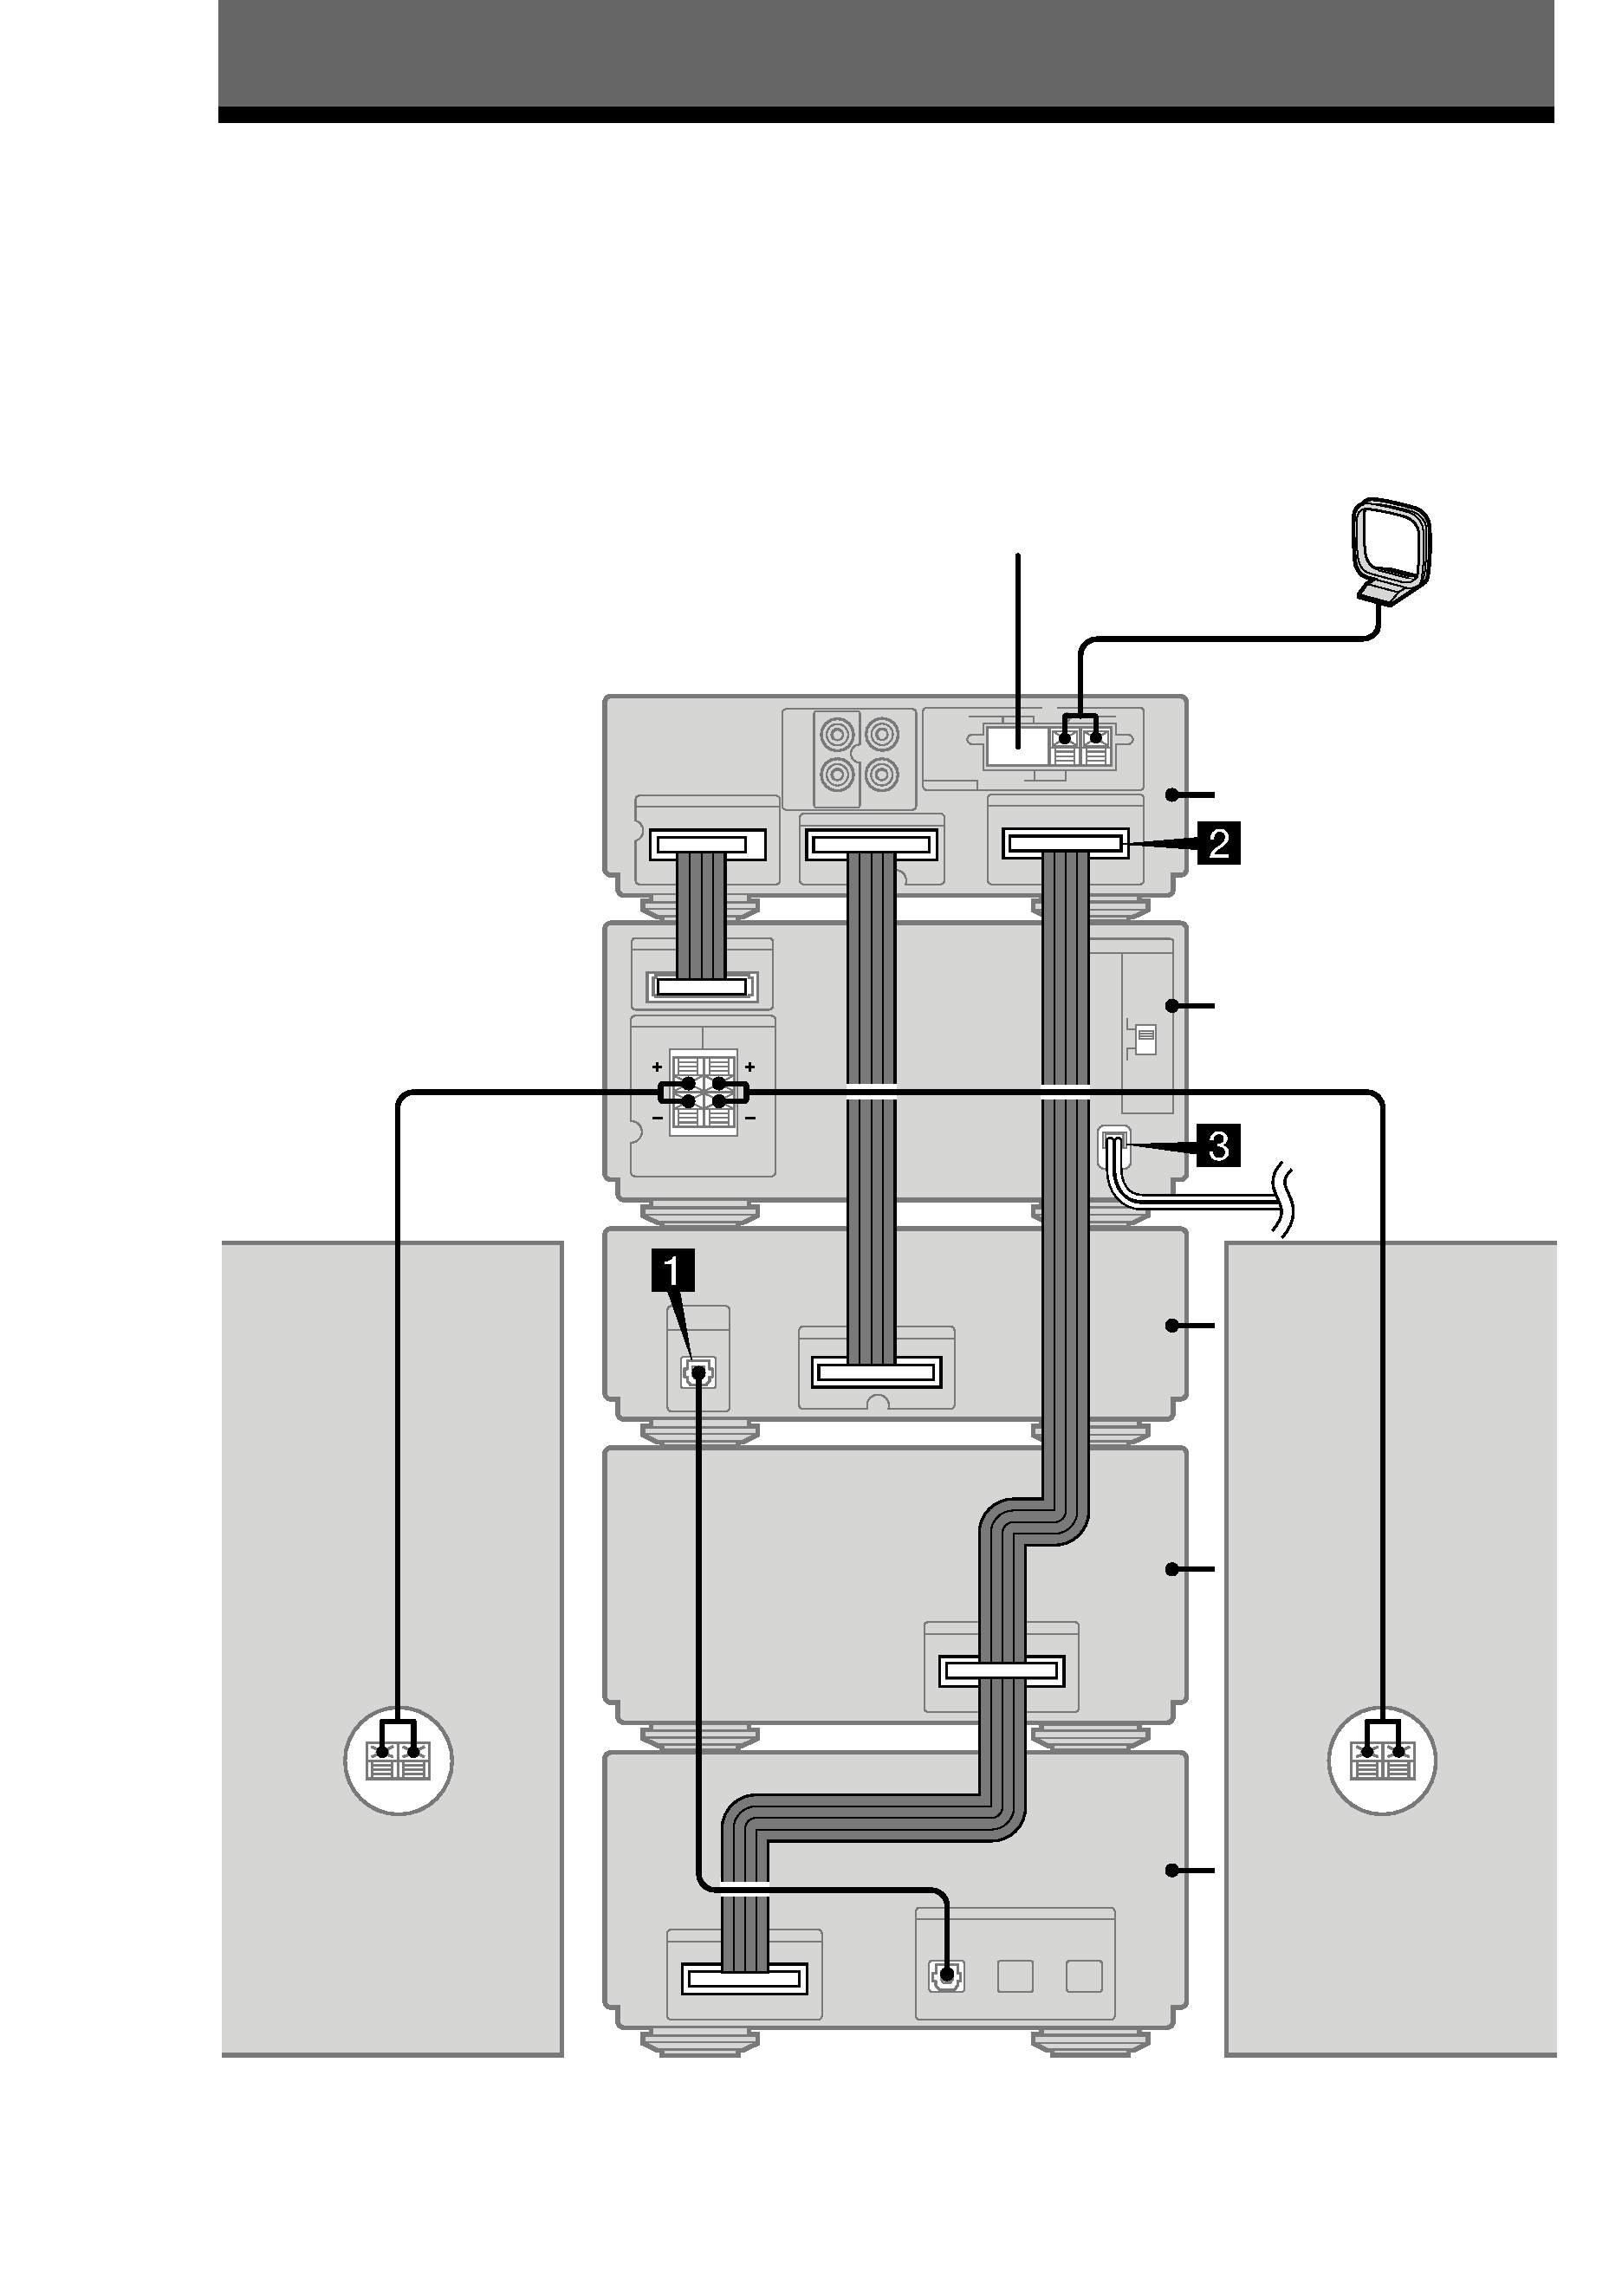
Perform the following procedure 1 to 3 to hook up MDS-SP55 using the supplied cords.
Note
Be sure to hook up the system with the mains lead unplugged from the mains. Hooking up the system with the
mains lead plugged in may cause the system to malfunction.
AM loop aerial
Right
speaker
Rear panel
FM aerial
Left
speaker
Tuner
Amplifier
CD player
Tape deck
MD deck
5
Getting
Started
Preparations
1 Stack the components vertically in the order of
tuner, amplifier, CD player, tape deck and MD
deck.
2 Disconnect the system cable supplied with
CMT-SP55TC from the SYSTEM CONTROL
3 connectors on the tuner and tape deck.
1 Connect the supplied digital cable to
DIGITAL OPTICAL OUT on the CD
player and DIGITAL OPTICAL CD
IN 1 on the MD deck.
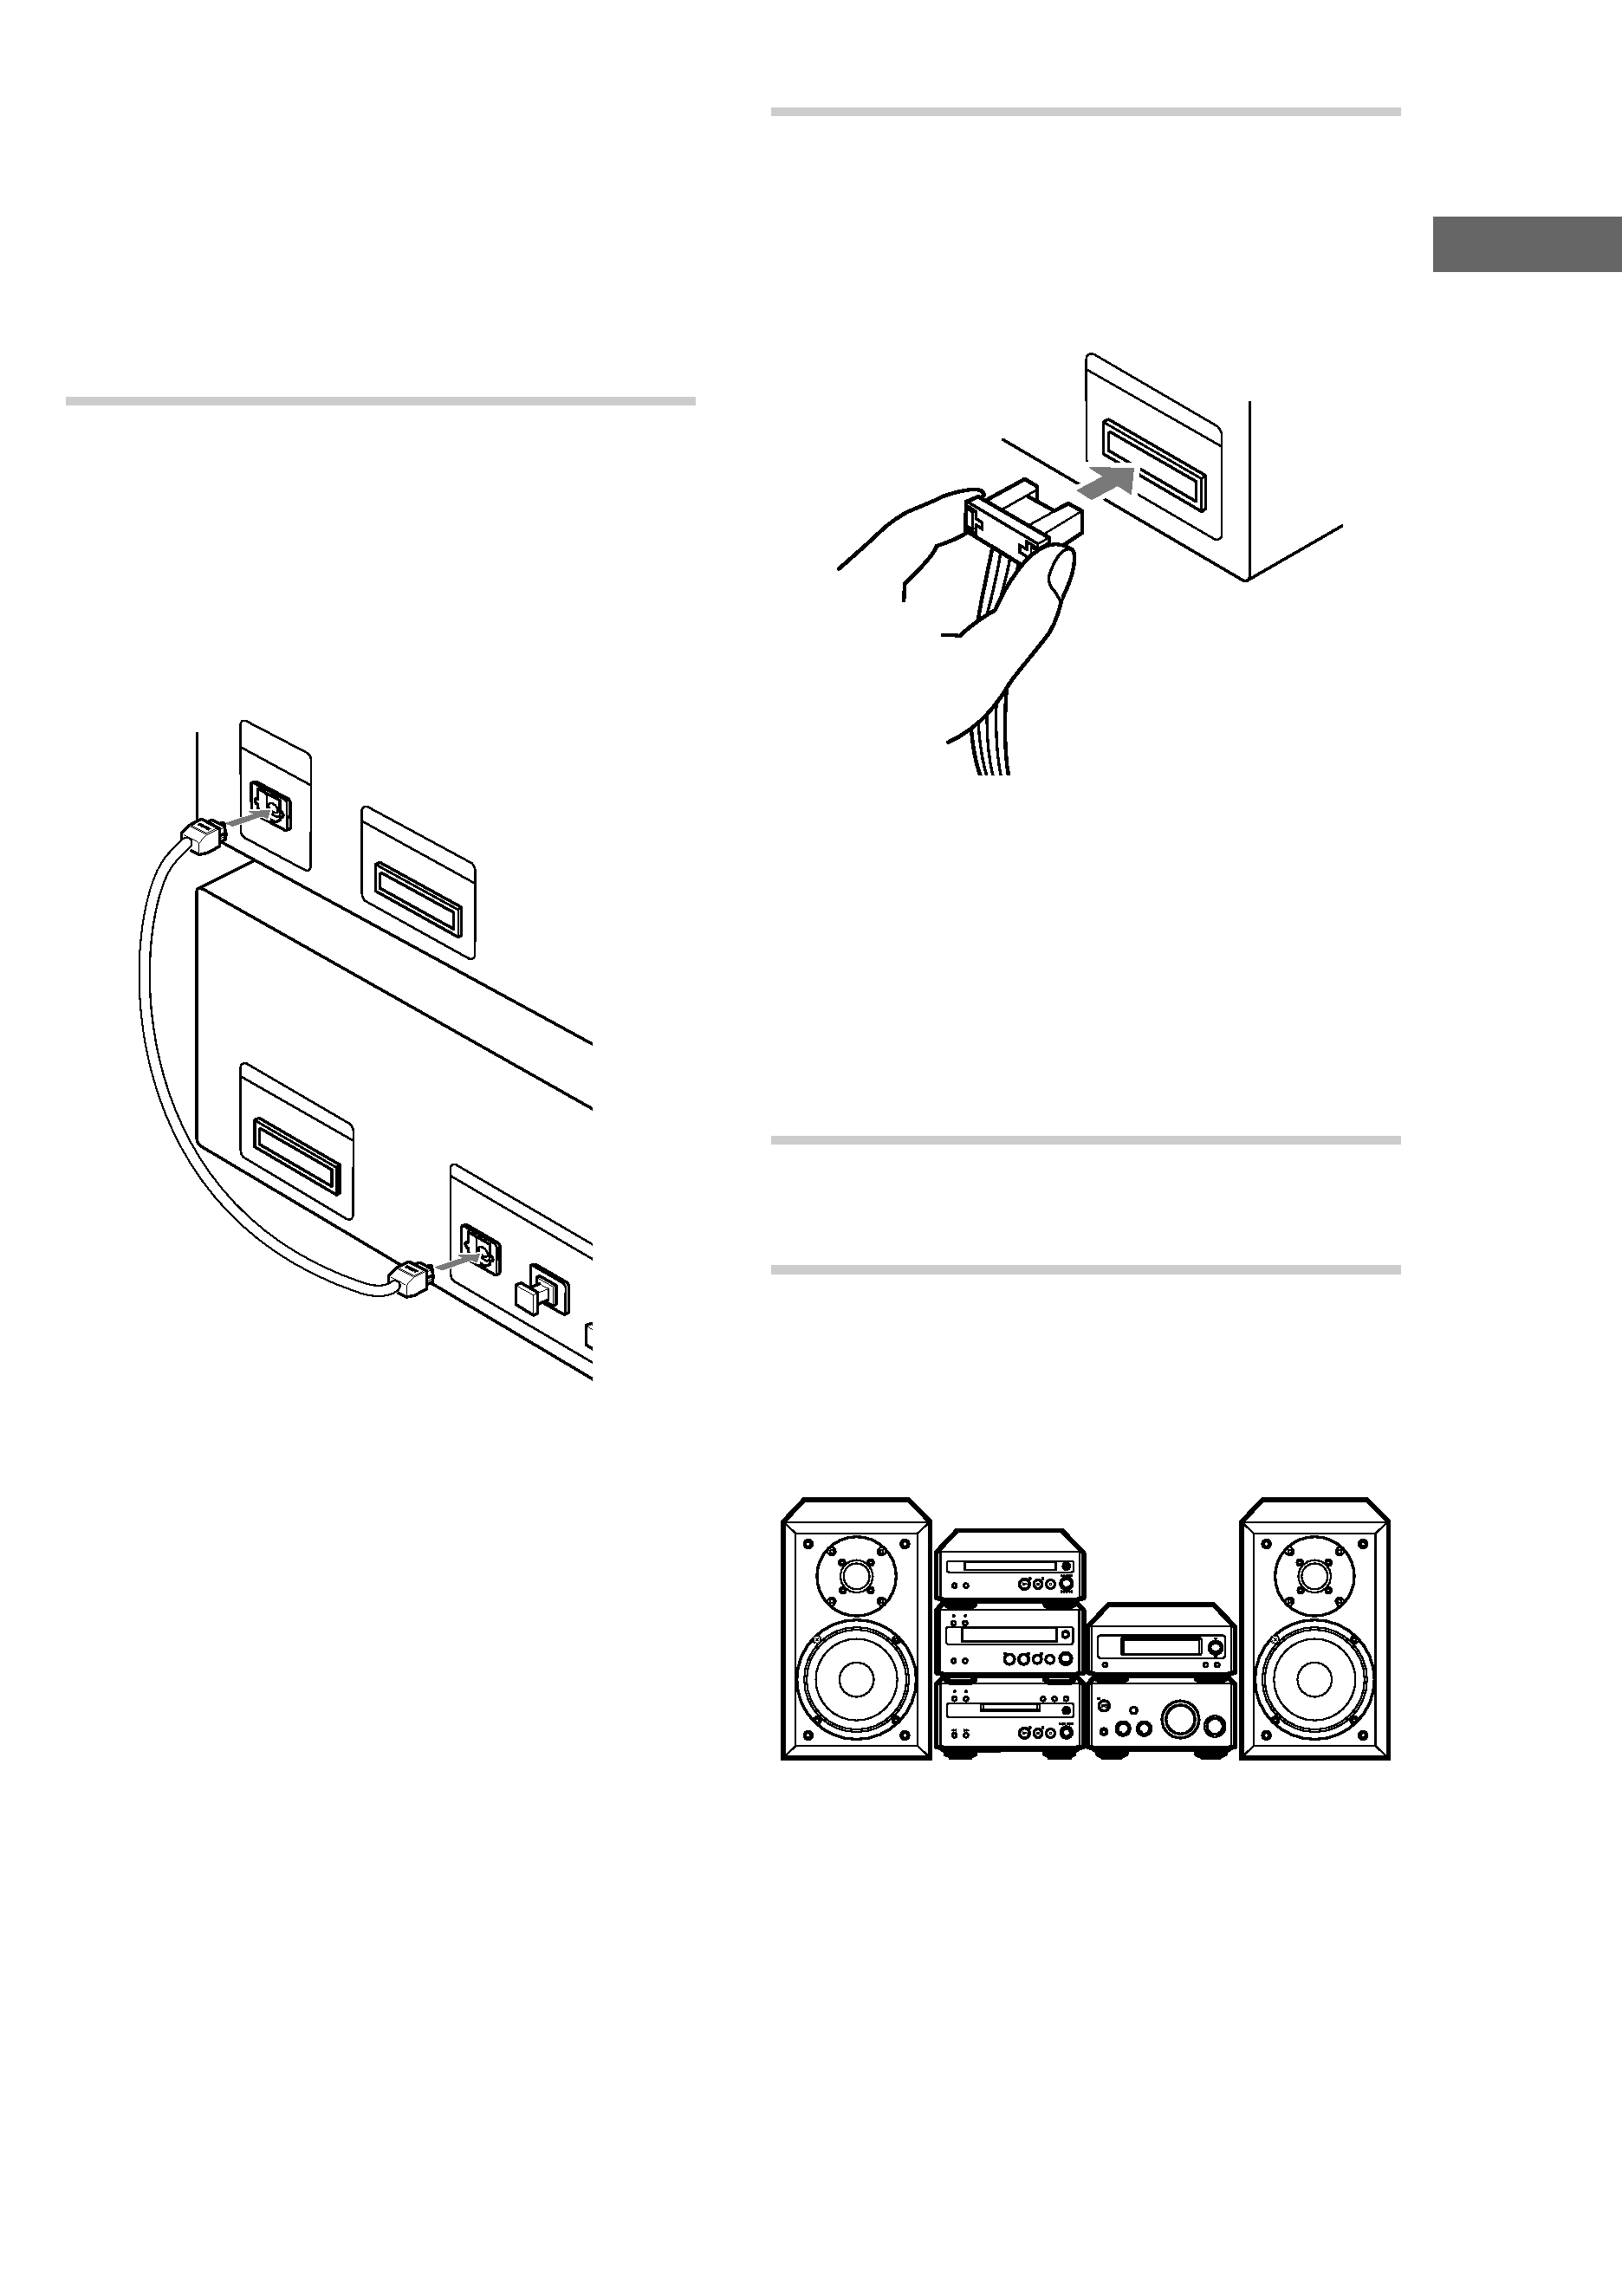
Take the caps off the connectors, then insert
the plugs until they click into place.
IN
2
CD
AU
X
DIG
ITA
L O
PT
ICA
L
DIG
ITA
L
OP
TIC
AL
SY
ST
EM
CO
NT
RO
L 3
IN
1
SY
STE
M C
ON
TR
OL 2
OU
T
2 Connect the SYSTEM CONTROL 3
connectors in the order of the tuner, tape
deck and MD deck using the system
cable supplied with MDS-SP55.
SY
ST
EM
C
ON
TR
OL
3
SY
ST
EM
C
ON
TR
OL
3
Notes
· The system cable is used to send signals and
electricity between the components for
interlinked operation.
Be sure to insert the connector horizontally
until it clicks into place. Otherwise the system
will not operate correctly.
· Keep the system cable away from the aerials
to prevent noise or malfunction.
3 Connect the mains lead to the mains
after you complete all the connections.
Arranging the components side
by side
Once you have finished the connections, you can
rearrange the components as desired.
Tip
All information for the MDS-SP55 MD deck appears
in the display on the tuner of CMT-SP55TC.