1
EN
© 1998 by Sony Corporation
3-862-832-21(1)
MDS-S707
MiniDisc Deck
Operating Instructions
Mode d'emploi
GB
EN
F
S
2
EN
This symbol is intended to
alert the user to the presence
of important operating and
maintenance (servicing)
instructions in the literature
accompanying the appliance.
INFORMATION
This equipment has been tested and
found to comply with the limits for a
Class B digital device, pursuant to Part
15 of the FCC Rules. These limits are
designed to provide reasonable
protection against harmful interference
in a residential installation. This
equipment generates, uses, and can
radiate radio frequency energy and, if
not installed and used in accordance
with the instructions, may cause
harmful interference to radio
communications.
However, there is no guarantee that
interference will not occur in a
particular installation. If this equipment
does cause harmful interference to radio
or television reception, which can be
determined by turning the equipment
off and on, the user is encouraged to try
to correct the interference by one or
more of the following measures:
Reorient or relocate the receiving
antenna.
Increase the separation between the
equipment and receiver.
Connect the equipment into an outlet
on a circuit different from that to
which the receiver is connected.
Consult the dealer or an experienced
radio/TV technician for help.
CAUTION
You are cautioned that any changes or
modification not expressly approved in
this manual could void your authority
to operate this equipment.
Owner's Record
The model and serial numbers are
located on the rear of the unit.
Record the serial number in the space
provided below. Refer to them
whenever you call upon your Sony
dealer regarding this product.
Model No. MDS-S707
Serial No.
WARNING
To prevent fire or shock
hazard, do not expose the unit
to rain or moisture.
To avoid electrical shock, do
not open the cabinet. Refer
servicing to qualified
personnel only.
The laser component in this product is
capable of emitting radiation exceeding
the limit for Class 1.
This appliance is classified as a CLASS 1
LASER product. The CLASS 1 LASER
PRODUCT MARKING is located on the
rear exterior.
The following caution label is located
inside the unit.
For the customers in US
This symbol is intended to
alert the user to the presence
of uninsulated "dangerous
voltage" within the product's
enclosure that may be of
sufficient magnitude to
constitute a risk of electric
shock to persons.
For the customers in Canada
CAUTION
TO PREVENT ELECTRIC SHOCK, DO
NOT USE THIS POLARIZED AC PLUG
WITH AN EXTENSION CORD,
RECEPTACLE OR OTHER OUTLET
UNLESS THE BLADES CAN BE FULLY
INSERTED TO PREVENT BLADE
EXPOSURE.
IN NO EVENT SHALL SELLER BE
LIABLE FOR ANY DIRECT,
INCIDENTAL OR
CONSEQUENTIAL DAMAGES OF
ANY NATURE, OR LOSSES OR
EXPENSES RESULTING FROM
ANY DEFECTIVE PRODUCT OR
THE USE OF ANY PRODUCT.
Precautions
On safety
· The use of optical instruments with
this product will increase eye hazard.
· Should any solid object or liquid fall
into the cabinet, unplug the deck and
have it checked by qualified
personnel before operating it any
further.
On power sources
· Before operating the deck, check that
the operating voltage of the deck is
identical with your local power
supply. The operating voltage is
indicated on the nameplate at the rear
of the deck.
· If you are not going to use the deck
for a long time, be sure to disconnect
the deck from the wall outlet. To
disconnect the AC power cord, grasp
the plug itself; never pull the cord.
· The mains switch is located on the
rear exterior.
· AC power cord must be changed only
at the qualified service shop.
On placement (only on models
supplied with a MAIN POWER switch)
Do not install the appliance in a
confined space, such as a bookcase or
built-in cabinet because the mains
power switch (MAIN POWER) is
located on the rear exterior.

3
EN
TABLE OF CONTENTS
Getting Started
Hooking Up the System ........................................................................... 4
Connecting Optional AV Components ................................................. 5
Recording on an MD ................................................................................ 6
Playing an MD .................................................................................... 8
Recording on MDs
Notes on Recording ................................................................................. 9
Useful Tips for Recording ...................................................................... 9
Recording Over Existing Tracks ........................................................... 11
Adjusting the Recording Level .............................................................. 11
Marking Track Numbers while Recording (Track Marking) ........... 12
Starting Recording with 6 Seconds of Prestored Audio Data
(Time Machine Recording) ..................................................................... 13
Synchro-Recording a CD ........................................................................ 14
Synchro-Recording a Tape and Radio Program ................................. 15
Recording on an MD Using a Timer .................................................... 15
Playing MDs
Using the Display .................................................................................... 17
Locating a Specific Track ........................................................................ 18
Locating a Particular Point in a Track .................................................. 19
Playing Tracks Repeatedly ..................................................................... 20
Playing in Random Order (Shuffle Play) ............................................. 20
Creating Your Own Program (Program Play) .................................... 21
Playing an MD Using a Timer ............................................................... 22
Editing Recorded MDs
Notes on Editing ...................................................................................... 23
Erasing Recordings (Erase Function) ................................................... 23
Erasing a Portion of a Track (A-B Erase Function) ............................ 24
Dividing Recorded Tracks (Divide Function) .................................... 25
Combining Recorded Tracks (Combine Function) ............................ 26
Moving Recorded Tracks (Move Function) ........................................ 27
Labeling Recordings (Title Function) ................................................... 28
Undoing the Last Edit (Undo Function) .............................................. 30
Additional Information
Display Messages .................................................................................... 31
System Limitations .................................................................................. 31
Troubleshooting ....................................................................................... 32
Specifications ............................................................................................ 33
Guide to the Serial Copy Management System .................................. 34
Index ................................................................................................................ 35
On operation
If the deck is brought directly from a
cold to a warm location, or is placed in a
very damp room, moisture may
condense on the lenses inside the deck.
Should this occur, the deck may not
operate properly. In this case, remove
the MD and leave the deck turned on for
about an hour until the moisture
evaporates.
On the MiniDisc cartridge
· Do not open the shutter to expose the
MD.
· Do not place the cartridge where it
will be subject to extremes of sunlight,
temperature, moisture or dust.
On cleaning
Clean the cabinet, panel and controls
with a soft cloth slightly moistened with
a mild detergent solution. Do not use
any type of abrasive pad, scouring
powder or solvent such as alcohol or
benzine.
If you have any questions or problems
concerning your deck, please consult
your nearest Sony dealer.
Welcome!
Thank you for purchasing the Sony
MiniDisc Deck. Before operating the
deck, please read this manual
thoroughly and retain it for future
reference.
About This Manual
Conventions
· Controls in the instructions are those
on the deck; these may, however, be
substituted by controls on the remote
that are similarly named or, when
different, appear in the instructions
within brackets.
· The following icons are used in this
manual:
Z
Indicates a procedure that
requires use of the remote.
z
Indicates tips for making the
task easier and hints.
EN
Getting Started
4
EN
MAIN POWER
ON
OFF
MAIN
POWER
Getting Started
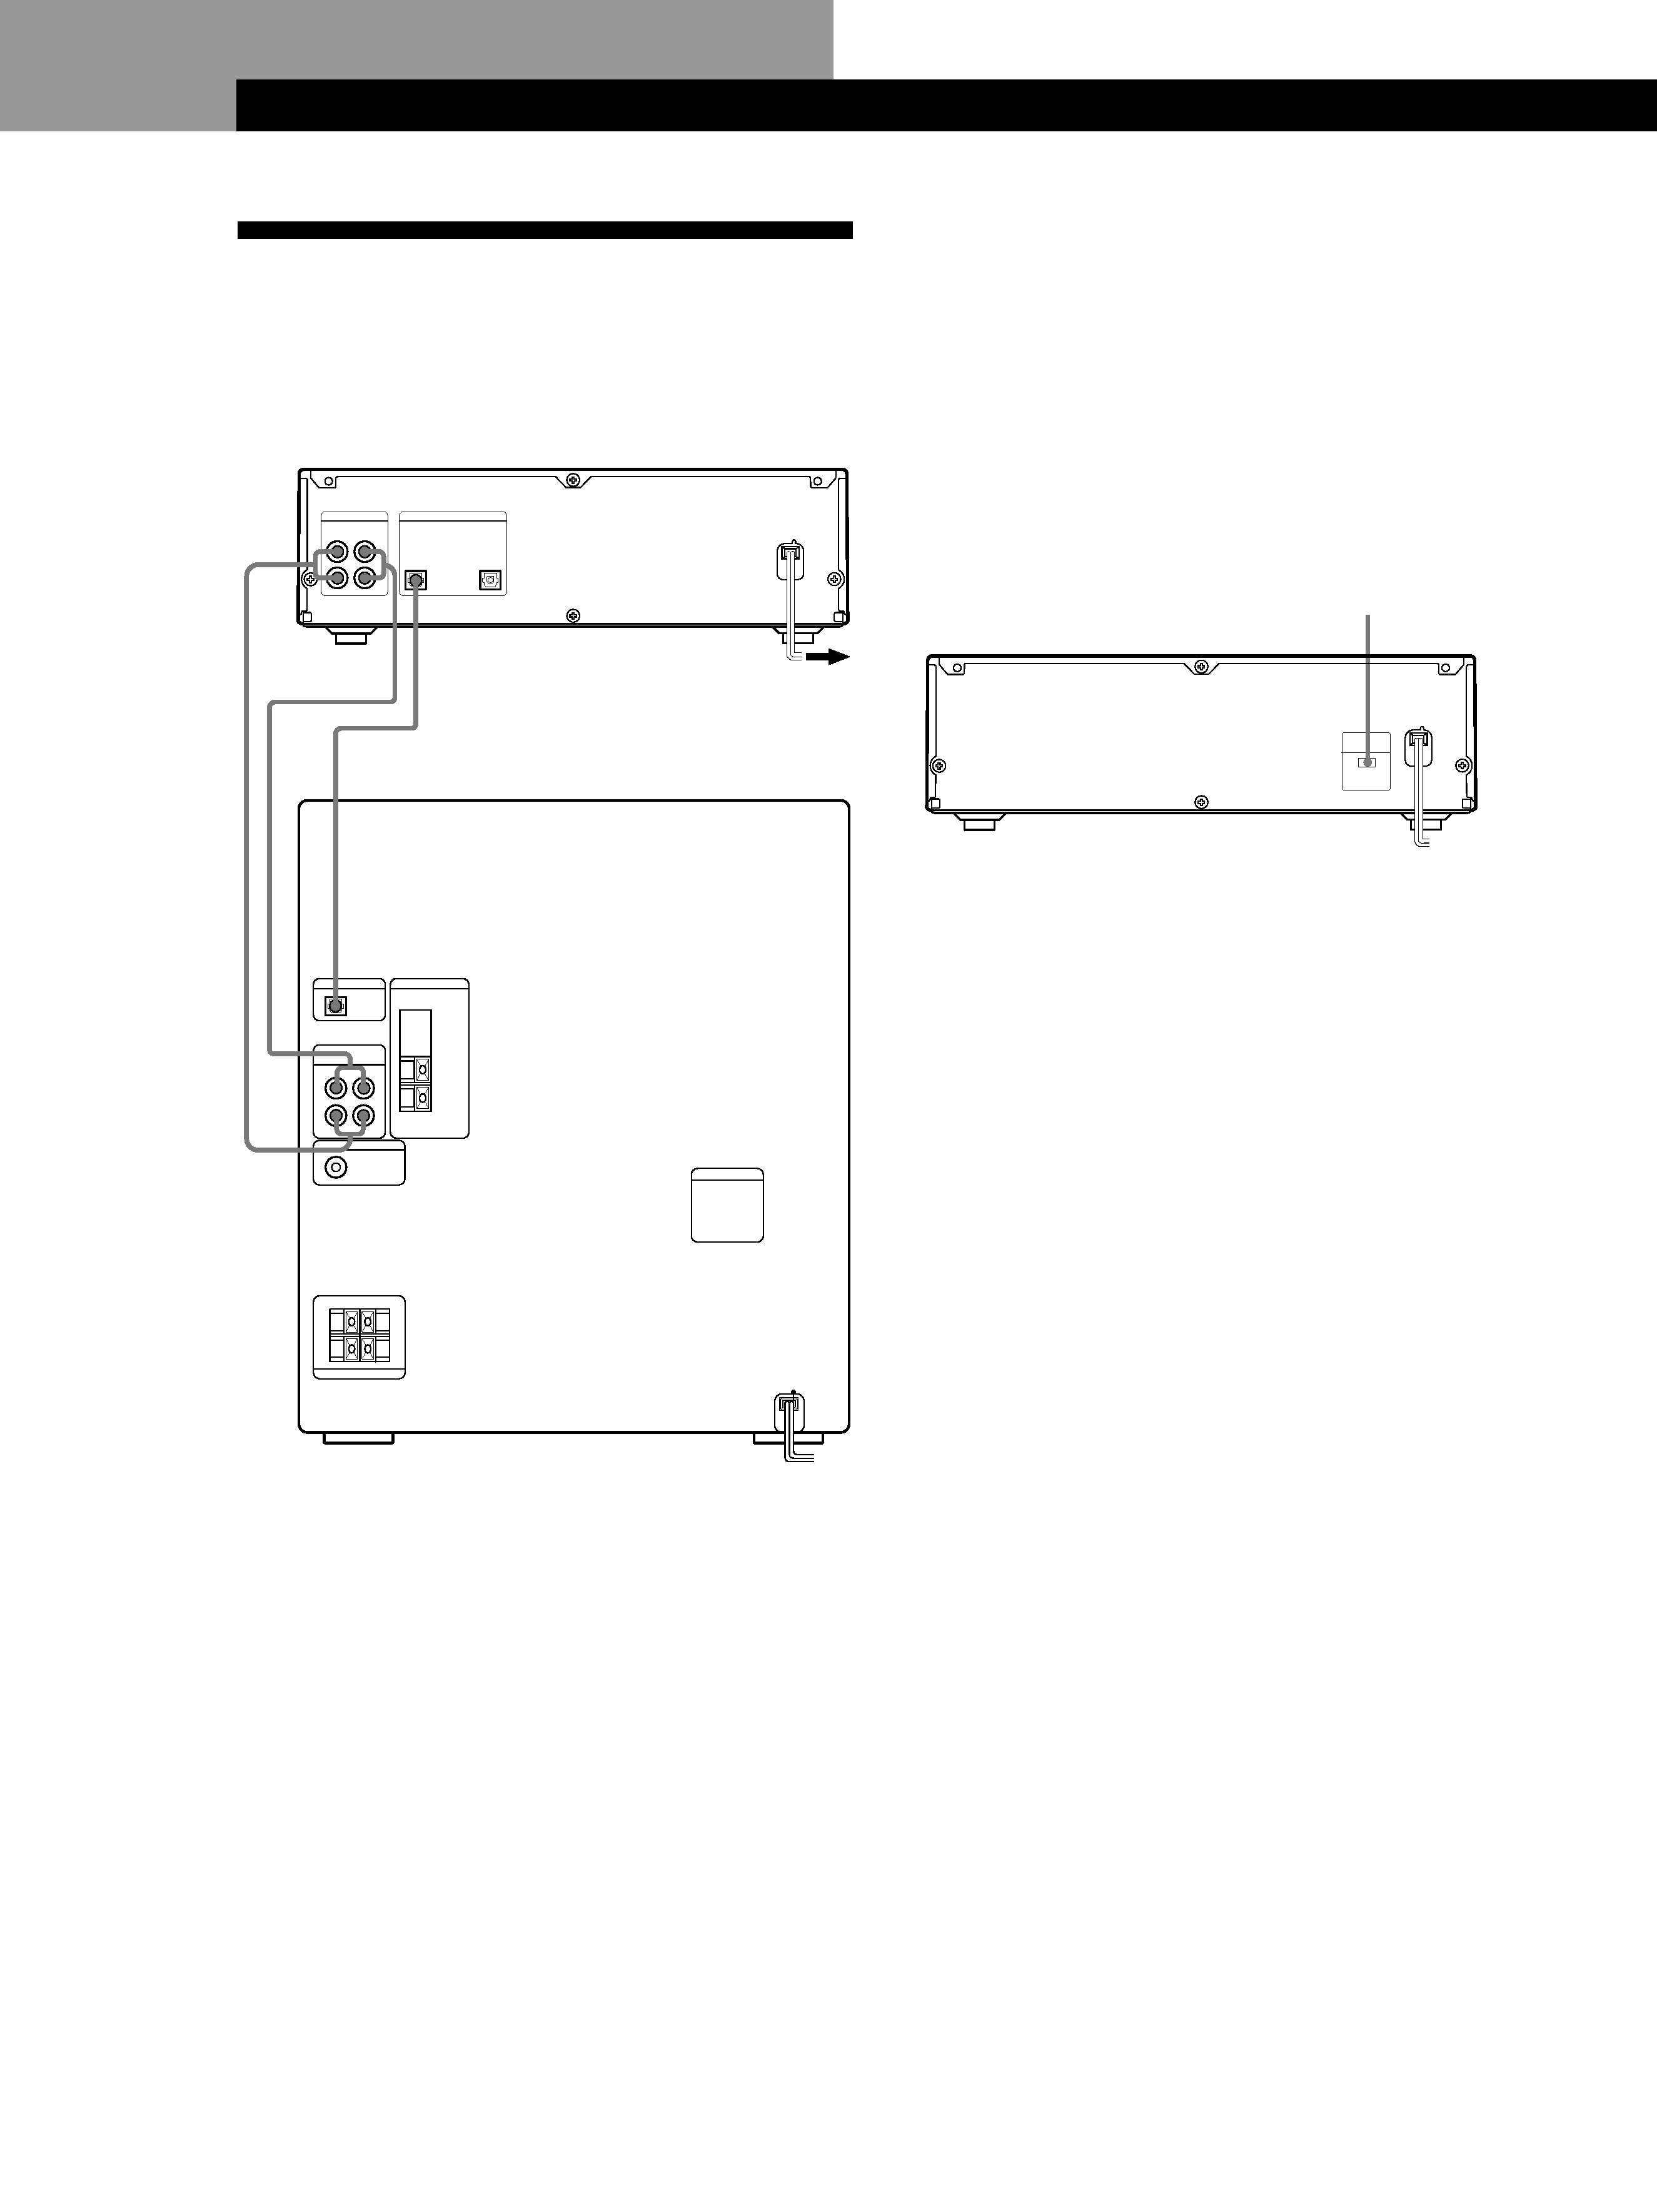
Hooking Up the System
Connect the supplied cords (1 and 2) as described
below.
1 Connect the audio connecting cords.
Make sure to match the color of the plugs and the
connectors. Be sure to make connections firmly to
prevent hum and noise.
2 Connect the optical cable.
Take the caps off the connectors and then insert
the plugs until they click into place.
Connecting the AC power cord
Connect the AC power cord to a wall outlet or to the
outlet of a timer.
Turning on the unit (only on models
supplied with a MAIN POWER switch)
Set MAIN POWER on the rear of the unit to ON.
The unit is turned on in standby mode.
L I N E
(ANALOG)
D I G I T A L
IN
OUT
L
R
IN
OUT
1
2
MD / VIDEO
(AUDIO)
ANTENNA
SUPER WOOFER
CD DIGITAL OUT
OPTICAL
IN
OUT
L
R
L
R
SPEAKER
L
R
+
+

Getting Started
5
EN
Connecting Optional AV
Components
You can connect a digital components (such as a DAT
deck or another MD deck) for digital recording. Refer
to the instructions of the component for details
regarding its operation.
Connect the digital component using the optical cable.
Take the caps off the connectors and then insert the
plugs until they click into place.
A built-in sampling rate converter automatically
converts the sampling frequency of various digital
sources to the 44.1 kHz sampling rate of your MD
deck.
This allows you to record sources such as 32- and 48-
kHz DAT or satellite broadcasts, as well as compact
discs and other MDs.
Note
When recording through the DIGITAL IN connector, you
cannot adjust the recording level.
To the DIGITAL IN connector of the component
L I N E
(ANALOG)
D I G I T A L
IN
OUT
L
R
IN
OUT