4-237-878-12(1)
2002 Sony Corporation
MDS-NT1
MiniDisc Deck
Owner's Record
The model and serial numbers are located on the bottom of the unit. Record the serial
number in the space provided below. Refer to them whenever you call upon your Sony
dealer regarding this product.
Model No. MDS-NT1
Serial No.
Operating Instructions
Mode d'emploi
Manual de instrucciones
GB
FR
ES
CT
2GB
WARNING
To prevent fire or shock hazard, do not
expose the unit to rain or moisture.
This appliance is classified as a CLASS 1 LASER
product.
This label is located on the bottom exterior.
To prevent fire, do not cover the ventilation of the
apparatus with newspapers, table-cloths, curtains, etc.
And don't place lighted candles on the apparatus.
To prevent fire or shock hazard, do not place objects
filled with liquids, such as vases, on the apparatus.
CAUTION: INVISIBLE LASER RADIATION
WHEN OPEN AND INTERLOCKS DEFEATED.
AVOID EXPOSURE TO BEAM.
IN NO EVENT SHALL SELLER BE LIABLE
FOR ANY DIRECT, INCIDENTAL OR
CONSEQUENTIAL DAMAGES OF ANY
NATURE, OR LOSSES OR EXPENSES
RESULTING FROM ANY DEFECTIVE
PRODUCT OR THE USE OF ANY PRODUCT.
Don't throw away the battery with
general house waste, dispose of it
correctly as chemical waste.
For the customers in the U.S.A.
This symbol is intended to alert the
user to the presence of uninsulated
"dangerous voltage" within the
product's enclosure that may be of
sufficient magnitude to constitute a
risk of electric shock to persons.
This symbol is intended to alert the
user to the presence of important
operating and maintenance (servicing)
instructions in the literature
accompanying the appliance.
If you have any questions about this product, you may call:
Sony customer Information Center 1-800-488-7669
The Number below is for the FCC related matters only.
Regulatory Information
Declaration of Conformity
Trade name:
SONY
Model No.:
MDS-NT1
Responsible Party:
Sony Electronics Inc.
Address:
680 Kinderkamack Road,
Oradell, NJ.07649 USA
Telephone No.:
201-930-6972
This device complies with Part 15 of the FCC
Rules. Operation is subject to the following two
conditions: (1) This device may not cause harmful
interference, and (2) this device must accept any
interference received, including interference that
may cause undesired operation.
WARNING
This equipment has been tested and found to comply
with the limits for a Class B digital device, pursuant
to Part 15 of the FCC Rules. These limits are
designed to provide reasonable protection against
harmful interference in a residential installation. This
equipment generates, uses, and can radiate radio
frequency energy and, if not installed and used in
accordance with the instructions, may cause harmful
interference to radio communications. However, there
is no guarantee that interference will not occur in a
particular installation. If this equipment does cause
harmful interference to radio or television reception,
which can be determined by turning the equipment
off and on, the user is encouraged to try to correct the
interference by one or more of the following
measures:
· Reorient or relocate the receiving antenna.
· Increase the separation between the equipment and
receiver.
· Connect the equipment into an outlet on a circuit
different from that to which the receiver is
connected.
· Consult the dealer or an experienced radio/TV
technician for help.
CAUTION
You are cautioned that any changes or modification
not expressly approved in this manual could void
your authority to operate this equipment.
The shielded interface cable recommended in this
manual must be used with this equipment in order to
comply with the limits for a digital device pursuant to
Subpart B of Part 15 of FCC Rules.
For the customers in Canada
CAUTION
TO PREVENT ELECTRIC SHOCK, DO NOT USE
THIS POLARIZED AC PLUG WITH AN
EXTENSION CORD, RECEPTACLE OR OTHER
OUTLET UNLESS THE BLADES CAN BE FULLY
INSERTED TO PREVENT BLADE EXPOSURE.
CAUTION
This Class B digital apparatus complies with
Canadian ICES-003.
3GB
Welcome!
Thank you for purchasing the Sony MiniDisc
Deck. Before operating the deck, please read this
manual thoroughly and retain it for future
reference.
For information on user support, visit the
following web site.
Net MD User support:
http://www.sony.co.jp/en/Products/homeaudio/
If you install another application software that
supports the Net MD after installing the supplied
OpenMG Jukebox, the links to the above web site
may be changed. In this case, enter the above
address manually in the address field of your
browser.
About This Manual
· This manual explains the location, function and
connection of parts on the MDS-NT1 and
provides notes on the operation of the
MDS-NT1.
· The MDS-NT1 is operated through connection
by USB cable to a computer installed with the
OpenMG Jukebox software. For details on the
installation and operation of OpenMG Jukebox,
refer to the instruction manual or the online
help for OpenMG Jukebox.
· The OS messages described in this manual
might be slightly different from the actual
massage that appears on your computer.
Unpacking
Check that you have the following items:
· AC power adaptor (1)
· USB cable (1)
· Audio connecting cord
(stereo mini-plug
×1 y stereo mini-plug ×1)
(1)
· OpenMG Jukebox CD-ROM (1)
· Operating instructions for OpenMG Jukebox
(1)
· If a problem should occur on this MD
deck as a result of defective
manufacturing, SONY shall replace unit.
However, SONY shall bear no other
responsibility.
· In no event shall SONY be liable for any
financial loss or loss of profits, including
claims made by third parties, arising out of
the use of the MD deck.
Table of Contents
Location and Function of Parts
Front Panel Parts Description ...................... 4
Rear Panel Parts Description ....................... 5
Hooking Up ................................................. 6
Additional Information
Notes on Recording ..................................... 7
Precautions .................................................. 8
Handling MDs ............................................. 9
System Limitations ...................................... 9
Troubleshooting ......................................... 10
Specifications ............................................ 11
Self-Diagnosis Function ............................ 12
GB
4GB
Location and Function of Parts
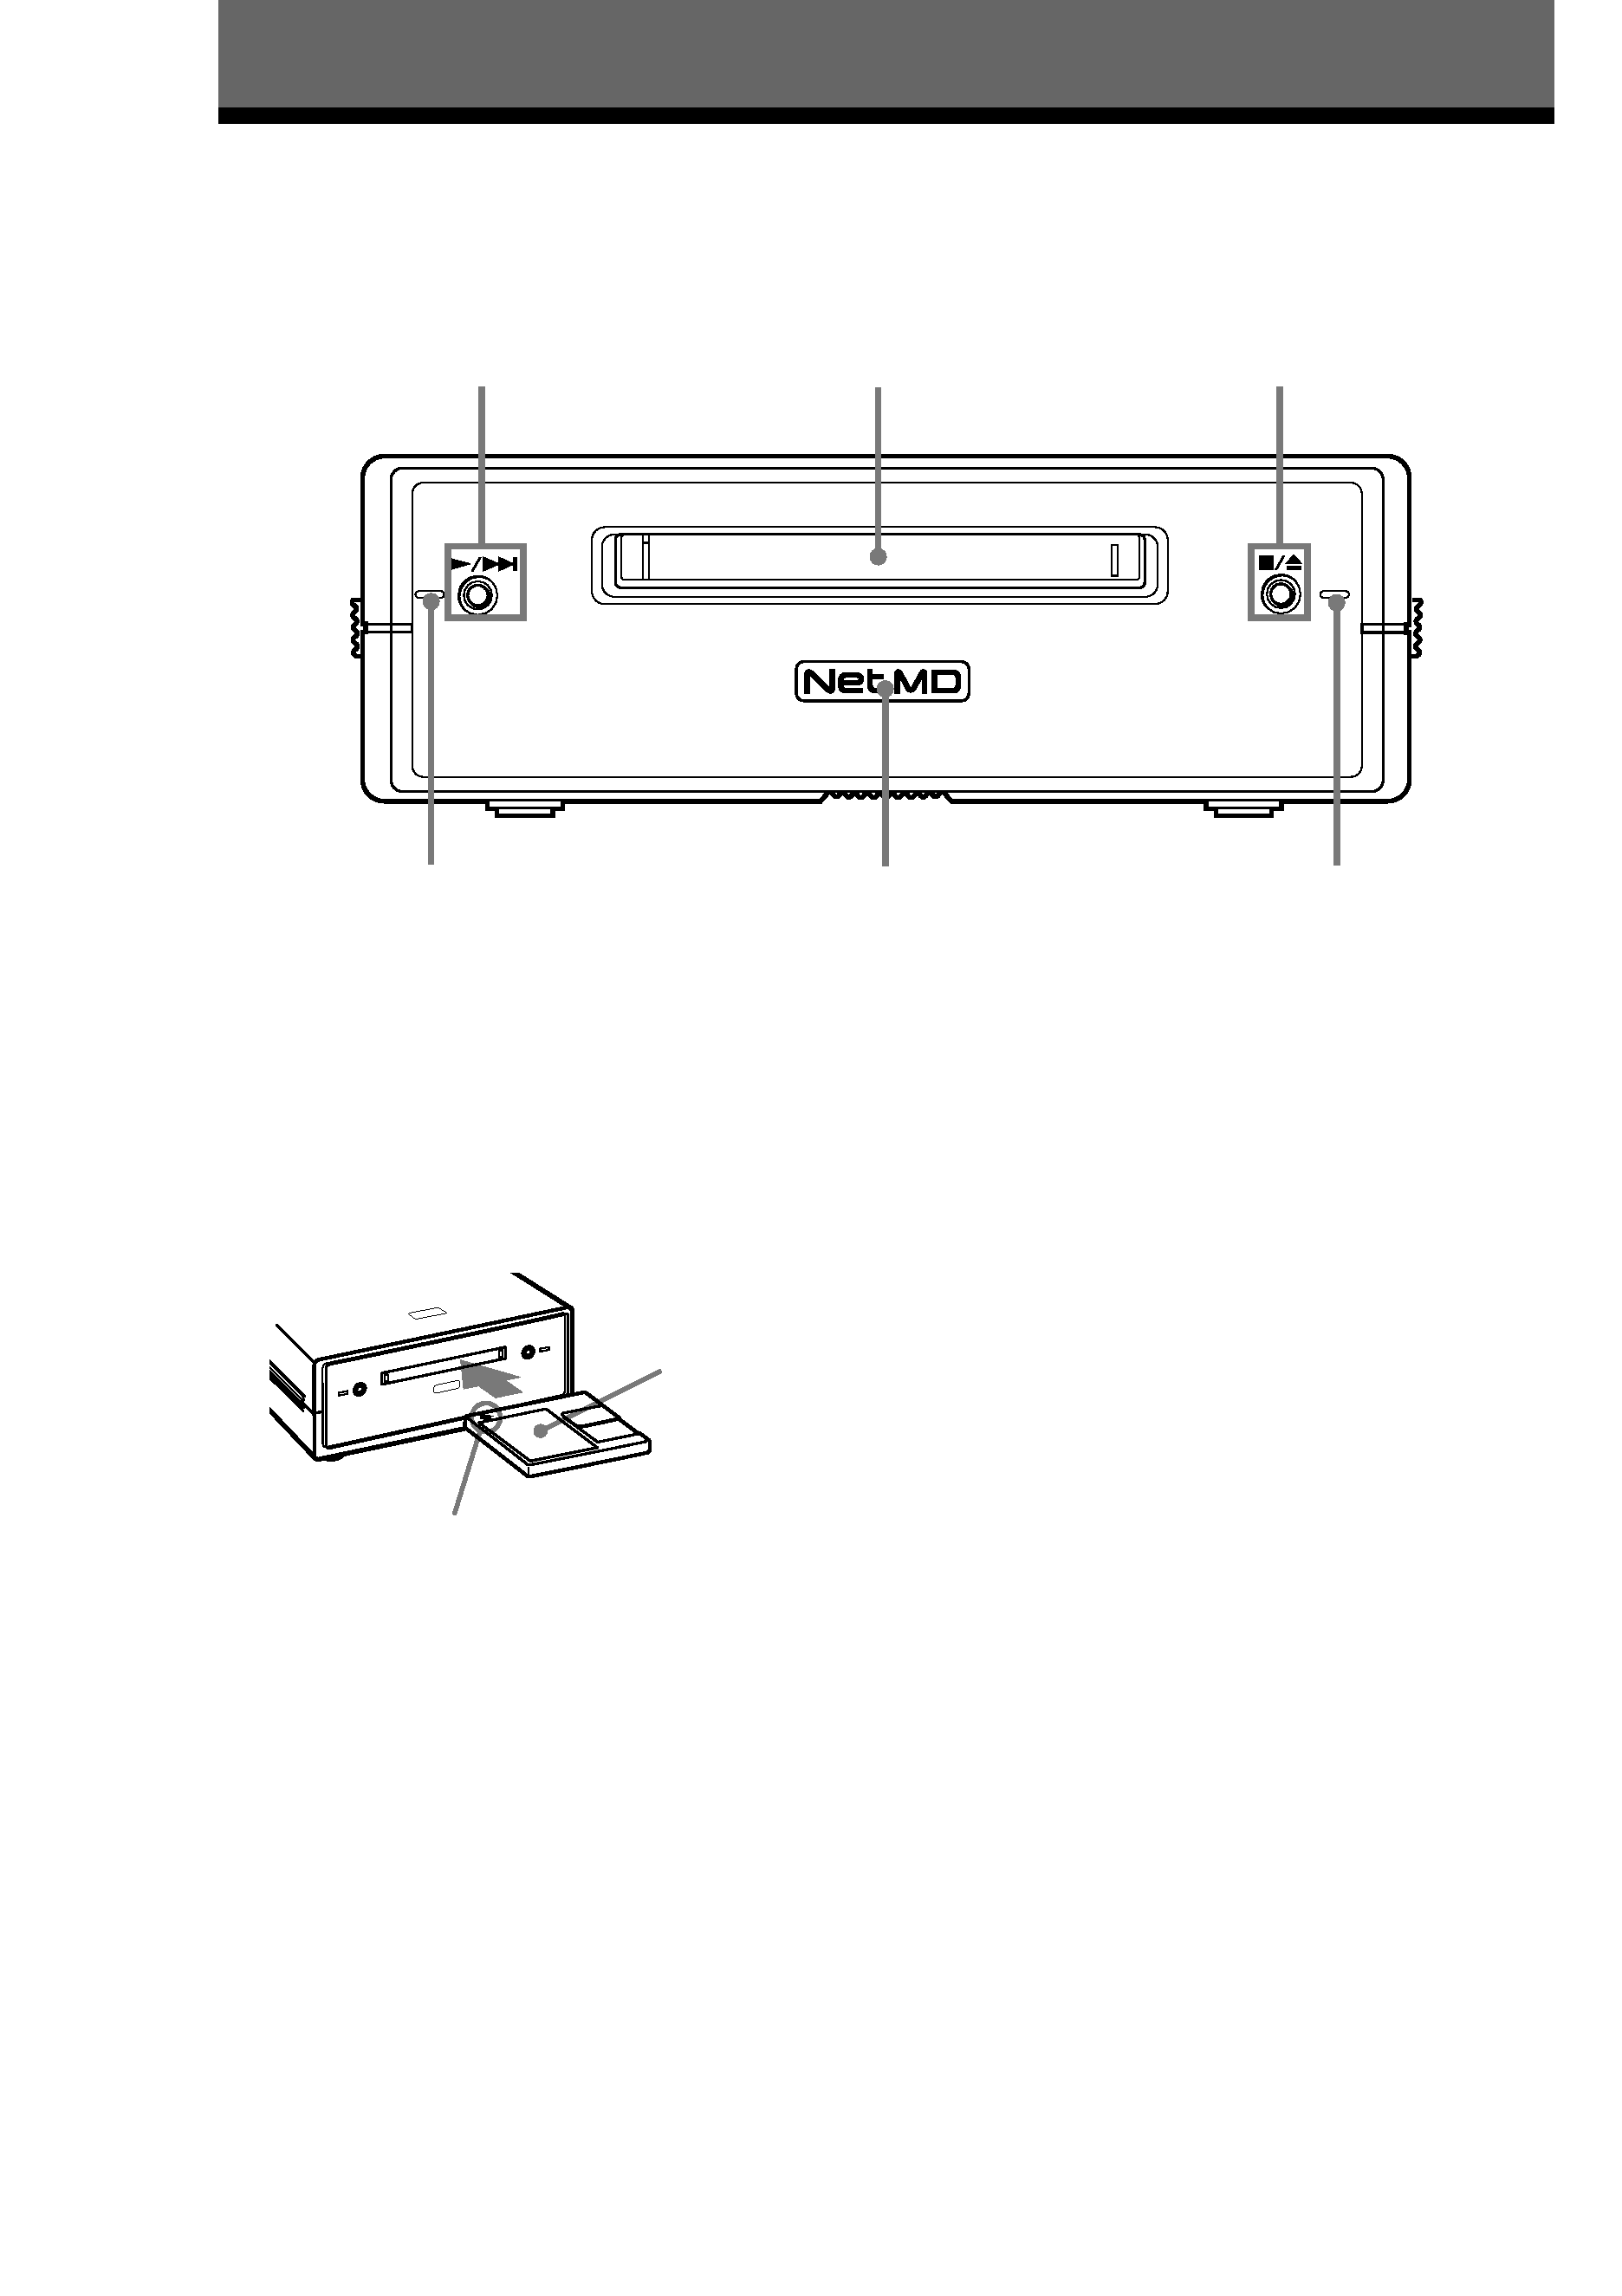
Front Panel Parts Description
This chapter tells you about the location and function of the various buttons, controls on the MD deck.
13
2
5
4
6
1
N/> button
Press while the unit is stopped to start playback.
Press while the unit is playing to locate the
beginning of the next track.
2
MD insertion slot
Insert the MD as illustrated below.
3
x/Z button
Press while the unit is playing to stop playback.
Press while the unit is stopped to eject the MD.
4
Recording indicator
Lights up in the following cases:
While an audio file is being transferred from the
connected computer to the MD deck (check-out).
While an audio file is being transferred from the
MD deck to the connected computer (check-in).
When TOC information (such as track
information) has not been recorded to the MD.
Flashes when overwriting of the MD's TOC by
the MD deck is started by pressing x/Z .
5
Net MD lamp
Indicates the USB connection status between the
unit and the computer.
Lights dimly when the unit is connected only to a
wall outlet with the supplied AC adaptor.
Lights brightly when the unit is connected to a
computer with its operating system running.
6
Playback indicator
Lights during playback.
Flashes while the MD's TOC is being loaded by
the MD deck.
Notes
· Except for operation of the x/Z button for ejecting
the MD, all other operations on the MD deck are
disabled while the Net MD is connected through the
supplied USB cable to a computer with its operating
system running.
Under these conditions, the Net MD lamp flashes
(the other indicators remain off) whenever you
attempt to do an operation that is disabled.
· The flashing of the Net MD lamp and flashing or
lighting up of the other indicators are indications
that the MD deck's self-diagnosis function is active.
For details, see page 12.
With the labeled
side up
With the arrow pointing
towards the deck
Location
and
Function
of
Parts
5GB
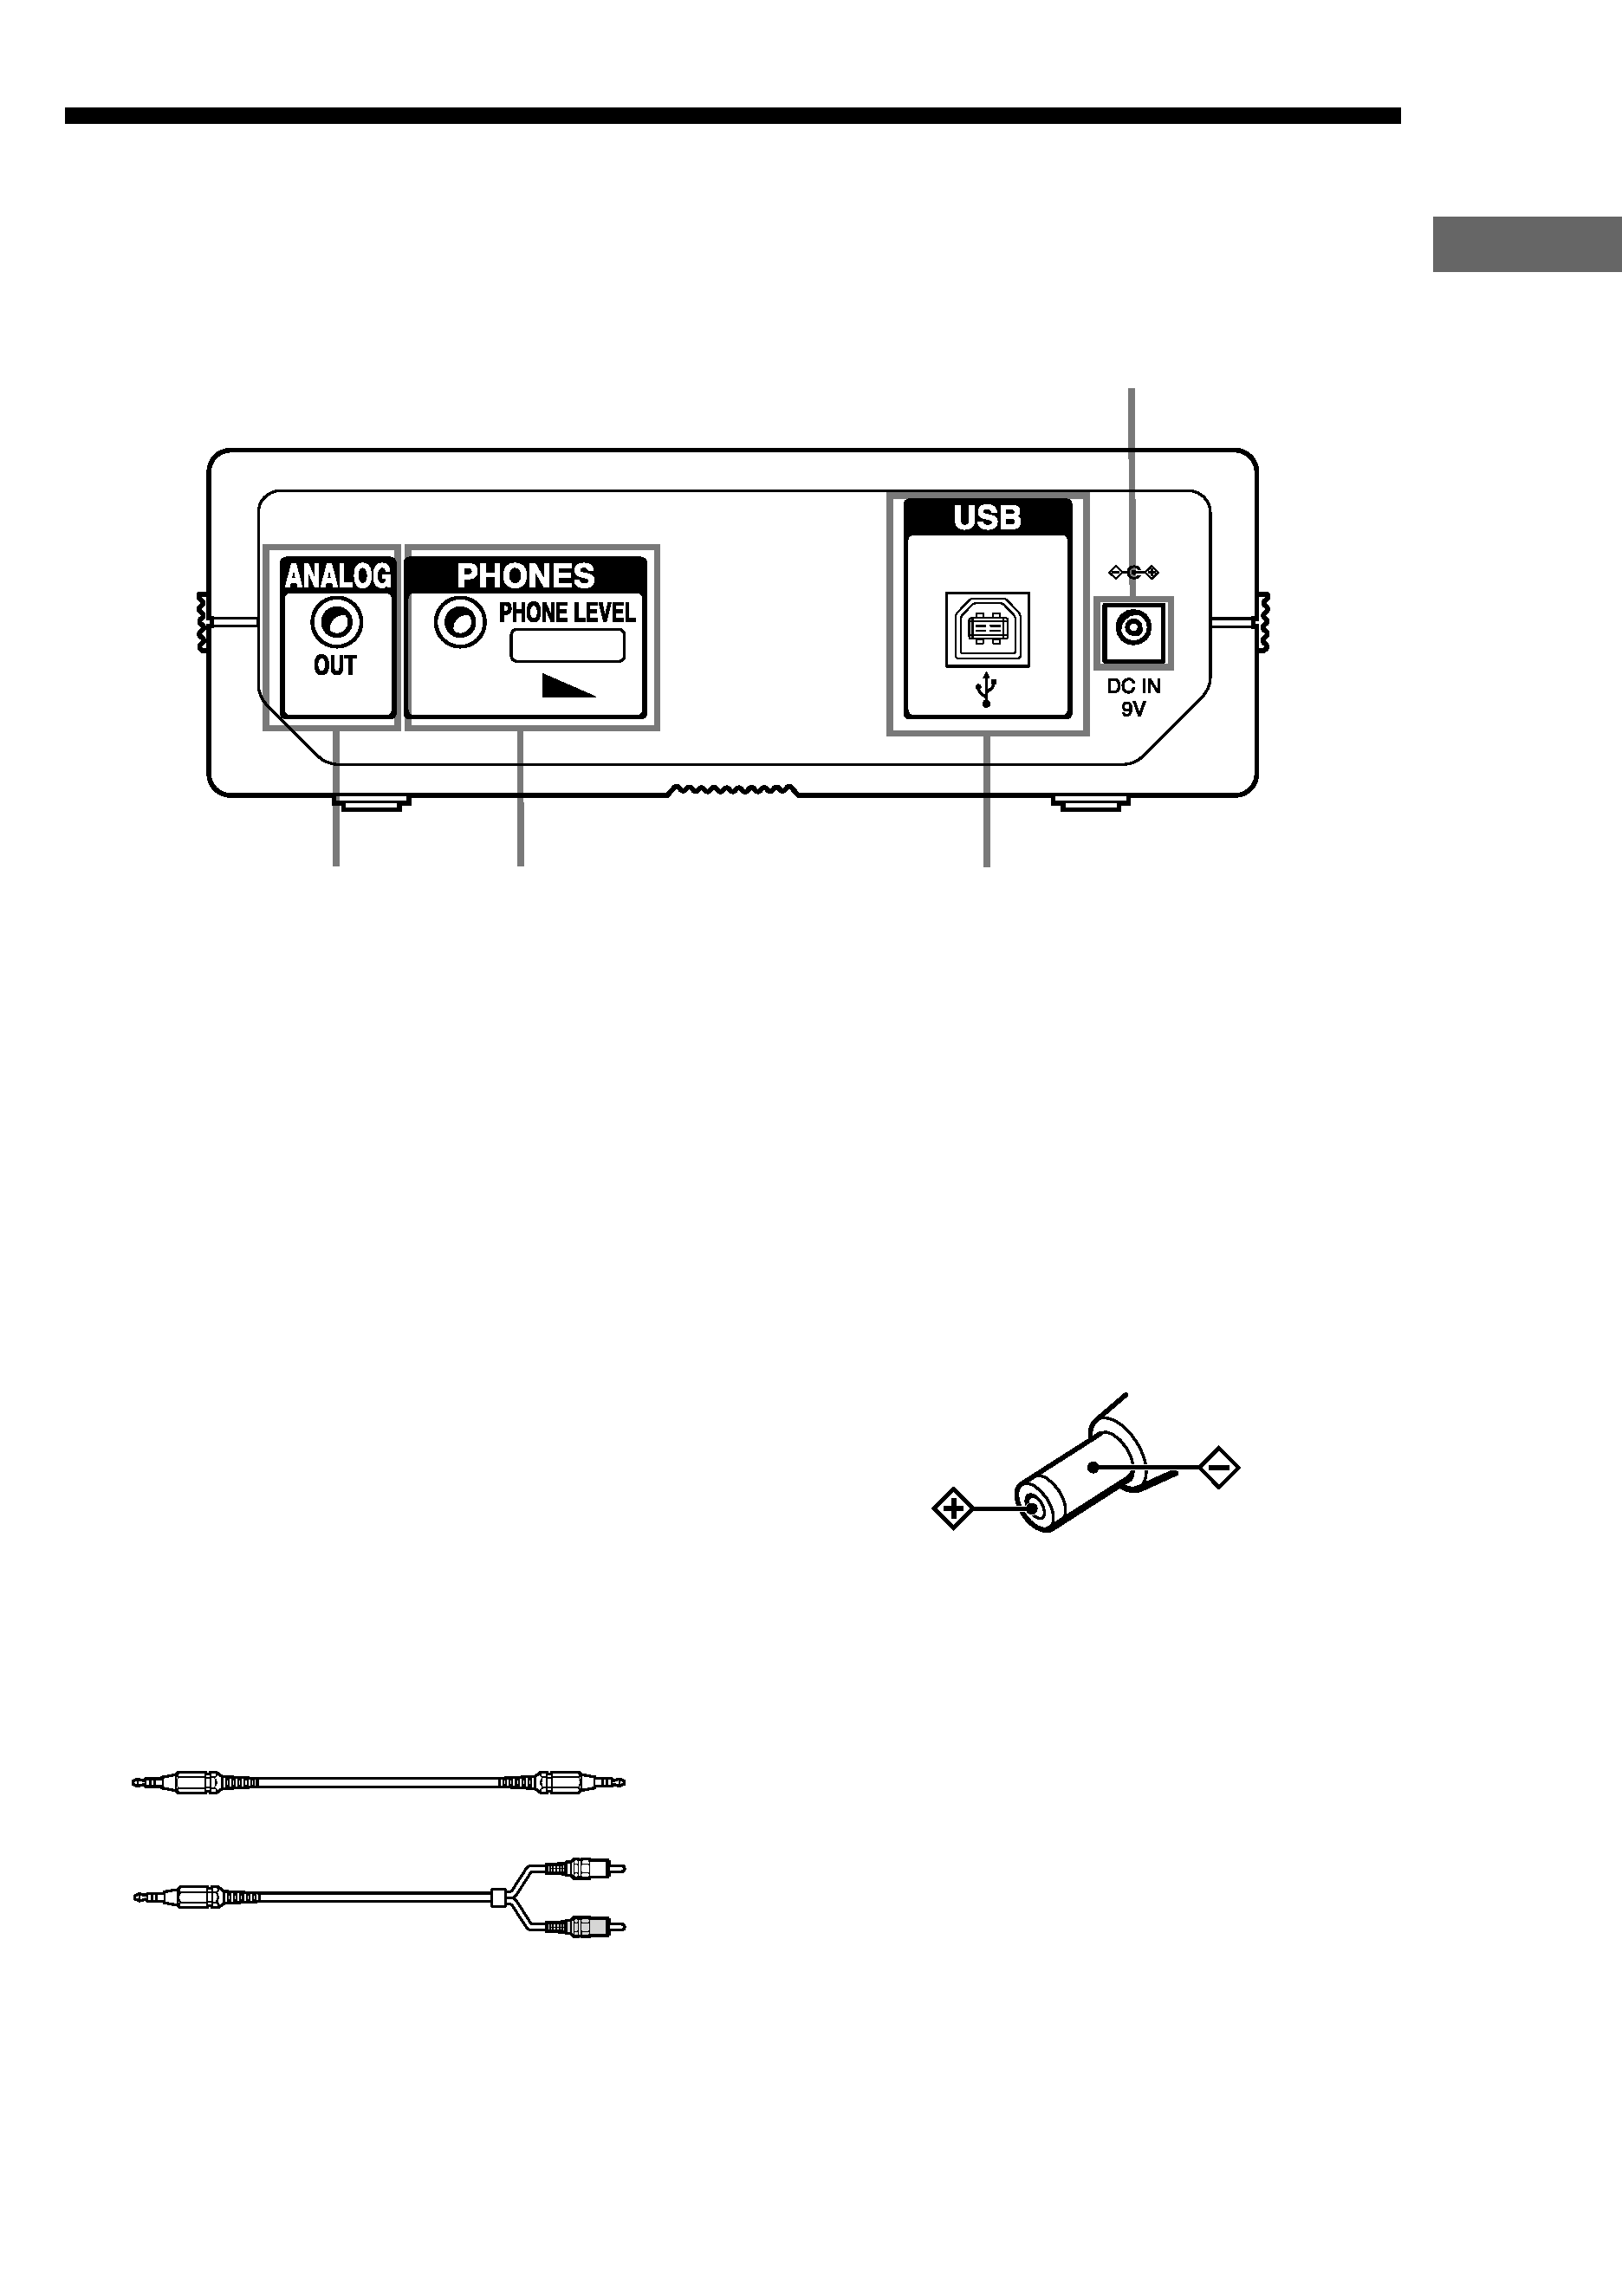
Rear Panel Parts Description
1
2
3
4
Notes
· Full performance of the MD deck is not guaranteed
when it is connected to the computer through a
USB hub or USB extension cord. Be sure to
connect the MD deck directly to the computer with
the supplied USB cable.
· Do not connect the supplied AC power adaptor to a
switched AC outlet (e.g., on an amplifier).
· Use only the supplied AC power adaptor. Do not
use any other AC power adaptor.
Polarity of the plug
The shielded interface cable recommended in this
manual must be used with this equipment in order to
comply with the limits for a digital device pursuant to
Subpart B of Part 15 of FCC Rules.
· Before outputting sound through the headphones, it
is recommended that you turn the volume down
completely, and then gradually turn up the volume
to the desired level while listening to the sound.
1
DC IN 9V jack
Connect this jack to a wall outlet via the supplied
AC power adaptor to power the MD deck.
2
USB port
Connect this port to a USB port on your
computer with the supplied USB cable.
3
Headphones jack and PHONE LEVEL
control
Connect a headphones plug to this jack.
Turn the PHONE LEVEL control to adjust the
volume of the connected headphones.
4
ANALOG OUT jack
Connect active speakers, etc. to this jack with the
supplied audio connecting cord (stereo mini-plug
×1 y stereo mini-plug ×1) or optional audio
connecting cord (stereo mini-plug
×1 y phono
plug
×2).
or