Trinitron Color TV
©1998 by Sony Corporation
KV-XF21M8J
3-866-013-11 (1)
Operating Instructions
GB
· Before operating the unit, please read this manual thoroughly and retain
it for future reference.
· Avant de faire fonctionner cet appareil, lisez attentivement le présent
mode d'emploi et conservez-le pour toute référence ultérieure.
FR
Mode D'emploi
PR
AR

2
WARNING
· Dangerously high voltages are present inside the TV.
· Operate the TV only between 110 240 V AC.
To prevent fire or shock hazard, do not expose
the TV to rain or moisture.
Do not operate the TV if any liquid or solid object
falls into it. Have it checked immediately by
qualified personnel only.
Do not open the cabinet or the rear cover of the
TV. Refer servicing to qualified personnel.
Do not install the TV in hot, humid or excessively
dusty places.
Do not install the TV in a confined space, such
as a bookcase or built-in cabinet.
Do not block the ventilation openings of the TV.
Do not pull the power cord to disconnect the TV.
Pull it out by the plug.
Disconnect the power cord during lightning
storms or if you are not going to use the TV for
several days.
Install the TV in a stable position. Do not allow
children to climb onto it.
Do not plug too many appliances into the same
power socket. Do not damage the power cord.
Clean the TV with a dry soft cloth.
Do not use benzine, thinner, or any other chemicals
to clean the TV. Do not scratch the picture tube.

3
Using
Y
our
New
TV
The features you will enjoy include:
· FAVORITE CH for qiuick and easy channel selection (page 16)
· PICTURE MODE/SOUND MODE/SURROUND for customizing your TV (pages 14, 15)
Your TV also offers the following setup features:
· On-screen display language options -- English/Arabic (page 12)
· CHILD LOCK for pr eventing childr en fr om watching certain pr
ograms (page 18)
· INTELLIGENT VOL for automatic volume adjustment (page 12)
GB
Table of Contents
WARNING
Using Your New TV
Getting Started ............................................................................................. 4
Step 1: Connect the antenna .................................................................. 4
Step 2: Insert the batteries into the remote .......................................... 5
Step 3: Preset the channels automatically ............................................ 5
Connecting optional components ............................................................. 6
Securing the TV ............................................................................................ 7
Presetting channels ...................................................................................... 8
Watching the TV ........................................................................................ 11
Advanced Operations
Customizing the picture and sound ....................................................... 14
Viewing your favorite channels -- FAVORITE CHANNEL ............... 16
Blocking the channels -- CHILD LOCK ................................................ 18
Additional Information
Troubleshooting ......................................................................................... 19
Self-diagnosis function .............................................................................. 22
Identifying parts and controls ................................................................. 23
Specifications .............................................................................. Back cover
4
Using Your New TV
Getting Started
Step 1
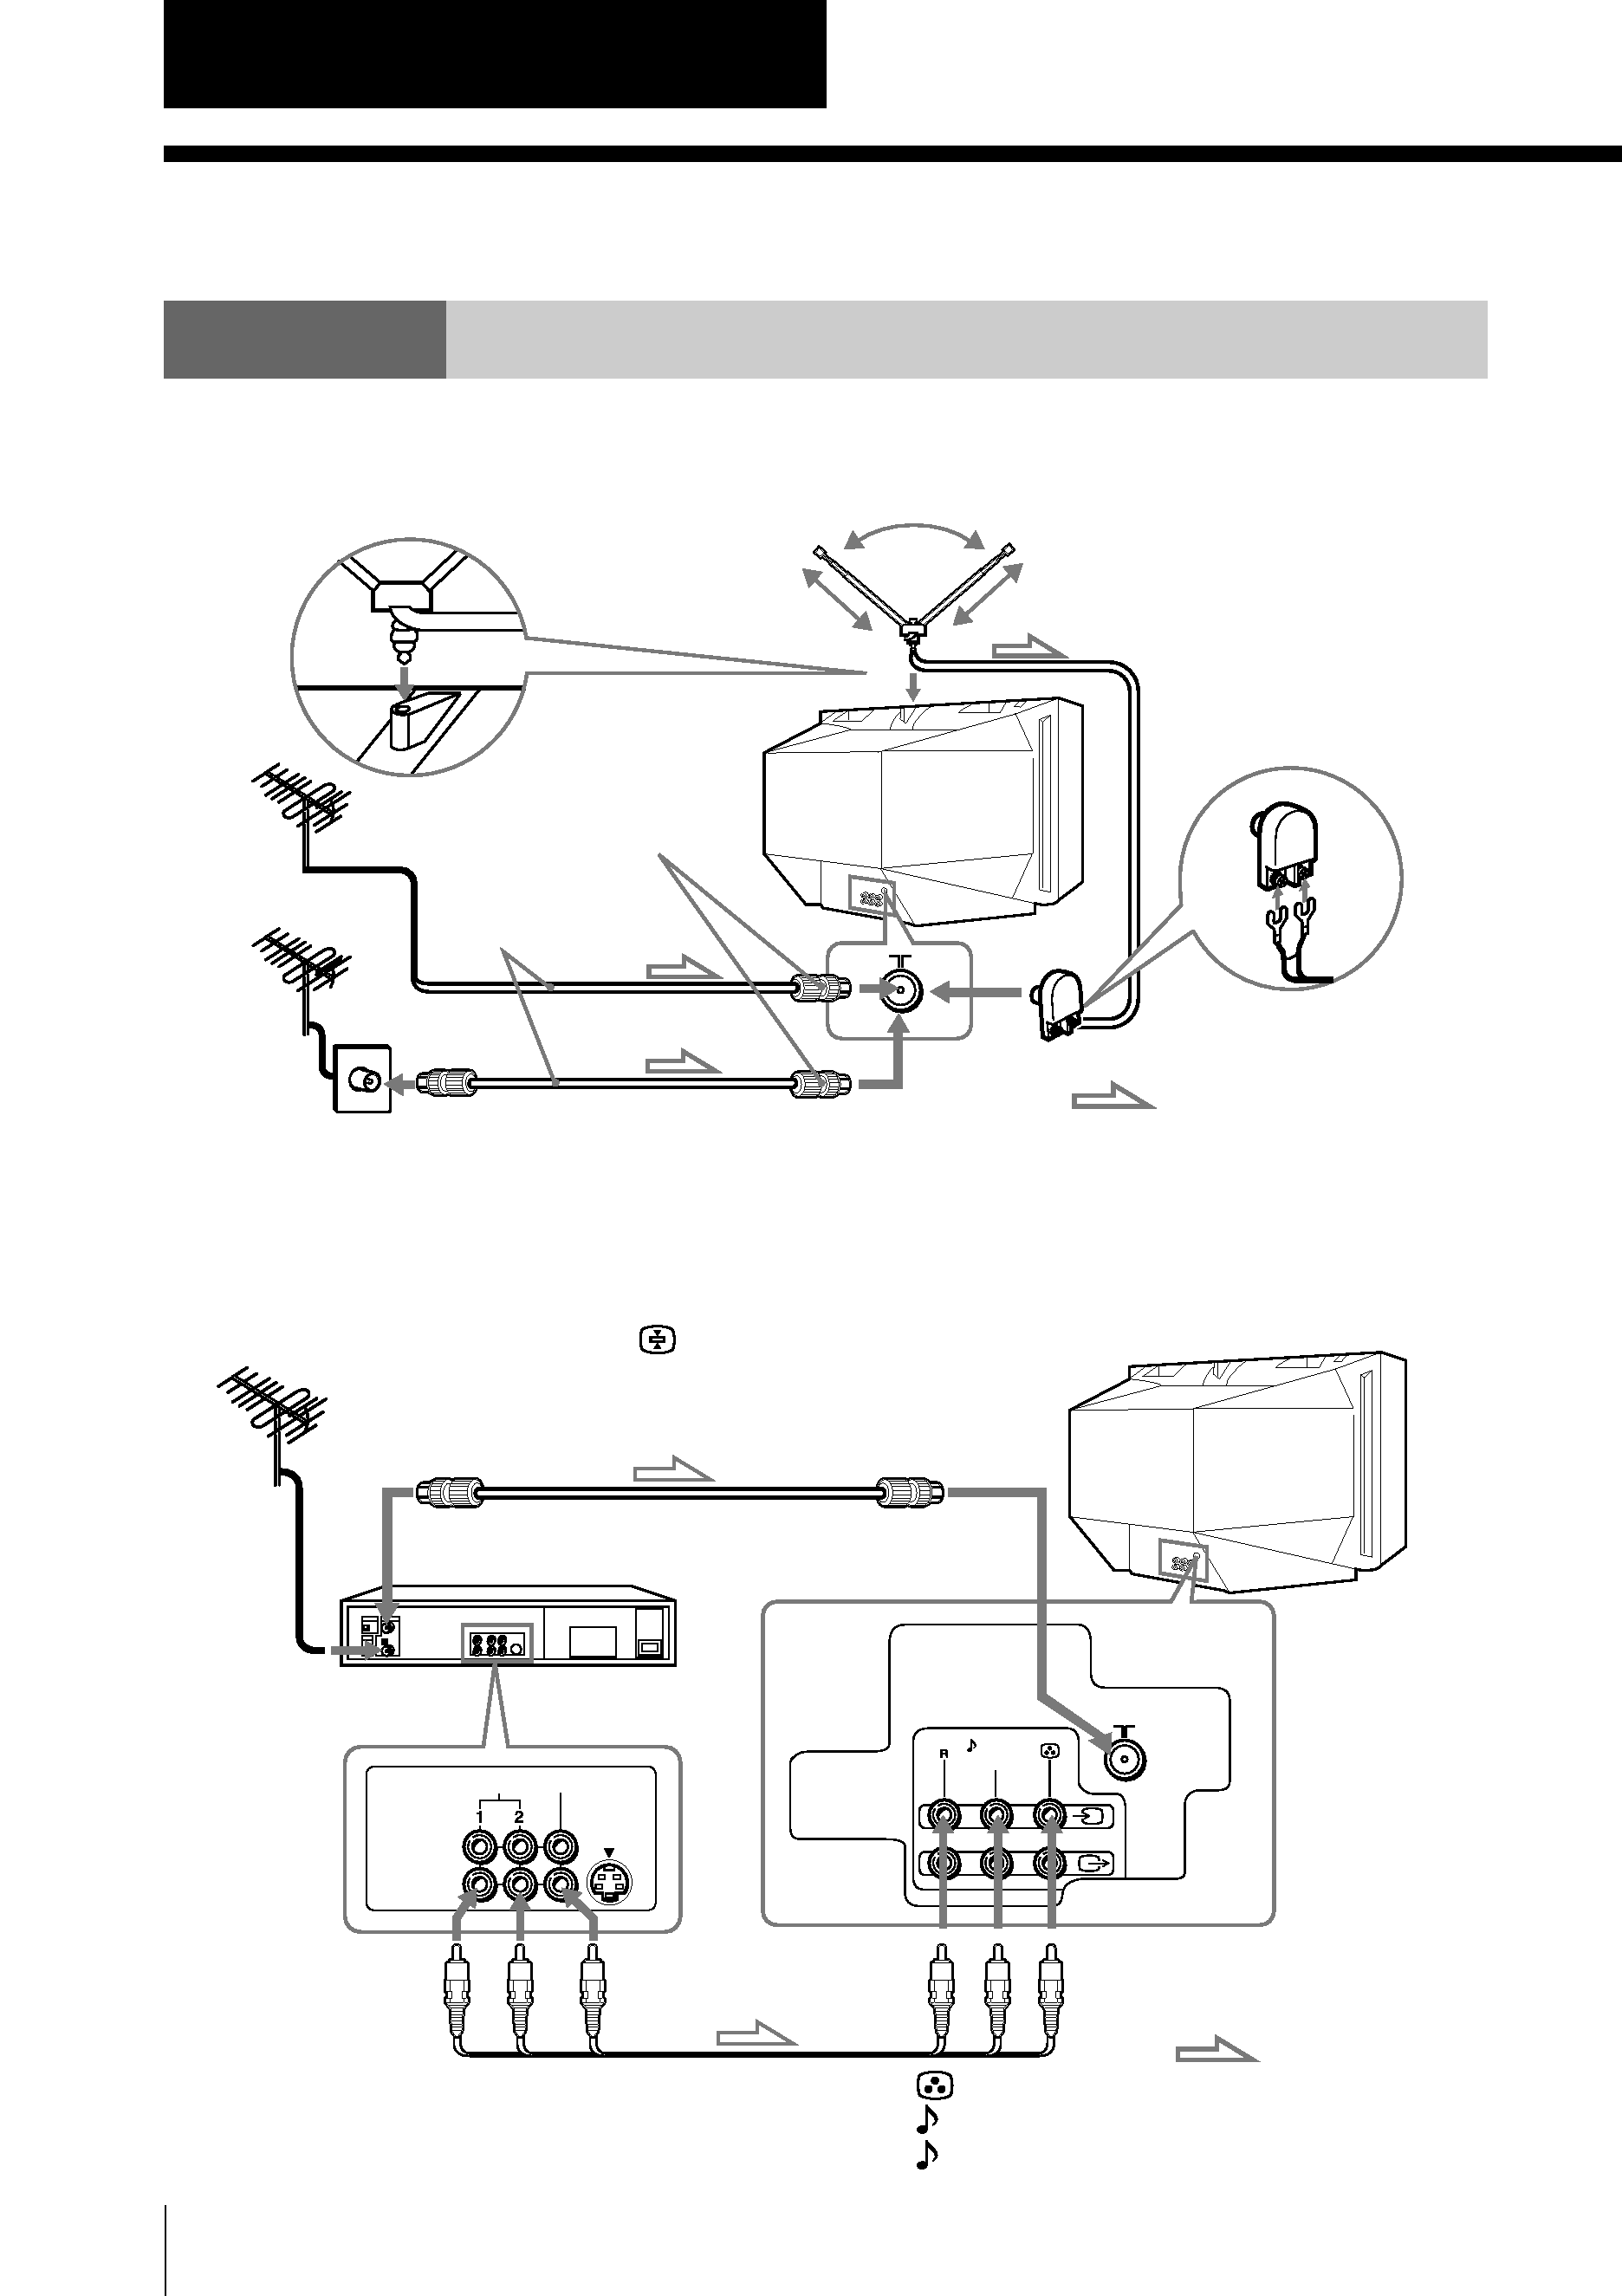
Connect the antenna
If you wish to connect a VCR, see the "Connecting a VCR" diagram below.
Using Your New TV
IEC connector
(not supplied)
To video and
audio outputs
VCR
(yellow)
-L (MONO) (white)
-R (red)
Antenna cable (not supplied)
To ... 1
(video input)
Audio/Video cable
(not supplied)
: Signal flow
To antenna
output
Antenna cable
(not supplied)
Rear of TV
Rear of TV
Connecting a VCR
To play a video tape, press ...
(see page 12).
Note
· You are advised to use an outdoor antenna for better reception.
Rod antenna and cable
(supplied)
or
: Signal flow
or
VIDEO
VIDEO IN
VIDEO OUT
AUDIO
L(MONO)
1
To
(antenna)
5
Using
Y
our
New
TV
Using Your New TV
Notes
· If you connect a monaural VCR, connect the yellow plug to
(the yellow
jack) and the black plug to
-L (MONO) (the white jack).
· If you connect a VCR to the (antenna) terminal, preset the signal output
from the VCR to the program number 0 on the TV.
· When no signal is input to the connected video equipment, the TV screen
becomes blue.
CAUTION
Do not connect the power cord until all other connections are complete;
otherwise, a minimal current leakage through the antenna and/or other terminals
to the ground could occur.
Front of TV
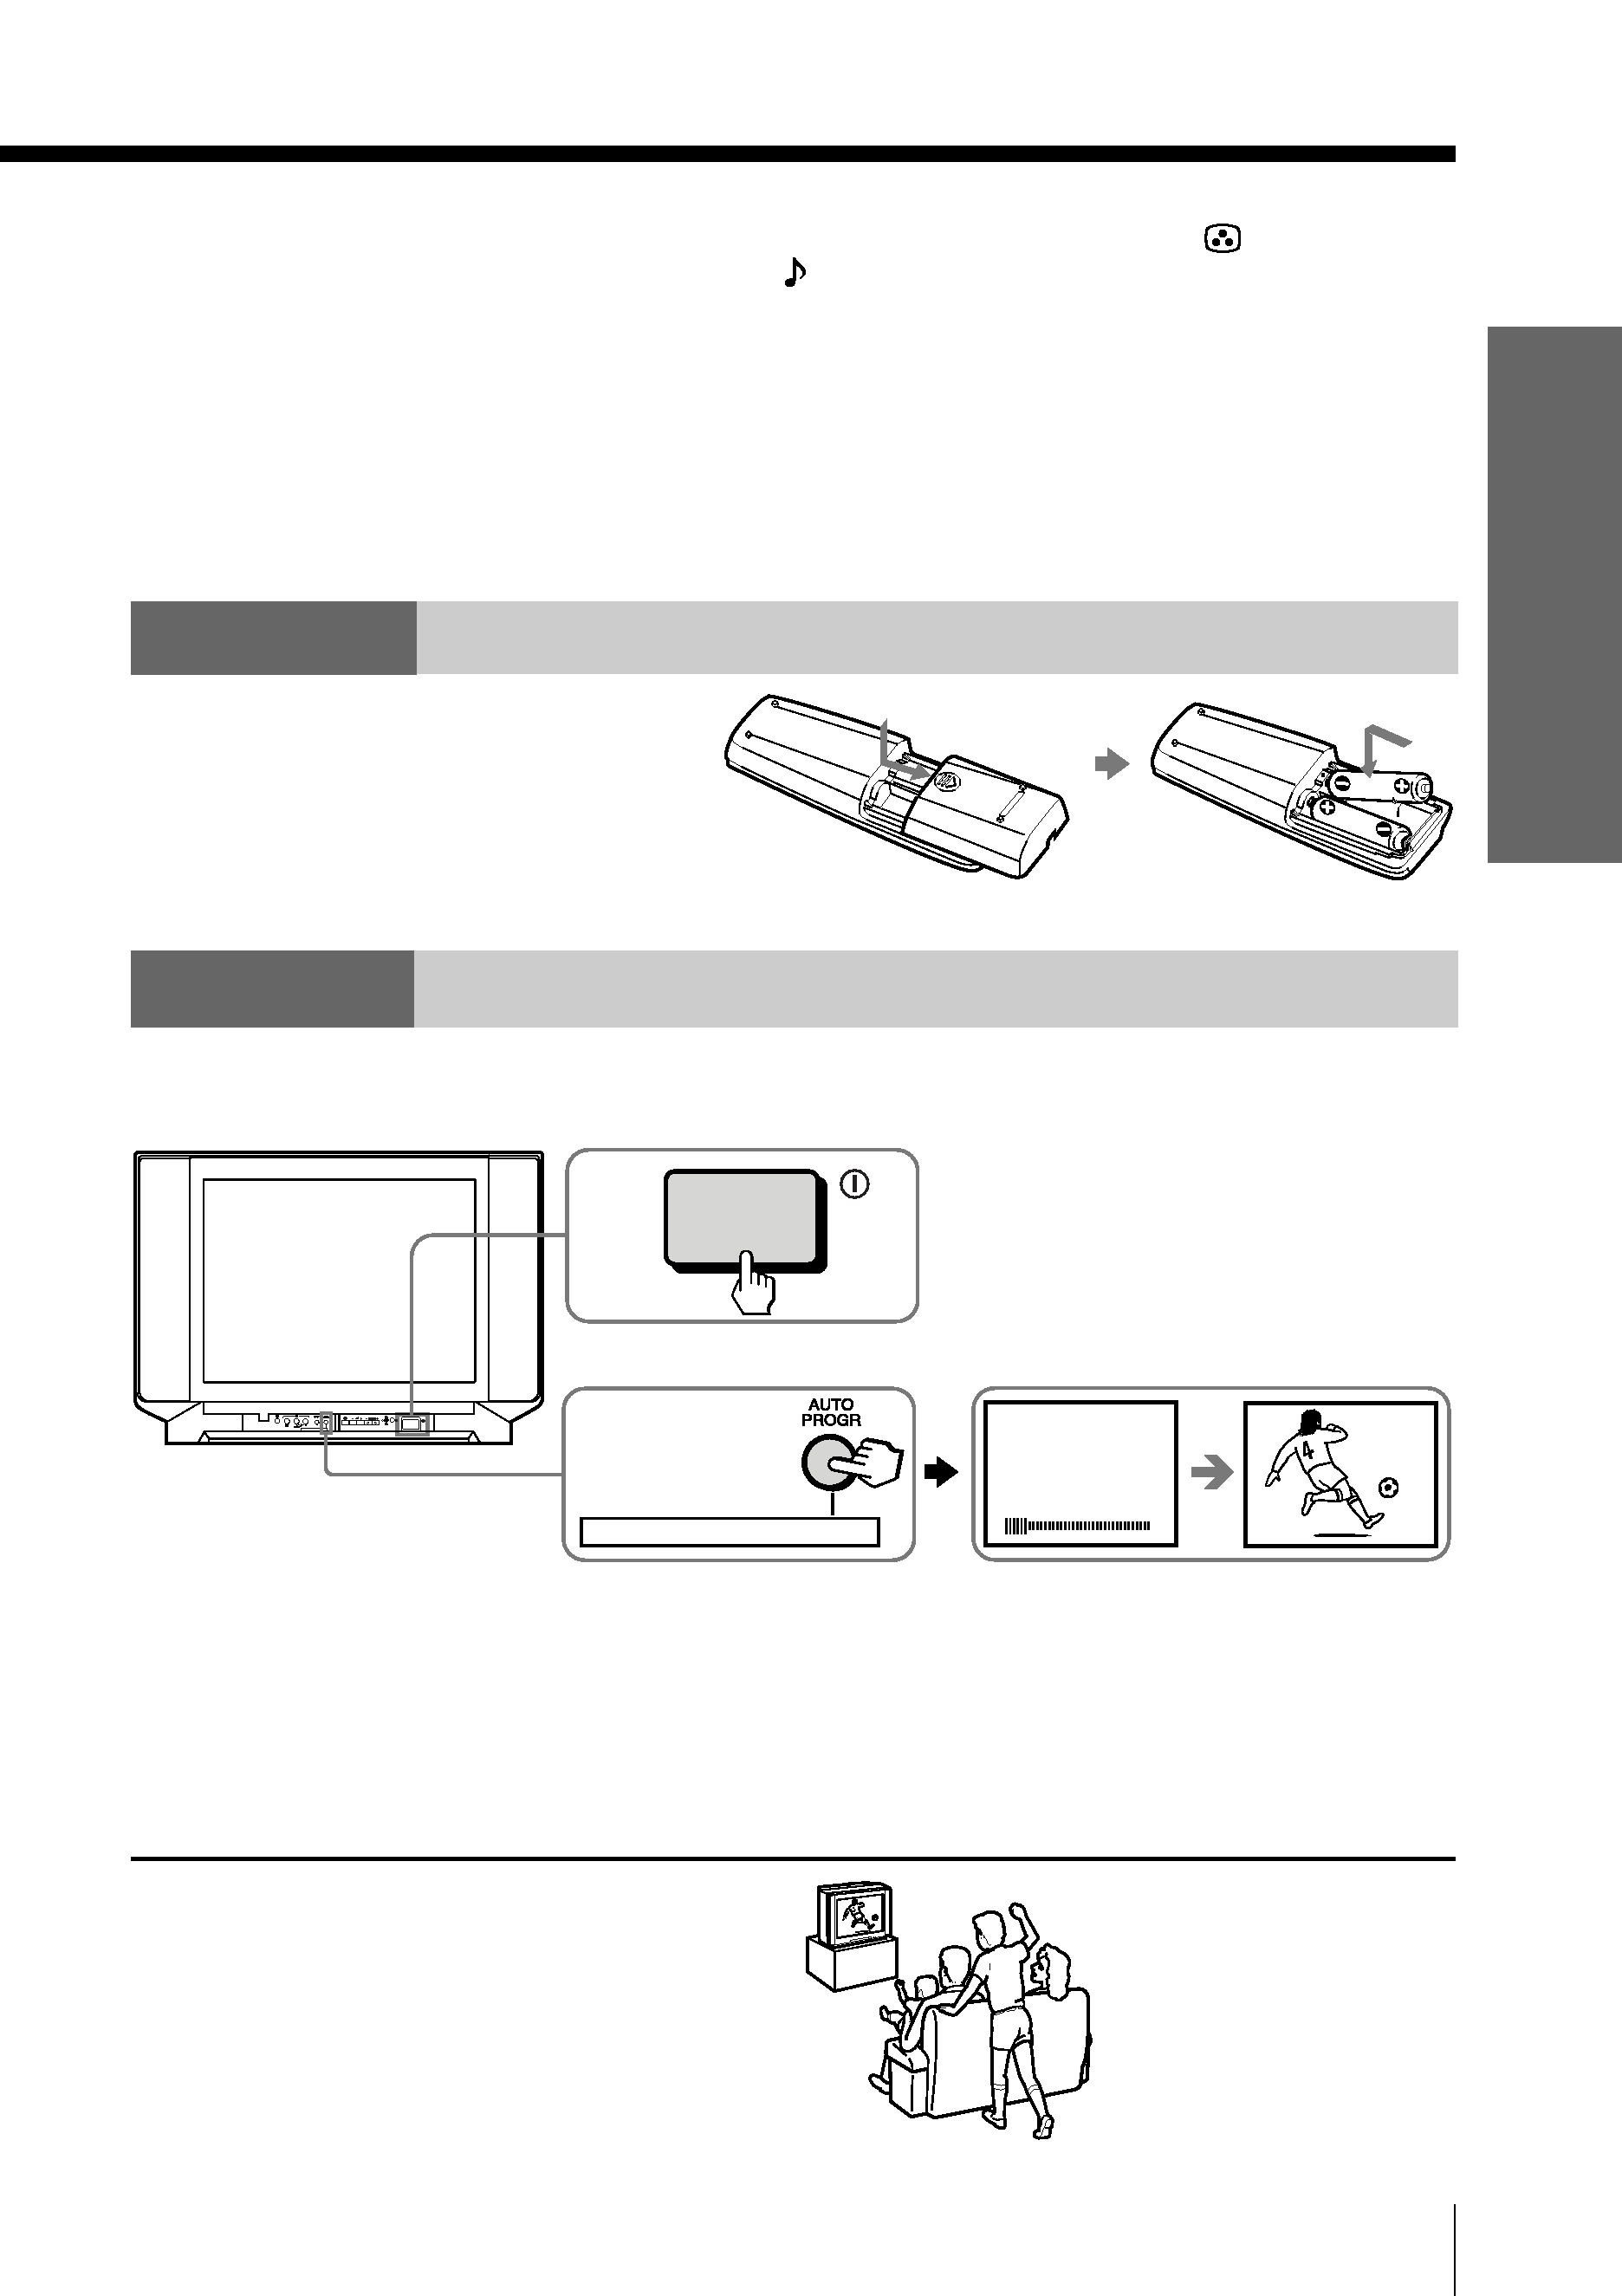
Step 2
Insert the batteries
into the remote
Note
· Do not use old batteries or different types of batteries together.
Step 3
Preset the channels automatically
Tips
· If you want to stop automatic channel presetting, press SELECT twice.
· If an unwanted channel has been preset or you cannot preset a particular
channel, preset your TV manually (see page 9).
Note
· During automatic channel presetting, the TV screen displays either B/G, I, D/
K, or M, depending on the setting of program number "1" (see page 8).
Now You Are Ready. . .
To watch the TV, see page 11.
ONE-PUSH AUTOMATIC PROGRAMING
1
1
ONE-PUSH AUTOMATIC PROGRAMMING
1
2
VHF LOW B/G