R
4-087-135-41(1)
Instruction Manual
KF-50SX200K
©2002 by Sony Corporation
GB
BG
Návod k obsluze
CZ
Kezelési útmutató
HU
Instrukcja obslugi
PL
o y
RU
01COVER.fm Page 1 Tuesday, February 12, 2002 12:28 PM

3
GB
Introduction
Thank you for choosing this Sony "Grand Wega" model.
Before operating the TV set, please read this manual thoroughly and retain it for future reference.
· Symbols used in the manual:
·
Important information.
·
Information on a feature.
· 1,2... Sequence of instructions.
·
Buttons shaded white on the remote control show the
buttons you have to press to follow the sequence
of instructions.
·
Informs you of the result of the instructions.
Table of Contents
Introduction ...................................................................................................................................................................................................................... 3
Safety Information............................................................................................................................................................................................................ 4
Overview
Checking the Accessories Supplied.................................................................................................................................................................. 5
Overview of TV Buttons .................................................................................................................................................................................... 5
Overview of Remote Control Buttons.............................................................................................................................................................. 6
Installation
Inserting Batteries into the Remote Control.................................................................................................................................................... 7
Connecting the Aerial and VCR ....................................................................................................................................................................... 8
Stabilizing the TV set.......................................................................................................................................................................................... 8
First Time Operation
Switching on the TV set and Automatically Tuning ..................................................................................................................................... 9
Menu System
Changing the Screen Format ........................................................................................................................................................................... 11
Introducing and Using the Menu System ..................................................................................................................................................... 11
On Screen display Menus Guide .................................................................................................................................................................... 12
Using the Menu System:
Adjusting the Picture ..................................................................................................................................................................................... 13
Adjusting the Sound ...................................................................................................................................................................................... 14
Using the Features menu............................................................................................................................................................................... 16
Manually Tuning the TV ............................................................................................................................................................................... 17
Labelling a channel ........................................................................................................................................................................................ 18
Skipping programme positions.................................................................................................................................................................... 19
Using the "Further Programme Preset" function...................................................................................................................................... 20
Inputting your personal ID ........................................................................................................................................................................... 21
Using the Demo Mode................................................................................................................................................................................... 22
Adjusting the H Centre picture for an RGB source................................................................................................................................... 23
Labelling and Selecting the screen format of Input Sources .................................................................................................................... 24
Using Multi PIP (Picture In Picture)............................................................................................................................................................ 25
Using PAP (Picture And Picture)................................................................................................................................................................. 25
Teletext ...................................................................................................................................................................................................................... 26
NexTView................................................................................................................................................................................................................. 28
Optional Connections
Connecting Optional Equipment.................................................................................................................................................................... 30
Using Optional Equipment.............................................................................................................................................................................. 31
Smartlink ............................................................................................................................................................................................................ 32
Remote Control of other Sony Equipment .................................................................................................................................................... 32
Additional Information
Remote Control Configuration for VCR/DVD ............................................................................................................................................ 33
Replacing the Lamp .......................................................................................................................................................................................... 34
Optimum Viewing Area .................................................................................................................................................................................. 35
Specifications ..................................................................................................................................................................................................... 36
Troubleshooting ................................................................................................................................................................................................ 37
01GB.fm Page 3 Tuesday, February 12, 2002 12:30 PM
4
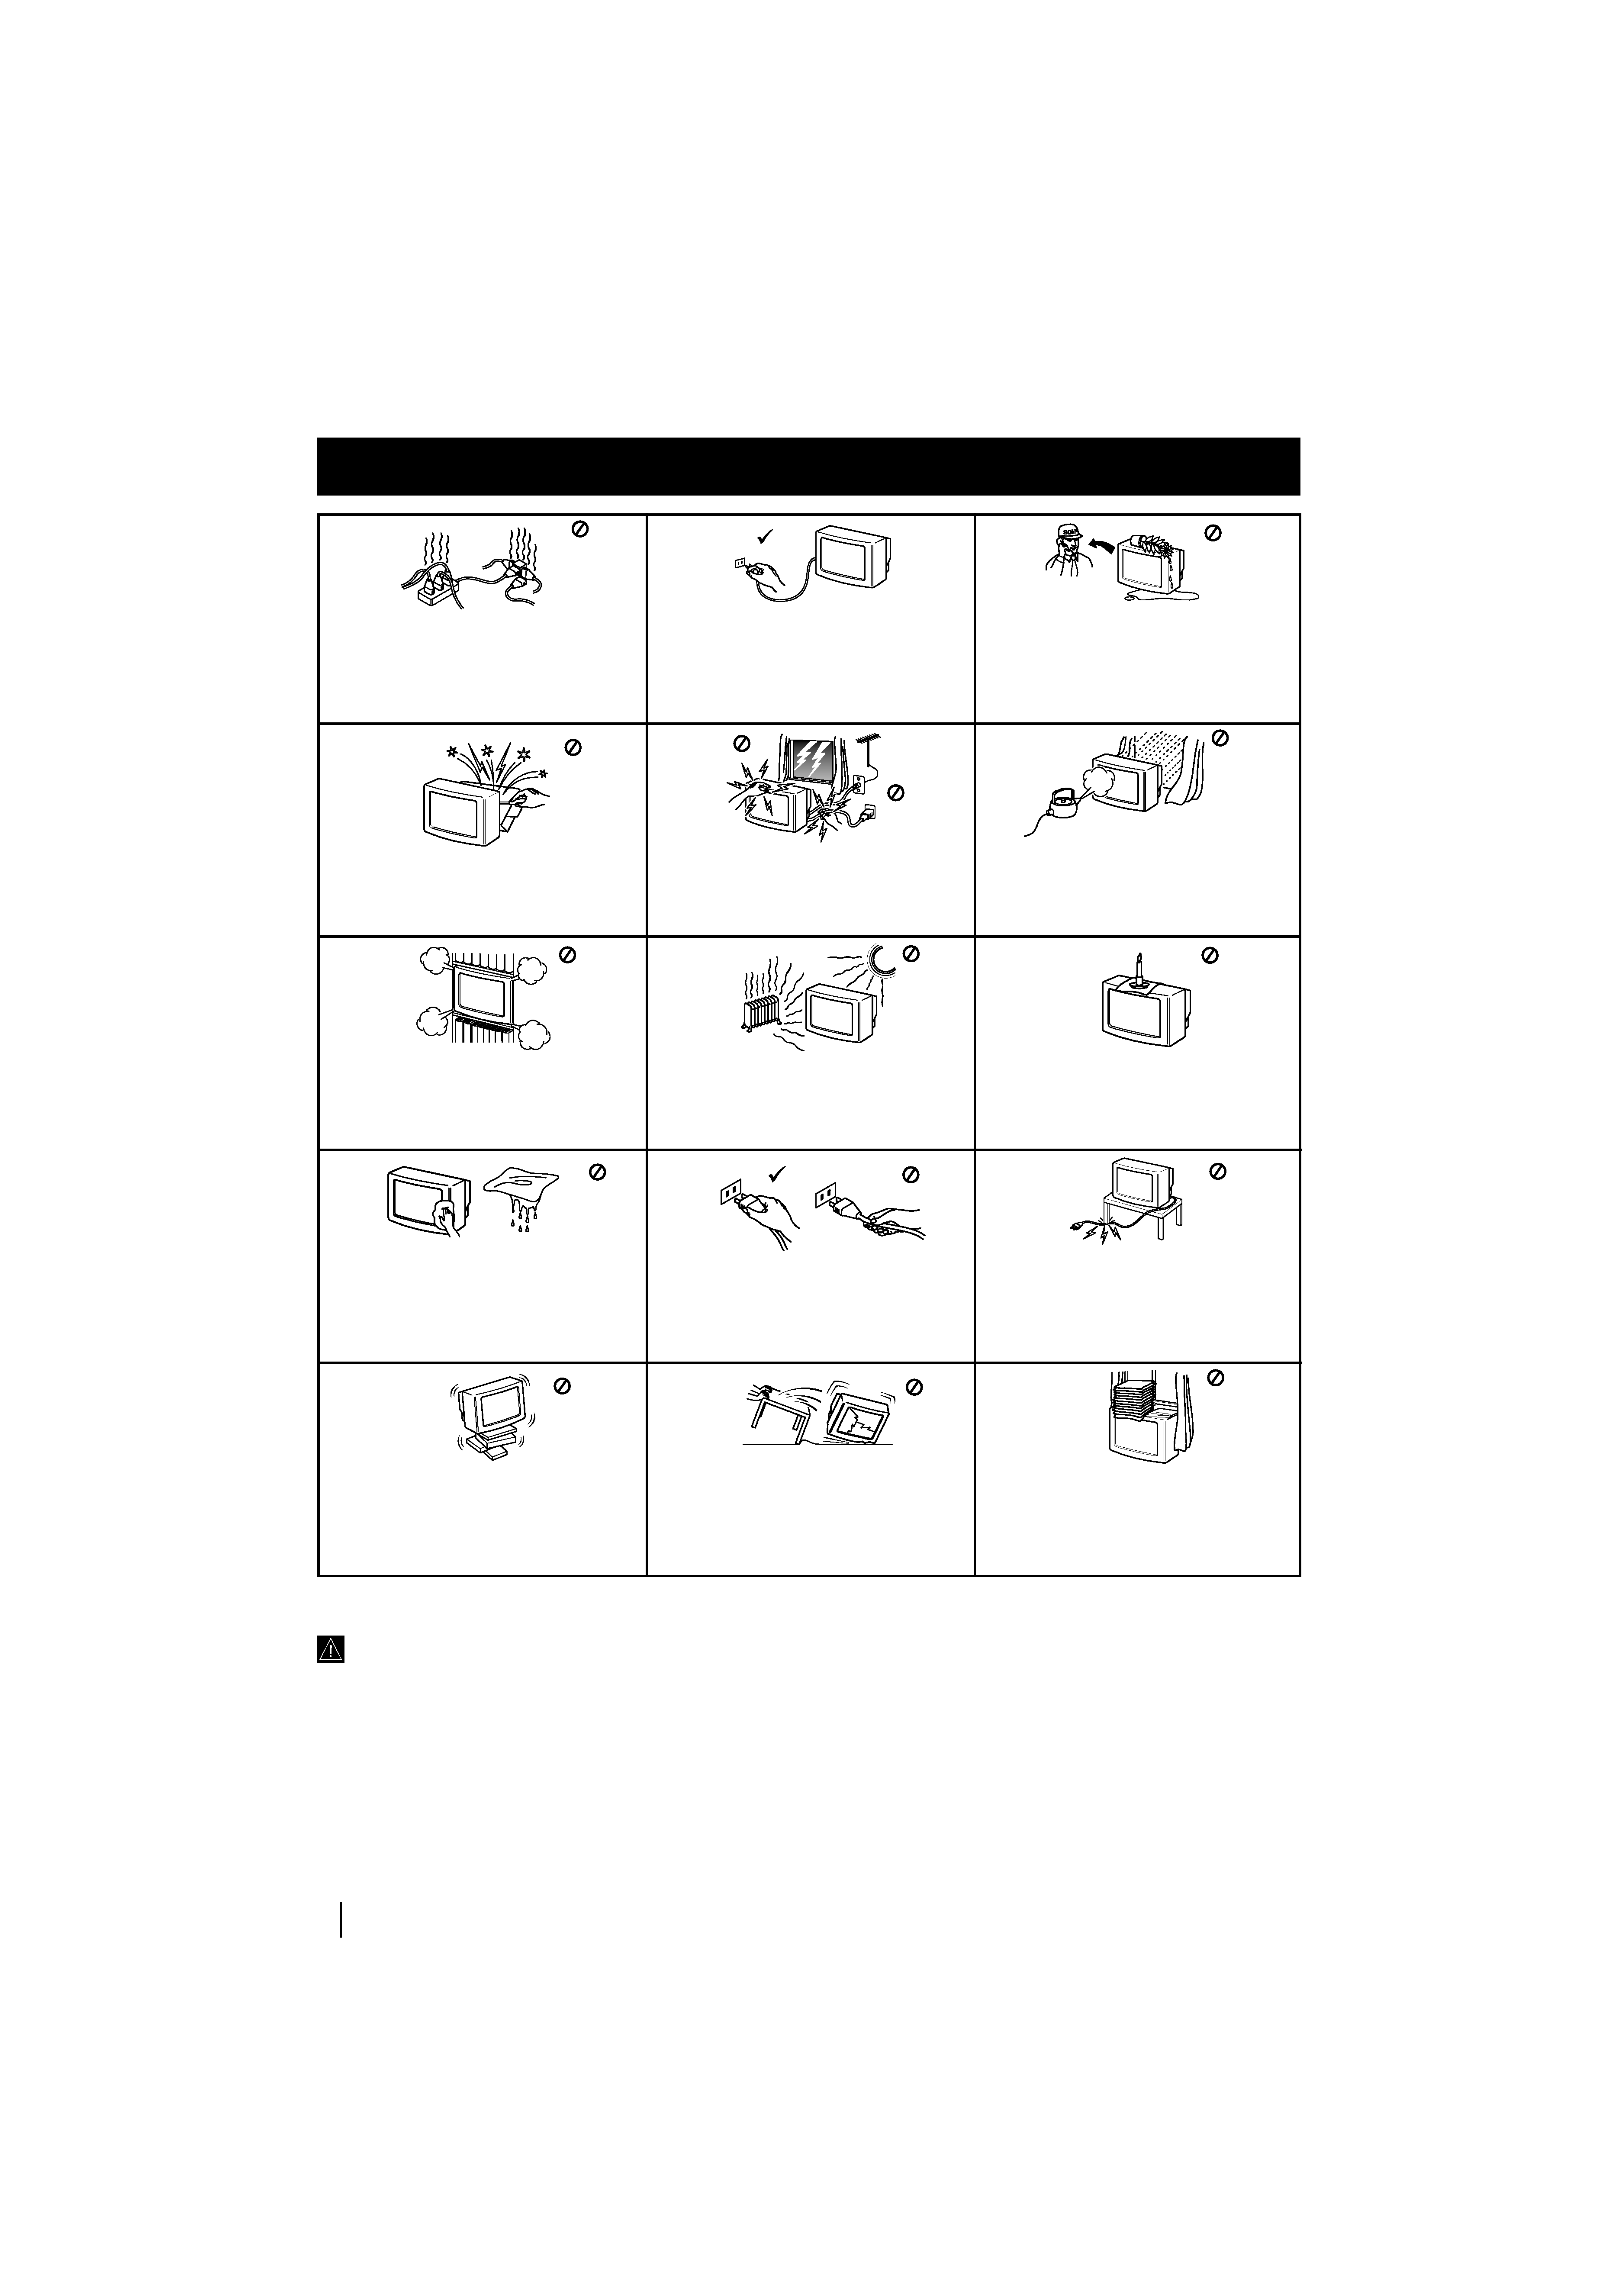
Safety Information
Do not open the cabinet and the rear cover of
the TV. Refer to qualified service personnel
only.
To prevent fire or shock hazard, do not expose
the TV to rain or moisture.
For your own safety, do not touch any part
of the TV, power lead or aerial lead during
lightning storms.
Do not cover the ventilation openings of the
TV For ventilation, leave a space of at least
10cm all around the set.
Never place the TV in hot, humid or
excessively dusty places. Do not install the
TV where it may be exposed to mechanical
vibrations.
To prevent fire, keep inflammable objects or
naked lights (eg candles) away from the TV.
Clean the TV with a soft, lightly dampened
cloth. Do not use benzine, thinner or any
other chemicals to clean the TV. Do not
scratch the TV screen. As a safety precaution,
unplug the TV before cleaning it.
Pull out the power lead by the plug. Do not
pull on the power lead itself.
Take care not to place heavy objects on the
power lead as this could result in damage.
We recommend you wind any excess lead
around the holders provided on the rear of the
TV.
Place the TV on a secure stable stand. Do not
allow children to climb on to it. Do not place
the TV on its side or face up.
Do not cover the ventilation openings of the
TV with items such as curtains or newspapers
etc.
Never push objects of any kind into the set as
this could result in a fire or electric shock.
Never spill liquid of any kind on the set. If
any liquid or solid object does fall into the
cabinet, do not operate the TV. Have it
checked immediately by qualified personnel.
For environmental and safety reasons, it is
recommended that the TV set is not left in
standby mode when not in use. Disconnect
from the mains.
This set is to operate on a 220-240V AC supply
only. Take care not to connect too many
appliances to the same power socket as this
could result in fire or electric shock.
Unplug the power lead before moving the TV.
Avoid uneven surfaces, quick steps or
excessive force. If the set has been dropped or
damaged, have it checked immediately by
qualified service personnel.
Additional Safety Information
Safety Information
Safety Information
· When moving the TV set two persons are needed. To prevent
damage DO NOT push on the speaker grills on each side of the
screen. Do not grasp the front panels to prevent these parts from
breaking off. Support the bottom of the screen with one hand
while grasping the top part with the other hand.
· Do not block or cover the ventilation opening situated on the
bottom rear of the left hand side of the TV set. For ventilation,
leave a space of at least 10 cm from the wall.
· If after transporting the TV set, directly from a cold to a warm
location, or if the room temperature has changed suddenly,
pictures may be blurred or show poor colour over portions of the
picture. This is because condensation has formed on the mirrors
or lenses inside the TV set. Let the moisture evaporate before
using the TV set.
·To obtain a clear picture, do not expose the screen to direct
illumination or direct sunlight. If possible, use spot lighting
directed down from the ceiling.
· This TV set incorporates the latest high-precision LCD technology.
Even though the highest standards are applied in manufacture it is
still possible that a few black dots or bright points (red, green or
blue) may be visible on the screen under certain picture conditions.
It is not possible to remove them and this is not a fault condition.
· The screen of this TV set has an anti-reflection screen coating. To
avoid screen degradation, follow the advice given below:
· To remove dust from the surface of the screen, wipe with the
supplied cleaning cloth or a soft cloth.
· Clean the screen and cabinet with a soft, damp cloth. Do not use
any abrasive cleaners. As a safety precaution, unplug the TV set
before cleaning it.
· Avoid touching the screen, and take care not to scratch the
surface with hard objects.
01GB.fm Page 4 Tuesday, February 12, 2002 12:30 PM
5
GB
Overview of TV Buttons
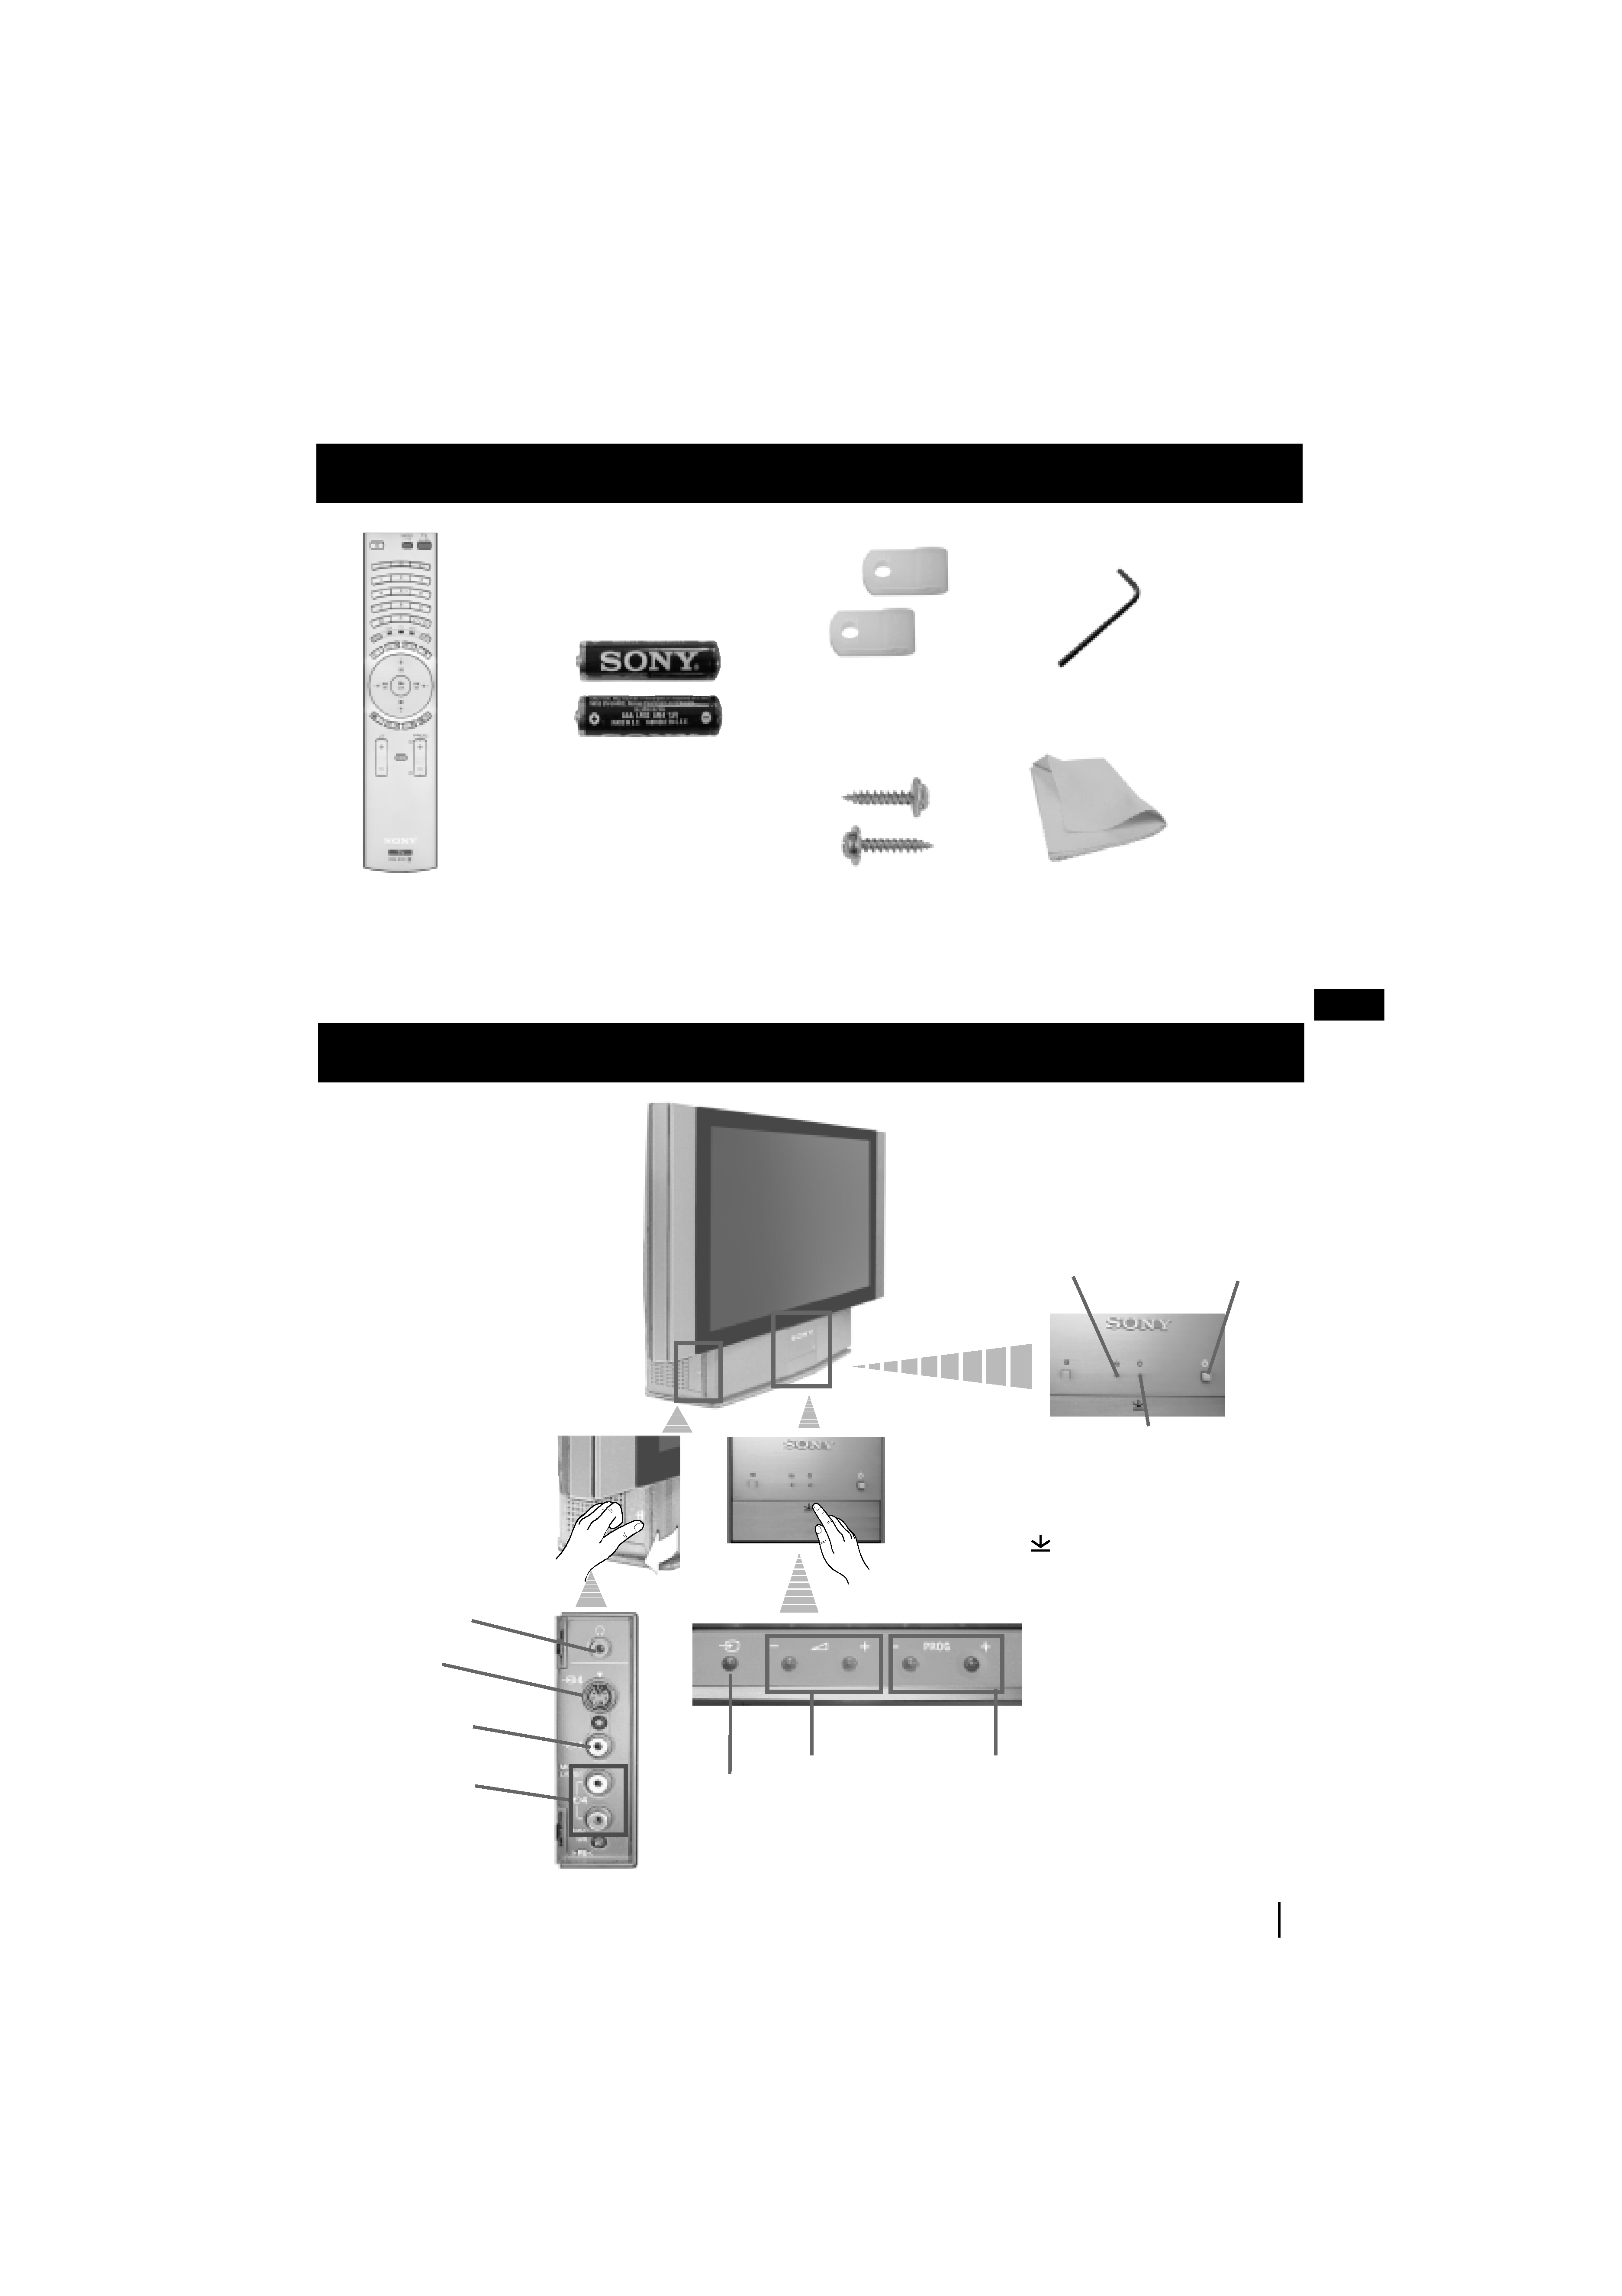
Checking the Accessories Supplied
Overview
Overview
s
1 Hexagon key
2 Brackets
2 Screws
1 Cleaning cloth
One Remote Control
(RM-905)
Two batteries
(AAA size)
Lamp
indicator (see
page 34)
Video Input
jack
Programme up
or down buttons
(selects TV channels)
Input source
selection
button
Volume control
buttons
On
/Off
Switch
Standby indicator:
· By pressing the On/
Off button on the
Remote Control to
turn the TV off, the
standby indicator
light up in red.
· By pressing the On/
Off on the TV set to
turn the TV off, the
standby indicator
lights up in amber.
Headphone
jack
Audio Input
jacks
S Video
Input jack
Press on the mark
,
on the front of the TV
set to reveal the front
connectors.
01GB.fm Page 5 Tuesday, February 12, 2002 12:30 PM
6
Overview
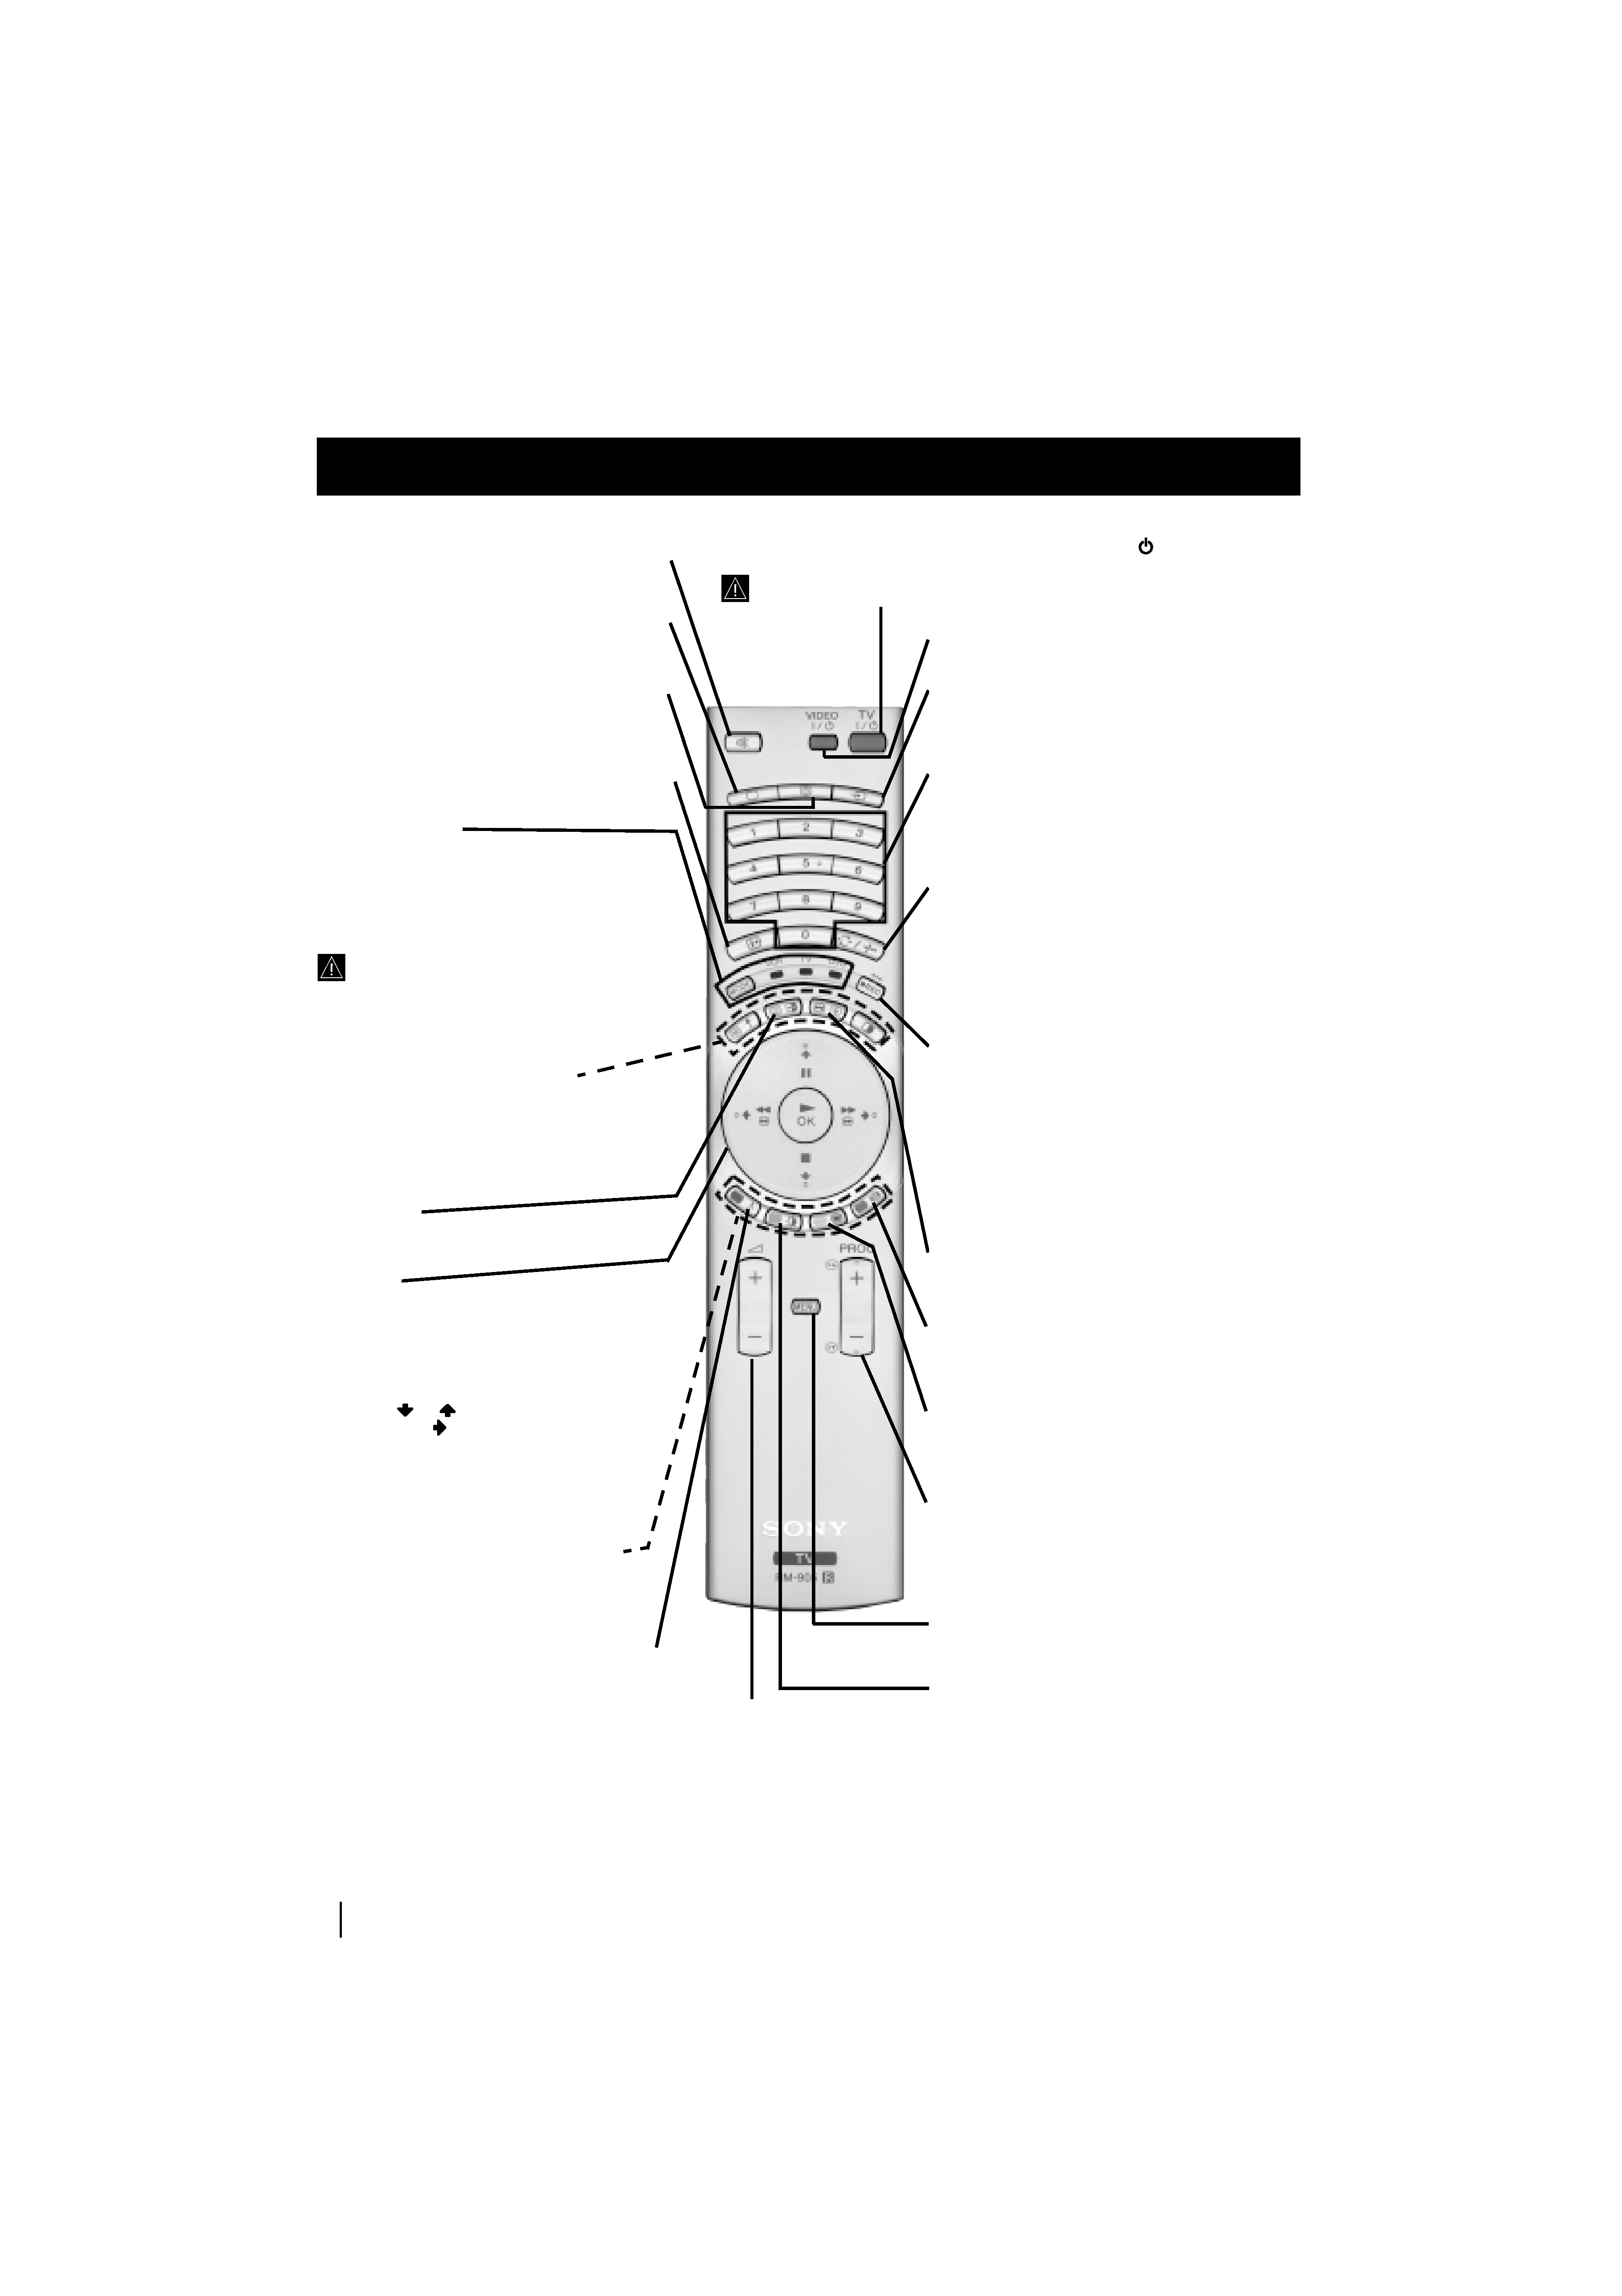
Overview of Remote Control Buttons
Overview
To Temporarily Switch Off:
Press to temporarily switch off TV (the standby indicator
on the TV set lights
up in red). Press again to switch on TV from standby mode.
After 15-30 minutes without a signal and without any button being pressed,
the TV set switches automatically into standby mode.
VCR DVD on/off: Press this button to switch
your VCR or DVD on or off.
Selecting Input source: Press this button
repeatedly until the input of the desired source
appears on the TV screen.
Selecting channels:
If Media Selector is switched to TV or VCR, press
this button to select channels.
For double-digit programme numbers, enter the
second digit within 2.5 seconds.
a) If Media Selector is switched to TV:
Press this button to watch the last channel
selected (the last channel watched for at least 5
seconds).
b) If Media Selector is switched to VCR:
To select a double-digit programme on a Sony
VCR, e.g. 23, press -/- - first and then the
buttons 2 and 3.
a) Recording button:
If Media Selector is switched to VCR, press this
button to record programmes.
b) Resetting to factory set levels:
Press, for a minimum of 3 seconds, to return the
picture and sound settings to the factory default
levels. This will also return the set to the install
condition and the "Auto Tuning" menu will
appear on the screen. If this is the case refer to the
section "Switching on the TV set and
automatically Tuning" (step 4) of this manual.
Freezing the picture: Press this button to
freeze the picture. Press again to return to the
normal picture.
Selecting Screen format: Press this button
repeteadly to change the format of the screen (for
more details, please refer to the section "Changing
the Screen format") of this manual.
Displaying Multi PIP (Picture In Picture):
Press to display Multi PIP mode. Press again to
cancel. For more details, please refer to the section
"UsingMulti PIP (Picture In Picture)".
a) Selecting channels: Press this button to
select the number of the next or previous
broadcast channel.
b) Teletext: These buttons are also used for
teletext operation. For more detail please refer to
the section "Teletext" of this manual.
Displaying the menu system: Press this
button to display the menu on the screen. Press
again to remove the menu display from the screen.
Selecting Picture mode: Press this button
repeatedly to change the picture mode.
Muting the Sound: Press to mute TV sound.
Press again to restore the sound.
Selecting TV mode: Press to switch off PAP,
Multi PIP, Teletext or video input.
Displaying the time: Press to switch the time
display on or off (available only when teletext is
broadcast).
Displaying On Screen Information: Press
to display all on-screen indications. Press again to
cancel.
Media Selector:
With this remote control you can operate not
only this TV but also the main functions of
your VCR or DVD.
Switch on the device you want to operate and next
press this button repeatedly to select the VCR, TV
or DVD. A green light will be momentarily lit to
indicate the chosen function.
Before the first time you want to control
a DVD or VCR by using this remote
control, you have to set it up depending on the
brand of the device to be used. For more details,
refer to chapter "Remote Control Configuration
for VCR or DVD" on page 33.
a) PAP (Picture And Picture):
For more details, please refer to the section
"Using PAP (Picture And Picture)".
b) Teletext:
Buttons with green symbols are also used for
teletext operation. For more details, please
refer to the section "Teletext" of this manual.
NexTView:
For more details, please refer to the section
"NexTView" of this manual.
Joystick:
a) If Media Selector is switched to TV:
·When MENU is switched on, use these
buttons to operate the menu system. For
details refer to "Introducing and Using
the Menu System" on page 11.
· When MENU is switched off, press OK to
show an overview of all TV channels. Then
press
or
to select the channel and
then press
button to watch the selected
channel.
b) If Media Selector is switched
to VCR or DVD:
Using these buttons you can control
the main functions of your VCR or DVD.
Fastext: These buttons are also used for
Fastext operation. For more details please refer
to the "Fastext" chapter in the "Teletext"
section of this manual.
Selecting Sound effect: Press this button
repeatedly to change the sound effect.
Adjusting TV Volume: Press
this button to adjust the volume
of the TV.
01GB.fm Page 6 Tuesday, February 12, 2002 12:30 PM