Battery Life (Approx. hours)
(JEITA*)
When using
FM
AM
Sony alkaline size AA (LR6)
66
84
Sony size AA (R6)
23
31
* Measured by JEITA (Japan Electronics and Information Technology Industries
Association) standards.
The actual battery life may vary depending on circumstances of use.
Replace the batteries
When the batteries become weak, the sound may become weak or distorted, and
"E" will flash in the display. After that, when the batteries are used up, "E"
will light up and clock time display appears. And then the cycle-computer
function will be stopped so that any button functions will not work. The Radio
function will be also turned off if it is on. If this happens, replace the batteries
with new ones.
After the batteries are replaced, press RADIO POWER, RESET, or install the
unit on the Mount. ("E" turn off in the display.)
Note on replacing the batteries
Do not take more than 5 minutes to replace the batteries, otherwise, the clock
setting will be initialized. Should that happen, reset the functions.
Notes on batteries
· Do not charge the dry batteries.
· Do not carry the dry batteries together with coins or other metallic objects. It
can generate heat if the positive and negative terminals of the batteries
accidentally come into contact with metallic objects.
·When you are not going to use the unit for a long time, remove the batteries to
avoid damage from battery leakage and corrosion.
· Do not use different types of batteries at the same time.
·When you replace the batteries, replace all with new ones.
Installing the unit on the
bicycle
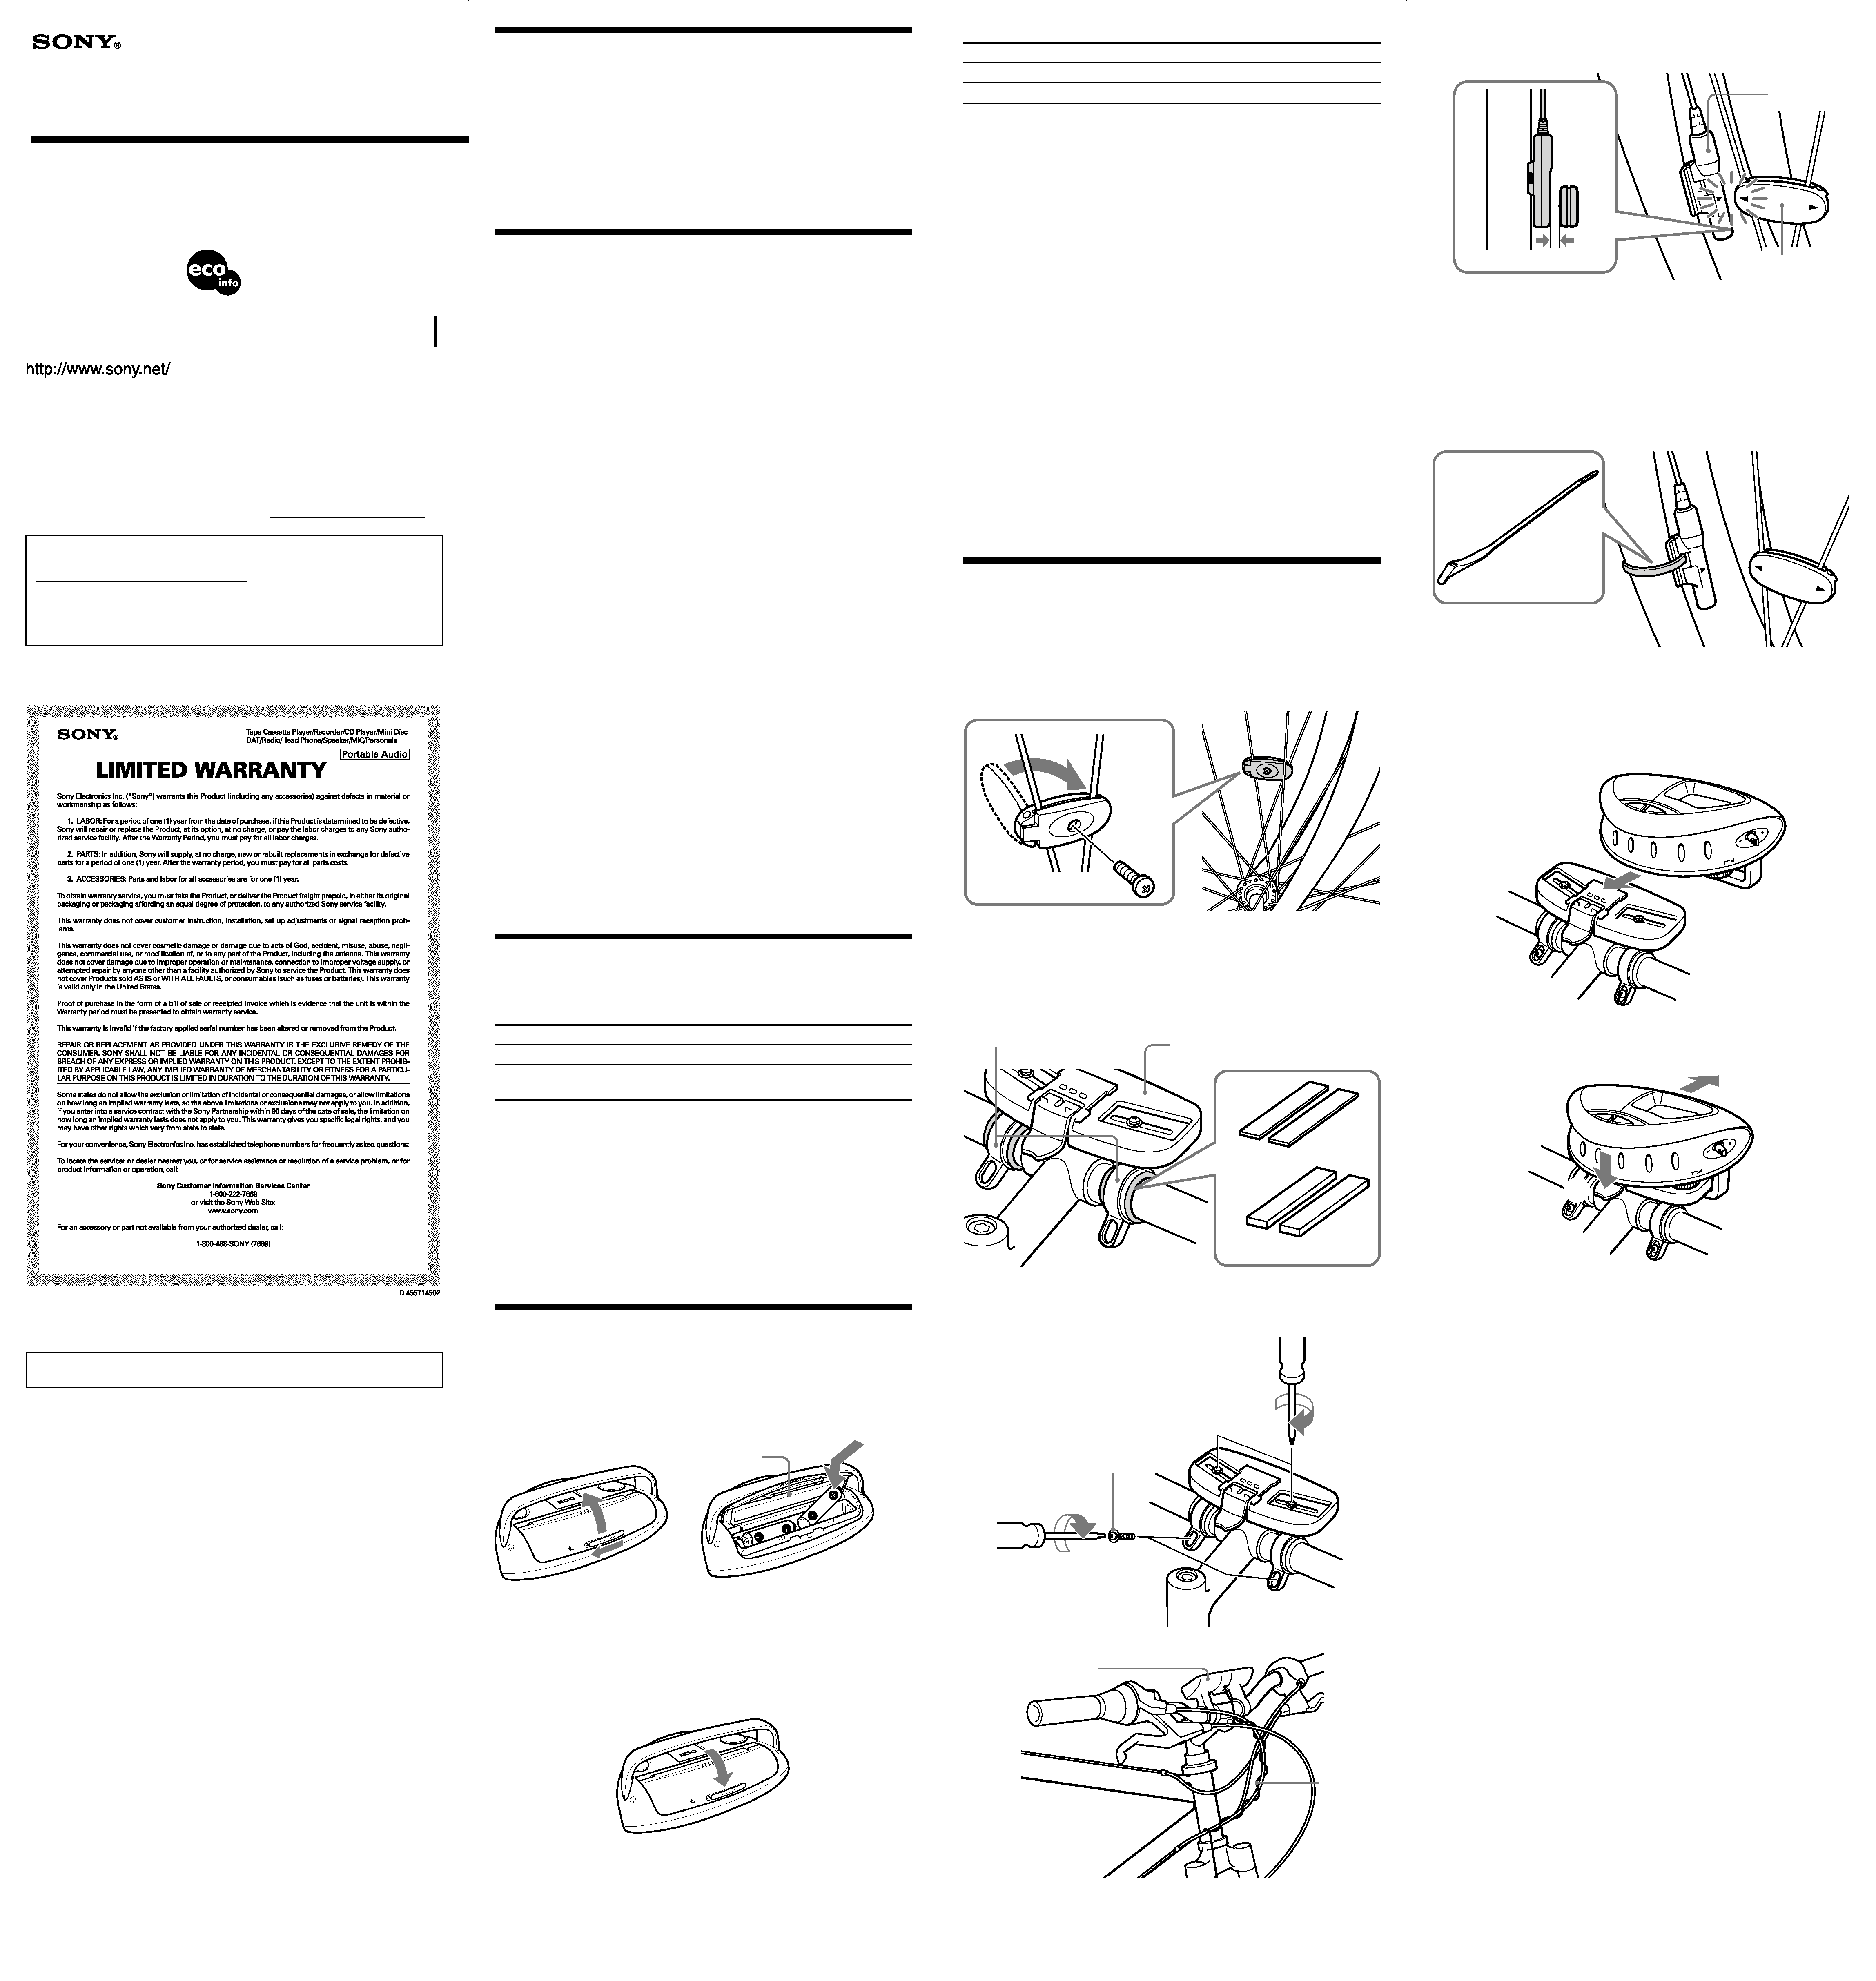
Install the Wheel Magnet
1 Remove the screw of the wheel magnet and open.
2 Attach the magnet between two spokes of the front wheel with the
head of the screw facing inward, and tighten the screw.
Install the Mount
1 Choose the appropriate rubber pads according to the diameter of the
handlebar and attach them.
Use one or two rubber pads depending on the diameter of the handlebar. You
can attach the Mount clamps without the rubber pads if not required.
The Mount clamps are adjustable. You can adjust the width of the clamps to
fit your handlebar.
2 Install the Mount on the rubber pads and secure with the 4 screws.
3 Wind the sensor cord around the break cable.
Note
Be sure to allow enough cord slack to ensure full movement and unhindered
operation of the handlebar, and not to wind it too loosely as this may interfere
with the unit's operation.
Features
· FM/AM PLL(phase locked loop) synthesized radio with built in cycle-computer
·New ergonomic design
·Water-resistant for all-weather use
· 15 station memory presets (10FM/5AM)
· Easy Jog lever operation
· Easy to see backlit LCD
· Easy to install mounting kit included
· FM SENS DX(Distance)/LOCAL switch
Precautions
· Operate the unit only on 3 V DC with two size AA (R6) batteries.
·Avoid exposure to temperature extremes, direct sunlight, moisture, sand, dust or
mechanical shock. Never leave in a car parked under the sun.
·Avoid continuous exposure to direct sunlight or extremely high temperatures to
prevent possible damage to the display. The display will function normally
again in normal operating temperature.
· Display switching may become slower in cold climates.
· Should any solid object or liquid fall into the unit, remove the batteries and
have the unit checked by a qualified personnel before operating it any further.
·To clean the casing, use a soft cloth dampened with a mild detergent solution.
· Since a strong magnet is used for the speaker. Keep away personal credit cards
using magnetic cording or spring-wound watches from the unit to prevent
possible damage from the magnet.
Cautions on Water-resistance
This unit is designed so that it can be used with slight exposure to rain, snow and
other forms of moisture, but there are several points on which caution should be
observed.
· Do not allow it to come into contact with large amounts of water.
· Do not immerse it in water.
· If water should get on it or if it should fall into water, take it out immediately
and wipe it off with a dry cloth. To prevent the battery from corroding, wipe out
the interior of the battery compartment as follows:
Open or close the battery compartment with dry hands in a place without
exposure to any water.
Wipe off the battery and the inside of the battery compartment. Give special
attention to the contacts so that no water remains on them.
Notes on the cycle-computer radio
·The user must obey all traffic laws when using the device.
·To check whether the local laws allow the use of the device.
· In order to prevent dangerous condition, do not operate the device when
running the bicycle.
· In order to prevent theft, take your device with you at all times.
· In order to prevent dangerous condition, install the sensor cord properly so that
it will not get tangle by the tire.
If you have any questions or problems concerning your unit, please consult your
nearest Sony dealer.
The preset stations may be initialized, if a maintenance service is performed.
Please keep a copy of your settings in case you want to preset them again.
Specifications
Time display: 12-hour system
Frequency range:
Band
Range
Channel step
FM
87.5 - 108 MHz
0.1 MHz
AM
530 - 1 710 kHz
10 kHz
531 - 1 710 kHz
9 kHz
Speaker: Approx. 50 mm (2 inches) dia, 8
Power output: 80 mW (at 10% harmonic distortion)
Power requirements: 3V DC, two size AA (R6) batteries
Dimensions :
Approx. 166.8
× 70 × 95 mm (w/h/d) (6 5/
8 × 2
7/
8 × 3
3/
4 inches) incl.
projecting parts and control.
Mass: Approx. 281.4 g (9.93 oz) incl. batteries / excl. accessories
Supplied accessories:
Mount with wheel sensor (1), Thick/Thin rubber pads (2 each),
Wheel magnet (1), Zip ties (5), Double-sided tape (1), Screws (2)
Design and specifications are subject to change without notice.
Installing the Batteries
1 Slide OPEN to open the battery compartment lid and install two
size AA (R6) batteries (not supplied) with correct polarity.
When the batteries are first installed, "AM 12:00" flashes in the display.
Once the current time is set, the flashing stops. (See "Setting the Clock.")
*Packing inside of the lid is used to ensure water-resistance for the battery
compartment. Therefore, make sure to close the battery compartment lid
securely.
2 Close the lid.
OPEN
Operating Instructions
3-267-406-11(1)
FM/AM PLL Synthesized Radio
© 2004 Sony Corporation
Printed in China
ICF-M88B
OWNER'S RECORD
The model number is located on the left side of the front panel, and the serial
number is inside the battery compartment. Record the serial number in the space
provide below. Refer to these numbers whenever you call upon your Sony dealer
regarding this product.
Model No. ICF-M88B
Serial No.
For customers who purchased this product in the USA
Please register this product on line at
http://www.sony.com/productregistration
Proper registration will enable us to send you periodic mailings about new
products, services, and other important announcements. Registering your
product will also allow us to contact you in the unlikely event that the
product needs adjustment or modification. Thank you.
WARNING
You are cautioned that any changes or modifications not expressly approved
in this manual could void your authority to operate this equipment.
INFORMATION
This equipment has been tested and found to comply with the limits for a Class B
digital device, pursuant to Part 15 of the FCC Rules. These limits are designed to
provide reasonable protection against harmful interference in a residential
installation. This equipment generates, uses, and can radiate radio frequency
energy and, if not installed and used in accordance with the instructions, may
cause harmful interference to radio communications. However, there is no
guarantee that interference will not occur in a particular installation. If this
equipment does cause harmful interference to radio or television reception, which
can be determined by turning the equipment off and on, the user is encouraged to
try to correct the interference by one or more of the following measures:
-- Reorient or relocate the receiving antenna.
-- Increase the separation between the equipment and receiver.
-- Connect the equipment into an outlet on a circuit different from that to
which the receiver is connected.
-- Consult the dealer or an experienced radio/ TV technician for help.
Printed on 100% recycled paper using
VOC (Volatile Organic Compound)-free
vegetable oil based ink.
OPEN
Insert the # side of the battery first.
Size AA (R6)
× 2
Packing*
1
2
1
2
4 Temporarily attach the Sensor to a fork using the attached
Double-sided tape.
· When attaching, align the center of the sensor and that of the magnet (triangle
mark).
· Ensure a clearance not exceeding 4mm (except Sensor and Magnet touching)
between the Sensor and the Wheel magnet (when aligned).
· Attach the unit on the Mount, and then check the reaction of the sensor by
revolving the wheel (See fig. "Install the unit").
5 After determining the position of the Sensor, secure it with the zip
tie to front fork and cut any surplus. Install the Sensor cord with zip
ties such that it does not become tangled with the wheel.
Note
Be careful that the position of the Sensor does not shift when tightening the zip
tie.
Install the unit
Install the unit on the Mount, sliding from the front until it clicks into position.
BAND/S
ET
TUNE MODE
ENTER/SEL
ECT
RADIO
PO
WER
LIGHT
VOL
Remove the unit
Pull the unit forward while pushing down the lever.
BAND/S
ET
TUNE MODE
ENTER/SEL
ECT
RADIO
PO
WER
LIGHT
VOL
1
2
Note
Ensure that the contact points between the Mount and the unit are clean for
proper operation.
Caution
For safe and proper use of the cycle-computer, check whether the Mount, the
sensor and its cord and the wheel magnet are set properly before riding.
4mm
Zip tie
Wheel magnet
Sensor
Wheel magnet
Thin rubber pads
Thick rubber pads
Mount with wheel sensor
Mount clamp
Screw
Mount
Sensor
cord
RADIO POWER
LIGHT
ENTER/SELECT
TUNE MODE
BAND/SET
VOL
BAND/SET
TUNE MODE
RADIO
POW
ER
LIGHT
VOL
ENTER
/SELECT
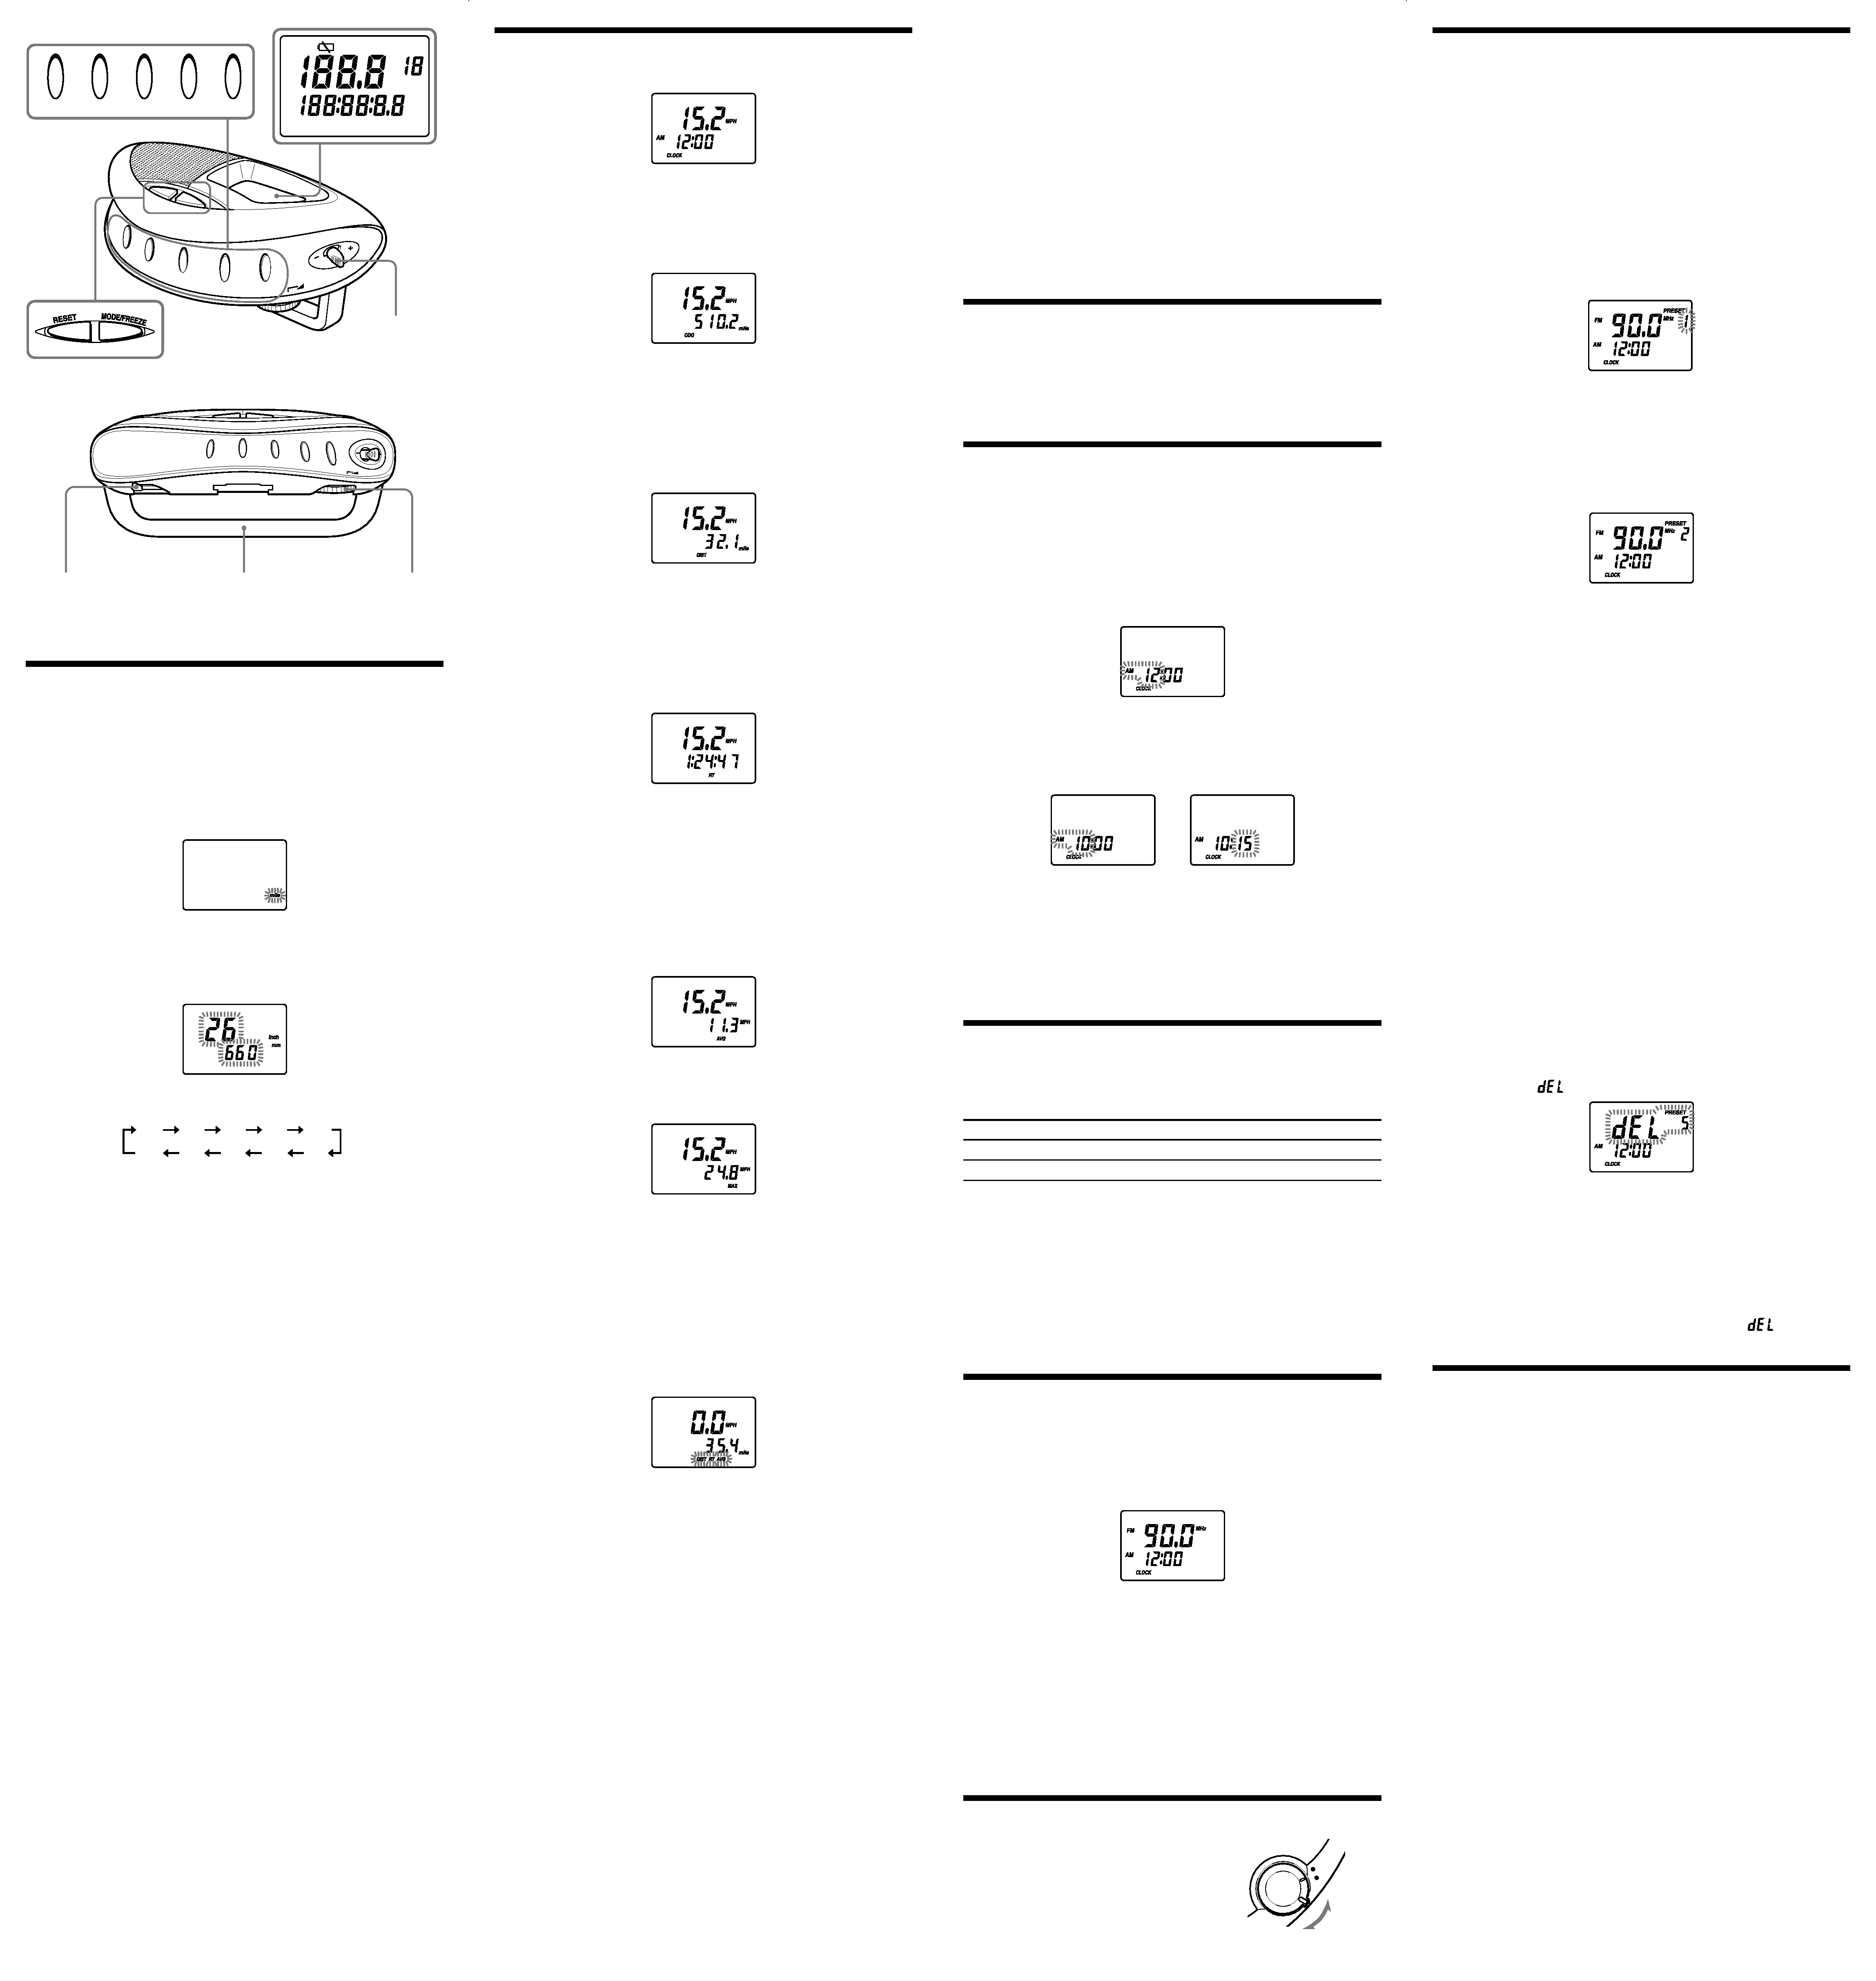
MPH
AM
PM
FM
FREEZE
PRESET
MHz
MPH
kHz
km/h inch
AM
km/h
mile
CLOCK ODO DIST RT AVG MAX
mm
RADIO POWER
LIGHT
ENTER/SELECT TUNE MODE
BAND/SET
For the initial setting
(with the radio off)
The cycle-computer needs initial set up before using.
If the wheel size you set into the cycle-computer is not suitable for using actual
wheel size, it is not possible to measure speed and distance correctly.
1 Press and hold BAND/SET for a few seconds to select "mile" or
"km".
"mile" flashes in the display.
Each press of the ENTER/SELECT toggles between "mile" and "km".
The unit of speed is "MPH" for miles, and "km/h" for kilometers.
Select and show the desirred unit.
2 Press BAND/SET to set a wheel size.
The wheel size flashes.
Press ENTER/SELECT repeatedly to select your wheel size (inches). Each
press changes the display as follows.
26
27
28
12
14
16
18
20
22
24
Note
The "mm" values shown on the display are approximate. Adjust the accurate size
of the wheel using Jog lever + or - after measuring diameter of your wheel.
It is recommend to set the wheel size in "mm" because the cycle-computer
calculates in "mm". If you set the wheel size in "mm", the range is from 300 to
750 mm.
Push and hold Jog lever to change the value rapidly.
3 Press BAND/SET.
"ODO" appears in the display, and the last digit of the total distance
(odometer) flashes.
If you do not change the odometer, jump to step 4.
To change the total distance
You can change the default setting of the total distance (odometer) using Jog
lever + or - (to increase or decrease) and ENTER/SELECT (to select
another digit).
4 Press BAND/SET again.
The initial setting is completed.
Tips
· When you choose the "mile", the range is from 0.0 to 99 999.9 miles.
·When you choose the "km", the range is from 0.0 to 159 999.9 kilometers. And
the maximum digit range is from 0 to 15.
Notes
· If you do not make any selections, for within about 65 seconds, or do press
TUNE/MODE button during the initial setting mode, the setting mode will be
canceled and the unit returns to the previous mode.
· If you press the LIGHT button for within about 65 seconds during the initial
setting mode, the setting mode will be extended.
· If you cancel during initial setting mode, the value of the unit, wheel size and
total distance entered will be erased. The unit will revert to the previous setting.
·The cycle-computer will not activate during the initial setting mode.
· If you press RADIO POWER to turn on the unit during the initial setting
mode, the mode is canceled and the radio will activate.
· If you change the unit in the initial setting mode, the values showed in the total
distance (odometer) setting mode will be automatically converted into the new
setting unit. However, when you convert the unit from miles to kilometers, any
value over 159 999.9km is shown as 159 999.9km.
Displaying data
While cycling, current speed is always displayed and updated every second.
The highest speed that can be displayed is 124.2 MPH (199.9 km/h) and remains
displayed beyond that speed. Below 2.5 MPH (4.0 km/h), 0.0 is displayed.
Displaying the odometer
Press MODE/FREEZE repeatedly until "ODO" appears.
The current total distance is displayed.
Note
If 99 999.9 miles (160 934.3 km) is exceeded, the odometer returns to zero.
Displaying trip distance
Press MODE/FREEZE repeatedly until "DIST" appears.
At the point you want to start calculating the distance, perform the zero reset
operation.
For details on how to perform the zero reset operation, refer to "Performing the
zero reset."
Note
If 9 999.9 miles (16 093.3 km) is exceeded, the trip distance returns to zero.
Displaying riding time
Press MODE/FREEZE repeatedly until "RT" appears.
The "Hour: Minute: Second" is indicated in the display.
At the point you want to start calculating riding time, perform the zero reset
operation. For details on how to perform the zero reset operation, refer to
"Performing the zero reset."
Riding time is updated every second.
When one wheel revolution takes over a second, riding time is updated when the
magnet passes the sensor.
If the interval at which the magnet passes the sensor is more than 1 minute, the
calculation is canceled.
Note
If the displayed "99:59:59" is exceeded, riding time returns to zero.
Displaying average speed
Press MODE/FREEZE repeatedly until "AVG" appears.
Average speed is calculated according to trip distance and riding time.
Displaying maximum speed
Press MODE/FREEZE repeatedly until "MAX" appears.
The maximum speed recorded to date is displayed.
Note
If either trip distance or riding time returns to zero, trip distance, riding time and
average speed simultaneously return to zero.
Performing the zero reset
The zero reset operation of trip distance, riding time and average speed are
performed simultaneously and cannot reset individually.
1 Press MODE/FREEZE to display either "DIST," "RT" or
"AVG."
2 Press and hold RESET for a few seconds.
"DIST," "RT" and "AVG" flash.
3 Press RESET again.
The zero reset operation is completed, and "DIST," "RT" and "AVG" are set
to zero.
You can reset maximum speed only. Select "MAX" in step 1, followed by step 2
and 3.
Setting Freeze mode
You can deactivate odometer calculation, trip distance, riding time, average time,
and maximum speed (except for current speed) with the Freeze mode.
1 Press and hold MODE/FREEZE for a few seconds.
"FREEZE" lights up, and the cycle-computer enters Freeze mode.
To cancel Freeze mode, press and hold MODE/FREEZE for a few seconds.
("FREEZE" is no longer displayed.)
Standby mode
When your bicycle is stopped with the radio off, and no button is pressed for
more than 10 minutes, the cycle-computer enters Standby mode, and only the
current time is displayed.
To cancel Standby mode
When the unit is attached to the Mount
At the point where you start and the magnet passes the sensor, or you press any
active button, Standby mode is canceled. (The display returns to the previous one
before entering Standby mode.)
When the unit is not attached to the Mount
When you attach the unit to the Mount or press any active button, Standby mode
is canceled.
Note
If the cycle-computer enters Standby mode with Freeze mode activated, Freeze
mode is not canceled.
Using the Backlight
Press LIGHT.
The backlight will light for 10 seconds. If any buttons are pressed
while the backlight is on, the backlight will turn off 10 seconds after
pressing the button.
Setting the Clock
The clock time display of this unit is a 12-hour system.
When the batteries are first installed, "AM 12:00" flashes and "CLOCK" turns on
in the display.
1 Press RADIO POWER to turn off the power.
2 Press MODE/FREEZE repeatedly until "CLOCK" appears.
3 Hold down ENTER/SELECT for more than 2 seconds until
"AM 12" starts flashing.
4 Push the Jog lever towards + or to adjust the hour, then press
ENTER/SELECT.
The beep sounds and the minute setting starts to flash.
If you hold down the Jog lever towards + or , the digit changes rapidly.
Midnight is indicated as "AM 12:00" and Noon is indicated by "PM 12:00."
g
5 Repeat step 4 above to adjust the minutes.
":" starts flashing and the clock starts operating.
To set the current time exactly to the second, adjust the minute setting and
then press ENTER/SELECT to synchronize it with a time signal (such as
the telephone time signal).
Note
If you do not push the Jog lever towards + or , or ENTER/SELECT within
about 65 seconds, the clock setting mode will be canceled.
Changing AM Channel Step
The AM channel step differs depending on area. The channel step of this unit is
factory-set to 10 kHz. Change the settings as shown below to be able to listen to
the radio.
Area
Channel step
North and South American countries
10 kHz
Other countries/regions
9 kHz
Note
When the AM channel step is changed, only the preset stations on the AM band
will be initialized.
1 Press RADIO POWER to turn off the power.
2 While holding down ENTER/SELECT, keep pressing RADIO
POWER for more than 5 seconds.
Two short beeps sound, and the AM channel step will change and "9" kHz
(or "10" kHz) will light up for about 2 seconds in the display.
If you proceed to step 2 again, the channel step changes again.
Playing the Radio
-- Manual Tuning
1 Press RADIO POWER to turn on the power.
2 If "PRESET" is displayed, press TUNE MODE so that
"PRESET" disappears.
Pressing TUNE MODE will switch over between manual tuning mode and
preset tuning mode.
3 Press BAND/SET to select the band.
Each press changes the band.
4 Push the Jog lever towards + or to select the desired frequency.
If you hold down the Jog lever towards + or , the frequency changes
rapidly.
When the frequency matches the broadcast frequency, the broadcast will be
received.
5 Adjust the volume using VOL.
To turn off the radio, press RADIO POWER.
Improving Radio Reception
FM: Set FM SENS to LOCAL if interference is
prevalent when radio wave intensity is dramatically
stronger.
Under normal conditions, set to DX.
Presetting your Favorite
Stations
-- Preset Tuning
You can preset up to 5 AM stations, and 10 FM stations. You can also delete a
preset station, whether factory-set or preset yourself.
Presetting a Station
1 Follow steps 1 to 5 in "Playing the Radio" and manually tune in to
the station you wish to preset.
2 Hold down ENTER/SELECT until the preset number flashes.
A preset number with no station will flash.
When all preset numbers have assigned stations (factory-set), "1" flashes and
"PRESET" appears.
3 Push the Jog lever towards + or to select the number you wish to
preset, then press ENTER/SELECT.
If a preset number you select with the Jog lever has an assigned preset
station, "PRESET" appears; if no station is assigned, only the number flashes.
When you press ENTER/SELECT, the selected preset number lights up in
the display.
Example: Preset number 2, FM 90.0 MHz
To preset another station, repeat the above steps.
To change a preset station, preset a new station. The previous station will be
canceled.
Note
If you do not perform a preset operation for about 65 seconds, presetting mode
will be canceled.
Tuning in to a Preset Station
1 Press RADIO POWER to turn on the power.
2 Press BAND/SET to select the band.
3 Press TUNE/MODE so that "PRESET" and preset number
appear.
4 Push the Jog lever towards + or to select the desired preset
number.
5 Adjust the volume using VOL.
To turn off the radio, press RADIO POWER.
Note
If you hold down TUNE/MODE for more than 2 seconds, the unit enters the
preset station deleting mode. Press TUNE/MODE again to return to the previous
mode.
Deleting a Preset Station
1 Follow steps 1 and 3 in "Tuning in to a Preset Station".
2 Push the Jog lever towards + or to select the preset number to be
deleted.
3 Hold down TUNE/MODE for more than 2 seconds until
"PRESET", "
" and the preset number flash.
preset number to be deleted
4 While the letters and the preset number are flashing, press
ENTER/SELECT.
The station set to the preset number just before the deleted station will be
displayed.
To delete other stations, repeat steps 2 to 4.
If all the preset stations are deleted, "PRESET -" appears in the display.
To cancel deleting, press TUNE/MODE while "PRESET", "
" and the
preset number are flashing.
Playing the Radio on the
Mount
When the current speed is displayed (for example, after having installed the unit
on the Mount), pressing a button or the Jog lever (to perform a radio operation)
only displays the station frequency and/or current preset number. From this
display, press the BAND/SET, TUNE/MODE or Jog lever + or - to perform the
desired radio operation.
Holding down Jog lever + or -, ENTER/SELECT or TUNE/MODE while the
current speed is displayed
Jog lever + or - :
Pushing the Jog lever displays the current frequency.
Pushing and holding the Jog lever changes the frequency or
preset number.
ENTER/SELECT : Pressing this button displays the current frequency.
Pressing and holding selects the Station-presetting mode.
TUNE/MODE :
Pressing this button displays the current frequency.
Pressing and holding selects preset station deleting mode in
preset tuning mode. In manual tuning mode, holding down
has no effect.
Notes
· If you perform a radio operation once in the current speed display and do not
operate the radio again within 5 seconds, the display automatically returns to
the current speed indication.
·When the radio is turned off, the current speed display appears. When the radio
is turned on, the current frequency is displayed. If you do not perform any
operation within 5 seconds, the display returns to the current speed.
· While presetting mode or deleting mode, the current speed display will not
appear. After completing or canceling the presetting/deleting mode, the current
speed display appears after 5 seconds.
VOL*
FM antenna
FM SENS
DX/LOCAL
Jog lever
* There is a tactile dot beside VOL to show the direction to turn up
the volume.
DX
LOCAL
FM
SENS