3-253-601-21 (1)
2003 Sony Corporation
Printed in China
TV/WEATHER/FM/AM
CD Portable Radio
Operating Instructions
ICF-CD73V
Owner's Record
The model number and the serial number are located at the bottom.
Record the serial number in the space provided below. Refer to them whenever you
call upon your Sony dealer regarding this product.
Model No. ICF-CD73V
Serial No.
For customers in the USA
Please register this product on line at
http://www.sony.com/productregistration.
Proper registration will enable us to send you periodic mailings about new
products, services, and other important announcements.
Registering your product will also allow us to contact you in the unlikely event
that the product needs adjustment or modification. Thank you.
· To clean the casing, use a soft cloth dampened
with water, wipe it again with a dry cloth. Do
not use alcohol, benzine or thinner.
· Do not use soap or detergent; do not dry with
an electric hair dryer.
Note on condensation
If the player is brought directly from a cold to a
warm location, or is placed in a very damp room,
moisture may condense on the lens inside the CD
player section. Should this occur, the player will
not operate properly. In this case, remove the CD
and wait about an hour for the moisture to
evaporate.
Notes on CDs
· Before playing, clean the CD with a cleaning
cloth. Wipe the CD from the center out.
· If there is a scratch, dirt or fingerprints on the
CD, it may cause tracking error.
Cautions on Water-
resistance
This unit is designed so that it can be used with
slight exposure to rain, snow and other forms of
moisture, but there are several points on which
caution should be observed.
· Do not allow it to come in contact with large
amounts of water.
· Do not immerse it in water.
· Open or close the battery/CD compartment
with dry hands in a place without exposure to
any water.
· Do not touch the AC power adaptor with wet
hands, as there is a risk of electric shock.
· Use batteries for the unit when you use it in a
wet place, such as a bathroom. Do not use the
AC power adaptor, as there is a risk of electric
shock.
· The rubber parts attached to the lid of the
battery/CD compartment and the DC IN 6V
socket are necessary to keep the unit water
resistant. Do not damage them.
· Before replacing batteries, wipe all water
droplets from the unit. Then, open the lid on
the back of the unit.
· Any malfunction caused by water entering the
unit, consult the nearest Sony dealer.
Replacing the
Batteries
· When the batteries (not supplied) become
weak, the sound becomes weak and distorted
and "E" flashes. Replace the batteries with
new ones. When the batteries are completely
exhausted, the unit and the timer will turn off
and "E" is displayed.
· When the batteries become weak while playing
a CD, "E" will flash in the display and CD
playback will stop. However, the radio will still
function after turning on the unit again until
the batteries are completely exhausted.
· Before replacing the batteries, make sure that
the unit is turned off.
· After replacing the batteries, press RADIO ON
BAND/CD u and "E" will disappear.
· Replace the batteries within 5 minutes.
Otherwise, the memories for the clock and the
preset stations will be erased and "AM 12:00"
will flash in the display.
· When operating the unit on batteries, remove
the AC power adaptor from the DC IN jack.
The unit cannot be operated on batteries when
the AC power adaptor is connected to the DC
IN jack.
· When you install/replace the batteries, do not
push hard on the unit as it may damage the
display panel or cause a malfunction.
Notes on batteries
· Do not charge dry batteries.
· Do not carry dry batteries together with coins
or other metallic objects. It can generate heat if
the positive and negative terminals of the
batteries accidentally come into contact with
metallic objects.
· When you are not going to use the unit for a
long time, remove the batteries to avoid
damage from battery leakage and corrosion.
· Do not use different types of batteries at the
same time.
· When you replace the batteries, replace all with
new ones.
Using the AC power
adaptor
· When operating the unit with an external
power source, do not remove the batteries.
These batteries serve to backup the clock and
memory settings. Since the batteries discharge
in this case as well, we recommend changing
them about once a year.
· To prevent battery leakage, we recommend
removing the batteries when the unit is
connected to a wall outlet.
· Before connecting and disconnecting the
external power source plug, be sure to turn off
the radio/CD. Otherwise, "E" may be
displayed. When this occurs, turn on the
radio/CD so that "E" disappears.
· When the AC power adaptor (not supplied) is
not to be used for a long period of time, unplug
it both from the DC IN 6 V jack and from the
wall outlet.
· Use only the recommended AC power adaptor.
Using any other AC power adaptor may cause
damage to the unit.
· When the cover of the DC IN 6 V jack is open
(to use the AC power adaptor), the jack area is
not water-resistant. When the AC power
adaptor is not connected to the DC IN 6 V jack,
be sure to close the cover of the DC IN 6 V jack.
· For details of the AC power adaptor (not
supplied), see "Specifications."
Polarity of the plug
If you have any questions or problems
concerning your unit, please consult your
nearest Sony dealer.
Troubleshooting
Should any problem occur with the unit, do the
following checks to determine whether or not
servicing is required. If the problem persists,
consult the nearest Sony dealer.
The CD player does not operate.
· Did you close the CD compartment lid?
· Did you place the disc correctly?
The disc should be placed with the labeled
side up.
· Dusty or defective disc--Clean the disc with an
optional cleaning cloth. Wipe the disc from the
center out (see "Notes on CDs").
· Take out the CD and leave the CD compart-
ment open for about an hour to get rid of
moisture condensation (see "Note on
condensation").
Sporadic loss of sound in CD operation.
· Dusty or defective disc--Clean or replace the
disc.
· Volume too high--Reduce the volume.
· Strong vibration.
Specifications
CD player section
System: Compact disc digital audio system
Laser diode properties: Material: GaAlAs
Wavelength: 780 nm
Emission duration: Continuous
Laser output: Less than 44.6 µW
(This output is the value measured at a
distance of about 200 mm from the objective
lens surface on the optical pick-up block with
7 mm aperture.)
Frequency response: 20 20 000 Hz
+1
1.5
dB
Wow and flutter: Below measurable limit
Radio section
Frequency range:
Band
Range
Channel
step
TV
2 13 ch
1 channel
WEATHER
1 7 ch
1 channel
FM
87.5 108 MHz
0.1 MHz
AM
530 1 710 kHz
10 kHz
General
Time display: 12-hour system
Speaker: 50 mm (2 inches) dia, 6
Power outputs:
400 mW + 400 mW (at 10% harmonic
distortion)
Power requirements:
6 V DC, four Size C (R14) batteries
External power source: DC IN 6 V
Dimensions:
Approx. 151.5
× 248 × 84 mm (w/h/d)
(Approx. 6
× 9 7/8 × 3 3/8 inches) incl.
projecting parts and controls
Mass: Approx. 1 350 g (2 lb 16 oz) incl. batteries
Supplied accessories:
Suction cup (1), Strap (1)
Optional accessory
AC power adaptor AC-E60HG*
*
The voltage of power supply is different
depending on the country/region. Please buy
an AC power adaptor in the country/region
where the unit to be used.
Your dealer may not handle the above listed
accessory. Please ask the dealer for detailed
information.
Design and specifications are subject to change
without notice.
Choosing Power
Sources
Installing the Batteries (See
Fig. A)
Press the buckle of the battery compartment lid
inward and pull upward to open the lid.
Install four Size C (R14) batteries (not supplied)
with the correct polarity and close the lid.
"AM12:00" flashes in the display when you
install batteries for the first time. To stop the
display from flashing, set the clock (see "Setting
the Clock").
Battery Life (Approx. hours)
(JEITA*)
When
TV
WEATHER
FM
AM
CD
using
Sony
alkaline
50
50
50
60
18
Size C
(LR 14)
Sony
Size C
15
15
15
17
3
(R 14)
*
Measured by JEITA (Japan Electronics and
Information Technology Industries Associa-
tion) standards. The actual battery life may
vary depending on the circumstance of the
unit.
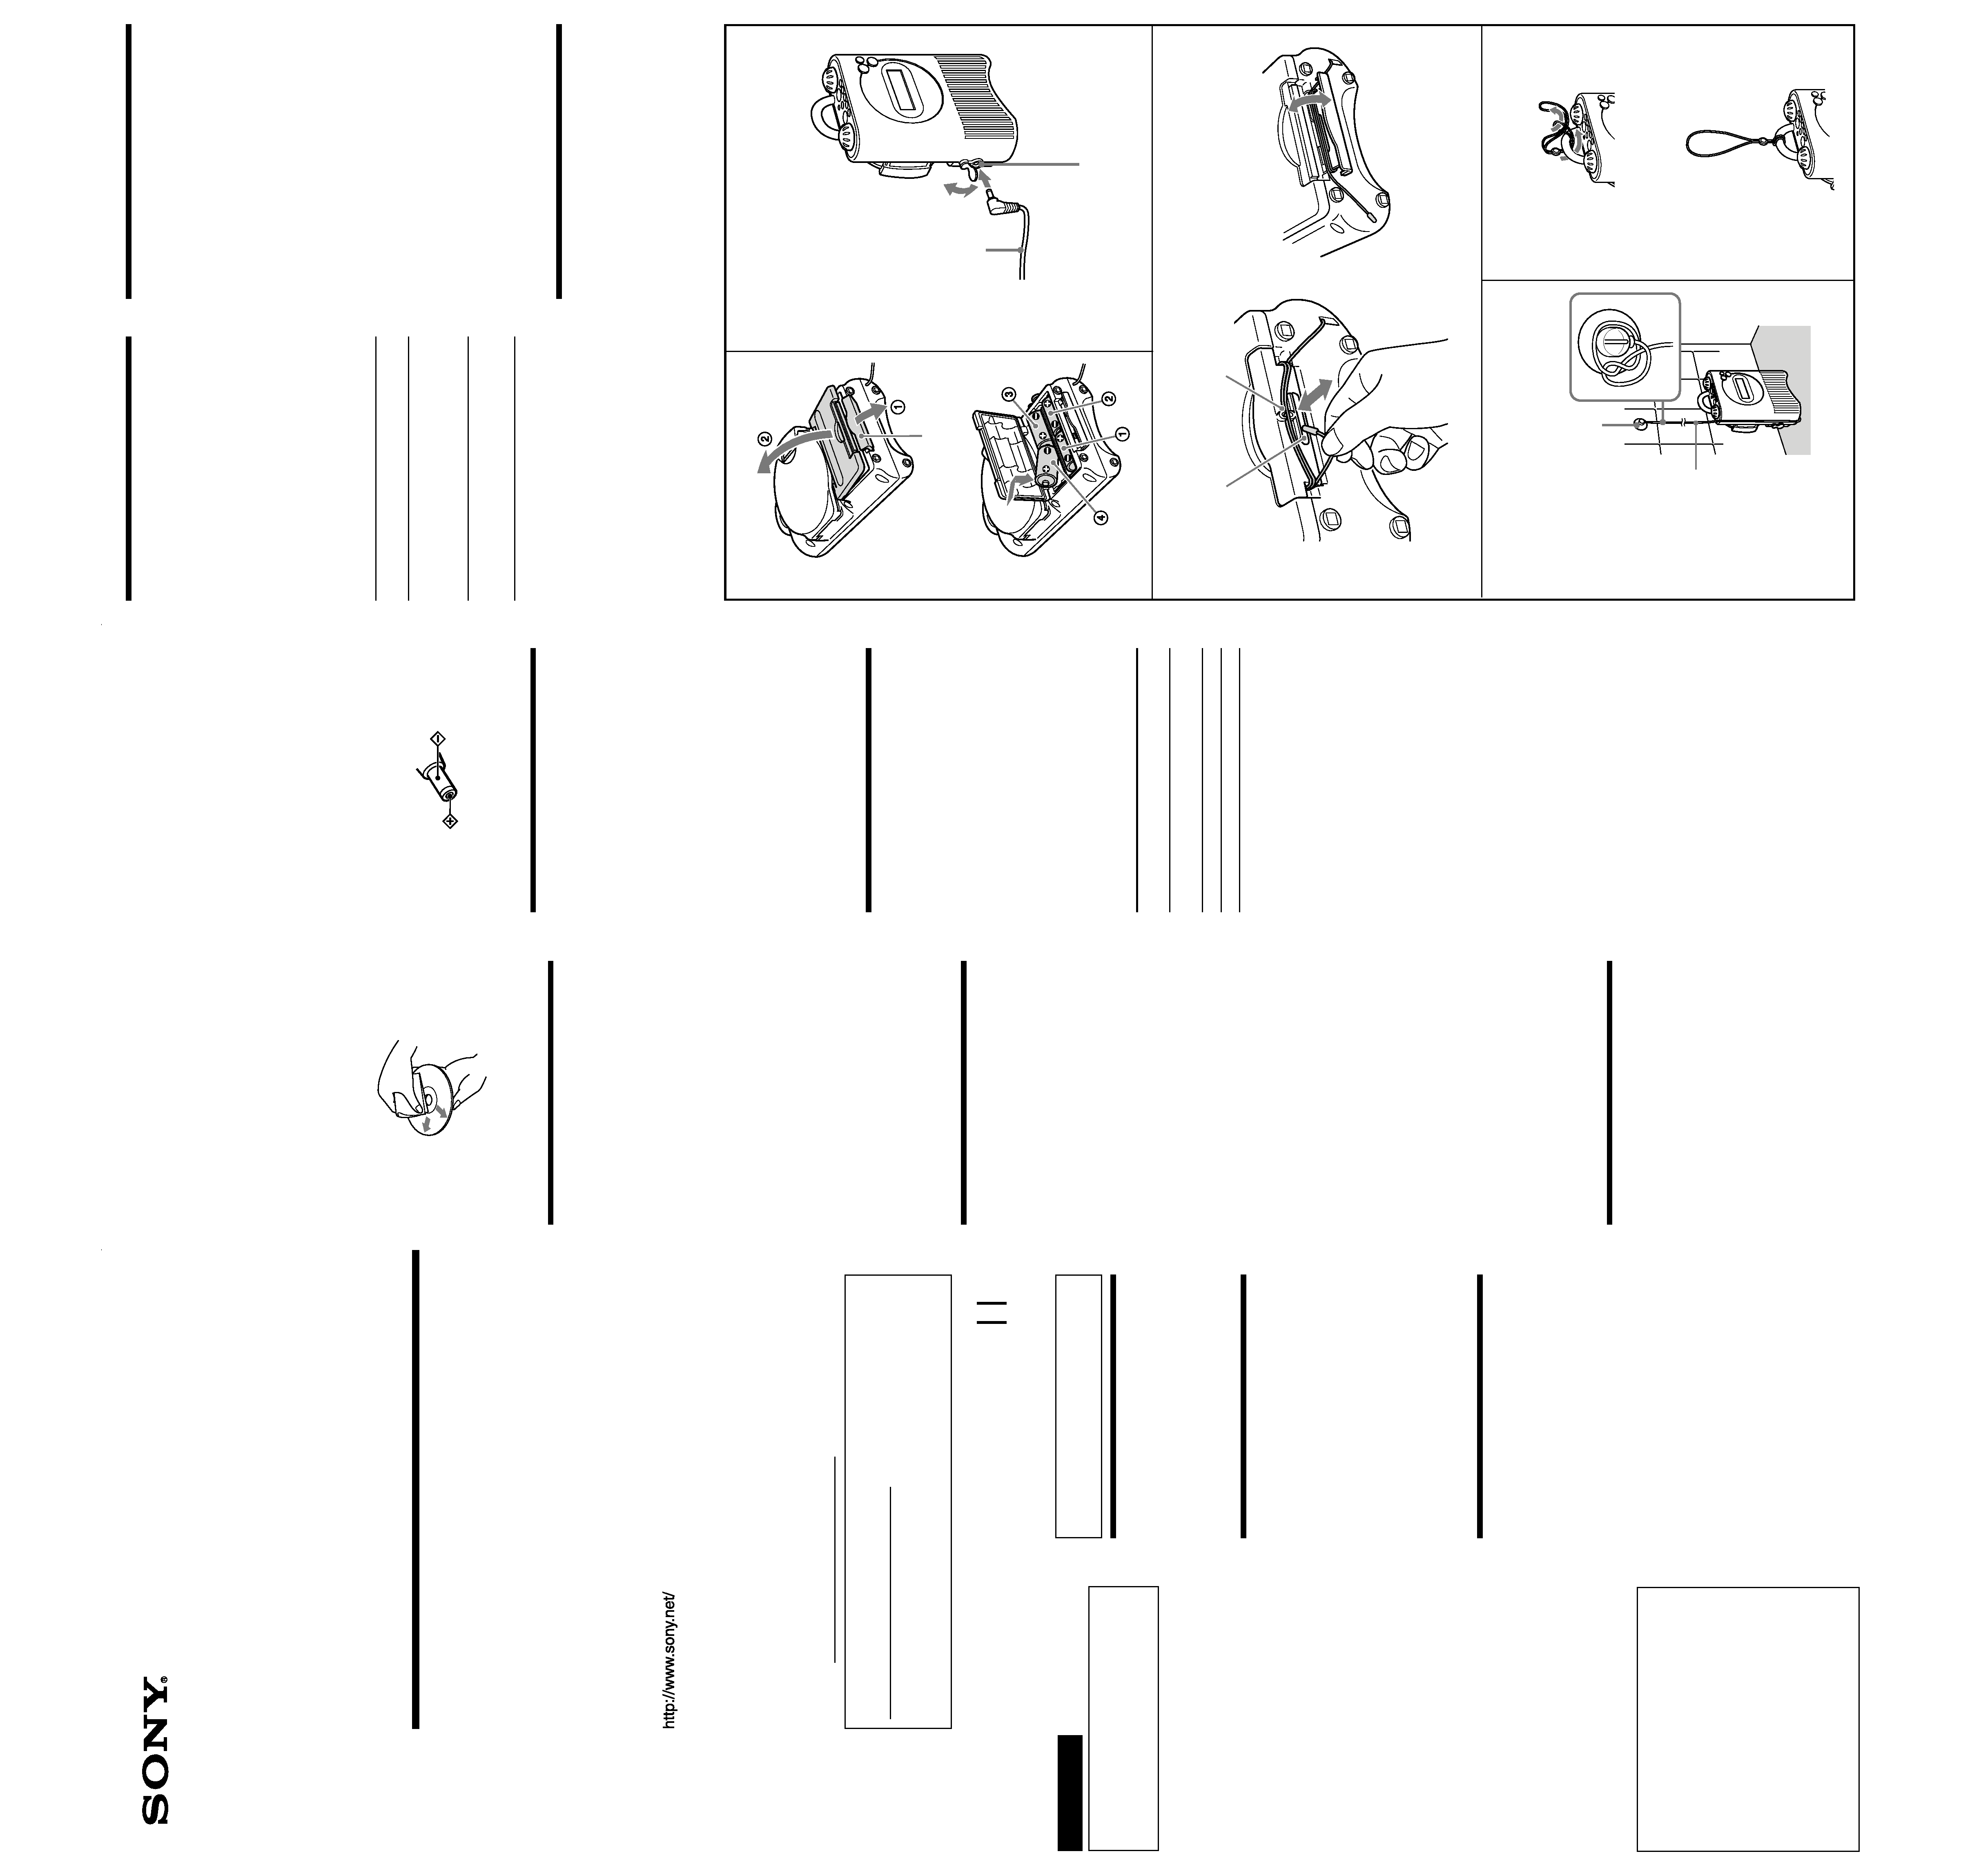
House Current (See Fig. B)
Make sure the unit is turned off before using
house current.
Connect the Sony AC power adaptor (not
supplied) to the DC IN 6 V jack firmly, and plug
it into a wall outlet.
When the AC power adaptor is not connected to
the DC IN 6 V jack, be sure to close the cover of
the DC IN 6 V jack.
WARNING
You are cautioned that any changes or
modifications not expressly approved in this
manual could void your authority to operate
this equipment.
INFORMATION
This equipment has been tested and found to
comply with the limits for a Class B digital
device, pursuant to Part 15 of the FCC Rules.
These limits are designed to provide reasonable
protection against harmful interference in a
residential installation. This equipment
generates, uses, and can radiate radio frequency
energy and, if not installed and used in
accordance with the instructions, may cause
harmful interference to radio communications.
However, there is no guarantee that interference
will not occur in a particular installation. If this
equipment does cause harmful interference to
radio or television reception, which can be
determined by turning the equipment off and on,
the user is encouraged to try to correct the
interference by one or more of the following
measures:
--Reorient or relocate the receiving antenna.
--Increase the separation between the
equipment and receiver.
--Connect the equipment into an outlet on a
circuit different from that to which the
receiver is connected.
--Consult the dealer or an experienced radio/
TV technician for help.
If you have any questions about the product, you
may call:
Sony Direct Response Center 1-(800)-222-7669 or
write to:
Sony Direct Response Center 12451 Gateway
Blvd. Fort Myers, FL 33913
Declaration of Conformity
Trade Name:
SONY
Model:
ICF-CD73V
Responsible Party:
Sony Electronics Inc.
Address:
680 Kinderkamack Road,
Oradell, NJ 07649 USA
Telephone Number: 201-930-6972
This device complies with Part 15 of the FCC
Rules. Operation is subject to the following
two conditions: (1) This device may not cause
harmful interference, and (2) this device must
accept any interference received, including
interference that may cause undesired
operation.
CAUTION
The use of optical instruments with this
product will increase eye hazard.
Before You Begin
Thank you for choosing the Sony CD Portable
Radio! It will give you many hours of reliable
service and listening pleasure.
Before operating the unit, please read these
instructions thoroughly and retain them for
future reference.
Features
· Built-in CD player with CD-R/RW playback
· TV/WEATHER/FM/AM PLL (Phase Locked
Loop) synthesized tuner with 25 station
memory presets
· Water resistant; you can enjoy music in your
bathroom or kitchen.
· Easy-to-use shuttle dial for tuning and time
setting.
· Easy-to-set countdown timer for cooking, etc.
· Product can be hung with the supplied
hanging strap, or placed on a tabletop.
Note on AM Channel Step
The AM channel step differs depending on area.
See "Changing AM Channel Step".
Precautions
· Operate the unit only on 6 V DC. For battery
operation, use 4 Size C (R14) batteries. For AC
operation, use only the recommended AC
power adaptor.
· The unit is not disconnected from the AC
power source (mains) as long as it is connected
to a wall outlet, even if the unit itself has been
turned off.
· The nameplate indicating operating voltage,
etc. is located on the bottom exterior.
· Avoid exposure to temperature extremes,
direct sunlight, moisture, sand, dust or
mechanical shock. Never leave in a car parked
under the sun.
· In vehicles or buildings, radio reception may
be difficult or subject to interference. Try
listening near a window.
· Since a strong magnet is used for the speaker,
keep away personal credit cards using
magnetic coding or spring-wound watches
from the unit to prevent possible damage from
the magnet.
A
f
B
D
AC power adaptor
(not supplied)
Using the FM wire
antenna (See Fig. C)
Taking out the FM wire antenna
Hook your finger around the FM wire antenna and
pull out the end of the antenna from the slot 1.
Open the buckle and unwrap the FM wire antenna
completely, then close the buckle.
Storing the FM wire antenna
When the FM wire antenna is not in use, store the
antenna as follows:
Open the buckle and wrap the FM wire antenna
completely around the buckle, then close the
buckle. Insert the end of the wire antenna into the
slot 1. Pinch the antenna wires wrapped around
the buckle and push them into the slit 2.
Note
When you close the buckle, make sure the antenna
is stored correctly. You may damage the antenna if
you close the buckle forcefully.
Tying the FM wire antenna (See
Fig. D)
Tie the FM wire antenna to the supplied suction
cup and attach the cup to the wall.
Using the Strap (See
Fig. E)
Use the strap as shown in the illustration.
Notes
· The strap is only for hanging the unit, do not use
the strap to carry it.
· Do not hang the unit from where it can easily
fall down.
C
To a wall outlet
B
B
B
B
B
FM wire antenna
Suction cup
f
Buckle
12
DC IN 6 V jack
E
5
4
3
2
AUTO
OFF
VOLUME
TUNE/TIME SET
TIMER SET
MAX
MIN
TIMER
SET
ON/OFF
MODE
PRESET TUNING/PRESET TIMER
SELECT/
PRESET
CLOCK
1
RADIO
CD
SHUFFLE
REP1
MHz
kHz
AUTO OFF
TIMER
PRESET
TRACK
WEATHER
TV
FM12PM
AM
ALL
RADIO
ON
BAND
OFF
CD
F
G
g
Area
Channel step
North and South America
10 kHz
Other countries/regions
9 kHz
1 Press OFF x to turn off the power.
2 While holding down OFF x, keep
pressing the PRESET TUNING /
PRESET TIMER button 1 for more than
5 seconds.
Two short beeps will sound, and the AM
channel step will be changed. If you proceed
to step 2, the channel step will change again.
Notes
· When the AM channel step is changed, the
preset stations will be erased.
· When the AM channel step is changed, the
preset stations will be reset to their default
factory settings.
· When the AM channel step is changed, the FM
channel step also will be changed.
Improving the
Reception (See fig.
G)
TV, WEATHER, FM:
Tie the FM wire antenna to the supplied
suction cup.
Extend and adjust the antenna Secure the
suction cup on the wall where you get
optimum reception .
AM: Rotate the unit horizontally for optimum
reception. A ferrite bar antenna is built in
the unit.
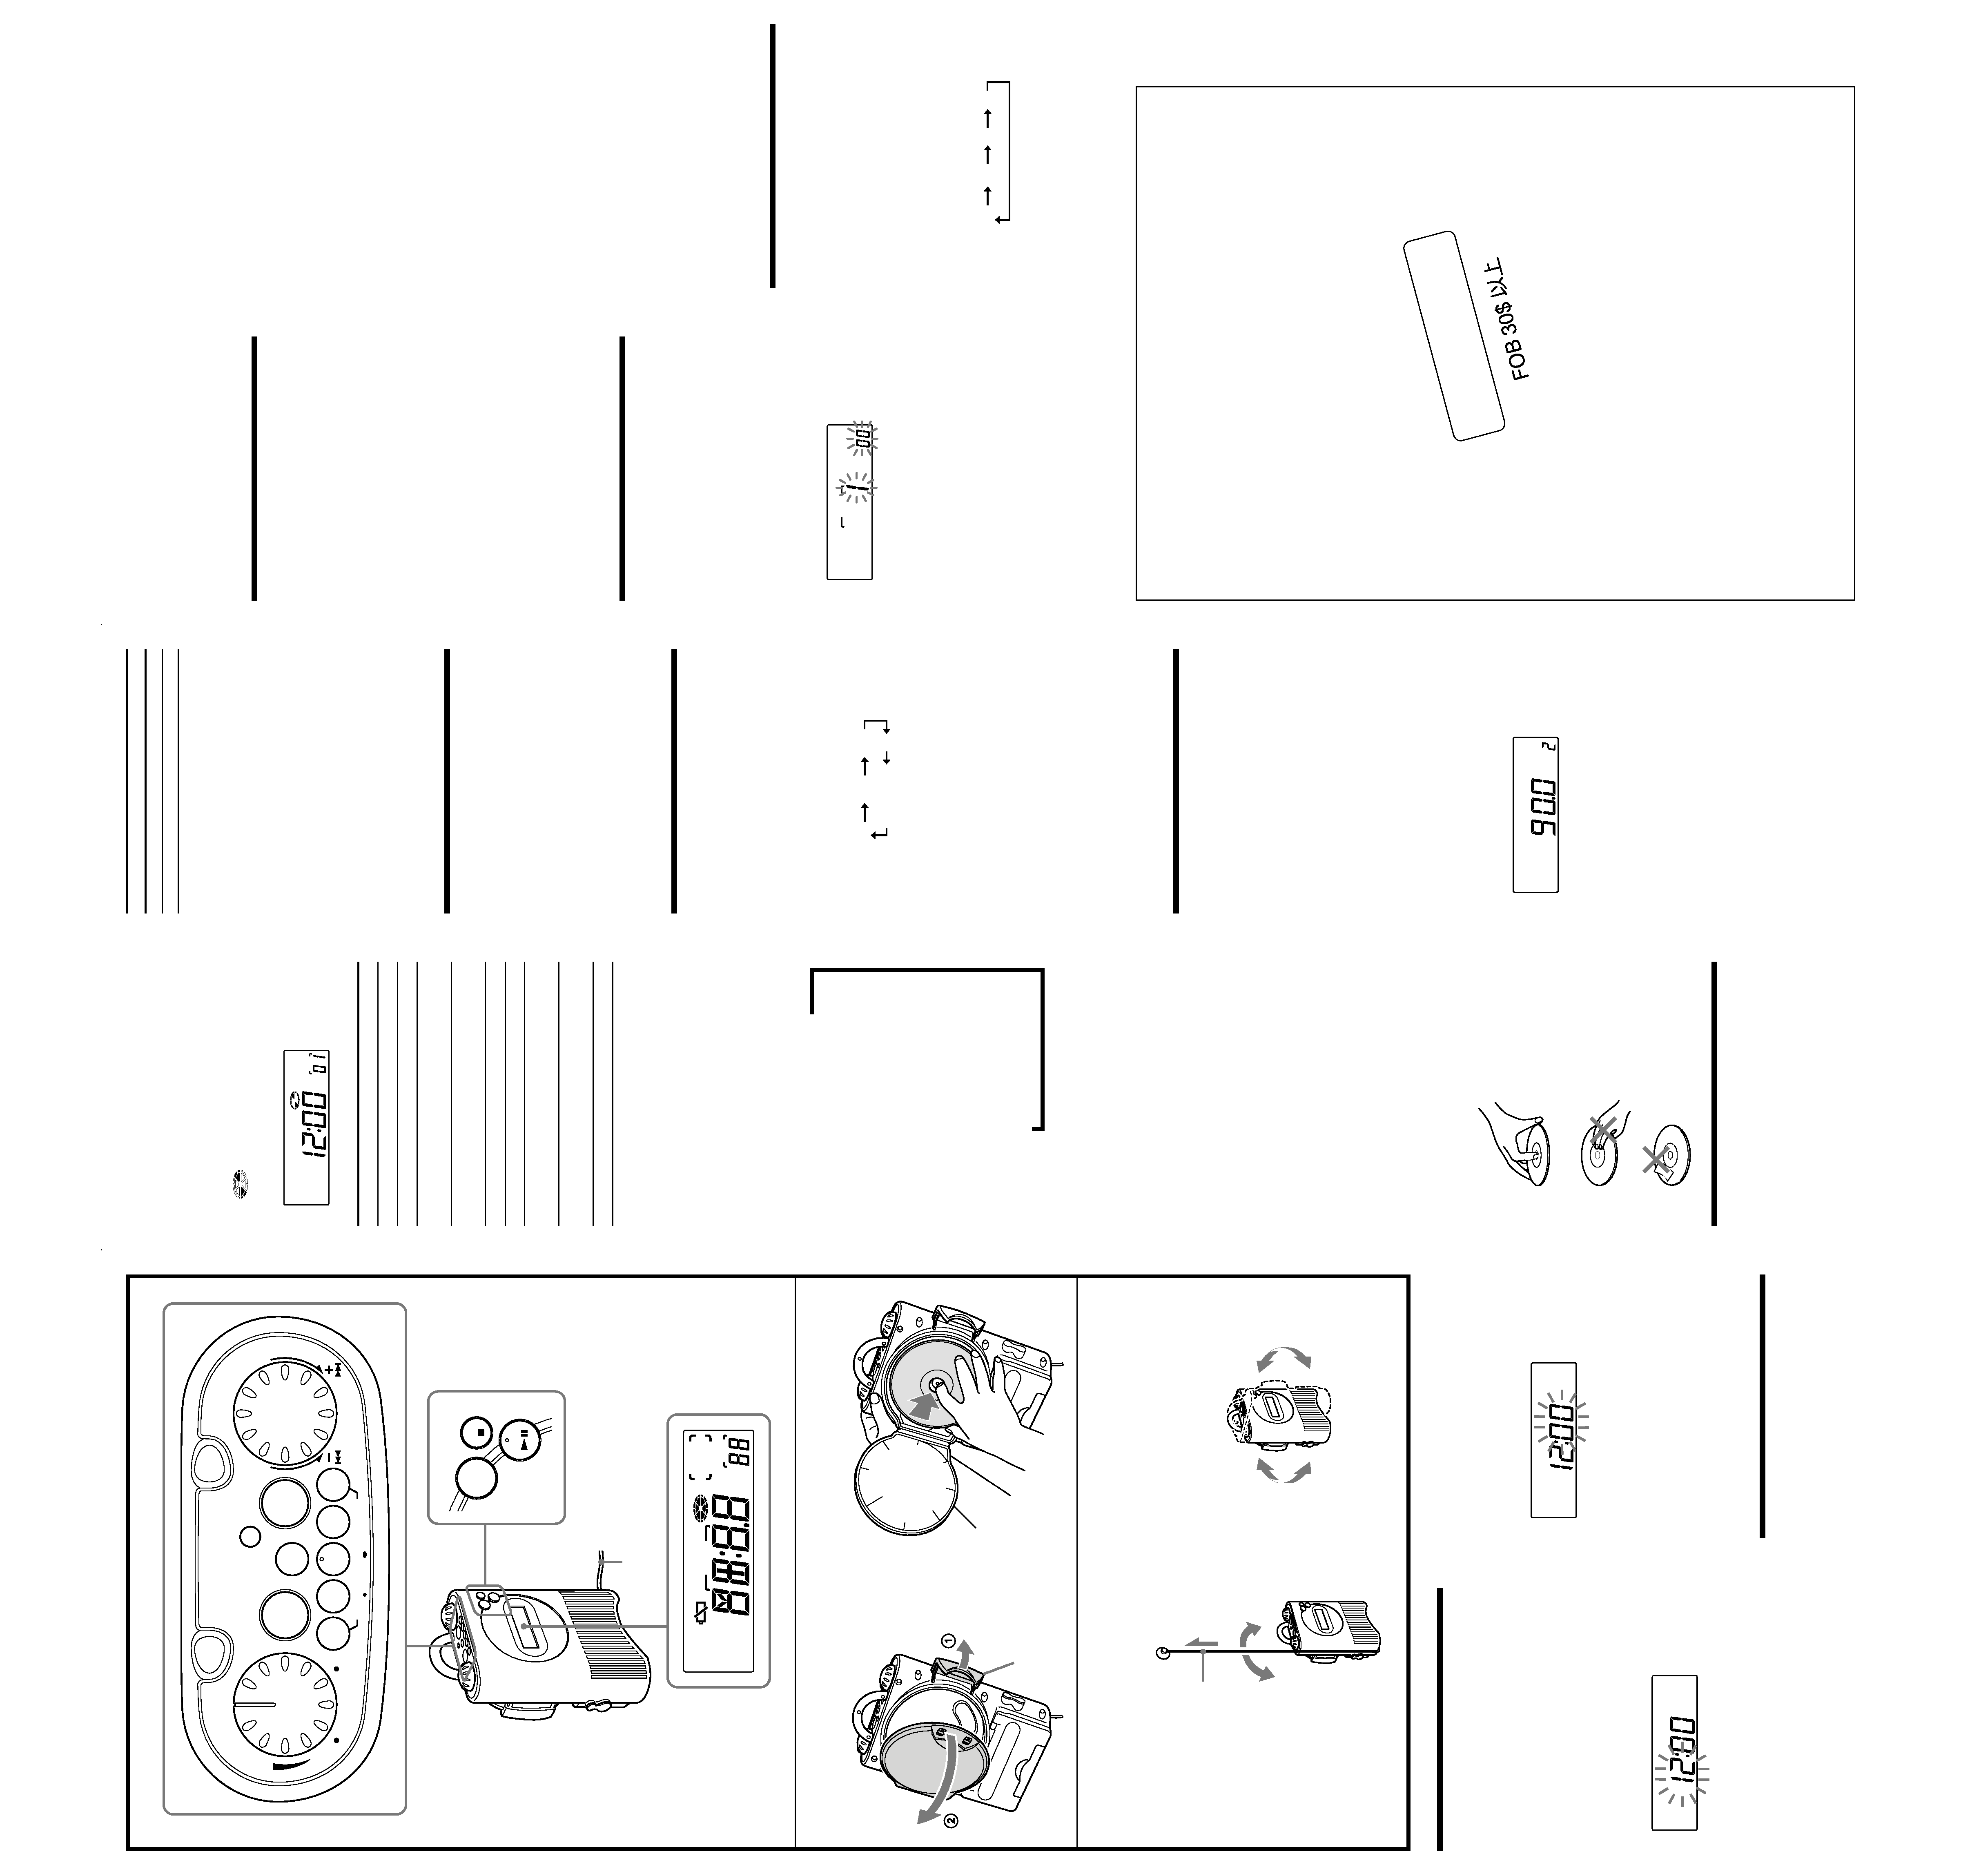
Playing the Radio
--Manual Tuning
1 Press RADIO ON BAND to turn on the
radio.
The band and frequency will appear in the
display for a few seconds. Then the current
time indication will return to the display.
2 Press RADIO ON BAND repeatedly to
select the desired band.
AM
FM1
WEATHER
TV
FM2
When using FM1 or FM2 preset mode, you
may listen to the radio on either mode
(See "Presetting Your Favorite Station").
3 Rotate in either +/ direction the TUNE/
TIME SET/TIMER SET dial to tune in to
the desired station.
Two short beeps sound when the minimum
frequency of each band is received during
tuning.
4 Adjust the volume using VOLUME.
To check the station being received
Press RADIO ON BAND or rotate in either +/
direction the TUNE/TIME SET/TIMER SET dial
lightly. The display shows the band and
frequency for a few seconds and then returns to
the current time.
To turn off the radio, press OFF x.
Presetting Your
Favorite Station
--Preset Tuning
You can preset 10 stations in FM (5 stations in
FM1, 5 stations in FM2) and 5 stations in each
AM, TV, WEATHER.
Presetting a Station
Example: To set FM 90.0 MHz to PRESET
TUNING/PRESET TIMER button 2.
1 Press RADIO ON BAND to turn on the
radio.
2 Tune in to FM 90.0 MHz (See "Manual
Tuning").
3 Hold down the desired PRESET
TUNING/PRESET TIMER button (in
this case, 2) until you hear two short
beeps.
RADIO
CD
SHUFFLE
REP1
MHz
kHz
AUTO OFF
TIMER
PRESET
TRACK
WEATHER
TV
FM12PM
AM
ALL
The display shows the frequency for a few
seconds and then changes back to the current
time.
To preset another station, repeat these steps.
To change the preset station, tune in to the
desired station and hold down the PRESET
TUNING 1 to 5 button. The new station will
replace the previous station on the PRESET
TUNING button.
Tuning in to a Preset Station
1 Press RADIO ON BAND to turn on the
radio.
2 Press RADIO ON BAND repeatedly to
select the desired band.
3 Press the PRESET TUNING/PRESET
TIMER button of your choice.
4 Adjust the volume using VOLUME.
After a few seconds, the display returns to
the current time but the PRESET TUNING
button number remains.
Note
To change the preset station, preset a new station
to the button of your choice. The previous station
will be overwritten by the new one.
Switching between
monaural and stereo
1 Press RADIO ON BAND to turn on the
radio.
2 Press RADIO ON BAND repeatedly to
select FM 1 or FM 2.
3 Press MODE.
"Mono (monaural)" or "ST (Stereo)" appears
in the display.
Each time you press MODE, the mode
changes either "Mono" or "ST."
4 Select Mono or ST.
The mode you selected appears in the display
for a few seconds and returns to the current
time.
Note
When listening to the FM stereo reception, normally
set to
"ST" (stereo). If the FM stereo reception is
poor, set to
"Mono".
Although the sound will not be heard in stereo, noise
will be reduced.
Using the
Countdown Timer
The beep alarm will go off when the countdown
time has elapsed. Use the timer as a reminder.
The buzzer alarm activates whether or not the
radio reception/CD playback mode is on.
The countdown time can be set at 1 minute
intervals between 1 to 120 minutes.
1 Press TIMER SET ON/OFF.
The indication flashes in the display.
RADIO
CD
SHUFFLE
REP1
MHz
kHz
TIMER
PRESET
TRACK
WEATHER
TV
FM12PM
AM
ALL
2 Rotate in either +/ direction the TUNE/
TIME SET/TIMER SET dial to set the
desired time.
3 Press TIMER SET ON/OFF.
Two short beeps sound and countdown
starts. When the countdown has completed,
the beep alarm will go off and the display
will flash.
Notes
· To stop the beep alarm, press TIMER SET ON/
OFF. The alarm will beep 30 minutes if it is not
turned off.
· While the timer is counting down, the display
shows the remaining time. To display the
current time, press CLOCK. To check the station
you are listening to, Press RADIO ON BAND
shortly. The band and frequency will appear
for a few seconds.
· To cancel the timer during the countdown,
press TIMER SET ON/OFF.
The countdown timer will be canceled and the
current time will appear in the display.
Using the PRESET TIMER buttons
You can use the countdown timer with the
PRESET TUNING/PRESET TIMER buttons.
1 Press TIMER SET ON/OFF.
2 Press the desired PRESET TUNING/
PRESET TIMER button.
The countdown time and the preset button
number will appear in the display.
The default countdown time for the PRESET
TIMER buttons 1 to 5 are 3 minutes,
10 minutes, 30 minutes, 60 minutes and
90 minutes respectively.
3 Press TIMER SET ON/OFF again.
A beep sound and starts to countdown.
When the countdown time has elapsed, the
beep alarm will go off and the display will
flash.
Presetting a Countdown Time
You can also store a countdown time of your
choice to each of the five preset buttons.
1 Set the timer (See steps 1 and 2 of
"Using the Countdown Timer").
2 Hold down the desired PRESET
TUNING/PRESET TIMER button until
you hear two short beeps.
The countdown time has been stored as
displayed.
Other Useful
Functions
AUTO OFF function
The AUTO OFF function will turn off the radio/
CD after a preset duration of time.
1 Press RADIO ON BAND/CDu to turn
on the radio/CD.
2 Press AUTO OFF.
Each time you press AUTO OFF, the AUTO
OFF time (minutes) changes as follows.
30
OFF
120
90
The radio/CD will play for the AUTO OFF
time you have set, then turn off.
The AUTO OFF time appears in the display
for a few seconds with AUTO OFF indication.
Note
To turn off the radio/CD before the AUTO OFF
time has elapsed, press OFF x.
Buckle
1 Release the buckle on the back of the
unit to open the CD compartment lid
and place a disc.
2 Close the CD compartment lid and
fasten with the buckle until it clicks.
3 Press CD u.
"
" and "TRACK 01" appear in the
display to indicate that track 1 of CD is
playing.
RADIO
CD
SHUFFLE
REP1
MHz
kHz
AUTO OFF
TIMER
PRESET
TRACK
WEATHER
TV
FM12PM
AM
ALL
4 Adjust the volume using VOLUME.
To
Operation
Pause
CD u
Resume play after pause
CD u again
Locate the beginning of
.
**
the current track (AMS*)
Locate the next track
>
**
(AMS*)
Go back at high speed
Hold .**
Go forward at high speed
Hold >**
Locate the previous track
.
repeatedly**
(AMS*)
Locate the succeeding
>
repeatedly**
track (AMS*)
Stop play
OFF x
*
AMS = Automatic Music Sensor
**
These operations are possible during both play
and pause.
Various Modes of CD Playback
You can play tracks repeatedly or in random order.
Press MODE.
Each pressing MODE changes the play mode as
follows:
Display
indication
Play mode
none
(normal play)
All the tracks are played once.
m
"REP 1"
(single repeat)
A single track is played repeatedly.
m
"REP ALL"
(all repeat)
All the tracks are played repeatedly.
m
"SHUFFLE"
(shuffle play)
All the tracks are played once in random order.
m
"SHUFFLE REP" (shuffle repeat)
All the tracks are played repeatedly in random
order.
Notes
· Discs with non-standard shapes (e.g., heart,
square, star) cannot be played on this unit.
Attempting to do so may damage the unit.
Do not use such discs.
· If you press CD u when there is no disc in
the CD compartment, "00" flashes for about
5 seconds on the display and the unit turns off
automatically.
About CD-Rs/CD-RWs
This unit is compatible with CD-Rs/CD-RWs but
playback capability may vary depending on the
quality of the disc, the recording device and
application software.
Music discs encoded with
copyright protection technolo-
gies
This product is designed to play back discs that
conform to the Compact Disc (CD) standard.
Recently, various music discs encoded with
copyright protection technologies are marketed
by some record companies. Please be aware that
among those discs, there are some that do not
conform to the CD standard and may not be
playable by this product.
To handle compact discs
Correct
Handle the disc
by its edge.
Incorrect
Do not touch the
surface.
Do not stick paper or
tape nor write
anything on the
surface.
Changing AM
Channel Step
The AM channel step differs depending on area.
The channel step of this unit is factory-set to
10 kHz to change the setting as shown below to
be able to listen to the radio.
TV/WEATHER/FM
AM
FM wire antenna
FM wire antenna
<
Setting the Clock
The display will flash "AM12:00" when the
batteries are installed or the AC power adaptor
is plugged in for the first time.
1 Hold down CLOCK for more than
2 seconds.
The beep sounds and the hour flashes in the
display.
2 Rotate in either +/ direction the TUNE/
TIME SET/TIMER SET dial until the
correct hour appears in the display.
RADIO
CD
SHUFFLE
REP1
MHz
kHz
AUTO OFF
TIMER
PRESET
TRACK
WEATHER
TV
FM12PM
AM
ALL
Each rotation of the dial changes the digit(s)
by one.
When you hold the dial, the digit(s) change
rapidly.
3 Press CLOCK.
The beep sounds and the minute starts to
flash. Repeat step 2 to set the minute. After
setting the minute, press CLOCK again. The
two beeps sound and the clock starts from
0 seconds.
RADIO
CD
SHUFFLE
REP1
MHz
kHz
AUTO OFF
TIMER
PRESET
TRACK
WEATHER
TV
FM12PM
AM
ALL
12-hour system: "AM 12:00" = midnight
"PM 12:00" = noon
Notes
· You can set the clock also during the radio
reception/CD playback mode.
· To set the current time quickly, rotate and hold
in either +/ direction the TUNE/TIME SET/
TIMER SET dial.
· To set the current time exactly, follow step 2
and press CLOCK again with the time signal of
a radio station.
Playing a CD (See
Fig. F)
An 8 cm (3-inch) CD can be played without an
adaptor.
LIMITED
WARRANTY
(Portable
Audio)