2001 Sony Corporation
4-659-757-11(1)
User's Guide
CRX85U
List of Accessories
When you unpack the carton, make sure that it contains the CRX85U and all of the accessories
listed below.
If anything is missing or damaged, contact your retailer.
· CRX85U
· AC Adapter (AC-CRX85)
· Interface Cable
· Power cord
· Setup Guide
· Software CD-ROM
· Warranty Card
· User's Guide
· Ferrite Clamp
· Software Quick Start Guide
Note
To guard against possible loss or damage, be sure to make a backup copy of the provided software CD-ROM on a
CD-R disc or other media. The software CD-ROM is not sold separately.
Before Connecting the Interface Cable
Attach the ferrite clamps to the end of the interface cable. To position the center of the ferrite
clamp as shown in the illustration below, wind the interface cable around it once, and then
secure the ferrite clamp by closing it until you hear a click.
Note
To satisfy radio-frequency interference suppression standards, be sure to install the ferrite clamp correctly. It reduces
the possibility interference with other devices.
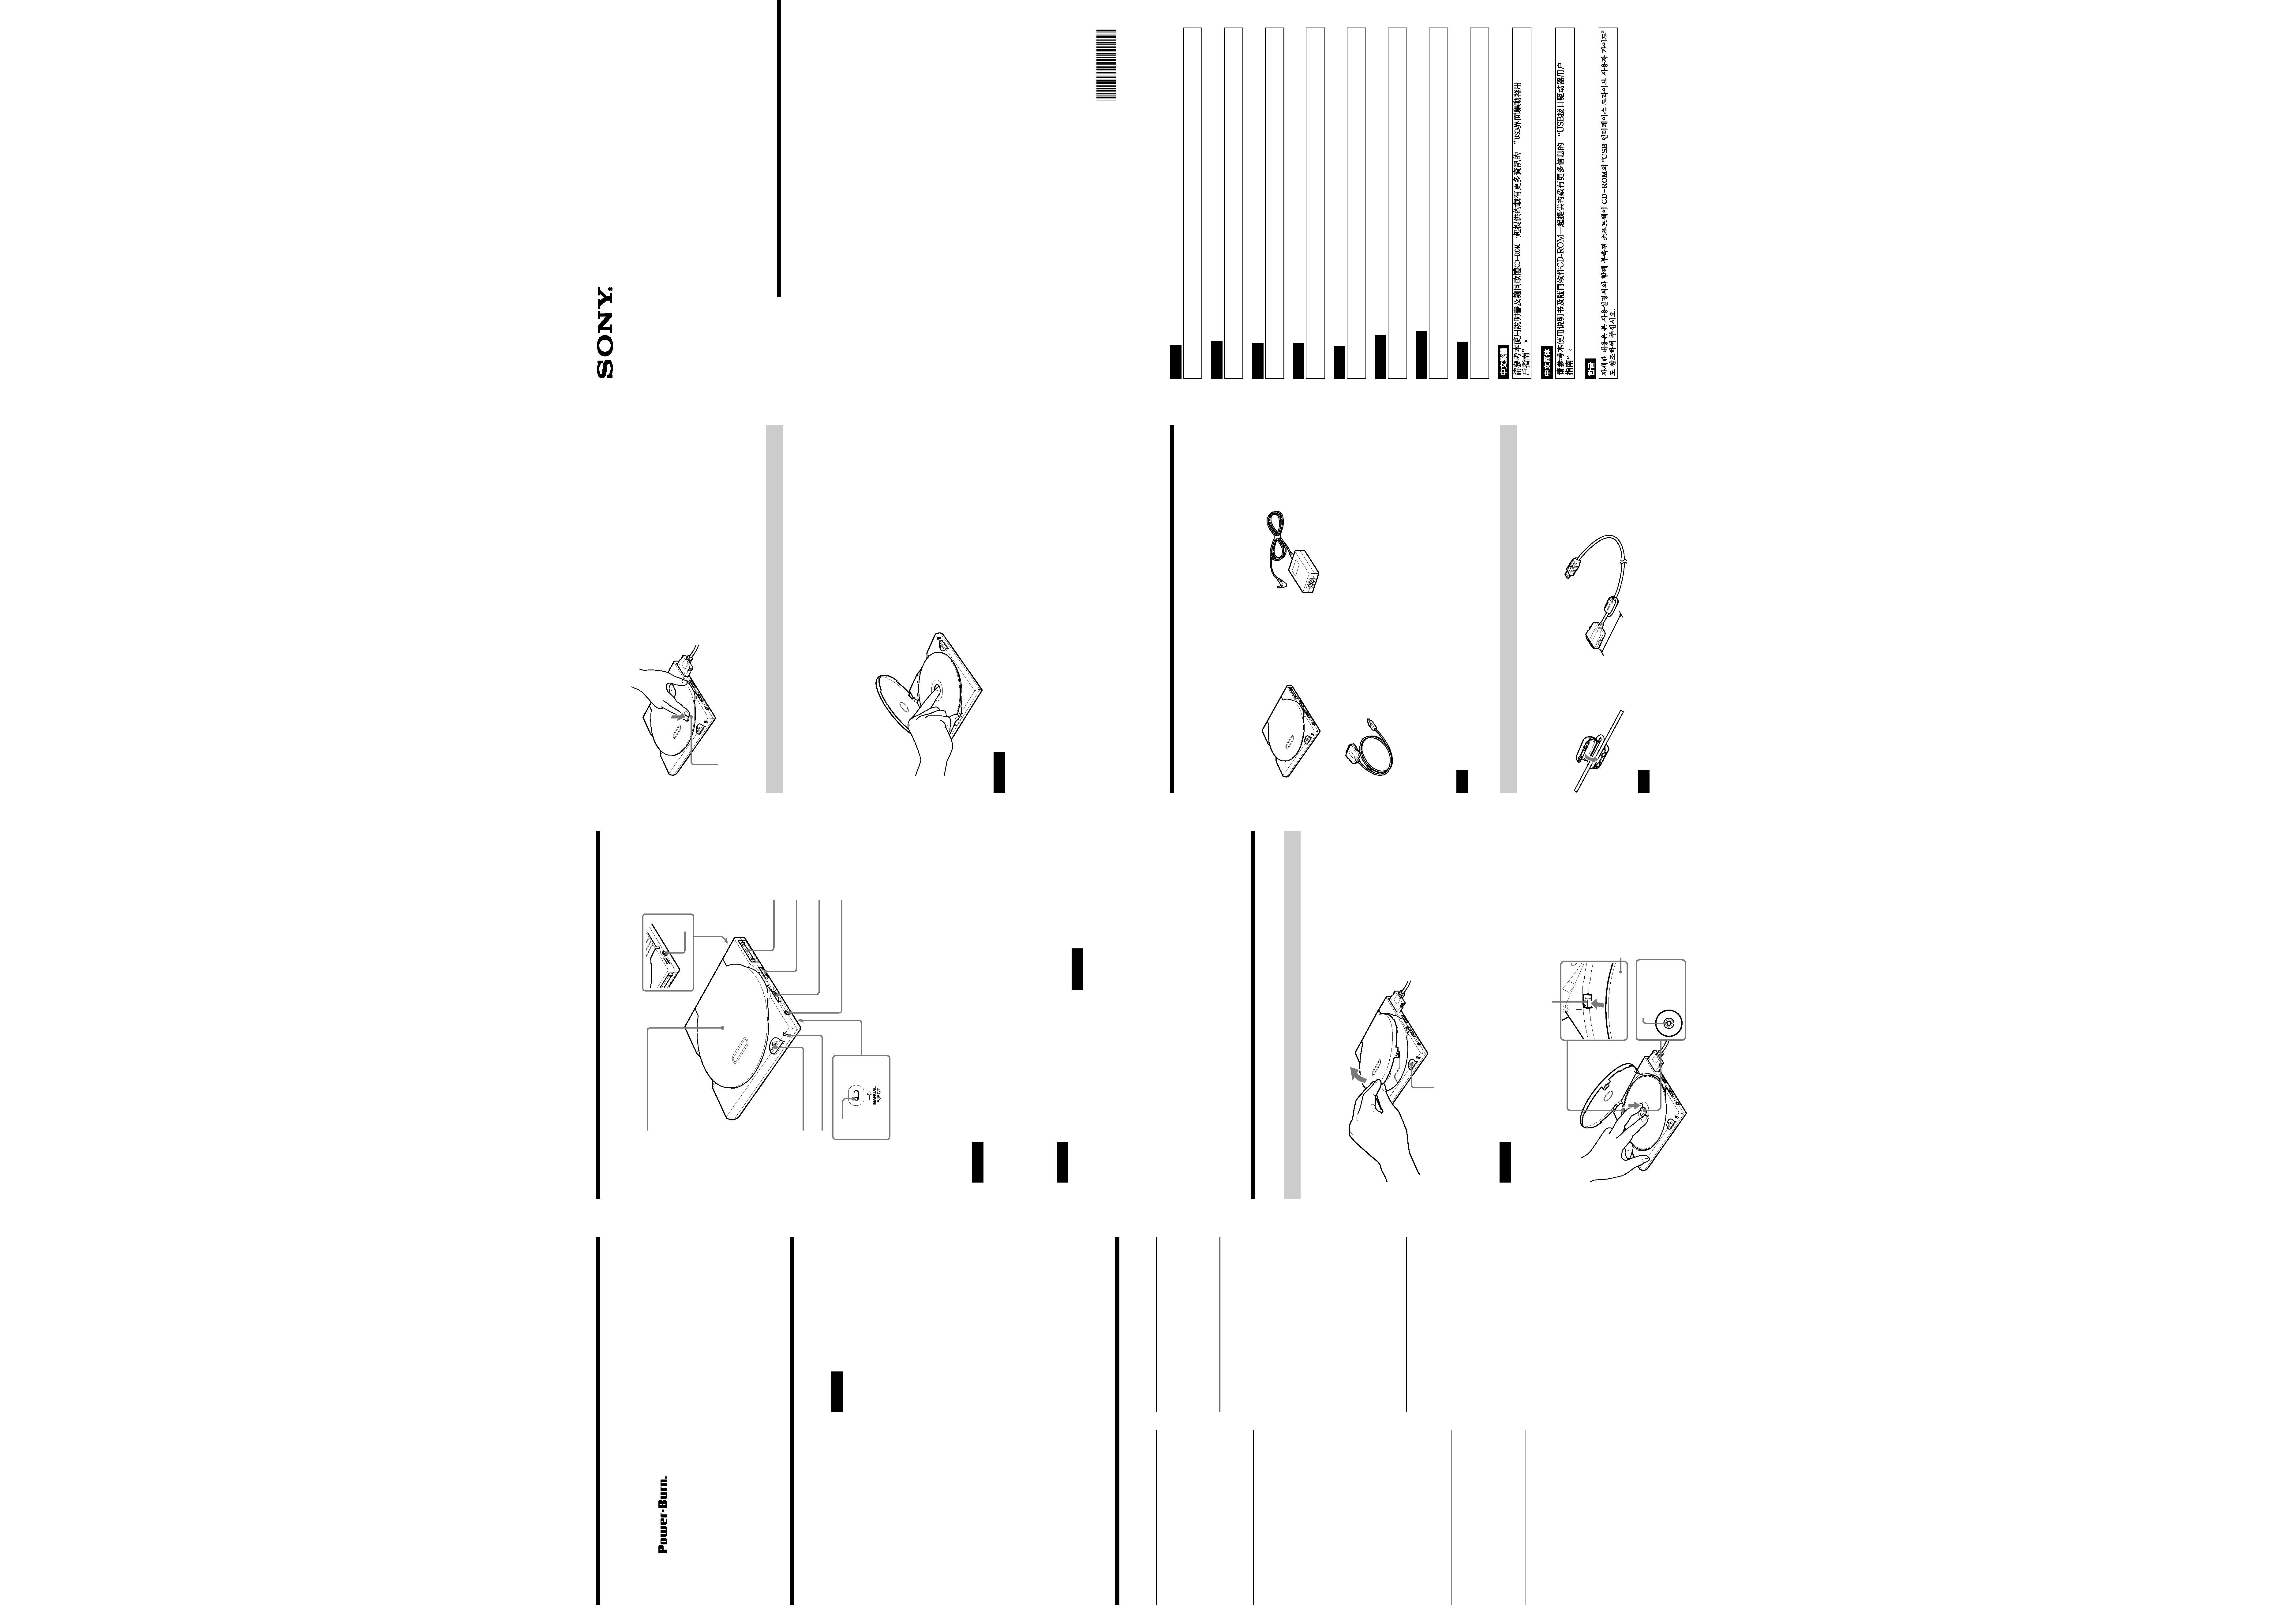
Names and Functions of Parts
Main unit
3
4
5
6
8
9
1
7
2
1 Top Cover
2 Power Jack (rear of unit)
Connect the AC adapter (provided) here.
CAUTION
Never connect any AC adapter other than the one
that was provided with the CRX85U.
3 Interface Connector
Connect the interface cable (provided)
here.
CAUTION
Never connect any interface cable other than the
one that was provided with the CRX85U.
4 Power Switch
Use this switch to turn the CRX85U on
and off.
5 Volume Dial
Use this dial to adjust the volume of the
analog audio signal that is output from
the headphone jack.
6 Headphone Jack
Headphones or active speakers can be
connected here.
7 Manual Eject Lever (bottom of unit)
When the CRX85U is off, push this
lever in the direction indicated by the
arrow to open the top cover.
8 Indicator
This indicates the operating status of the
drive. When the drive is on but idle, this
indicator is green; when the drive is in
operation, this indicator is orange.
9 Eject Button
Press this button to open the top cover.
Important
The CRX85U is equipped with an electronically
powered eject mechanism in order to prevent the
top cover from being opened accidentally while
the drive is in operation. As a result, if the drive is
off, pressing the eject button will not open the top
cover. Furthermore, even when the power is on,
depending on the status of the application that is
currently running, the top cover might not open for
one second or longer after the eject button is
pressed.
If the top cover does not open when the eject
button is pressed (unless the drive is currently
writing a disc), press the manual eject lever
(located on the bottom of the drive) in the direction
indicated by the arrow to open the top cover.
3 Close the top cover.
You can now access the data on the disc.
Ejecting a Disc
1 Press the eject button to open the top cover.
The top cover will open slightly by itself. You can then manually lift it until it opens fully.
2 Remove the disc.
Hold one finger against the edge of the disc from the side of the CRX85U, and press
another finger against the protrusion in the center of the drive to remove the disc.
CAUTION
· Make sure that the disc has stopped spinning before removing the disc.
· Do not open the top cover while the indicator is orange. Doing so may cause the computer to freeze up.
Portable
CD-RW/DVD-ROM
Drive
Printed in Malaysia
Approximately
8 cm
Loading and Ejecting Discs
Loading a Disc
1 Press the eject button to open the top cover.
The top cover will open slightly by itself. Lift it all of the way open manually.
2 Load a disc.
Push down on the center of the disc until the disc clicks into place. Do not press too hard.
Also, be careful not to touch the lens or any other optical parts in the drive.
CAUTION
When loading a disc, press the disc's edge against the side of the spring-loaded bumper inside the disc
compartment. Make sure that the disc's recording surface does not sit on top of the bumper before closing the
drive cover.
Press here.
Label facing up
Disc
Disc
Bumper
Eject button
English
Please refer to this manual together with the "USB Interface Drive User's Guide" in the attached Software CD-
ROM, which carries more detailed information.
Français
Reportez-vous au présent manuel ainsi qu'aux documents intitulés "USB Interface Drive Guide de l'utilisateur"
contenu sur le CD-ROM accompagnant ce produit pour plus de détails.
Deutsch
Einzelheiten entnehmen Sie bitte diesem Handbuch zusammen mit der "Betriebsanleitung für das USB-
Schnittstellenlaufwerk" auf der mitgelieferten CD-ROM, die zusätzliche Details enthält.
Español
Consulte este manual junto con la "Guía del usuario de la unidad de interfaz USB" del CD-ROM del software
suministrado, que ofrece información más detallada.
Italiano
Fare riferimento a questo manuale insieme a "Guida dell'utilizzatore dell'unità disco a interfaccia USB" nel
CD-ROM del software allegato, che contiene informazioni più dettagliate.
Português
Consulte este manual junto com o "Guia do Utilizador do Drive de Interface USB" no CD-ROM do Software
em anexo, que traz informações mais detalhadas.
Nederlands
Raadpleeg deze gebruiksaanwijzing samen met de "USB station-interface gebruikershandleiding" op de
bijgeleverde CD-ROM, die meer gedetailleerde informatie bevat.
Svenska
Vi hänvisar till denna bruksanvisning tillsammans med "Användarguide för enhet med USB gränssnitt" på den
bifogade CD-ROM-skivan, som innehåller mer detaljerad information.
Press here firmly to close.
Required System Configuration
The CRX85U can be used with a personal
computer with the following specifications:
Windows PC
CPU: Pentium II 400 MHz or faster
RAM: At least 64 MB
Hard disk space: 1 GB or more
OS: Windows 98 Second Edition
(Windows 98 SE), Windows 2000
Professional (Windows 2000), Windows
Millennium (Windows Me), or Windows
XP Home Edition or Professional
(Windows XP)
Computer must have a CD-ROM drive or
be capable of connection to the Internet.
(Used for installing driver software with
Windows 98 SE.)
Macintosh
PowerMac G3, G4, G4 Cube, iMac,
iBook, PowerBook G3, G4
Mac OS 9.0.4, 9.1, 9.2.1
At least 64MB RAM
Macintosh with built in USB connector
CAUTION
· The required system configuration is designed to
provide the basic capability to write CD-R and CD-
RW discs. In order to actually use the CRX85U, it is
necessary to satisfy not only the system requirements
described here, but also the system requirements that
are specified for the writer software. (The system
requirements for writer software usually exceed the
system requirements described here.)
· system meeting the following requirements is needed
in order to use USB 2.0 operation with this device.
-- USB interface cable conforming to USB 2.0
(supplied with this device)
-- Computer that is equipped with a USB
2.0-compliant USB connector or PCI interface
card1), and on which the USB 2.0 EHCI driver
software2) has been installed.
1) Recommended Product: Adaptec
"USB2connect" card (AUA-3100LP)
2) Supplied with currently available PCI interface
cards that conform to USB 2.0.
· When connected to a product that conforms to the
earlier USB 1.1 standard, the device operates at the
fastest transfer speed allowed under USB 1.1.
· Macintosh supports USB1.1 only.
(As of September 2001)
Introduction
The CRX85U has the following features:
Features
technology
to prevent buffer under-run errors.
Can write CD-R discs at a speed of
up to 20
×.
Can write CD-RW discs at a speed of
up to 8
×.
Can read CD-ROM discs at a speed of
up to 24
×.
Can read DVD-ROM discs at a speed of
up to 8
×.
Has a compact, lightweight design for
portability.
Includes a compact, lightweight AC
adapter that is compatible with power
supply voltages from 100 to 240 V.
Provided with a USB 2.0 interface cable.
When connected to a system supporting
USB 2.0, provides full-performance read
speeds of up to 24
× (3600 Kbytes/sec).
Speed
Write speed
20
× maximum (CD-R)
8
× maximum (CD-RW)
Read speed
24
× maximum (CD-ROM)
8
× maximum (DVD-ROM)
Discs
Compatible discs
CD-ROM
DVD-ROM
CD-ROM XA
DVD-Video
Photo CD
(Multisession compatible)
CD-DA
CD-R
CD-RW
CD-I
Video CD
CD Extra (CD+)
CD TEXT
Audio combined CD-ROM
Disc diameter: 12 cm
8 cm (CD-DA reading only)
Writing methods
Track at once
Disc at once
Session at once
Fixed packet writing
Drive
Data transfer rate
Maximum: 3600 kb/s (24
×1))
Access time
Average (random stroke): 160 ms
1) The maximum data transfer rate varies
according to the performance capabilities
of the computer.
Operating Environment/Storage
Environment
Operating temperature
5
°C to 35°C
Power Supply/Miscellaneous
Power supply
External power jack: rated 5 V
AC adapter: AC-CRX85
(rated input AC100 V - 240 V)
Power consumption
2.0 A
Size
Approximately 129
× 18 × 134 mm
(W
× H × D)
Weight
Approximately 230 g (main unit only)
Interfaces
Drive interface
USB 2.0 compliant*
* For connection to a computer using the
ACR-U20 interface cable provided with
the CRX85U.
Buffer capacity
8 MB
These specifications and the appearance of
the product are subject to change without
notice.
Main Specifications
Safety Regulations
WARNING
You are cautioned that any changes or modifications not expressly approved in this manual
could void your authority to operate this equipment.
To prevent fire or shock hazard, do not expose the unit to rain or moisture.
To avoid electrical shock, do not open the cabinet. Refer servicing to qualified personnel only.
CAUTION:
As the laser beam in this CRX85U is harmful to the eyes, do not attempt to disassemble the
cabinet. Refer servicing to qualified personnel only.
The use of optical instruments with this product will increase eye hazard.
The use of controls or adjustments or performance of procedures other than those specified
herein may result in hazardous radiation exposure.
This label is located on the disc tray and inside the bottom cover.
Dieses Etikett befindet sich auf der CD-Schublade und auf der Innenseite der unteren
Abdeckung.
DANGER
VISIBLE AND INVISIBLE LASER RADIATION WHEN OPEN.
AVOID DIRECT EXPOSURE TO BEAM
VORSICHT
SICHTBARE UND UNSICHTBARE LASERSTRAHLUNG. WENN ABDECKUNG
GEOFFNET NICHT DEM STRAHL AUSSETZEN.
This CD-RW/DVD-ROM drive is classified as a CLASS 1 LASER PRODUCT.
The CLASS 1 LASER PRODUCT label is located on the bottom cover.
Bei diesem CD-RW/DVD-ROM-Laufwerk handelt es sich um ein Laser-Produkt der Klasse 1.
Das Etikett mit der Aufschrift LASER KLASSE 1 PRODUKT befindet sich auf der Unterseite
des Gehäuses.
CLASS 1
LASER PRODUCT
LASER KLASSE 1
PRODUKT
DANGER
VISIBLE AND INVISIBLE LASER RADIATION WHEN OPEN.
AVOID DIRECT EXPOSURE TO BEAM.
ATTENTION
RAYONNEMENT VISIBLE ET INVISIBLE EN CAS D'OUVERTURE.
EXPOSITION DANGEREUSE AU FAISCEAU.
VORSICHT
SICHTBARE UND UNSICHTBARE LASERSTRAHLUNG, WENN
ABDECKUNG GEÖFFNET. NICHT DEM STRAHL AUSSETZEN.
ADVARSEL
SYNLIG OG USYNLIG LASERSTRÅLING VED ÅBNING,
UNDGÅ UDSÆTTELSE FOR STRÅLING.
ADVARSEL
SYNLIG OG USYNLIG LASERSTRÅLING NÅR DEKSEL ÅPNES.
UNNGÅ EKSPONERING FOR STRÅLEN.
VARNING
SYNLIG OCH OSYNLIG LASERSTRÅLNING NÄR DENNA DEL ÄR
ÖPPNAD. STRÅLEN ÄR FARLIG.
VARO!
NÄKYVÄÄ JA NÄKYMÄTÖN AVATTAESSA OLET ALTTIINA
LASERSÄTEILYLLE, ÄLÄ KATSO SÄTEESEN.
FCC Compliance:
This equipment has been tested and found to comply with the limits for a Class B digital
device, pursuant to Part 15 of the FCC Rules. These limits are designed to provide reasonable
protection against harmful interference in a residential installation. This equipment generates,
uses, and can radiate radio frequency energy and, if not installed and used in accordance with
the instructions, may cause harmful interference to radio communications. However, there is
no guarantee that interference will not occur in a particular installation. If this equipment does
cause harmful interference to radio or television reception, which can be determined by turning
the equipment off and on, the user is encouraged to try to correct the interference by one or
more of the following measures:
· Reorient or relocate the receiving antenna.
· Increase the separation between the equipment and receiver.
· Connect the equipment into an outlet on a circuit different from that to which the receiver
is connected.
· Consult the dealer or an experienced radio/TV technician for help.
The shielded interface cable recommended in this manual must be used with this equipment in
order to comply with the limits for a digital device pursuant to Subpart B of Part 15 of FCC
Rules.
Note:
If you have any questions about this product, you may call the telephone number listed on the
"Product and Support Information" page. The telephone number below is not for customer
service but only for official purpose.
Declaration of Conformity
Trade Name:
SONY
Model No.:
CRX85U
Responsible Party: Sony Electronics Inc.
Address:
680 Kinderkamack Road, Oradell, NJ 07649 USA
Telephone No.:
201-930-6972
This device complies with Part 15 of the FCC Rules. Operation is subject to the following
two conditions:
(1) This device may not cause harmful interference, and
(2) This device must accept any interference received, including interference that may cause
undesired operation.
CE Sicherheitsbestimmungen
Diese Ausrüstung erfüllt die Europäischen EMC-Bestimmungen für die Verwendung in
folgender / folgenden Umgebung(en):
· Wohngegenden
· Gewerbegebiete
· Leichtindustriegebiete
(Diese Ausführung erfüllt die Bestimmungen der Norm EN55022, Klasse B.)
CAUTION
The mains plug on this equipment must be used to disconnect mains power.
Please ensure that the socket outlet is installed near the equipment and shall be easily accessible.
Achtung
Zur Trennung vom Netz ist der Netzsecker aus der Steckdose zu ziehen, welche sich in der Nähe des Gerätes befinden
muß und leicht zugänlich sein soll.
LUOKAN 1 LASERLAITE
KLASS 1 LASER APPARAT
· Power-Burn, and
are trademarks of Sony Corporation.
· Pentium is a registered trademarks of Intel Corporation.
· Microsoft, and Windows are registered trademarks of Microsoft Corporation.
· Macintosh and Mac OS are registered trademarks of Apple Computer Inc.
· Other system and product names used herein are registered trademarks or trademarks of their
respective manufacturers, although theTM and ®marks are not used in the text.
Before using this device, be sure to read the end users license agreements for the software
provided with your computer.
Our product guarantee is valid only when the supplied accessories (including
software) are used in the specified or recommended system environment, in
accordance with this Users Guide, and applies only to this CD-RW/DVD-ROM
drive. Our customer service and user support apply only under these product
guarantee conditions.
Please note that we cannot accept responsibility for failure of the computer or other
devices, incompatibility with special hardware, operating problems caused by
improper installation of software, loss of data, discs or other accidental or incidental
damage that might occur when using this product.
The guarantee and user support for this product are valid only within the countries
or sales regions specified on the warranty card.
Copyright laws prohibit the copying of all or part of the supplied software and Users
Guide, or loaning the software, without obtaining permission of the copyright
holder.
We cannot accept responsibility for any direct or indirect financial damage or loss
of profit that might occur when using the supplied software.
Specifications of the supplied software may be changed without notice in the
interest in product improvement.
DVD-VIDEO Playback and Region Codes
(Region Numbers)
The playing of DVD-VIDEO (DVD discs) is
protected and controlled by a region code*
setting.
* Region Playback Control standard (RPC
standard)
In order for the DVD-ROM drive to play a
DVD-VIDEO, the region code shown on the
DVD disc, the region code of the
DVD-ROM drive, and the DVD video
software region code must all match.
DVD-VIDEO Playback and Region Codes with the CRX85U
With the CRX85U, the region code can be
set up to five times, including the initial
assignment (RPC Phase 2 standard). The
CRX85U region code is set by the
DVD-VIDEO playback software.
Important
After setting the region code five times (including the
initial setting), the setting becomes permanent and
cannot be changed. Thereafter, you will only be able
to play DVD-VIDEOs whose region code matches
that set the fifth time.
Caution
Do not attempt to make unauthorized changes to the
region code. Any problems that result from doing so
will not be covered by the warranty.
Points to Consider when Playing
DVD-VIDEOs
The playback conditions for DVD-VIDEOs
are sometimes determined by software
makers. Since this drive plays back discs as
determined by the software manufacturer,
some drive functions may not always work
as expected. When playing back
DVD-VIDEOs, refer to the instructions
accompanying each disc.
· A warranty card should be provided with
this product at the place of purchase.
· Please read the warranty card, fill in the
specified information, and retain it for
future reference.
· The warranty period is one year from the
date of purchase.
Repair Requirements
If the drive needs repair, return, it together
with all supplied accessories (PC Card
cables and AC adapter) to your place of
purchase or repair service provider.
· If you return the drive to your place of
purchase or repair service provider because
of damage resulting from misuse or other
causes, you will be responsible for all
repair-related expenses, including shipping
and handling and product adjustments.
Warranty Card & After Sales Service
Warranty Card
After-Sales Service
Note
The warranty and technical support service are valid
only in the countries or sales regions specified on the
warranty card.
Repairs under Warranty
We provide repair services as described in
this and on the Warranty Card.
Please contact your supplier or repair service
provider for details.
Repairs outside of Warranty
If operation can be restored by repair, we
will repair the drive for a charge.
Product and Support Information
Sony Global Sites Information
· Products purchased in USA:*
http://www.sony.com/storagesupport
· Products purchased in Canada:
http://www.sony.ca/
· Products purchased in Europe: *
http://www.sony-cp.com/cd-rw
* Local web sites for computer peripheral
products.
About the Bundled Writing
Software
Detailed information about the supplied
writing software is available on the web sites
of the software manufacturers and software
distributors. (Accessible from the links in
each software application)
Technical Support
Please consult the above sources before
calling with questions about using CRX85U,
or with technical questions about the drive or
the supplied software. If using telephone or
email support, please have the following
information available.
· Model number: CRX85U
· Serial number
· Date and place of purchase
· Computer maker and model number
· Computer specifications (CPU speed,
memory size, OS version, etc.)
· Writer software used (version, etc.)
Local technical support service is available
in the following sales regions.
For products purchased in USA
(Sony Electronics Inc):
Monday to Saturday
8:00 a.m. - 8:00 p.m. CT
· Toll Free: 1-800-588-3847
· Free telephone support is offered for 90
days from your first call.
For products purchased in Canada
(Sony of Canada Limited):
Monday to Friday
8:00 a.m. - 8:00 p.m. EST
· Toll Free: 1-800-961-7669
· E-mail : [email protected]
For products purchased in Europe
(Sony UK Limited):
Monday - Friday 8:00 a.m. - 9:00 p.m.
· Toll Free: 00800-CNCESONY
(00800-26237669)
· E-mail: [email protected]
(For Nordic regions)
· E-mail: [email protected]
(For other European regions)
Please Record Responsibly
Before copying anything onto a CD-R or CD-RW disc, please be sure you are not
violating copyright laws. Most software companies allow you to make a back-up or
archive copy of software. Check your software's license agreement for specific details.
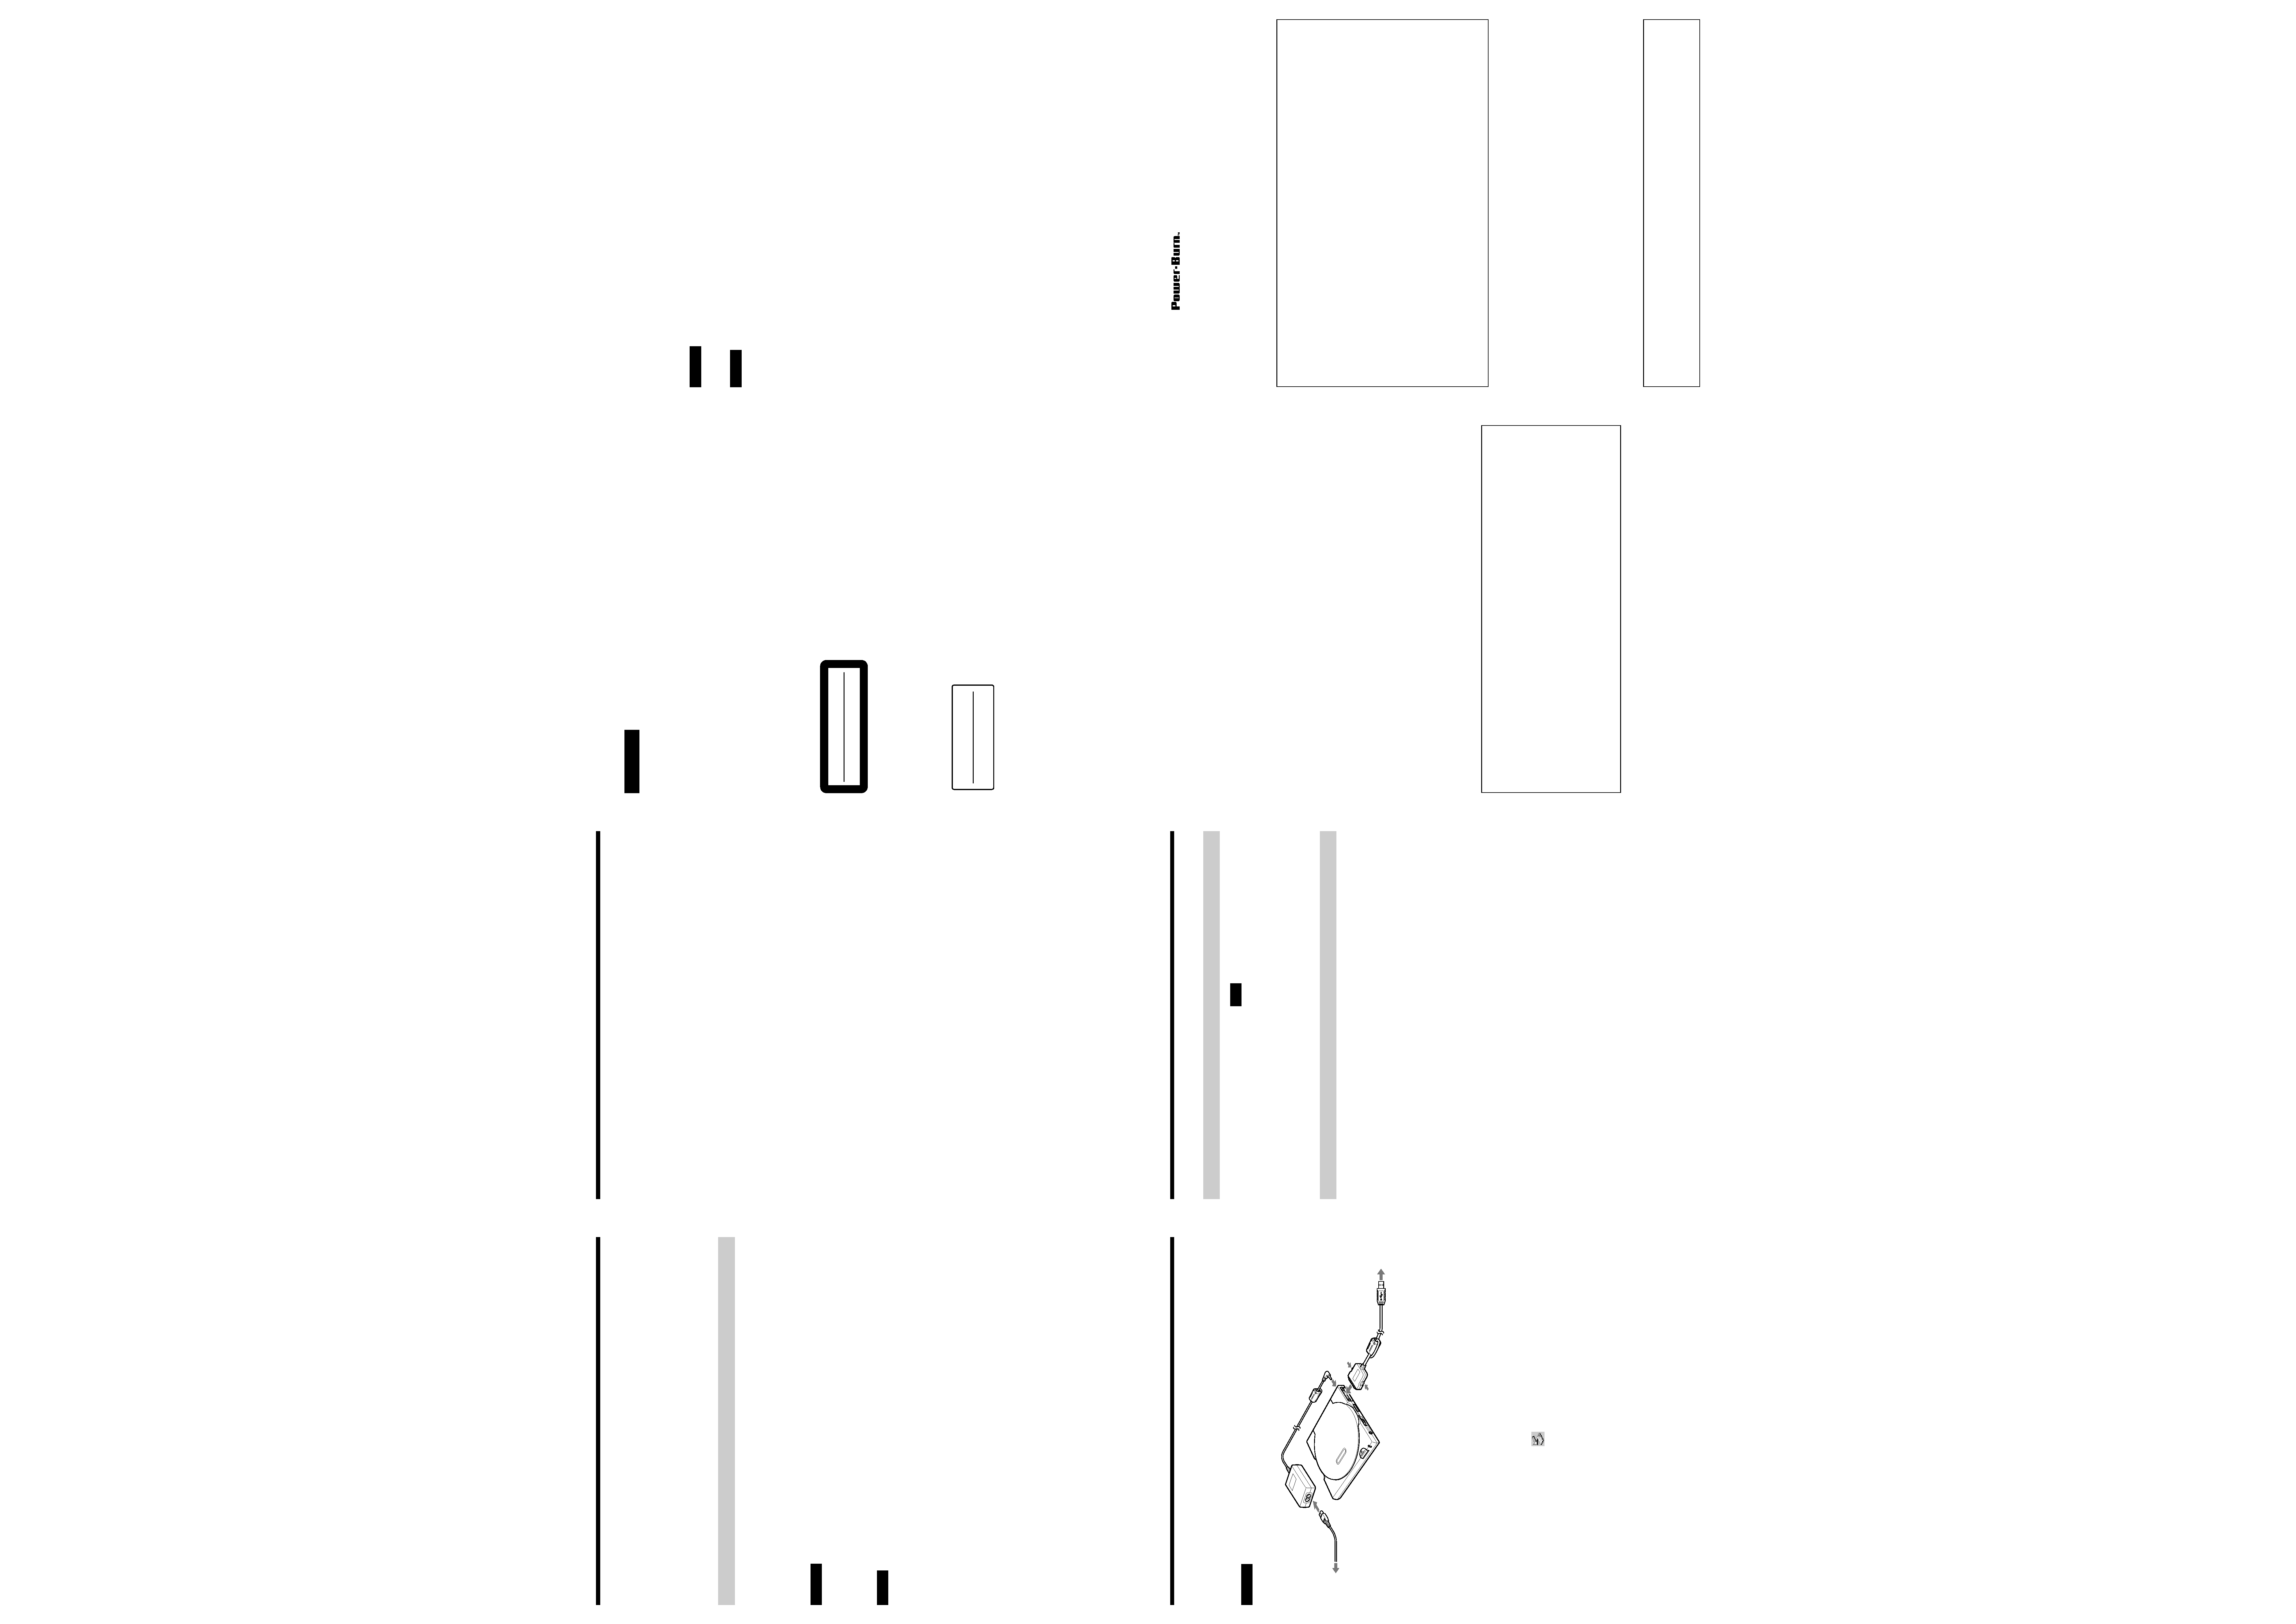
Connecting the Drive to a Personal
Computer
Connect the drive to a personal computer as shown in the illustration below.
CAUTION
· Be sure to read the Quick Start Guide before connecting the CRX85U to the computer the first time.
· Use only the supplied AC adapter, power cord, and USB cable for connections.
Precautions for USB Connections
· Connect the CRX85U directly to a USB port on the computer. Operation through a hub
(including keyboard hubs) cannot be guaranteed.
· Do the following before disconnecting the interface cable from the CRX85U.
Disconnect the connector on the computer end of the cable.
Turn off the power to the CRX85U.
Using the CRX85U with Windows XP, Windows Me or Windows 2000
Once the CRX85U has been set up, the USB cable can be connected and removed while the
CRX85U and computer remain turned on. However, for Windows XP, Windows Me and
Windows 2000, we recommend clicking
on the task bar and allowing the CRX85U to stop
before removing the cable. Otherwise, a warning message will be displayed when the USB
cable is removed.
To USB connector on the PC
to AC power outlet