© 2002 Sony Corporation
US
FM/AM
Compact Disc
Player
CDX-MP30
For installation and connections, see the supplied installation/connections manual.
En ce qui concerne l'installation et les connexions, consulter le manuel
d'installation/raccordement fourni.
Para obtener información sobre la instalación y las conexiones, consulte el manual
de instalación/conexiones suministrado.
Owner's Record
The model and serial numbers are located on the bottom of the unit.
Record these numbers in the space provided below.
Refer to these numbers whenever you call upon your Sony dealer regarding this
product.
Model No. CDX-MP30 Serial No.
3-241-296-21 (1)
FR
ES
Operating Instructions
Mode d'emploi
Manual de instrucciones

2
Welcome !
Thank you for purchasing this Sony Compact
Disc Player. You can enjoy its various features
even more with:
·MP3 file playback.
· CD-R/CD-RW which can have a session
added can be played (page 7).
·Discs recorded in Multi Session (CD-Extra,
Mixed CD, etc.) can be played, depending on
the recording method (page 7).
·Optional CD/MD units (both changers and
players)*1.
·ID3 tag*2 version 1 information (displayed
when an MP3 file is played).
·CD TEXT information (displayed when a CD
TEXT disc*3 is played).
·Supplied controller accessory
Card remote commander
RM-X115
·Optional controller accessory
Rotary commander
RM-X4S
*1 This unit works with Sony products only.
*2 ID3 tag is an MP3 file that contains information
about album name, artist name, track name,
etc.
*3 A CD TEXT disc is an audio CD that includes
information such as the disc name, artist name
and track names. This information is recorded
on the disc.
The "XM Ready" logo indicates that this
product will control a Sony XM tuner module
(sold separately).
Please see your nearest authorized Sony dealer
for details on the XM tuner module.
For instructions on XM tuner operation, please
refer to the XM tuner module's included
instruction manual.
Warning
This equipment has been tested and found to
comply with the limits for a Class B digital
device, pursuant to Part 15 of the FCC Rules.
These limits are designed to provide
reasonable protection against harmful
interference in a residential installation. This
equipment generates, uses, and can radiate
radio frequency energy and, if not installed
and used in accordance with the instructions,
may cause harmful interference to radio
communications. However, there is no
guarantee that interference will not occur in a
particular installation. If this equipment does
cause harmful interference to radio or
television reception, which can be determined
by turning the equipment off and on, the user
is encouraged to try to correct the interference
by one or more of the following measures:
-- Reorient or relocate the receiving antenna.
-- Increase the separation between the
equipment and receiver.
-- Connect the equipment into an outlet on a
circuit different from that to which the
receiver is connected.
-- Consult the dealer or an experienced radio/
TV technician for help.
You are cautioned that any changes or
modifications not expressly approved in this
manual could void your authority to operate
this equipment.
CAUTION
The use of optical instruments with this
product will increase eye hazard.

3
Table of Contents
Location of controls ............................................. 4
Precautions ............................................................ 6
Notes on discs ....................................................... 6
About MP3 files .................................................... 7
Getting Started
Resetting the unit ................................................. 9
Detaching the front panel ................................... 9
Setting the clock ................................................. 10
CD Player
CD/MD Unit (optional)
Playing a disc ...................................................... 11
Display items ...................................................... 12
Automatically scrolling a display item
-- Auto Scroll ............................................... 12
Playing tracks repeatedly
-- Repeat Play ............................................... 13
Playing tracks in random order
-- Shuffle Play ............................................... 13
Labeling a CD
-- Disc Memo* .............................................. 14
Locating a disc by name
-- List-up* ..................................................... 15
* Functions available with optional CD/MD unit
Radio
Storing stations automatically
-- Best Tuning Memory (BTM) ................... 15
Storing only the desired stations ..................... 16
Receiving the stored stations ............................ 16
Storing station names
-- Station Memo ........................................... 17
Tuning in a station through a list
-- List-up ....................................................... 17
Other Functions
Using the rotary commander ........................... 18
Adjusting the sound characteristics ................ 20
Quickly attenuating the sound ........................ 20
Changing the sound and display settings ...... 20
Selecting the sound position
-- My Best sound Position (MBP) .............. 21
Boosting the bass sound
-- D-bass ........................................................ 21
Additional Information
Maintenance ........................................................ 22
Removing the unit ............................................. 23
Specifications ...................................................... 24
Troubleshooting .................................................. 25
Error displays/Messages .................................. 26

4
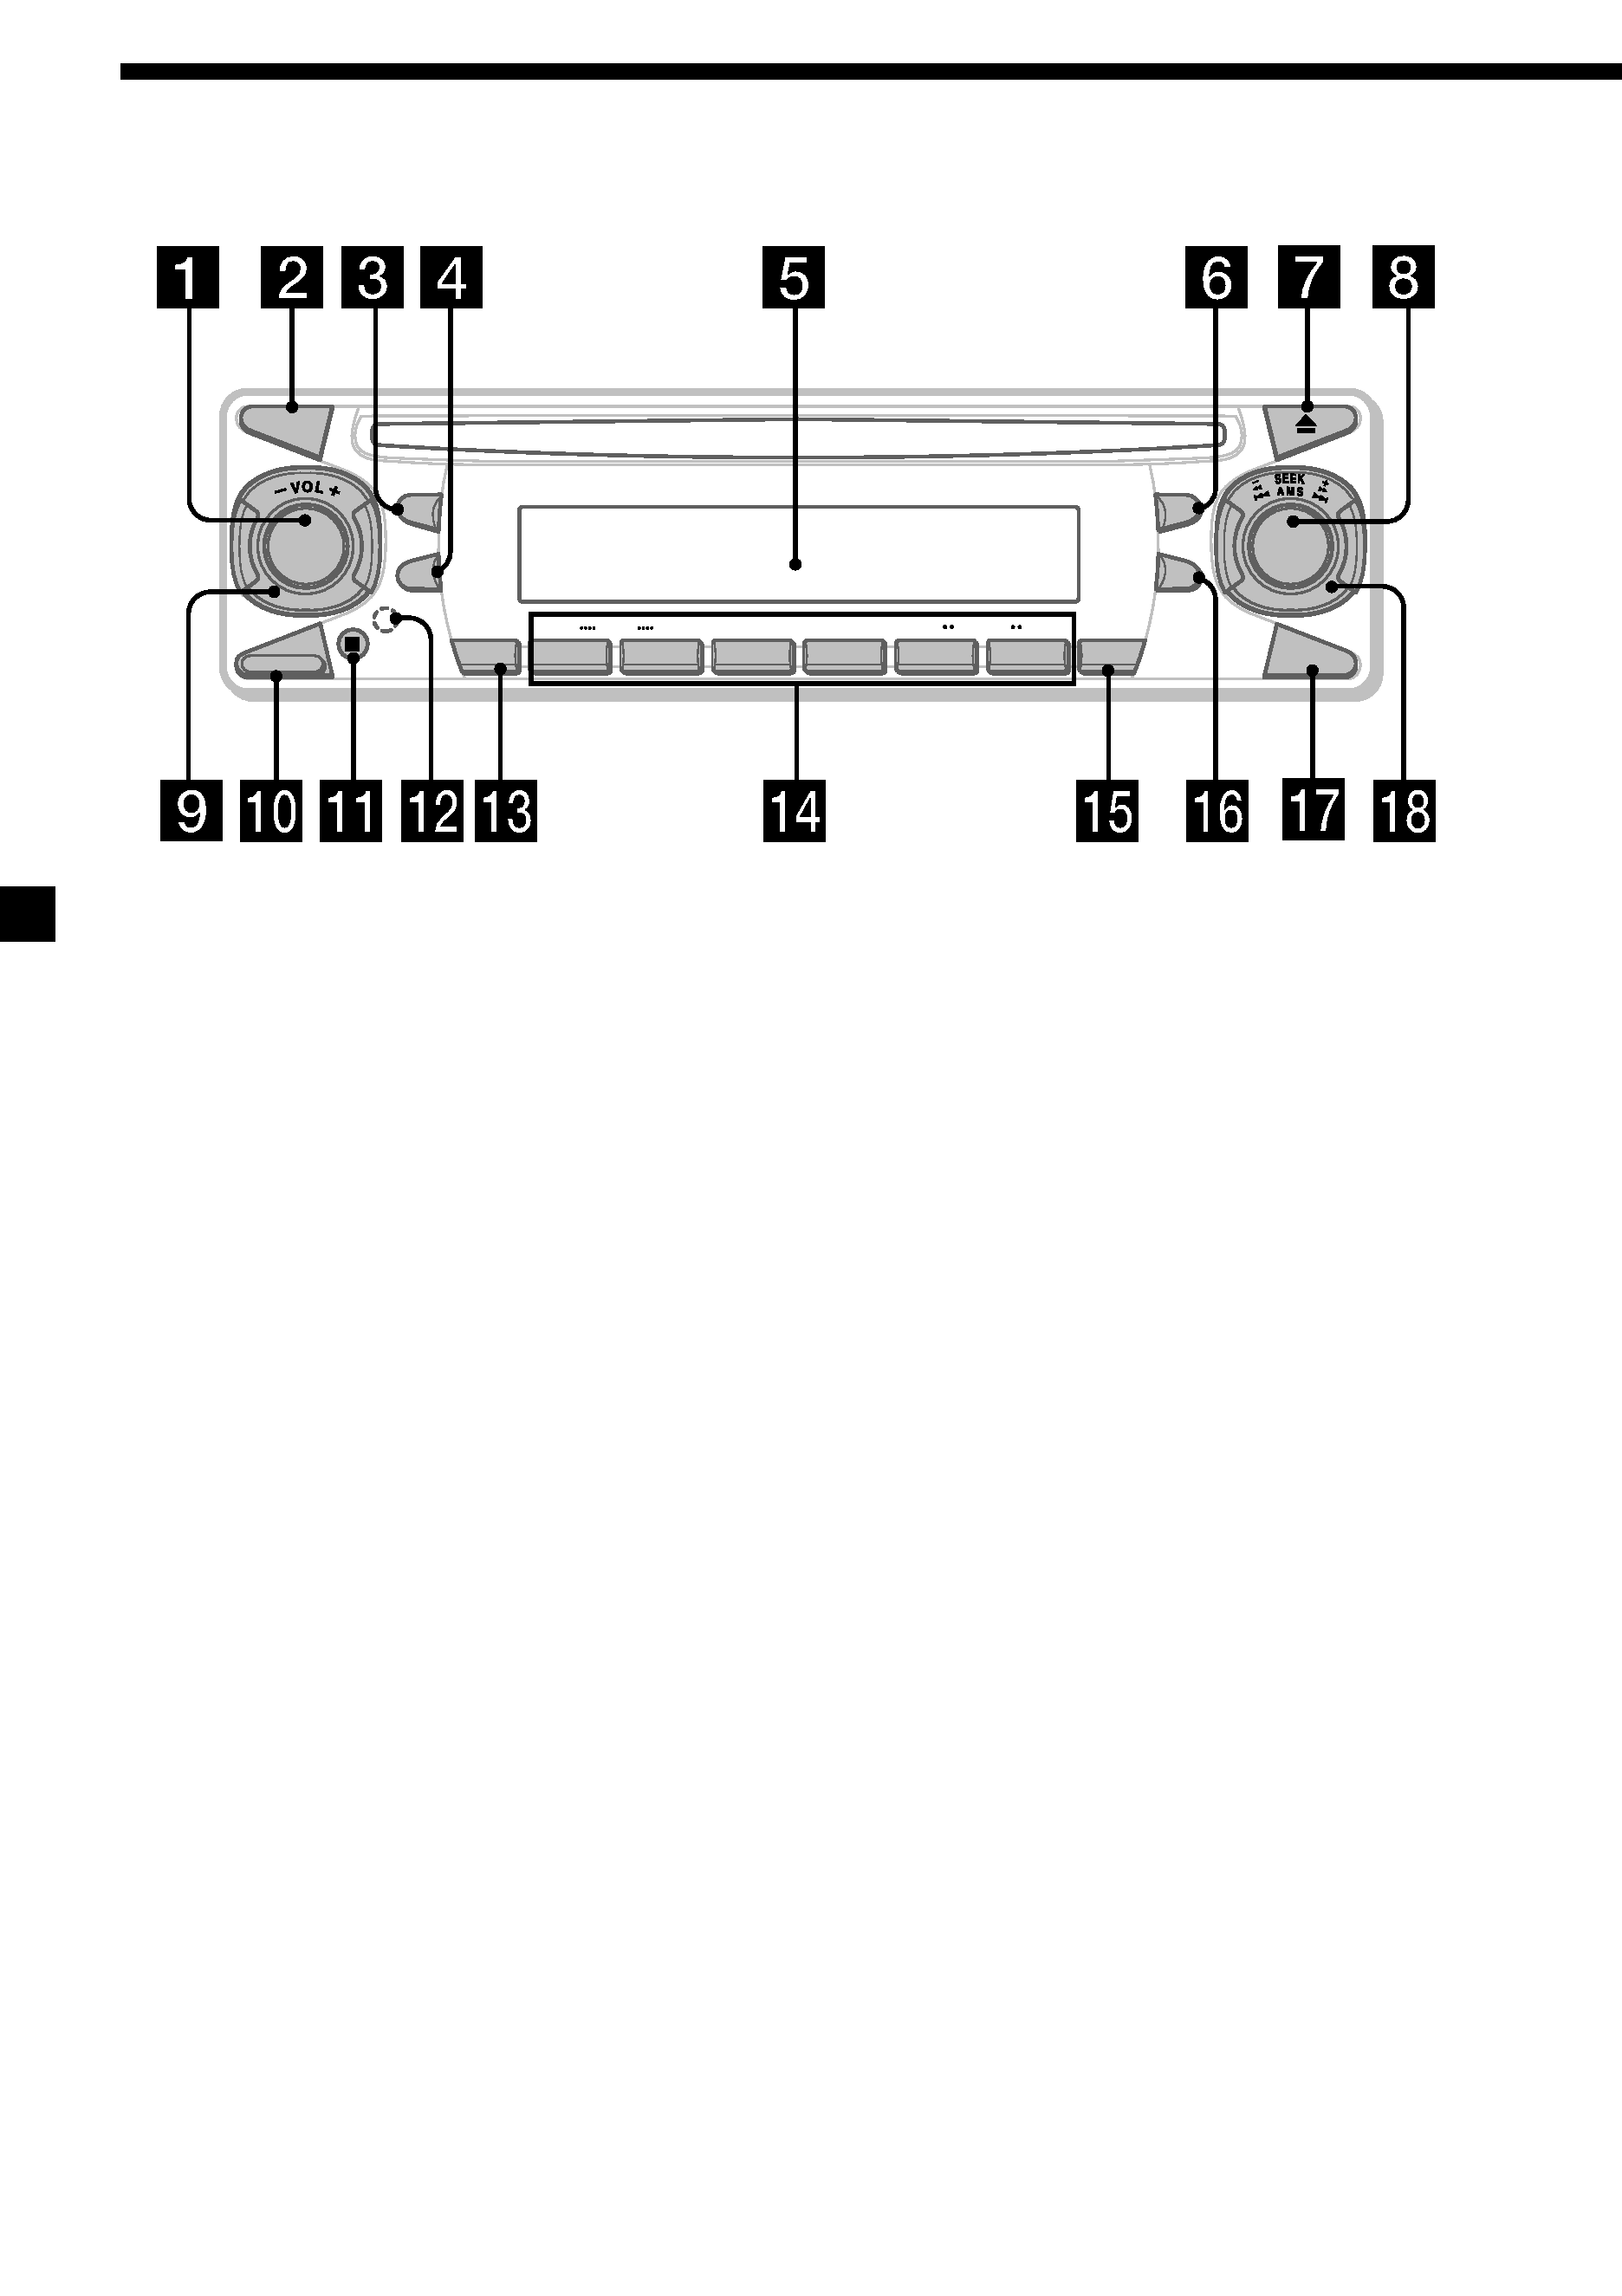
Location of controls
1 SOURCE (Power on/Radio/CD/MD)
button 11, 14, 15, 16, 17
2 MODE button 11, 14, 15, 16, 17
3 SEL (select) button 10, 12, 14, 17, 20, 21
4 DSPL (display mode change) button
10, 12, 14, 17
5 Display window
6 MBP (My Best sound Position) button 21
7 Z (eject) button 11
8 D-BASS button 21
9 VOL (volume) /+ control dial 10, 14, 20
0 RELEASE (front panel release) button 9
qa Receptor for the card remote
commander
qs RESET button (located on the front side of
the unit, behind the front panel) 9
qd ATT (attenuate) button 20
CDX-MP30
SOURCE
SEL
DSPL
MODE
LIST
MBP
OFF
1
2
3
4
5
6
SENS
ATT
RELEASE
D-BASS
+
REP
DISC
+
ALBUM
SHUF
BTM
Refer to the pages listed for details.
qf Number buttons 12, 16, 20
(1) DISC 11
(2) DISC + 11
(3) REP 13
(4) SHUF 13
(5) ALBUM 11
(6) ALBUM + 11
qg SENS/BTM button 15, 16
qh LIST button 14, 15, 17
qj OFF button* 9, 11
qk SEEK/AMS /+ control dial 11, 15, 16
* Warning when installing in a car
without an ACC (accessory) position
on the ignition key switch
Be sure to press (OFF) on the unit for 2
seconds to turn off the clock display after
turning off the engine.
Otherwise, the clock display does not turn
off and this causes battery drain.

5
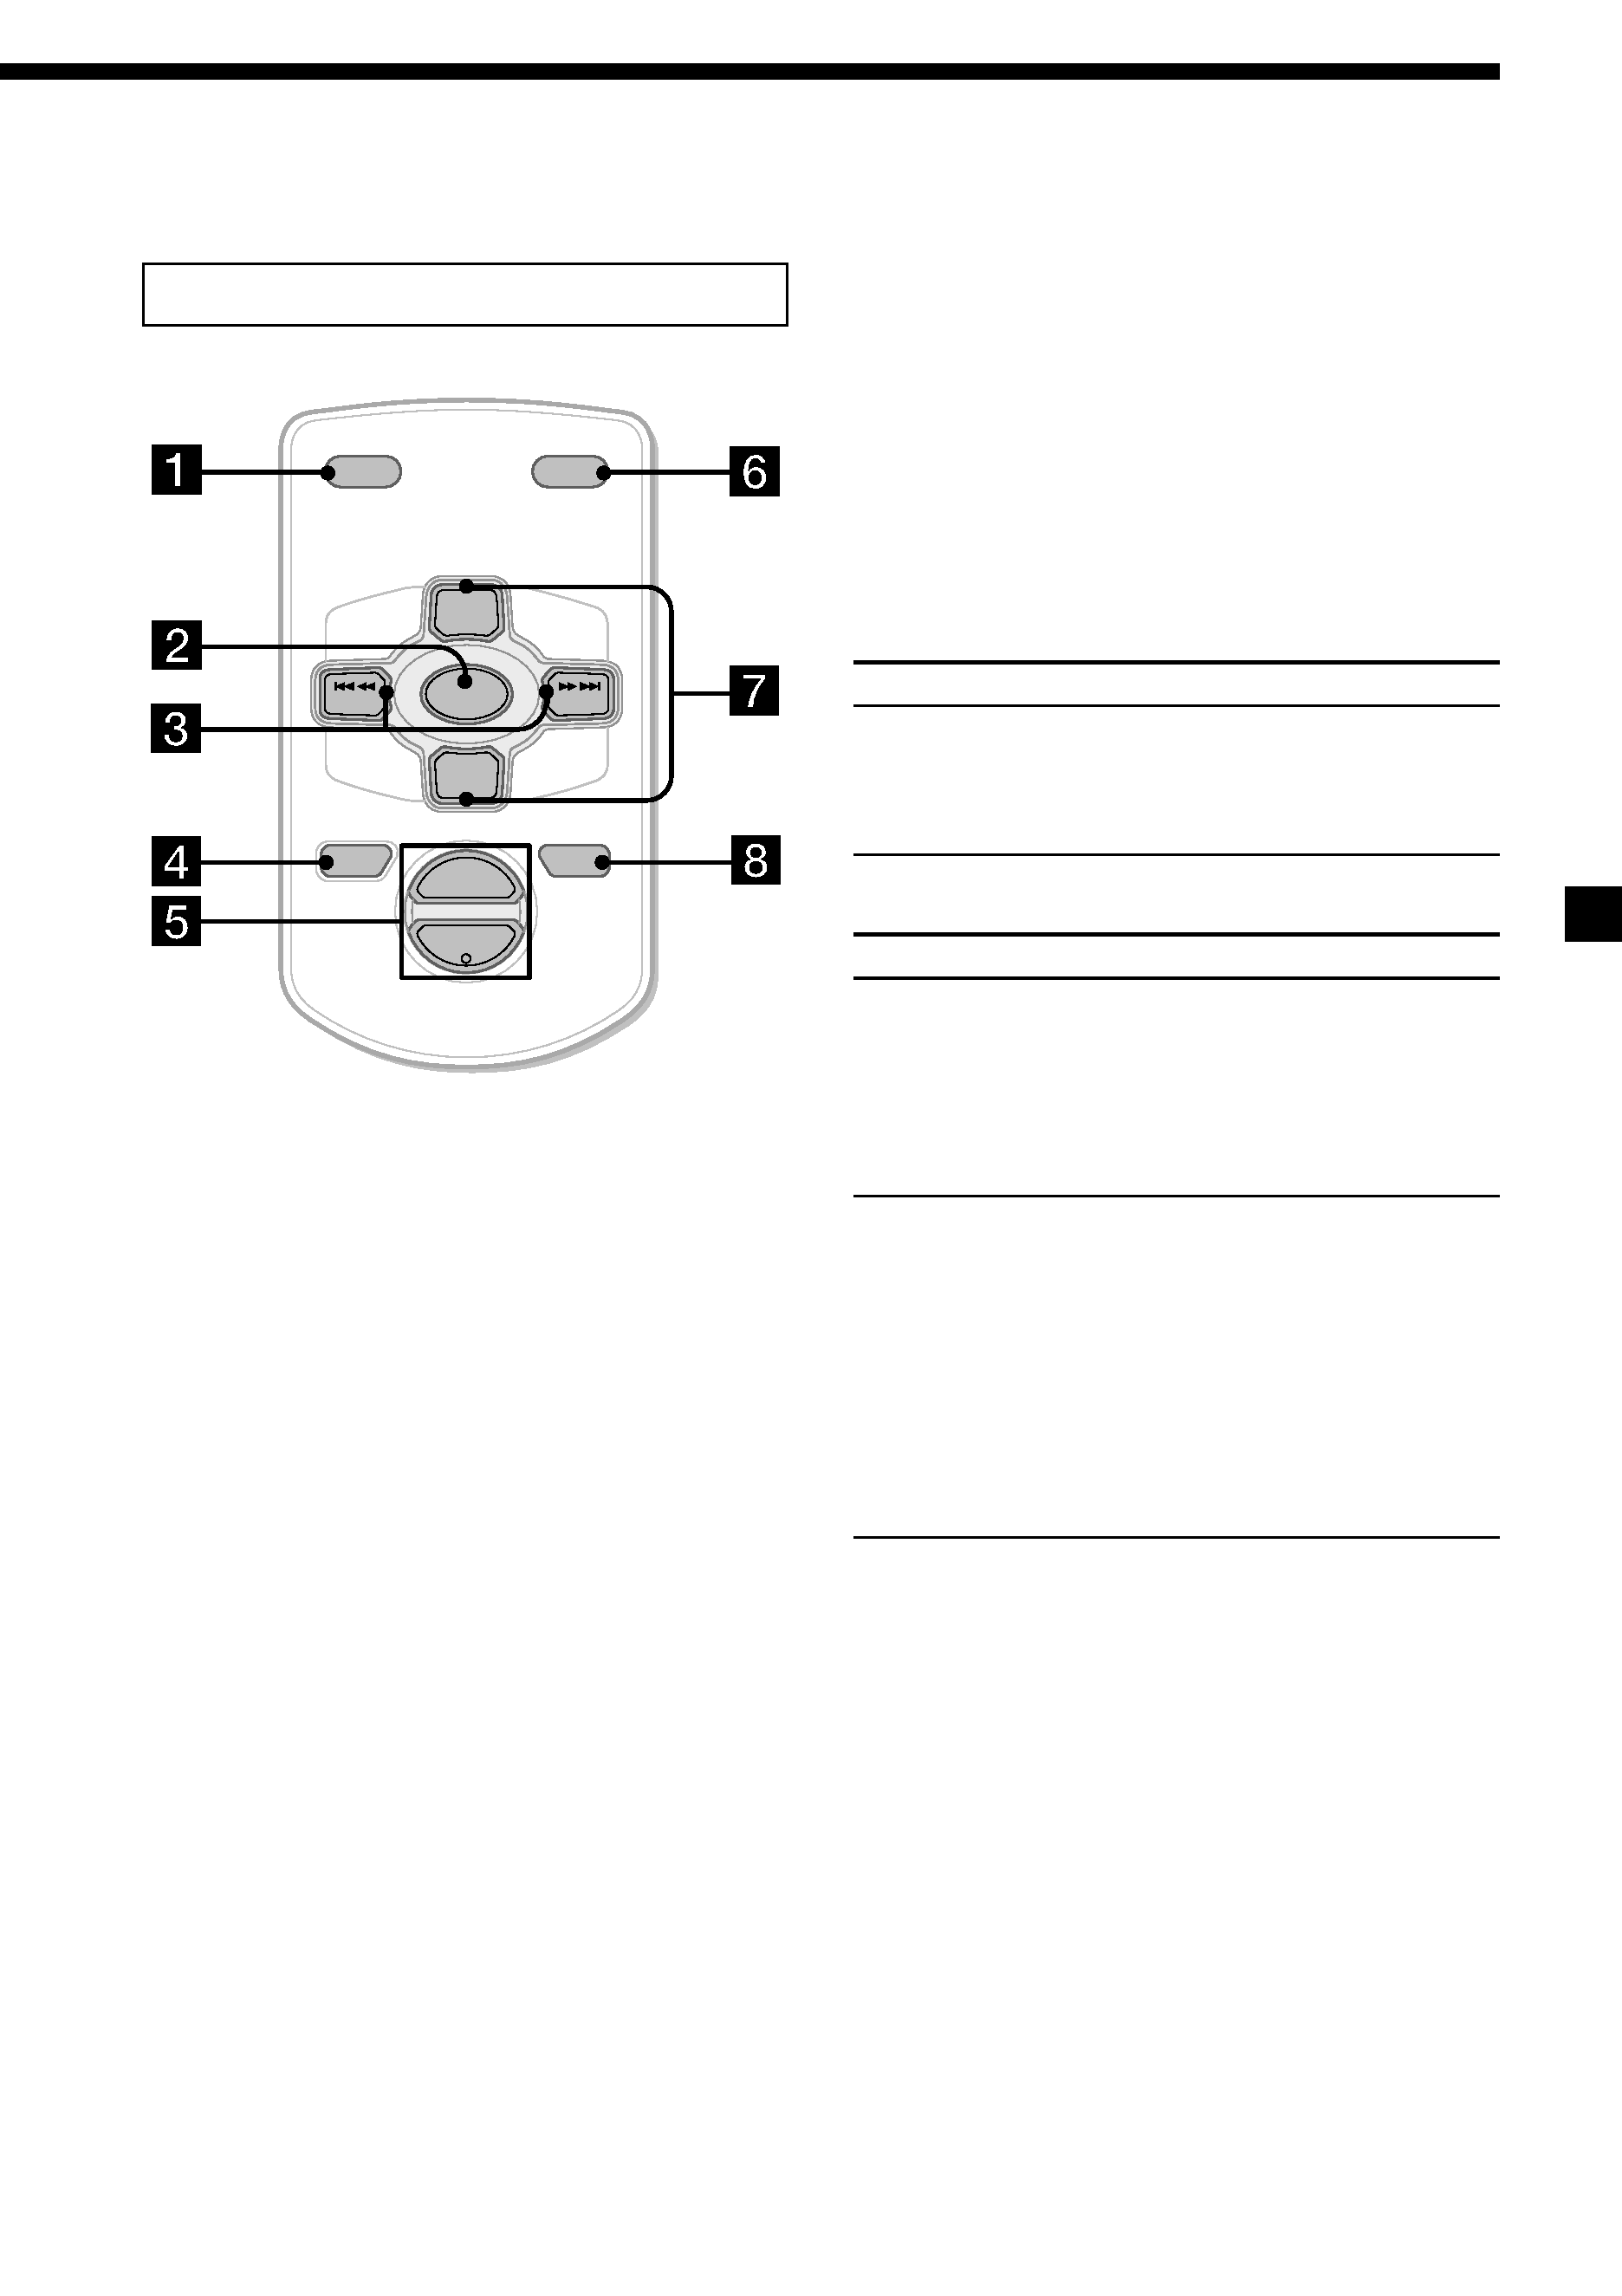
Card remote commander RM-X115
The corresponding buttons of the card
remote commander control the same
functions as those on this unit.
1 DSPL button
2 SOURCE button
3 SEEK/AMS (/+) buttons
4 OFF button
5 VOL (+/) buttons
6 MODE button
7 DISC/ALBUM/PRESET (+/) buttons
8 ATT button
Note
If the unit is turned off by pressing (OFF) for 2
seconds, it cannot be operated with the card
remote commander unless (SOURCE) on the unit is
pressed, or a disc is inserted to activate the unit
first.
Tip
Refer to "Replacing the lithium battery" for details
on how to replace the batteries (page 23).
ATT
OFF
DSPL
MODE
SOURCE
VOL
+
PRESET
+
PRESET
SEEK
SEEK+
Selecting a disc and album with the
card remote commander
Disc and album can be skipped using the
DISC/ALBUM/PRESET (+/) buttons on the
card remote commander.
(With this unit)
To
Press
Skip albums*
Album selection
(With optional unit)
To
Do this
Skip discs
Disc selection
Skip albums*
Album selection
* Available only when an MP3 file is played.
+ or [once for each album]
To continuously skip
albums, press and hold
either button.
Press + or [once for each
disc]
To continuously skip discs,
press once and press again
within 1 second (and hold)
either button.
1
To enter Album
selection mode, press
and hold + or for a
moment.
Within 1 second,
proceed to step 2.
2
Press + or quickly and
repeatedly, to skip
albums one by one.
