4-229-440-12 (1)
2000 Sony Corporation
CDP-M333ES
Operating Instructions
Compact Disc
Player

2
WARNING
To prevent fire or shock
hazard, do not expose
the unit to rain or
moisture.
To avoid electrical shock,
do not open the cabinet.
Refer servicing to
qualified personnel only.
Reorient or relocate the receiving
antenna.
Increase the separation between the
equipment and receiver.
Connect the equipment into an outlet
on a circuit different from that to
which the receiver is connected.
Consult the dealer or an experienced
radio/TV technician for help.
CAUTION
You are cautioned that any changes or
modifications not expressly approved in
this manual could void your authority to
operate this equipment.
Owner's Record
The model and serial numbers are
located at the rear of the unit.
Record the serial number in the space
provided below. Refer to them whenever
you call upon your Sony dealer
regarding this product.
Model No. CDP-M333ES
Serial No.
_________________________
This symbol is intended to alert
the user to the presence of
uninsulated "dangerous voltage"
within the product's enclosure
that may be of sufficient
magnitude to constitute a risk of
electric shock to persons.
This symbol is intended to alert
the user to the presence of
important operating and
maintenance (servicing)
instructions in the literature
accompanying the appliance.
INFORMATION
This equipment has been tested and
found to comply with the limits for a
Class B digital device, pursuant to Part
15 of the FCC Rules. These limits are
designed to provide reasonable
protection against harmful interference
in a residential installation. This
equipment generates, uses, and can
radiate radio frequency energy and, if
not installed and used in accordance
with the instructions, may cause harmful
interference to radio communications.
However, there is no guarantee that
interference will not occur in a particular
installation. If this equipment does cause
harmful interference to radio or
television reception, which can be
determined by turning the equipment off
and on, the user is encouraged to try to
correct the interference by one or more of
the following measures:
Welcome!
Thank you for purchasing this Sony
Compact Disc Player. Before operating
the unit, please read this manual
thoroughly and retain it for future
reference.
About This Manual
The instructions in this manual are for
model CDP-M333ES.
Conventions
· Instructions in this manual describe
the controls on the player.
You can also use the controls on the
remote if they have the same or
similar names as those on the player.
· The following icons are used in this
manual:
Z
Indicates that you can do the
task using the remote.
z
Indicates hints and tips for
making the task easier.
For the customers in the United States
ENERGY STAR® is a U.S.
registered mark.
As
ENERGY STAR® Partner,
Sony Corporation has
determined that this product
meets the
ENERGY STAR®
guidelines for energy
efficiency.
For the customers in Canada
CAUTION
TO PREVENT ELECTRIC SHOCK, DO NOT
USE THIS POLARIZED AC PLUG WITH AN
EXTENSION CORD, RECEPTACLE OR
OTHER OUTLET UNLESS THE BLADES
CAN BE FULLY INSERTED TO PREVENT
BLADE EXPOSURE.

3
TABLE OF CONTENTS
Getting Started
Unpacking ............................................................................................................................. 4
Hooking Up the System ...................................................................................................... 4
Connecting Another CD Player ......................................................................................... 6
Inserting CDs ........................................................................................................................ 7
Playing CDs
Playing a CD ....................................................................................................................... 10
Using the Display .............................................................................................................. 11
Locating a Specific Disc .................................................................................................... 12
Specifying the Next Disc to Play ..................................................................................... 14
Playing the Disc Just Inserted (Easy Play) ..................................................................... 14
Playing Discs in Various Modes (Repeat/Shuffle Play) .............................................. 15
Creating Your Own Program (Program Play) ............................................................... 16
Customising the Sound of Your Music (Digital Filter) ................................................ 19
Using the Timer ................................................................................................................. 19
Fading In or Out ................................................................................................................. 19
Storing Information About CDs (Custom Files)
What You Can Do With the Custom Files ..................................................................... 20
Labeling Discs (Disc Name) ............................................................................................. 20
Storing Custom File Information Using a Keyboard .................................................... 23
Storing Specific Tracks (Delete Bank) ........................................................................... 24
Grouping Discs (Group File) ............................................................................................ 24
Classifying Discs According to Artist Name (Artist File) ............................................ 26
Storing Your Favorite Tracks (Hit List) .......................................................................... 29
Using the Player with Another Component
Controlling Another CD Player (Advanced Mega Control) ....................................... 31
Playing Alternately (No-Delay Play/X-Fade Play) ...................................................... 32
Controlling the Player by Another Unit ......................................................................... 33
Additional Information
Precautions ......................................................................................................................... 34
Notes on CDs ...................................................................................................................... 34
Troubleshooting ................................................................................................................. 35
Specifications ...................................................................................................................... 35
Index
Index ..................................................................................................................... Back cover

Getting Started
4
Unpacking
Check that you received the following items:
· Audio cord (1)
· Monaural (2P) mini-plug cord (1) (Connecting cord
for CONTROL A1 ) (supplied for Canadian models
only)
· Remote commander (remote) (1)
· Size AA (R6) batteries (2)
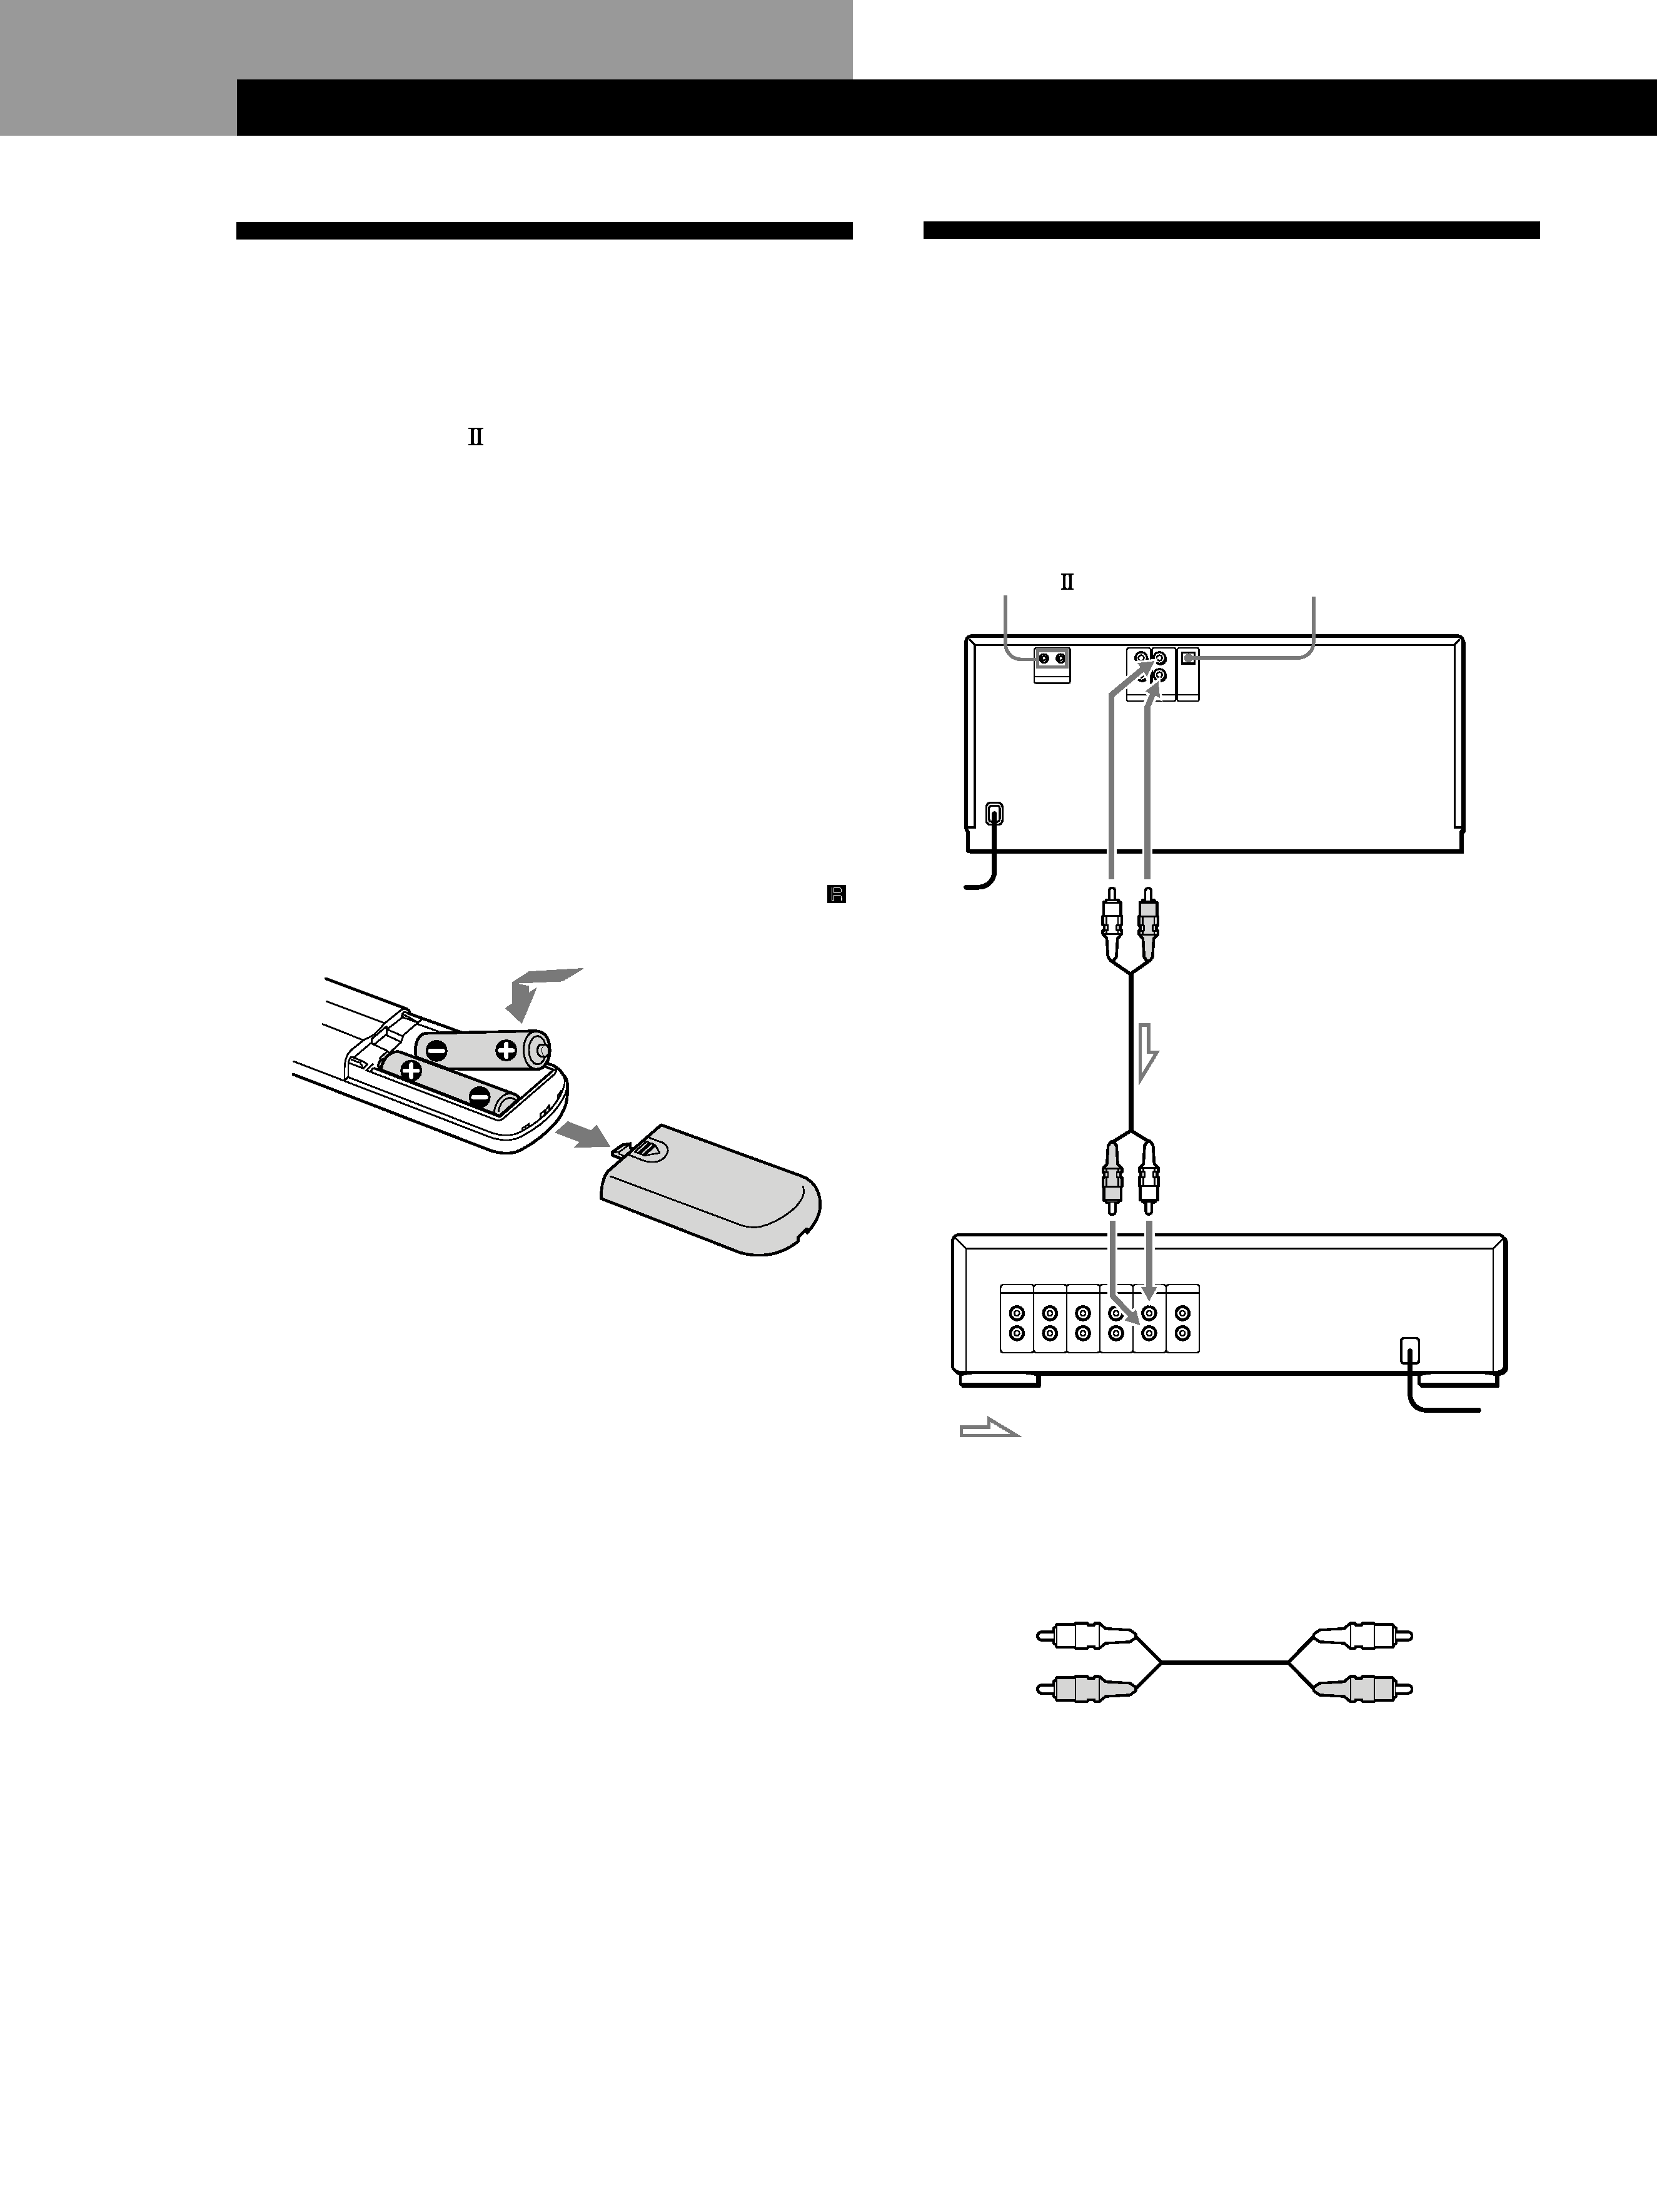
Inserting batteries into the remote
You can control the player using the supplied remote.
Insert two size AA (R6) batteries (supplied) by
matching the + and ends on the batteries to the
diagram inside the battery compartment.
Insert the negative () end first, then push in and down
until the positive (+) end clicks into position.
When using the remote, point it at the remote sensor
on the player.
Hooking Up the System
Overview
This section describes how to hook up the CD player to
an amplifier. Be sure to turn off the power of each
component before making the connections.
White
(L)
Red
(R)
White
(L)
Red
(R)
What cords will I need?
Audio cord (supplied) (1)
z When to replace batteries
With normal use, the batteries should last for about six
months. When the remote no longer operates the player,
replace all the batteries with new ones.
Notes
· Do not leave the remote near an extremely hot or humid
place.
· Do not drop any foreign object into the remote casing,
particularly when replacing the batteries.
· Do not expose the remote sensor to direct sunlight or leave
too near lighting apparatuses. Doing so may cause a
malfunction.
· If you do not use the remote for an extended period of time,
remove the batteries to avoid possible damage from battery
leakage and corrosion.
Getting Started
CD player
DIGITAL OUT
(OPTICAL)
Amplifier
To line output (L)
To line output (R)
To an AC outlet
: Signal flow
To audio input
To an AC outlet
CONTROL A1

Getting Started
Getting Started
5
Hookups
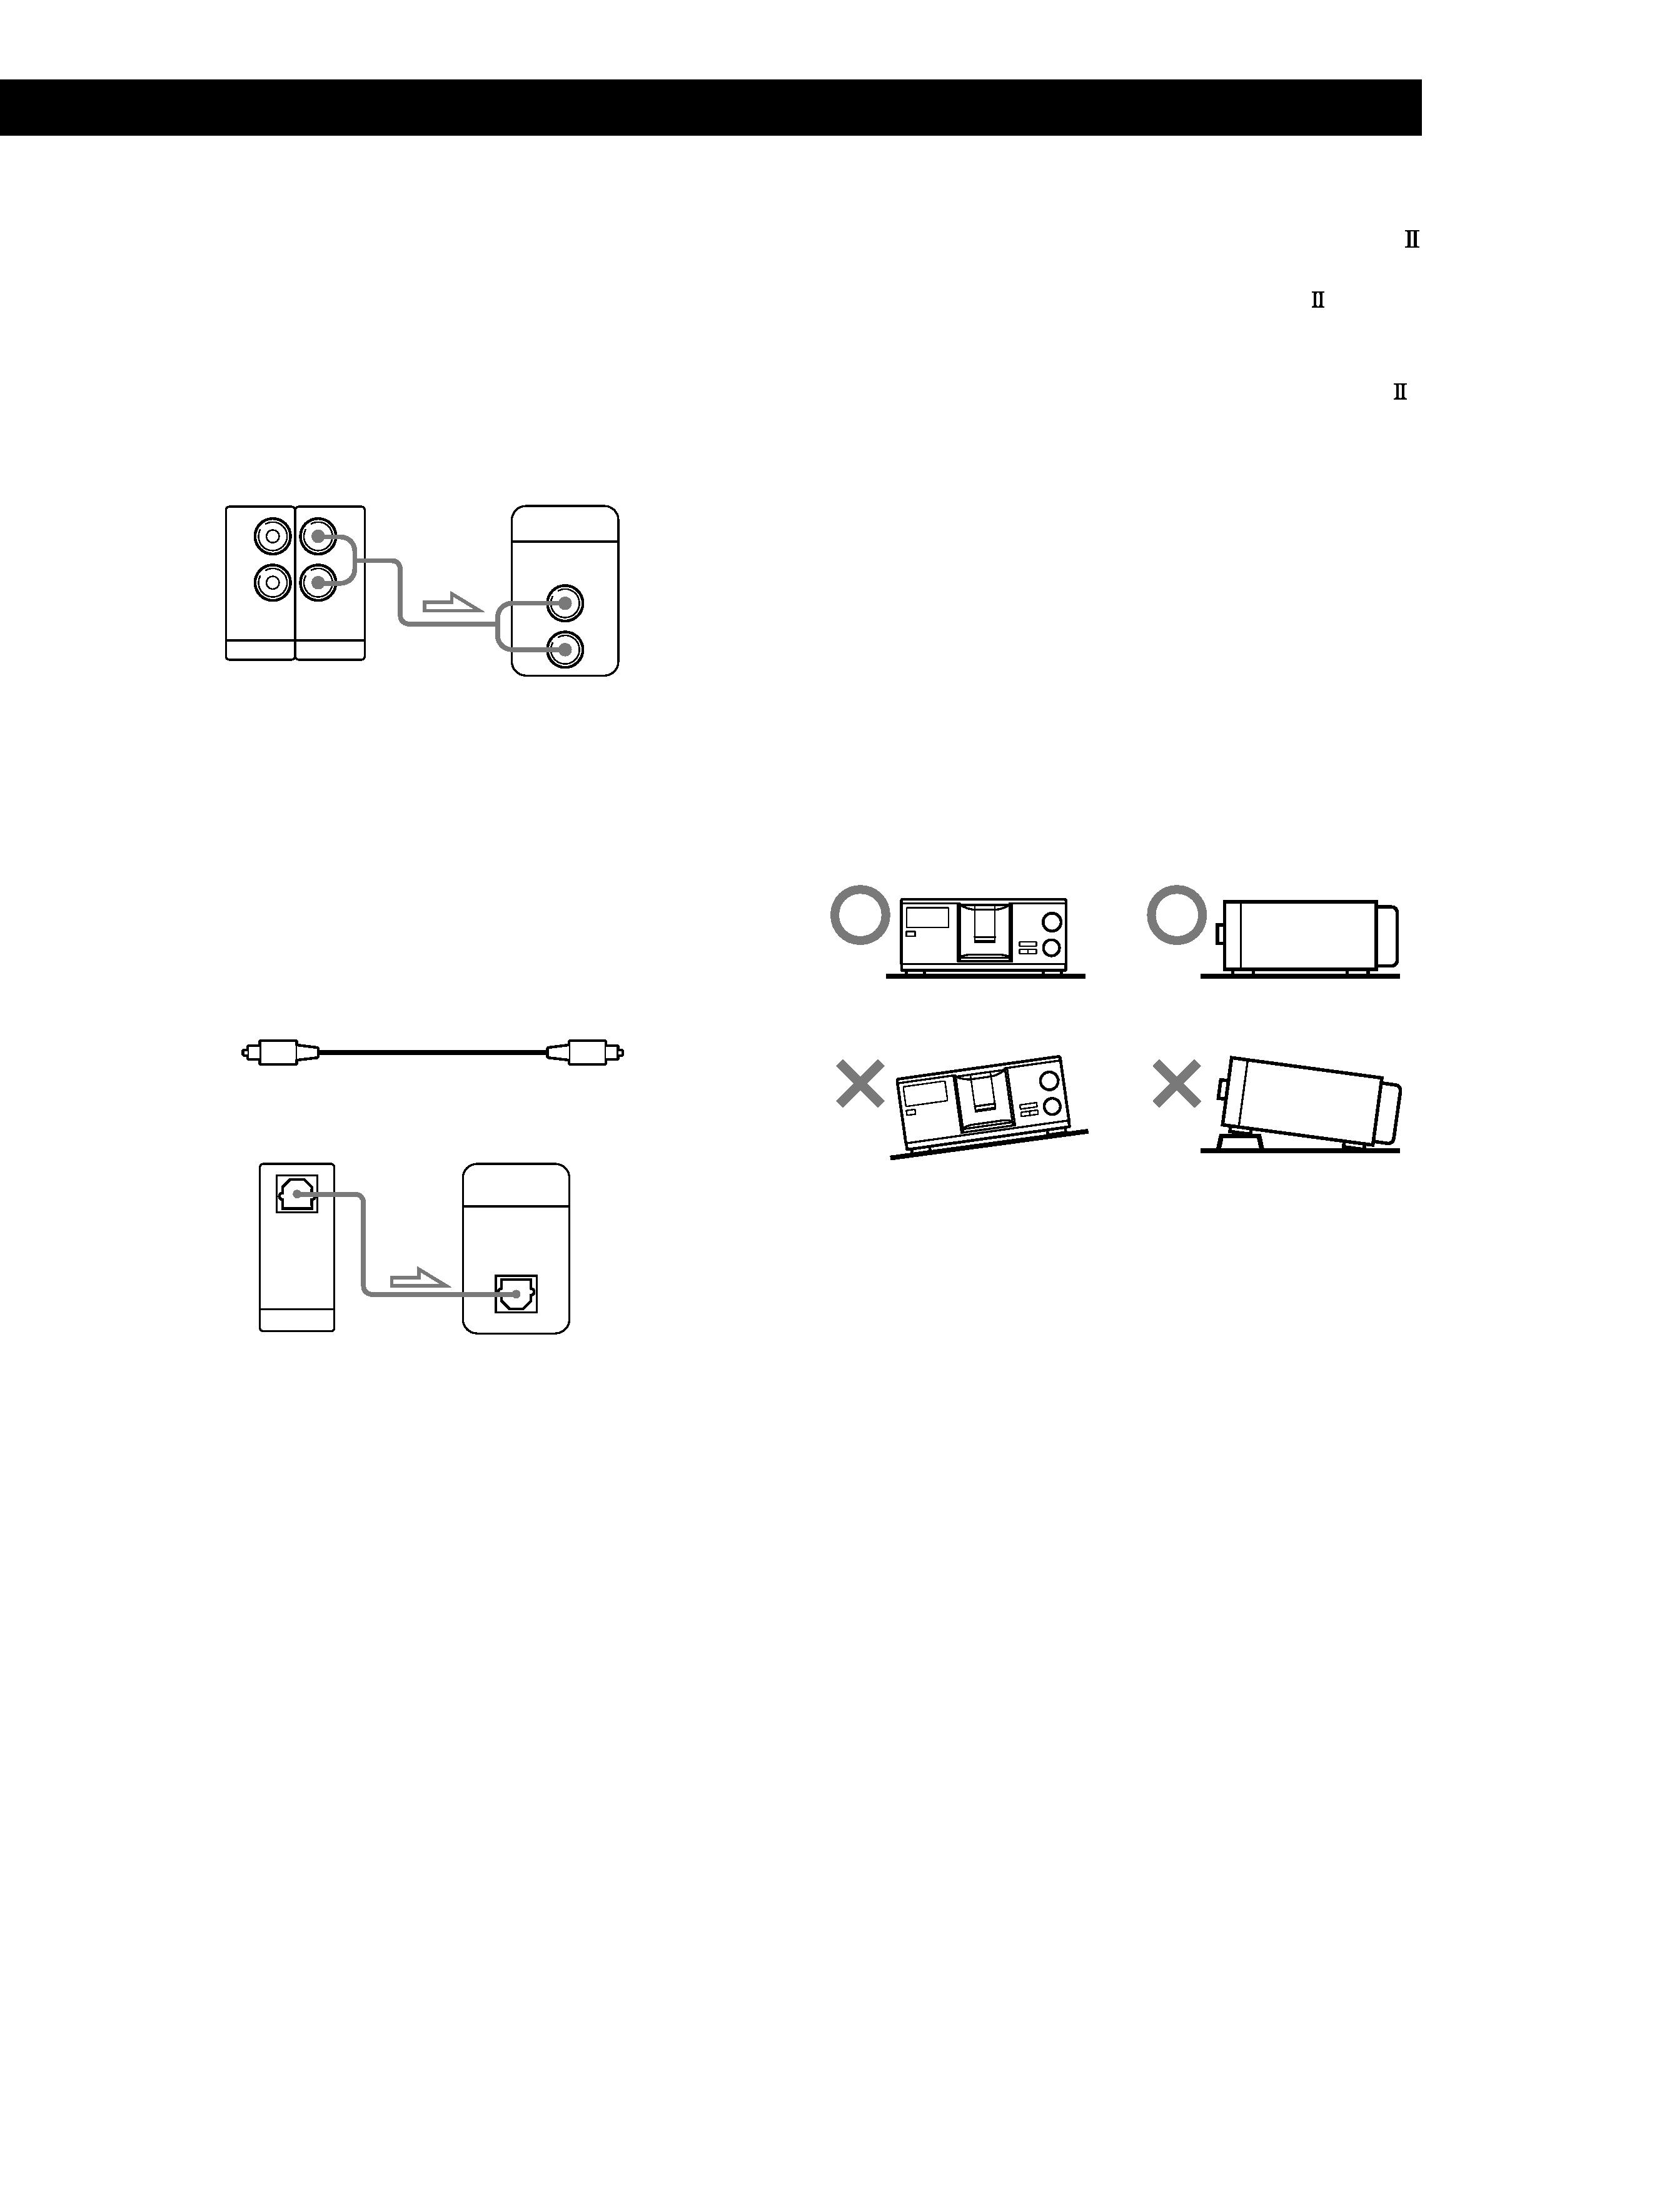
When connecting an audio cord, be sure to match the
color-coded cord to the appropriate jacks on the
components: Red (right) to Red and White (left) to
White. Be sure to connect firmly to avoid hum and
noise.
· If you have a digital component such as a digital
amplifier, D/A converter, DAT, or MD
Connect the component via the DIGITAL OUT (OPTICAL)
connector using an optical cable (not supplied). Take off the
cap and plug in the optical cable.
Note that you cannot use fading in or out (page 19) and
Time Fade (page 19) functions when making this
connection.
z If you have a Sony component with the CONTROL A1
(or CONTROL A1) jack
Connect the component via the CONTROL A1 (or
CONTROL A1) jack. You can simplify the operations of
audio systems composed of separate Sony components.
For details, refer to the supplementary "CONTROL A1
Control System" instructions.
Amplifier
CD player
Optical cable (not supplied)
Note
When you connect via the DIGITAL OUT (OPTICAL)
connector, noise may occur when you play CD software other
than music, such as a CD-ROM.
CD player
Digital component
Connecting the AC power cord
Connect the AC power cord to a wall outlet.
Note on placement of the player
Be sure to place the player in a flat, horizontal place.
If the player is left in a slanted position, it may cause a
malfunction or damage the player.
INPUT
CD
L
R
IN
OUT
L
R
L
R
2ND CD
ANALOG
DIGITAL
INPUT
OPTICAL
DIGITAL
OPTICAL
OUT
