3-865-665-21 (1)
© 1999 by Sony Corporation
CDP-CX230
Compact Disc
Player
GB
FR
ES
P
Operating Instructions
Mode d'emploi
Manual de instrucciones
2
GB
WARNING
To prevent fire or shock
hazard, do not expose the unit
to rain or moisture.
To avoid electrical shock, do
not open the cabinet. Refer
servicing to qualified
personnel only.
Do not install the appliance in
a confined space, such as a
bookcase or built-in cabinet.
Welcome!
Thank you for purchasing the Sony
Compact Disc Player. Before operating
the unit, please read this manual
thoroughly and retain it for future
reference.
About This Manual
The instructions in this manual are for
model CDP-CX230.
Conventions
· Instructions in this manual describe
the controls on the player.
You can also use the controls on the
remote if they have the same or
similar names as those on the player.
· The following icons are used in this
manual:
Indicates that you can do the
task using the remote.
Indicates hints and tips for
making the task easier.
For the customers in Canada
CAUTION
TO PREVENT ELECTRIC SHOCK,
DO NOT USE THIS POLARIZED AC
PLUG WITH AN EXTENSION
CORD, RECEPTACLE OR OTHER
OUTLET UNLESS THE BLADES
CAN BE FULLY INSERTED TO
PREVENT BLADE EXPOSURE.
This appliance is classified as a CLASS 1
LASER product.
The CLASS 1 LASER PRODUCT
MARKING is located on the rear
exterior.
The laser component in this product
is capable of emitting radiation
exceeding the limit for Class 1.
This equipment is intended for home
entertainment purposes only. The
warranty shall be invalidated if used
in commercial environments, such as
by disc jockeys, etc., even within the
Warranty Period.
WARNING
To prevent shock hazard, do not insert
the plug cut off from the mains lead into
a socket outlet. This plug cannot be used
and should be destroyed.

3
GB
TABLE OF CONTENTS
Getting Started
Unpacking ............................................................................................................................ 4
Hooking Up the System ..................................................................................................... 4
Inserting CDs ....................................................................................................................... 6
Playing a CD ............................................................................................................................ 8
Playing CDs
Using the Display ............................................................................................................. 10
Locating a Specific Disc ................................................................................................... 11
Specifying the Next Disc to Play .................................................................................... 13
Locating a Specific Track or a Point in a Track ............................................................ 13
Playing Repeatedly ........................................................................................................... 14
Playing in Random Order (Shuffle Play) ...................................................................... 14
Creating Your Own Program (Program Play) .............................................................. 15
Storing Information About CDs (Custom Files)
What You Can Do With the Custom Files .................................................................... 18
Labeling Discs (Disc Memo) ............................................................................................ 18
Storing Specific Tracks (Delete Bank) ............................................................................ 21
Grouping Discs (Group File) ........................................................................................... 21
Additional Information
Precautions ........................................................................................................................ 24
Notes on CDs ..................................................................................................................... 24
Troubleshooting ................................................................................................................ 25
Specifications ..................................................................................................................... 25
Index .......................................................................................................................................... 26
Getting Started
4
GB
Getting Started
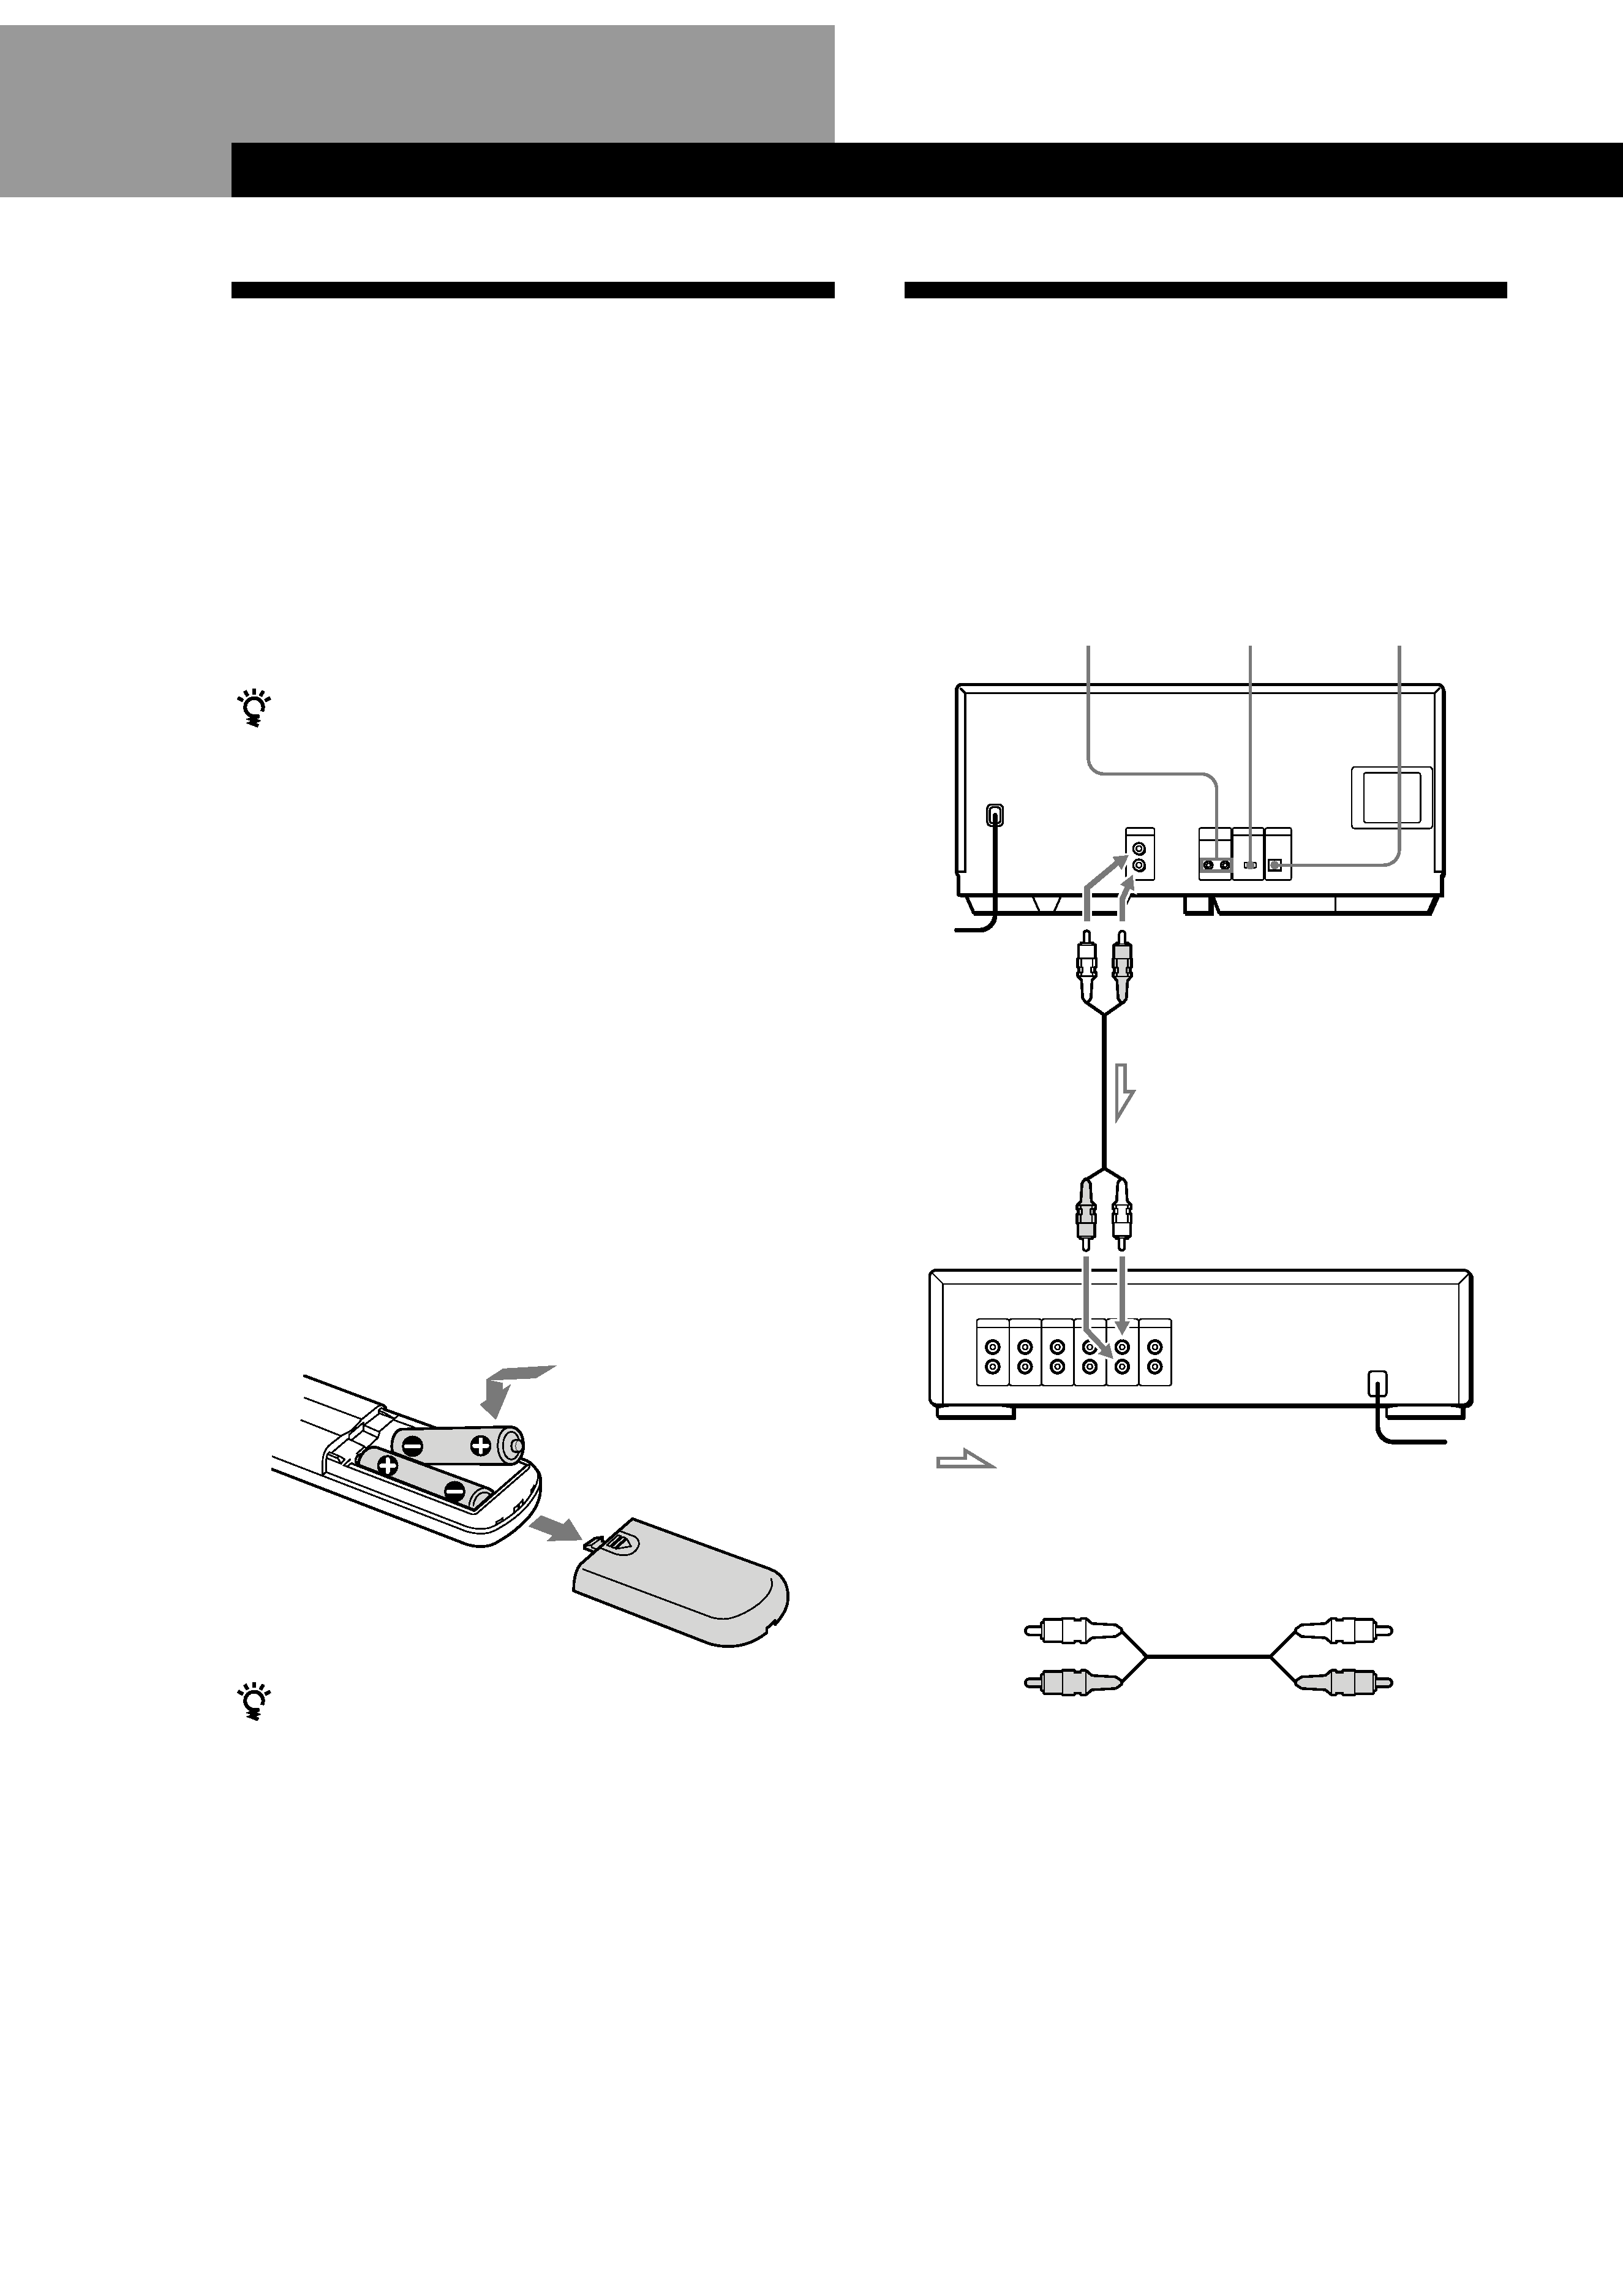
Hooking Up the System
Overview
This section describes how to hook up the CD player to
an amplifier. Be sure to turn off the power of each
component before making the connections.
Unpacking
Check that you received the following items:
· Audio cord (1)
· Monaural (2P) mini-plug cord (1) (Connecting cord
for CONTROL A1) (supplied for Canadian models
only)
· Remote commander (remote) (1)
· R6 (size AA) batteries (2)
· CD booklet holders (2) and label (1)
How to use the CD booklet holder
The CD booklet holder helps you locate the disc easily.
After you have inserted discs into the player, you can put
the CD booklet (which comes with a CD) into the
supplied holder. Put two CD booklets facing back to back
into a pocket. Stick the number label on each pocket,
matching the number of the disc slot where you have
inserted the disc. You can put up to 200 CD booklets into
the holders.
Inserting batteries into the remote
You can control the player using the supplied remote.
Insert two R6 (size AA) batteries by matching the +
and on the batteries to the diagram inside the battery
compartment.
Insert the negative () end first, then push in and down
until the positive (+) end clicks into position.
When using the remote, point it at the remote sensor g
on the player.
What cords will I need?
Audio cord (1) (supplied)
White
(L)
Red
(R)
White
(L)
Red
(R)
When to replace batteries
With normal use, the batteries should last for about six
months. When the remote no longer operates the player,
replace all the batteries with new ones.
Notes
· Do not leave the remote near an extremely hot or humid
place.
· Do not drop any foreign object into the remote casing,
particularly when replacing the batteries.
· Do not expose the remote sensor to direct sunlight or
lighting apparatuses. Doing so may cause a malfunction.
· If you do not use the remote for an extended period of time,
remove the batteries to avoid possible damage from battery
leakage and corrosion.
CD player
DIGITAL OUT
(OPTICAL)
COMMAND
MODE
S-LINK/
CONTROL A1
Amplifier
To line output (L)
To line output (R)
To an AC outlet
: Signal flow
To audio input
To an AC outlet
Playing CDs
Getting Started
Getting Started
5
GB
Hookups
When connecting the audio cord, be sure to match the
color-coded cord to the appropriate jacks on the
components: Red (right) to Red and White (left) to
White. Be sure to make connections firmly to avoid
hum and noise.
CD player
Amplifier
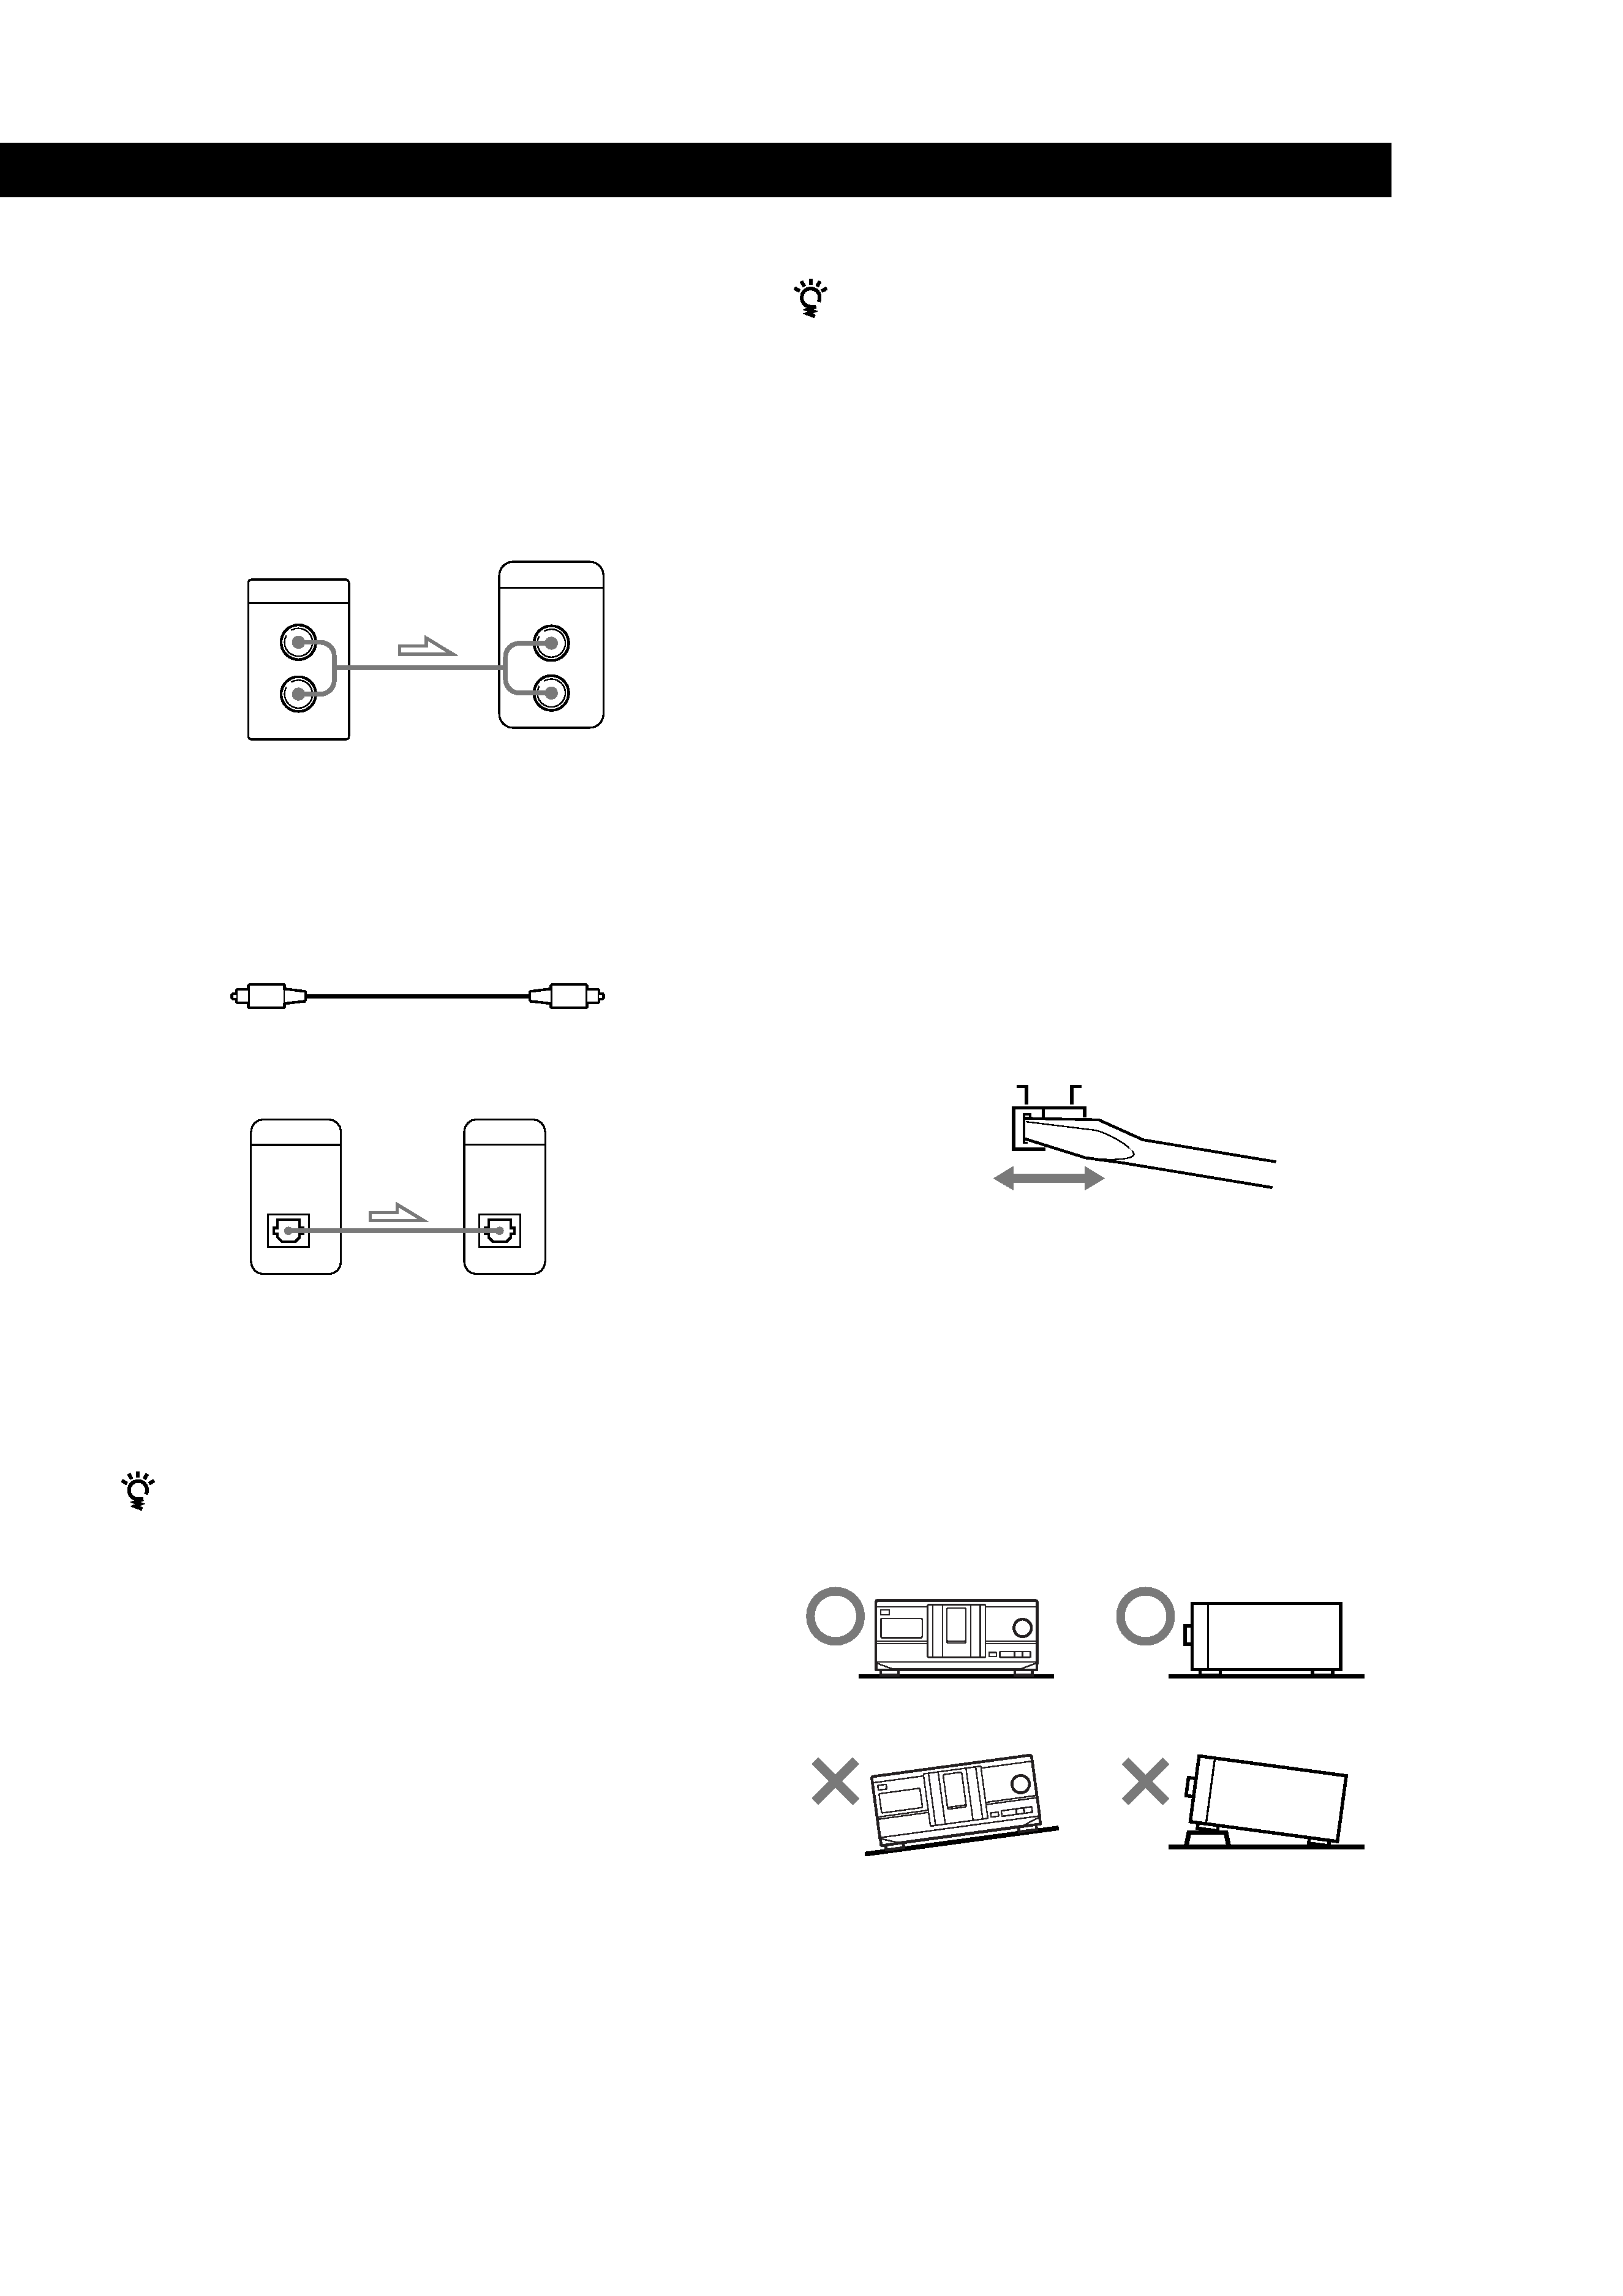
· If you have a digital component such as a digital
amplifier, D/A converter, DAT or MD
Connect the component via the DIGITAL OUT (OPTICAL)
connector using an optical cable (not supplied). Take off the
cap and plug in the optical cable.
POC-15
Optical cable (not supplied)
CD player
Digital component
Note
When you connect via the DIGITAL OUT (OPTICAL)
connector, noise may occur when you play CD software
other than music, such as a CD-ROM.
If you have a Sony component with the CONTROL A1
jack
Connect the component via the CONTROL A1 jack. You
can simplify the operation of audio systems composed of
separate Sony components. For details, refer to the
supplementary "S-LinkTM/CONTROL-A1 Control
System" instructions.
When using another Sony CD player together with
this player
You can make the supplied remote effective only for this
player.
· When using the player equipped with the
COMMAND MODE selector:
Set the COMMAND MODE selector of this player to
CD 1 and that of another player to CD 2 or CD 3. Then
set the CD 1/2/3 switch on the remote supplied for
each player accordingly.
· When using the player not equipped with the
COMMAND MODE selector:
The command mode of the player without the
COMMAND MODE selector is set to CD 1. Set the
COMMAND MODE selector of this player to CD 2,
and set the CD 1/2/3 switch on the remote to CD 2.
Setting the voltage selector (voltage
selector equipped models only)
Check that the voltage selector on the rear panel of the
player is set to the local power line voltage. If not, set
the selector to the correct position using a screwdriver
before connecting the AC power cord to a wall outlet.
Connecting the AC power cord
Connect the AC power cord to a wall outlet.
Note on placement
Be sure to place the player on a horizontal place.
If the player is slanted, it may cause malfunction or
damage the player.
220 - 240 V
110 - 120 V
DIGITAL OUT
OPTICAL
DIGITAL INPUT
OPTICAL
LINE OUT
L
R
INPUT
CD
L
R