
2,5 mm ø
P1
P2
E
P1
P2
TEST BOX
SYSTEM2013PLL
1
2
5
6
4
3
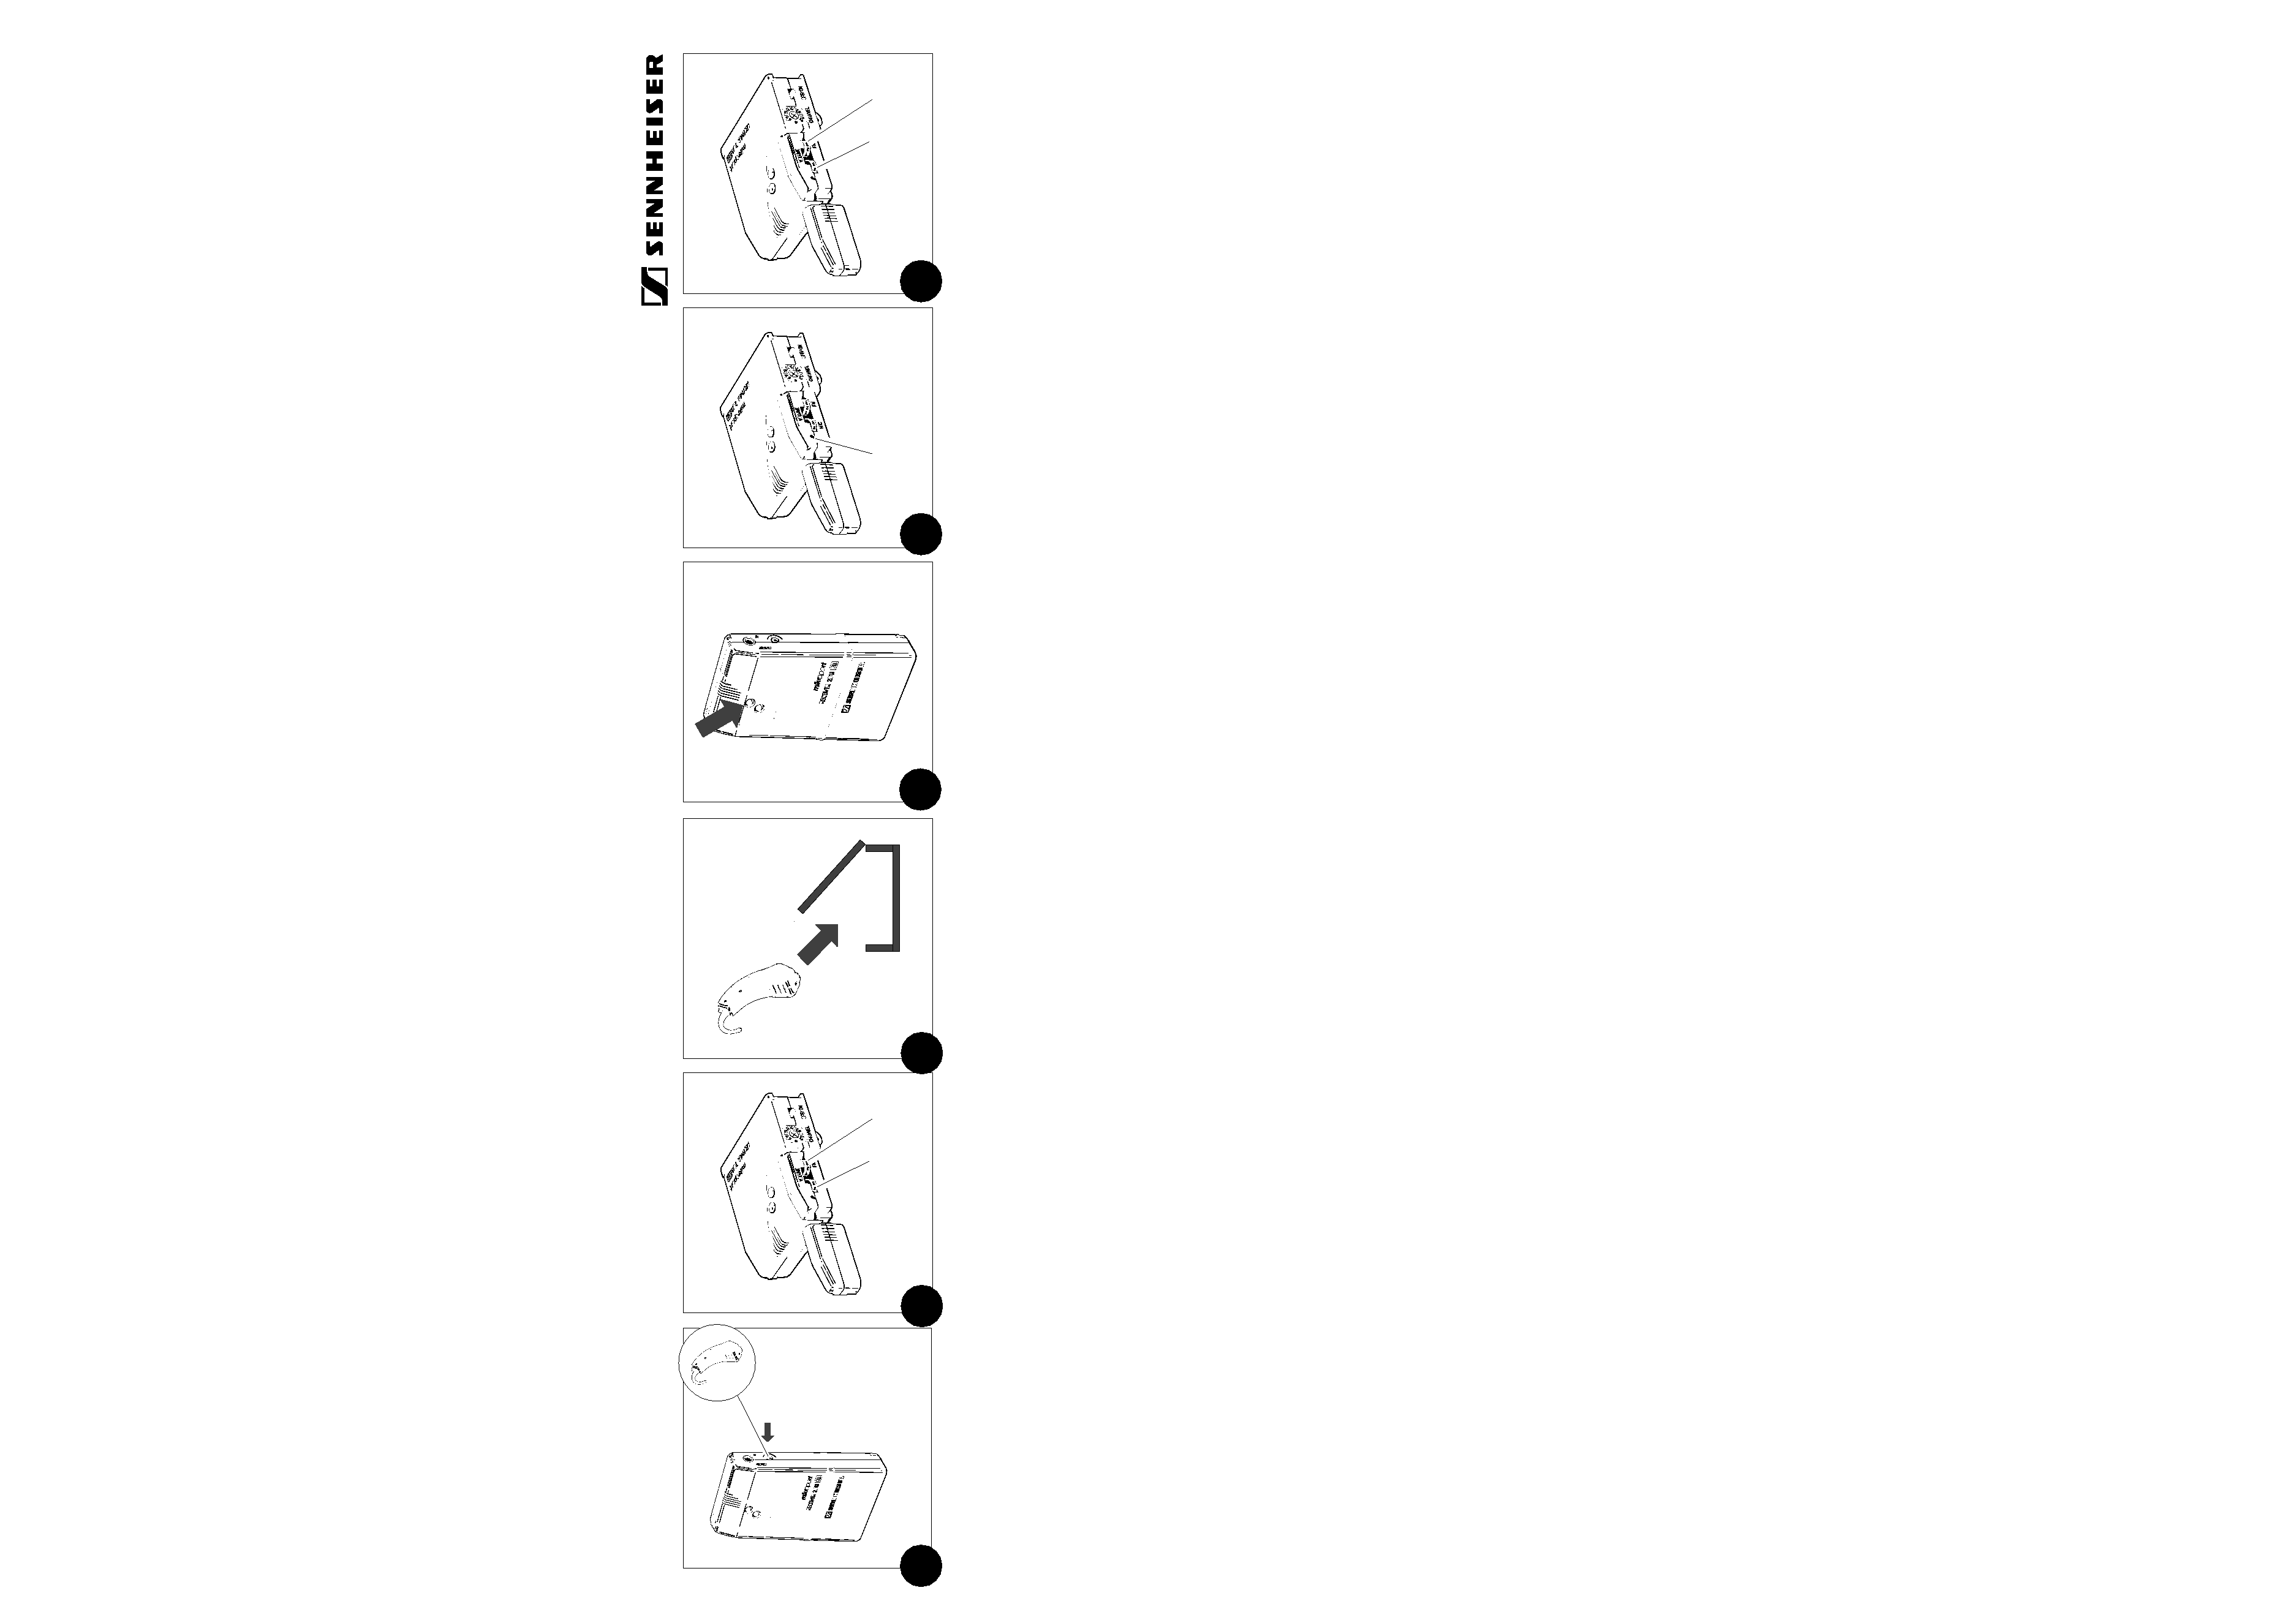
Set controls P1 and P2 on the EK 2013 PLL
receiver to "0", which serves to mute signals
from the transmitter and the in-built
microphone. This is the only way to obtain
exact measurements!
Place hearing aid in test box and apply
sound pressure level of about 70 dB(N).
Neither AGC (I) nor AGC (0) should be
activated! Adjust arbitrary amplification
and write down output level of hearing aid.
Switch on both transmitter and receiver.
Speak into the SK 2013 PLL transmitter to
cause the green LED on the EK 2013 PLL
to light permanently.
Legen Sie das Hörgerät in die Meßbox und
beschallen Sie dies mit ca. 70 dB (N) SPL.
Am Hörgerät darf weder die AGC (I) noch
die AGC (O) ansprechen! Stellen Sie eine
beliebige Verstärkung ein, und notieren Sie
sich den Ausgangspegel des Hörgerätes.
Stellen Sie die Regler P1 und P2 am
Empfänger EK 2013 PLL auf "0". Damit
wird das Tonsignal, das auf dem Sendeweg
kommt und das Tonsignal, das das
eingebaute Mikrofon liefert, ausgeblendet.
Nur so kann die Tiefe der Absenkung
korrekt gemessen werden!
Schalten Sie nun Sender und Empfänger
an, und besprechen Sie den Sender SK
2013 PLL so, daß am Empfänger EK 2013
PLL die grüne Übertragungskontrollan-
zeige ständig aufleuchtet.
Stellen Sie nun am Empfänger EK 2013
PLL die Absenkung so ein, daß beim
Besprechen des Senders SK 2013 PLL am
Hörgerät eine Absenkung des Ausgangs-
schalldrucks um ca. 15 dB meßbar wird.
Diese Einstellung nehmen Sie mit dem
Regler E vor.
Set automatic volume phasing facility on
EK 2013 PLL to value that reduces the
hearing aid´s sound pressure level by about
15 dB when speaking into the SK 2013
PLL. The said adjustment is effected with
the help of control E .
Mettez à présent l'émetteur et le récepteur
en marche et parlez dans l'émetteur SK
2013 PLL de façon à ce que le témoin de
transmission vert s'allume en permanence
sur le récepteur EK 2013 PLL.
Réglez à présent l'atténuation sur le
récepteur EK 2013 PLL pour que l'on
puisse relever une diminution de la pression
acoustique en sortie d'env. 15 dB pendant
l'utilisation de l'émetteur SK 2013 sur
l'appareil auditif. Procédez à ce réglage en
agissant sur le régulateur E.
Placez l'appareil auditif dans le coffret de
mesure et émettez un signal sonore d'env.
70 dB (N) SPL. Ni l'AGC (I) ni l'AGC (0)
ne doivent réagir sur l'appareil auditif !
Réglez une amplification quelconque et
notez le niveau de sortie de l'appareil auditif.
Placez les régulateurs P1 et P2 du récepteur
EK 2013 PLL sur "0". Le signal sonore
arrivant sur la ligne d'émission et le signal
sonore délivré par le microphone incorporé
sont ainsi coupés. Seule cette procédure
permet de mesurer correctement la valeur
de l'atténuation!
Make the "System 2013 PLL" ready for
operation. Switch it on (position "M").
Connect the hearing aid to the audio socket
of the EK 2013 PLL. Use one of the cables
listed in Sennheiser´s "Instructions for use",
paragraph "Accessories". Make sure that
the audio signal is not attenuated, e.g.
through decoupling resistors in the audio
shoe.
Mettez le système 2013 PLL en ordre de
marche (position "M") et raccordez l'appareil
auditif par l'entrée audio sur le récepteur
EK 2013 PLL. Pour cela vous disposez du
câble mentionné en "Accessoires" dans les
"Instructions pour l´usage". Un affaiblisse-
ment du signal, dû par exemple aux
résistances séries de la cosse audio, ne devrait
pas avoir lieu dans la mesure du possible.
Machen Sie das System 2013 PLL betriebs-
bereit und schalten Sie es ein (Stellung M).
Schließen Sie das Hörgerät über den
Audioeingang an den EK 2013 PLL an.
Dazu stehen die unter ,,Zubehör" in der
Gebrauchsanleitung aufgeführten Kabel zur
Verfügung. Eine Bedämpfung des Signales,
etwa durch Vorwiderstände im Audio-
schuh, sollte ausgeschlossen werden.
Wichtige Information für den Hörgeräte-Akustiker: Einstellung der Einblendautomatik
Zur Erhöhung der Sprachverständlichkeit kann mit Hilfe der Einblendautomatik ein besseres Stör-Nutzschallverhältnis erreicht werden. Die Einblendautomatik ist ab Werk eingeschaltet und voreingestellt
(Voreinstellung: 15 dB Absenkung bezogen auf 2 k
Eingangsimpedanz des Audioeinganges), sollte jedoch vor Abgabe des Systems 2013 PLL auf das eingesetzte Hörgerät abgeglichen werden.
Stellen Sie nun mit den Reglern P1 und P2
den Ausgangspegel der Hörgeräte bei
aktivierter Einblendautomatik auf den
ursprünglichen Ausgangspegel ein.
Die Absenkung ist nun an das Hörgerät
angepaßt.
Änderungen vorbehalten.
Important information for audiologists: How to adjust the priority circuit
The priority circuit serves to enhance the system´s signal-to-noise ratio and to improve voice intelligibility. Although the EK 2013 PLL receiver comes with the priority circuit switched on and preset
(preadjustment: attenuation = 15 dB for an input impedance of the audio socket of 2 k
), the "System 2013 PLL" should be specially matched to the customer´s hearing aid.
Activate the priority circuit. Use controls
P1 and P2 to set the output level of the
hearing aid to the original value.
The priority circuit is now perfectly
matched to the hearing aid.
Subject to alterations and corrections.
Activez le système d´atténuation auto-
matique. En utilisant les régulateurs P1 et
P2, le niveau de sortie de l´appareil auditif
doit être ajusté à la valeur originale.
Maintenant le système d´atténuation auto-
matique est adapté à l'appareil auditif.
Sous réserve de modifications et d'erreurs.
Sennheiser electronic GmbH & Co. KG
D-30900 Wedemark
Printed in Germany
Publ. 5/95
48750 A02
Information importante pour l'audiologiste: Réglage du système d'atténuation automatique
Le système d'atténuation automatique permet d'obtenir un rapport signal/bruit plus élevé dans le but d'améliorer l'intelligibilité de la parole. Le système d'atténuation automatique est branché et préréglé en usine
(Préréglage: atténuation = 15 dB pour une impédance d´entrée de l´entrée audio de 2 k
). Il convient cependant de l'ajuster en fonction de l'appareil auditif utilisé avant la remise du système 2013 PLL.
2,5 mm ø
P1
P2
E
P1
P2
TEST BOX
SYSTEM2013PLL
1
2
5
6
4
3
Teniendo activado el mecanismo auto-
mático de conexión, con los botones P1 y
P2 regule ahora el nivel de sonoridad de los
audífonos hasta alcanzar de nuevo el nivel
original.
En tal forma se ajusta la atenuación al
audífono.
Salvo omisiones y modificaciones.
Regule entonces en el receptor EK 2013
PLL la atenuación de tal forma que, al
hablar en el transmisor SK 2013 PLL, pueda
medirse en el audífono una atenuación de
la presión sonora de salida de uno 15 dB.
Este reglaje puede efectuarse con el
Regulador E (véanse también las instrucci-
ones en la página S 1.10).
Conecte entonces el transmisor y el receptor
y hable a través del transmisor SK 2013
PLL de tal manera que en el receptor EK
2013 PLL se ilumine constantemente la
lamparilla verde de control de transmisión.
Coloque el audífono en la caja de medición
y aplíquele a ésta unos 70 dB (N) SPL. En
el audífono no deberán responder ni el
AGC (I) ni el AGC (O). Regule entonces la
amplificación deseada y anote el nivel de
salida del audífono.
Coloque los reguladores P1 y P2 del receptor
EK 2013 PLL (véanse las instrucciones en
la página 1.10) en 0. Con ello se suprime la
señal sonora que viene del transmisor y la
señal sonora que suministra el micrófono
incorporado. Sólo en tal forma puede
medirse correctamente la profundidad de
la atenuación.
Prepare el ,,System 2013 PLL" para el
funcionamiento y, a través de la entrada de
audio, conecte el audífono al EK 2013 PLL
(véanse las instrucciones página 1.8). A tal fin
dispone Vd. de los cables que se incluyen
como ,,Accesorios", mencionados en las
instrucciones de manejo; sin embargo, en
cuanto sea posible, debe excluirse una
atenuación de la señal, como por ejemplo
mediante resistencias previas en el terminal
de audio.
Informaciones importantes relativas a los Auriculares acùsticos: Regulación del automatismo de mezcla
Gracias al automatismo de mezcla puede lograrse una relación más alta de perturbaciones/sonoridad útil, lo que mejora la comprensibilidad de la voz.
Ya en la fábrica se ha conectado y regulado previamente el automatismo de mezcla; no obstante, antes de entregar el equipo System 2013 PLL, es conveniente compararlo con el audífono utilizado.
Mettere in funzione il sistema 2013 PL e
collegare l'apparecchio acustico tramite
l'entrata audio a EK 2013 PLL (vedi le
istruzioni a pag. 1.8). A tale scopo sono
disponibili i cavi riportati sotto il titolo
,,Accessori" nelle istruzioni. Uno smorza-
mento del segnale, dovuto per esempio a
resistenze addizionali nel capocorda audio,
va possibilmente escluso.
Informatzione importante per il technico delgi apparecchi akcustici: Registrazione della sovrapposizione automatica
Per aumentare la comprensibilità della voce si può ottenere un più elevato rapporto disturbo/suono utile con l'aiuto della sovrapposizione automatica.
Quest'ultima viene inserita e preregistrata dalla fabbrica, va tuttavia adattata all'apparecchio acustico impiegato prima di consegnare il sistema 2013 PLL.
Commutare il regolatore P1 eP2 sul
ricevitore EK 2013 PLL (vedi le istruzioni
a pag. 1.10) su ,,0". Il segnale sonoro che
arriva sulla via di trasmissione e il segnale
sonoro che viene fornito dal microfono
incorporato, viene così soppresso. Solo in
questo modo può essere misurato corretta-
mente il valore di abbassamento!
Inserire l'apparecchio acustico nella cassetta
di misurazione e applicarvi ca. 70 dB (N)
SPL. Sull'apparecchio acustico non deve
reagire né l'AGC (I) né l'AGC (O)!
Registrare una amplificazione a piacere e
annotare il livello di uscita dell'apparecchio
acustico.
Inserire ora il trasmettitore e il ricevitore
eseguendo un controllo vocale del
trasmettitore SK 2013 PLL in modo che sul
ricevitore EK 2013 PLL la spia di controllo
verde della trasmissione rimanga illuminata
in permanenza.
Registrare ora l'abbassamento sul ricevitore
EK 2013 PLL in modo che effettuando la
prova vocale del trasmettitore SK 2013
PLL sull'apparecchio acustico possa essere
misurato un abbassamento della pressione
sonora di uscita di ca. 15 dB. Eseguire
questa registrazione con il regolatore E
(vedi anche le istruzioni a pag. S 1.10).
Regolare ora il livello sonoro di uscita degli
apparecchi acustici al valore originario con
l`inserimento automatico attivato sui
regolatori P1 et P2
L'abbassamento è ora adattato all'appa-
recchio acustico.
Con riserva die modifiche e di errori.
Viktig information för Hörapparatsakustiker: Inställning av mottagningsautomatik
För bättre talåtergivning kan med hjälp av mottagningsautomatiken ett bättre förhållande mellan störning och nyttig ljudeffekt uppnås.
Mottagningsautomatiken har vid fabriken kopplats in och förinställts, men skall helst före leverans av systemet 2013 PLL utbalanseras mot använd hörapparat.
Gör systemet 2013 PLL färdigt och anslut
sedan hörapparaten via audioingången till
EK 2013 PLL (se anvisning sida 1.8). För
anslutning lämnas uppgifter om lämpliga
kablar under rubriken ,,Tillbehör" i
bruksanvisningen. En signaldämpning t ex
med förkopplade motstånd i audiokabelskon
skall helst inte ske.
Ställ regulatorerna P1 och P2 på mottagaren
EK 2013 PLL i läge 0 (se anvisning sida
1.10). Härvid kan tonsignalen som kommer
från sändaren och tonsignalen som levereras
av inbyggd mikrofon tonas bort. Nu först
kan dämpningens djup mätas korrekt!
Placera hörapparaten i mätboxen och
ljudsätt med ca 70 dB(N) SPL. På
hörapparaten får varken AGC (I) eller AGC
(0) aktiveras!
Ställ in valfri förstärkning och anteckna
hörapparatens utgångsnivå.
Koppla nu in sändare och mottagare samt
tala in sändaren SK 2013 PLL så att på
mottagaren EK 2013 PLL den gröna
kontrollampan för överföring kontinuerligt
tänds.
Ställ härefter in dämpningen på mottagaren
EK 2013 PLL så att en ljudtrycksdämpning
på hörapparaten om ca 15 dB kan uppmätas
när sändaren SK 2013 PLL talas in. Denna
inställning utförs med regulatorn E (se även
bild på sida 1.10).
Ställ nu utgångsnivån på hörapparaterna
till ursprungligt värde med reglagen P1 och
P2 samt tillslagen inkopplingsautomatik.
Dämpningen är nu anpassad til hörapparaten.
Rätt till ändring och fel förbehålls.