Operating Instructions
Manual de instrucciones
STEREO CD CASSETTE DECK RECEIVER
REPRODUCTOR DE DISCOS
COMPACTOS/PLATINA/RECEPTOR ESTEREO
XR-A790
XR-A390
SPEAKER SYSTEM
SISTEMA DE ALTAVOCES
S-A790VLR
S-A390

Ventilation
When installing this unit, make sure to leave space around the
unit for ventilation to improve heat radiation (at least 30 cm at top,
15 cm at rear, and 15 cm at each side). If not enough space is
provided between the unit and walls or other equipment, heat
will build up inside, interfering with performance or causing
malfunctions.
Thank you for buying this Pioneer product.
Please read through these operating instructions so you will
know how to operate your model properly. After you have
finished reading the instructions, put them away in a safe place
for future reference.
In some countries or regions, the shape of the power plug and
power outlet may sometimes differ from that shown in the
explanatory drawings. However, the method of connecting and
operating the unit is the same.
WARNING: TO PREVENT FIRE OR SHOCK
HAZARD, DO NOT EXPOSE THIS APPLIANCE TO RAIN
OR MOISTURE.
Energy-saving design
This system is designed to use 1 W of electricity when
power is switched to Standby.
Note: This equipment has been tested and found to comply with the limits for a Class B digital device, pursuant to Part 15 of the
FCC Rules. These limits are designed to provide reasonable protection against harmful interference in a residential installation.
This equipment generates, uses, and can radiate radio frequency energy and, if not installed and used in accordance with the
instructions, may cause harmful interference to radio communications. However, there is no guarantee that interference will not
occur in a particular installation. If this equipment does cause harmful interference to radio or television reception, which can be
determined by turning the equipment off and on, the user is encouraged to try to correct the interference by one or more of the
following measures:
-- Reorient or relocate the receiving antenna.
-- Increase the separation between the equipment and receiver.
-- Connect the equipment into an outlet on a circuit different from that to which the receiver is connected.
-- Consult the dealer or an experienced radio/TV technician for help.
CAUTION
· Use of controls or adjustments or performance of procedures other than those specified herein may result in hazardous
radiation exposure.
· The use of optical instruments with this product will increase eye hazard.
Information to User
Alteration or modifications carried out without appropriate authorization may invalidate the user's right to operate the
equipment.
VOLTAGE
SELECTOR
240V
220
230V
110
127V
LINE VOLTAGE SELECTOR SWITCH
Mains voltages in Saudi Arabia are 127 V and 220 V only.
The line voltage selector switch is located on the rear panel
of this receiver. Check that it is set properly before plugging
the power cord into the outlet. If the voltage is not properly
set or if you move to an area where the voltage require-
ments differ, adjust the selector switch as follows:
1. Disconnect the power cord.
2. Use a medium-size screwdriver.
3. Insert the screwdriver into the groove on the voltage
selector, and adjust so that the tip of the arrow points to
the voltage value of your area.
THE STANDBY/ON BUTTON IS SECONDARY
CONNECTED AND THEREFORE DOES NOT SEPARATE
THE UNIT FROM MAINS POWER IN STANDBY POSITION.
The exclamation point within an equilateral triangle is
intended to alert the user to the presence of important
operating and maintenance (servicing) instructions in
the literature accompanying the appliance.
CAUTION:
TO PREVENT THE RISK OF ELECTRIC SHOCK, DO
NOT REMOVE COVER (OR BACK). NO USER-
SERVICEABLE PARTS INSIDE. REFER SERVICING
TO QUALIFIED SERVICE PERSONNEL.
The lightning flash with arrowhead symbol, within an
equilateral triangle, is intended to alert the user to the
presence of uninsulated "dangerous voltage" within
the product's enclosure that may be of sufficient
magnitude to constitute a risk of electric shock to
persons.
IMPORTANT
RISK OF ELECTRIC SHOCK
DO NOT OPEN
CAUTION
En
This product is for general household purposes. Any failure
due to use for other than household purposes (such as
long-term use for business purposes in a restaurant or use
in a car or ship) which requires repair will be charged for
even during the warranty period.
CAUTION
This product contains a laser diode of higher class than 1.
To ensure continued safety, do not remove any covers or
attempt to gain access to the inside of the product.
Refer all servicing to qualified personnel.
The following caution label appears on your unit.
Location: rear of the unit
CLASS 1
LASER PRODUCT

ChH/Sp
VOLTAGE
SELECTOR
240V
220
230V
110
127V
Ventilación
Cuando se instala esta unidad, asegúrese de dejar espacio
alrededor de la unidad para proporcionar ventilación y mejorar así
la radiación del calor (por lo menos 30 cm en la parte superior, 15
cm en la parte trasera y 15 cm de cada lado). Si no hay suficiente
espacio entre la unidad y las paredes u otro equipo, se acumulará
calor en el interior, interfiriendo con el rendimiento o causando
fallas de funcionamiento.
ADVERTENCIA: PARA EVITAR INCENDIOS Y
DESCARGAS ELECTRICAS, NO EXPONGA ESTE
APARATO A LA LLUVIA NI A LA HUMEDAD.
Diseño con ahorro de energía
Este sistema está diseñado para utilizar 1 W de electri-
cidad cuando el tocadiscos está en el modo de espera.
Gracias por la adquisición de este producto Pioneer.
Para saber cómo utilizar correctamente su modelo, lea
cuidadosamente este manual de instrucciones. Después de
haber finalizado su lectura, guárdelo en un lugar seguro para
futuras referencias.
En algunos países o regiones, la forma de la clavija de alimentación
y de la toma de corriente pueden ser diferentes a la indicada en
las ilustraciones explicatorias, sin embargo el método de conexión
y operación de la unidad es idéntico.
VOLTAGE
SELECTOR
240V
220
230V
110
127V
INTERRUPTOR SELECTOR DE VOLTAJE DE LINEA
Las tensiones de la red en Arabia Saudí son de 127 V y
220 V solamente.
El interruptor selector de voltaje de línea se ubica en el
panel trasero del reproductor. Verifique que se encuentra
ajustado adecuadamente antes de enchufar el cable de
alimentación al tomacorriente. Si el voltaje no se ajusta
adecuadamente o si va una área en donde los
requerimientos de voltaje son diferentes, ajuste el
interruptor selector de la manera siguiente:
1. Desconecte el cable de la alimentación.
2. Utilice un destornillador de tamaño medio.
3. Inserte el destornillador en la ranura del conmutador
selector de tensión y
mueva el
conmutador de
forma que la punta
de la flecha señale
hacia la tensión
ustilizada en su área.
EL INTERRUPTOR DE ENCENDIDO/EN (STANDBY/ON)
ESPERA ESTÁ CONECTADO EN SECUNDARIO Y POR LO
TANTO NO DESCONECTA AL APARATO DE LA RED
CUANDO ESTE EN LA POSICION DE ESPERA (STANDBY).
Este producto es para tareas domésticas generales.
Cualquiera avería debida a otra utilización que tareas
domésticas (tales como el uso a largo plazo para motivos
de negocios en un restaurante o el uso en un coche o un
barco) y que necesita una reparación hará que cobrarla
incluso durante el período de garantía.
PRECAUCION
Este aparato contiene un diodo láser de clase superior a 1.
Para mantener la seguridad apropiada, no saque ninguna
cubierta ni intente acceder al interior del aparato.
Lleve siempre el aparato a un centro con personal de servicio
técnico cualificado.
En su la unidad aparecerá la etiqueta de precaución siguiente.
Ubicación: parte posterior de la unidad.
CLASS 1
LASER PRODUCT
CLASS 1
LASER PRODUCT

4
En
Before You Start
1
Checking what's in the box
Thank you for buying this Pioneer product. Before starting to set
up your new stereo system, please check that you received the
following supplied accessories:
· Operating instructions
· Remote control unit
· Power cord x1 (x2 (Latin American model only))
· FM antenna
· AM loop antenna
· Power plug adapter (Latin American model only)
· Speaker cord (S-A790VLR only)-- red/black speaker cords
(x2), blue/black speaker cords (x2)
Using this manual
This manual is for the XR-A790 and XR-A390 Stereo CD Cassette
Deck Receiver. It is split into three sections: setting up (chapters 1
and 2); using the system (chapters 3 to 10), and additional
information (chapter 11). This last chapter contains care
information for the unit, discs and tapes, a troubleshooting
section, and specifications.
9 Using Sound Effects
Using the sound morph .................................................. 50
Using preset effects ....................................................... 50
Audio preset mode ...................................................... 50
Surround preset mode ................................................. 50
Changing sound presets using the remote .................... 50
Using individual sound effects ........................................ 52
Equalizer mode ........................................................... 52
Zoom Surround mode ................................................. 52
P.Bass mode ................................................................ 52
Changing sound effects using the remote ..................... 52
Saving your own settings ................................................ 54
Changing the sound display ............................................ 54
Muting the sound ........................................................... 54
10Using the Timer
Setting the wake-up timer .............................................. 56
Setting the sleep timer ................................................... 58
Setting the record timer ................................................. 58
Canceling the timer ....................................................... 60
11 Additional Information
Taking care of your system ............................................. 62
Disc lens cleaner .......................................................... 62
Taking care of your discs ................................................ 62
Storing discs ................................................................ 62
Discs to avoid .............................................................. 64
Using cassette tapes ....................................................... 64
Tapes you should avoid ................................................ 64
Protecting your recordings .......................................... 64
Troubleshooting ............................................................. 66
Specifications ................................................................ 69
Switching the demo mode on/off ....................... back cover
Contents
1 Before You Start
Checking what's in the box ............................................... 4
Using this manual ............................................................. 4
Putting the batteries in the remote ................................... 5
Using the remote control ................................................. 5
Finding a suitable location ................................................ 5
Avoiding condensation problems ................................... 5
Moving the system unit ..................................................... 5
Discs compatible with this system ..................................... 5
2 Connecting Up
The rear panel ............................................................... 10
Connecting the speakers ................................................ 10
Connecting the front speakers ..................................... 10
Connecting the Super Woofer speakers ....................... 12
Connecting the rear speakers ...................................... 12
Placing the speakers .................................................... 12
Connecting the radio antennas ........................................ 14
Connecting external antennas ....................................... 16
Connecting auxiliary components .................................. 16
Connecting the power ..................................................... 16
3 Controls & Displays
Front panel ..................................................................... 18
Display .......................................................................... 20
Remote control .............................................................. 22
4 Getting Started
Switching on and setting the clock ................................. 24
Playing CDs ................................................................... 26
Summary of playback controls for CDs ........................ 28
Changing discs ............................................................... 28
Tuning in stations ........................................................... 30
Improving poor FM reception ...................................... 30
Playing cassette tapes ..................................................... 30
Resetting the tape counter ........................................... 34
Relay play .................................................................... 34
5 More CD Features
Programming a playlist ................................................... 36
Using repeat play ........................................................... 36
Using random play ......................................................... 38
6 More Tuner Features
Saving stations for quick recall ....................................... 40
Listening to station presets .......................................... 40
Changing the frequency step.......................................... 40
7 Recording Cassette Tapes
Making tape recordings .................................................. 42
Automatically recording CDs ....................................... 44
Copying tapes ............................................................. 46
Improving AM tape recordings ..................................... 46
8 Singing Karaoke
Singing karaoke ............................................................. 48

1
5
En
Before You Start
Putting the batteries in the
remote
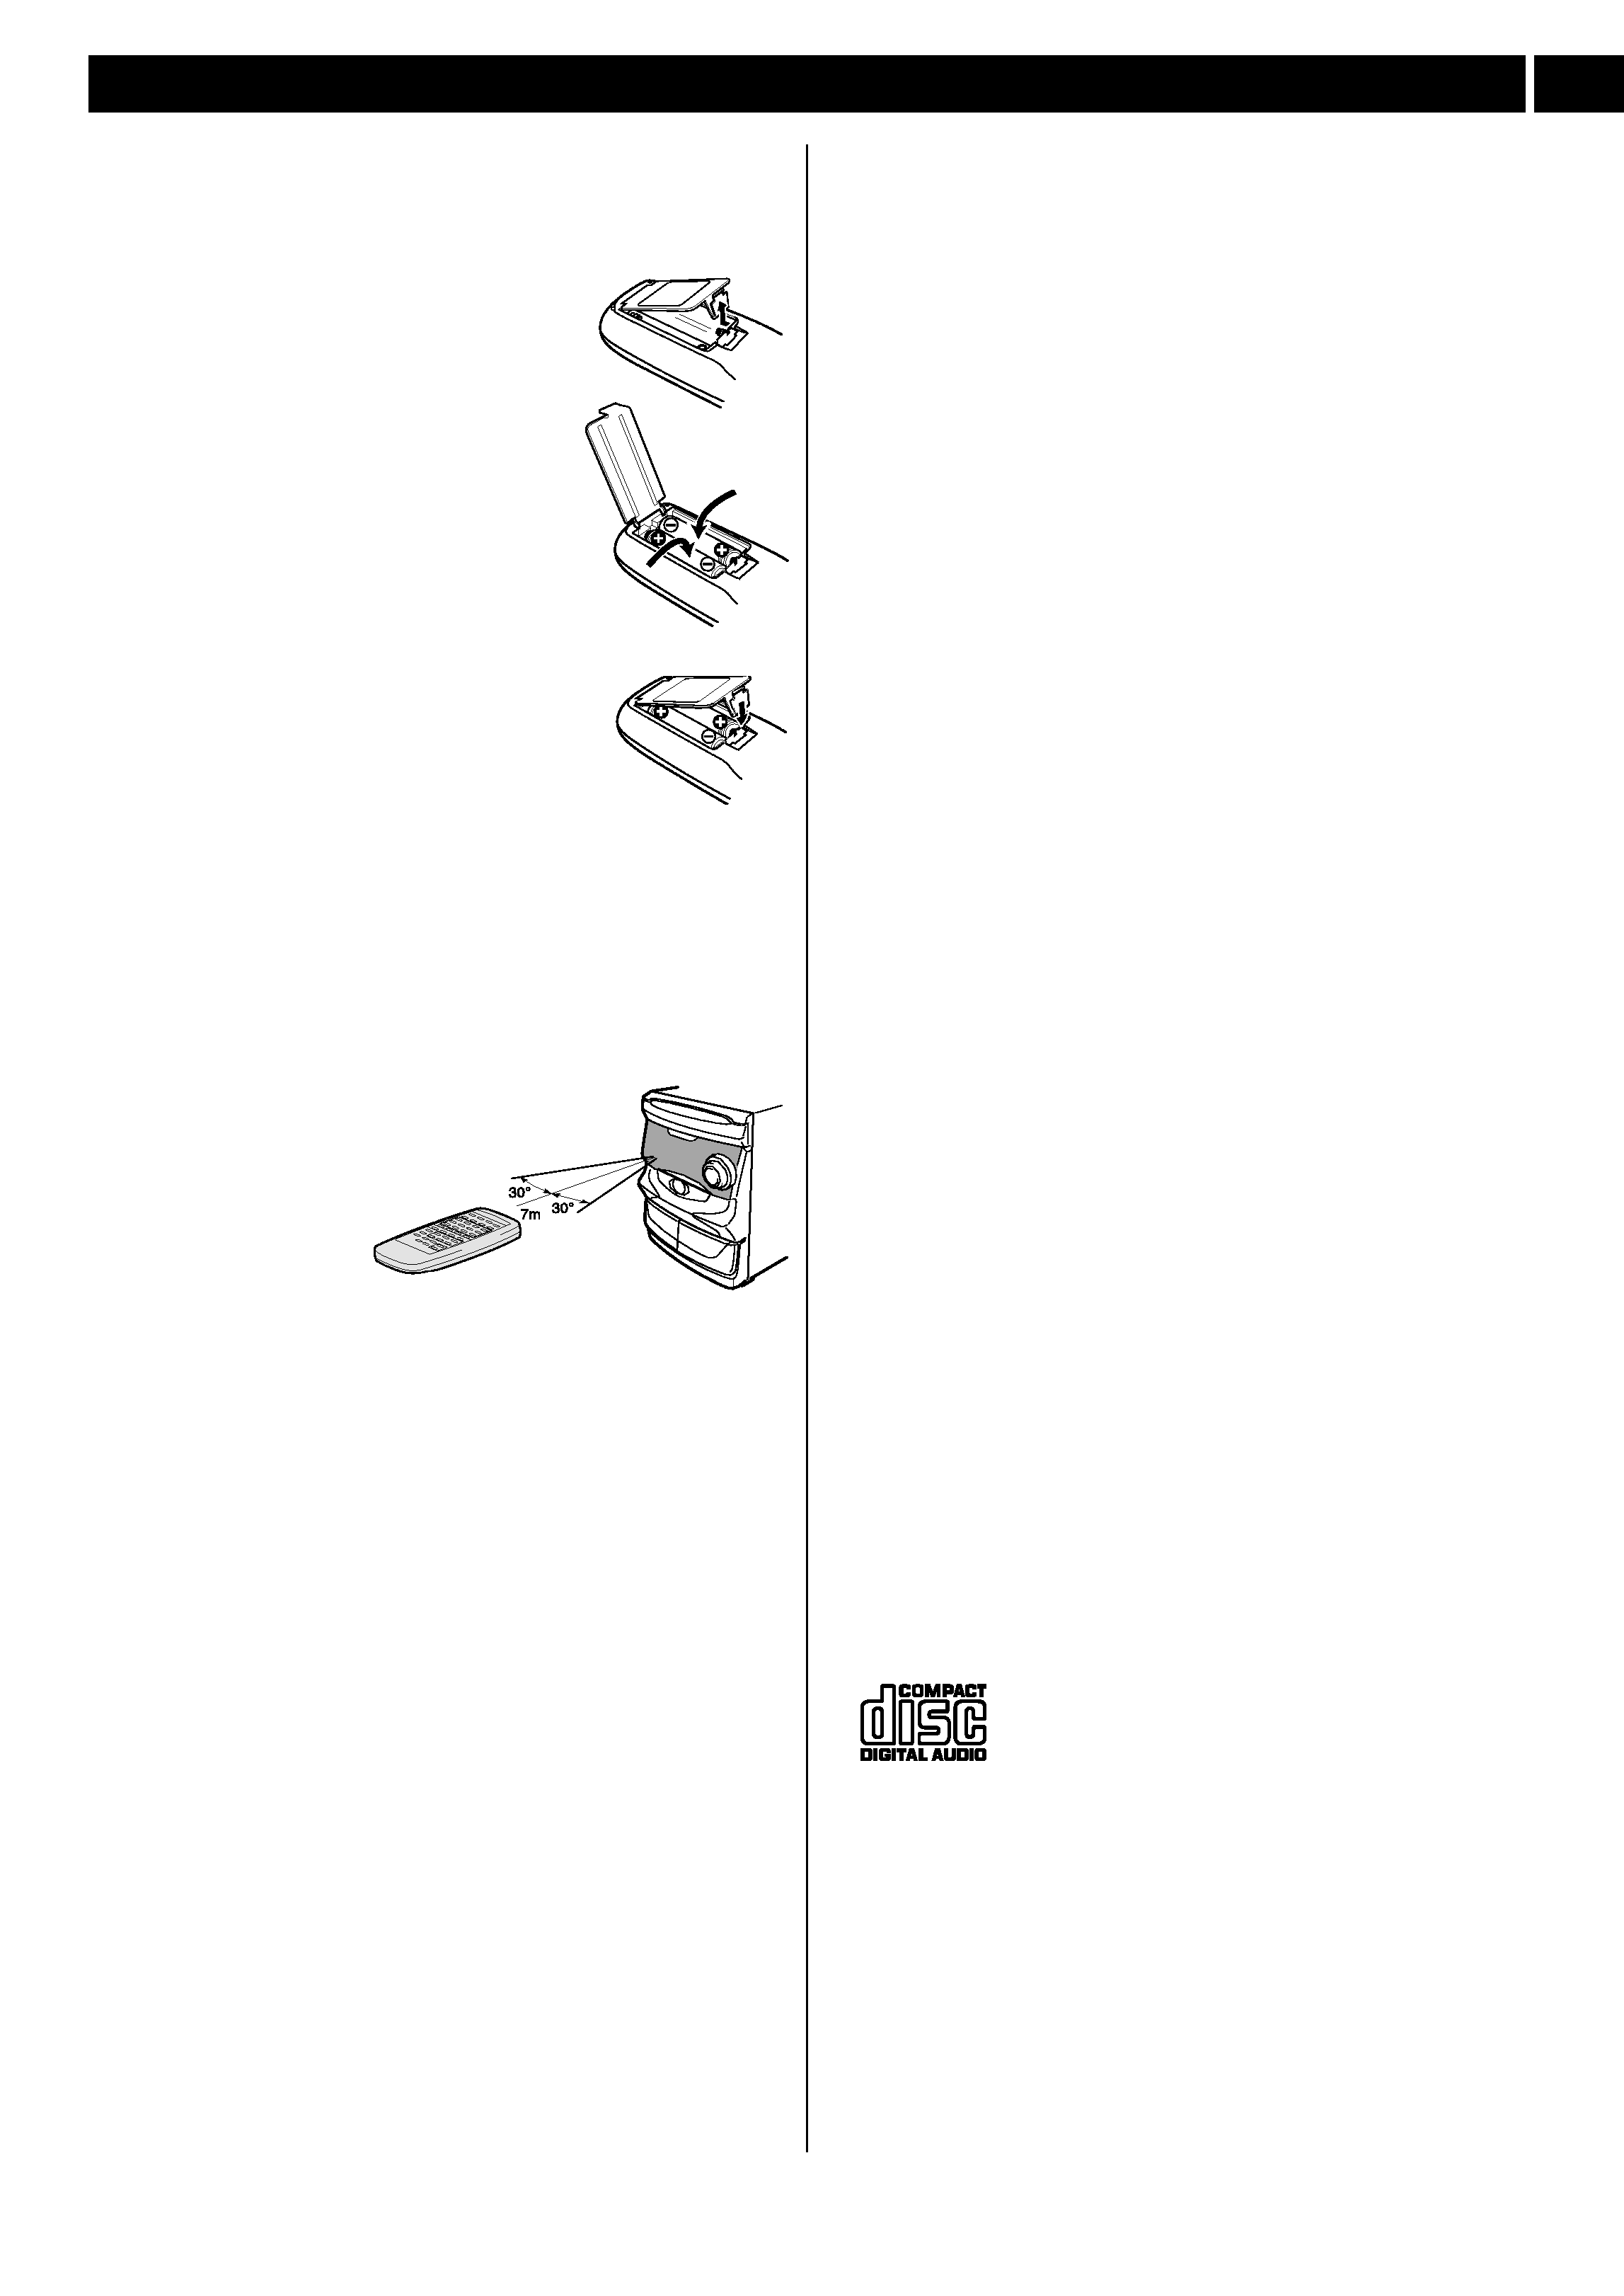
1 Open the battery compartment
cover on the back of the remote
control unit.
2 Load the two AA/R6P batteries
into the battery compartment
following the indications (
ª, ·)
inside the compartment.
3 Close the cover.
Caution!
· Remove the batteries if the remote is
not going to be used for a month or
more.
· Remove dead batteries promptly--
they can leak and damage the unit.
Using the remote control
Keep in mind the following when using the remote control unit:
· Make sure that there are no obstacles in between the remote
and the remote sensor on the unit.
· Use within the operating range and angle, as shown in the
diagram. (A)
· Remote operation may
become unreliable if
strong sunlight or
fluorescent light is
shining on the
unit's remote
sensor.
· Remote controllers for different devices can interfere with each
other. Avoid using remotes for other equipment located nearby
this unit.
· Replace the batteries when you notice a fall off in the
operating range of the remote.
Finding a suitable location
We want you to enjoy using your new stereo system for years to
come, so please bear in mind the following points when choosing
a suitable location for the system components and speakers:
Do...
Use in a well-ventilated room.
Place on a solid, flat, level surface, such as a table, shelf or
stereo rack.
Don't...
Use in a place exposed to high temperatures or humidity,
including near radiators and other heat-generating appli-
ances.
Place on a window sill or other place where any of the
components or speakers will be exposed to direct sunlight.
Use in an excessively dusty or damp environment.
Place directly on top of any appliance which becomes hot in
use.
Use near a television or monitor as you may experience
interference--especially if the television uses an indoor
antenna.
Use in a kitchen or other room where the unit may be exposed
to smoke or steam.
Place on an unstable surface, or one that is not large enough
to support all four of the unit's feet, or the whole footprint of
each speaker.
Block the cooling fan on the rear of the unit. Don't cover the
unit with cloth, or use on thick carpet, etc.
Put objects on top of the speakers.
Avoiding condensation problems
Condensation may form inside the unit if it is brought into a
warm room from outside, or if the temperature of the room rises
quickly. Although the condensation won't damage the unit, it may
temporarily impair its performance. For this reason you should
leave it to adjust to the warmer temperature for about an hour
before switching on and using.
Moving the system unit
If you need to move the system unit, first switch it off and unplug
from the wall outlet. Never lift or move the unit during play-
back--discs rotate at a high speed and may be damaged.
Discs compatible with this
system
Any disc that displays one of the following logos should play in
this system. Other formats, including DVD, Video CD, CD-R, CD-
RW,
CD-ROM, SACD and Photo CD will not play.
12cm or 8cm discs.
3
2
1
(A)
