1
En
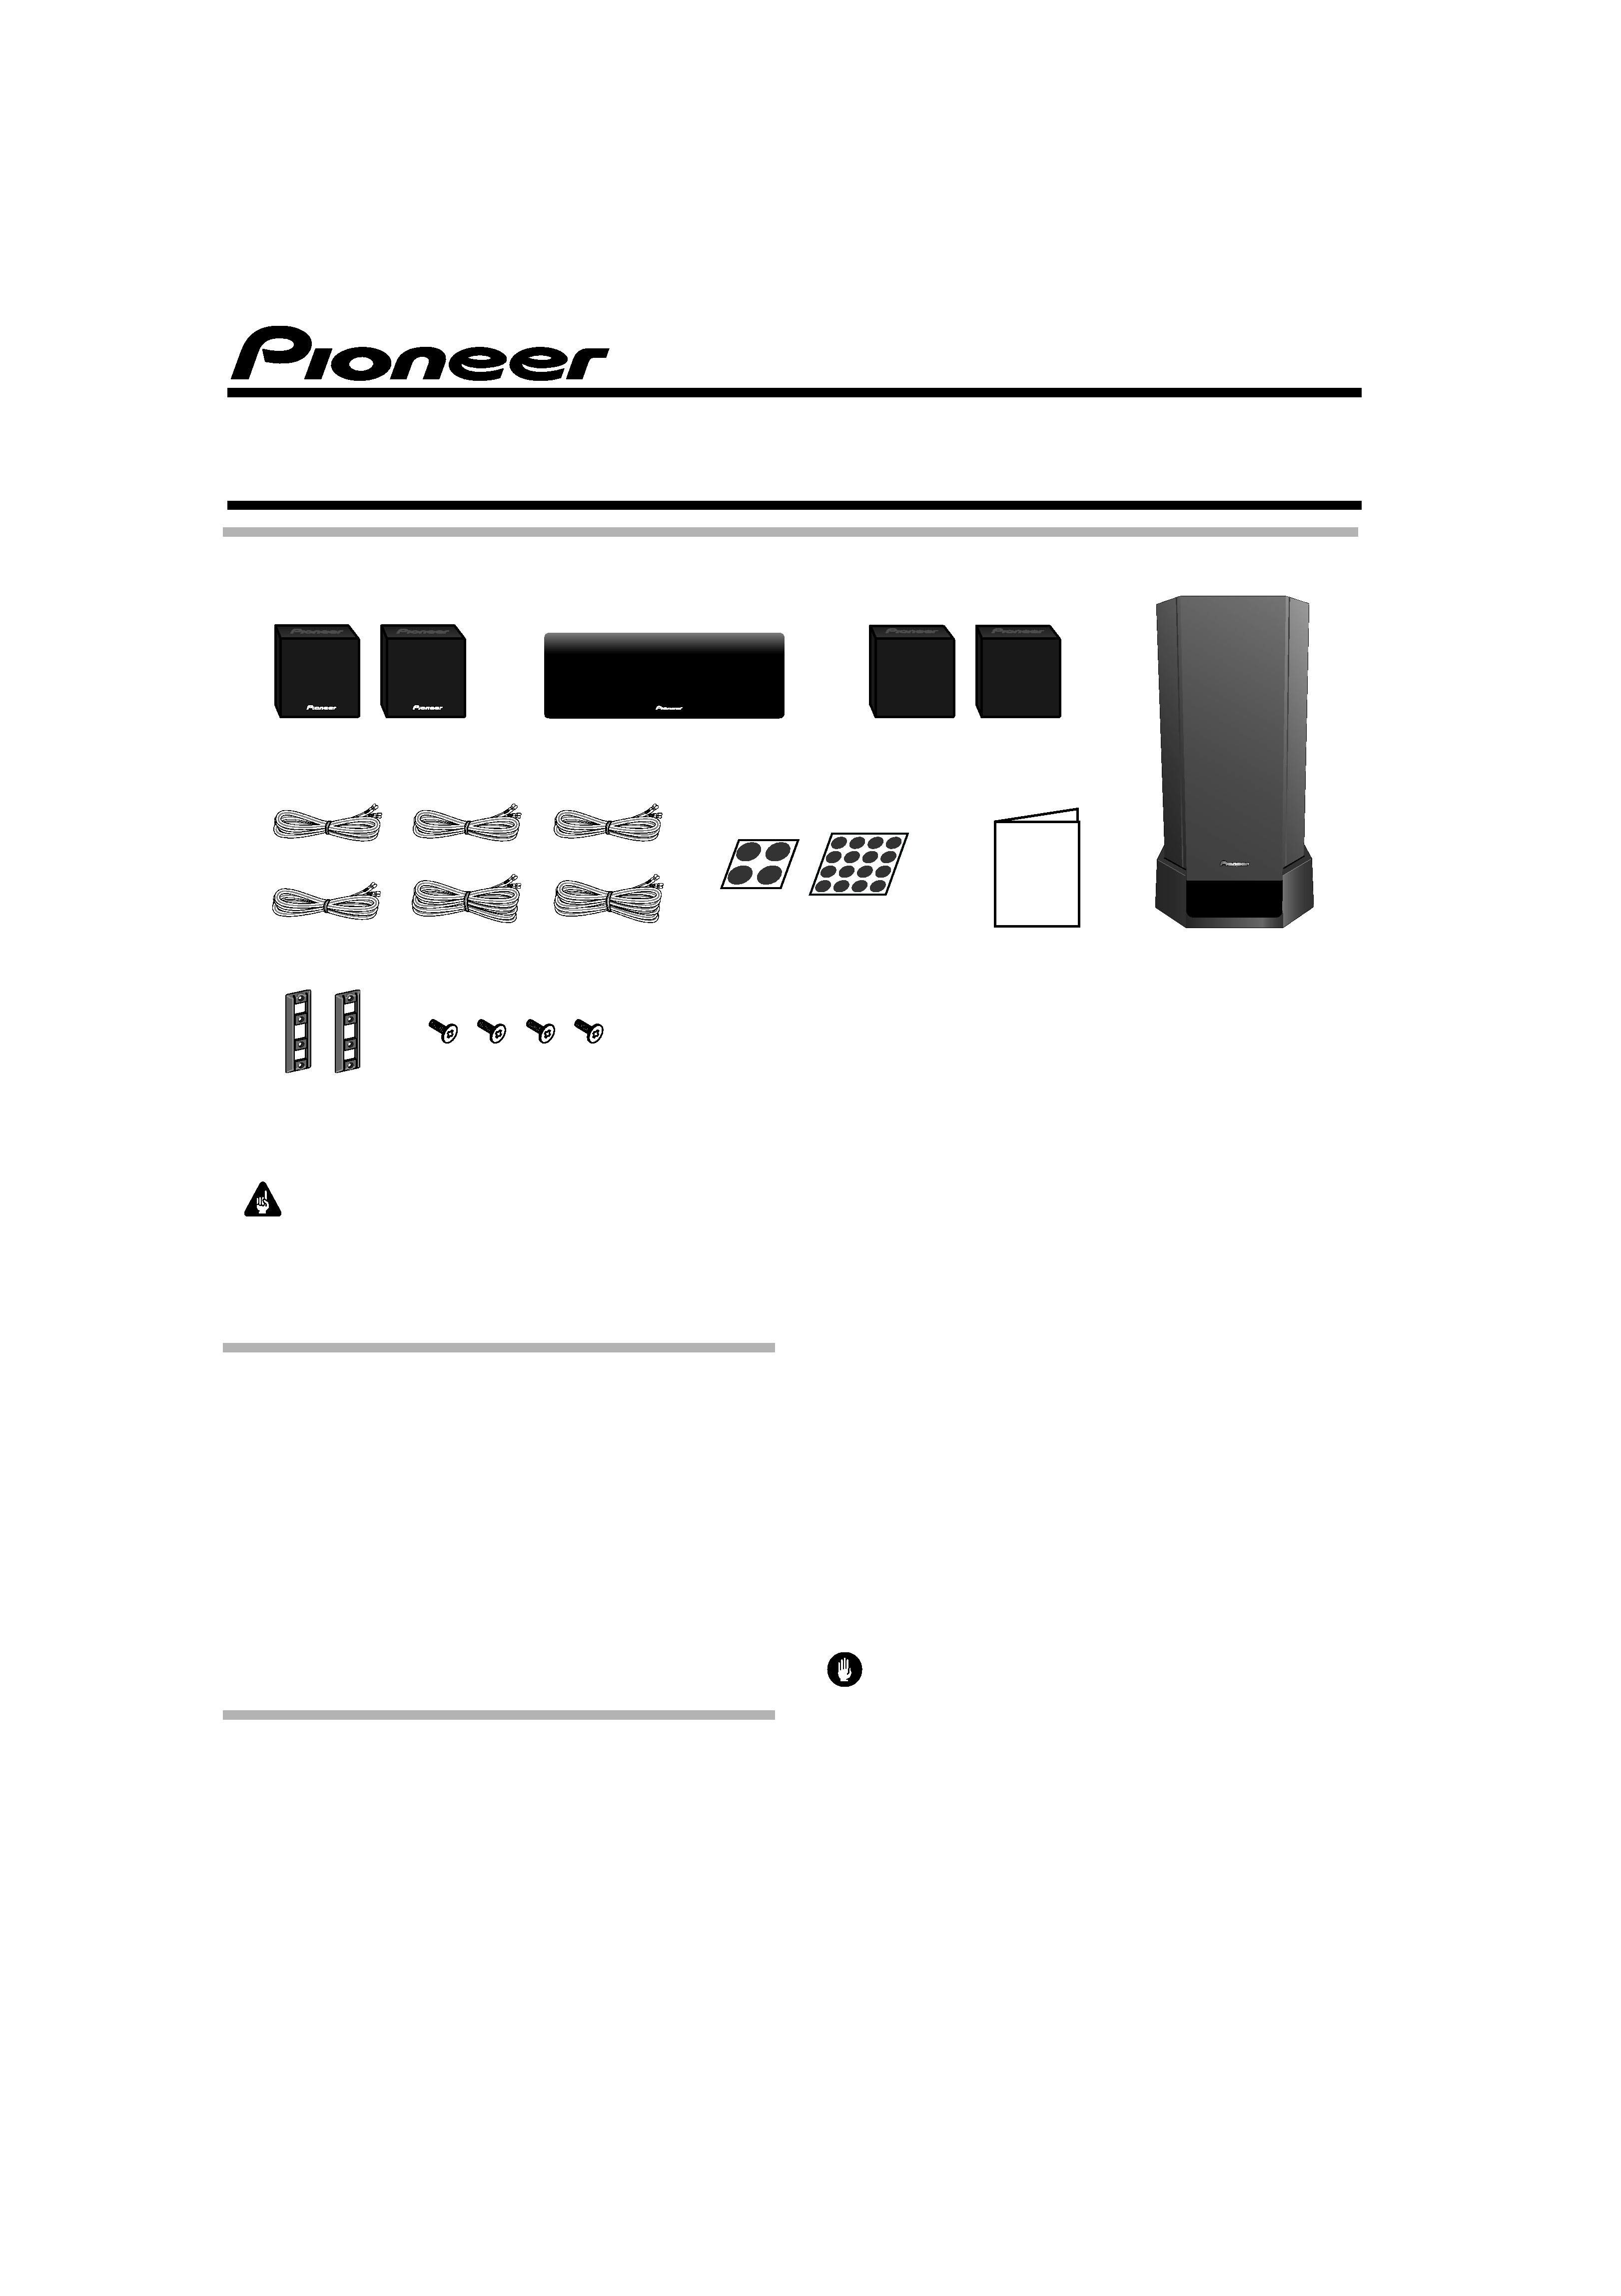
WHAT'S IN THE BOX
Important
The serial number for this equipment is located on the side of
the packing case. Please write this serial number on the
warranty page and keep it in a secure area for future reference.
BEFORE USE
· Thank you for buying this Pioneer product.
· Please read through this operating guide before using your
speaker system to optimize performance.
FRONT / CENTER / SURROUND SPEAKERS
In order to prevent damage to the speaker system resulting from
input overload, please observe the following precautions:
· When connecting or disconnecting cables, be sure amplifier
power is OFF.
· Do not use excessive amplifier volume if using a tone control to
emphasize high or low frequencies.
INSTALLATION PRECAUTIONS
FRONT / CENTER / SURROUND SPEAKERS
· Do not install these units near a stove or other heating
appliance, or put them in a place exposed to the sun. Such
locations may cause the cabinet to change color and the
speaker system to break down.
· The front, center and surround speakers supplied with this
system are magnetically shielded. However, placing them
extremely close to a television may result in color distortion on
the screen. If this happens, move the speakers a little further
away and switch off the television for 15 to 30 minutes.
· Do not use the speaker to output distorted sound for long
periods of time. This can result in damages to the speaker and
poses a potential fire hazard.
SUBWOOFER
· Do not place anything on top of the cabinet.
· Do not spill liquid on the cabinet.
· Place the subwoofer at least 8 inches (20 cm) from any wall or
curtain in order to avoid heat build-up.
· The subwoofer is not magnetically shielded and so should not
be placed near a TV or monitor. Magnetic storage media (such
as floppy discs and tape or video cassettes) should also not be
kept close to the subwoofer.
Caution
· Do not connect this speaker to any amplifier other than the one
supplied with this system. Connection to any other amplifier
may result in a malfunction or a fire.
· Do not attach the subwoofer to the wall or ceiling. It may fall off
and cause injury.
· Front speakers x 2
· Center speaker
· Subwoofer
· Surround speakers x 2
· Speaker cords x 6
Front right (Red)
Subwoofer (Purple)
Surround right (Grey)
Surround left (Blue)
Front left (White)
Center (Green)
· Non-skid pads (large) x 4
· Non-skid pads (small) x 16
· Operating Instructions
· Brackets x 2
· Screws x 4
http://www.pioneerelectronics.com
Operating Instructions
S-FCRW3100-K
Speaker System
01 speaker system_En.fm 1
2
En
PLACEMENT AND FINE TUNING
SUBWOOFER
Sound spreads in all directions in the very low frequency range.
Human hearing cannot easily detect the source of very low
frequencies. Be sure to provide a space of at least 8 inches (20 cm)
between the rear of the subwoofer and the nearest wall.
FRONT SPEAKERS
For best results the loudspeaker should be positioned near ear level
and the loudspeakers separated a distance approximately equal to
the listening distance. Angling the loudspeakers inward towards the
listener will improve the image stability for non-central listeners.
Close proximity to a side or rear wall will enhance the midbass
performance, although too close (particularly a corner location) and
the bass may be unnaturally high and image performance may be
degraded.
CENTER SPEAKER
The loudspeaker should be positioned below the TV. For best results
align the front of the loudspeaker with the front of the TV. If the
loudspeaker is placed under the TV and very close to the floor, then
tilting upwards may be beneficial.
When installing the center speaker on top of the TV, be sure to
secure it with tape or some other suitable means. Otherwise, the
speaker may fall from the TV due to external shocks such as
earthquakes, endangering those nearby or damaging the speaker.
SURROUND SPEAKERS
For best results the loudspeakers should be positioned at or above
ear level. Depending upon your room layout and preferences, the left
and right rear speakers should be positioned on the side walls just
the rear of the listening position, or on the walls.
NON-SKID PADS
If the front and surround speakers are placed on a hard surface,
such as wood or tile place four non-skid pads (small) on the bottom
flat surface of the speakers.
If the subwoofer is placed on a hard floor, such as wood or tile, place
four non-skid pads (large) on the bottom surface of the subwoofer.
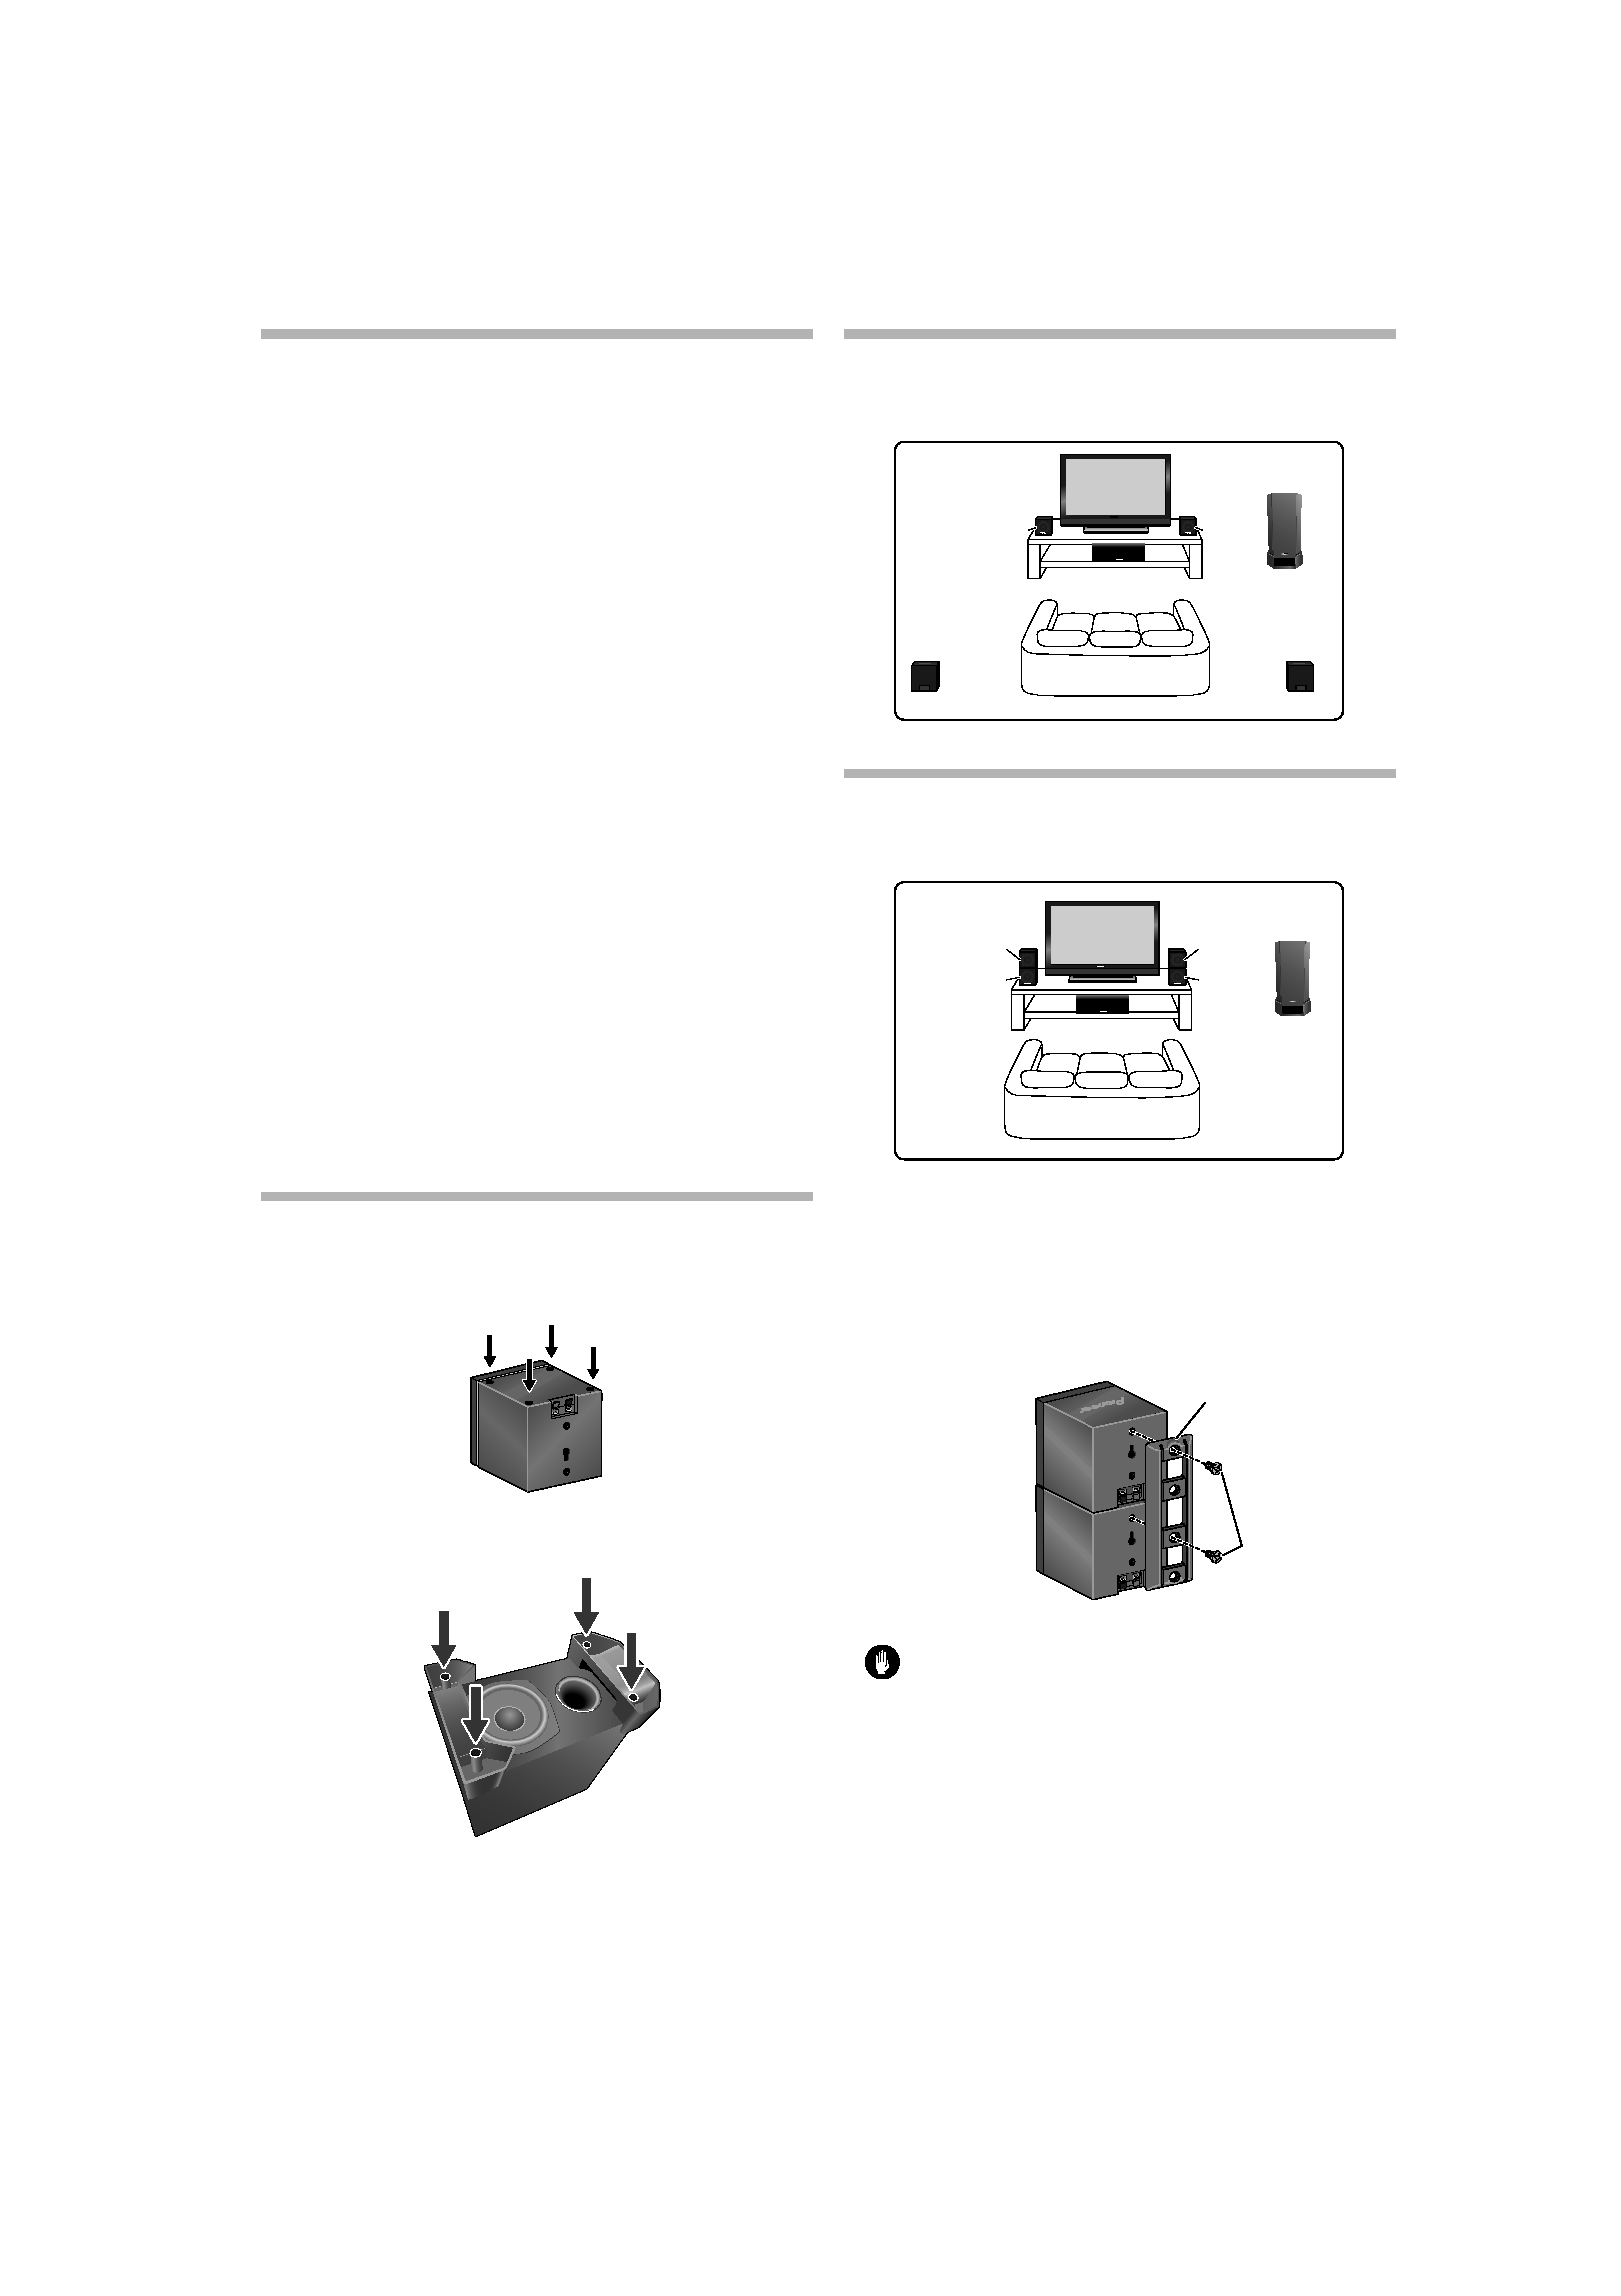
STANDARD SURROUND SETUP
This is a standard multichannel surround sound speaker setup for
optimal 5.1 channel home theater sound.
EXTRA POWER SETUP
This optional setup allows you to enjoy richer, fuller sound from
stereo (2.1 ch) sources.
For Front and Surround speakers
Stack the speakers and fix with the brackets.
As shown in the illustration, stack the surround speakers on top of
the front speakers. Align the bracket with the respective upper
screw hole for the surround speaker and lower screw hole for the
front speaker, and fasten the screws securely.
Caution
Do not attempt to carry the speakers when they are connected
with the bracket. Doing so may cause damage to the bracket or
worsen damage to the bracket and speakers in the event they
are dropped.
Surround left
Surround right
Center
Front
left
Listening position
Front
right
Subwoofer
Surround
left
Surround
right
Center
Front
left
Listening position
Front
right
Subwoofer
Bracket
Screw
Surround
speaker
Front
speaker
01 speaker system_En.fm 2
3
En
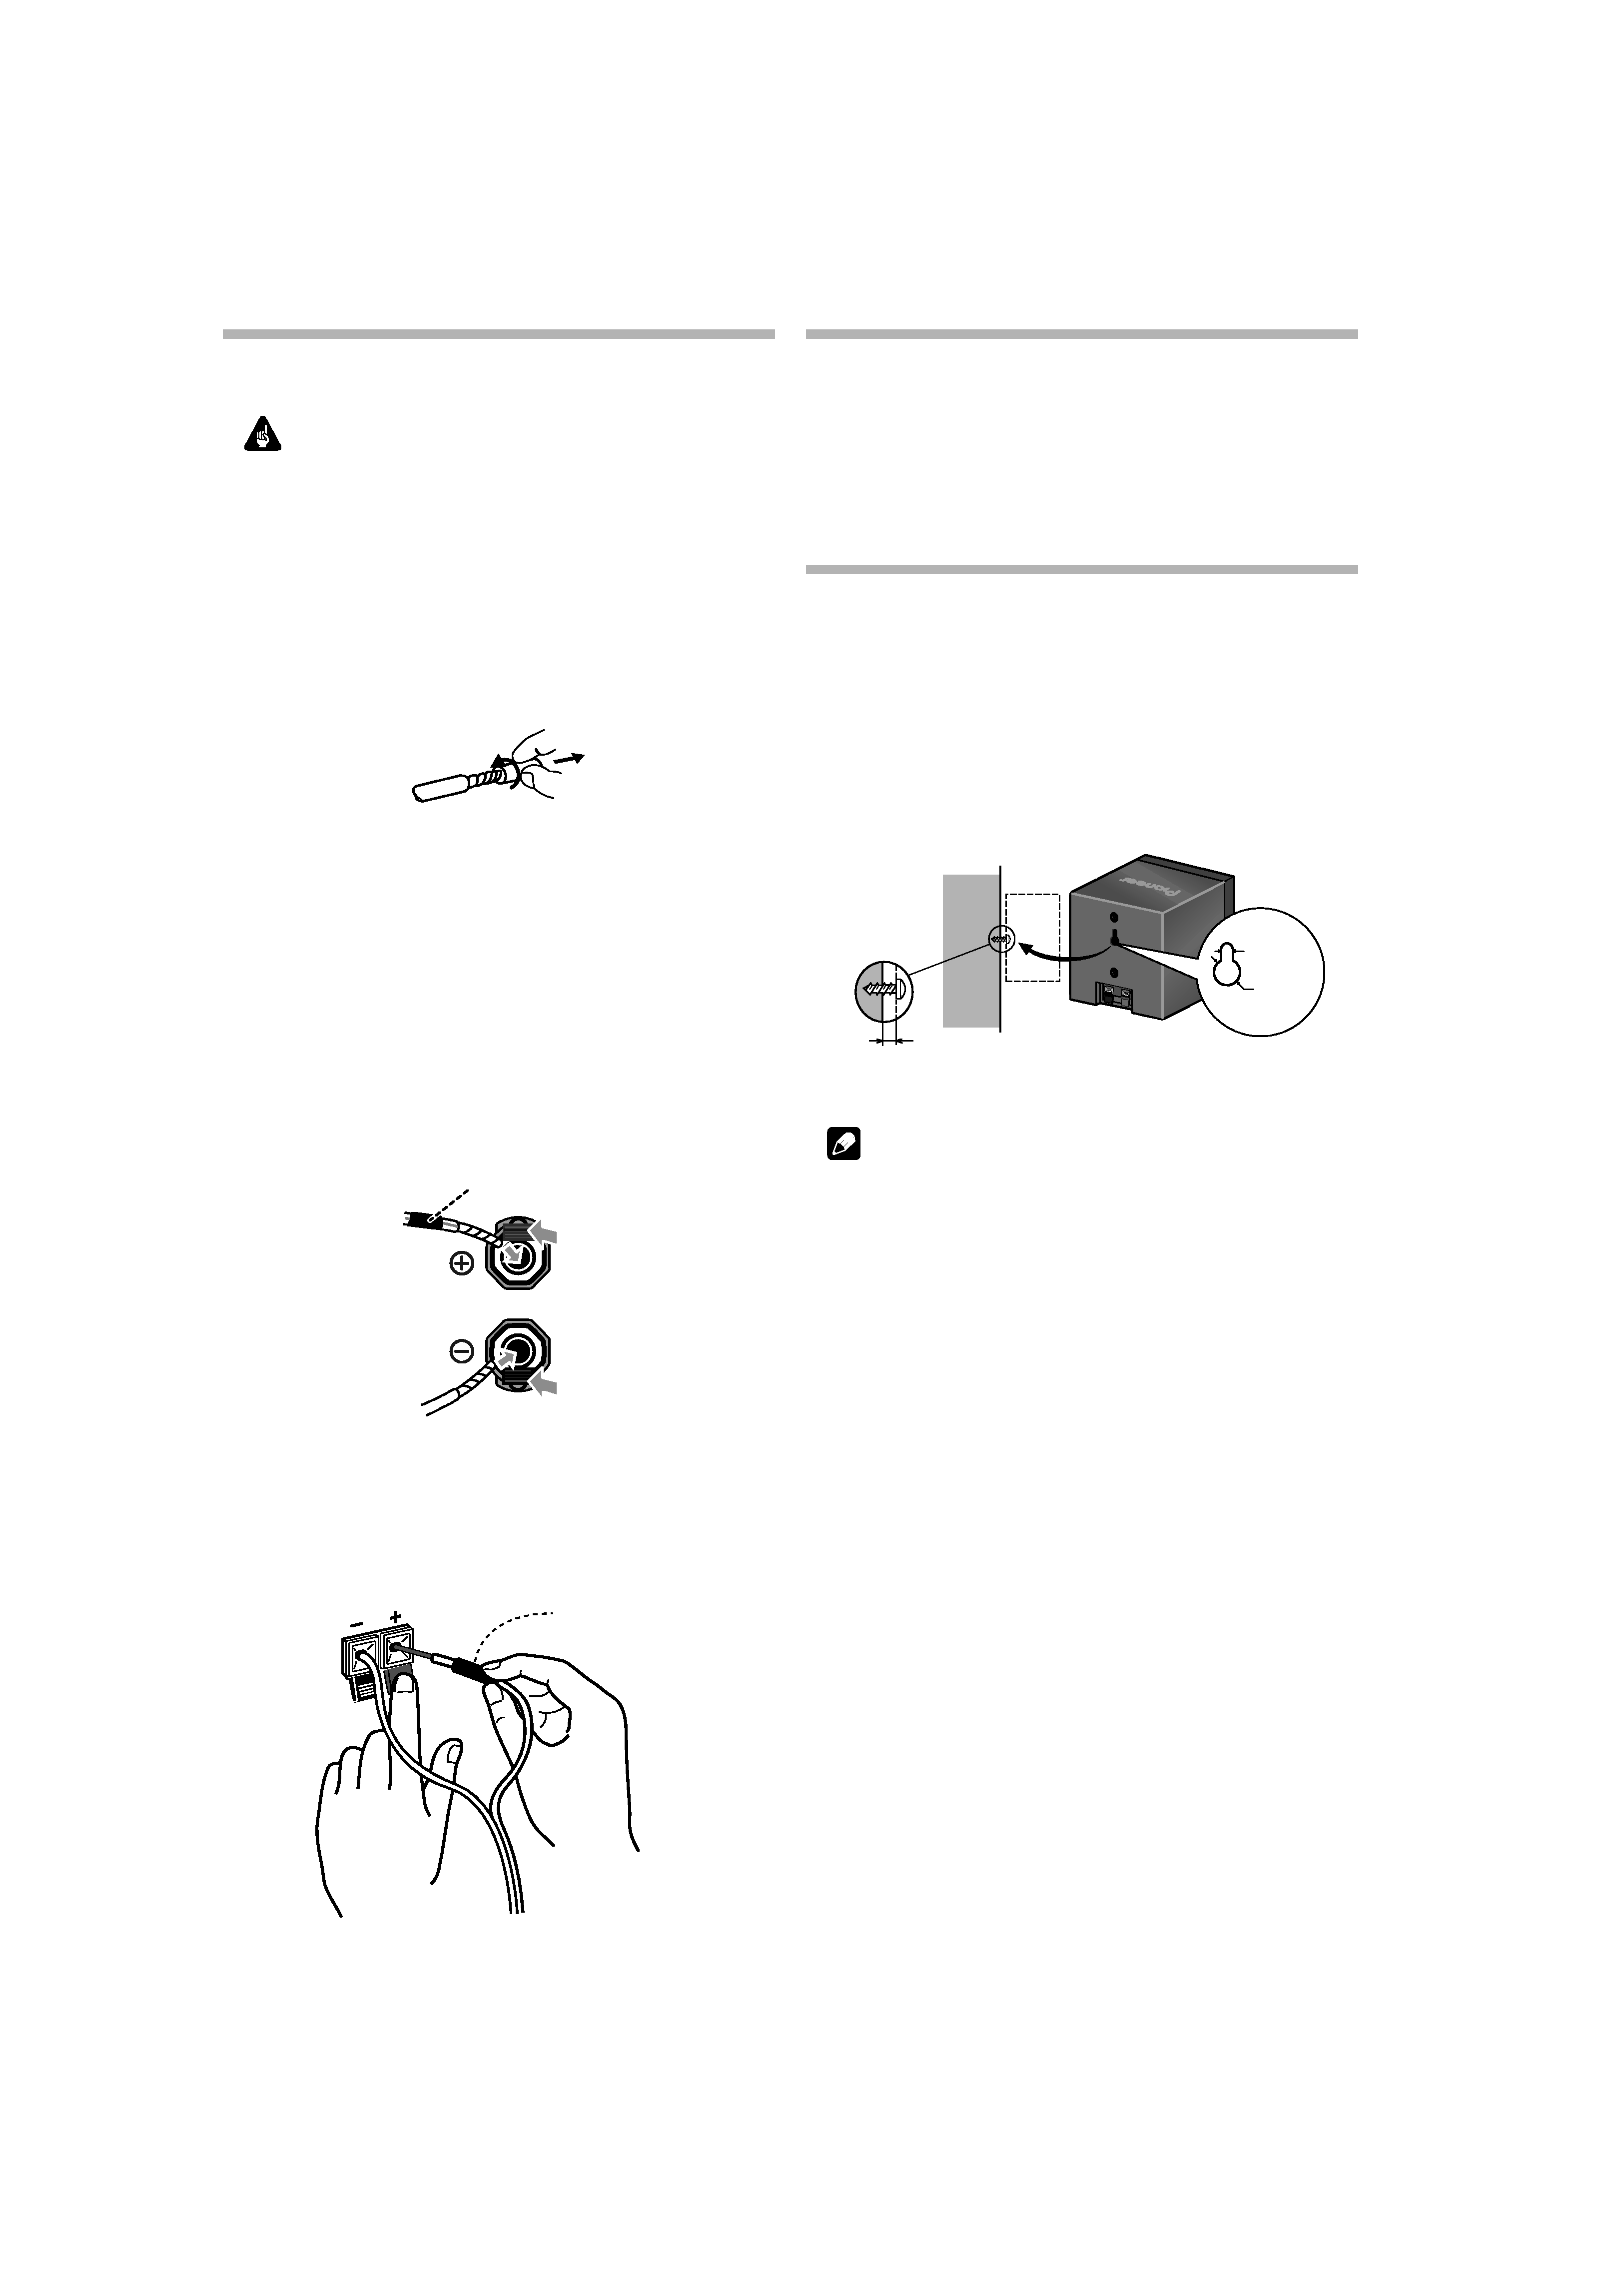
CONNECTING YOUR SYSTEM
Important
Make sure all equipment is turned off before making any
connections.
· Correct wiring of your loudspeakers is essential for achieving
the best sound quality. Be careful to ensure proper polarity of
connection.
· If any of the bare speaker wire touches the back panel it may
cause the power to cut off as a safety measure.
Twist and pull off the protective shields on each wire.
Connect to the speaker terminals on the rear of the
receiver.
To connect, insert the colored wire into the matching positive
(colored) terminal and the other wire into the negative (black)
terminal as shown below.
Note that the color-coded tabs are as follows:
· Red : Front right (R)
· White : Front left (L)
· Green : Center speaker
· Purple : Subwoofer
· Grey : Surround right (R)
· Blue : Surround left (L)
Connect to the speaker terminals on the rear of the
speakers.
Match the colored wire with the color-coded label (above the tabs),
then insert the colored wire into the red (+) tab and the other wire
with the black () tab.
CABINET MAINTENANCE
Use a polishing cloth or dry cloth to wipe off dust and dirt.
When the cabinet is very dirty, clean with a soft cloth dipped in some
neutral cleanser diluted five or six times with water, and then wipe
again with a dry cloth. Do not use furniture wax or cleaners.
Never use thinners, benzine, insecticide sprays and other chemicals
on or near the cabinets, since these will corrode the surfaces.
WALL-MOUNTING THE FRONT, CENTER AND
SURROUND SPEAKER SYSTEM
Before mounting
· Remember that the speaker system is heavy and that its weight
could cause the screws to work loose, or the wall material to fail
to support it, resulting in the speaker falling. Make sure that the
wall you intend to mount the speakers on is strong enough to
support them. Do not mount on plywood or soft surface walls.
· Mounting screws are not supplied. Use screws suitable for the
wall material and support the weight of the speaker.
Note
· If you are unsure of the quality and strength of the walls, consult
a professional for advice.
· Pioneer is not responsible for any accidents or damage that
result from improper installation.
Colored marker
Colored marker
red
black
5 mm to 7 mm
(3/16 in. to 1/4 in.)
5 mm
(3/16 in.)
10 mm
(3/8 in.)
Mounting screw
(not supplied)
01 speaker system_En.fm 3

4
En
TROUBLESHOOTING
SPECIFICATIONS
FRONT / SURROUND SPEAKERS
Enclosure . . . . . . . . . . . . . . . . . . . . . . . . . . . . . Closed-box bookshelf type
(magnetically shielded)
System . . . . . . . . . . . . . . . . . . . . . . . . . . . . . . . . . . . . 7.7 cm 1-way system
Speaker . . . . . . . . . . . . . . . . . . . . . . . . . . . . . . . . . . . . . . . 7.7 cm cone type
Impedance . . . . . . . . . . . . . . . . . . . . . . . . . . . . . . . . . . . . . . . . . . . . . . . 8
Frequency range . . . . . . . . . . . . . . . . . . . . . . . . . . . . . . . . 80 Hz to 20 kHz
Dimensions . . . . . . . . . . . . . . . 100 mm (W) x 100 mm (H) x 100 mm (D)
(3 15/16 in. (W) x 3 15/16 in. (H) x 3 15/16 in. (D))
Weight. . . . . . . . . . . . . . . . . . . . . . . . . . . . . . . . . . . . . . . . 0.54 kg/ 1 lb 3 oz
CENTER SPEAKER
Enclosure . . . . . . . . . . . . . . . . . . . . . . . . . . . . . Closed-box bookshelf type
(magnetically shielded)
System . . . . . . . . . . . . . . . . . . . . . . . . . . . . . . . . . . . . 7.7 cm 1-way system
Speaker . . . . . . . . . . . . . . . . . . . . . . . . . . . . . . . . . . . . . . . 7.7 cm cone type
Impedance . . . . . . . . . . . . . . . . . . . . . . . . . . . . . . . . . . . . . . . . . . . . . . . 8
Frequency range . . . . . . . . . . . . . . . . . . . . . . . . . . . . . . . . 75 Hz to 20 kHz
Dimensions . . . . . . . . . . . . . . . . 220 mm (W) x 90 mm (H) x 100 mm (D)
(8 11/16 in. (W) x 3 9/16 in. (H) x 3 15/16 in. (D))
Weight. . . . . . . . . . . . . . . . . . . . . . . . . . . . . . . . . . . . . . . . 0.70 kg/ 1 lb 9 oz
SUBWOOFER
Enclosure . . . . . . . . . . . . . . . . . . . . . . . . . . Bass-reflex floorstanding type
System . . . . . . . . . . . . . . . . . . . . . . . . . . . . . . . . . . . . 16 cm 1-way system
Speaker . . . . . . . . . . . . . . . . . . . . . . . . . . . . . . . . . . . . . . . 16 cm cone type
Impedance . . . . . . . . . . . . . . . . . . . . . . . . . . . . . . . . . . . . . . . . . . . . . . . 8
Frequency range . . . . . . . . . . . . . . . . . . . . . . . . . . . . . . . .32 Hz to 1.2 kHz
Dimensions . . . . . . . . . . . . . 221 mm (W) x 401.5 mm (H) x 390 mm (D)
(8 11/16 in. (W) x 15 13/16 in. (H) x 15 3/8 in. (D))
Weight. . . . . . . . . . . . . . . . . . . . . . . . . . . . . . . . . . . . . . . 5.5 kg/ 12 lbs 2 oz
NOTE: Specifications and design subject to possible modification
without notice due to improvements.
Symptom
Possible cause
Remedy
No sound
· Bad speaker wire or
connection.
· Receiver is off.
· Volume control is at zero.
· Connect correctly or
replace wire.
· Turn on receiver.
· Slowly turn up volume.
Sound is distorted.
· Extreme signal condition.
· Turn down the amplifier's
output level (volume, bass
control, bass boost) to lower
the level.
Published by Pioneer Corporation.
Copyright © 2008 Pioneer Corporation.
All rights reserved.
01 speaker system_En.fm 4
5
En
S001_En
Selecting fine audio equipment such as the unit
you've just purchased is only the start of your
musical enjoyment. Now it's time to consider how
you can maximize the fun and excitement your
equipment offers. This manufacturer and the
Electronic Industries Association's Consumer
Electronics Group want you to get the most out of
your equipment by playing it at a safe level. One that
lets the sound come through loud and clear without
annoying blaring or distortion-and, most importantly,
without affecting your sensitive hearing.
Sound can be deceiving. Over time your hearing
"comfort level" adapts to higher volumes of sound.
So what sounds "normal" can actually be loud and
harmful to your hearing. Guard against this by
setting your equipment at a safe level BEFORE your
hearing adapts.
To establish a safe level:
· Start your volume control at a low setting.
· Slowly increase the sound until you can hear it
comfortably and clearly, and without distortion.
Once you have established a comfortable sound
level:
· Set the dial and leave it there.
Taking a minute to do this now will help to prevent
hearing damage or loss in the future. After all, we
want you listening for a lifetime.
We Want You Listening For A Lifetime
Used wisely, your new sound equipment will
provide a lifetime of fun and enjoyment. Since
hearing damage from loud noise is often
undetectable until it is too late, this manufacturer
and the Electronic Industries Association's
Consumer Electronics Group recommend you avoid
prolonged exposure to excessive noise. This list of
sound levels is included for your protection.
Decibel
Level Example
30
Quiet library, soft whispers
40
Living room, refrigerator, bedroom away from traffic
50
Light traffic, normal conversation, quiet office
60
Air conditioner at 20 feet, sewing machine
70
Vacuum cleaner, hair dryer, noisy restaurant
80
Average city traffic, garbage disposals, alarm clock
at two feet.
THE FOLLOWING NOISES CAN BE DANGEROUS
UNDER CONSTANT EXPOSURE
90
Subway, motorcycle, truck traffic, lawn mower
100
Garbage truck, chain saw, pneumatic drill
120
Rock band concert in front of speakers,
thunderclap
140
Gunshot blast, jet plane
180
Rocket launching pad
Information courtesy of the Deafness Research Foundation.
01 speaker system_En.fm 5