1
S-A5 Speaker System
Thank you for buying this Pioneer product. Please read through
these operating instructions so you will know how to operate your
model properly. After you have finished reading the instructions,
put them away in a safe place for future reference.
Before you start
· The nominal impedance of this speaker system is 6 ohms.
Connect the speaker system to an amplifier with a load
impedance ranging from 4 to 16 ohms (a model with
"4 16
" displayed on the speaker output terminals).
· Do not touch the speaker cones as they are easily damaged.
In order to prevent damage to the speaker system resulting
from input overload, please observe the following precautions:
· Do not supply power to the speaker system in excess of the
maximum permissible input.
· When connecting or disconnecting anything in your AV
system, make sure the amplifier is switched off.
· When using a graphic equalizer to emphasize loud sounds
in the high-frequency range, do not use excessive amplifier
volume.
· Do not try to force a low-powered amplifier to produce loud
volumes of sound (the amplifier's harmonic distortion will be
increased, and you may damage the tweeter).
Caution: installation
· Do not place the speaker on an unstable surface. It could
present a hazard if it falls, as well as damaging the equip-
ment.
· Switch off and unplug your AV equipment and consult the
instructions when connecting up components. Make sure
you use the correct connecting cables.
· Do not put a TV or other AV equipment on top of this
speaker. It could present a hazard if it falls, as well as
damaging the equipment.
Caution: in use
· Don't use the speaker to output distorted sound for long
periods of times. This can result in a fire hazard.
· Do not sit or stand on the speaker, or let children play on the
speaker.
· Do not put large or heavy objects on top of the speaker.
Installing your speaker
Please observe the following points when installing speakers:
· Sounds played through speaker systems are easily affected
in subtle ways by the conditions in the listening space.
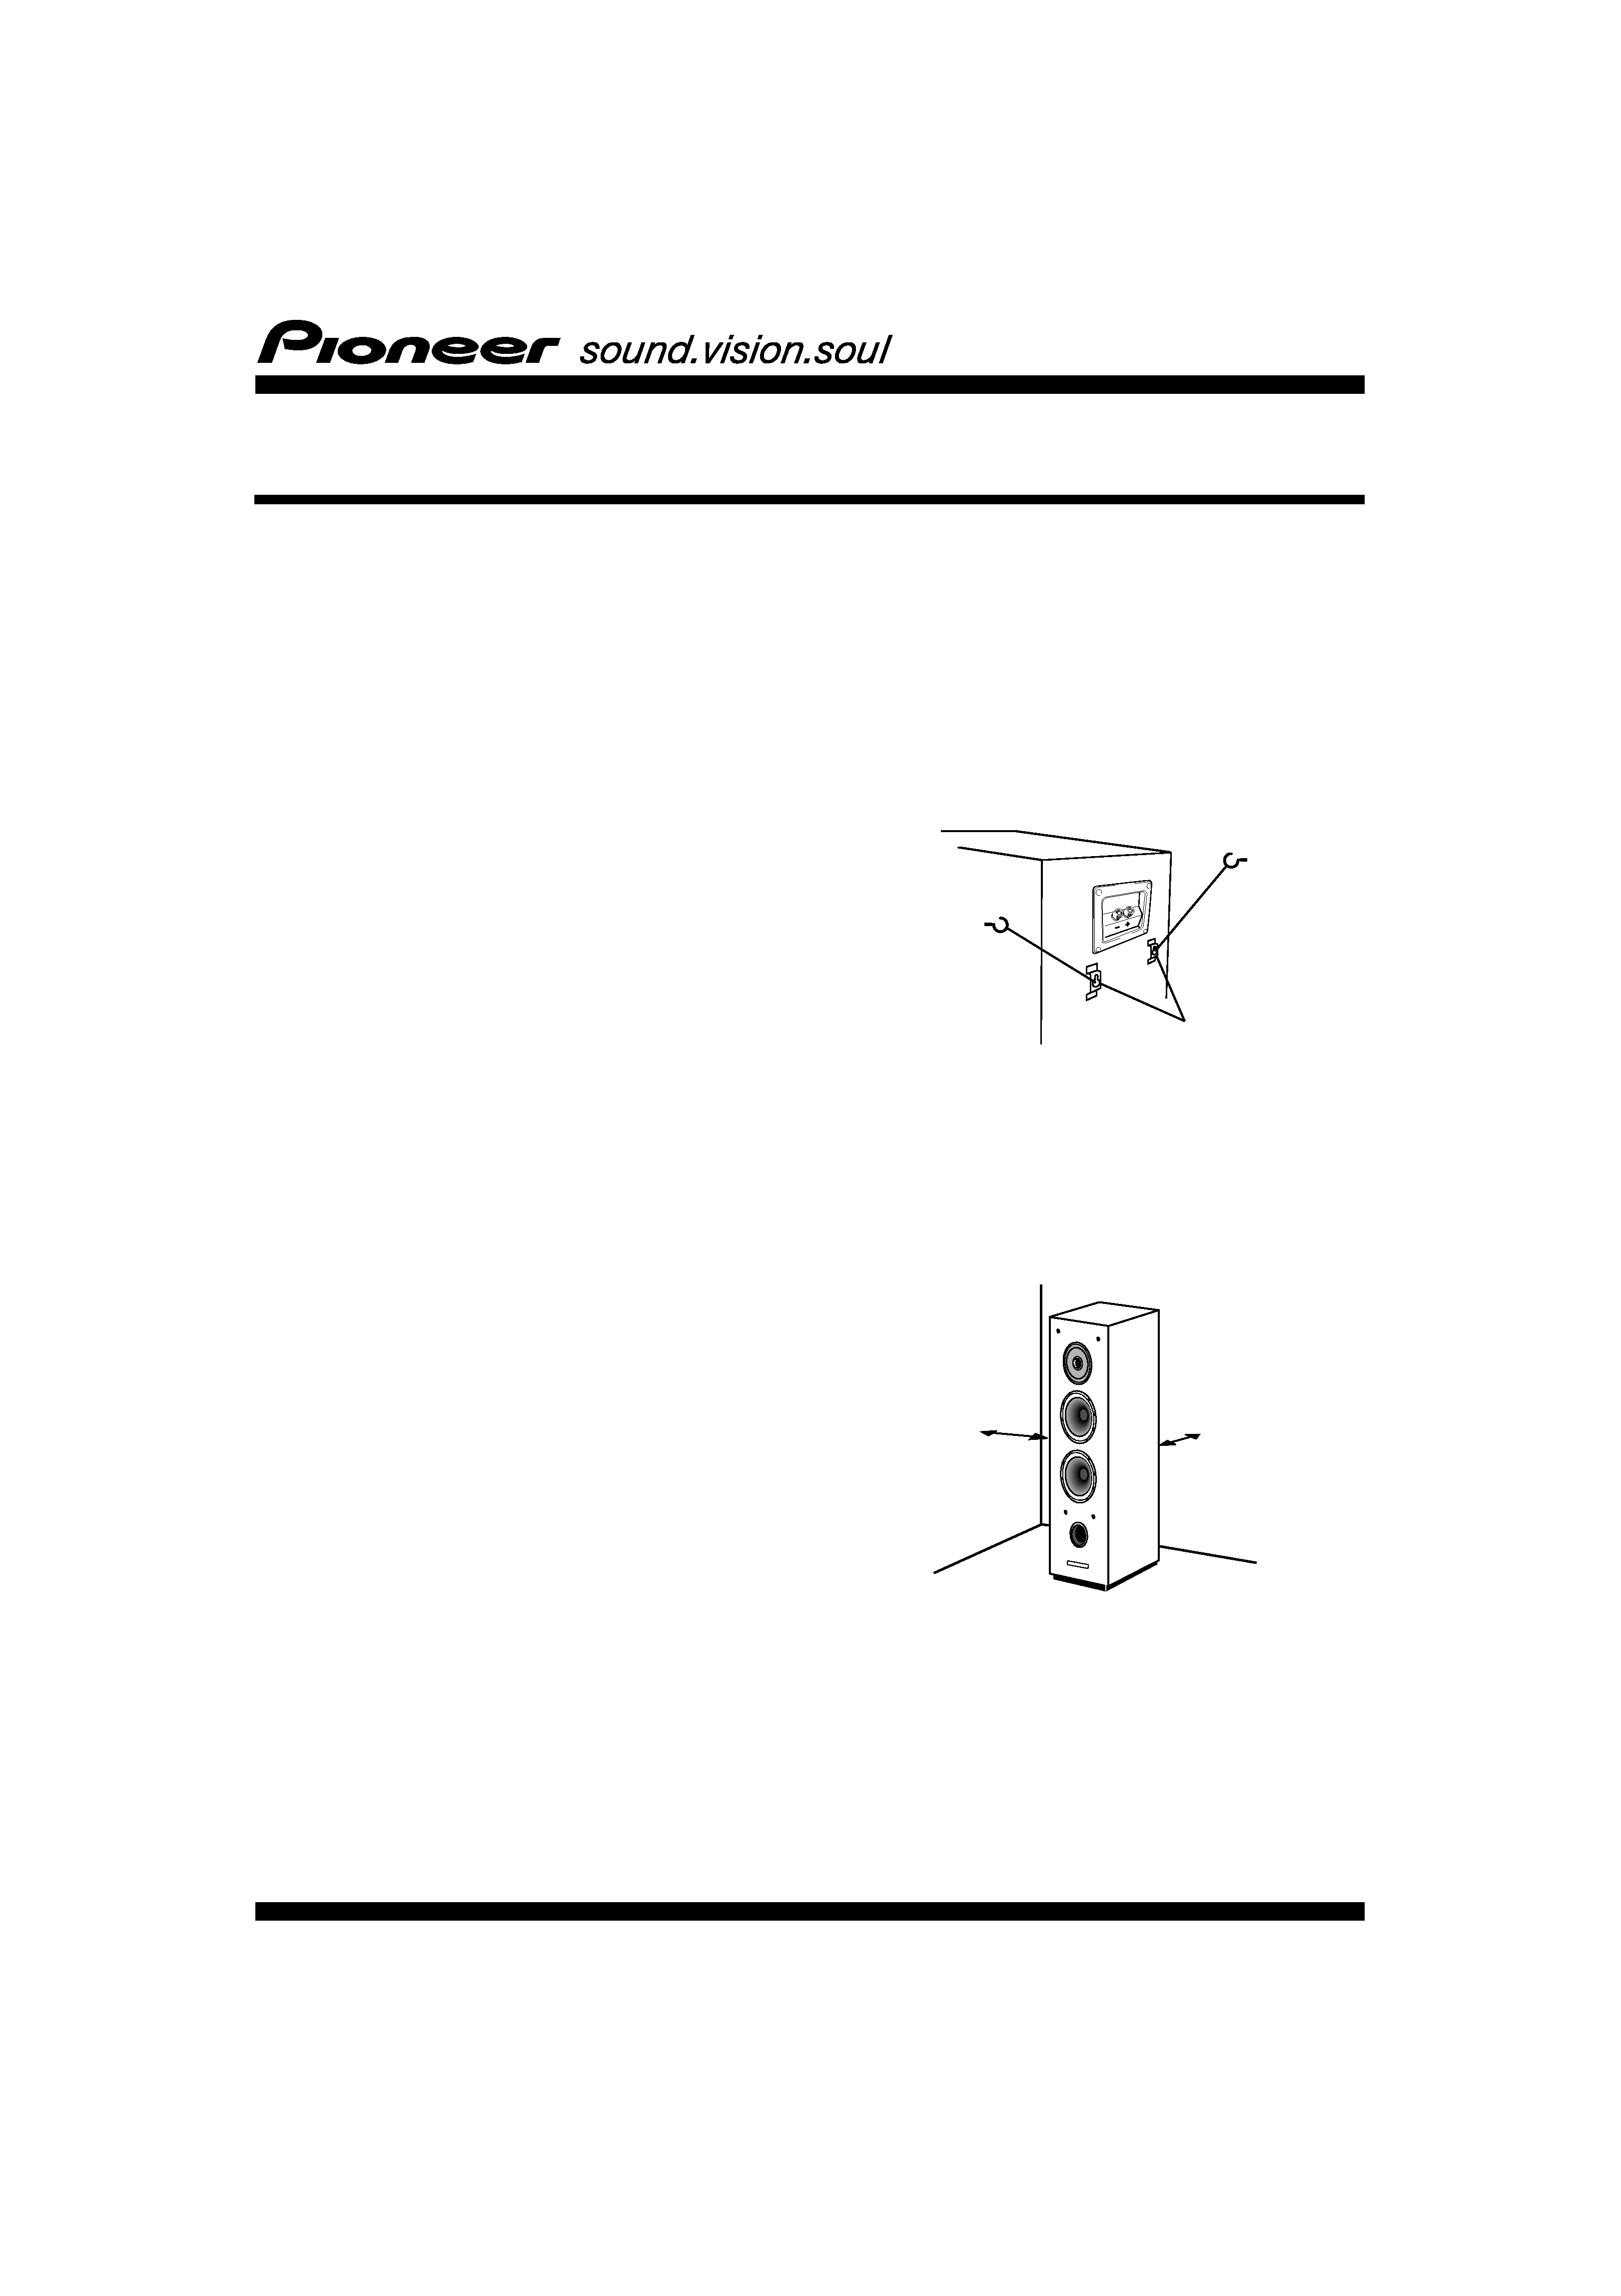
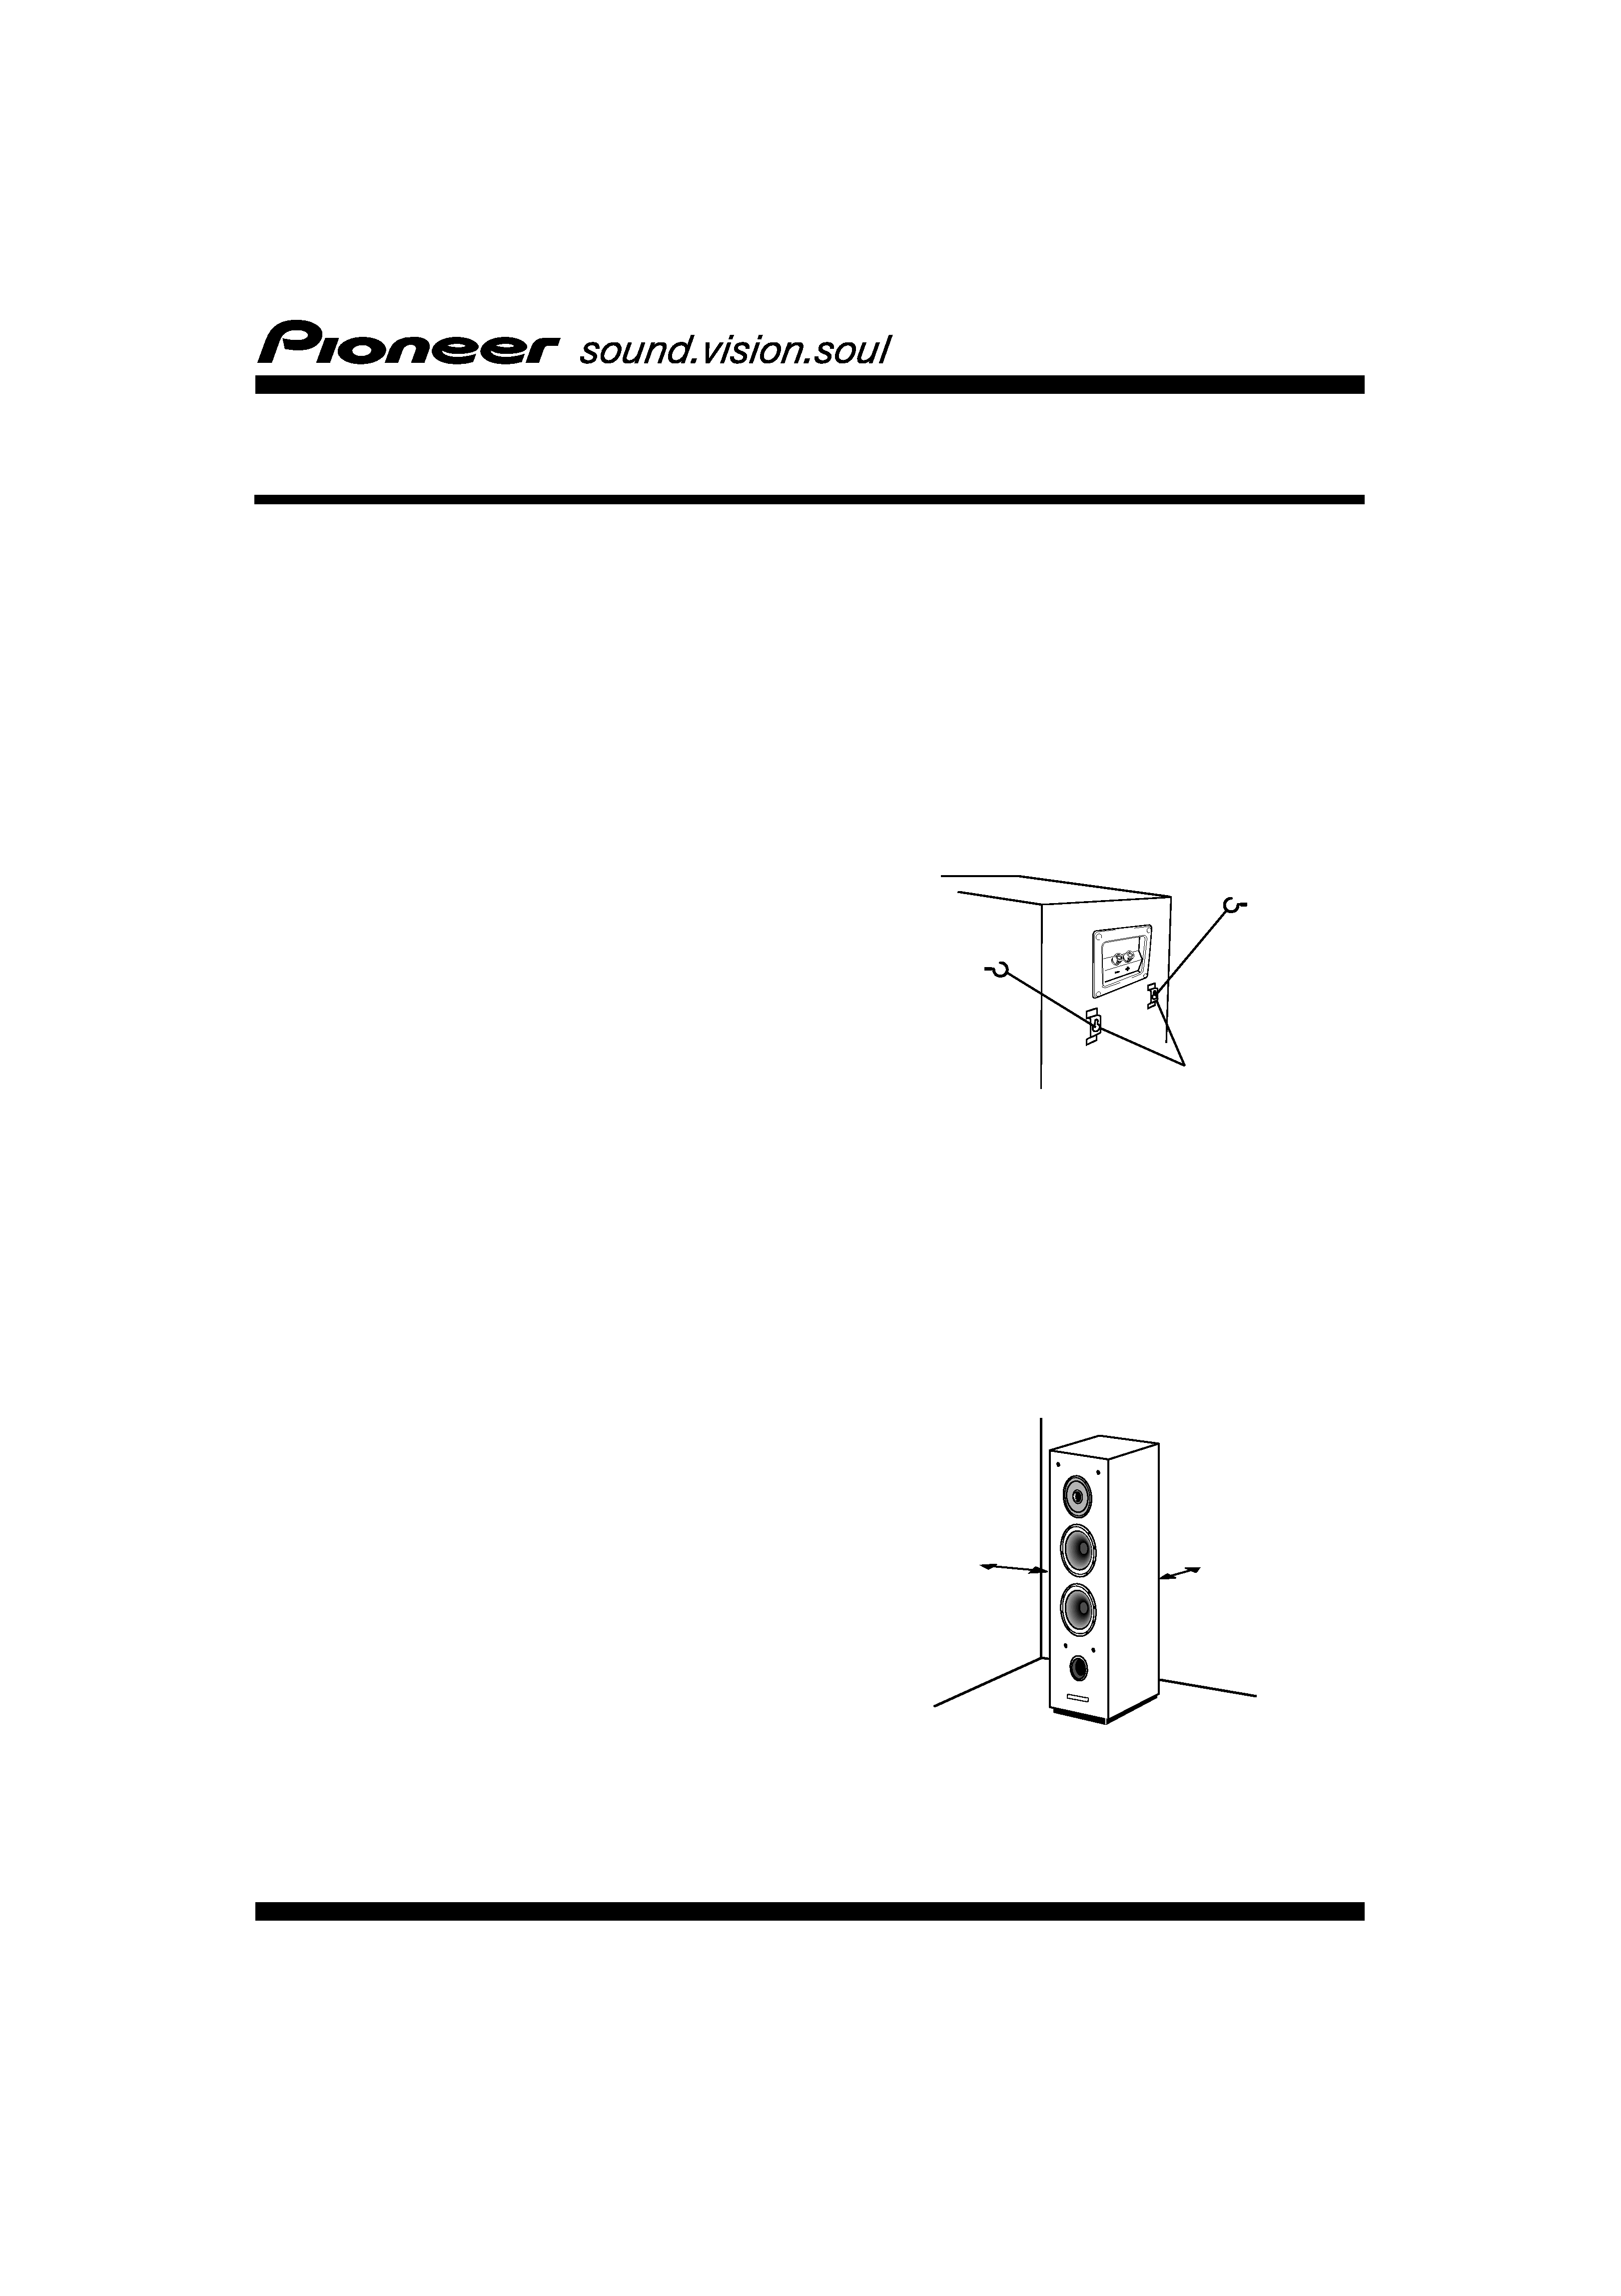
· On the rear of the speaker are two metal catches. These are
for stabilizing the speaker so that in the event of an earth-
quake, etc., the speaker does not fall over.
· Screw two picture hooks or similar into the wall behind the
speaker. Pass a chain or cord around the hooks and through
the metal catches so that the speaker is stabilized.
· After installing, make sure the speaker is securely fixed.
Pioneer cannot take responsibility for injuries or accidents
arising from improper installation of this speaker.
· Speakers are heavy, so make sure the surface where you
install them is solid. For good sound, the speaker should be
about 20cm away from the back wall and at least 50cm away
from the side wall.
50cm
20cm
metal catches
S-A5
02.2.20, 1:47 PM
1
2
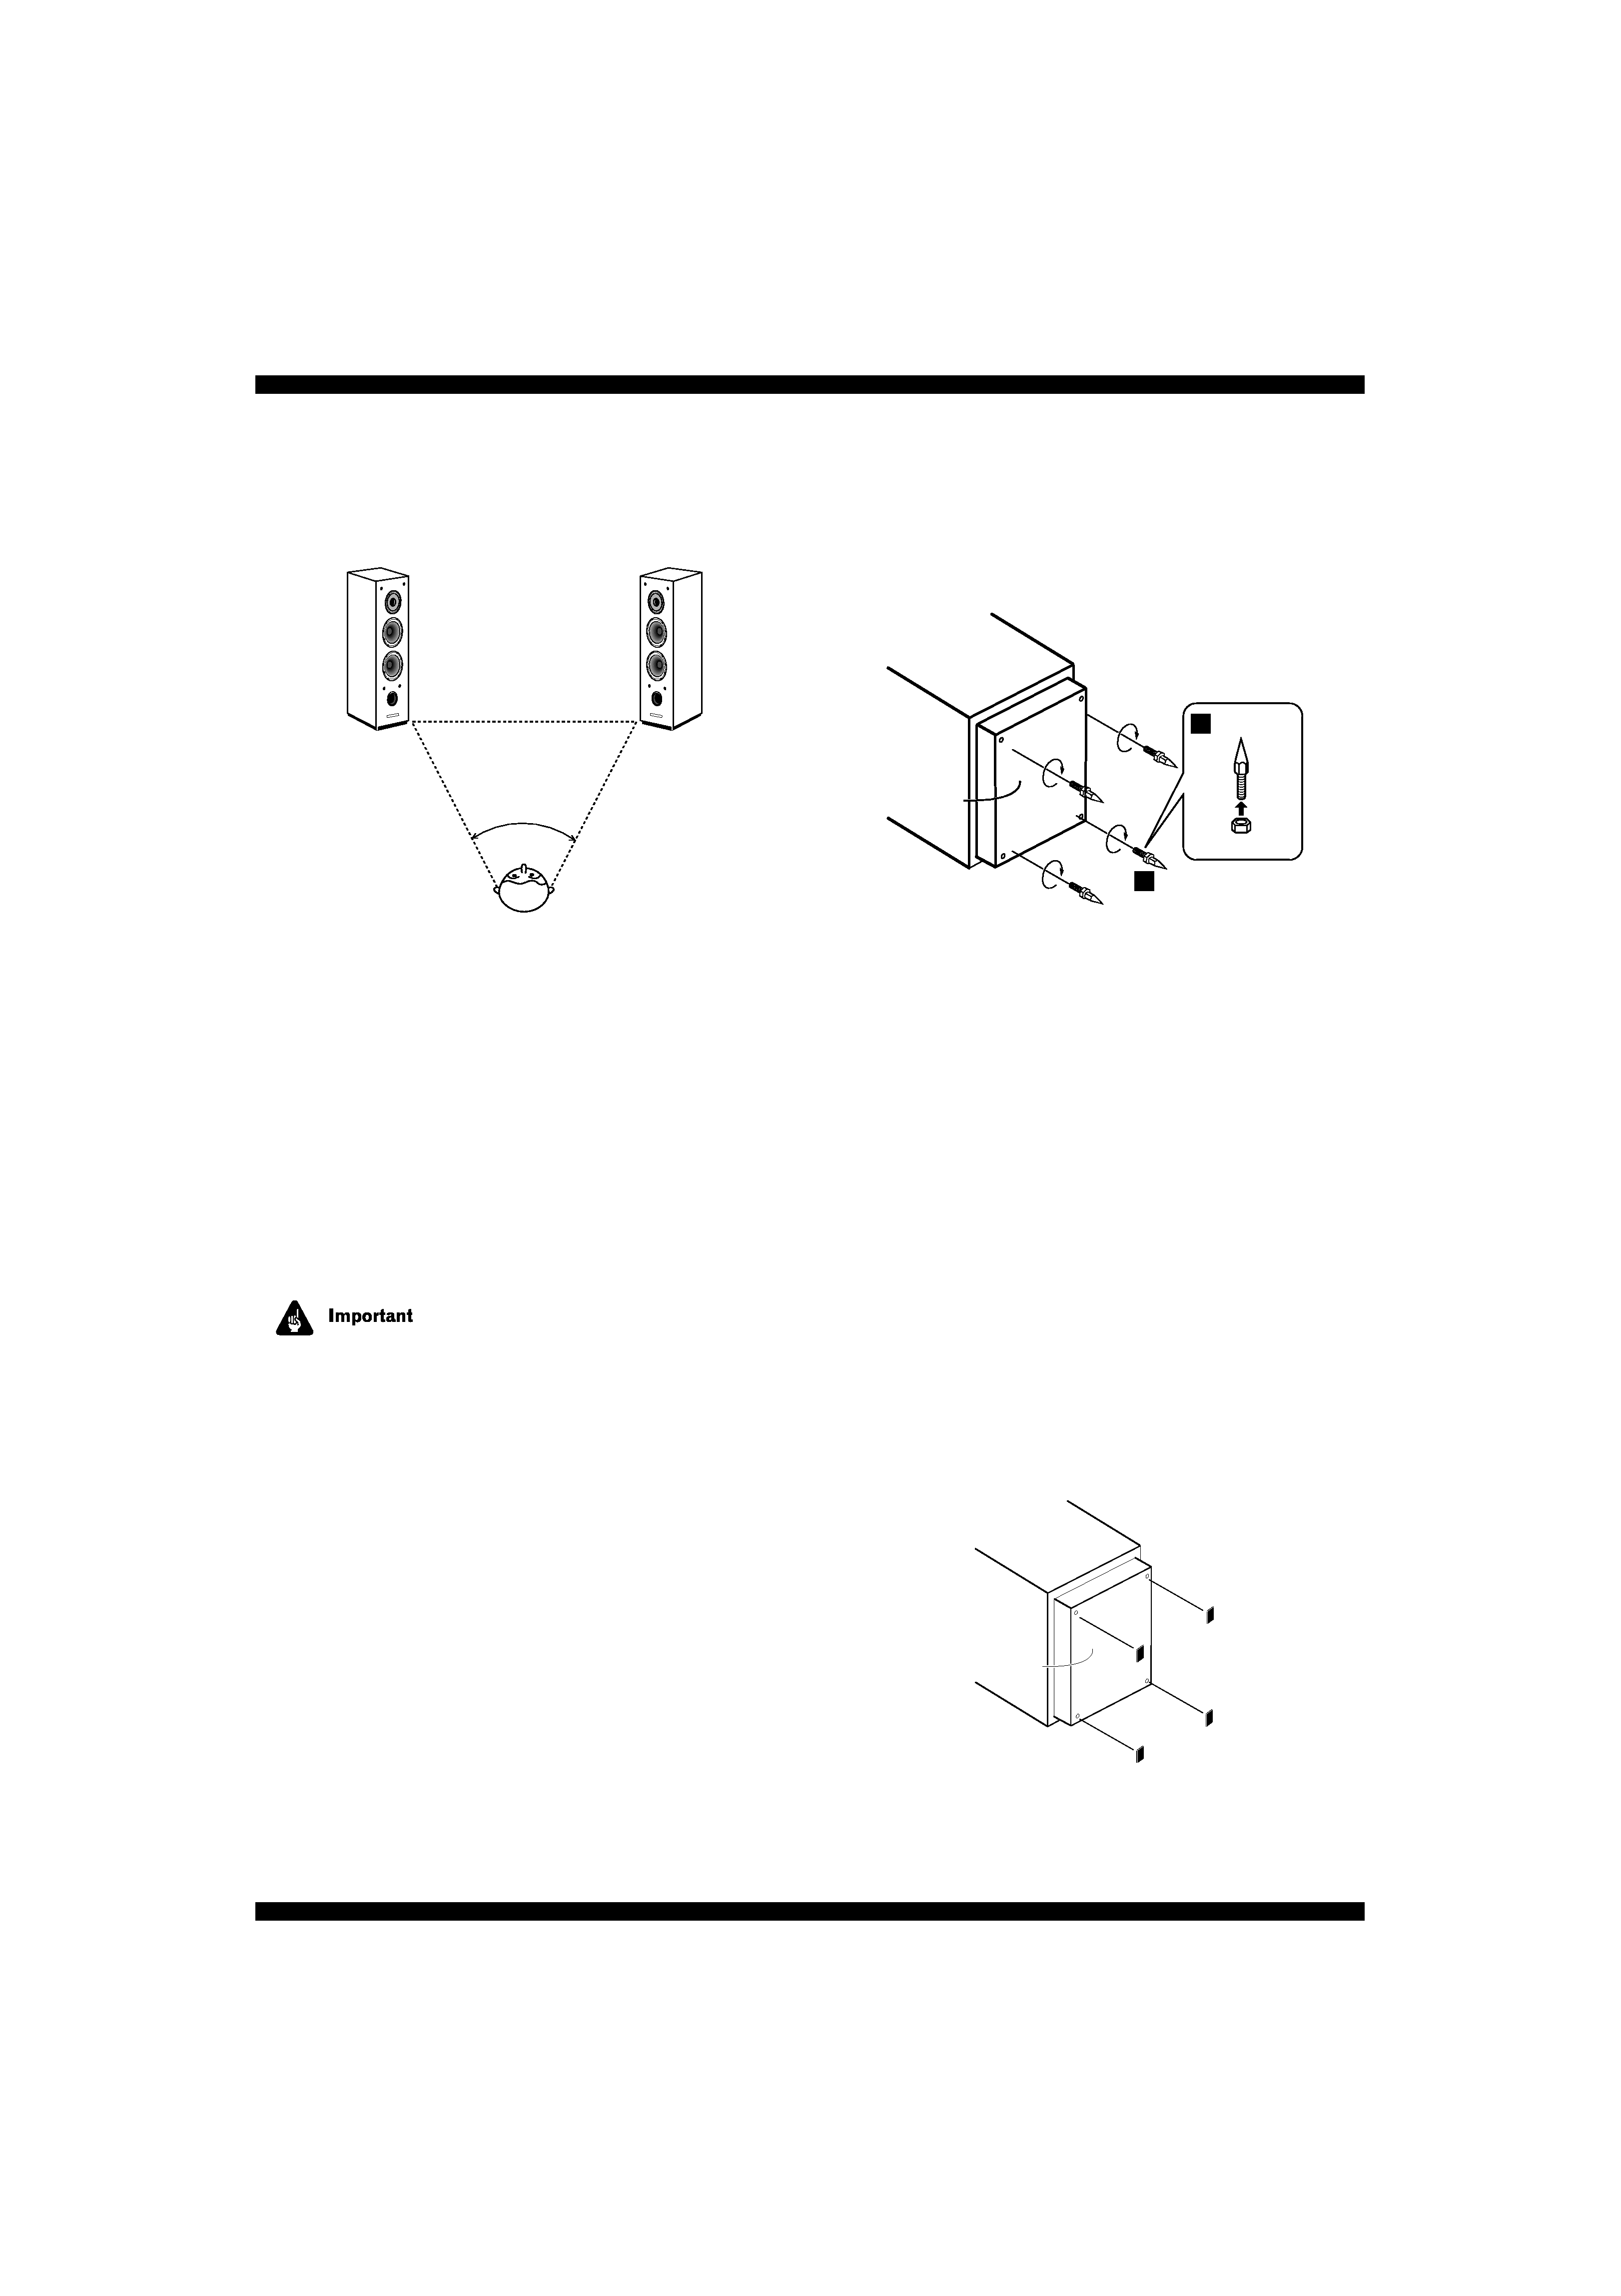
· Place speakers equal distances from your listening position
for good stereo sound. Use speaker cords of the same length
for each speaker.
50 60º
· If you're using these speakers for your TV sound, install them
at equal distances either side of the TV and point them in the
same direction as the TV.
· If the room has a lot of reverberation, we recommend
hanging heavy fabric on the walls, and/or putting a carpet on
the floor to damp the sound. For best results, cover walls
completely.
· Do not place the speaker where it will be in direct sunlight,
and avoid positioning it near heaters and air conditioners.
This may cause warping and discoloration of the speaker
cabinet and damage the speakers.
· The speaker is heavy. Placing it on an unstable surface is
dangerous, and should be avoided.
Pioneer assumes no liability whatsoever for damages resulting
from assembly, improper mounting, insufficient reinforce-
ment, misuse of the product, acts of nature, etc.
Attaching the spikes
A set of four metal spikes is supplied that you can use to isolate
the speaker from the floor. We recommend using the spikes over
the supplied non-slip pads as they will improve the sound of the
speaker.
1
2
For each spike:
1
Screw the nut all the way onto the spike.
2
Screw the spike into the base of the speaker.
There are four holes for the spikes in the base of the speaker
cabinet.
3
Place the speaker upright so that the spikes are resting
on the spike bases on the floor.
4
Adjust the spike lengths by unscrewing them slightly
from the speaker cabinet.
Adjust so that the speaker is resting squarely on all four spikes.
5
Tighten the nut up against the base of the speaker.
Attaching the non-slip pads
A set of four self-adhesive non-slip pads are supplied that you
can use in place of the spikes to provide some isloation and also
prevent the speakers moving.
1
Remove the backing tape of the non-slip pads and stick
one in each corner on the base of the speaker.
Spike
Nut
Speaker base
Speaker base
S-A5
02.2.20, 1:47 PM
2

3
Connecting to an amplifier
Before connecting to your amplifier, make sure that the amp is
switched off.
Use the supplied speaker cable to connect up the speakers.
Make sure that you match up the speaker terminals on the
speakers with those on your amplifier so that the positive (+)
terminals and negative () terminals are paired.
1
Twist off the protective shielding on the ends of the
speaker cable. Twist together any stray strands of speaker
wire.
2
Unscrew the terminals on the speakers and insert the
speaker wire as shown.
3
Connect the other end of the speaker cable to the
speaker terminals on your amplifier.
You can also use banana plugs to connect up the speaker.
· After connecting the plugs, pull lightly on the cables to make
sure that the ends of the cables are securely connected to
the terminals. Poor connections can create noise and
interruptions in the sound.
· If the cables' wires happen to be pushed out of the terminals,
allowing the wires to come into contact with each other, it
places an excessive additional load on the amp. This may
cause the amp to stop functioning, and may even damage
the amp.
Detatching and replacing the front grille
The front grille of this speaker system is removable. Proceed as
follows:
1
Use both hands to hold the bottom part of the grille,
and pull it gently towards you. You will then be able to free
the bottom part of grille.
2
Similarly, take hold of the top part of the grille, and pull
it towards you; the whole grille will then be detached from
the speaker system.
3
To replace the grille, align the holes in the grille's corners
with the projections on the front of the speaker, and push
each of the corners into place.
Magnetic shielding
This speaker system is magnetically shielded. However, depend-
ing on the installation location, color distortion may occur if the
speaker system is installed extremely close to the screen off a
television set.
If this happens, turn off the television, then turn it on again after
15 to 30 minutes. If the problem persists, place the speaker
system away from the television set.
Cleaning the speaker cabinet
With normal use, wiping with a dry cloth should be sufficient to
keep the cabinet clean. If necessary, clean with a cloth dipped in
a neutral cleanser diluted five or six times with water, and wrung
out well. Do not use furniture wax or cleansers.
Never use thinners, benzine, insecticide sprays or other chemi-
cals on or near this unit since these will corrode the surfaces.
Striped half of speaker
cable to positive (+)
speaker terminal
Other half of speaker cable to
negative () speaker terminal
Note which way
up the grille goes
S-A5
02.2.20, 1:47 PM
3
4
Specifications
Enclosure ........................... Bass-reflex type magnetically shielded
floorstanding speaker
Configuration ............................................................................. 2-way
Woofer .................................................................. 13 cm cone x2
Tweeter .................................................................... 2.5 cm dome
Nominal impedance .................................................................... 6
Frequency response .................................................... 31~42,000 Hz
Sensitivity ................................................................ 88 dB/W (at 1 m)
Allowable input
Maximum input (EIAJ) ...................................................... 100 W
Crossover frequency .............................................................. 2.5 kHz
Exterior dimensions (mm) ............. 175 (W) x 895 (H) x 280 (D) mm
Weight ..................................................................................... 17.2 kg
Supplied accessories
Speaker cable (2.5 m) .............................................................. x1
Spikes ........................................................................................ x4
Spike bases ............................................................................... x4
Non-slip pads ...................................................................... x1 set
Operating instructions ............................................................. x1
Specifications and design subject to possible modification
without notice, due to improvements.
Real, natural wood is used in the construction of the speaker
system cabinets. They feature a wonderful color and depth that
is much more attractive than plastic veneers and similar
materials.
No two pieces of natural wood are exactly alike. Keep this point
in mind as you enjoy these speakers.
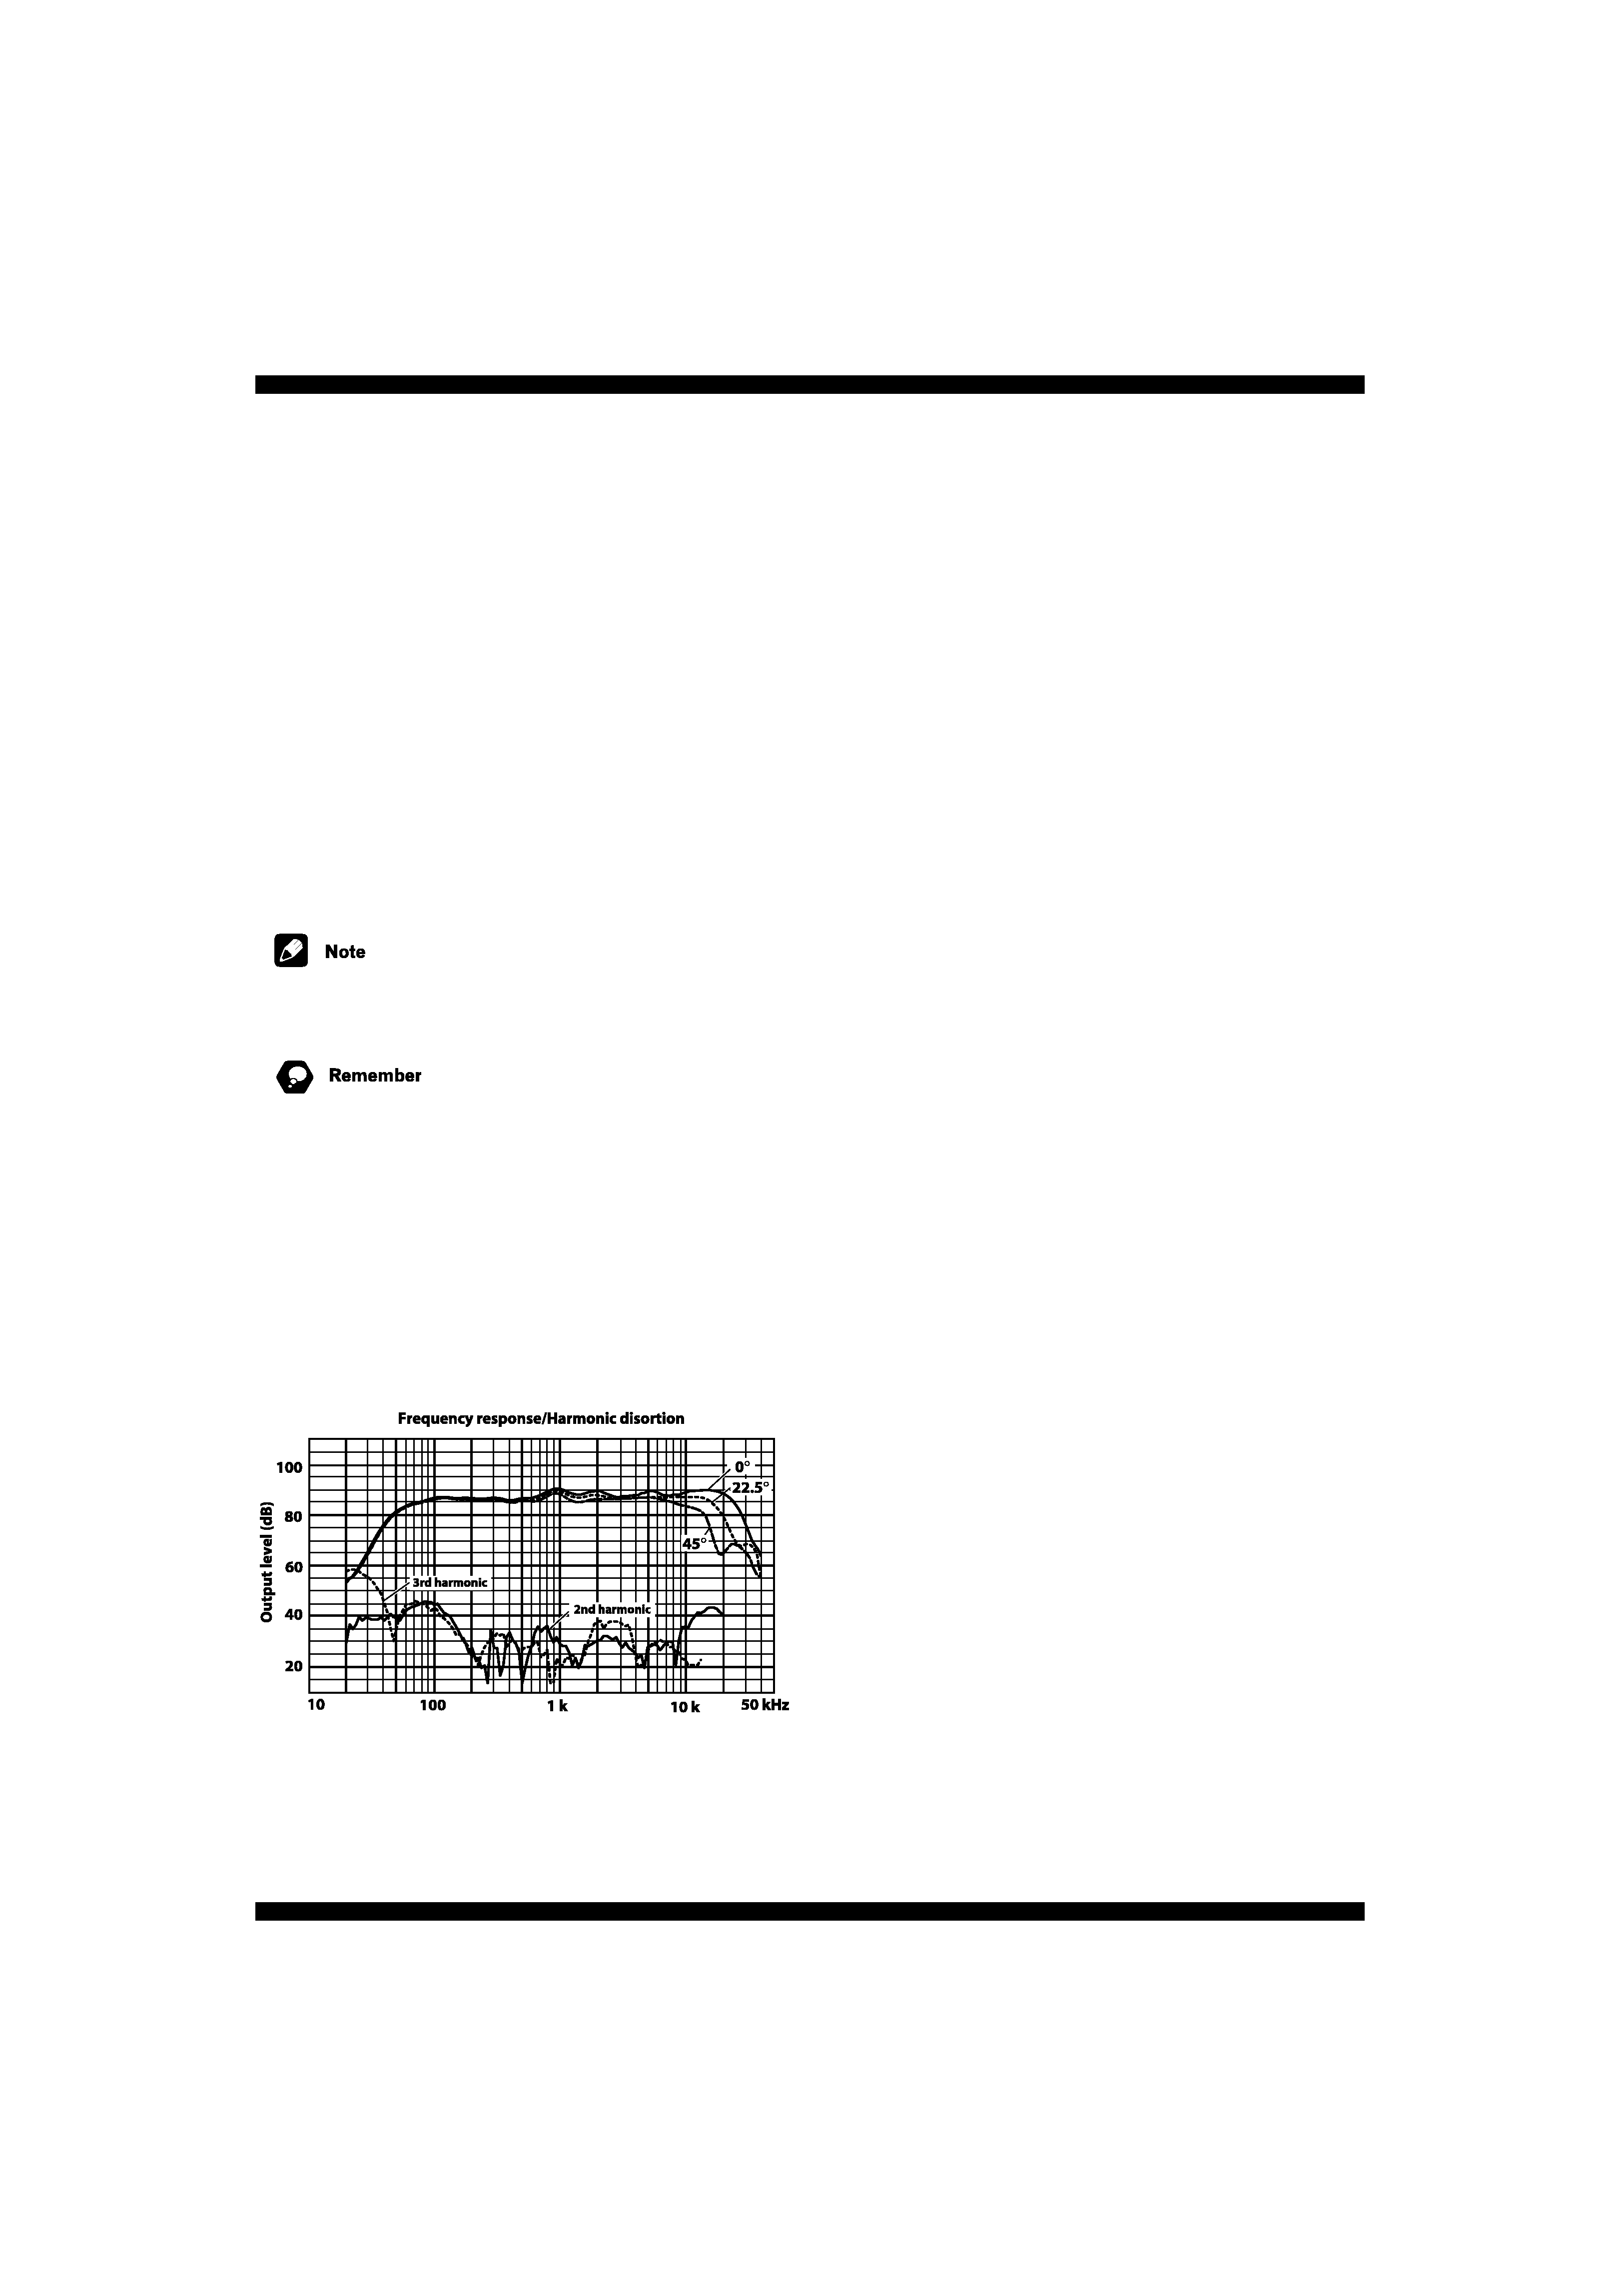
Frequency response and harmonic
distortion
Published by Pioneer Corporation.
Copyright © 2002 Pioneer Corporation.
All rights reserved.
S-A5
02.2.20, 1:47 PM
4
5
Sistema de altavoces S-A5
Le agradecemos la compra de este producto Pioneer. Lea con
atención este manual de instrucciones para aprender cómo
utilizar adecuadamente este modelo. una vez que haya leído las
instrucciones, guárdelas en un lugar seguro para poderlas
consultar en el futuro.
Antes de comenzar
· La impedancia nominal de este sistema de altavoces es de 6
ohmios. Conecte el sistema de altavoces a un amplificador
que tenga una carga de impedancia de 4 a 16 ohmios (es
decir, un modelo en el que observe "4 -16
" en los termi-
nales de salida del altavoz).
· No toque los conos de los altavoces porque podrían dañarse
fácilmente.
Para evitar daños al sistema de altavoces que podrían resultar
de una sobrecarga en la entrada, le rogamos que siga estas
precauciones:
· No sobrealimente el sistema de altavoces más allá de la
capacidad máxima permisible.
· Al conectar o desconectar cualquier dispositivo de su AV,
asegúrese de que el amplificador está apagado.
· Al usar un ecualizador gráfico para enfatizar los sonidos
altos en la gama de frecuencias alta, no use un volumen
excesivo en el amplificador.
· No intente forzar un amplificador de baja potencia para que
produzca volúmenes altos de sonido (la distorsión armónica
del amplificador se incrementará y puede dañar el altavoz de
agudos).
Precaución: Instalación
· No coloque el altavoz sobre una superficie inestable. Podría
ser peligroso en caso de que cayera y podría dañarse el
equipo.
· Apague y desconecte su equipo AV y consulte las
instrucciones cuando conecte los componentes. Asegúrese
de que está utilizando los cables de conexión correctos.
· No coloque un televisor ni ningún otro equipo AV encima del
altavoz. Podría ser peligroso en caso de que cayera y podría
dañarse el equipo.
Precaución: en uso
· No use el altavoz para reproducir sonidos distorsionados
durante largos períodos de tiempo.Esto podría representar
un peligro de incendio.
· No se siente ni se ponga de pie, ni permita que los niños
jueguen con el altavoz.
· No coloque objetos grandes ni pesados encima del altavoz.
Instalación de los altavoces
Le rogamos que respete las siguientes recomendaciones al
instalar los altavoces:
· Los sonidos que se reproduzcan a través de estos sistemas
de altavoces se verán fácilmente afectados sutilmente por
las condiciones del espacio de audición.
· Verá dos colgadores metálicos en la parte posterior de los
altavoces. Su propósito es estabilizar el altavoz para que en
caso de que ocurra un terremoto, etc. el altavoz no se caiga.
· Atornille dos ganchos o similar a la pared de detrás del
altavoz. Pase una cadena o cable entre los ganchos y por los
amarres metálicos para que el altavoz quede estabilizado.
· Terminada la instalación, asegúrese de que el altavoz quede
fijado con seguridad.
Pioneer no puede aceptar ninguna responsabilidad por
lesiones o accidentes que puedan ocurrir por el mal montaje
de los altavoces en una pared o en el techo.
· Los altavoces son pesados, por lo que le rogamos que se
cerciore de que la superficie sobre la que instala los
altavoces es sólida. Para obtener unos buenos resultados
acústicos, los altavoces deberían estar alejados unos 20 cm
de la pared posterior y al menos 50 cm de las paredes
laterales.
50cm
20cm
amarres metálicos