
2
En
Thank you for buying this Pioneer product. Please read
through these operating instructions so you will know how to
operate your model properly. After you have finished reading
the instructions, put them away in a safe place for future
reference.
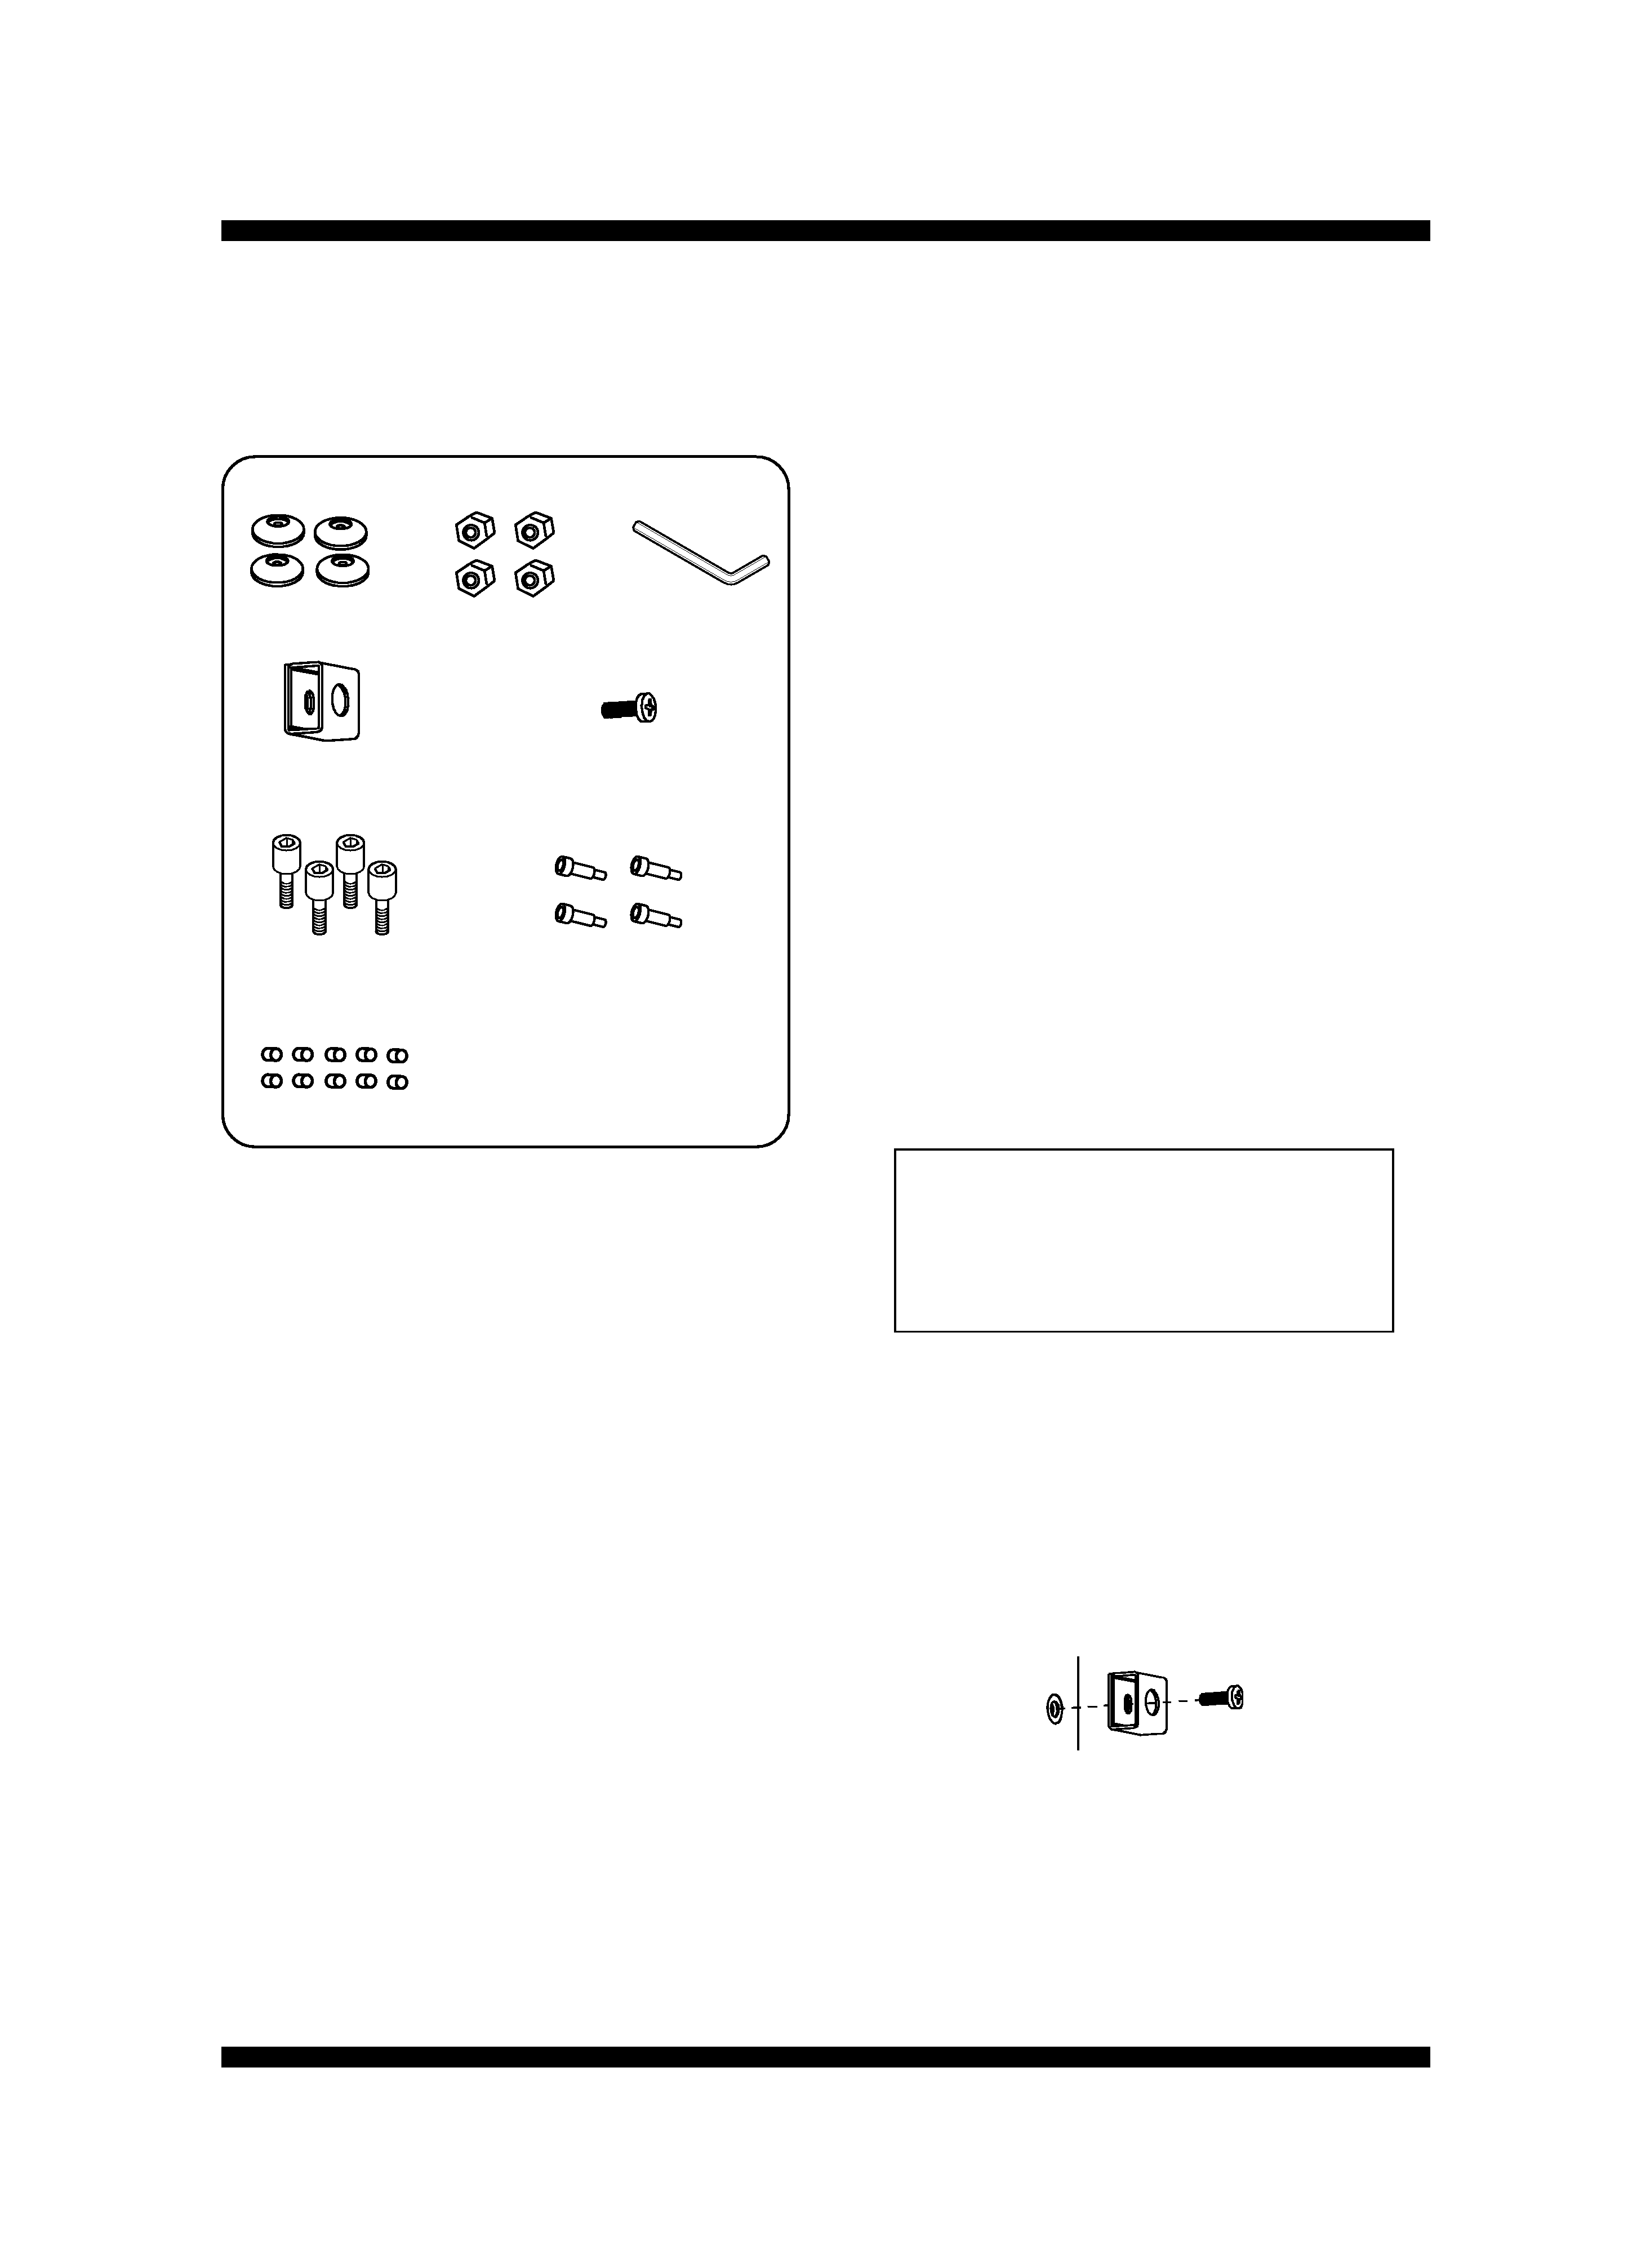
What's in the box
Features of this speaker system
· Construction follows leading-edge TAD technology
· Beryllium dual-concentric tweeter
· Aramid/carbon fiber reinforced composite 18 cm woofer
· Perfect time alignment design
Before you start
· The nominal impedance of this speaker system is 6
.
Connect the speaker system to an amplifier with a load
impedance ranging from 4
to 16 (a model with "4
16
" displayed on the speaker output terminals).
· Do not touch the speaker cones as they are easily
damaged.
· Do not place magnetic objects such as screwdrivers or
iron parts near the tweeter or midrange. Since the
speakers use strong magnets, the objects may be
attracted, causing injury or damaging the diaphragm.
In order to prevent damage to the speaker system resulting
from input overload, please observe the following precau-
tions:
· Do not supply power to the speaker system in excess of
the maximum permissible input.
· When connecting or disconnecting anything in your AV
system, make sure the amplifier is switched off.
· When using a graphic equalizer to emphasize loud
sounds in the high-frequency range, do not use exces-
sive amplifier volume.
· Do not try to force a low-powered amplifier to produce
loud volumes of sound (the amplifier's harmonic
distortion will be increased, and you may damage the
speaker).
Caution: installation
· Do not place the speaker on an unstable surface. It
could present a hazard if it falls, as well as damaging the
equipment. If placing the speaker on a thick carpet, we
recommend using the supplied speaker spikes for
stability.
· Switch off and unplug your AV equipment and consult
the instructions when connecting up components. Make
sure you use the correct connecting cables.
· Do not put a TV or other AV equipment on top of this
speaker. It could present a hazard if it falls, as well as
damaging the equipment.
· Do not install your speakers overhead on the ceiling or
wall. If improperly attached, the speaker grille can fall
and cause damage or personal injury.
· Do not attach these speakers to the wall or ceiling. They
may fall off and cause injury.
Caution: in use
· Do not use the speaker to output distorted sound for
long periods of times. This can result in a fire hazard.
· Do not sit or stand on the speaker, or let children play on
the speaker.
· Do not put large or heavy objects on top of the speaker.
WARNING: Handling the cord on this product or
cords associated with accessories sold with the
product will expose you to chemicals listed on
proposition 65 known to the State of California and
other governmental entities to cause cancer and
birth defect or other reproductive harm.
D36-P4_A_En
Wash hands after handling
Installing your speaker
Please observe the following points when installing speakers:
· Sounds played through speaker systems are easily
affected in subtle ways by the conditions in the listening
space.
· On the rear of the speaker is a hole provided to attach a
metal catch. This is for stabilizing the speaker so that in
the event of an earthquake etc., the speaker does not fall
over. Use the supplied screws to attach the catches.
· Spike bases x4
· Nuts (for spikes)
x4
· Hex wrench
x1
· Metal catch x1
· Screw (for metal catch)
x1
· Fastening screws
(for grille) x4
· Finishing screws
(for grille) x4
· Caps x10
· Grille x1
· Operating instructions
3
En
English
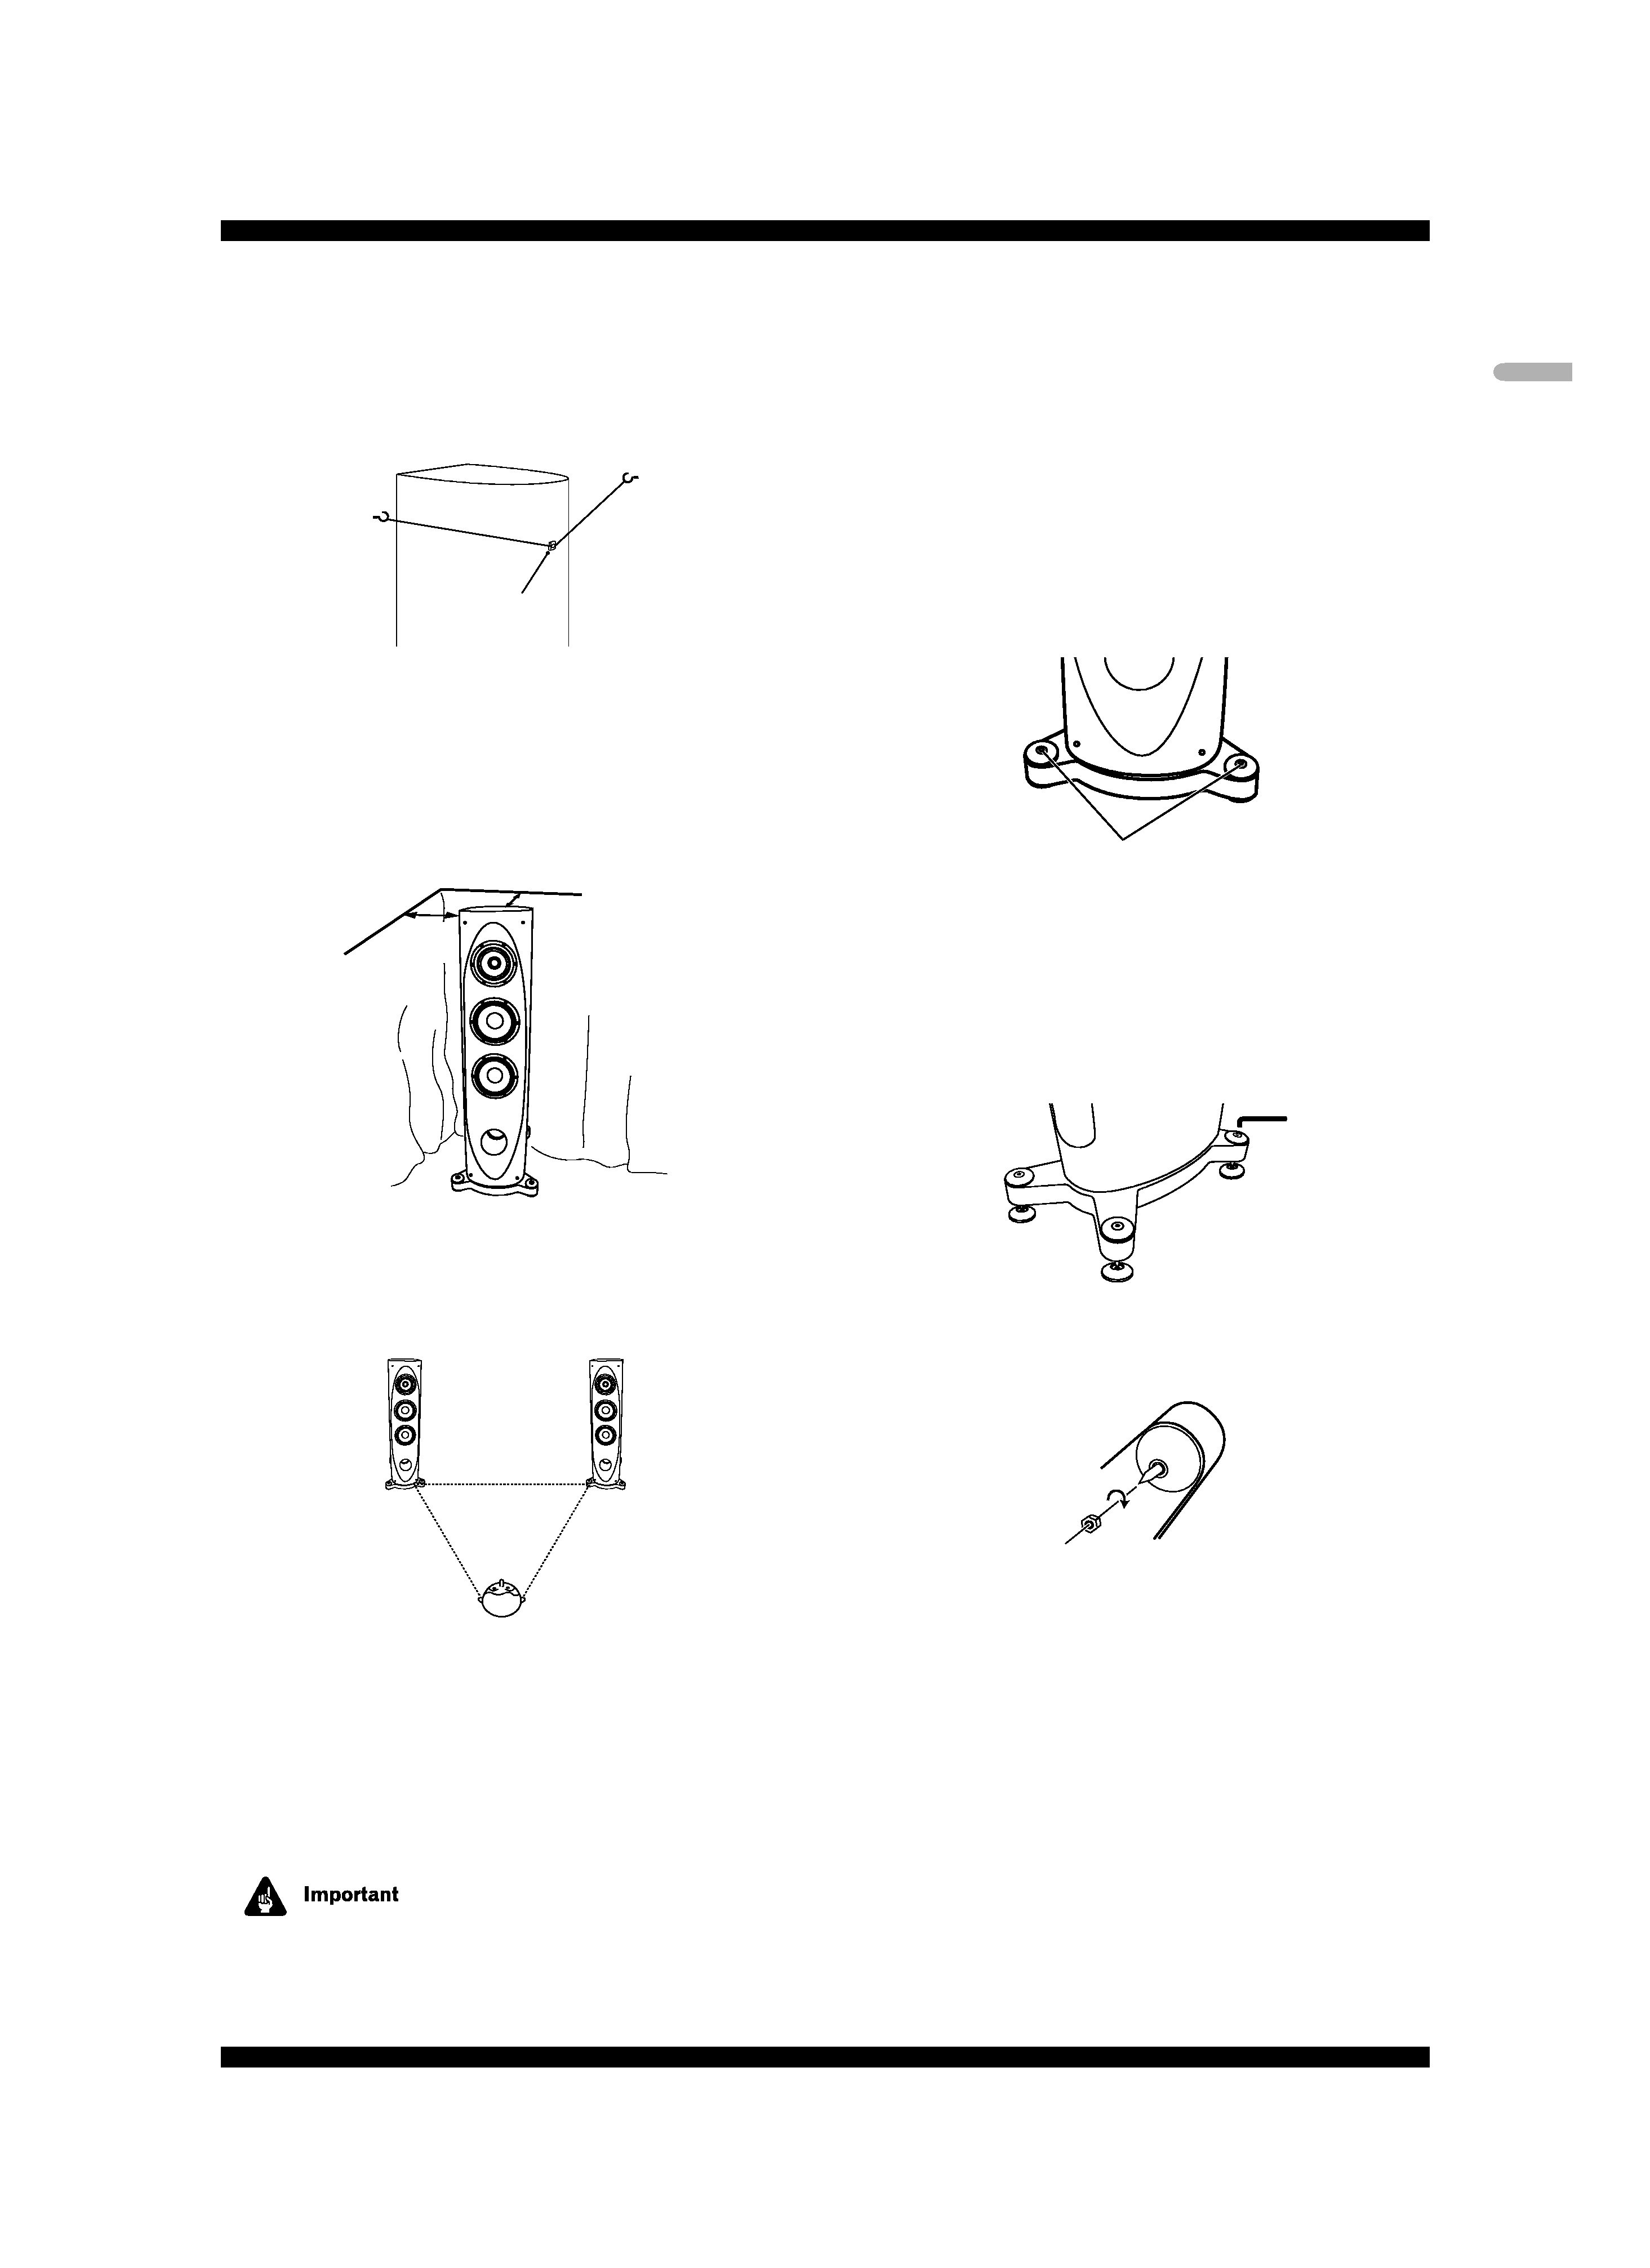
· Screw two picture hooks or similar into the wall behind
the speaker. Pass a chain or cord around the hooks and
through the metal catch so that the speaker is stabilized
(make sure to test that it supports the weight of the
speaker).
· After installing, make sure the speaker is securely fixed.
· For good sound, the speaker should be about 20 cm
away from the back wall and at least 50 cm away from
the side wall. If the room has a lot of reverberation, we
recommend hanging heavy fabric on the walls, and/or
putting a carpet on the floor to damp the sound. For best
results, cover walls completely.
· Place speakers equal distances from your listening
position for good stereo sound. Use speaker cords of the
same length for each speaker.
· If you are using a set of speakers for your TV sound,
install the speakers at equal distances either side of the
TV and point them in the same direction as the TV.
· Do not place the speaker where it will be in direct
sunlight, and avoid positioning it near heaters and air
conditioners. This may cause warping and discoloration
of the speaker cabinet and damage the speaker.
· Pioneer assumes no liability whatsoever for damages
resulting from assembly, improper mounting, insuffi-
cient reinforcement, misuse of the product, acts of
nature, etc.
Using the spikes
There are four metal spikes built-in to the speaker base that
you can use to isolate the speaker from the floor. Spikes are
recommended when placing the speakers on a thick carpet
(for added stability), or for better sound when placing the
speakers on a hard reverberant surface (such as a concrete
or wood floor). Use the supplied spike pads to avoid scratch-
ing the floor or other surface where the speaker is placed.
1
Choose the location for speaker placement then put
the spike bases on the floor.
2
Remove the protective cover from the top of the leg
support.
3
Place the speaker upright so that the corners are
resting on the spike bases on the floor.
4
Insert and turn the supplied hex wrench until the
spike protrudes from the base.
Do this in turn for each spike, making sure all four corners
are of even height and the speaker is stable and resting
squarely on all four spikes.
5
After the spike lengths are even, tighten the nuts to
fix the spikes in place.
Caution: when using the spikes
· Note that these spikes are sharp metal and can cause
damage to flooring. Make sure to lay down a cloth or
suitable base before setting up.
· The speaker is very heavy (about 66 kg) and can cause
serious damage or injury if you are attempting to tighten
the nuts with the speaker standing or leaning. Make
sure to lay down a cloth and tighten the nuts with the
speaker laying flat. Two people or more during place-
ment and setup is advised.
Hex wrench
Protective covers
Metal catch
20 cm
50 cm
4
En
Connecting to an amplifier
Before connecting to your amplifier, make sure that the amp is
switched off.
This speaker does not include speaker cables used for
connecting to a stereo. Note the following when selecting
speaker cables.
· Use heavy-gauge speaker cable if possible, and keep the
cables to the minimum necessary length.
· If the length of cable required for left and right speakers
differs, use cables of the same length, matched to the
longer distance.
· Cables have differing characteristics. Keep this in mind
when using any cable.
· Select cables with as little resistance as possible, and
make sure the cables to the speaker terminals and amp
are firm and secure.
CAUTION
These speaker terminals carry
HAZARDOUS LIVE
voltage. To prevent the risk of electric shock when
connecting or disconnecting the speaker cables,
disconnect the power cord before touching any
uninsulated parts.
D3-4-2-2-3_A_En
Connecting the cables
1
Switch off the power to your amplifier.
2
Connect the speaker cables to the input terminals
(lower) on the back of the speaker. For input terminal
polarity, red is positive (+) and black is negative ().
Grasp the cap knobs on the lower input terminals and rotate
them to the left (counter-clockwise), insert the speaker cable
wires into the holes in the terminal posts, then tighten the
knobs to secure the short bar as well as the wires.
· You can also use banana plugs for this connection. To do
so, you must first remove the caps from the terminal
posts.
3
Connect the other ends of the cables to the amp's
speaker output terminals (for more details, refer to your
amp owner's manual).
· After connecting the plugs, pull lightly on the cables to
make sure that the ends of the cables are securely
connected to the terminals. Poor connections can
create noise and interruptions in the sound.
· If the cables' wires happen to be pushed out of the
terminals, allowing the wires to come into contact with
each other, it places an excessive additional load on the
amp. This may cause the amp to stop functioning, and
may even damage the amp.
· When using a set of speakers connected to an amplifier,
you won't be able to obtain the normal stereo effect if the
polarity (
,
) of one of the speakers (left or right) is
reversed.
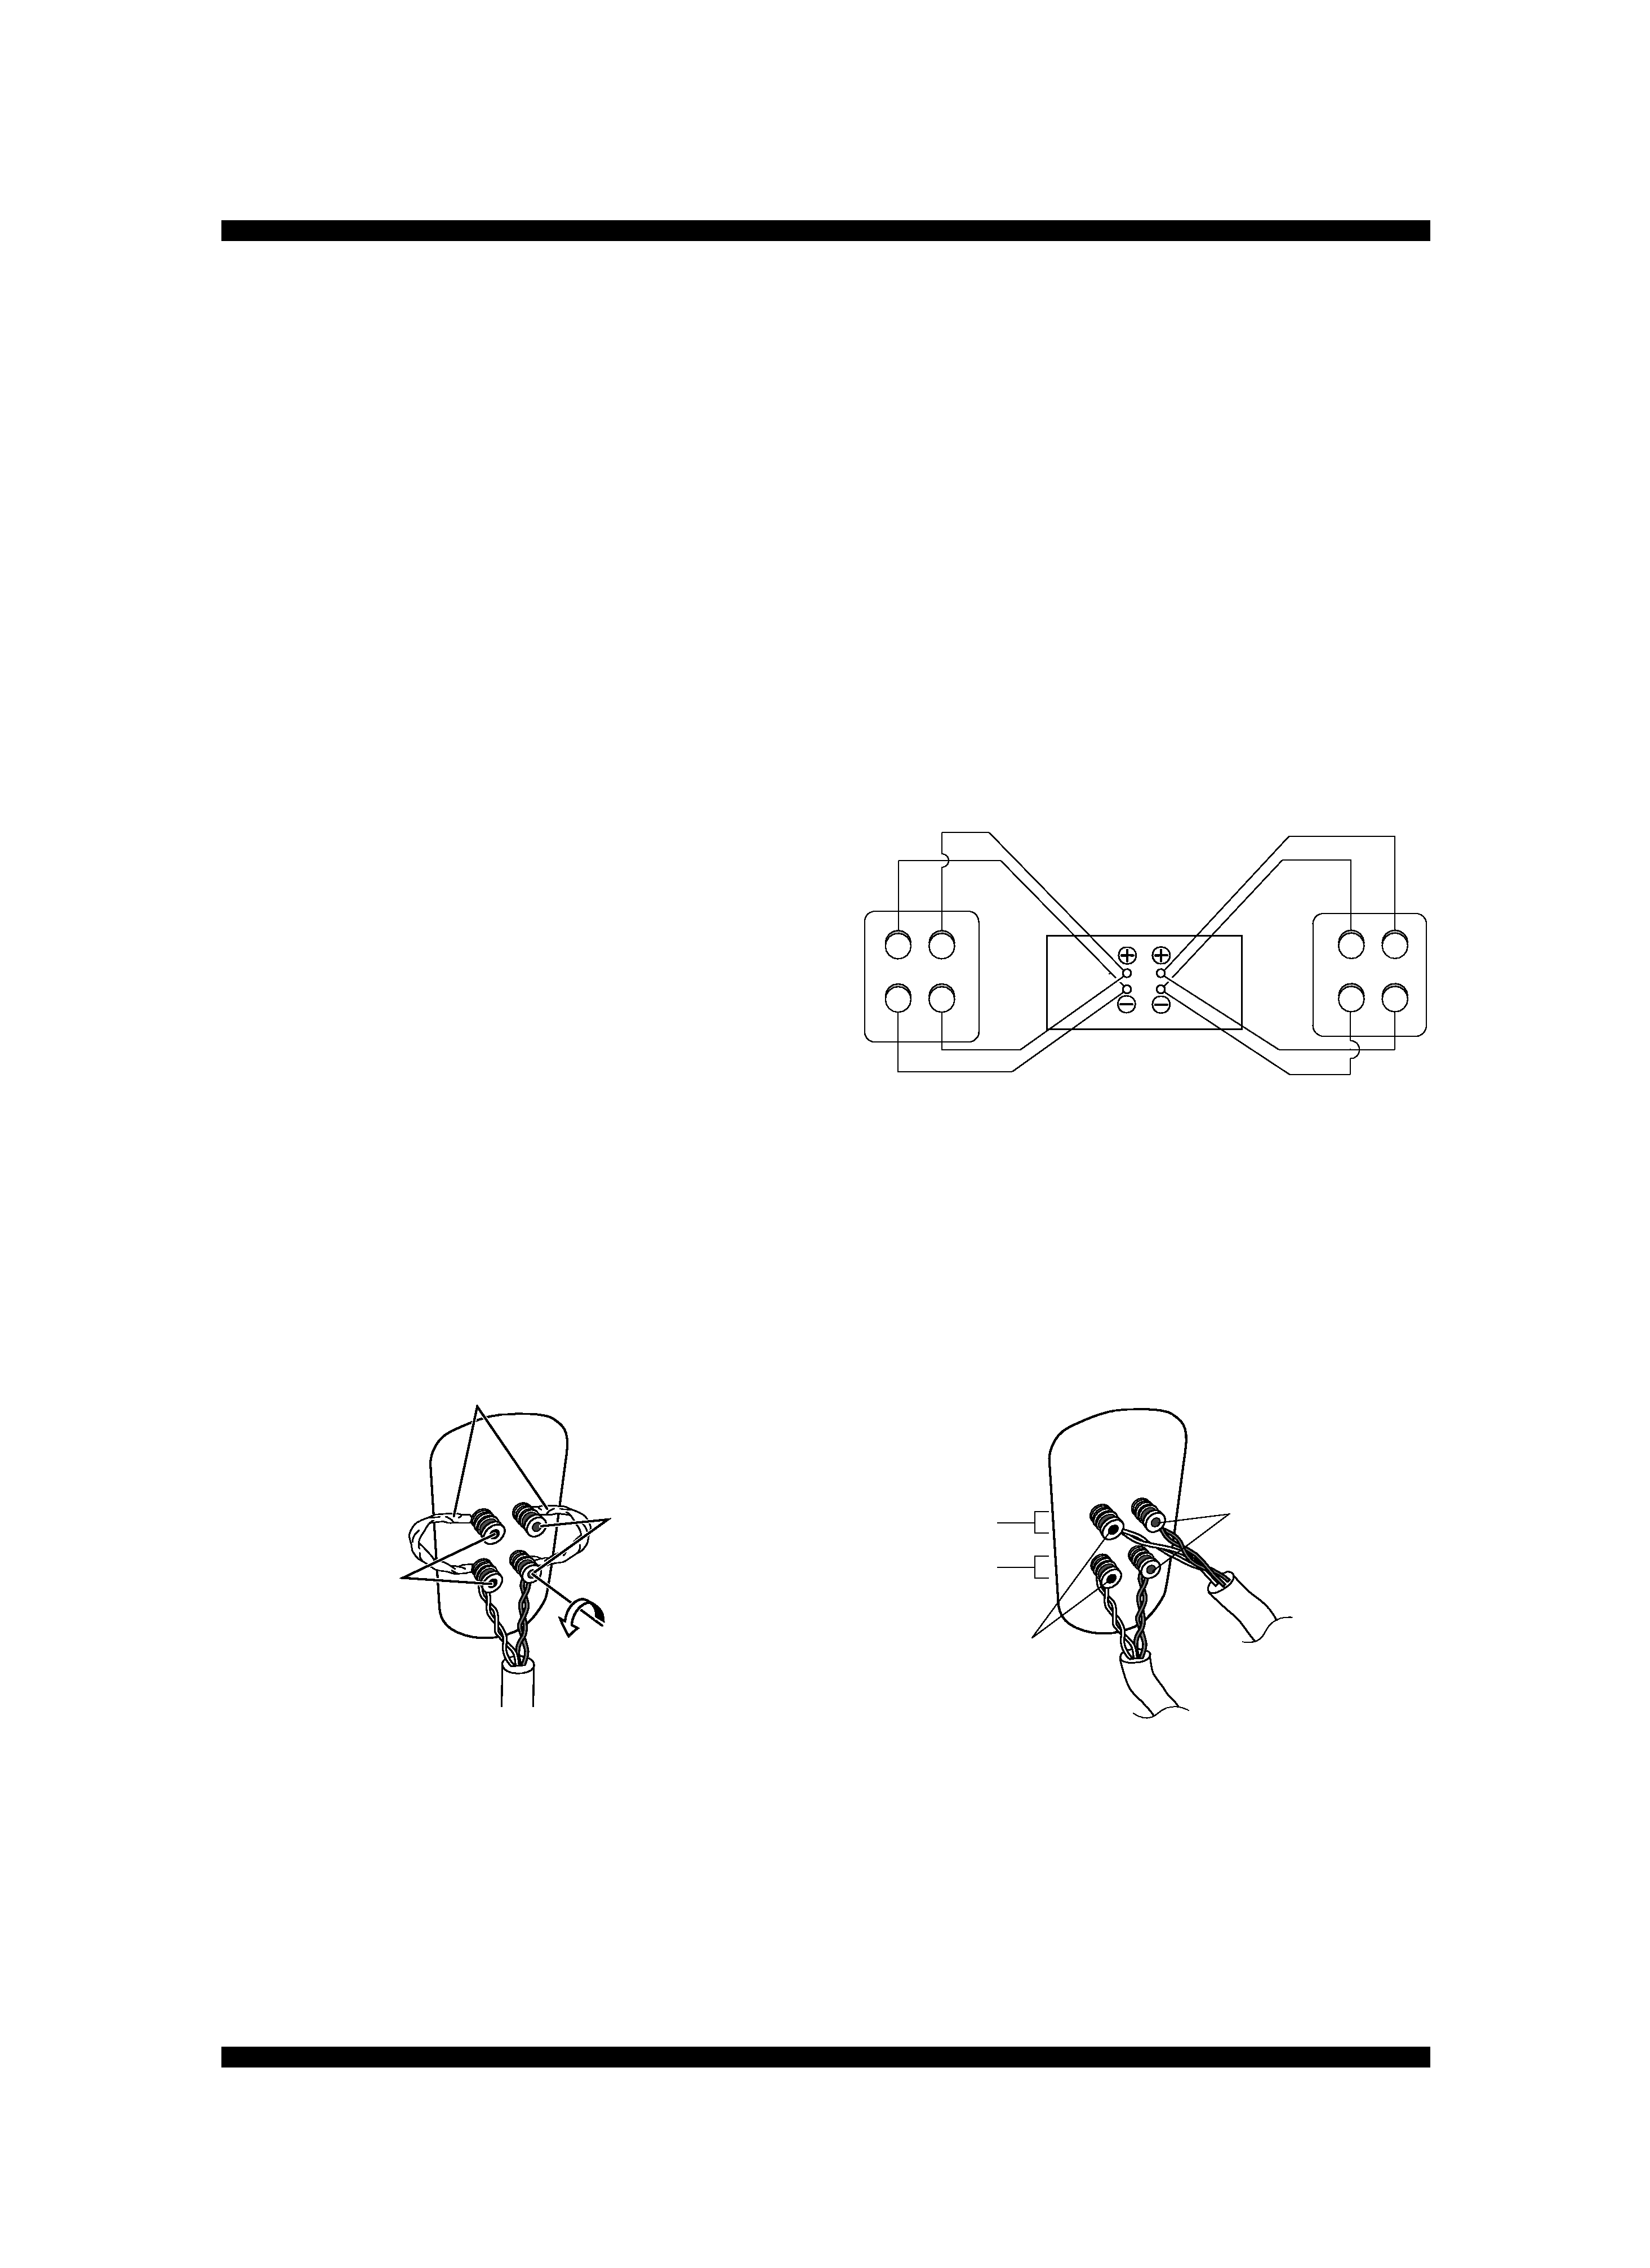
Bi-wiring Connections
Bi-wiring requires two cables for each speaker, one for high
frequencies and one for low frequencies. Using separate
cables for the high end and low end improves the sound.
1
Loosen the cap knobs on the left input terminals and
remove the two short bars.
In this state, the low-frequency speakers and the higher-
frequency speakers are completely independent. Store the
short bars in a safe place for later use. The lower terminals
are for the bass, and the upper terminals are for midrange
and treble sounds.
2
Insert a speaker cable into each of the terminal post
holes, then tighten the knobs.
Caution: when bi-wiring
Note that in this setup, connecting the cables with the
polarity reversed may seriously degrade the tone; refer to the
section "Connecting the cables" again and confirm that the
cables are connected properly.
Amplifier
Black terminal (
)
Red terminal (
)
High frequency
terminals
Low frequency
terminals
Black Red
Black Red
Speaker
Speaker
R ch
L ch
Black terminal (
)
Short bar connectors
Red terminal ( )
5
En
English
3
Connect the matched pairs to the same speaker
terminals on your amp (taking care not to get the
polarity reversed).
Make sure to use the same type of cable for the low-fre-
quency and the same type for the high-frequency connec-
tions.
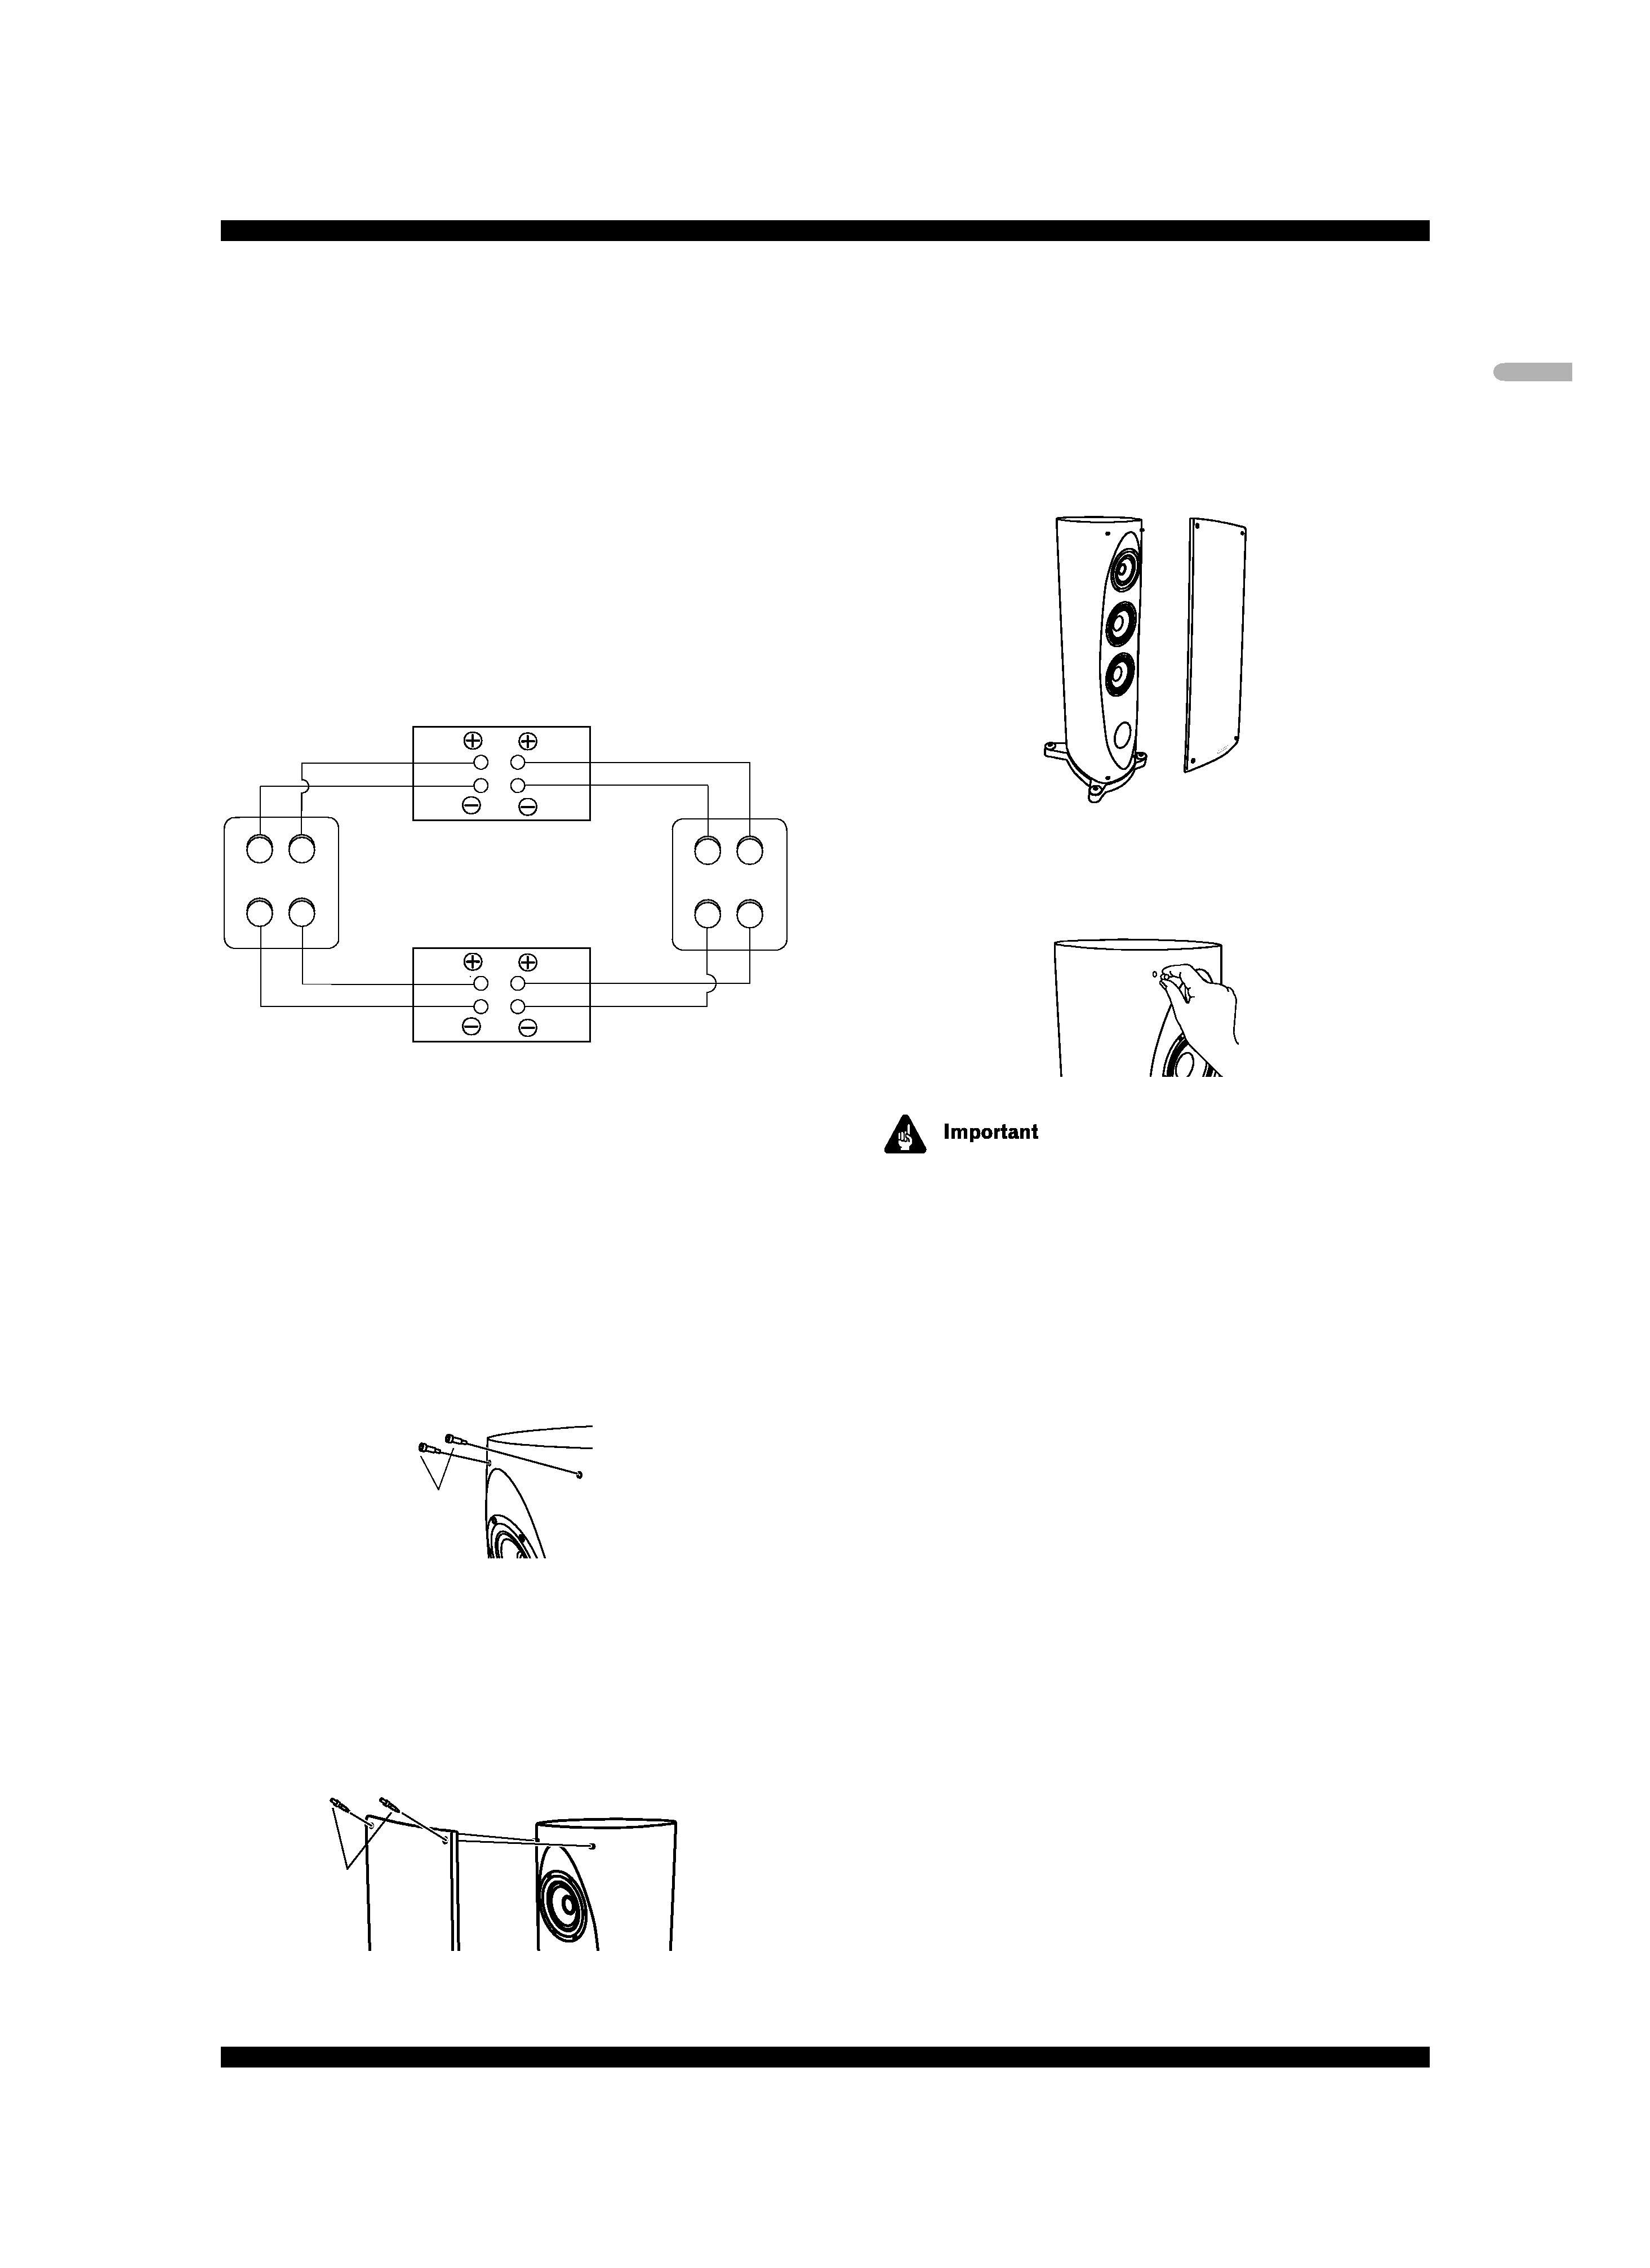
When bi-amping
Bi-amping is an even more powerful way of connecting your
speakers. Just as with bi-wiring, the input terminal short bars
are removed, but here the low-frequency terminals are
connected to a separate, dedicated low-frequency amp, and
the high-frequency terminals are connected to a dedicated
high-frequency amp.
Attaching and removing the front grille
The front grille of this speaker system is removable. Follow
the instructions below to attach/remove the grilles.
Attaching the grille
1
Insert the supplied fastening screws into the four
holes provided on the front of the speaker.
Use your fingers (not a screwdriver) to secure the screws to
the front of the speaker.
2
Line up the holes on the grille with the protruding
ends of the screws on the front of the speaker and press
firmly.
3
Insert the supplied finishing screws into the four
holes on the front of the grille and tighten to secure.
Use your fingers to tighten the finishing screws.
Removing the grille
1
Loosen, then remove the finishing screws from the
four corners on the front of the grille.
2
After detaching the grille, remove the fastening
screws from the four holes on the front of the speaker.
Optionally, you can insert the supplied caps into the holes.
· Do not use a screwdriver (or hex wrench) to tighten the
screws. Overtightening could damage the speaker.
· When not in use, store the screws with these operating
instructions for safekeeping.
Magnetic shielding
This speaker system is magnetically shielded. However,
depending on the installation location, color distortion may
occur if the speaker system is installed extremely close to the
screen of a television set.
If this happens, turn off the television, then turn it on again
after 15 min to 30 min. If the problem persists, place the
speaker system away from the television set.
Cleaning the speaker cabinet
With normal use, wiping with a dry cloth should be sufficient
to keep the cabinet clean. If necessary, clean with a cloth
dipped in a neutral cleanser diluted five or six times with
water, and wrung out well. Do not use furniture wax or
cleansers.
Never use thinners, benzine, insecticide sprays or other
chemicals on or near this unit since these will corrode the
surfaces.
Black Red
Black Red
Speaker
Speaker
Woofer amp
R ch
L ch
R ch
L ch
Finishing
screws
Tweeter amp
Fastening
screws