
Operation Manual
Multi-CD control High power CD player with FM/AM
tuner
DEH-P2550
English
Portugu
ês
(B)
Español
Thank you for buying this Pioneer product.
Please read through these operating instructions so you will know how to operate
your model properly. After you have finished reading the instructions, put them away
in a safe place for future reference.
Before You Start
About this manual 4
Precautions 4
Use and care of the remote control 4
Installing the battery 4
Using the remote control 4
Protecting your unit from theft 5
Removing the front panel 5
Attaching the front panel 5
Whats What
Head unit 6
Remote control 7
Power ON/OFF
Turning the unit on 8
Selecting a source 8
Turning the unit off 8
Tuner
Listening to the radio 9
Introduction of advanced tuner
operation 10
Storing and recalling broadcast
frequencies 10
Tuning in strong signals 10
Storing the strongest broadcast
frequencies 11
Built-in CD Player
Playing a CD 12
Introduction of advanced built-in CD player
operation 13
Repeating play 13
Playing tracks in a random order 13
Scanning tracks of a CD 13
Pausing CD playback 14
Using disc title functions 14
Entering disc titles 14
Displaying disc titles 15
Multi-CD Player
Playing a CD 16
50-disc multi-CD player 16
Introduction of advanced multi-CD player
operation 17
Repeating play 17
Playing tracks in a random order 17
Scanning CDs and tracks 18
Pausing CD playback 18
Using ITS playlists 18
Creating a playlist with ITS
programming 18
Playback from your ITS playlist 19
Erasing a track from your ITS
playlist 19
Erasing a CD from your ITS
playlist 19
Using disc title functions 20
Entering disc titles 20
Displaying disc titles 20
Using CD TEXT functions 21
Displaying titles on CD TEXT
discs 21
Scrolling titles in the display 21
Using compression and bass emphasis 21
Audio Adjustments
Introduction of audio adjustments 22
Using balance adjustment 22
Using the equalizer 22
Recalling equalizer curves 23
Adjusting equalizer curves 23
Fine adjusting equalizer curve 23
Adjusting loudness 24
Front image enhancer (F.I.E.) 24
Adjusting source levels 25
Contents
En
2

Initial Settings
Adjusting initial settings 26
Setting the clock 26
Setting the FM tuning step 26
Setting the AM tuning step 27
Switching the warning tone 27
Switching the auxiliary setting 27
Other Functions
Turning the clock display on or off 28
Using the AUX source 28
Selecting AUX as the source 28
Setting the AUX title 28
Additional Information
Understanding built-in CD player error
messages 29
CD player and care 29
CD-R/CD-RW discs 30
Specifications 31
En
3
English
Contents
About this manual
This unit features a number of sophisticated
functions ensuring superior reception and op-
eration. All the functions have been designed
for the easiest possible use, but many are not
self-explanatory. This operation manual will
help you benefit fully from this productspo-
tential and to maximize your listening enjoy-
ment.
We recommend that you familiarize yourself
with the functions and their operation by read-
ing through the manual before you begin
using this unit. It is especially important that
you read and observe precautions on this
page and in other sections.
Precautions
CAUTION:
USE OF CONTROL OR ADJUSTMENT OR
PERFORMANCE OF PROCEDURES
OTHER THAN THOSE SPECIFIED HEREIN
MAY RESULT IN HAZARDOUS RADIATION
EXPOSURE.
CAUTION:
THE USE OF OPTICAL INSTRUMENTS
WITH THIS PRODUCT WILL INCREASE
EYE HAZARD.
! Keep this manual handy as a reference for
operating procedures and precautions.
! Always keep the volume low enough so you
can hear sounds outside of the car.
! Protect this product from moisture.
! If the battery is disconnected or dis-
charged, the preset memory will be erased
and must be reprogrammed.
! If this unit does not operate properly, con-
tact your dealer or nearest authorized Pio-
neer Service Station.
Use and care of the remote
control
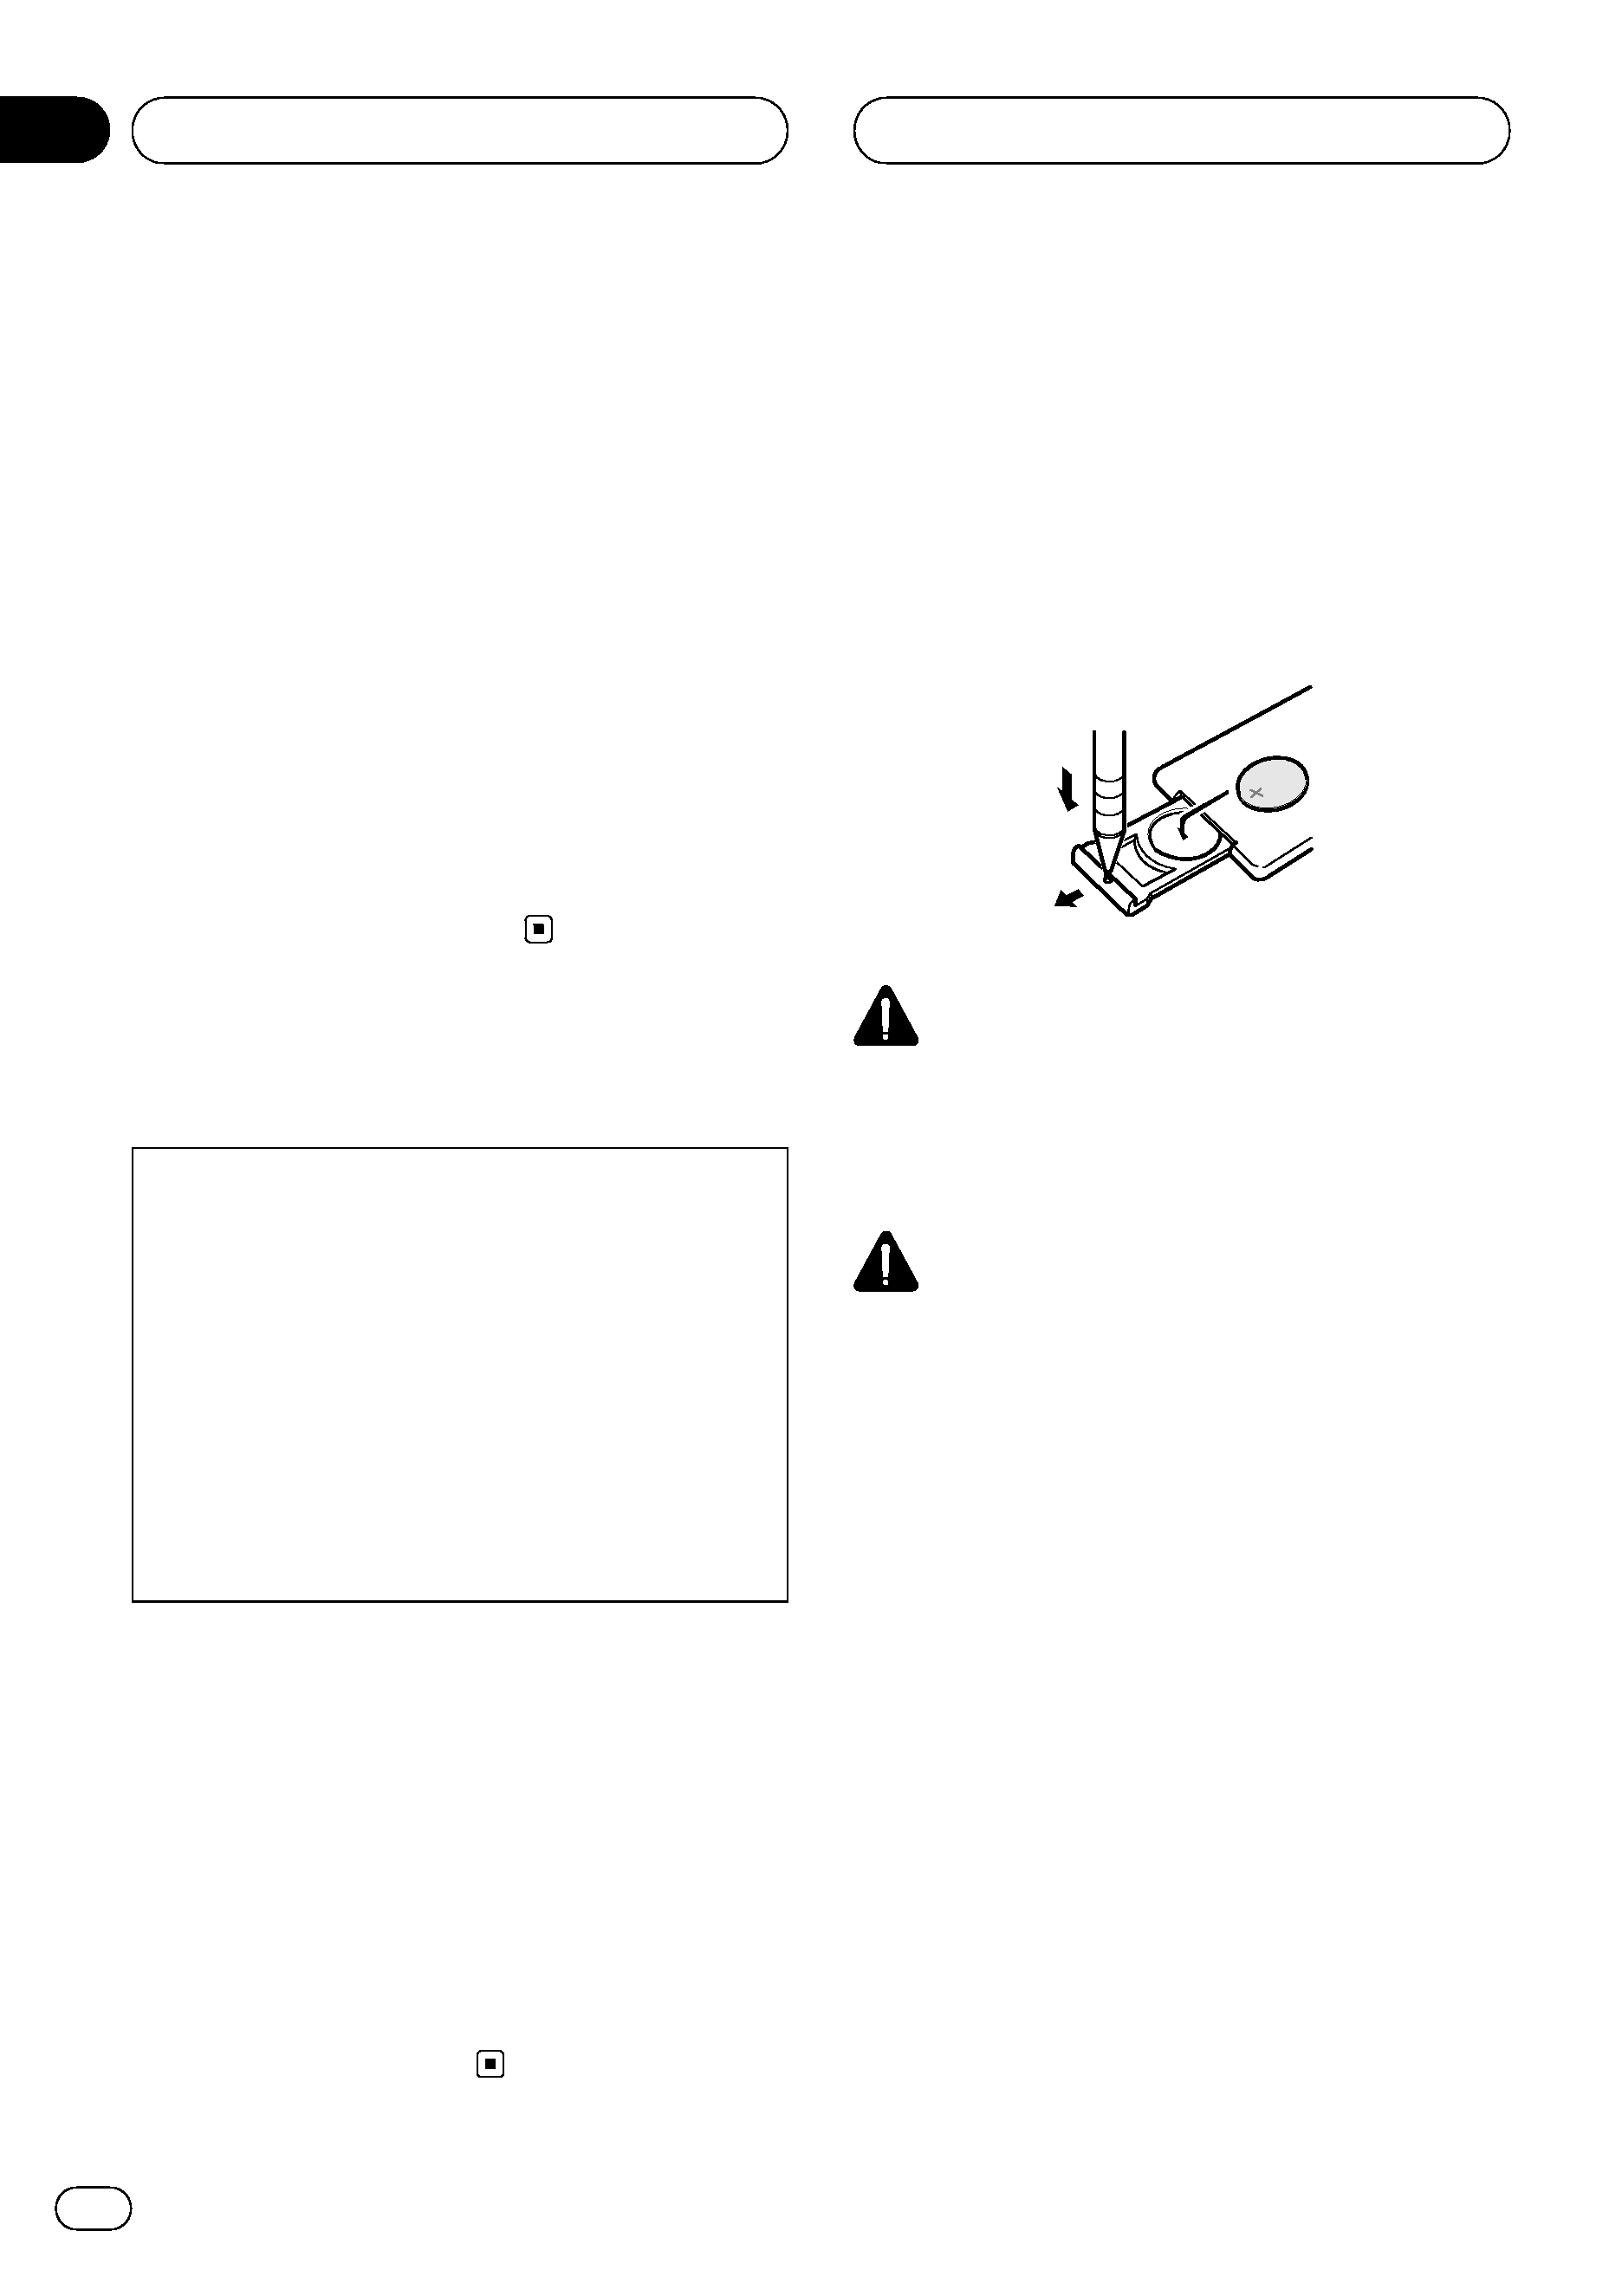
Installing the battery
Slide the tray out on the back of the remote
control and insert the battery with the plus (+)
and minus () poles pointing in the proper di-
rection.
WARNING
Keep the battery out of the reach of children.
Should the battery be swallowed, immediately
consult a doctor.
CAUTION
! Use only one CR2025 (3 V) lithium battery.
! Remove the battery if the remote control is not
used for a month or longer.
! Do not recharge, disassemble, heat or dispose
of the battery in fire.
! Do not handle the battery with metallic tools.
! Do not store the battery with metallic materi-
als.
! In the event of battery leakage, wipe the re-
mote control completely clean and install a
new battery.
! When disposing of used batteries, please
comply with governmental regulations or en-
vironmental public institutions rules that
apply in your country/area.
Using the remote control
Point the remote control in the direction of the
front panel to operate.
Before You Start
En
4
Section
01
HHHHHHHHHHHHHH
Important
! Do not store the remote control in high tem-
peratures or direct sunlight.
! The remote control may not function properly
in direct sunlight.
! Do not let the remote control fall onto the
floor, where it may become jammed under the
brake or accelerator pedal.
Protecting your unit from
theft
The front panel can be detached from the
head unit and stored in the protective case
provided to discourage theft.
! If the front panel is not detached from the
head unit within five seconds of turning off
the ignition, a warning tone will sound.
! You can turn off the warning tone. See
Switching the warning tone on page 27.
Important
! Never use force or grip the display and the
buttons tightly when removing or attaching.
! Avoid subjecting the front panel to excessive
shocks.
! Keep the front panel out of direct sunlight and
high temperatures.
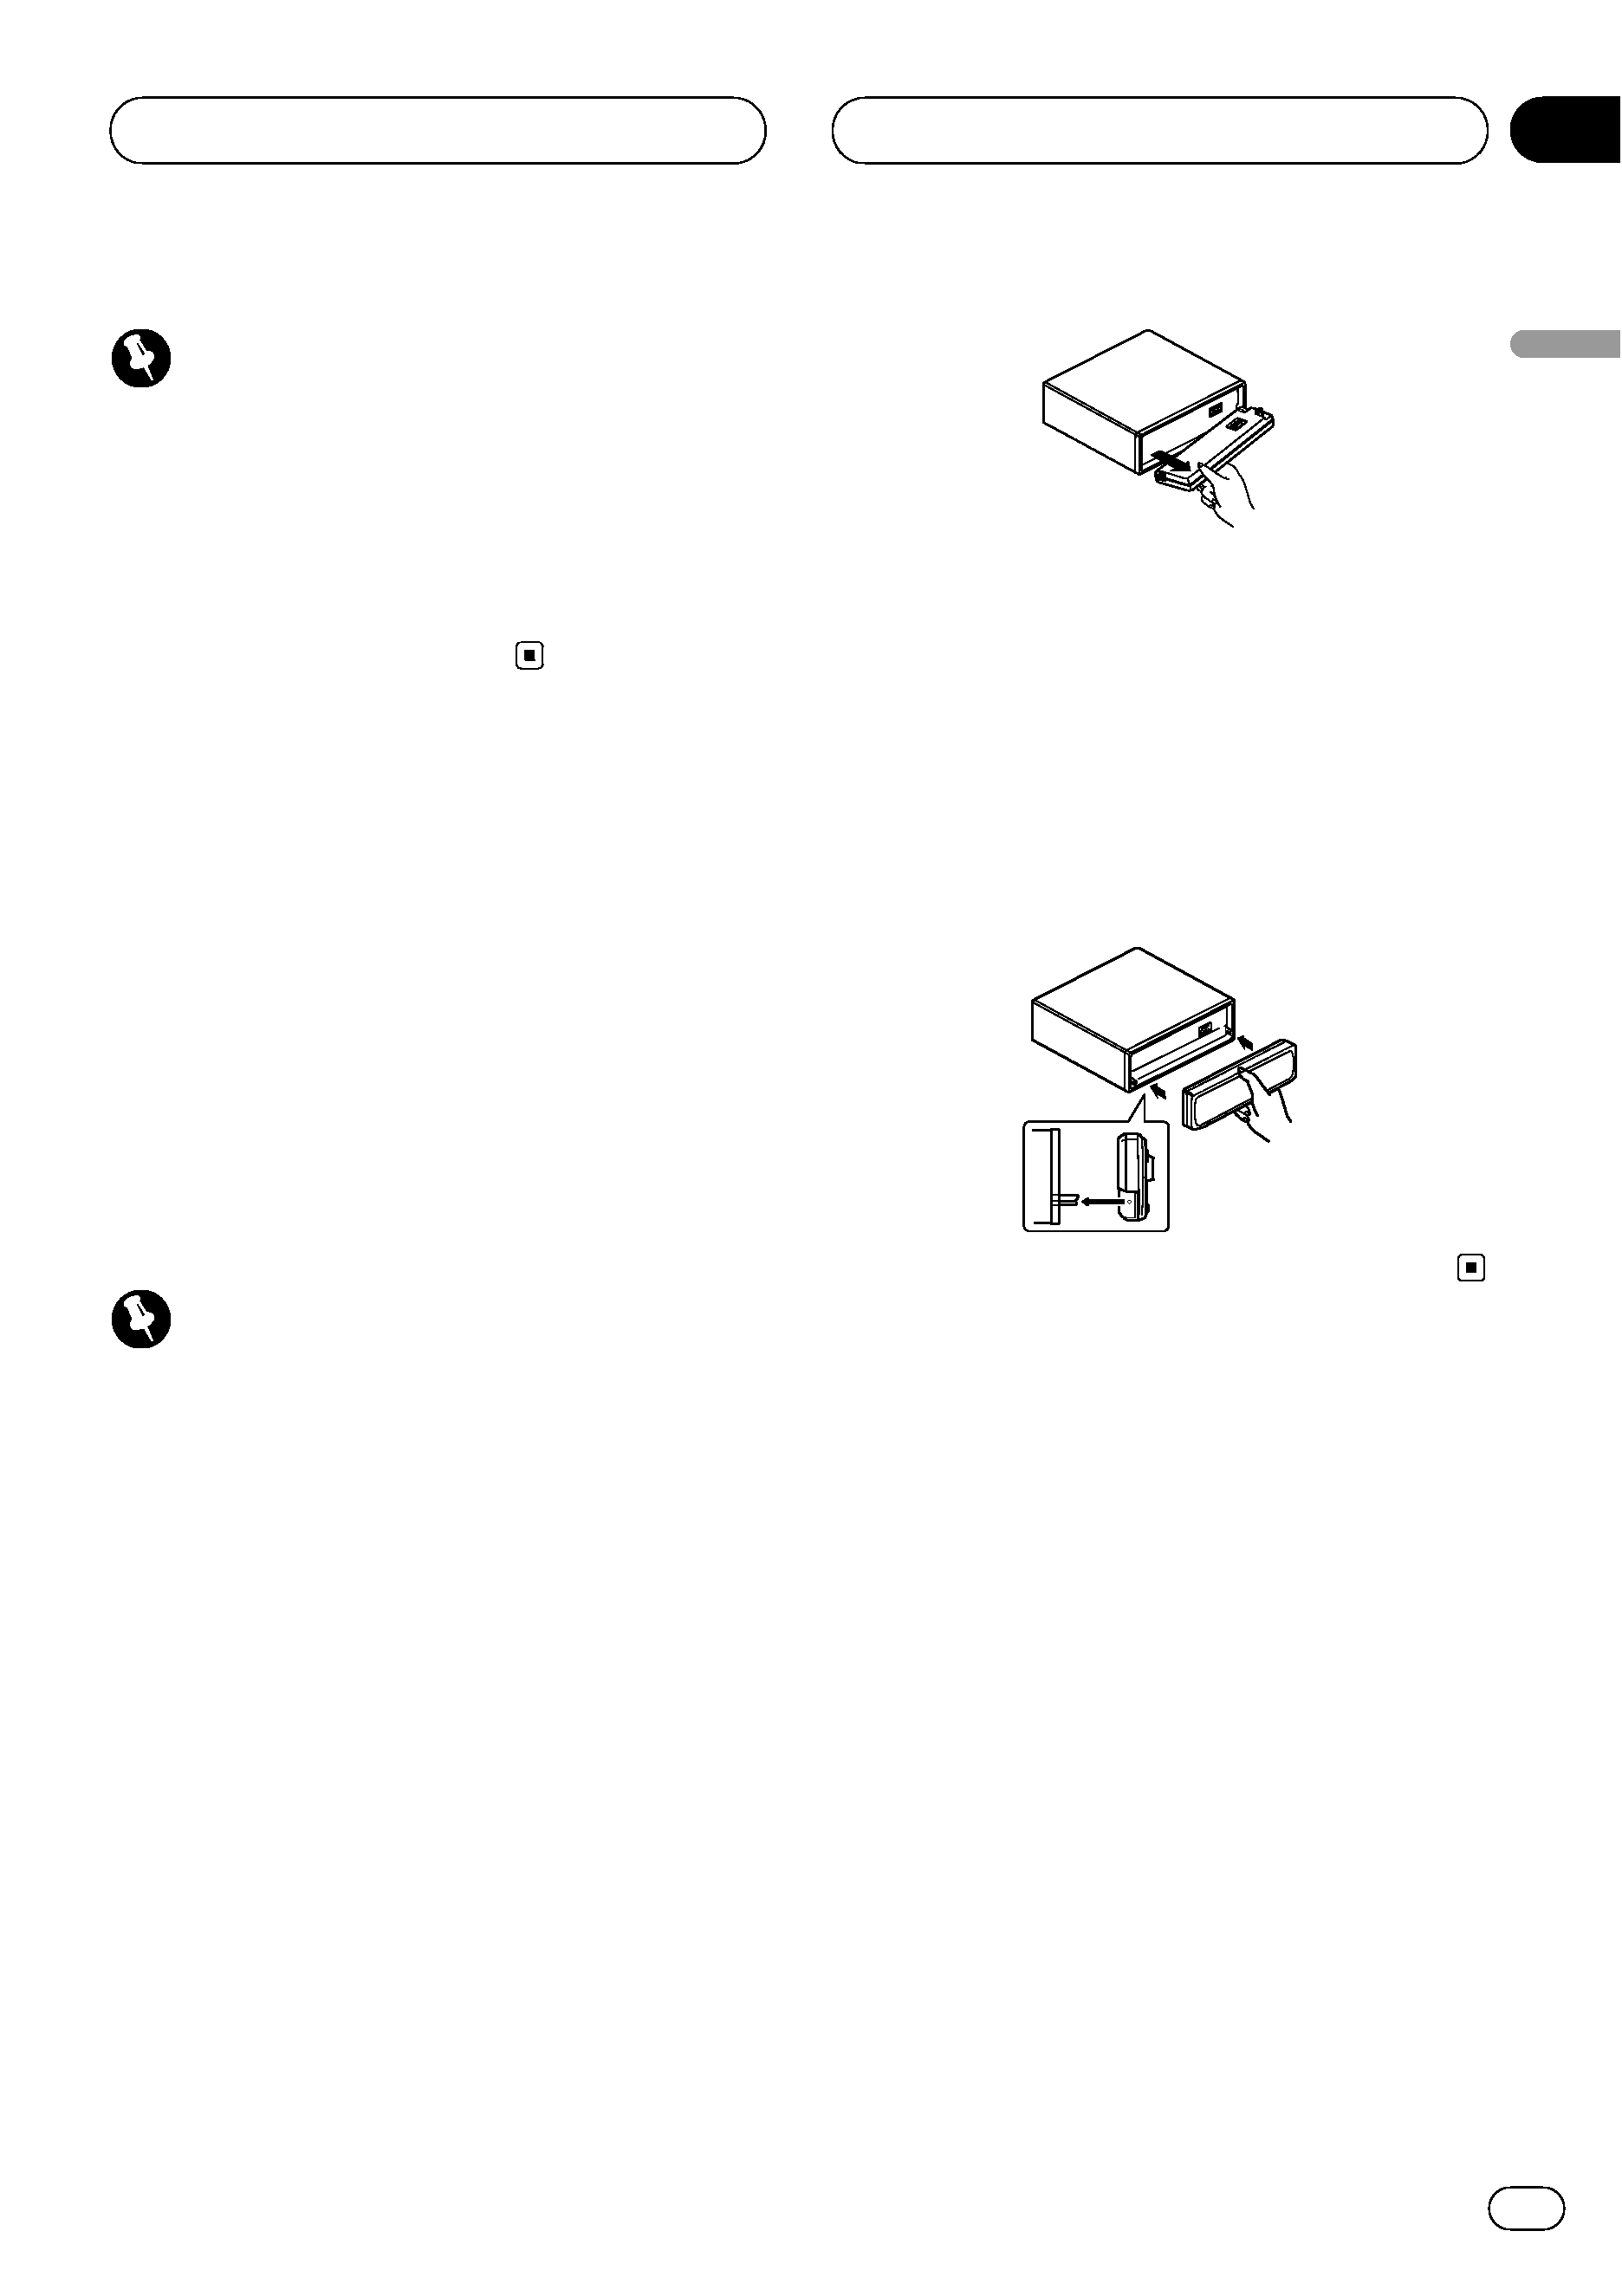
Removing the front panel
1 Press OPEN to open the front panel.
2 Grip the left side of the front panel and
pull it gently outward.
Take care not to grip it tightly or drop it.
3 Put the front panel into the protective
case provided for safe keeping.
Attaching the front panel
% Replace the front panel by holding it
upright to this unit and clipping it securely
into the mounting hooks.
Before You Start
En
5
English
Section
01
HHHHHHHHHHHHHH