
SPEAKER STAND
OPERATING GUIDE
CP-ST3
BEFORE USE
Thank you for purchasing the CP-ST3 Pioneer speaker stand. This
speaker stand should only be used for a Pioneer speaker system.
÷ Read this operating guide carefully before setting up your
speaker system, and then save it for future reference.
÷ Before setting up your speaker system, a thorough reading of
the operating guide is recommended.
Assembly
Tools required: A medium-size Phillips
screwdriver and the supplied hexagonal wrench.
Note:
Assemble the stand on a level surface, preferably covered with
carpet.
Follow the instructions below to assemble the stand.
1 Insert the tubular supports into the mount, and fix using the two
M4x8 (3/16x5/16in) screws from the back of the supports.
2 Insert the tubular supports into the holes in the base. Use the
hollow bolt to fix the left-hand support; the speaker cable
passes through the hole in the bolt. Use the ordinary bolt to fix
the right-hand support.
Use the supplied hexagonal wrench to tighten the bolts.
* Be careful to use the correct bolts for the left and right supports.
3. Insert the speaker cable (supplied with HTZ-ST7) into the
bottom of the left-hand support and pass it through the support,
until it appears at the mount end.
4. Pass the speaker cable through the mini-stand (supplied with
HTZ-ST7), then fix the mini-stand to the mount using the double-
sided adhesive tape and mounting screw M3x10 (1/8x3/8 in).
CAUTIONS
÷ Fix the speaker system to the stand using the fixing screws
supplied.
÷ Do not place the stand on an unstable and/or sloping surface.
Otherwise, the stand and speaker may fall and cause injury.
÷ Do not mount any speaker other than the specified Pioneer
speaker on this stand. Otherwise, the stand may collapse and/
or the speaker may fall and cause injury.
÷ When moving the speaker and stand, first remove the speaker
from the stand, and then move the stand, holding the tubular
columns.
÷ This stand can hold a speaker with the maximum weight of 1.0
kg (2 lb 3oz).Mounting a speaker heavier than the maximum
weight may cause the stand and speaker to collapse and be
damaged.
Tubular supports
(SLH1064)
Base Assy
You can mount the HTZ-ST7 Pioneer satellite
speaker on this stand.
Names of Parts
(
)The replacement part numbers are shown in parentheses.
Tubular supports
(SNK2365)
Assembled CP-ST3 speaker stand
Tubular supports
Washers(WCX0FZB)
Base Assy
Tubular supports
Ordinary hexagonal bolt
(SBA1169)
Hollow hexagonal bolt
(SBA1168)
Supplied hexagonal wrench
(SEX1020)
M4x8 (3/16x5/16in),
two
fixing
screw
(BXZ40P080FZB)
<99D00ZZ0P00>
Printed in Japan
<SRA1339-A>
PIONEER ELECTRONIC CORPORATION 4-1, Meguro 1-Chome, Meguro-ku, Tokyo 153-8654, Japan
PIONEER ELECTRONICS [USA] INC.
P.O. BOX 1540, Long Beach, California 90801-1540
PIONEER ELECTRONICS OF CANADA, INC.
300 Allstate Parkway, Markham, Ontario L3R OP2, Canada
PIONEER ELECTRONIC [EUROPE] N.V.
Haven 1087, Keetberglaan 1, 9120 Melsele, Belgium TEL: 03/570.05.11
PIONEER ELECTRONICS AUSTRALIA PTY. LTD.
178-184 Boundary Road, Braeside, Victoria 3195, Australia, TEL: [03] 9586-6300
PIONEER ELECTRONICS DE MEXICO S.A. DE C.V. San Lorenzo Num 1009 3er piso Desp. 302 Col. Del Valle, Mexico D.F. C.P. 03100 TEL: 5-688-52-90
Published by Pioneer Electronic Corporation.
Copyright © 1999 Pioneer Electronic Corporation.
All rights reserved.
SPECIFICATIONS
INSTALLATION
Place the stand on a stable, level surface; placing the stand on an
unstable surface can be dangerous. If there are any gaps under the
stand, stabilize the stand by packing them with cardboard or
similar material.
[
] The replacement part numbers are shown in parentheses.
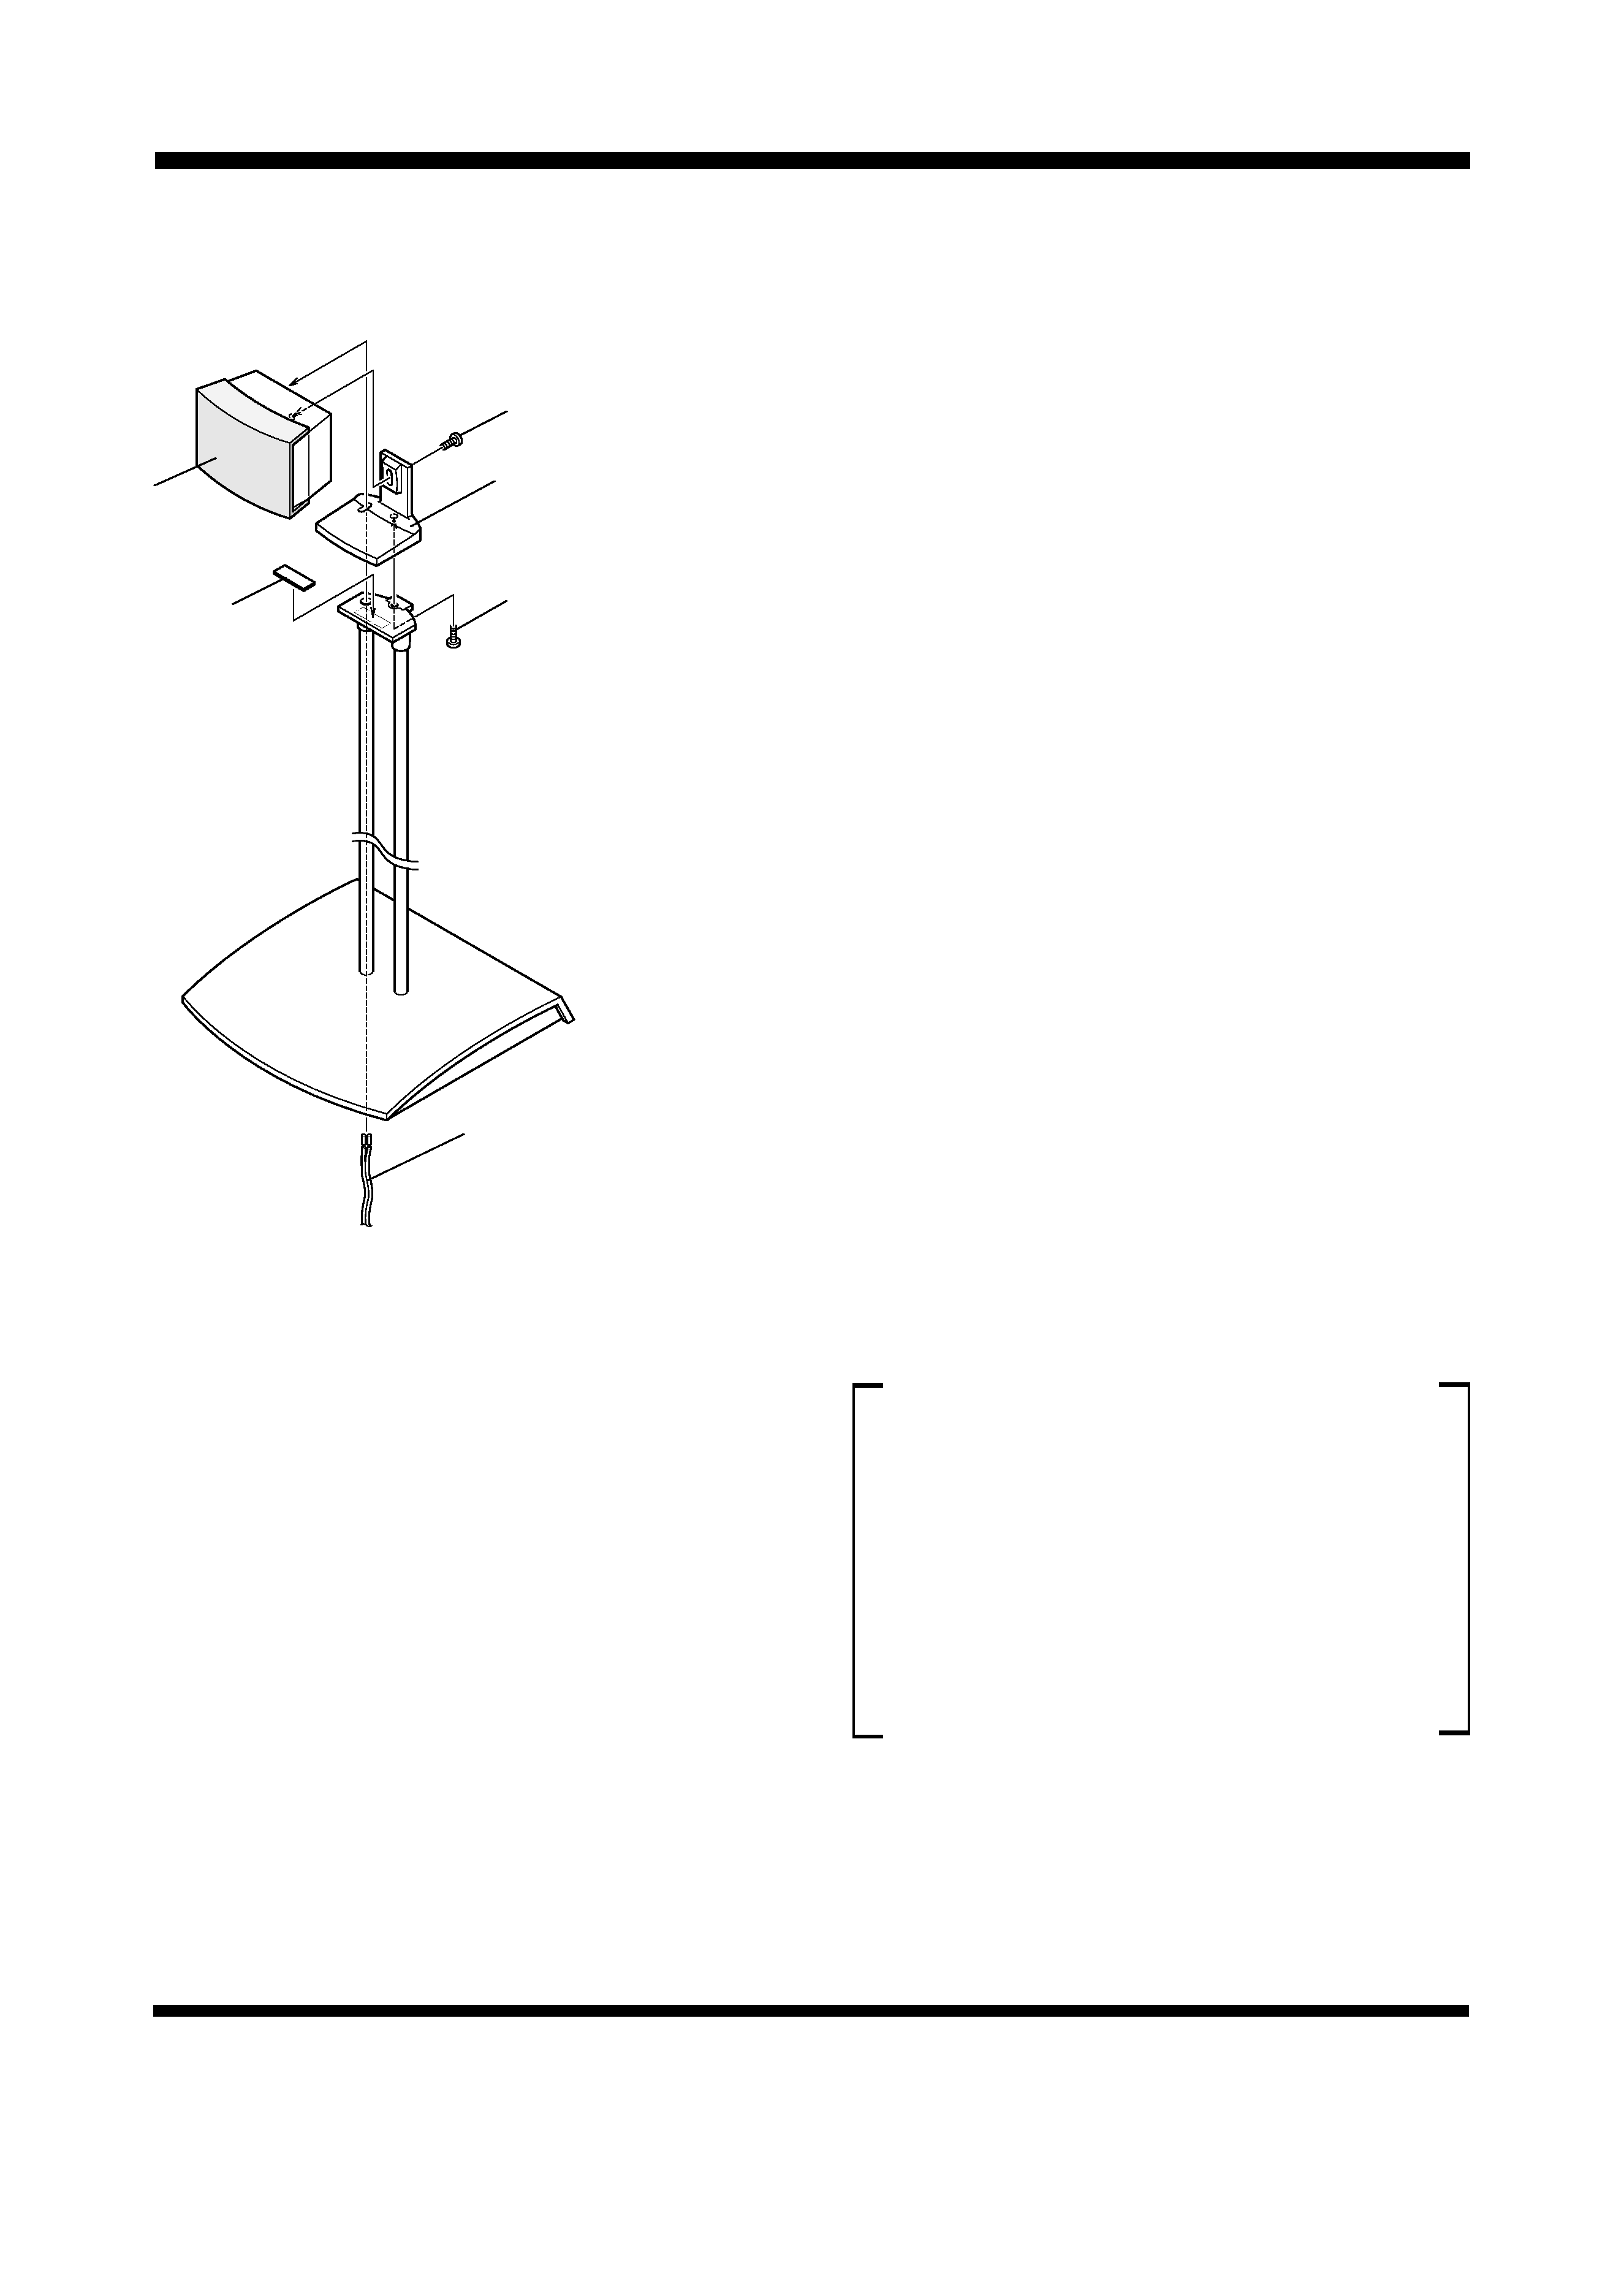
HTZ-ST7
Satellite speaker
5. Fix the HTZ-ST7 satellite speaker to the mini-stand with the
fixing screw (supplied with HTZ-ST7), and connect the cable to
the speaker.
To connectors on the
speaker
Mini-stand
(supplied with HTZ-ST7)
M3x10 (1/8x3/8in) fixing screw
(BMZ30P100FZB)
Speaker cable
(supplied with HTZ-ST7)
Tone is affected by the position of the speaker.
If the bass is insufficient, move the speaker closer to the wall. The
richest bass sound is obtained when the speaker is right against
the wall. If the bass is too powerful, producing muffled tone, move
the speaker away from the wall. Placing the speaker against a thick
curtain may also be effective.
Adjust the position as needed to obtain the desired sound.
CABINET MAINTENANCE
÷ Use a polishing cloth or dry cloth to wipe off dust and dirt.
÷ If the cabinet is very dirty, use a soft cloth dipped in some
neutral cleanser diluted 5 or 6 times with water. Finally, wipe
again using a dry cloth. Do not use furniture wax or cleaners.
÷ Never use thinners, benzine, insecticide sprays and other
chemicals on or near the cabinets, since these will corrode
the surfaces.
Double-sided
adhesive tape
Part
Part number
÷ Protector ....................................................... SHE1083
÷ Protector ....................................................... SHE1084
÷ Outer carton ................................................. SHH1297
÷ Protective mat .............................................. SHC1717
÷ Plastic bag .................................................... SHL1233
÷ Base Assy
Screw ............................................. BTZ50P200FZB
Base plate ................................................. SNA1389
Base ......................................................... SNK2364
Rubber feet .............................................. SXK1045
Supplied accessories
÷ Operating guide ............................................ SRA1339
÷ Inner carton .................................................. SHF1082
External dimensions ....................... 300 (W) x 890 (H) x 300 (D) mm
(11-13/16 (W) x 35-1/16 (H) x 11-13/16 (D) in.)
Weight ............................................................... 3.0 kg ( 6 lb10 oz )
Supplied accessories
Ordinary hexagonal bolt (without a cable hole) ........................... x 2
Hollow hexagonal bolt (with a cable hole) ................................... x 2
Fixing screws M4x8 (3/16x5/16 in), three types,black ............... x 4
Fixing screws M3x10 (1/8x3/8 in), three types,black ................. x 2
Double-sided adhesive tape ........................................................ x 2
Hexagonal wrench ...................................................................... x 1
Operating guide .......................................................................... x 1
NOTE:
Specifications and design subject to possible modification without
notice, due to improvements.
M4x12 (3/16x1/2in) fixing screw
(supplied with HTZ-ST7)