
Audio Visual Master Unit
Manual
AVM-P7000R

&RQWHQWV
Installation ............................................. 4
Installing the Unit ............................................... 4
· Mounting with Brackets
· Mounting with Velcro Tape
Installing the Remote Control Unit ...... 5
Fitting the Remote Control Unit ......................... 5
Installation Using Only the Mounting Base ....... 5
Installation Using the Mounting Base
and the Bracket ................................................ 6
Connecting the Units ............................ 8
Connecting to a Sold Separately Power Amp .... 9
Connecting the System (A) ............................... 10
Connecting the System (B) ............................... 11
Speaker Input Jack Connection ........................ 12
VIDEO Input/Output Connection ..................... 13
Connection Diagram ........................... 14
Connecting the Power Cord .............................. 14
Key Finder ........................................... 16
· Remote Controller
Before Using This Product ................. 17
About This Product ........................................... 17
About This Manual ........................................... 18
To Ensure Safe Driving .................................... 18
Resetting the Microprocessor ........................... 19
Precaution ......................................................... 19
In Case of Trouble ............................................ 19
Using the Remote Controller ............. 20
· Batteries
Basic Operation .................................. 21
To Listen to Music ........................................... 21
Basic Operation of Tuner ................................. 23
·Band
· Manual and Seek Tuning
· Preset Tuning
Basic Operation of Multi-CD Player ................ 24
· Disc Search
· Disc Number Search (for 6-Disc, 12-Disc types)
· Track Search and Fast Forward/Reverse
Entering the Function Menu ............................. 25
· Function Menu Functions
Entering the Detailed Setting Menu ................. 27
· Detailed Setting Menu Functions
Tuner Operation .................................. 29
Local Seek Tuning (LOCAL) .......................... 29
Best Stations Memory (BSM) .......................... 30
Using the RDS Functions ................... 31
What is RDS ? .................................................. 31
Frequency Display ON/OFF ............................ 31
· Program Service Name
· PTY Information
AF Function (AF) ............................................. 32
· Activating/Deactivating the AF Function
PI Seek Function .............................................. 33
·PI Seek
· Auto PI Seek (for preset station)
Regional Function (REGIONAL) .................... 34
· Activating the Regional
TA Function (TRAFFIC ANNC.) .................... 35
· Activating/Deactivating the TA Function
· Canceling Traffic Announcements
· Adjusting the TA Volume
· TP Alarm Function
PTY Function ................................................... 37
· Searching the PTY
· News Program Interruption Setting (NEWS)
·PTY Alarm
· PTY List

Using Multi-CD Players ....................... 41
Repeat Modes (PLAY MODE) ........................ 41
Pause (PAUSE) ................................................ 42
Random Play (RANDOM) ............................... 43
Scan Play (SCAN) ............................................ 43
CD Sound Quality Adjustment
(COMP SELECT) .......................................... 45
· COMP/DBE ON/OFF Switching
ITS (Instant Track Selection) ........................... 45
· ITS Programming (ITS INPUT)
· ITS Play (ITS PLAY)
· Erase a Track Program
· Erase a Disc Program
Disc Title .......................................................... 48
· Disc Title Input (TITLE INPUT)
CD TEXT Function
(for CD TEXT compatible type) ................... 50
· Title Display Switching
· Title Scroll
Other Functions ................................................ 52
· Switching the Multi-CD Player
· Playing Discs on a 50-Disc Type Multi-CD
Player
Audio Adjustment ............................... 53
Entering the Audio Menu ................................. 53
Balance Adjustment (FADER/BALANCE) ..... 54
Bass/Middle/Treble Adjustment
(BASS/MID/TREBLE) ................................. 55
Loudness Adjustment (LOUDNESS) ............... 56
Using a Subwoofer ........................................... 56
· Subwoofer Output (SUBW.1)
· Subwoofer Setting Adjustment (SUBW.2)
Front Image Enhancer Function (FIE) ............. 58
Source Level Adjustment (SLA) ...................... 59
Picture Adjustment ............................. 60
Adjusting the Picture ........................................ 60
· Color (COLOR)
· Sharpness (SHARP)
Initial Setting Menu ............................. 62
Entering the Initial Setting Menu ..................... 62
Changing the FM Tuning Step
(FM TUNING STEP) .................................... 63
Setting the DAB Priority Function
(DAB PRIORITY) ........................................ 63
Switching the Auto PI Seek
(AUTO PI SEEK) ......................................... 64
Switching the AUX Mode (AUX) ................... 65
Switching the Speaker Input Mode
(SPEAKER INPUT) ...................................... 65
Switching the VIDEO Modes
(VIDEO INPUT A/B) ................................... 66
Other Functions .................................. 67
Using the PGM Button
(PGM-FUNCTION) ......................................... 67
· Setting the PGM Button
· Using the PGM Button
Using the AUX Source .................................... 69
· Selecting the AUX Source
· AUX Title Input
Using the Speaker Input Source ....................... 70
Selecting the Picture (Front Display) ............... 70
Using the Rear Display .................................... 71
Volume Attenuator ........................................... 71
Muting Function ............................................... 72
· Mobile Navigation Unit Muting
· Cellular Telephone Muting
When using the DAB
(Digital Audio Broadcasting) Tuner ............. 73
· About this Product's Indications
· Operation
Specifications ...................................... 75
1RWH
· Before finally installing the unit, connect the wiring temporarily, making sure it is all connected up
properly, and the unit and the system work properly.
· Use only the parts included with the unit to ensure proper installation. The use of unauthorized parts
can cause malfunctions.
· Consult with your nearest dealer if installation requires the drilling of holes or other modifications of
the vehicle.
· Install the unit where it does not get in the driver's way and cannot injure the passenger if there is a
sudden stop, like an emergency stop.
· When mounting this unit, make sure none of the leads are trapped between this unit and the
surrounding metalwork or fittings.
· Do not mount this unit near the heater outlet, where it would be affected by heat, or near the doors,
where rainwater might splash onto it.
· Before drilling any mounting holes always check behind where you want to drill the holes. Do not
drill into the gas line, brake line, electrical wiring or other important parts.
· If this unit is installed in the passenger compartment, anchor it securely so it does not break free while
the car is moving, and cause injury or an accident.
· If this unit is installed under a front seat, make sure it does not obstruct seat movement. Route all leads
and cords carefully around the sliding mechanism so they do not get caught or pinched in the
mechanism and cause a short circuit.
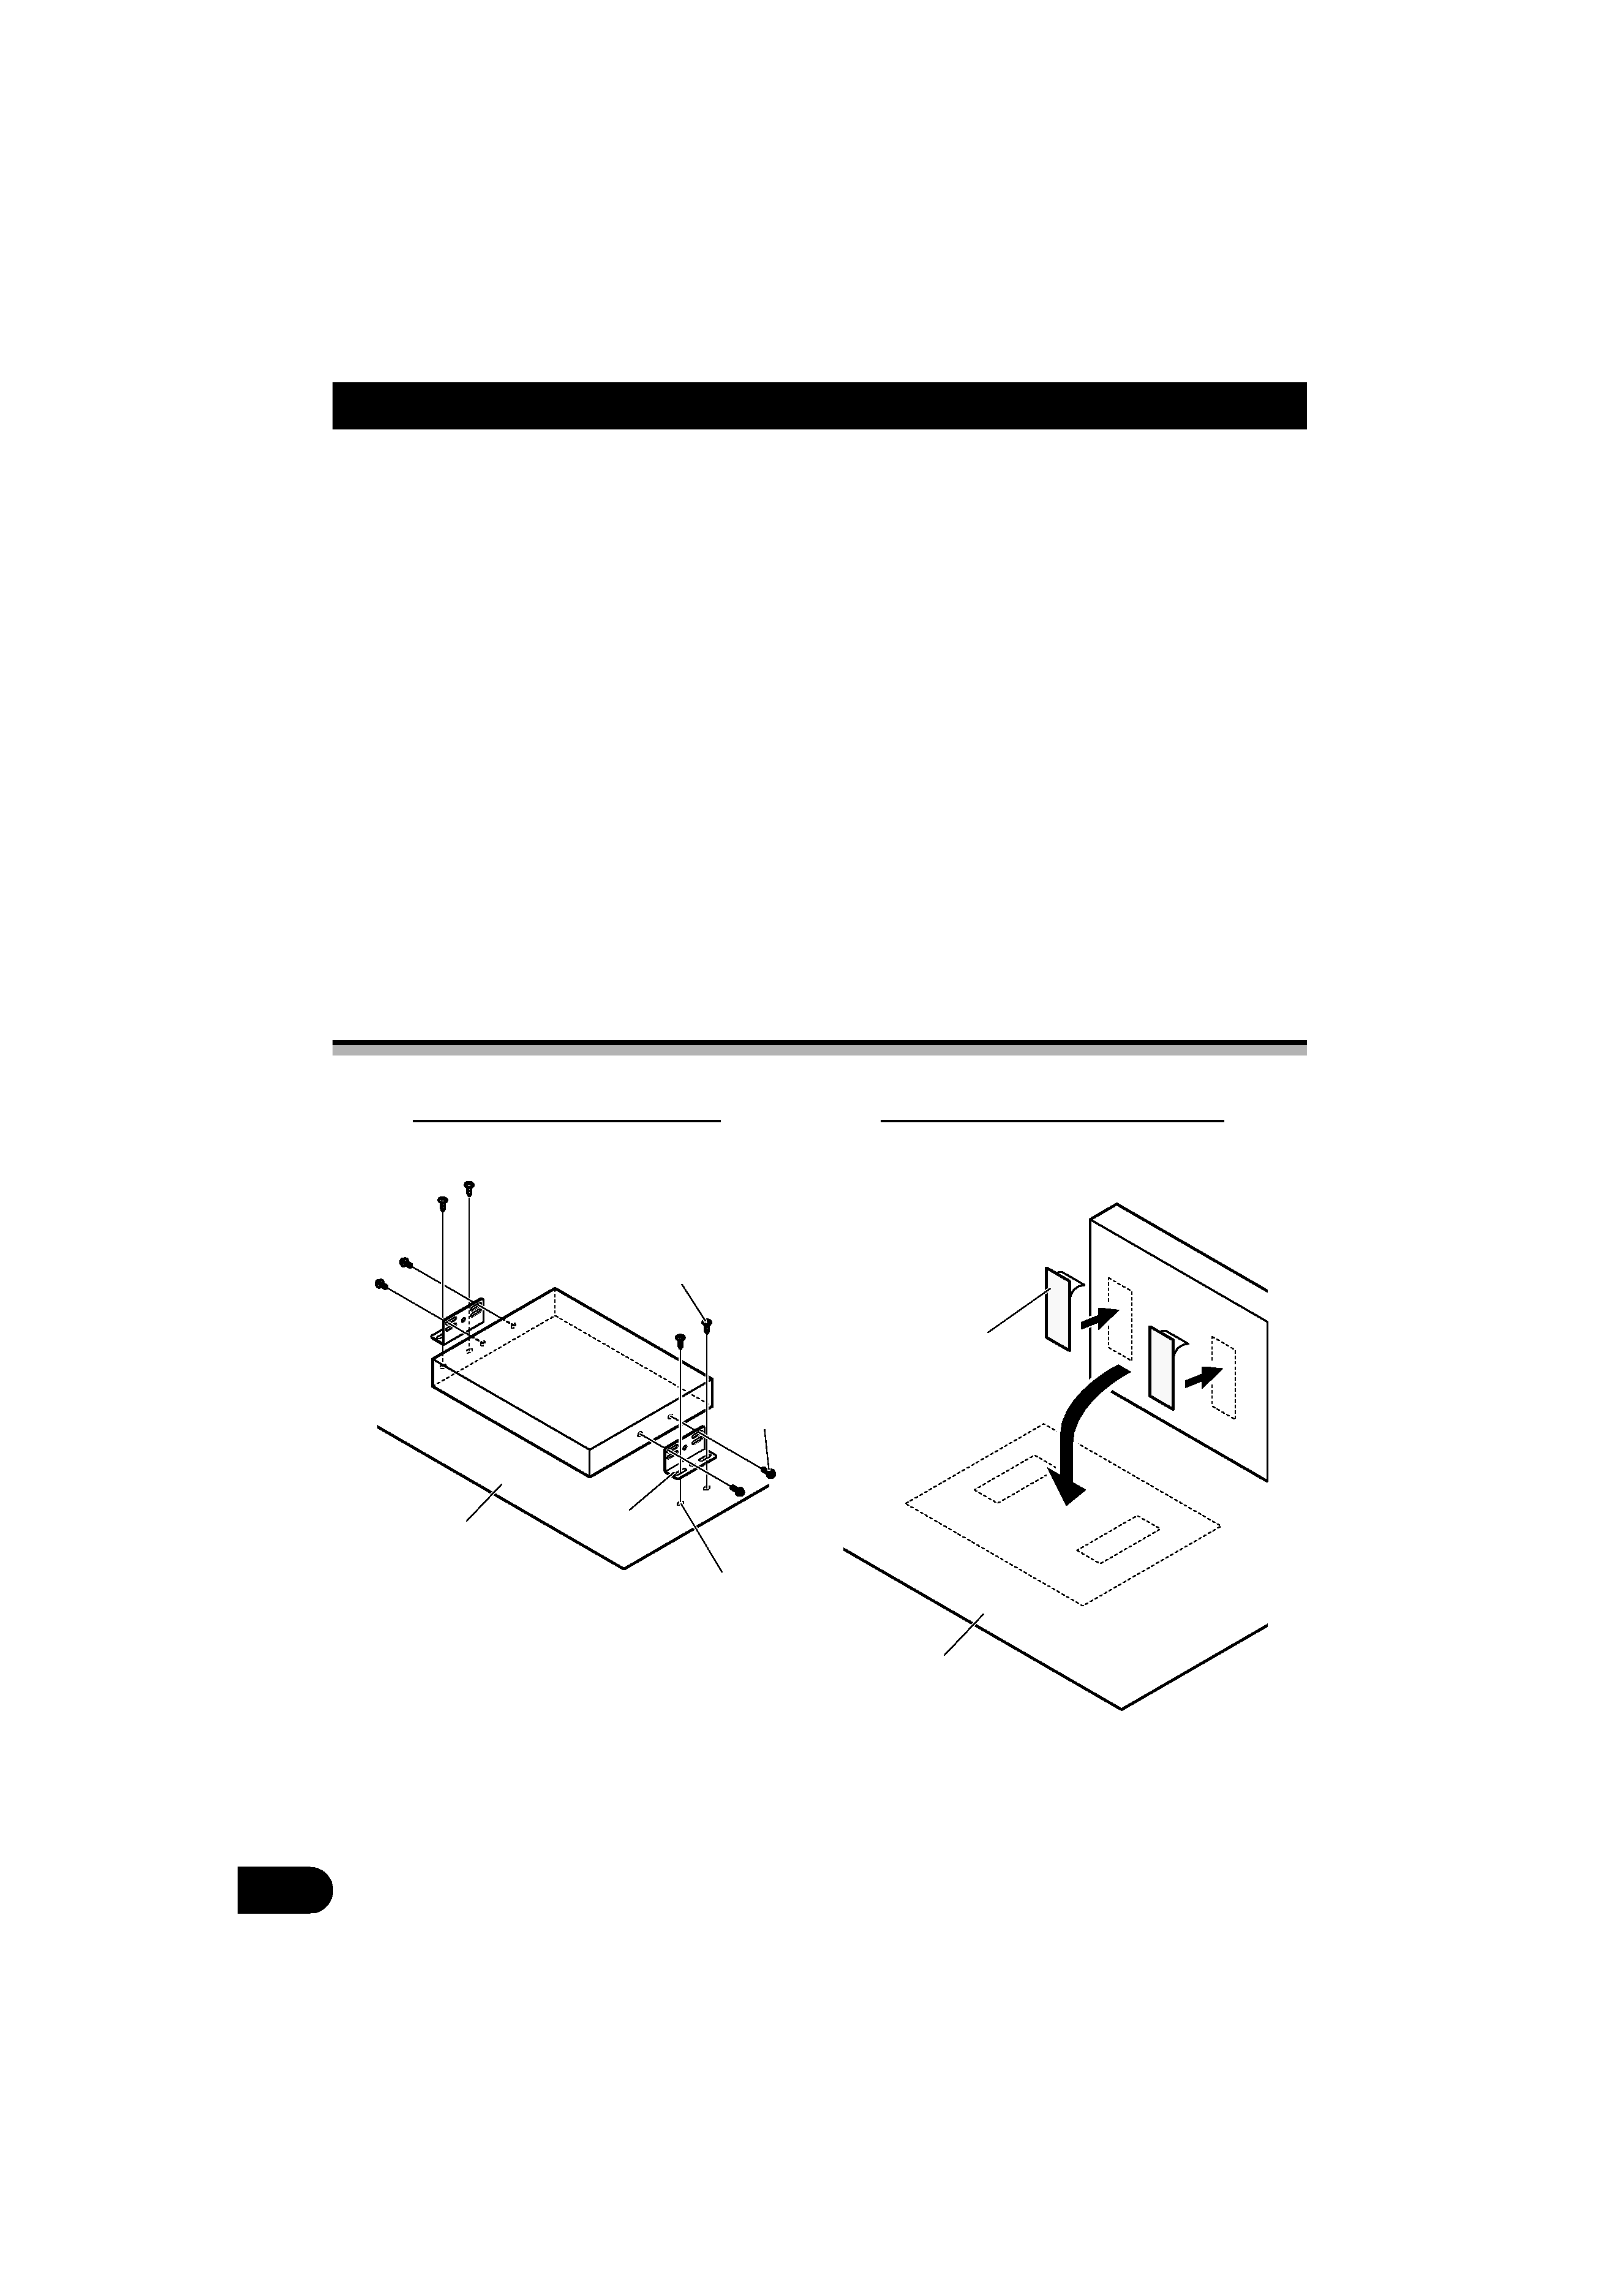
Installing the Unit
Mounting with Brackets
Tapping screw (4
E 12 mm)
Car mat or chassis
Drill 2 to 2.5 mm diameter holes.
Bracket
Screw
(4
E 8 mm)
Mounting with Velcro Tape
· Thoroughly wipe off the surface
before affixing the velcro tape.
Velcro tape
Car mat or chassis
,QVWDOODWLRQ
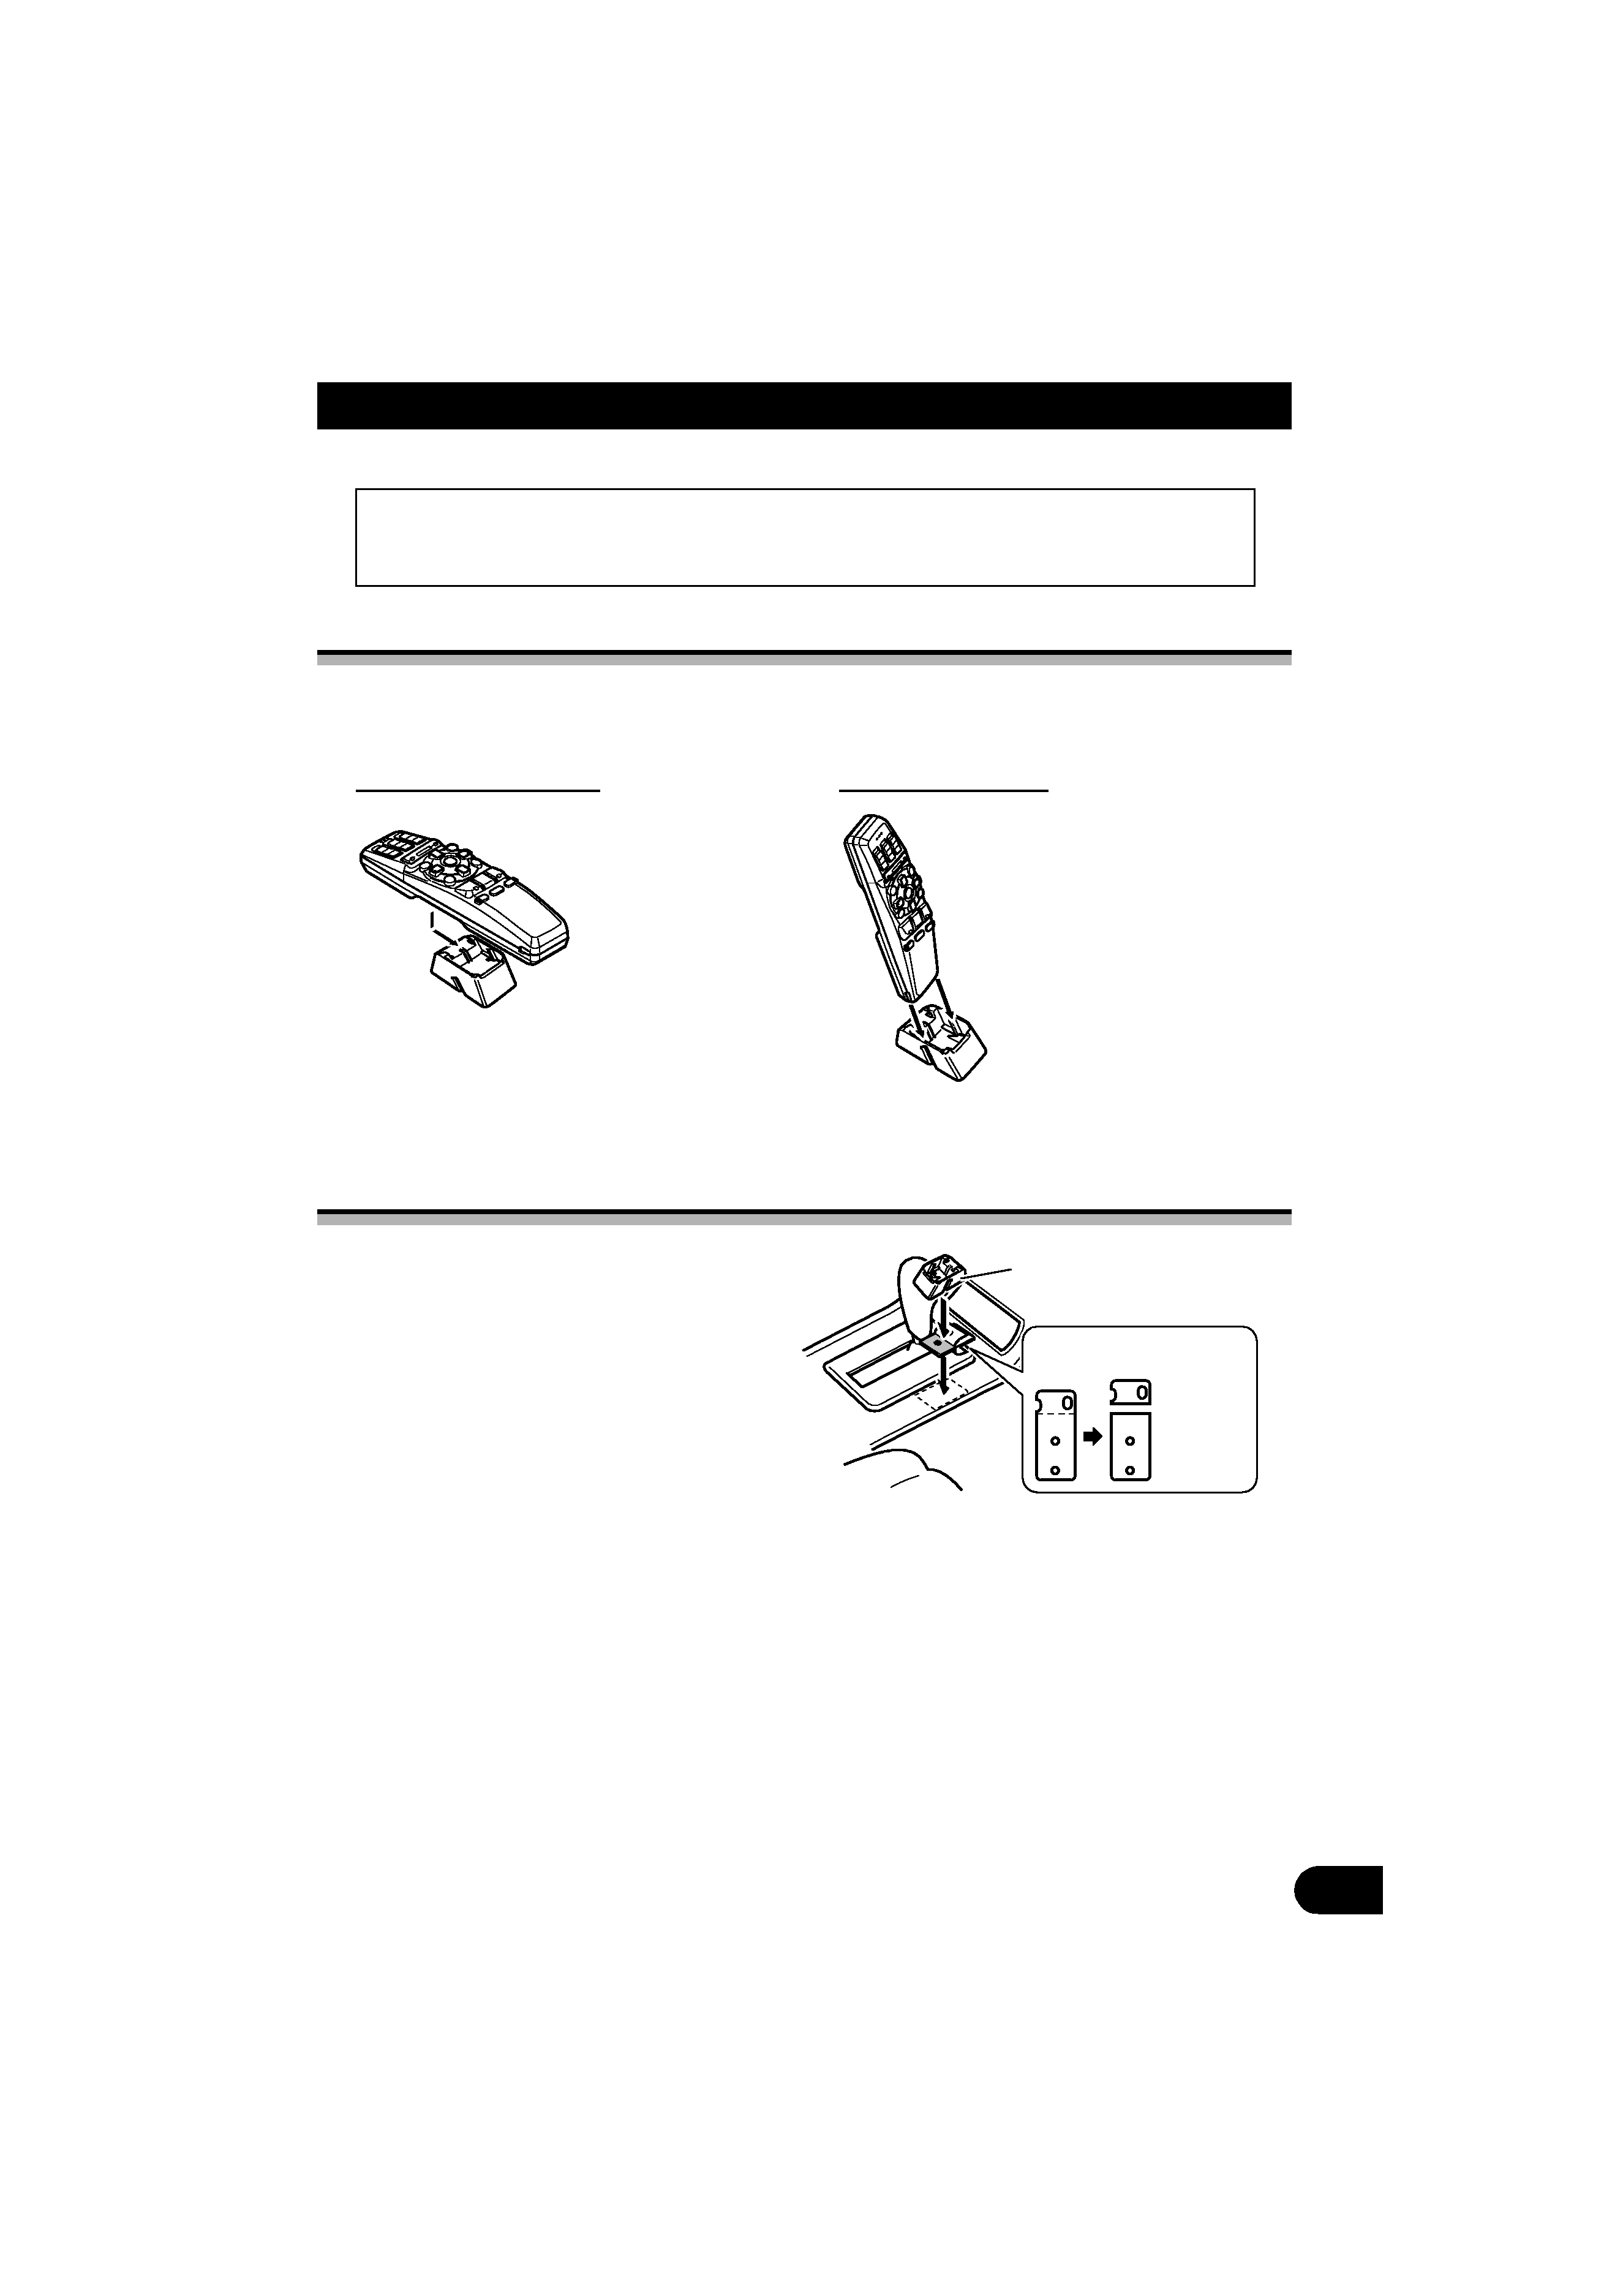
,QVWDOOLQJWKH 5HPRWH &RQWURO 8QLW
Fitting the Remote Control Unit
3UHFDXWLRQ
· Press the remote controller unit onto the mounting base until it clicks into place.
Installation Using Only the Mounting Base
3UHFDXWLRQ
· Install the mounting base so that the remote controller is slanting upwards at an angle when
fitted.
Fitting horizontally
Fitting vertically
Mounting Base
Double-sided tape
Not used
Used
Passenger seat
3UHFDXWLRQ
· To avoid it being a hindrance to driving,
always install the remote control unit to the
passenger's side -- not the driver's side.
· Before using double-sided tape, clean off
any dirt on the surface to which the double-
sided tape is to be attached.