ENGLISH
ESPAÑOL
DEUTSCH
FRANÇAIS
ITALIANO
NEDERLANDS
16:9 Touch Panel Display
Owner's Manual
AVD-W6210
This product conforms to new cord colors.
Los colores de los cables de este producto se conforman con un nuevo
código de colores.
Dieses Produkt entspricht den neuen kabelfarben.

1
Contents
Contents ...................................................... 1
IMPORTANT SAFEGUARDS .................... 2
Please Read All of These Instructions
Regarding Your Display and Retain
them for Future Reference ........................ 2
Fitting and Removing the Display .......... 3
To fit the display .............................................. 3
To remove the display ...................................... 4
IMPORTANT INFORMATION .................... 5
About This Product .......................................... 5
-
When combined with a Pioneer navigation
unit
Precaution .......................................................... 5
In Case of Trouble ............................................ 5
Before Using This Product ...................... 6
To Avoid Battery Exhaustion ............................ 6
To Protect the LCD Screen of the Display ........ 6
When Viewing is Difficult, use [BRIGHTNESS]
and [DIMMER] to Adjust .......................... 6
About the RCA Video and Audio Outputs of
this Unit ...................................................... 6
To Ensure Safe Driving .................................... 7
Resetting the Microprocessor ............................ 7
Key Finder .................................................... 8
Component Parts and Features .......................... 8
Basic Operation ........................................ 9
Turn On Power .................................................. 9
Volume Adjustment .......................................... 9
Selecting a Source ............................................ 10
Changing the Wide Screen Mode .................... 11
-
Wide Modes Available
Operating the Setup Menu .................... 13
Entering the Setup Menu ................................ 13
Picture Adjust .................................................. 14
-
BRIGHTNESS/CONTRAST/COLOR/HUE
-
DIMMER
Video Setting .................................................. 16
-
Input Setting [AV IN2]
-
Functions for Back-up Camera
-
Switching the image of rear display
Audio Setting .................................................. 19
-
Setting the Mixing of the Guidance Voice
[GUIDE]
Using the Display Correctly .................. 20
Handling the Display ...................................... 20
About the Liquid Crystal Display (LCD)
Screen ...................................................... 21
Keeping the Display in Good Condition ........ 21
About the Small Fluorescent Tube .................. 21
Connecting the System .......................... 22
Names and Functions of Connection
Terminals .................................................. 24
Connecting the Power Cable .......................... 25
Connection Diagram (VIDEO input) .............. 26
Connection Diagram (26-pin input) ................ 27
Connecting RCA Audio and Video Output .... 28
Connecting "REVERSE-GEAR SIGNAL
INPUT" Lead .......................................... 29
Installation ................................................ 30
Before Installing and Fixing ............................ 31
Before Affixing the Adhesive Tape ................ 31
Installing the Display Using the Accessory
Mounting Base ........................................ 32
Installing the Hide-away Unit ........................ 35
-
Installation Precautions
-
Hide-away Unit Installation
Specifications .......................................... 36

2
ENGLISH
ESPAÑOL
DEUTSCH
FRANÇAIS
ITALIANO
NEDERLANDS
IMPORTANT SAFEGUARDS
Please Read All of These Instructions Regarding Your Display
and Retain them for Future Reference
1. Read this manual fully and carefully before operating your display.
2. Keep this manual handy for future reference.
3. Pay close attention to all warnings in this manual and follow the instructions care-
fully.
4. Never allow others to use the system until they have read and understood the
operating instructions.
5. Do not install the display where it may (i) obstruct the driver's vision, (ii) impair
the performance of any of the vehicle's operating systems or safety features,
including airbags, or (iii) impair the driver's ability to safely operate the vehicle.
6. As with any accessory in your vehicle's interior, the display should not divert
your attention from the safe operation of your vehicle. If you experience difficul-
ty in operating the system or reading the display, please park safely before mak-
ing adjustments.
7. Do not attempt to install or service your display by yourself. Installation or ser-
vicing of the display by persons without training and experience in electronic
equipment and automotive accessories may be dangerous and could expose you
to the risk of electric shock or other hazards.
8. Please remember to wear your seat belt at all times while operating your vehicle.
If you are ever in an accident, your injuries can be considerably more severe if
your seat belt is not properly buckled.
9. Use of this product is subject to any government laws regarding placement or use.
PIONEER does not accept any liability for any problems, damage or loss incurred
as a result of the product being used with an incorrect setting or in violation of
any government laws.
10. This product is designed for use with a back-up camera. Users may connect the
AV IN2 input with "REVERSE-GEAR SIGNAL INPUT" only to a back-up cam-
era. Users must not connect any other devices to the AV IN2 input with
"REVERSE-GEAR SIGNAL INPUT".

3
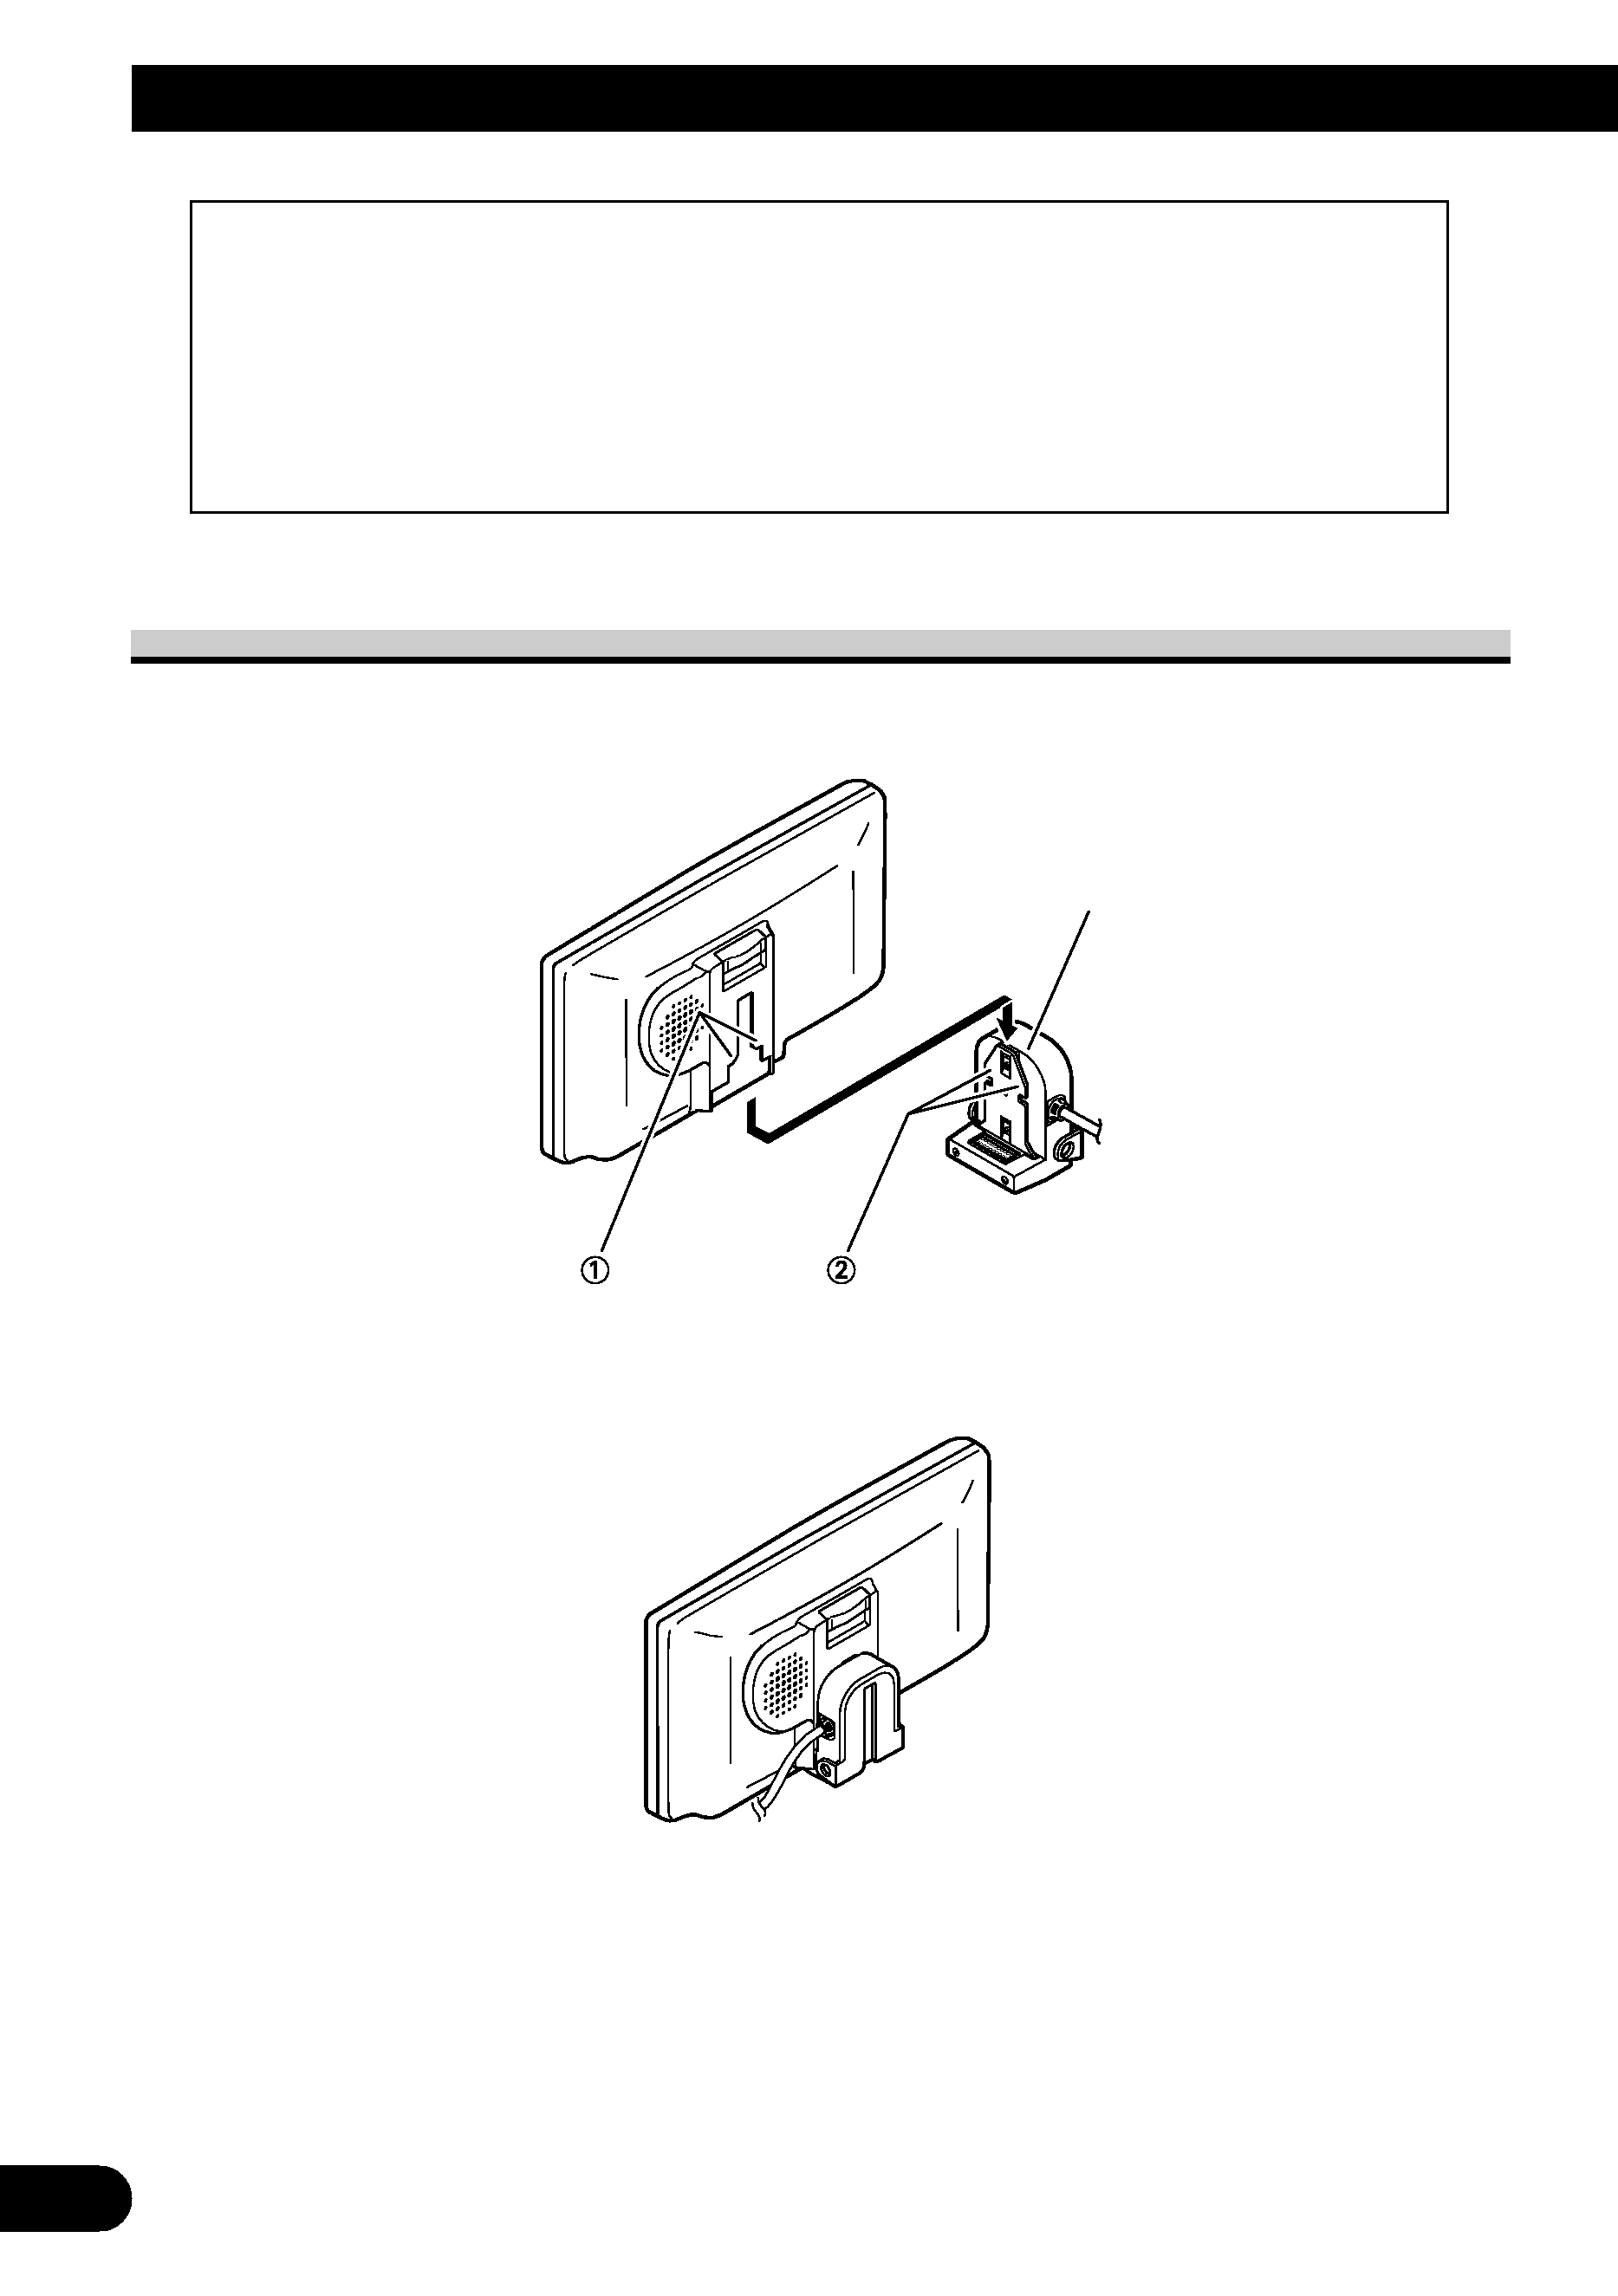
To fit the display
1. Fit part 1 of the display into the grooves 2 on the left and right of the base.
2. Slide the display downward until it clicks into place.
Precaution:
· To prevent failure, be sure to turn the ignition switch or system power OFF before fitting or
removing the display. Also take care not to grip the screen or buttons too firmly or to drop the
display.
· Do not let any water get on the terminals on the display or on the base and do not allow the ter-
minals to be shorted by a metal object or the like. This can cause system breakdown.
· Be careful not to touch terminals on the display or on the base. Doing so may cause connection
failures. If any terminals are stained, wipe them with a clean dry cloth.
Fitting and Removing the Display
Base

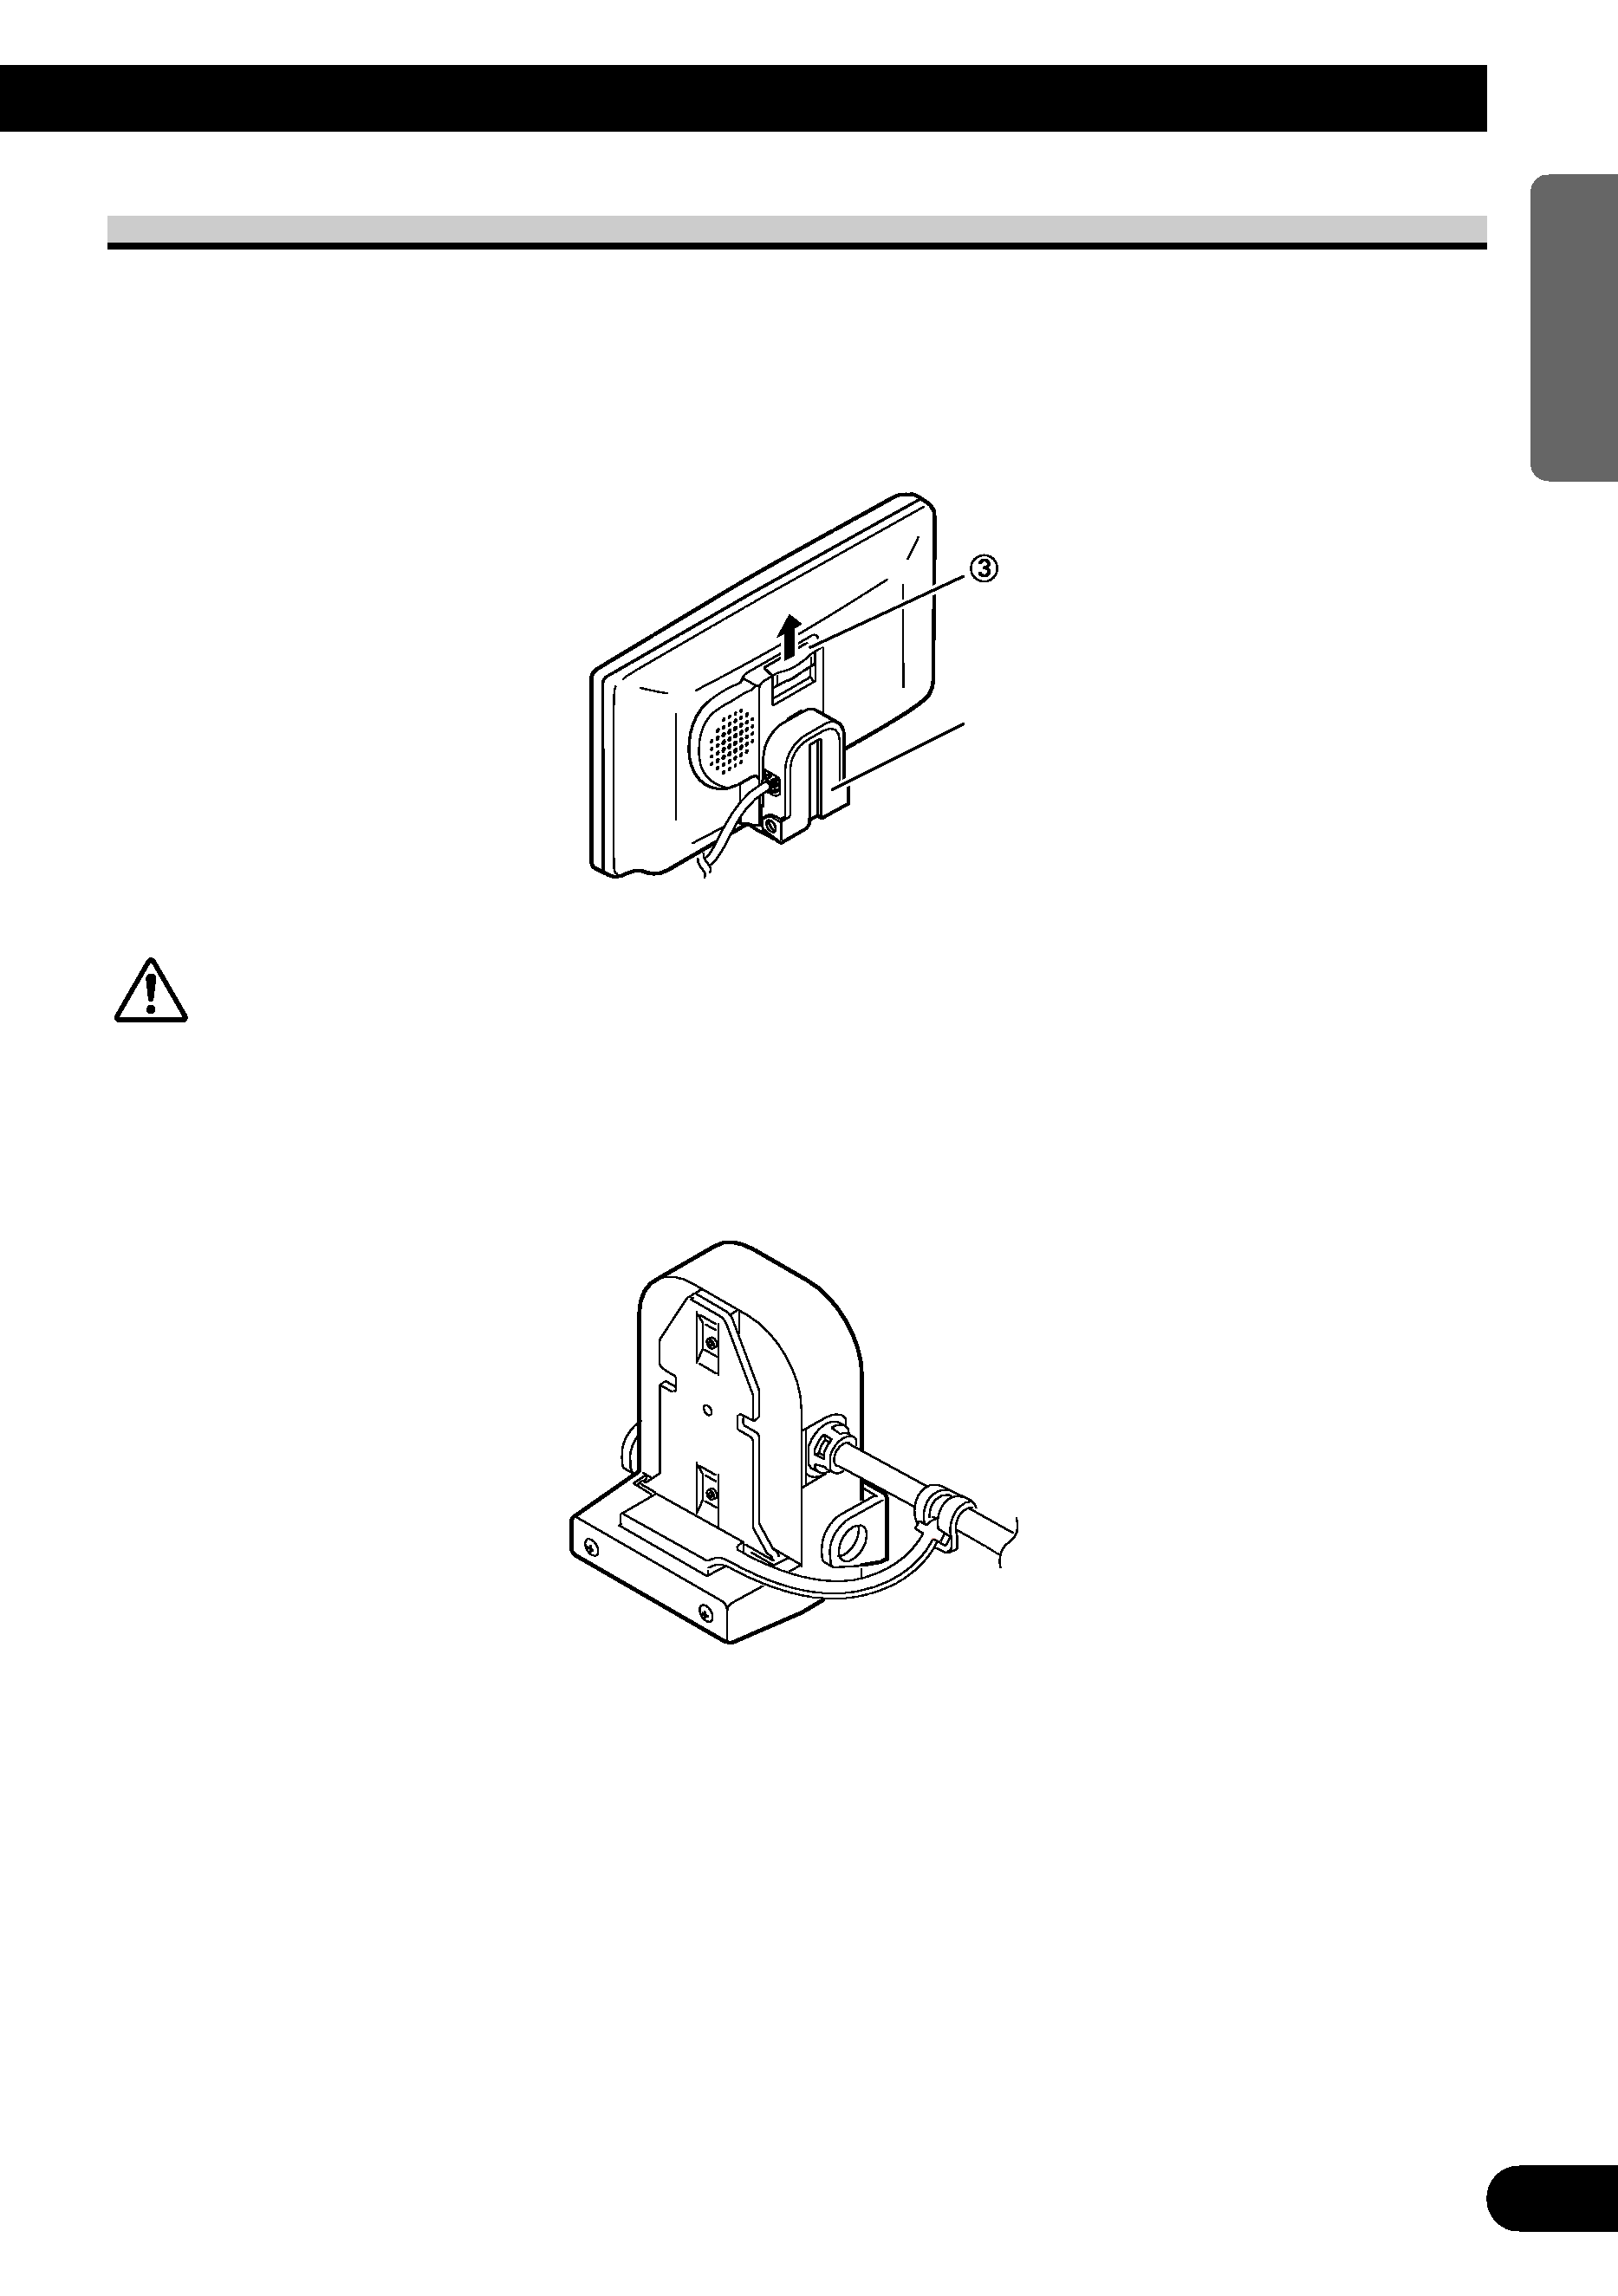
To remove the display
· Pull the lock release lever 3 upward and hold in that position, then slide the
display upward and detach it from its base.
· To prevent theft of the display, remove the display when leaving the vehicle.
CAUTION
Dust or other foreign matter may lead to poor connector contact. Be sure to
use the supplied cover to protect the connector when the display is not in use.
(Refer to the illustration below.)
4
ENGLISH
ESPAÑOL
DEUTSCH
FRANÇAIS
ITALIANO
NEDERLANDS
Base
