
ENGLISH
15
Model SR5000 User Guide
AV Surround Receiver

EN
G
LI
S
H
Non sono coperti da garanzia difetti derivanti da uso improprio, errata
installazione, manutenzione effettuata da personale non autorizzato o,
comunque, da circostanze che non passano riferirsi a difetti di funzionamento
dell'apparecchio.
Sono inoltre esclusi dalla garanzia gli interventi inerenti l'installazione e
l'allacciamento agli impianti di alimentazione.
Gli apparecchi verranno riparati presso i nostri Centri di Assistenza. Le
spese ed i rischi di trasporto sono a carico del cliente.
La casa costruttrice declina ogni responsabilita' per danni diretti o indiretti
provocati dalla inosservanza delle prescrizioni di installazione, uso e
manutenzione dettagliate nel presente manuale.
Per informazioni sull'abbonamento al servizio Assistenza postgaranzia e
per conoscere l'indirizzo dei Centri Assistenza Marantz rivolgetevi al nostro
servizio consumatori (telefono 1678-20026 numero verde).
PORTUGUÊS
GARANTIA
Para informações sobre a garantia, contactar o distribuidor Marantz local.
GUARDAR O RECIBO DE COMPRA
O recibo é o registo permanente da compra que fez. Deve ser guardado
num local seguro, para ser apresentado em questões relacionadas com o
seguro ou para quando tiver de contactar a Marantz.
IMPORTANTE
Quando procurar assisténcia técnica ao abrigo da garantia, é da
responsabilidade do consumidor estabelecer a prova e data de compra. O
recibo é prova adequada.
ESPAÑOL
GARANTÍA
Para información sobre las Condiciones de Garantía, sírvase consultar el
Certificado que encontará en le interior del embalaje del equipo.
CONSERVE EL COMPROBANTE DE LA COMPRA
La factura es el comprobante de la adquisición de un producto valioso.
Consérvela en lugar seguro para poder consultarla en caso necesario.
IMPORTANTE
Para disponer de servicios cubiertos por la garantía, el usuario deberá
acreditar la fecha y el lugar de adquisición del equipo. La factura o recibo
de la compra constituyen un comprobante válido a tal efecto.
SVENSKA
GARANTI
Angáende garanti,kontakta din lokala Marantz handlare.
SPAR KVITTOT
Kvittot är din lnköpshandllng över lnköp av en värdefull vara.Det ska
placeras pá ett säkert ställe och hänvlsas till vid försäkringsfrágor eller vid
korrespondens med Marantz.
VIKTIGT
När garantiservice áberopas är det konsumentens ansver att visa datum
för inköp.Ditt kvitto eller din faktura är ett tillfredsställande bevis.
DANSK
GARANTI
Bed din Marantz-forhandler om oplysninger om garantien.
GEM DIN KVITTERING SOM KØBSEVIS
Din kvittering er bevis på et værdifuldt køb. Opbevar den på et sikkert sted,
hvor du let kan finde den i forbindelse med eventuelle erstatningskrav eller
korrespondance med Maranz.
VIGTIGT
Det er brugerens ansvar at forelægge købsbevis, hvis der er brug for det
i garantiforbindelse. Din kvittering eller faktura er gyldige beviser.
ENGLISH
WARRANTY
For warranty information, contact your local Marantz distributor.
RETAIN YOUR PURCHASE RECEIPT
Your purchase receipt is your permanent record of a valuable purchase. It
should be kept in a safe place to be referred to as necessary for insurance
purposes of when corresponding with Marantz.
IMPORTANT
When seeking warranty service, it is the responsibility of the
consumer to establish proof and date of purchase. Your purchase
receipt or invoice is adequate for such proof.
FOR U.K. ONLY
This undertaking is in addition to a consumer's statutory rights and
does not affect those rights in any way.
FRANÇAIS
GARANTIE
Pour des informations sur la garantie, contacter le distributeur local
Marantz.
CONSERVER L'ATTESTATION D'ACHAT
L'attestation d'achat est la preuve permanente d'un achat de valeur. La
conserver en lieur sûr pour s'y reporter aux fins d'obtention d'une
couverture d'assurance ou dans le cadre de correspondances avec Marantz.
IMPORTANT
Pour l'obtention d'un service couvert par la garantie, il incombe au client
d'établir la preuve de lachat et d'en corroborer la date. Le reçu ou la facture
constituent des preuves suffisantes.
DEUTSCH
GRANTIE
Bei Garantiefragen wenden Sie sich bitte an Ihren Marantz-Händler.
HEBEN SIE IHRE QUITTUNG GUT AUF
Die Quittung dient Ihnen als bleibende Unterlage für Ihre wertvolle
Anschaffung Das Aufbewahren der Quittung ist wichtig, da die darin
enthaltenen angaben für Versicherungszwecke oder bei korrespondenz
mit Marantz angeführt werden müssen.
WICHTIG!
Bei Garantiefrangen muß der Kunde eine Kaufunterlage mit kaufdatum
vorlegen. Ihre Quittung oder Rechnung ist als Unterlage ausreichend.
NEDERLANDS
GRANTIE
Voor inlichtingen omtrent garantie dient u zich te wenden tot uw plaatselijke
Marantz-handelaar.
UW KWITANTIE, KASSABON E.D. BEWAREN
Uw Kwitantie, kassabon e.d. vormen uw bewijs van aankoop van een
waardevol artikel en dienen op een veilige plaats bewaard te worden voor
evt. verwijzing, b.v. in verband met verzekering of bij correspondentie met
Marantz.
BELANGRIJK
Bij een evt. beroep op de garantie is het de verantwoordelijkheid van de
consument een gedateerd bewijs van aankoop te tonen. Uw kassabon of
factuur is zijn voldoende bewijs.
ITALIANO
CONDIZIONI DI GARANZIA
L'apparecchio e' garantito per 365 giorni dalla data di acquisto comprovata
da un documento attestante il nominativo del rivenditore e la data di
vendita. La garanzia sara' prestata con la sostituzione o riparazione gratuita
delle parti difettose.
1

ENGLISH
CONTENTS LIST
English .................................................................................................................................... page 3
Français ................................................................................................................................ page 14
Deutsch ................................................................................................................................ Seite 25
Nederlands ........................................................................................................................ pagina 38
Italiano ............................................................................................................................... pagina 50
Português .......................................................................................................................... página 61
Español .............................................................................................................................. página 73
Svenska ............................................................................................................................... sidan 85
Dansk ..................................................................................................................................... side 96
Specifications .................................................................................................................... page 107
Figures ................................................................................................................................. page 108
"Este aparato lleva elementos antiparasitarios necesarios para cumplir con los limites que se
estableren en el Anexo V del Reglamento sobre Pertubaciones Radioelectricas e Interferencias
aprobado en el Real Decreto 138/1989. (B.O.E. de 9 de Febrero1989)."
SI DICHIARA CHE L'APPARECCHIO SINTO-AMPLIFICATORE SR5000 RISPONDE ALLE PRESCRIZIONI
DELL'ART. 2 COMMA 1 DEL D.M. 28 AGOSTO 1995 N 548.
FATTO A EINDHOVEN, IL 1/1/1996.
MARANTZ EUROPE B.V.
5600 EINDHOVEN
THE NETHERLANDS
CE
MARKING
English
This unit is in conformity with EMC directive and low-voltage directive.
Français
Cet appareil est conforme à la directive EMC et à la directive sur les basses tensions.
Deutsch
Dieses Gerät entspricht den EMC-Richtlinien und den Richtlinien für Niederspannungsgeräte.
Nederlands
Dit apparaat voldoet aan de EMC-richtlijnen en de richtlijnen voor apparatuur met laag voltage.
Italiano
Quest'unità è conforme alle direttive EMC ed alla direttiva sulle basse tensioni.
Português
Esta unidade está em conformidade com as directivas EMC e as directivas de baixa voltagem.
Español
Esta unidad está de acuerdo con las normas EMC y las relacionadas con baja tensión.
Svenska
Denna enhet överensstämmer med EMC direktivet och direktivet för lågspänning.
Dansk
Dette apparat er i overensstemmelse med EMC direktivet og direktivet for lavspænding.
2

EN
G
LI
S
H
FOREWORD
This section must be read carefully before any connection is made to the
mains supply.
WARNINGS
Do not expose the equipment to rain or moisture.
Do not remove the cover from the equipment.
Do not insert anything into the equipment through the ventilation
holes.
Do not handle the mains lead with wet hands.
EQUIPMENT MAINS WORKING SETTING
Your Marantz product complies with the household power and safety
requirements in your area.
This is a voltage selector on the rear panel of the "Overseas" Version
product,. Be sure to set the voltage selector to the mains voltage of your
area before using the unit.
IMPORTANT
This apparatus is fitted with an approved moulded 13 Amp plug. To change
a fuse in this type of plug proceed as follows:
1. Remove fuse cover and fuse.
2. Fix new fuse which should be a BS1362 5A, A.S.T.A. or BSI approved
type.
3. Refit the fuse cover.
If the fitted plug is not suitable for your socket outlets, it should be cut off
and an appropriate plug fitted in its place.
If the mains plug contains a fuse, this should have a value of 5A. If a plug
without a fuse is used, the fuse at the distribution board should not be
greater than 5A.
NOTE: The severed plug must be destroyed to avoid a possible shock
hazard should it be inserted into a 13A socket elsewhere.
HOW TO CONNECT A PLUG
The wires in the mains lead are coloured in accordance with the following
code:
BLUE--"NEUTRAL" ("N")
BROWN--"LIVE" ("L")
1. The BLUE wire must be connected to the terminal which is marked
with the letter "N" or coloured BLACK.
2. The BROWN wire must be connected to the terminal which is marked
with the letter "L" or coloured RED.
3. Do not connect either wires to the earth terminal in the plug which is
marked by the letter "E" or by the safety earth symbol T or coloured
green or green-and-yellow.
Before replacing the plug cover, make certain that the cord grip is clamped
over the sheath of the lead -- not simply over the two wires.
COPYRIGHT
Recording and playback of some material may require permission. For
further information refer to the following:
Copyright Act 1956
Dramatic and Musical Performers Act 1958
Performers Protection Acts 1963, and 1972
Any subsequent statutory enactments and orders
INTRODUCTION
Thank you for selecting the Marantz AV Surround Stereo Receiver for your
AV system.
This AV Surround Stereo Receiver incorporates a number of features
designed to enhance the listening of your favorite music and home theater
sources.
Please read these operating instructions carefully. We recommend that
you read the entire user guide before you attempt to connect or operate
the receiver.
After you have reviewed the contents of this manual, we suggest that you
make all system connections before you attempt to operate the unit.
Refer to the figures on the pages at the back of this user's guide. The
callout numbers on the figures correspond to those found in the text. All
references to the connections and controls that are printed in BOLD type
are as they appear on the unit.
INSTALLATION
Remember the following important points when installing the receiver.
· Do not expose the component to rain or moisture, as this may cause
damage to the receiver.
· All receivers produce some heat during operation and this heat must be
allowed to disperse freely. Do not close any ventilation openings and
insure that there is adequate ventilation space behind, beside and
above the receiver.
· Prevent extra heat from reaching the unit. Never put the receiver in the
full glare of the sun or near a heat source.
PRECAUTIONS
The following precautions should be taken when operating the equipment.
GENERAL PRECAUTIONS
When installing the equipment ensure that:
the ventilation holes are not covered.
air is allowed to circulate freely around the equipment.
it is placed on a vibration-free surface.
it will not be exposed to excessive heat, cold, moisture or dust.
it will not be exposed to direct sunlight.
it will not be exposed to electrostatic discharges.
always install the unite horizontally.
In addition, never place heavy objects on the equipment.
If a foreign object or water does enter the equipment, contact your nearest
dealer or service center.
Do not pull out the plug by pulling on the mains lead; grasp the plug itself.
It is advisable when leaving the house, or during a thunderstorm, to
disconnect the equipment from the AC outlet.
SR5000 FEATURES
·
Equipped with 7 audio inputs and 4 video inputs
·
Front 100 watt x 2(stereo mode), 70 watt x 5 (surround mode)
·
DTS(Digital Theater System) digital surround decoder
·
Dolby digital(AC-3)surround decoder
·
3-in Digital selector (Coax.-1, Coax-2, Opt)
·
Surround decoder with digital delay control function.
·
30-station random preset memory.
·
Automatic preset memory at tuner.
·
Up to 90-minute sleep timer by remote control.
·
Radio Data System for European version
To ensure proper ventilation for the amplifier, do not mount it in a rack
or locate it inside a bookshelf. Note the following precautions.
-
Do not insert objects into the space underneath the amplifier.
-
Do not block the vents on the top of the amplifier.
-
Keep the area above the amplifier unobstructed for about one
meter.
-
Allow approximately 20 centimeters of space on all sides of the
amplifier.
3
ENGLISH
USING THE SURROUND MODES
8 surround modes are provided for reproducing sound with a live
atmosphere. Select the surround mode appropriate to the music/video
source and your listening room conditions.
1. DTS (Digital Theater System):
Allows you to enjoy 5.1 (or 6) discrete channels of high quality digital audio
from DTS program sources bearing the
SURROUND
DIGITAL
TM
" HDS "
or "HIGH
DEFINITION SURROUND" trade mark such as laser discs, DVD and
compact discs, etc. DTS Digital Surround delivers up to 6 channels of
transparent audio (which means identical to the original masters) and
results in exceptional clarity throughout a true 36O
soundfield.
The term DTS is a trademark of DTS Technology, LLC.
Manufactured under license from DTS Technology, LLC.
Note: The DTS program sources should be played back in the DTS
mode. If not, it will sound like continuous noise.
2. DOLBY DIGITAL (AC-3) SURROUND
Dolby Digital (also known as AC3) is new tecnology that was originally
developed to provide six separate channels of high quality discrete multi-
channel sound for motion picture theaters. The Marantz AV receiver brings
that same high quality sound into your home when used a compatible laser
disc player, as well as from future Dolby Digital sources such as DSS,
Digital Video Disc (DVD) and High Definition Television (HDTV).
The wide dynamic range of Dolby Digital enables the Marantz AV recever
to reproduce soundtracks with their full fidelity and a realism that is not
possible with conventional matrix surround systems.
3. DOLBY PRO LOGIC SURROUND
This is the setting you will probably use for watching most Dolby Surround
(
DOLBY SURROUND ) encoded videos. This provides you with left
and right stereo for off-screen imaging, a center channel for most on-
screen dialogue, and a surround channel for ambiance and special effects.
There are three center channel modes available in Dolby Surround.
"PHANTOM" (CENTER SPEAKER MODE : NONE) should be used if you
have elected not to use a center channel. This mode of operation directs
the center channel information equally to the left and right channel
speakers, creating a "phantom" center image of the dialogue. This is the
way the first generation Dolby Surround worked.
"NORMAL" should be used if you are using a small center channel
speaker (or speakers) with limited bass response. In NORMAL mode, the
lower frequencies (below 100 Hz) are removed from the center channel
and redirected equally to the left and right speakers. Since bass frequen-
cies are omnidirectional, this will not affect the imaging of the center
channel. The dialogue will still appear to come from the video screen.
"WIDE"
should be used if you are using a full-range center channel
speaker that is just as capable of good bass response as your main left and
right speakers. In this mode, all the center channel information remains in
the center channel output.
DELAY TIMES
Delay times available in Dolby Surround : 15 to 30 mS (milliseconds)
Delay times available in Dolby Digital (AC-3) : 0 to 15 mS (milliseconds)
For most home theater setups, the 20mS setting works best. This setting
should be used if your front speakers are the about the same distance
away from the listening position as the surround speakers are located.
Choose the 30mS setting only if you are sitting much closer to the surround
speakers than to the front speakers. Choose the 15mS setting
if you are further away from the surround speakers than you are to the
front speakers.
4. DOLBY 3 STEREO
This mode of operation is available to provide a center channel image for
stereo program sources that are not encoded with surround sound. This
is use for watching older movies or TV shows that are recorded in stereo,
particularly if your speakers are located relatively far apart from each other.
In this way, dialogue will be correctly located at the video screen, while the
stereo information will provide off-screen imaging. Only NORMAL and
WIDE center channel modes are available in 3 STEREO Mode. Delay time
is 0mS because the SURROUND channel is off.
5. THEATER
This setting creates the same intimate feeling as you get in a theater when
watching plays, musicals and solo acts.
6. HALL
This mode provides the ambiance of a concert hall for live, un-amplified
classical music sources such as orchestral, chamber music or solo
instrumentals.
7. STADIUM
The reverberation and open air atmosphere of a rock concert or sporting
event is created by this setting, when playing stereo (but not mono) source
material.
8. CHURCH
This mode provides the reverberant ambiance of a church, which can
enhance choral works, as well as adding a rich ambient effect to "dry"
studio recordings.
DOLBY PRO-LOGIC SURROUND
[Speaker Selection and Placement]
Front Speakers: These should be full-range, high quality speakers; the
best speakers in your system. They should be located far enough from
each side of your TV monitor to provide a well defined stereo image. The
TV monitor should be located midway between the left and right front
speakers. You may use smaller speakers if you are using a sub-woofer with
your system.
Surround Speakers: The rear speakers in your surround sound system
provide ambient sound for an open, "concert hall" effect when listening
to music. They also spread the sound and provide special effects on video
soundtracks when used in the Dolby Surround mode.
The demands made on your surround speakers are far less than on your
main speakers. Therefore, these speakers do not need to be as large (and
as expensive) as your main speakers. Deep bass response is not important
at all. Good 2-way bookshelf speakers will handle the job easily, and most
full-range mini-monitors are also quite suitable for this application. De-
pending on how extensive you want to get with your installation, there are
also several in-wall and wall-mount speakers that are suitable for use as
surround sound speakers. Dipole-type surround speakers can provide
even wider dispersion, with a diffused sound field which provides envel-
oping surround sound effects.
The surround channel speakers should be mounted so that their sound is
dispersed throughout the viewing area.
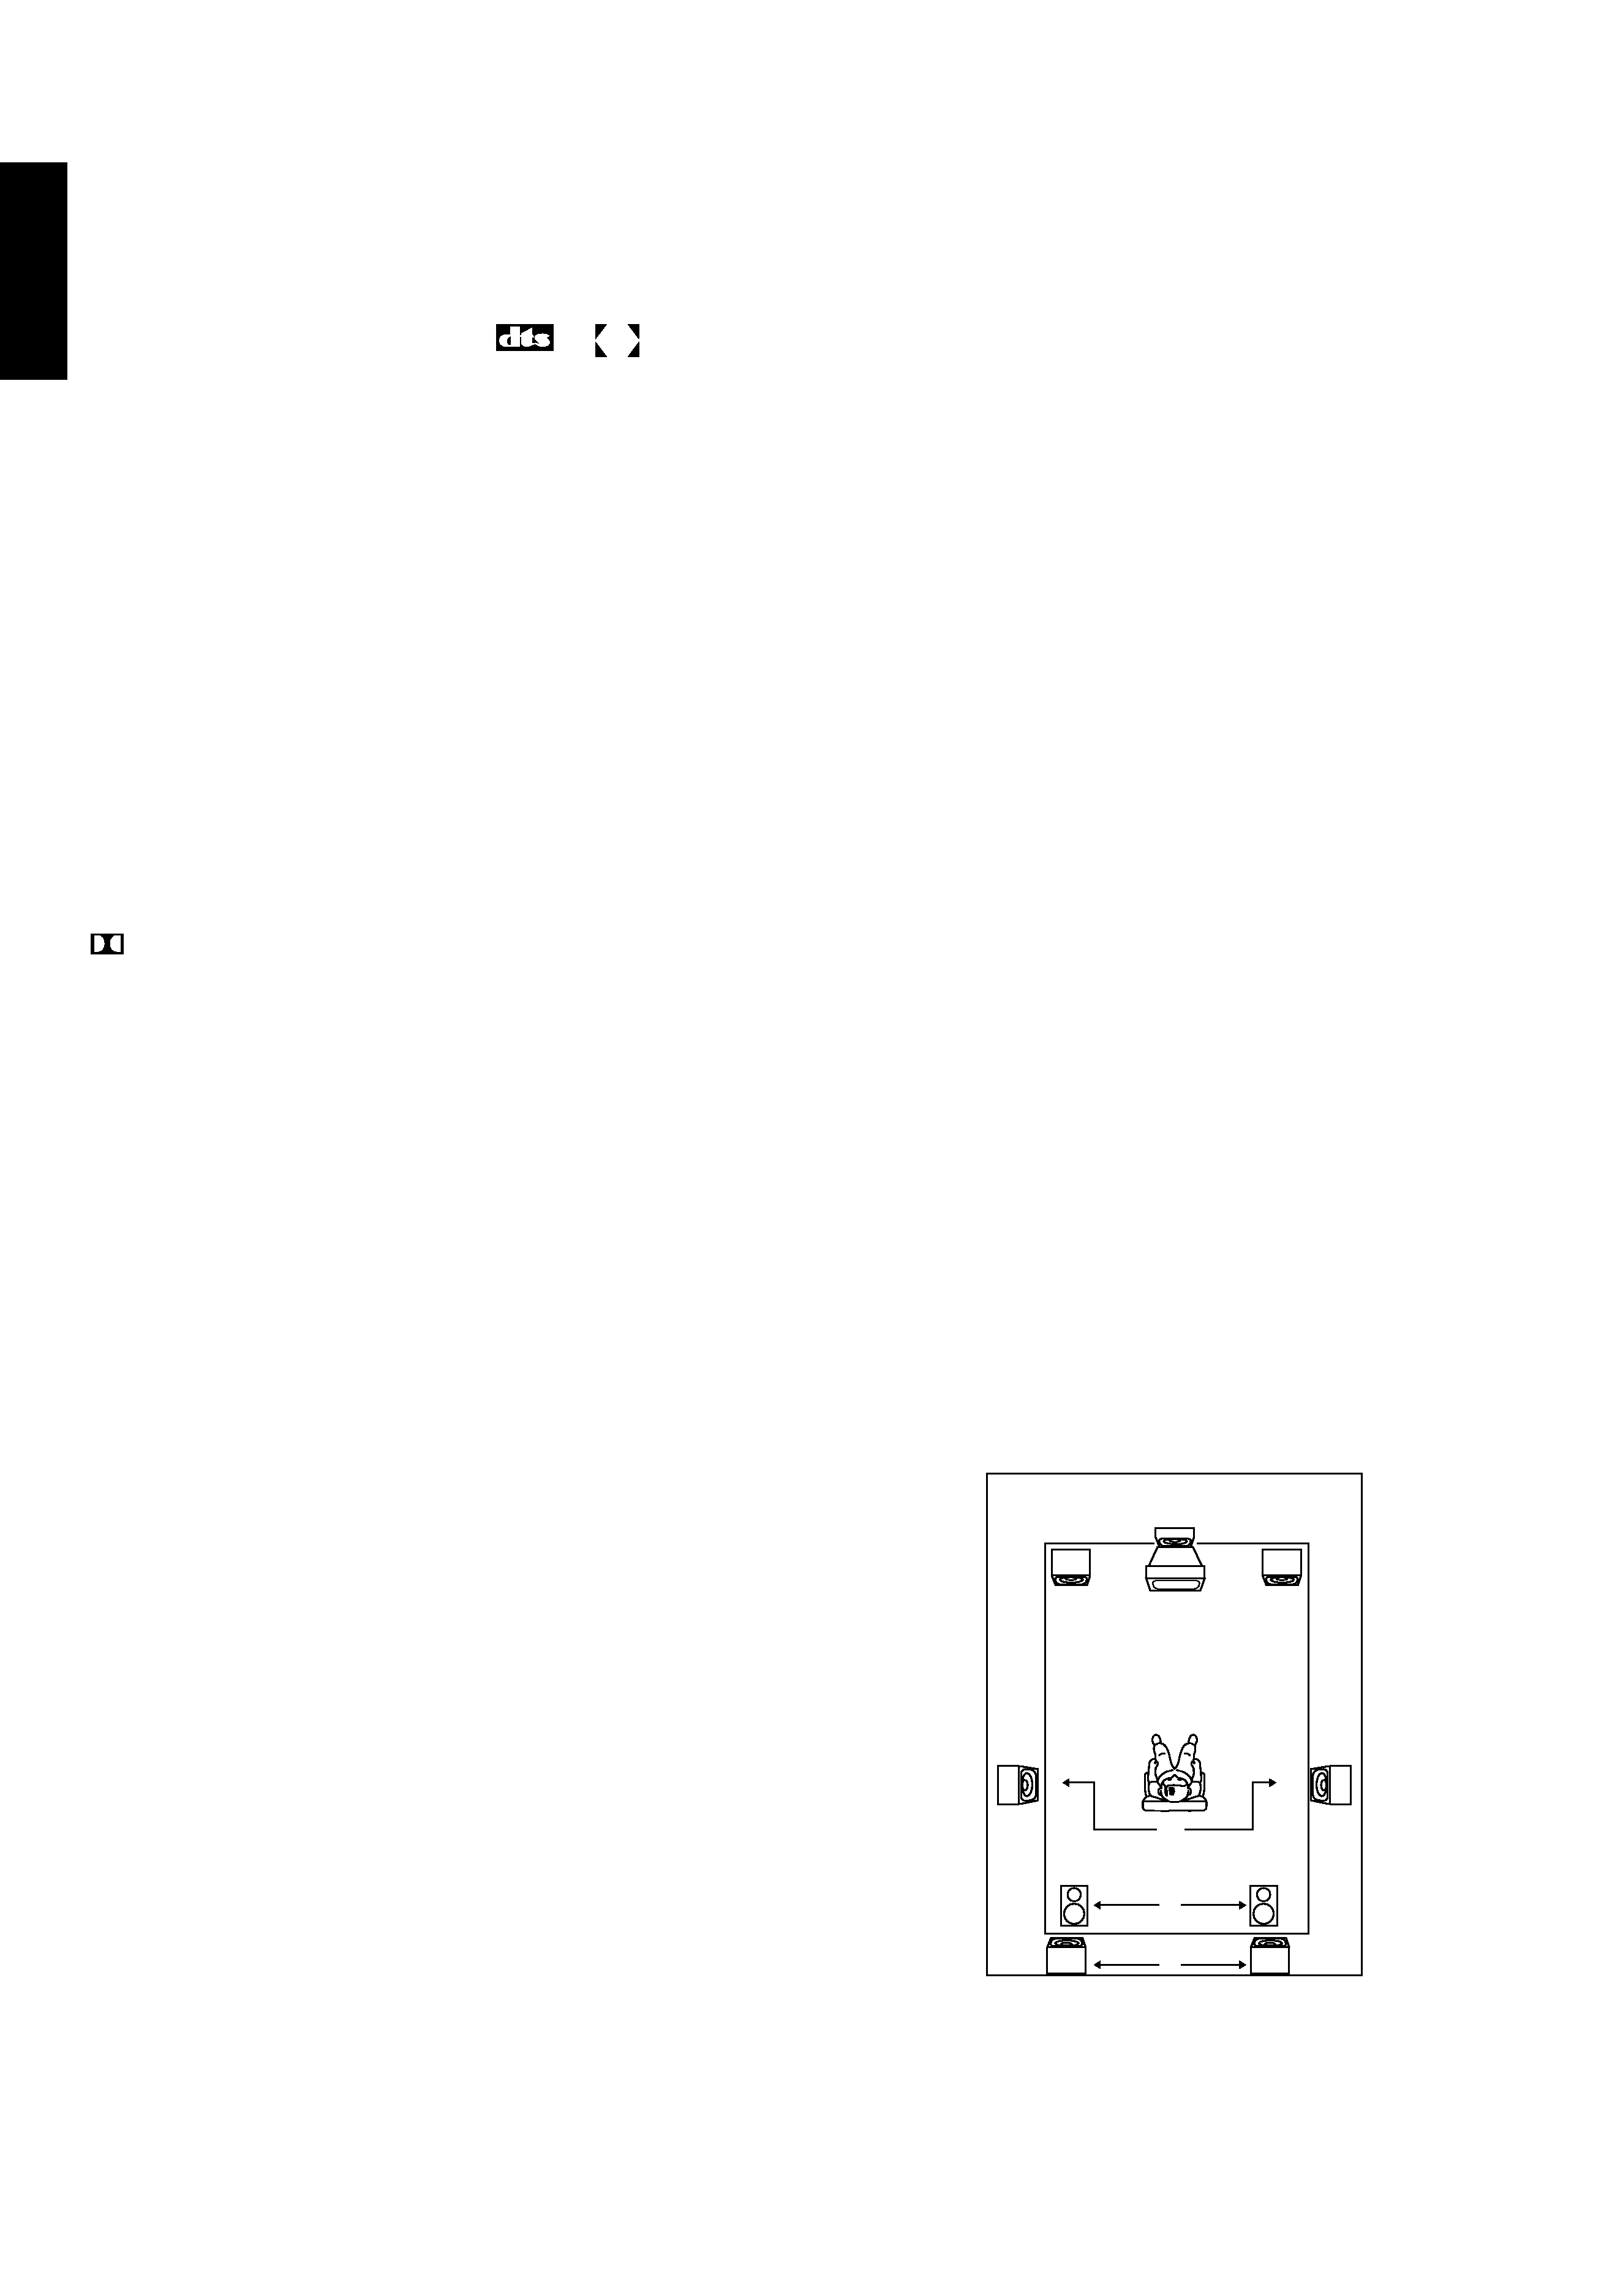
Ideally, you should install the surround speakers along the side walls of the
listening room, directly above and to the left and right to the listeners or
slightly behind them. Their height should be about 1 meter higher than the
level of the listener's ears. (Figure 1-A). This will provide the best surround
sound effect and should be used with both conventional direct-radiating as
well as dipole speaker types. If this is not possible or practical, then try
mounting the surround speakers on the back wall of the room, and aim
them so that they are not firing directly sounds do not reach directly toward
the listener's ears. (Figure 1-B) Another approach is to mount the speakers
facing upward so that their sound is dispersed by the ceiling and rear wall
(Figure 1-C).
A
C
B
Figure 1.
4
Figure 1. Surround Speaker Options
Option A:
Placed or mounted along side walls
Option B:
Placed or mounted behind listeners
Option C:
Placed or mounted facing upward