
QUICK START GUIDE
TM
DIGIT AL
8·BUS
MACKIE'S 56-INPUT, 72-CHANNEL, FULLY AUTOMATED DIGITAL AUDIO MIXING CONSOLE

TABLE OF CONTENTS
1. Introduction ............................................................................................................. 3
About the Quick Start Guide ...................................................................................................... 3
Unpacking...............................................................................................................................3
2. The Basics ............................................................................................................... 5
The Traditional Split-Console Approach ........................................................................................ 5
Three Things to Keep in Mind .............................................................................................. 5
Tracking ........................................................................................................................... 5
Monitoring ....................................................................................................................... 6
Overdubbing/Bouncing Tracks ............................................................................................. 6
Mixdown ......................................................................................................................... 7
Signal-flow Diagram ................................................................................................................ 7
3. Tutorial Hookup -- Let's Get It Working! .................................................................. 8
Hookup Stuff .......................................................................................................................... 8
Power-Up...............................................................................................................................9
Start-up ............................................................................................................................. 10
System Options .............................................................................................................. 10
Downloading Plug-Ins ...................................................................................................... 10
Getting Sound Out ................................................................................................................. 11
Preparing to Record ............................................................................................................... 11
Saving Your Session ............................................................................................................... 14
Creating a Default Snapshot .................................................................................................... 14
4. General Guidelines ................................................................................................. 15
Three Things to Keep in Mind (Reprise) ..................................................................................... 15
Setting Levels ....................................................................................................................... 15
Input Sensitivity Adjustment Procedure for Channels 1-24 .................................................... 15
Using Internal Channel Processing and Internal Effects................................................................. 16
EQ ............................................................................................................................. 16
Gate ............................................................................................................................. 17
Compressor .................................................................................................................... 17
Internal Effects ............................................................................................................... 17
Plug-Ins .................................................................................................................. 17
MFX .................................................................................................................... 17
IVL Vocal Studio .................................................................................................... 19
IVL Vocal Studio: Harmony Example ............................................................................ 19
Using External Effects............................................................................................................. 23
Soloing
............................................................................................................................. 24
5. Hookup for Multitrack Recording ............................................................................ 26
Hookup for Tracking ............................................................................................................... 27
Monitoring ..................................................................................................................... 27
Hookup for Mixdown ............................................................................................................. 29
6. Hookup for Live Mixing (D8·SR) ............................................................................ 30
Setting up Monitor Mixes ....................................................................................................... 31
7. Digital 8·Bus Overview ......................................................................................... 32
Channel Strip Description ........................................................................................................ 32
Master Section Description ...................................................................................................... 32
Rear Panel Description ........................................................................................................... 36
Remote CPU Description ......................................................................................................... 38
Connecting a Mouse, Keyboard, and SVGA Monitor ............................................................. 38
Other Connections ........................................................................................................... 38
Automation .................................................................................................................... 39
Remote CPU Rear Panel View ................................................................................................. 40
Top Panel View ..................................................................................................................... 41
Rear Panel View ................................................................................................................... 42

TM
Mackie Designs Inc.
16220 Wood-Red Rd. NE · Woodinville, WA 98072 · USA
800/898-3211 · Outside the US: 425/487-4333
Fax: 425/487-4337 · www.mackie.com
email: [email protected]
©1998 Mackie Designs Inc. All rights reserved. #820-075-00
Q
u
i
c
k
S
t
a
r
t
G
u
i
d
e
3
Introduction
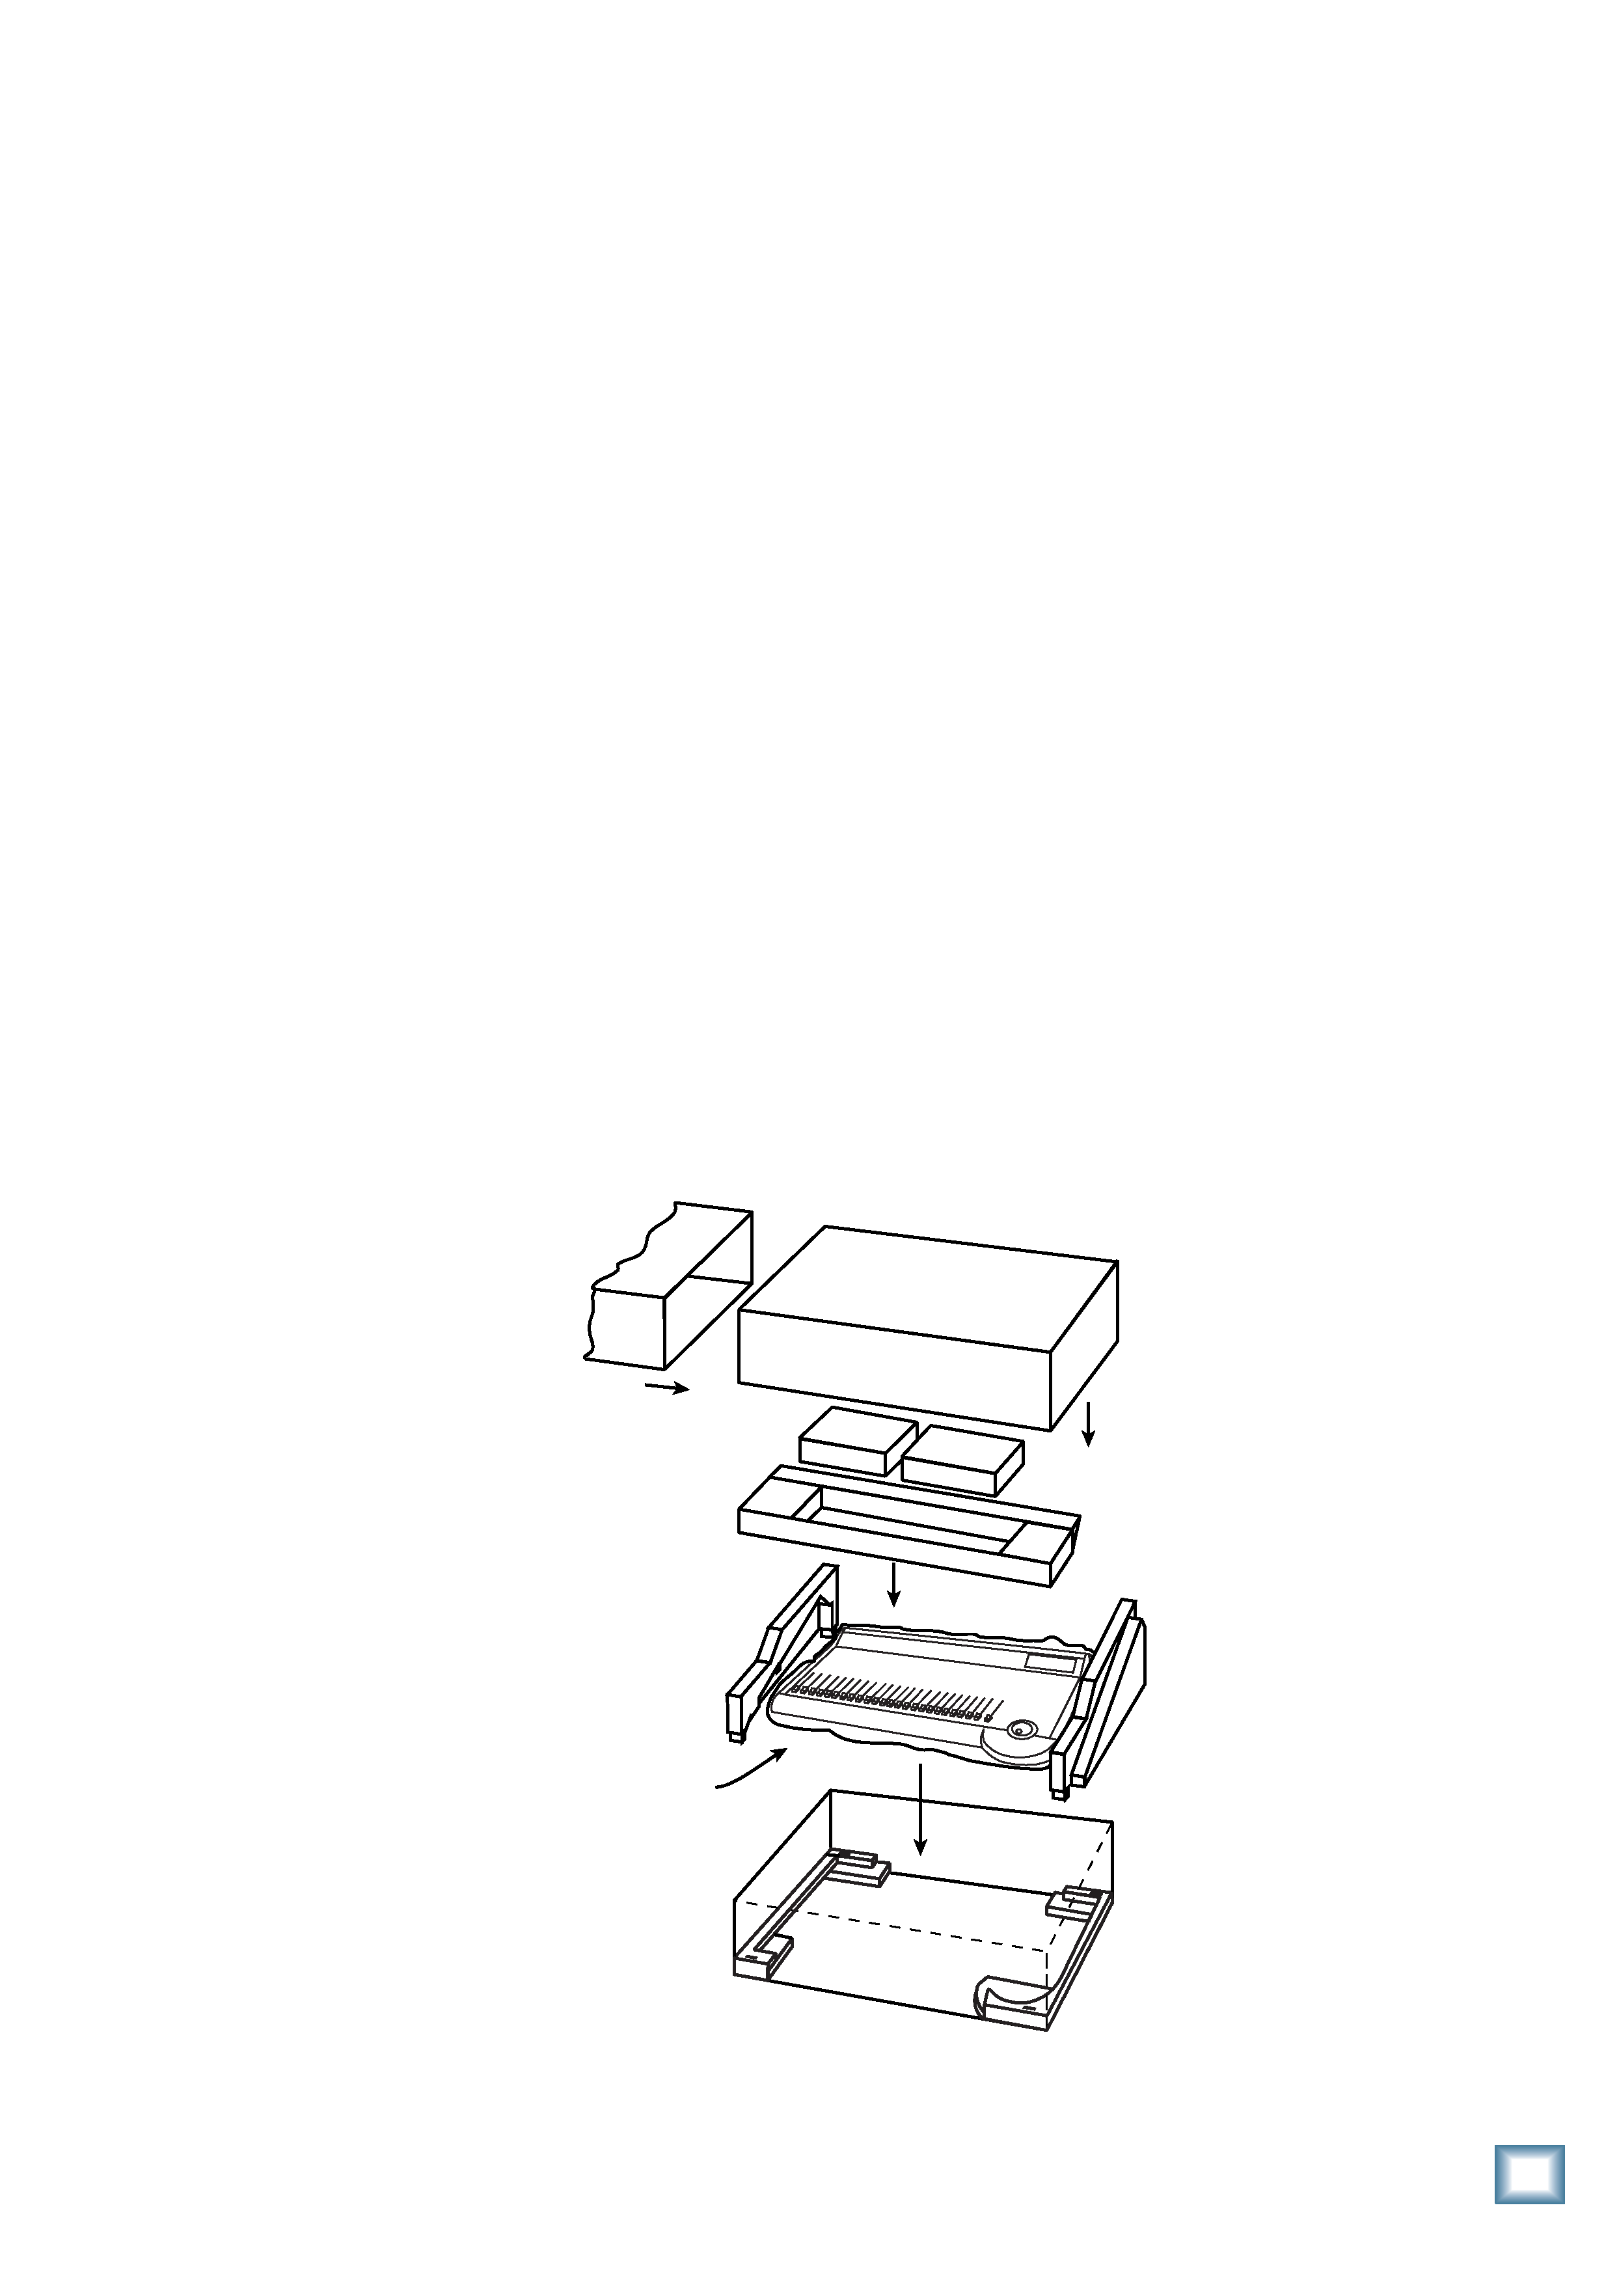
Figure 1. Unpacking the Console
1. Introduction
Now you've done it! You've just invested in
the newest generation of affordable digital
mixing consoles by Mackie Designs. Whether
or not you've used digital mixing consoles
before, you will be pleased by the analog feel of
our Digital 8·Bus, and by how easy it is to use.
Greg Mackie has been designing and building
analog mixers for years (since the TAPCO days
of the early '70s), and one of the prime direct-
ives for our first digital mixing console was to
make it as easy to use as an analog mixer.
The Digital 8·Bus combines the best of both
worlds, providing an intuitive control surface
for mixing the old-fashioned way -- with
faders and knobs -- and providing connections
for a mouse, keyboard, and video monitor for
performing computer-oriented functions such
as file maintenance and editing. Of course, you
can perform virtually all the same mixing
functions on the video monitor as you can on
the control surface, so you have the flexibility
to choose what works best for you.
About The Quick Start Guide
This Quick Start Guide is designed to help
you get going right away. Use it, along with the
Quick Start Video, to learn the basics of setting
up and using the Digital 8·Bus. But eventually
you will have to crack open the Digital 8·Bus
Owner's Manual to gain a
more in-depth understanding
of what the Digital 8·Bus
can do for you.
Unpacking
Obviously, you've already opened the box if
you're reading this manual. Here are some
helpful hints on unpacking:
· The Digital 8·Bus comes in two parts, each
packed in a separate box: The Console and
the Remote CPU.
The Console
· If you haven't removed the Digital 8·Bus
from the packing box yet, remove the
accessory tray containing the manuals,
video, and miscellaneous literature.
· Remove the foam blocks from the ends of
the console. Just lift up on them and they'll
come right out. The Digital 8·Bus weighs 65
pounds, so we recommend enlisting the help
of another person to assist in lifting it out of
the box. Position one person on each end of
the box and, on the count of three, lift the
console (remember: back straight, lift with
your legs!).
· Place the console on a flat surface, like the
floor next to the packing box, or a table top
large enough for the Digital 8·Bus to sit on.
· Remove the plastic bag from around the
console.
· Please save the box, the outer sleeve, and
all the foam innards. If you need to ship your
Digital 8·Bus anywhere, using the original
carton is the best way to do it.
Part No. 820-075-00 Rev. A 8/98
©1998 Mackie Designs Inc., All Rights Reserved. Printed in the U.S.A.
box top
accessories
accessory tray
outer sleeve
right side
foam
left side
foam
box bottom
right side
lower foam
left side
lower foam
factory fresh
console in
plastic bag
D
i
g
i
t
a
l
8
·
B
u
s
4
Introduction
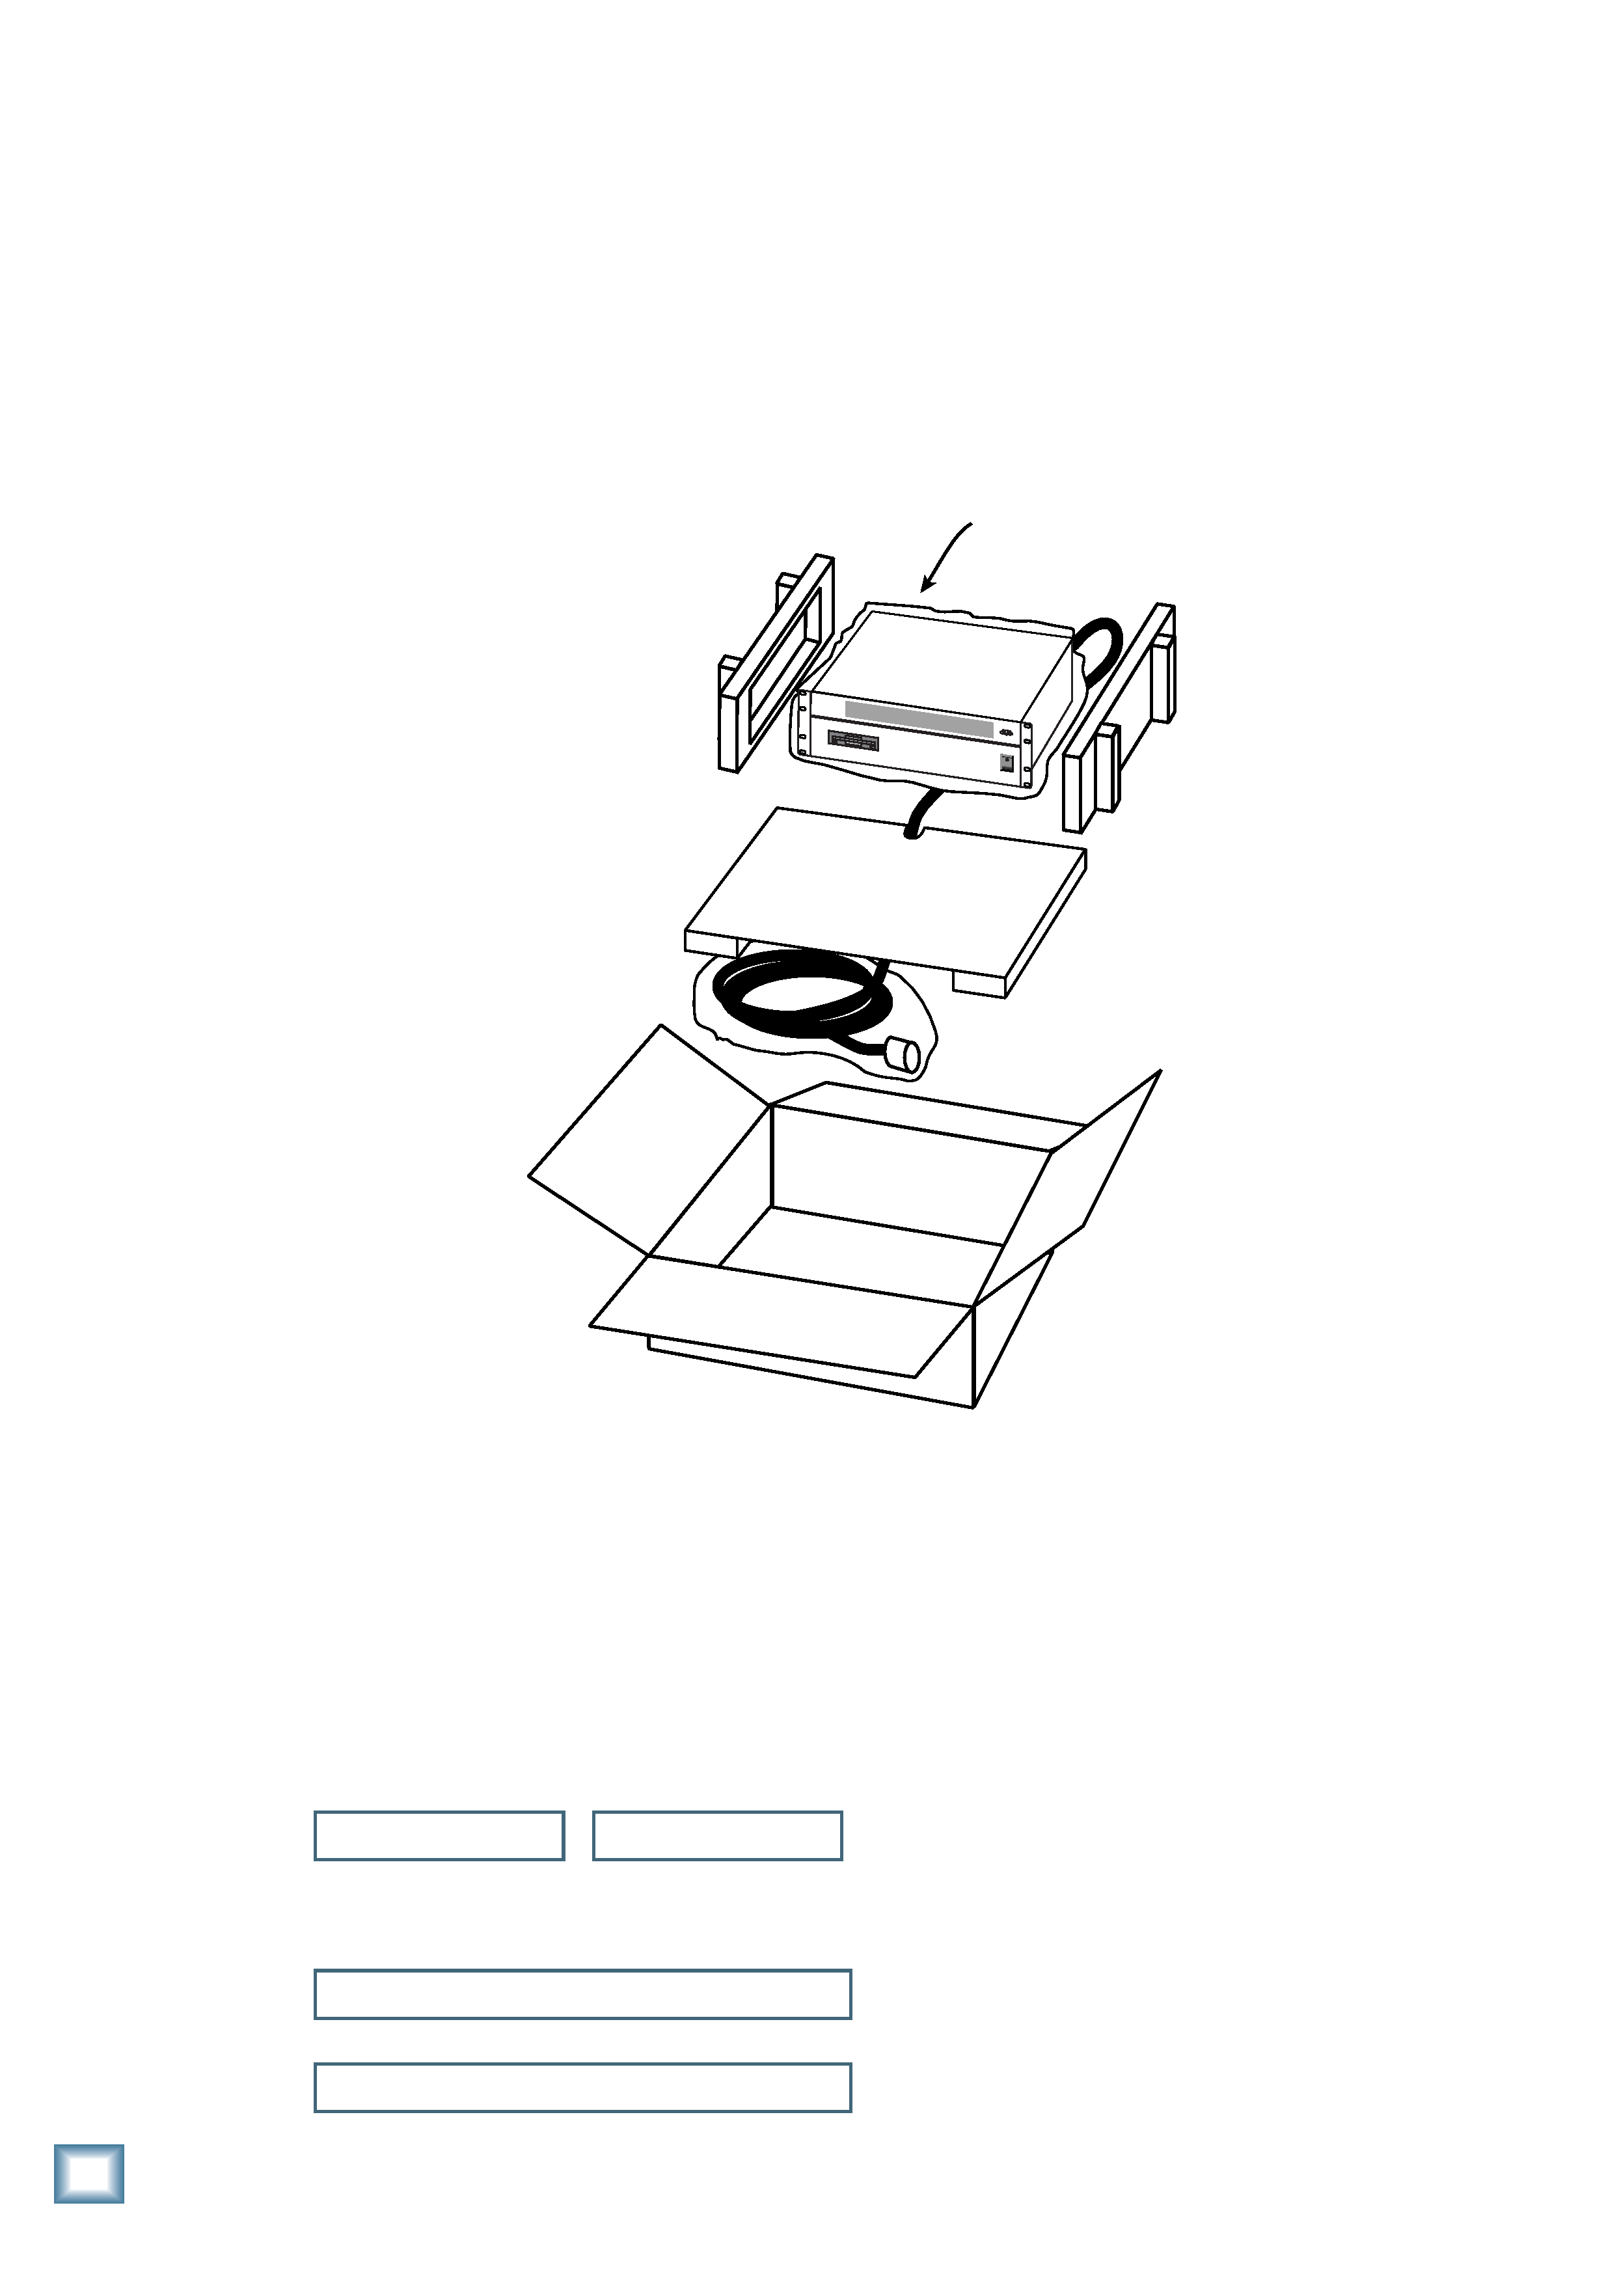
Figure 2. Unpacking the Remote CPU
The Remote CPU
· Use a sharp knife to cut the tape on the top
of the box.
· Open the flaps to expose the Remote CPU
inside.
· Lift the Remote CPU up and out of the
packing box. The foam blocks will come
with it, and the bottom tray will lift up also.
The DC Power Cable is coiled up underneath
the bottom tray.
· Set the Remote CPU on a flat surface, like the
floor next to the packing box, or a table top.
right side
foam
left side
foam
remote cpu
in plastic bag
connection cord
in plastic bag
bottom tray
remote cpu
box
ON
OFF
POWER
Take a moment now to fill out the Product
Registration Card located in the back of the
Digital 8·Bus Owner's Manual. Mailing it in will
automatically put you on our mailing list so you
can get updated information, so do it today.
Also, write the serial numbers of your
Digital 8·Bus console and Remote CPU here
so you'll always have them.
Console
Remote CPU
Purchased at:
Date Purchased:
· Remove the DC Power Cable from the
bottom tray.
· Remove the foam blocks from the sides of
the Remote CPU.
· Remove the plastic bag from around the
Remote CPU, and the plastic bag from
around the DC Power Cable.