1
AUX
U
1
2
3
4
5
6
U
U
U
+15
00
+15
00
+15
00
+15
00
5/6
SHIFT
+15
15
0
HI
+15
15
0
MID
+12
12
0
LO
EQ
0
R
L
PAN
SOLO
MUTE
ALT 3/4
OL
+20
U
00
1
MON
AUX
U
1
2
3
4
5
6
U
U
U
+15
00
+15
00
+15
00
+15
00
5/6
SHIFT
+15
15
0
HI
0
MID
0
LO
EQ
0
R
L
PAN
SOLO
MUTE
ALT 3/4
OL
+ 20
U
00
2
MON
AUX
U
1
2
3
4
5
6
U
U
U
+15
00
+15
00
+15
00
+15
00
5/6
SHIFT
+15
15
0
HI
0
MID
0
LO
EQ
0
R
L
PAN
SOLO
MUTE
ALT 3/4
OL
+20
U
00
3
MON
AUX
U
1
2
3
4
5
6
U
U
U
+15
00
+15
00
+15
00
+15
00
5/6
SHIFT
+15
15
0
HI
0
MID
0
LO
EQ
0
R
L
PAN
SOLO
MUTE
ALT 3/4
OL
+20
U
00
4
MON
AUX
U
1
2
3
4
5
6
U
U
U
+15
00
+15
00
+15
00
+15
00
5/6
SHIFT
+15
15
0
HI
0
MID
0
LO
EQ
0
R
L
PAN
SOLO
MUTE
ALT 3/4
OL
+20
U
00
5
MON
AUX
U
1
2
3
4
5
6
U
U
U
+15
00
+15
00
+15
00
+15
00
5/6
SHIFT
+15
15
0
HI
0
MID
0
LO
EQ
0
R
L
PAN
SOLO
MUTE
ALT 3/4
OL
+20
U
00
6
MON
AUX
U
1
2
3
4
5
6
U
U
U
+15
00
+15
00
+15
00
+15
00
5/6
SHIFT
+15
15
0
HI
0
MID
0
LO
EQ
0
R
L
PAN
SOLO
MUTE
ALT 3/4
OL
+20
U
00
7
MON
AUX
U
1
2
3
4
5
6
U
U
U
+15
00
+15
00
+15
00
+15
00
5/6
SHIFT
+15
15
0
HI
0
MID
0
LO
EQ
0
R
L
PAN
SOLO
MUTE
ALT 3/4
OL
+20
U
00
8
MON
AUX
U
1
2
3
4
5
6
U
U
U
+15
00
+15
00
+15
00
+15
00
5/6
SHIFT
+15
15
0
HI
0
MID
0
LO
EQ
0
R
L
PAN
SOLO
MUTE
ALT 3/4
OL
+20
U
00
9
MON
AUX
U
1
2
3
4
5
6
U
U
U
+15
00
+15
00
+15
00
+15
00
5/6
SHIFT
+15
15
0
HI
0
MID
0
LO
EQ
0
R
L
PAN
SOLO
MUTE
ALT 3/4
OL
+20
U
00
10
MON
AUX
U
1
2
3
4
5
6
U
U
U
+15
00
+15
00
+15
00
+15
00
5/6
SHIFT
+15
15
0
HI
0
MID
0
LO
EQ
0
R
L
PAN
SOLO
MUTE
ALT 3/4
OL
+20
U
00
11
MON
AUX
U
1
2
3
4
5
6
U
U
U
+15
00
+15
00
+15
00
+15
00
5/6
SHIFT
+15
15
0
HI
0
MID
0
LO
EQ
0
R
L
PAN
SOLO
MUTE
ALT 3/4
OL
+20
U
00
12
MON
AUX
U
1
2
3
4
5
6
U
U
U
+15
00
+15
00
+15
00
+15
00
5/6
SHIFT
+15
15
0
HI
0
MID
0
LO
EQ
0
R
L
PAN
SOLO
MUTE
ALT 3/4
OL
+20
U
00
13
MON
AUX
U
1
2
3
4
5
6
U
U
U
+15
00
+15
00
+15
00
+15
00
5/6
SHIFT
+15
15
0
HI
0
MID
0
LO
EQ
0
R
L
PAN
SOLO
MUTE
ALT 3/4
OL
+20
U
00
14
MON
AUX
U
1
2
3
4
5
6
U
U
U
+15
00
+15
00
+15
00
+15
00
5/6
SHIFT
+15
15
0
HI
0
MID
0
LO
EQ
0
R
L
PAN
SOLO
MUTE
ALT 3/4
OL
+20
U
00
15
MON
AUX
U
1
2
3
4
5
6
U
U
U
+15
00
+15
00
+15
00
+15
00
5/6
SHIFT
+15
15
0
HI
0
MID
0
LO
EQ
0
R
L
PAN
SOLO
MUTE
ALT 3/4
OL
+20
U
U
00
16
MON
U
1
2
3
4
U
U
U
+20
00
+20
00
+20
00
+20
00
C
1
2
3
4
C
C
C
R
L
1
2
3
4
STEREO AUX RETURNS
R
L
R
L
R
L
LEVEL
BALANCE
MONO
AUX
SOLO
+10
00
00
1/LEFT
2/RIGHT
LEVEL
SOLO/PHONES
MAIN OUTPUT
MUTE
SOLO
TO
MAIN
ALT PREVIEW
POWER
SOLO
LEVEL
-20
-16
-12
-8
-4
0
+2
+4
+8
CLIP
CR1604
16 CHANNEL MIC/LINE MIXER
2
34567
8
9
10
11
12
13
14
15
16
PHANTOM
MAINS
CR1604 16 CHANNEL MIC/LINE MIXER
LAMP 12 VAC
+4
25
13
U
10 ·
UNBALANCED LINE INPUTS
+4
25
14
U
10 ·
+4
25
15
U
10 ·
+4
25
16
U
10 ·
LEFT
RIGHT
BUSS INSERT
LEFT
RIGHT
ALT 3/4 OUT
3
6
2
5
1
4
MONITOR
LEFT
RIGHT
AUX OUTPUTS
MONO
BAL MAIN OUT
MAINS
PHANTOM
+48V
6
5
4
3
2
1
LOW Z BALANCED MICROPHONE INPUTS
BALANCED/UNBALANCED LINE INPUTS
+4
25
7
U
10 ·
+4
40
6
U
10
·
+4
40
5
U
10
·
+4
40
4
U
10
·
+4
40
3
U
10
·
+4
40
2
U
10
·
+4
40
1
U
10
·
SENSITIVITY
ADD 10dB FOR
MIC INPUTS
4
8
+4
25
8
U
10 ·
3
7
2
6
1
5
+4
25
9
U
10 ·
+4
25
10
U
10 ·
+4
25
11
U
10 ·
+4
25
12
U
10 ·
CHANNEL ACCESS
TIP=OUT
RING=IN
4
3
2
1
AUX RETURNS
L
R
+15
15
+12
12
+15
15
+12
12
+15
15
+12
12
+15
15
+12
12
+15
15
+12
12
+15
15
+12
12
+15
15
+12
12
+15
15
+12
12
+15
15
+12
12
+15
15
+12
12
+15
15
+12
12
+15
15
+12
12
+15
15
+12
12
+15
15
+12
12
+15
15
+12
12
1
CR-1604 OWNER'S MANUAL
2
9. Object and Liquid Entry -- Care should be taken so that
objects do not fall into and liquids are not spilled into the
inside of the CR-1604.
10. Damage Requiring Service -- The CR-1604 should be
serviced only by qualified service personnel when:
A. Objects have fallen onto, or liquid has spilled into the
CR-1604; or
B. The CR-1604 has been exposed to rain; or
C. The CR-1604 does not appear to operate
normally or exhibits a marked change in performance; or
D The CR-1604 has been dropped, or its chassis damaged.
11. Servicing -- The user should not attempt to service the
CR-1604 beyond those means described in this operating
manual. All other servicing should be referred to the Mackie
Service Department. See page 21.
12. To prevent electric shock, do not use this polarized plug
with an extension cord, receptacle or other outlet unless the
blades can be fully inserted to prevent blade exposure.
Pour préevenir les chocs électriques ne pas utiliser cette fiche
polariseé avec un prolongateur, un prise de courant ou une
autre sortie de courant, sauf si les lames peuvent être insérées
à fond sans laisser aucune pariie à découvert.
13. Grounding or Polarization -- Precautions should be
taken so that the grounding or polarization means of the
CR-1604 is not defeated.
This apparatus does not exceed the Class A/Class B
(whichever is applicable) limits for radio noise emissions from
digital apparatus as set out in the radio interference
regulations of the Canadian Department of Communications.
ATTENTION --Le présent appareil numérique n'émet pas de
bruits radioélectriques dépassant las limites applicables aux
appareils numériques de class A/de class B (selon le cas)
prescrites dans le règlement sur le brouillage radioélectrique
édicté par les ministere des communications du Canada.
WARNING -- To reduce the risk of fire or electric shock, do
not expose this appliance to rain or moisture.
CAUTION
AVIS
RISK OF ELECTRIC
SHOCK
DO NOT OPEN
RISQUE DE CHOC ELECTRIQUE
NE PAS OUVRIR
CAUTION: TO REDUCE THE RISK OF ELECTRIC SHOCK
DO NOT REMOVE COVER (OR BACK)
NO USER-SERVICEABLE PARTS INSIDE
REFER SERVICING TO QUALIFIED PERSONNEL
ATTENTION: POUR EVITER LES RISQUES DE CHOC
ELECTRIQUE, NE PAS ENLEVER LE COUVERCLE. AUCUN
ENTRETIEN DE PIECES INTERIEURES PAR L'USAGER. CONFIER
L'ENTRETIEN AU PERSONNEL QUALIFIE.
AVIS: POUR EVITER LES RISQUES D'INCENDIE OU
D'ELECTROCUTION, N'EXPOSEZ PAS CET ARTICLE
A LA PLUIE OU A L'HUMIDITE
The lightning flash with arrowhead symbol within an equilateral
triangle is intended to alert the user to the presence of uninsulated
"dangerous voltage" within the product's enclosure, that may be
of sufficient magnitude to constitute a risk of electric shock to persons.
Le symbole éclair avec point de flèche à l'intérieur d'un triangle
équilatéral est utilisé pour alerter l'utilisateur de la présence à
l'intérieur du coffret de "voltage dangereux" non isolé d'ampleur
suffisante pour constituer un risque d'éléctrocution.
The exclamation point within an equilateral triangle is intended to
alert the user of the presence of important operating and maintenance
(servicing) instructions in the literature accompanying the appliance.
Le point d'exclamation à l'intérieur d'un triangle équilatéral est
employé pour alerter les utilisateurs de la présence d'instructions
importantes pour le fonctionnement et l'entretien (service) dans le
livret d'instruction accompagnant l'appareil.
Thank you!!
There are a lot of makes and models of
mixers out there today, all competing for your
hard earned dough... but you have voted with
your wallet for the folks in Woodinville who
specialize in mixers.
And you are in good company !! The
CR-1604 is the compact mixer of choice for
some of the world's top performing groups,
studio players, producers and soundtrack
composers. Even when they could buy any-
thing they wanted, they chose the CR-1604. So
congratulations on joining the other
V 4.1 2/95, Part No. 820-001-00
SAFETY INSTRUCTIONS
1. Read Instructions -- All the safety and operation
instructions should be read before the CR-1604 is operated.
2. Retain Instructions and Packaging -- The safety and
operating instructions should be kept for future reference. Also
keep the box and end caps, in case the unit needs to be
returned for service.
3. Heed Warnings -- All warnings on the CR-1604 and in
these operating instructions should be followed.
4. Follow Instructions -- All operating and other instructions
should be followed.
5. Water and Moisture -- The CR-1604 should not be used
near water -- for example, near a bathtub, washbowl,
kitchen sink, laundry tub, in a wet basement, near a
swimming pool, swamp or salivating St. Bernard dog, etc.
6. Heat -- The CR-1604 should be situated away from heat
sources such as radiators, or other devices which produce
heat.
7. Power Sources -- The CR-1604 should be connected to a
power source only of the type described in these operation
instructions or as marked on the CR-1604.
8. Power Cord Protection -- Power supply cords should be
routed so that they are not likely to be walked upon or
pinched by items placed upon or against them, paying
particular attention to cords at plugs, convenience receptacles,
and the point where they exit the CR-1604.
©1995 Mackie DesignsTM. All rights reserved.
Printed in the USA.
3
IF YOU IGNORE
MANUALS OR ARE JUST
HOT TO GET STARTED...
Please at least read the sections marked
with these two icons:
They cover information that is absolutely
critical or is unique to the CR-1604. But it's
still a good idea to read the whole manual
through at some point. We worked and slaved
to make this manual readable, understand-
able and informative and it's bound to have a
few nifty nuggets of knowledge you haven't
picked up from the school of hard nox.
In particular, sections
marked with A CLOSER
LOOK icon include in-
depth information...or at
least our own opinions.
INPUT/OUTPUT "POD"
SECTION DESCRIPTION, PG. 11
CONNECTION TIPS &
HOOKUP , PG. 15
POD ROTATION INSTRUCTIONS
PG. 20
SERVICE, BLOCK DIAGRAM,
AND SPECS PG. 21-26
DESCRIPTION OF CONTROLS
BEGINS ON PG. 4
DETAILED LEVEL-SETTING
PROCEDURE, PG. 19
VER
YIMPOR
TANT
If this is your first pro-mixer, please flip
through the whole book. If you're a seasoned
pro, at least read the sections with "QUICK
START" or "VERY IMPORTANT" icons next to
them. (However, we've found that truly expe-
rienced engineers usually read their owner's
manuals cover-to-cover anyway... so they can
continue to make those big bucks.)
The following chapters will take you on a
guided tour of your new mixer and explain
the inner workings of each control, as well as
how it relates to the rest of the mixer and
your particular application.
discerning musicians/recordists who have
found in this product the quality and perfor-
mance that has long been considered
unattainable in this class and price range.
Okay, enough stroking. Time to dig in!
There are only two things that we ask:
Read this manual. Sounds obvious, but in all
the excitement that goes along with the pur-
chase of a new piece of gear the new owner
often neglects to become as familiar as they
should with the product, and as a result
runs the risk of missing out on many of the cool
features and convenience that it can offer.
ACL
OSER
LOOK
QUICK
START
CONTROLS
& FEATURES
INPUT
OUTPUT
POD
HOOK
UP
LEVEL
SETTING
STEPS
CHANGING
THE POD
TECH
STUFF
Our
Engineering
Manager
thinks this
looks like a
bomb. But
actually it's a
genuine Buck
Rogers-style
space ship.
4
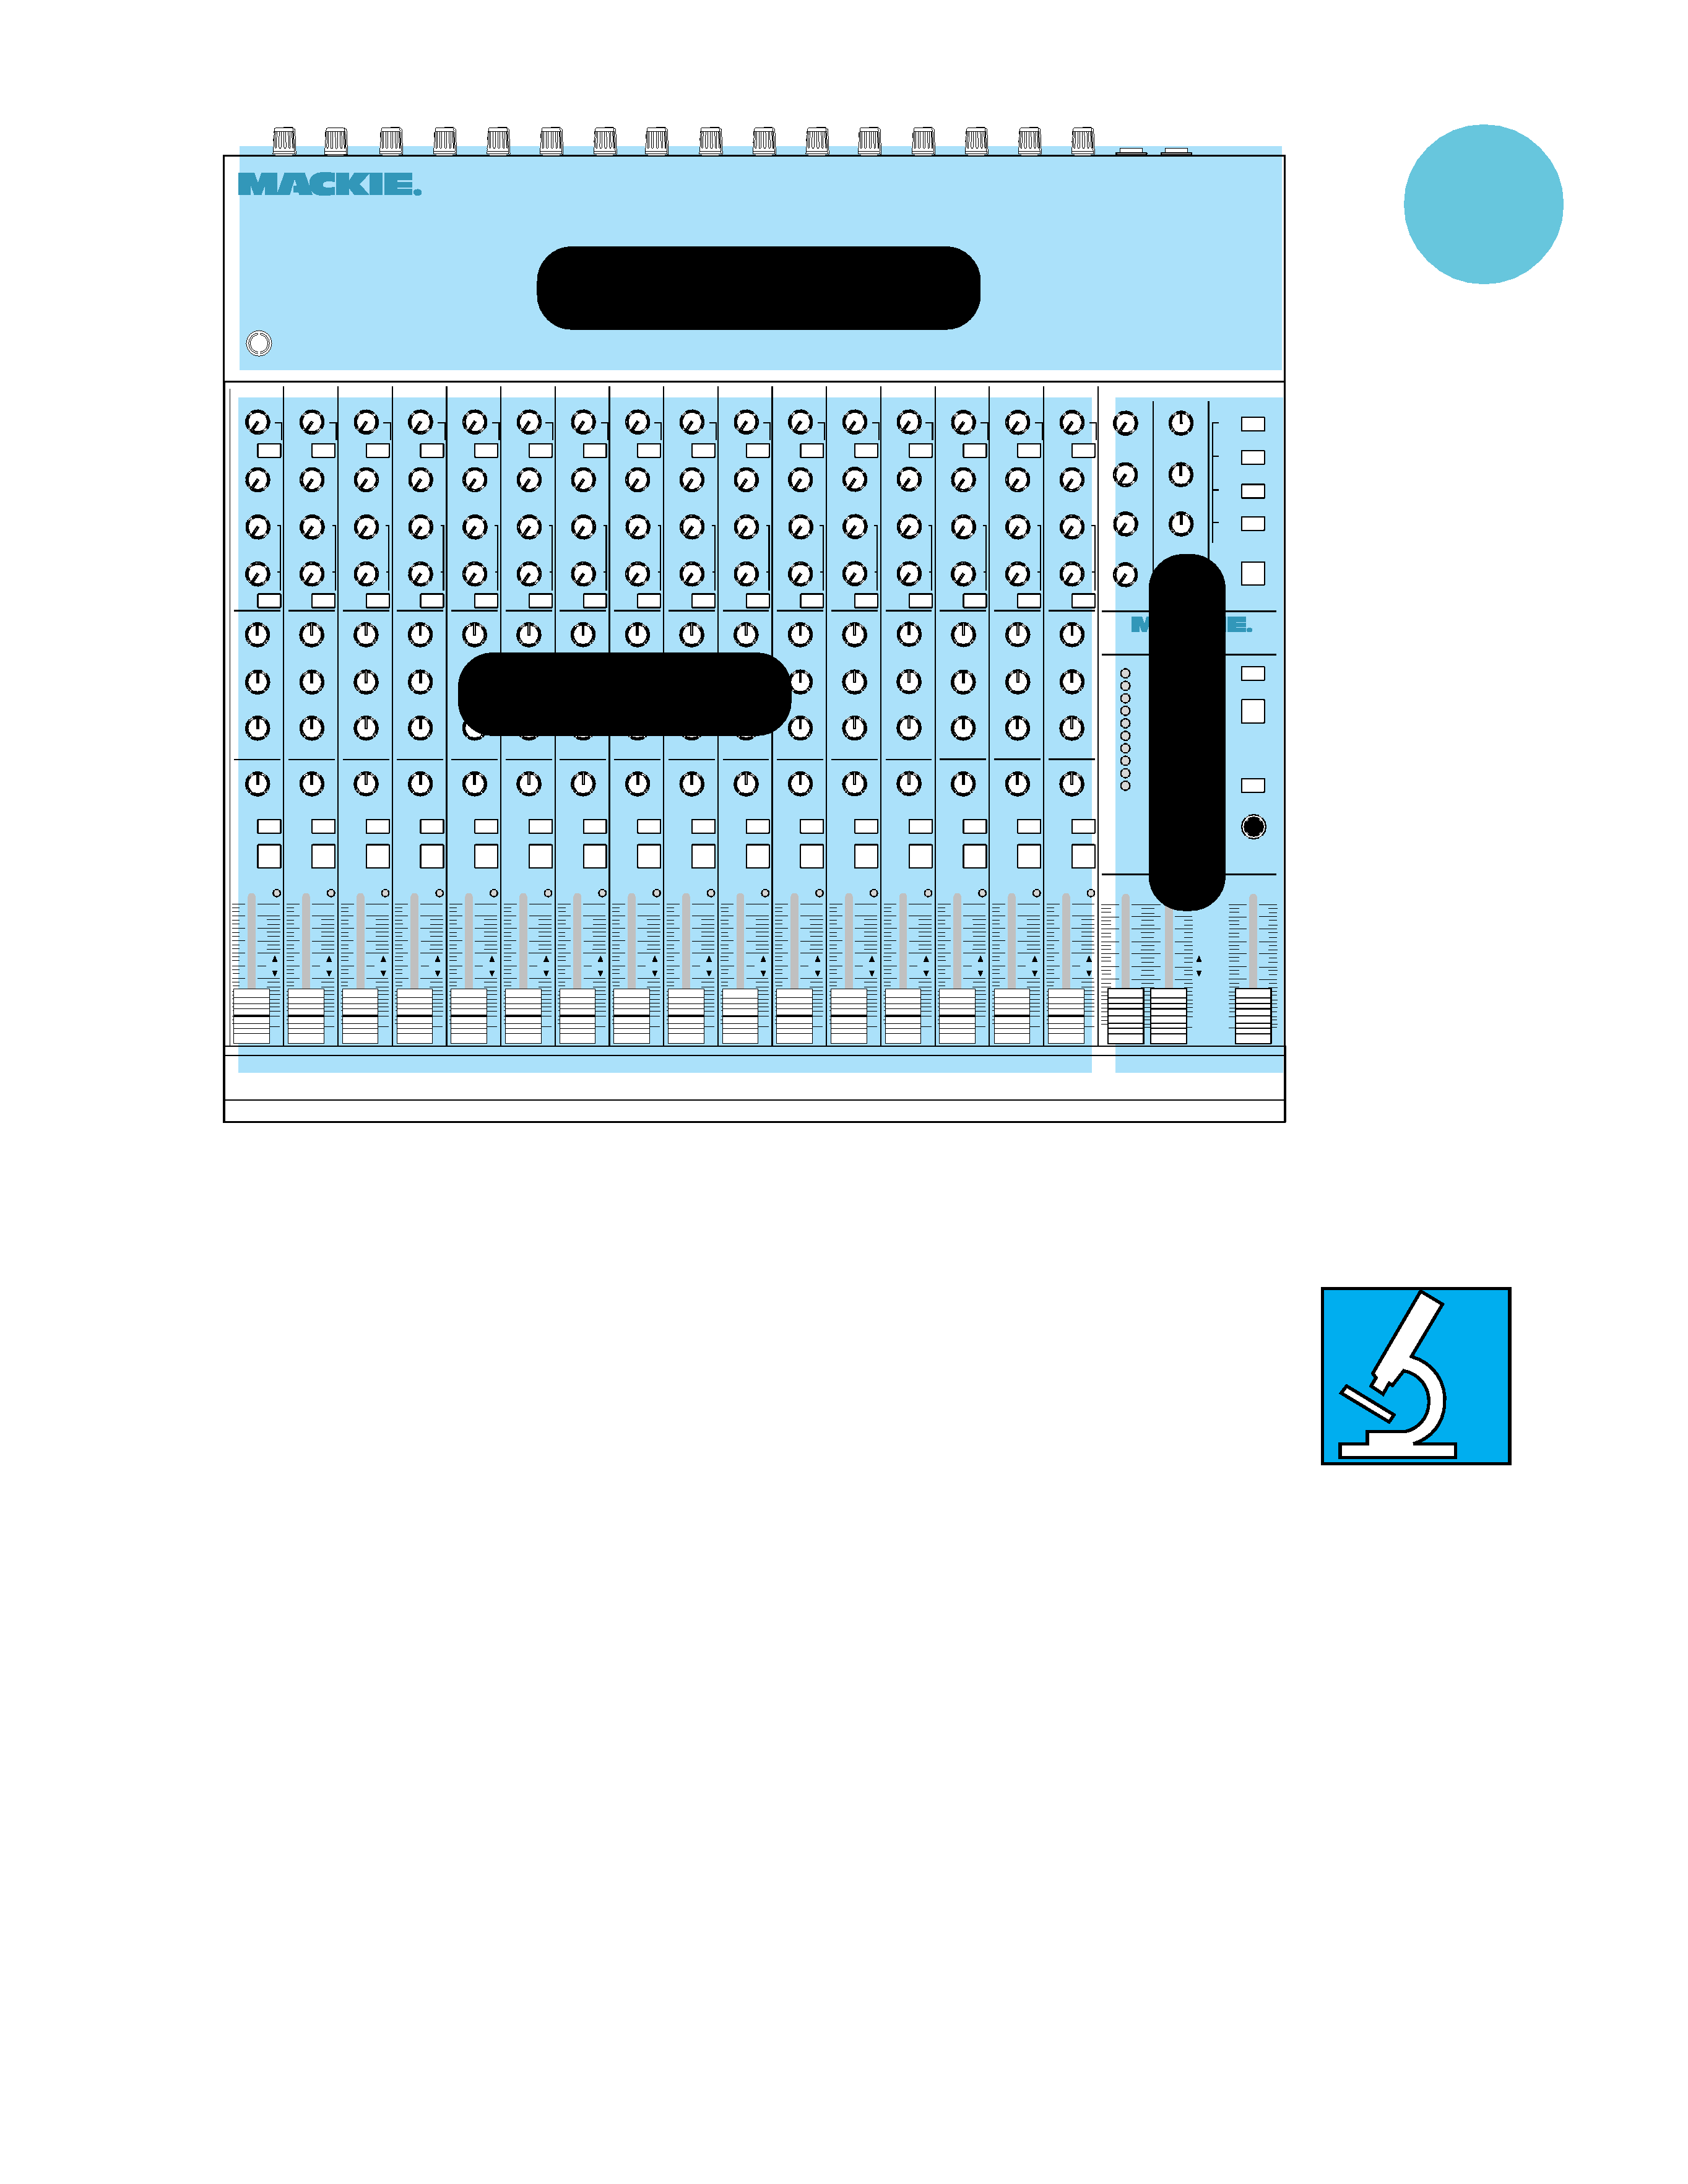
All the knobs and buttons on the CR-1604's
front panel can be broken down into sixteen
identical input modules (channel strips) plus
one Master Output section that's divided into
Aux Return and General Output sections (see
nifty diagram at right).
Each input channel strip can be divided
into four specific sections:
· The AUX SENDs, with knobs color-coded RED
· EQUALIZATION, color-coded BLUE
· PAN control, color-coded black, and
· the channel LEVEL CONTROL faders
All modern mixing boards utilize some
variation of this input module arrangement.
Once you've mastered the CR-1604's input
module layout, you should feel ready to take
on that old 132-channel Neve mixing desk
gathering dust in your Aunt Hattie's garage.
AUX SENDS
AUX 1, 2, 3 & 4
These controls are used to send the signal
out to outboard parallel effects processors
such as reverbs and delays. You may also use
an Aux Send to create a separate monitor mix
for stage monitors or headphone cues or gen-
erate separate mixes for recording.
There are a total of seven Aux Sends on
each CR-1604 channel strip. A combination of
four may be used at the same time.
NOTE: All of the
CR-1604's Aux sends have
a
very wide range of gain.
The first half of the
control's rotation reaches
from the off position to Unity Gain (0dB).
This half of the control's range corresponds to
the full range of a conventional mixer. The
second half of the control's rotation provides
you with even more gain, from Unity to
+15dB. For example, when you want a sound
super-"wet" (mostly reverb), the extra gain al-
lows you to bring the channel fader down
(and the send way up) so that the sound is
composed of predominantly reverb return
with just a touch of "dry" signal.
AUX 1/MON
This particular Aux control could be
viewed as the King of Sends, because of its
varied functions.
IMPORTANT
SENSITIVITY
ADJUSTMENT
PROCEDURE
To fully achieve the
CR-1604's impressive noise
and headroom specs, you should "tune" chan-
nel sensitivity of each channel to your
particular setup.
Can you run the mixer without this adjust-
ment? Sure. Chances are that you'll get pretty
good sound. But take a moment to adjust
things properly and you'll get excellent sound.
After all, it's your music.
Because we really want you to make this
adjustment, we've included a slightly more
detailed description of the process on page 19.
The basic procedure for adjustment is as
follows.
A. Set EQ controls approximately the way
they'll be used for that channel. If you don't
know in advance, just set them flat .
B. Turn the channel's PAN control all the way
to either the right or left.
C. Set Channel Fader to Unity (center detent).
D. Turn the channel's SENSITIVITY control
fully counter clockwise (+4 UNITY).
E. Press the channel's SOLO button and the
SOLO TO MAIN button over on the main
output section of the mixer.
F. Play through the channel at the same
volume and intensity that the channel is
going to handle during use. Turn the
channel's SENSITIVITY control clockwise
until the level on the CR-1604 meter (left
or right side, depending on which way you
have the PAN set) reads around OdB.
G. Set the EQ the way you think you'll want it,
then repeat step F.
H. Turn the channel's SOLO button off and
return the PAN control to center detent
position.
I. Repeat this procedure for each channel,
using the appropriate kind of source which
will be used with that channel.
1
Part1-- A GUIDED TOUR OF THE
CR-1604'S CONTROLS
QUICK
START
VER
YIMPOR
TANT
AUX
U
1
2
3
4
5
6
U
U
U
+15
00
+15
00
+15
00
+15
00
5/6
SHIFT
+15
15
0
HI
+15
15
0
MID
+12
12
0
LO
EQ
MON
1
VER
YIMPOR
TANT
+15
15
0
HI
+15
15
0
MID
+12
12
0
LO
EQ
0
R
L
PAN
SOLO
MUTE
ALT 3/4
OL
+20
U
00
9
+4
40
15
U
10 ·
9
-20
-16
-12
-8
-4
0
+2
+4
+8
CLIP
+4
40
15
U
10 ·
9
A
B
E
C
F
D
5
WUTZA DEEE-TENT?
Occasionally in this
manual you will see a
reference to detents. A
detent is a simple but
effective control feature
that will aid in easy re-
setting of your mixers
controls. It's simply a
notch in the movement
of the control compo-
nent, which determines a
neutral setting, such as
Unity on faders or center
on the PAN control. This
way you're either in de
tent or out of de tent, as
we say when camping up
here in the Northwest.
ACL
OSER
LOOK
Send 1 may be routed to AUX OUT 1 which
taps the signal downstream from the EQ cir-
cuitry and Channel Fader (we call this
Post-Fader/Post-EQ, meaning that the signal
will reflect any adjustments made to the fader
or EQ controls.)
Send 1 can also be routed to the MONITOR
OUT by pressing the MON button. This signal
is intercepted ahead of the EQ circuitry and
Channel Fader (known as pre-EQ/pre-Fader...
the signal will be the same as it was when it
first entered the input module, unaffected by
the control adjustments made with the EQ or
fader controls).
This arrangement allows for two separate
sends. You can use Send 1 on Channels 16 as
a stage monitor mix for vocals (with mic
inputs), and Send 1 on Channels 716 as a re-
verb send (with synth inputs, for example).
AUX 2
This send is Post EQ and Post Fader. Since
it's affected by EQ and gain adjustments, we
recommend that it be used as your main
reverb send.
AUX 3 & 4
These two sends are also post-EQ/post-Fader.
The "hidden" sends: 5 & 6
The 5/6 SHIFT button "converts" AUX 3
and 4 to AUX Sends 5 and 6. In other words,
after you press this button, signal is sent to
AUX 5 and AUX 6 but controlled by the AUX 3
and 4 Knobs. We did this to add the flexibility
of extra sends without making the mixer so
big that it looks like an airport landing strip.
To review
The CR-1604s Aux sends are used to route
a portion of the signal out to another source
for processing or sub-mixing. They allow you
to control how much effect is mixed with
each channel.
· All channel strips have four Aux sends
feeding a total of seven outputs.
· All sends are fully off in the extreme
counterclockwise position.
AUX
U
1
2
3
4
5
6
U
U
U
+15
00
+15
00
+15
00
+15
00
5/6
SHIFT
+15
--15
0
HI
+15
--15
0
MID
+12
--12
0
LO
EQ
0
R
L
PAN
SOLO
MUTE
ALT 3/4
OL
+20
U
00
1
MON
AUX
U
1
2
3
4
5
6
U
U
U
+15
00
+15
00
+15
00
+15
00
5/6
SHIFT
+15
--15
0
HI
0
MID
0
LO
EQ
0
R
L
PAN
SOLO
MUTE
ALT 3/4
OL
+ 20
U
00
2
MON
AUX
U
1
2
3
4
5
6
U
U
U
+15
00
+15
00
+15
00
+15
00
5/6
SHIFT
+15
--15
0
HI
0
MID
0
LO
EQ
0
R
L
PAN
SOLO
MUTE
ALT 3/4
OL
+20
U
00
3
MON
AUX
U
1
2
3
4
5
6
U
U
U
+15
00
+15
00
+15
00
+15
00
5/6
SHIFT
+15
--15
0
HI
0
MID
0
LO
EQ
0
R
L
PAN
SOLO
MUTE
ALT 3/4
OL
+20
U
00
4
MON
AUX
U
1
2
3
4
5
6
U
U
U
+15
00
+15
00
+15
00
+15
00
5/6
SHIFT
+15
--15
0
HI
0
MID
0
LO
EQ
0
R
L
PAN
SOLO
MUTE
ALT 3/4
OL
+20
U
00
5
MON
AUX
U
1
2
3
4
5
6
U
U
U
+15
00
+15
00
+15
00
+15
00
5/6
SHIFT
+15
--15
0
HI
0
MID
0
LO
EQ
0
R
L
PAN
SOLO
MUTE
ALT 3/4
OL
+20
U
00
6
MON
AUX
U
1
2
3
4
5
6
U
U
U
+15
00
+15
00
+15
00
+15
00
5/6
SHIFT
+15
--15
0
HI
0
MID
0
LO
EQ
0
R
L
PAN
SOLO
MUTE
ALT 3/4
OL
+20
U
00
7
MON
AUX
U
1
2
3
4
5
6
U
U
U
+15
00
+15
00
+15
00
+15
00
5/6
SHIFT
+15
--15
0
HI
0
MID
0
LO
EQ
0
R
L
PAN
SOLO
MUTE
ALT 3/4
OL
+20
U
00
8
MON
AUX
U
1
2
3
4
5
6
U
U
U
+15
00
+15
00
+15
00
+15
00
5/6
SHIFT
+15
--15
0
HI
0
MID
0
LO
EQ
0
R
L
PAN
SOLO
MUTE
ALT 3/4
OL
+20
U
00
9
MON
AUX
U
1
2
3
4
5
6
U
U
U
+15
00
+15
00
+15
00
+15
00
5/6
SHIFT
+15
--15
0
HI
0
MID
0
LO
EQ
0
R
L
PAN
SOLO
MUTE
ALT 3/4
OL
+20
U
00
10
MON
AUX
U
1
2
3
4
5
6
U
U
U
+15
00
+15
00
+15
00
+15
00
5/6
SHIFT
+15
--15
0
HI
0
MID
0
LO
EQ
0
R
L
PAN
SOLO
MUTE
ALT 3/4
OL
+20
U
00
11
MON
AUX
U
1
2
3
4
5
6
U
U
U
+15
00
+15
00
+15
00
+15
00
5/6
SHIFT
+15
--15
0
HI
0
MID
0
LO
EQ
0
R
L
PAN
SOLO
MUTE
ALT 3/4
OL
+20
U
00
12
MON
AUX
U
1
2
3
4
5
6
U
U
U
+15
00
+15
00
+15
00
+15
00
5/6
SHIFT
+15
--15
0
HI
0
MID
0
LO
EQ
0
R
L
PAN
SOLO
MUTE
ALT 3/4
OL
+20
U
00
13
MON
AUX
U
1
2
3
4
5
6
U
U
U
+15
00
+15
00
+15
00
+15
00
5/6
SHIFT
+15
--15
0
HI
0
MID
0
LO
EQ
0
R
L
PAN
SOLO
MUTE
ALT 3/4
OL
+20
U
00
14
MON
AUX
U
1
2
3
4
5
6
U
U
U
+15
00
+15
00
+15
00
+15
00
5/6
SHIFT
+15
--15
0
HI
0
MID
0
LO
EQ
0
R
L
PAN
SOLO
MUTE
ALT 3/4
OL
+20
U
00
15
MON
AUX
U
1
2
3
4
5
6
U
U
U
+15
00
+15
00
+15
00
+15
00
5/6
SHIFT
+15
--15
0
HI
0
MID
0
LO
EQ
0
R
L
PAN
SOLO
MUTE
ALT 3/4
OL
+20
U
U
00
16
MON
U
1
2
3
4
U
U
U
+20
00
+20
00
+20
00
+20
00
C
1
2
3
4
C
C
C
R
L
1
2
3
4
STEREO AUX RETURNS
R
L
R
L
R
L
LEVEL
BALANCE
MONO
AUX
SOLO
+10
00
00
1/LEFT
2/RIGHT
LEVEL
SOLO/PHONES
MAIN OUTPUT
MUTE
SOLO
TO
MAIN
ALT PREVIEW
POWER
SOLO
LEVEL
-20
-16
-12
-8
-4
0
+2
+4
+8
CLIP
CR1604
16 CHANNEL MIC/LINE MIXER
2
34567
8
9
10
11
12
13
14
15
16
PHANTOM
MAINS
CR1604 16 CHANNEL MIC/LINE MIXER
LAMP 12 VAC
+15
--15
+12
--12
+15
--15
+12
--12
+15
--15
+12
--12
+15
--15
+12
--12
+15
--15
+12
--12
+15
--15
+12
--12
+15
--15
+12
--12
+15
--15
+12
--12
+15
--15
+12
--12
+15
--15
+12
--12
+15
--15
+12
--12
+15
--15
+12
--12
+15
--15
+12
--12
+15
--15
+12
--12
+15
--15
+12
--12
1
CHANNEL STRIPS
INPUT/OUTPUT "POD"
OUTPUT
SECTION
CONTROLS
& FEATURES