
B60-5585-00 00 CS ( K, P, E, X ) KW 0410
AUDIO VIDEO SURROUND RECEIVER
VRS-7200
INSTRUCTION MANUAL
KENWOOD CORPORATION
About the supplied remote control
Compared to standard remote controls, the remote control supplied with this receiver has
several operation modes. These modes enable the remote control to control other audio/video
components. In order to effectively use the remote control it is important to read the operating
instructions and obtain a proper understanding of the remote control and how to switch its
operation modes (etc.).
Using the remote control without completely understanding its design and how to switch the
operation modes may result in incorrect operations.
Quick Start Reference
Please read the following pages so that you can enjoy the surround sound at the best
condition.
(These pages give shortcut explanations on how to connect the speaker system to the
receiver, set up the speakers and play a source.)
"Let's play DVD video software"
^&
2 EN
Units are designed for operation as follows.
Before applying power
Caution : Read this page carefully to ensure safe operation.
U.S.A. and Canada ........................................... AC 120 V only
Australia ........................................................... AC 240 V only
Europe ............................................................... AC 230 V only
THE EXCLAMATION POINT WITHIN AN EQUILATERAL TRIANGLE IS INTENDED TO ALERT THE USER TO
THE PRESENCE OF IMPORTANT OPERATING AND MAINTENANCE (SERVICING) INSTRUCTIONS IN THE
LITERATURE ACCOMPANYING THE APPLIANCE.
THE LIGHTNING FLASH WITH ARROWHEAD SYMBOL, WITHIN AN EQUILATERAL TRIANGLE, IS INTENDED
TO ALERT THE USER TO THE PRESENCE OF UNINSULATED "DANGEROUS VOLTAGE" WITHIN THE PROD-
UCT'S ENCLOSURE THAT MAY BE OF SUFFICIENT MAGNITUDE TO CONSTITUTE A RISK OF ELECTRIC
SHOCK TO PERSONS.
CAUTION: TO REDUCE THE RISK OF ELECTRIC SHOCK, DO
NOT REMOVE COVER (OR BACK). NO USER-SERVICEABLE
PARTS INSIDE. REFER SERVICING TO QUALIFIED SERVICE
PERSONNEL.
Safety precautions
WARNING: TO PREVENT FIRE OR ELECTRIC SHOCK, DO NOT EXPOSE THIS
APPLIANCE TO RAIN OR MOISTURE.
CAUTION
RISK OF ELECTRIC SHOCK
DO NOT OPEN
3 EN
Before applying power
How to use this manual
This manual is divided into four sections, Preparations, Operations,
Remote Control, and Additional Information.
Preparations
Shows you how to connect your audio and video components to the
receiver and prepare the surround processor. Since this receiver works
with all your audio and video components, we will guide you in setting up
your system to be as easy as possible.
Operations
Shows you how to operate the various functions available on the
receiver.
Remote Control
Shows you how to operate other components using the remote control,
as well as a detailed explanation of all remote control operations. Once
you have registered your components with the proper setup codes, you'll
be able to operate both this receiver and your other AV components (TV,
VCR, DVD player, CD player, etc.) using the remote control supplied with
this receiver.
Additional Information
Shows you additional information such as "In case of difficulty" (trouble
shooting) and "Specifications".
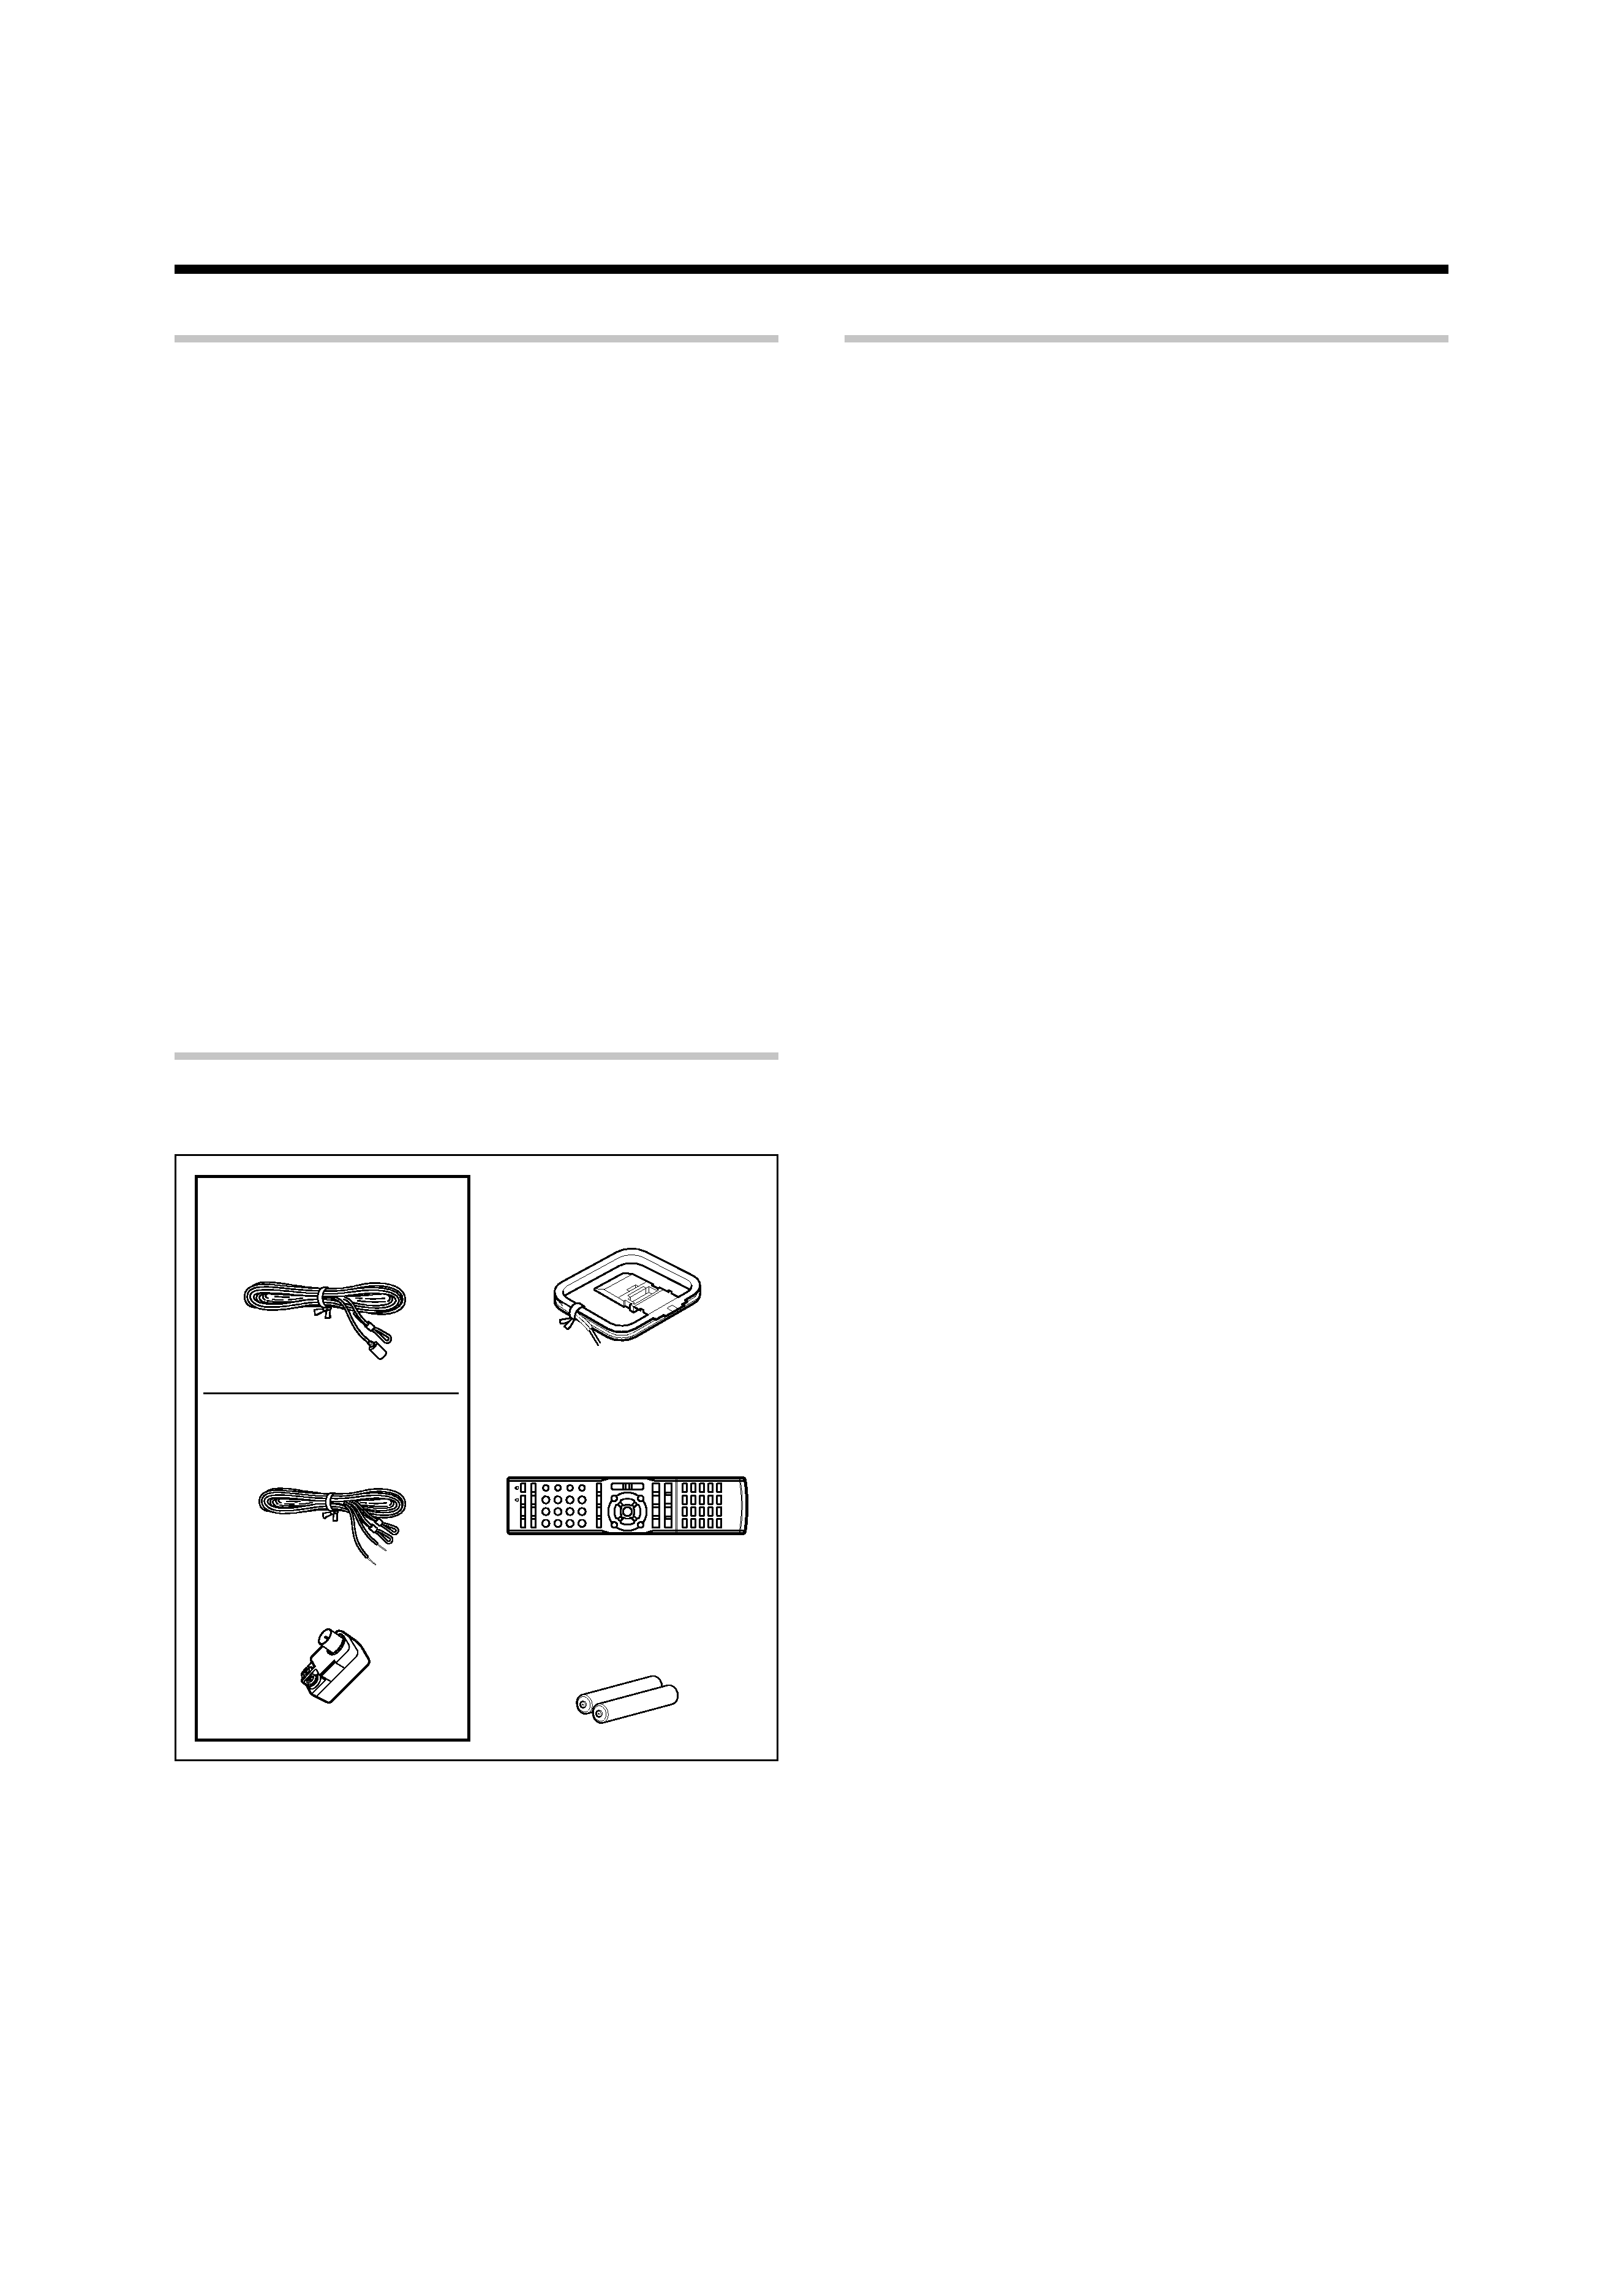
Unpacking
Unpack the unit carefully and make sure that all the accessories
are present.
If any accessories are missing, or if the unit is damaged or fails
to operate, notify your dealer immediately. If the unit was
shipped to you directly, notify your shipper immediately. Ken-
wood recommends that you retain the original carton and pack-
ing materials in case you need to move or ship the unit in the
future.
Keep this manual handy for future reference.
Remote control unit
(1)
Batteries (R03/AAA)
(2)
FM indoor antenna (1)
(For the U.S.A. and Canada)
(For Europe and Australia)
Special features
True home theater sound
/ ~ <
This receiver incorporates a wide variety of surround modes to bring you
maximum enjoyment from your video software and audio source. Select
a surround mode according to your equipment or the software you are
going to play and enjoy!
÷ Dolby Digital EX
÷ Dolby PRO LOGIC IIx, Dolby PRO LOGIC II
÷ Dolby Digital
÷ DTS-ES
÷ DTS NEO:6
÷ DTS 96/24
÷ DTS
÷ DSP Mode
÷ Dolby Virtual Speaker
÷ Dolby Headphone
GAME mode function
¡
When you connect a game machine to the GAME jacks on the front
panel, the input selector of the receiver switches automatically to
"GAME" and the optimum sound field for enjoying games is set.
This feature improves your convenience in playing video games.
DUAL SOURCE function
¢
While you enjoy audio listening through the speakers, another person
can enjoy another source (audio + video) through headphones by
connecting the source to the GAME, FRONT AUX jacks.
ACTIVE EQ
ACTIVE EQ mode will produce a more dynamic sound quality in any
condition. You can enjoy a more impressive sound effect when ACTIVE
EQ is turned on during Dolby Digital and DTS playback.
Remote control
·
In addition to the basic receiver, the remote control supplied with this
receiver can also operate almost all of your remote controllable audio and
video components. Just follow the simple setup procedure to register
the components you have connected.
RDS (Radio Data System) tuner (For Europe and Australia)
ª
The receiver is equipped with an RDS tuner that provides several
convenient tuning functions: RDS Auto Memory, to automatically preset
up to 40 RDS stations broadcasting different programs; station name
display, to show you the name of the current broadcast station; and PTY
search to let you tune stations by program type.
Antenna adaptor (1)
FM indoor antenna (1)
AM loop antenna
(1)
4 EN
Before applying power
Contents
Caution : Read the pages marked
carefully to ensure safe operation.
Before applying power ..................... 2
Safety precautions ................... 2
How to use this manual ................. 3
Unpacking ....................................... 3
Special features .............................. 3
Contents ......................................... 4
Names and functions of parts ............... 5
Main unit ........................................ 5
Remote control unit ....................... 6
Setting up the system ............................ 8
Connecting a DVD player ............... 9
Connecting video components,
audio components ........................ 10
Digital connections ....................... 11
Connecting the speakers ............. 12
Connecting the speaker terminals ... 13
PRE OUT jacks connections ........ 14
Connecting to the GAME jacks /
FRONT AUX jacks ........................ 14
Connecting the antennas ............. 15
Preparing the remote control ....... 15
Let's play DVD video software
......................................................... 16
Preparing for playback ......................... 18
Speaker settings .......................... 18
Re-assignment of rear panel jacks ... 22
Normal playback ................................... 23
Listening to a source component ... 23
Listening with headphones .......... 24
Adjusting the sound ..................... 24
Recording .............................................. 26
Analog sources ............................. 26
Digital sources .............................. 26
Listening to radio broadcasts .............. 27
Tuning (non-RDS) radio stations ... 27
Presetting radio stations .............. 27
Receiving preset stations ............. 28
Receiving preset stations in order
(P.CALL) ........................................ 28
Using RDS (Radio Data System)
(For Europe and Australia) ................... 29
Presetting RDS stations (RDS AUTO
MEMORY) ...................................... 29
Using the RDS DISP. (Display) key ... 29
Tuning by Program TYpe
(PTY search) ................................. 30
Ambience effects .................................. 31
Surround modes ........................... 31
Virtual modes ............................... 33
Surround play ............................... 34
Convenient functions ........................... 36
Adjusting the sound ..................... 36
Display dimmer adjustment ......... 38
Sleep timer ................................... 38
Basic remote control operations for
other components ................................ 39
Registering setup codes for other
components ................................. 39
Searching for your code ............... 39
Checking the codes ...................... 40
Re-assigning device keys ............. 40
Operating other components ....... 40
Clearing all of the settings registered or
stored in the remote control unit ..... 40
Setup code chart (RC-R0920) (For
U.S.A. and Canada) ...................... 41
Setup code chart (RC-R0920E) (For
Europe and Australia) ................... 44
DVD player , MD recorder CD player
& TV operations ........................... 55
VCR , Satellite receiver & Cable con-
verter operations ......................... 56
In case of difficulty ................................ 57
Specifications
(For U.S.A. and Canada) .................. 59
Specifications
(For Europe and Australia) .............. 60
Remote
Control
Additional
Information
Operations
Preparations
Operations
Maintenance of the unit
When the front panel or case becomes dirty, wipe with a soft, dry
cloth. Do not use thinner, benzine, alcohol, etc. for these agents may
cause discoloration.
In regard to contact cleaner
Do not use contact cleaners because it could cause a malfunction. Be
specially careful not to use contact cleaners containing oil, for they
may deform the plastic component.
5 EN
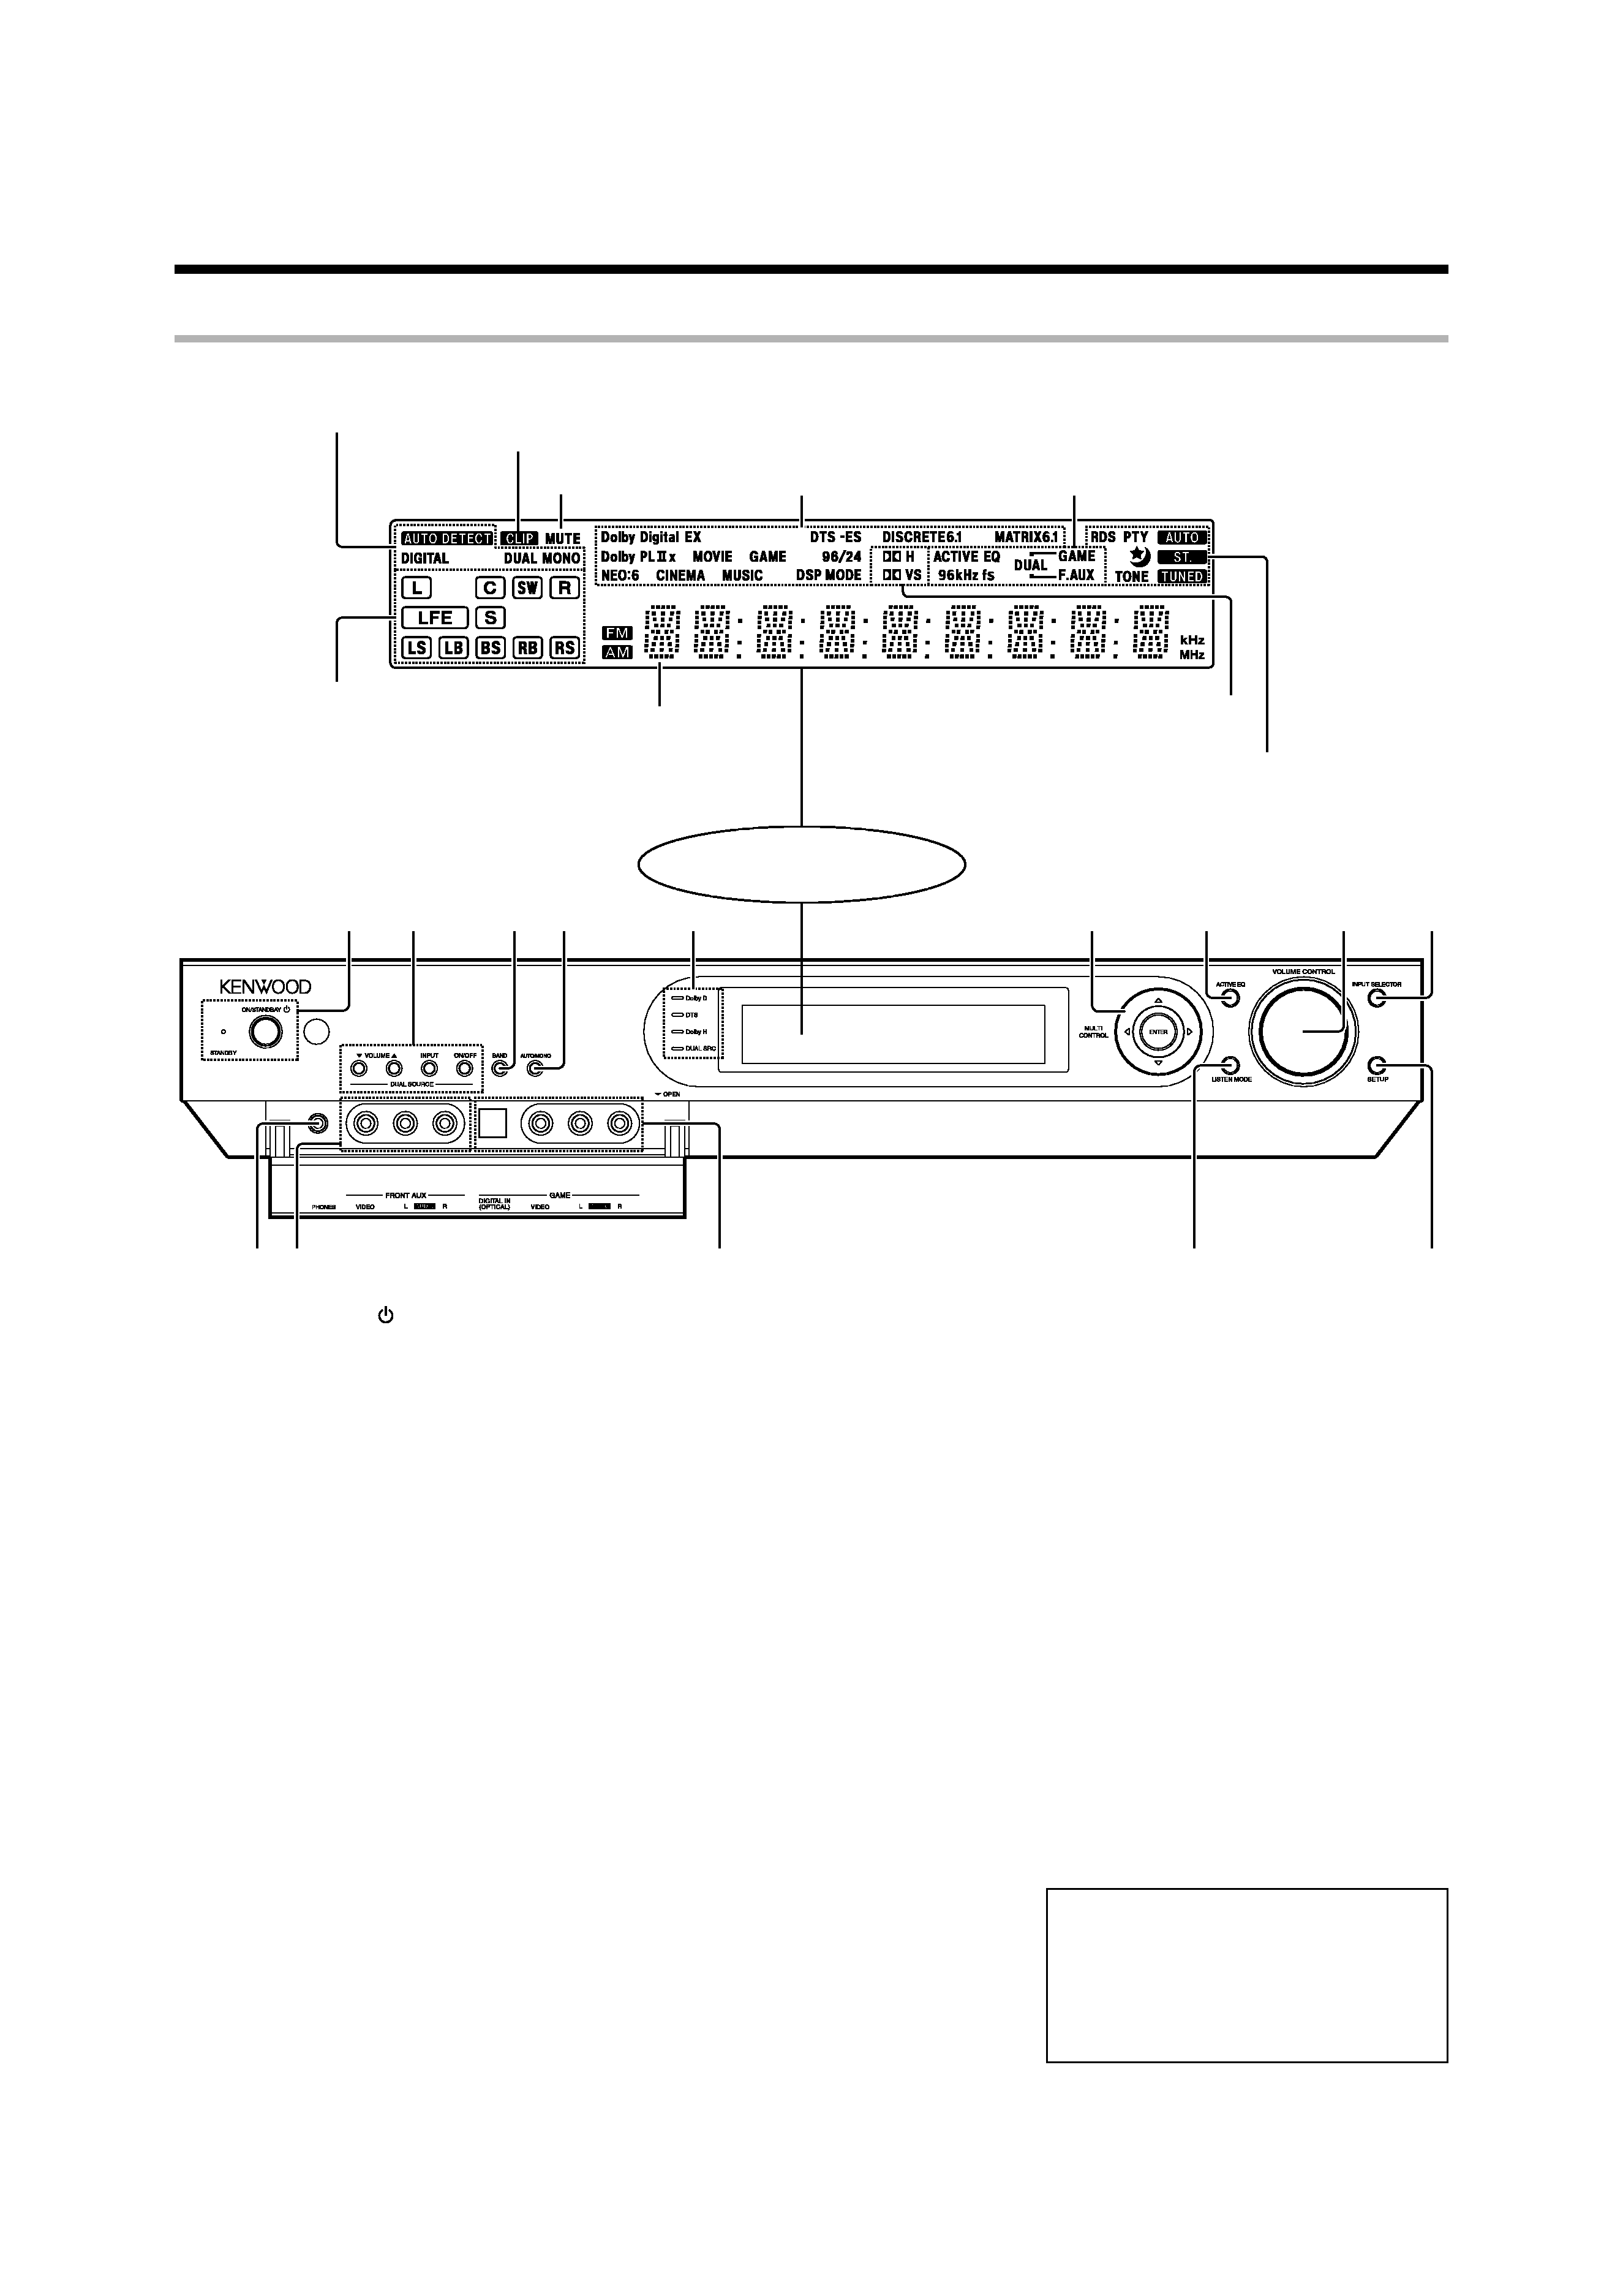
34
5
6
8
2
1
0
9
#
!
$@
7
1 ON/STANDBY key
Use to turn the power ON/STANDBY.
*
STANDBY indicator
Lights when the power is in the standby
mode.
2 DUAL SOURCE VOLUME 5/
keys
Use to adjust the volume in the DUAL
SOURCE mode.
¢
DUAL SOURCE INPUT key
Use to select the input for the DUAL
SOURCE mode.
¢
DUAL SOURCE ON/OFF key
Use to switch the DUAL SOURCE mode
ON/OFF.
¢
3 BAND key
Use to select the broadcast band.
¶ª
4 AUTO/MONO key
Use to select the auto or manual tuning
mode.
¶ª
5 Dolby D indicator
Lights when the receiver is in the Dolby
Digital mode.
>
DTS indicator
Lights when the receiver is in the
DTS mode.
>
Dolby H indicator
Lights when the Dolby Headphone mode
is ON.
<
DUAL SRC indicator
Lights when the DUAL SOURCE mode
is ON.
¢
6 Joystick
MULTI CONTROL
% / fi
Use to control a variety of settings.
^*
Use to tune of radio broadcasting.
¶
MULTI CONTROL
@ / #
Use to control a variety of settings.
^*
Use to select of preset radio stations.
·
ENTER
Use to control a variety of settings.
^*
Use to presetting of radio stations.
¶
7 ACTIVE EQ key
Use to switch the status of ACTIVE EQ.
8 VOLUME CONTROL knob
Use to adjust the receiver volume.
£
Display
Speaker selection indicators,
Input channel indicators (The Input channel
indicators lights up to indicate the channels
contained in the input signal. The "S" indicator
lights when the surround component consists
of a single channel.)
ACTIVE EQ indicator,
DUAL SOURCE Input indicator,
96 kHz fs indicator
Frequency display,
Input display, Preset
channel display,
Listen mode display
MUTE indicator
CLIP indicator
Input mode indicators
Listen mode indicators
Sleep timer indicator, TONE indicator,
AUTO indicator, ST. indicator,
TUNED indicator
For Europe and Australia:
RDS indicator, PTY indicator
Dolby Headphone mode indicator,
Dolby Virtual Speaker mode indicator
View when the GAME/ FRONT AUX jack
cover is open.
Main unit
Names and functions of parts
Standby mode
While the standby indicator is lit, a small
amount of power is supplied to the system to
back up the memory. This is called standby
mode. Under the condition, the system can
be turned ON by the remote control unit.
9 INPUT SELECTOR key
Use to select input sources.
£
0 SETUP key
Use to select the speakers' settings
etc.
^*
Use to switch the status of REC MODE.
§
! LISTEN MODE key
Use to select the listening mode.
>
@ GAME jacks
$¡¢
# FRONT AUX jacks
$¢
$ PHONES jack
Use for headphone listening.
¢