
TS-870S
HF TRANSCEIVER
© B62-1536-00 (K,P,E,X,M)(MC)
09 08 07 06 05 04 03 02 01 00
KENWOOD CORPORATION
INSTRUCTION MANUAL
Intelligent Digital Enhanced Communications System

WRITING CONVENTIONS FOLLOWED
The writing conventions described below have been
followed to simplify instructions and avoid unnecessary
repetition. This format is less confusing for the reader.
Reviewing the following information now will reduce
your learning period. That means less time will be
spent reading this manual; more time will be available
for operating.
Furthermore, a system of advisories is used as follows:
CAUTION:
Possibility of equipment damage
Note:
Important information or operating tip
Note:
Basic procedures are numbered sequentially to guide you
step-by-step. Additional information pertaining to a step, but not
essential to complete the procedure, is provided in bulleted form
following many steps for further guidance.
NOTICE TO THE USER
One or more of the following statements may be
applicable to this equipment.
INFORMATION TO THE DIGITAL DEVICE USER REQUIRED
BY THE FCC
This equipment has been tested and found to comply with the
limits for a Class B digital device, pursuant to Part 15 of the FCC
Rules. These limits are designed to provide reasonable
protection against harmful interference in a residential
installation.
This equipment generates, uses and can generate radio
frequency energy and, if not installed and used in accordance
with the instructions, may cause harmful interference to radio
communications. However, there is no guarantee that the
interference will not occur in a particular installation. If this
equipment does cause harmful interference to radio or television
reception, which can be determined by turning the equipment off
and on, the user is encouraged to try to correct the interference
by one or more of the following measures:
·
Reorient or relocate the receiving antenna.
·
Increase the separation between the equipment and
receiver.
·
Connect the equipment to an outlet on a circuit different from
that to which the receiver is connected.
·
Consult the dealer for technical assistance.
FCC WARNING
This equipment generates or uses radio frequency energy.
Changes or modifications to this equipment may cause harmful
interference unless the modifications are expressly approved in
the instruction manual. The user could lose the authority to
operate this equipment if an unauthorized change or modification
is made.
APPLICABLE MODEL
This manual applies to the following model:
TS-870S: HF Transceiver
Intelligent Digital Enhanced Communications System
Instruction
What to do
Press and release KEY.
Press and hold KEY1 down,
then press KEY2. If there are
more than two keys, press and
hold down each key in turn
until the final key has been
pressed.
Press KEY1 momentarily,
release KEY1, then press
KEY2.
With the transceiver power
OFF, press and hold KEY,
then switch ON the transceiver
power by pressing
[ ] (POWER).
Press [KEY].
Press
[KEY1]+[KEY2].
Press
[KEY1], [KEY2].
Press
[KEY]+[ ].
i
PRECAUTIONS
Please read all safety and operating instructions before
using this transceiver. For best results, be aware of all
warnings on the transceiver and follow the provided
operating instructions. Retain these safety and
operating instructions for future reference.
1 Power Sources
Connect this transceiver only to the power source
described in the operating instructions or as marked
on the transceiver itself.
2 Power Cable Protection
Route all power cables safely. Ensure the power
cables can neither be walked upon nor pinched by
items placed near or against the cables. Pay
particular attention to locations near AC receptacles,
AC extension bars and points of entry to the
transceiver.
3Electrical Shocks
Take care not to drop objects or spill liquids into the
transceiver through enclosure openings. Metal
objects, such as hairpins or needles, inserted into
the transceiver may contact voltages resulting in
serious electrical shocks. Never permit children to
insert any objects into this transceiver.
4Grounding and Polarization
Do not attempt to defeat methods used for
grounding and electrical polarization in the
transceiver, particularly involving the input power
cable.
5 Outdoor Antenna Grounding
Adequately ground all outdoor antennas used with
this transceiver using approved methods.
Grounding helps protect against voltage surges
caused by lightning. It also reduces the chance of a
build-up of static charges.
6 Power Lines
Minimum recommended distance for an outdoor
antenna from power lines is one and one-half times
the vertical height of the associated antenna support
structure. This distance allows adequate clearance
from the power lines if the support structure should
fail for any reason.
7Ventilation
Locate the transceiver so as not to interfere with its
ventilation. Do not place books or other equipment
on the transceiver that may impede the free
movement of air. Allow a minimum of 4 inches
(10 cm) between the rear of the transceiver and the
wall or operating desk shelf.
8Water and Moisture
Do not use the transceiver near water or sources of
moisture. For example, avoid use near bathtubs,
sinks, swimming pools, and in damp basements and
attics.
9 Abnormal Odors
The presence of an unusual odor or smoke is often a
sign of trouble. Immediately turn the power OFF and
remove the power cable. Contact a dealer or the
nearest Service Center for advice.
10 Heat
Locate the transceiver away from heat sources such
as radiators, stoves, amplifiers or other devices that
produce substantial amounts of heat.
11 Cleaning
Do not use volatile solvents such as alcohol, paint
thinner, gasoline or benzene to clean the cabinet.
Use a clean cloth with warm water or a mild
detergent.
12 Periods of Inactivity
Disconnect the input power cable from the power
source when the transceiver is not used for long
periods of time.
13 Servicing
Remove the transceiver's enclosure only to do
accessory installations described by this manual or
accessory manuals. Follow provided instructions
carefully to avoid electrical shocks. If unfamiliar with
this type of work, seek assistance from an
experienced individual, or have a professional
technician do the task.
14 Damage Requiring Service
Enlist the services of qualified personnel in the
following cases:
a) The power supply or plug is damaged.
b) Objects have fallen or liquid has spilled into the
transceiver.
c) The transceiver has been exposed to rain.
d) The transceiver is operating abnormally or
performance has degraded seriously.
e) The transceiver has been dropped or the
enclosure damaged.
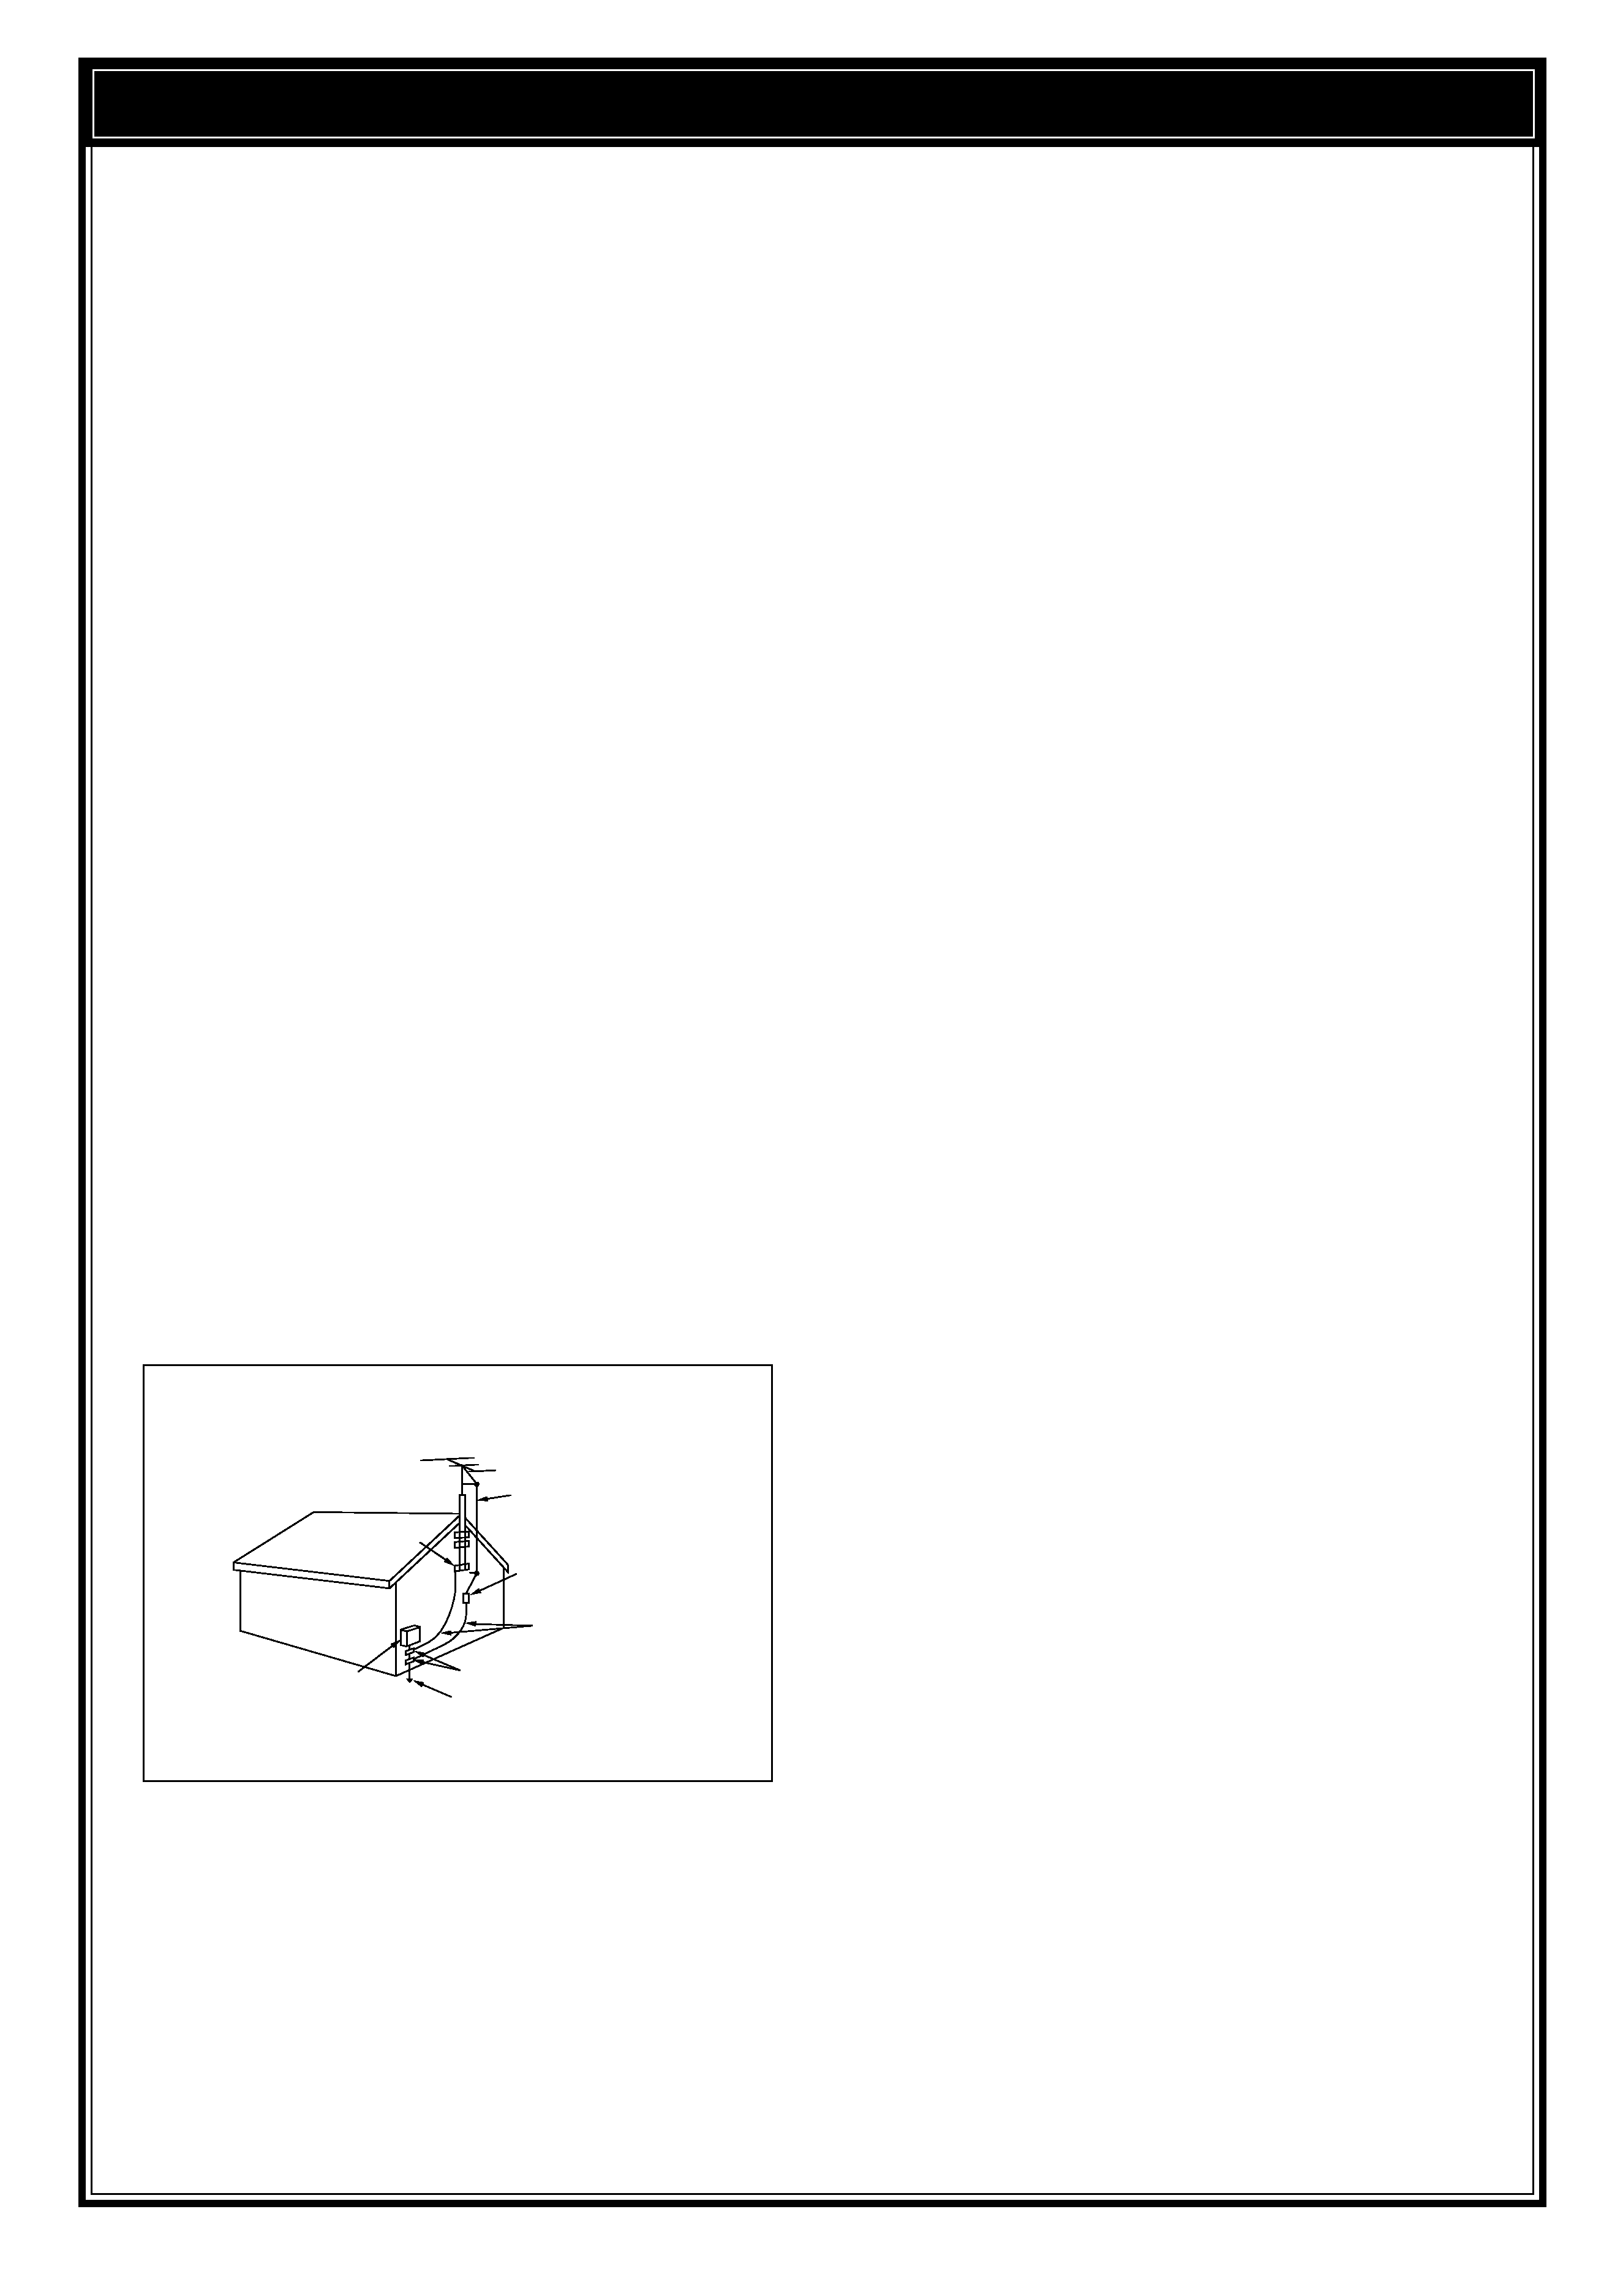
EXAMPLE OF ANTENNA GROUNDING
ANTENNA
LEAD IN
WIRE
GROUND
CLAMP
ELECTRIC SERVICE
EQUIPMENT
ANTENNA
DISCHARGE UNIT
GROUNDING
CONDUCTORS
GROUND CLAMPS
POWER SERVICE GROUNDING
ELECTRODE SYSTEM

ii
CONTENTS
DUAL DIGITAL VFOs ............................................ 19
SELECTING VFOS ([RX A], [RX B]) .................. 19
EQUALIZING VFO FREQUENCIES ([A=B]) ...... 20
SELECTING MODE ............................................... 20
SELECTING FREQUENCY ................................... 20
CHANGING BANDS .......................................... 20
USING 1 MHz STEPS ....................................... 20
QUICK CHANGES ............................................ 21
Changing Step Sizes .................................... 21
FINE TUNING .................................................... 21
DIRECT FREQUENCY ENTRY ......................... 22
FRONT PANEL METER ........................................ 22
TRANSMITTING .................................................... 23
SELECTING TRANSMIT POWER ..................... 23
TRANSMIT CARRIER LEVEL ........................... 23
MICROPHONE GAIN ........................................ 23
CHAPTER 5
MENU SETUP
24
WHAT IS A MENU? ............................................... 24
MENU ACCESS .................................................... 24
MENU A/ MENU B ............................................. 24
QUICK MENU FUNCTION ................................ 24
Programming the Quick Menu ...................... 24
Using the Quick Menu ................................... 24
TEMPORARY MENU RESETTING ....................... 24
MENU CONFIGURATION ..................................... 25
CROSS REFERENCE FOR
MENU FUNCTIONS .............................................. 28
CHAPTER 6
COMMUNICATING
29
SSB TRANSMISSION ........................................... 29
SLOW SCAN TV/ FACSIMILE ........................... 29
CW TRANSMISSION ............................................ 30
TX SIDETONE/ RX PITCH FREQUENCY ......... 30
ZERO-BEATING ................................................ 30
SWITCHING TX/RX MANUALLY ....................... 30
SEMI BREAK-IN ................................................ 31
Setting Delay Time ........................................ 31
FULL BREAK-IN ................................................ 31
CW REVERSE (RECEIVE) ................................ 31
RISE/DECAY TIMES ......................................... 31
ELECTRONIC KEYER ...................................... 32
Learning Outline ........................................... 32
Multiple-Button Functions .............................. 33
Emulation Options ........................................ 33
Storing CW Messages .................................. 34
CW Message Playback ................................. 34
Erasing CW Messages ................................. 35
Inquiry Functions .......................................... 35
Function Commands ..................................... 36
Embedded Functions .................................... 37
Serial Number Options .................................. 37
APPLICABLE MODEL .................. Inside Front Cover
WRITING CONVENTIONS
FOLLOWED ................................. Inside Front Cover
NOTICE TO THE USER ............... Inside Front Cover
PRECAUTIONS
i
CONTENTS
ii
CHAPTER 1
INTRODUCTION
1
THANK YOU! ........................................................... 1
DSP -- MAXIMUM SIGNAL/ MINIMUM NOISE ....... 1
FEATURES .............................................................. 1
SUPPLIED ACCESSORIES .................................... 1
CHAPTER 2
INSTALLATION
2
ANTENNA CONNECTION ....................................... 2
GROUND CONNECTION ........................................ 3
LIGHTNING PROTECTION ..................................... 3
DC POWER SUPPLY CONNECTION ...................... 3
REPLACING FUSES ........................................... 3
ACCESSORY CONNECTIONS ............................... 4
FRONT PANEL .................................................... 4
Headphones (PHONES) ................................. 4
Microphone (MIC) ........................................... 4
REAR PANEL ...................................................... 4
External Speaker (EXT SP) ............................ 4
Keys and Keyboards for CW Operation
(PADDLE and KEY) ........................................ 4
Computer Interface (COM) .............................. 5
RTTY Equipment (RTTY and ACC 2) .............. 5
Linear Amplifier (REMOTE) ............................. 5
Antenna Tuner (AT) ........................................ 6
SM-230 Station Monitor (IF OUT 1) ................. 6
Accessory Equipment (ACC 2) ....................... 6
CHAPTER 3
GETTING ACQUAINTED
8
YOUR FIRST QSO .................................................. 8
RECEIVING ......................................................... 8
TRANSMITTING .................................................. 9
FRONT PANEL ...................................................... 10
MICROPHONE ...................................................... 14
REAR PANEL ........................................................ 15
DISPLAY ............................................................... 16
CHAPTER 4
OPERATING BASICS
19
SWITCHING POWER ON/OFF ............................. 19
ADJUSTING VOLUME .......................................... 19
AUDIO FREQUENCY (AF) GAIN ....................... 19
RADIO FREQUENCY (RF) GAIN ...................... 19
ADJUSTING SQUELCH ........................................ 19

iii
FM TRANSMISSION ............................................. 38
FM REPEATER OPERATION ............................ 38
Selecting Subtone Frequency ....................... 39
Continuous or Burst Subtones? .................... 39
AM TRANSMISSION ............................................. 40
DIGITAL OPERATION ........................................... 40
RTTY (FREQUENCY SHIFT KEYING) .............. 40
ERROR-CHECKING MODES (AMTOR/ PACKET/
PACTOR/ G-TOR/ CLOVER .............................. 41
SPLIT-FREQUENCY OPERATION ........................ 42
TF-SET (TRANSMIT FREQUENCY SET) .......... 43
SATELLITE OPERATION .................................. 43
CHAPTER 7
OPERATING AIDS
44
RECEIVING ........................................................... 44
RIT (RECEIVE INCREMENTAL TUNING) ......... 44
AGC (AUTOMATIC GAIN CONTROL) ............... 44
Changing AGC ............................................. 44
Changing AF AGC ........................................ 44
TRANSMITTING .................................................... 45
VOX (VOICE-OPERATED TRANSMIT) ............. 45
Microphone Input Level Adjustment .............. 45
Delay Time Adjustment ................................. 45
TRANSMIT INHIBIT ........................................... 45
XIT (TRANSMIT INCREMENTAL TUNING) ....... 45
SPEECH PROCESSOR (SSB/AM) .................... 46
CHANGING FREQUENCY WHILE
TRANSMITTING ................................................ 46
TRANSMIT MONITOR ...................................... 46
CUSTOMIZING TRANSMIT SIGNAL
CHARACTERISTICS (SSB/AM) ........................ 47
Changing Transmit Bandwidth ...................... 47
Transmit Bandshift ........................................ 47
Equalizing Transmit Audio ............................. 47
Microphone AGC .......................................... 47
AUTOMATIC MODE .............................................. 48
AUTOMATIC MODE BOUNDARIES .................. 48
USING AUTOMATIC MODE .............................. 48
AUTOMATIC ANTENNA TUNER ........................... 49
PRESETTING (INTERNAL TUNER ONLY) ........ 49
INTERNAL TUNER ............................................ 49
AT-300 EXTERNAL TUNER (OPTIONAL) ......... 50
COMPUTER [\ TRANSCEIVER INTERFACE ... 50
COMMUNICATION PARAMETERS ................... 50
CHAPTER 8
REJECTING INTERFERENCE
51
DSP TOOLS .......................................................... 51
SLOPE TUNING (SSB/AM) ............................... 51
IF SHIFT (CW) ................................................... 51
CHANGING RECEIVE BANDWIDTH
(CW/FSK/FM) .................................................... 52
ADAPTIVE FILTERS ......................................... 52
AUTO NOTCH (SSB) ........................................ 52
BEAT CANCEL (SSB/AM) ................................. 52
NOISE REDUCTION (SSB/CW/FSK/AM) .......... 53
SETTING SPAC TIME ....................................... 53
NOISE BLANKER .................................................. 53
AIP (ADVANCED INTERCEPT POINT) ................. 53
ATTENUATOR ....................................................... 53
CHAPTER 9
MEMORY FEATURES
54
MICROPROCESSOR MEMORY BACKUP ............ 54
CONVENTIONAL OR QUICK MEMORY? ............. 54
CONVENTIONAL MEMORY .................................. 54
MEMORY CHANNEL DATA ............................... 54
MEMORY CHANNEL STORAGE ...................... 54
Simplex Channels ......................................... 54
Split-Frequency Channels ............................. 55
MEMORY CHANNEL RECALL .......................... 55
Quick Channel Search .................................. 55
Temporary Frequency Changes .................... 56
MEMORY CHANNEL SCROLL ......................... 56
MEMORY TRANSFER ...................................... 56
Memory \ VFO Transfers ........................... 56
Channel to Channel Transfers ....................... 57
ERASING MEMORY CHANNELS ..................... 57
Full Reset ..................................................... 57
STORING SCAN LIMITS IN CH 99 .................... 58
Confirming Start/End Frequencies ................ 58
Programmable VFO Function ....................... 58
QUICK MEMORY .................................................. 59
STORING INTO QUICK MEMORY .................... 59
RECALLING FROM QUICK MEMORY .............. 59
TEMPORARY FREQUENCY CHANGES .......... 59
QUICK MEMORY \ VFO ................................. 59
CHAPTER 10
SCAN
60
PROGRAM SCAN ................................................. 60
SCAN HOLD ..................................................... 60
CONFIRMING START/END LIMITS ................... 60
MEMORY SCAN ................................................... 61
BUSY FREQUENCY STOP ............................... 61
Scan Resume Methods ................................ 61
ALL-CHANNEL SCAN ....................................... 61
GROUP SCAN .................................................. 62
MEMORY CHANNEL LOCKOUT ...................... 62
SETTING SCAN SPEED ....................................... 62