
MINIDISC PERSONAL STEREO SYSTEM
B60-5052-00 00 CH (M)
0102
MDX-G2
INSTRUCTION MANUAL
*5052/01-03/EN
5/29/01, 10:28 AM
1
2 EN
THE EXCLAMATION POINT WITHIN AN EQUILATERAL TRIANGLE IS INTENDED TO ALERT THE USER
TO THE PRESENCE OF IMPORTANT OPERATING AND MAINTENANCE (SERVICING) INSTRUCTIONS
IN THE LITERATURE ACCOMPANYING THE APPLIANCE.
THE LIGHTNING FLASH WITH ARROWHEAD SYMBOL, WITHIN AN EQUILATERAL TRIANGLE, IS
INTENDED TO ALERT THE USER TO THE PRESENCE OF UNINSULATED "DANGEROUS VOLTAGE"
WITHIN THE PRODUCT'S ENCLOSURE THAT MAY BE OF SUFFICIENT MAGNITUDE TO CONSTI-
TUTE A RISK OF ELECTRIC SHOCK TO PERSONS.
CAUTION: TO REDUCE THE RISK OF ELECTRIC SHOCK,
DO NOT REMOVE COVER (OR BACK). NO USER-SER-
VICEABLE PARTS INSIDE. REFER SERVICING TO QUALI-
FIED SERVICE PERSONNEL.
Before applying power
Caution : Read this page carefully to ensure safe operation.
The marking of products using lasers (Except for some areas)
The marking is located on the rear panel and
says this product has been classified as Class
1. It means that there is no danger of hazard-
ous radiation outside the product
CLASS 1
LASER PRODUCT
Safety precautions
WARNING : TO PREVENT FIRE OR ELECTRIC SHOCK, DO NOT
EXPOSE THIS APPLIANCE TO RAIN OR MOISTURE.
CAUTION
RISK OF ELECTRIC SHOCK
DO NOT OPEN
Factory fitted moulded mains plug
1. The mains plug contains a fuse. For replacement,
use only a 13-Amp ASTA-approved (BS1362) fuse.
2. The fuse cover must be refitted when replacing
the fuse in the moulded plug.
3. Do not cut off the mains plug from this equip-
ment. If the plug fitted is not suitable for the power
points in your home or the cable is too short to reach
a power point, then obtain an appropriate safety
approved extension lead or adapter, or consult your
dealer.
If nonetheless the mains plug is cut off, remove
the fuse and dispose of the plug immediately, to
avoid a possible shock hazard by inadvertent con-
nection to the mains supply.
IMPORTANT: The wires in the mains lead are col-
oured in accordance with the following code:
Blue
: Neutral
Brown : Live
Do not connect those leads to the earth terminal of
a three-pin plug.
China and Russia .......................... AC 220 V only
Other countries ......... AC 110 - 120 / 220 - 240 V
switchable
Units are designed for operation as follows.
U.S.A. and Canada ....................... AC 120 V only
Australia ....................................... AC 240 V only
Europe and U.K. ........................... AC 230 V only
`For the United Kingdom
Inside this laser product, laser diodes classified
as Class 3A and 3B laser radiation are contained
as alerted by the internal caution label shown
above. To avoid exposure to laser beams, do
not open the cover.
CAUTION
INVISIBLE LASER RADIATION
WHEN OPEN. AVOID EXPOSURE
TO BEAM.
*5052/01-03/EN
5/29/01, 10:28 AM
2

3 EN
Contents
Caution : Read the pages marked
carefully to ensure safe operation.
Before applying power ................................. 2
Safety precautions ........................................ 2
Preparation section
System connection ........................................ 4-6
Unpacking ................................................... 4
Loading batteries
in the remote control unit ......................... 4
Connecting the accessories ........................ 5
Connecting other components ................... 6
Adjusting the current time ............................... 7
Presetting radio stations ................................ 8-9
Presetting stations automatically ................ 8
Presetting stations manually ....................... 9
Basic section
Playback of CD ............................................... 10
Playback of MD .............................................. 12
Receiving broadcast stations ......................... 14
Recording CD onto MD (MD O.T.E.) ............... 16
Playing audio input from AUX component ..... 18
Application section
Displayed information ................................ 19-20
Viewing the CD information ...................... 19
Viewing the MD information ..................... 20
Adjusting the tone .......................................... 21
Enhancement of bass and treble
(EX.BASS/LOUDNESS) ........................... 21
Fine adjustment of bass and treble
(TONE) ..................................................... 21
Adjusting the AUX input level ......................... 22
Playing CD or MD tracks
in the desired sequence (PGM) .................... 23
Repeating a CD or MD (REPEAT) ................... 24
Playing a CD or MD in random (RANDOM) .... 24
Stereo LP modes ........................................... 25
Setting the recording mode ............................ 26
High-speed recording
of all CD tracks onto an MD ......................... 27
Recording onto MD ........................................ 29
Recording CD tracks onto MD in desired
sequence .................................................... 30
Recording only the first track of CD
(BEST HITS) .................................................. 31
Editing the MD titles ................................. 32-34
Assigning a title to a disc or track ............. 32
Title editing character list .......................... 34
Moving several tracks at a time ...................... 35
Combining tracks ............................................ 37
Dividing a track ............................................... 39
Erasing several tracks at a time ...................... 41
Canceling editing ............................................ 42
Waking up to the timer playback (O.T.T.) ....... 43
Program timer ........................................... 45-48
Timer playback using program timer ......... 45
Timer recording using program timer ....... 47
Sleep timer (SLEEP) ....................................... 49
Auto power save (A.P.S.) ................................. 49
Knowledge section
Important items ............................................. 50
In case of difficulty ......................................... 53
Display message list ...................................... 56
Specifications ................................................. 57
Controls and indicators ................................... 58
*5052/01-03/EN
5/29/01, 10:28 AM
3
4 EN
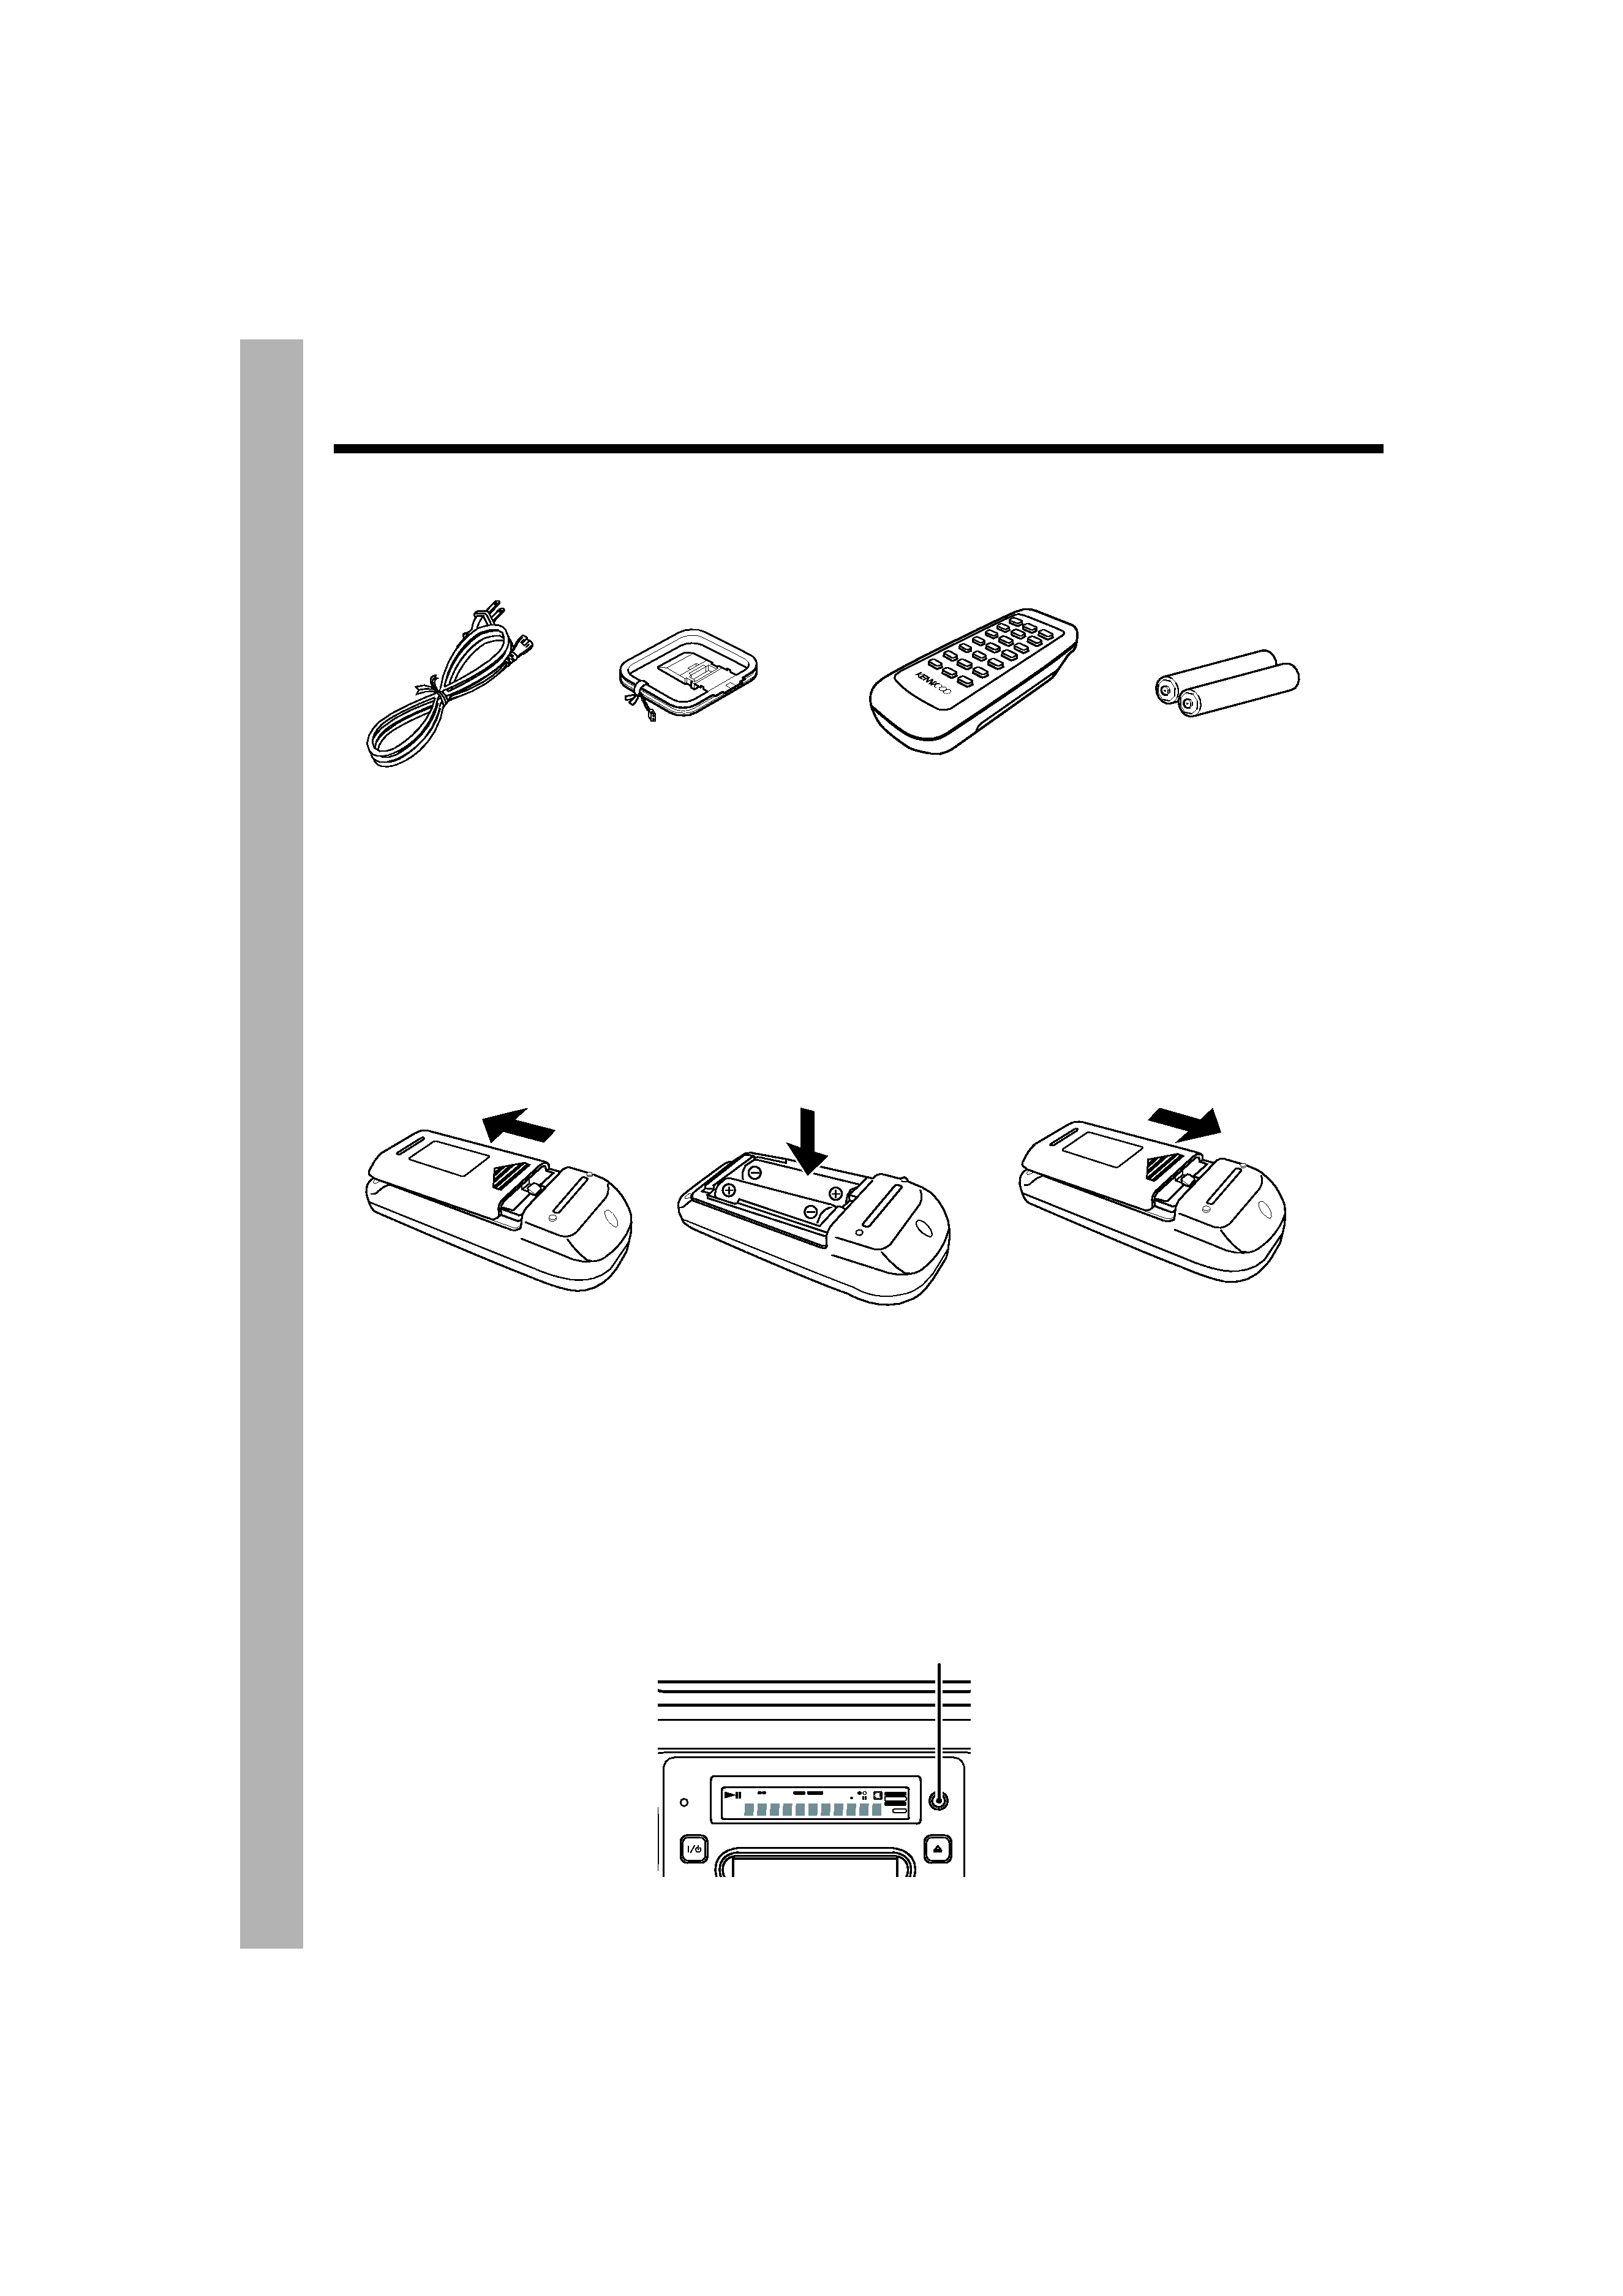
System connection
Power cord (1)
Remote control unit (1)
Batteries (R6/AA)
for remote (2)
AM loop antenna (1)
Loading batteries in the remote control unit
÷ The provided batteries are intended for use in operation checking, and their service life may be
short.
÷ When the remote-controllable distance becomes short, replace both of the batteries with new
ones.
÷ If the remote sensor on the main unit's front panel is exposed to direct sunlight or the light of a
high-frequency fluorescent lamp (inverter type, etc.), malfunction may occur. In such a case, change
the installation position to avoid malfunction.
÷ When pressing more than one remote control keys successively, press each key securely by leav-
ing an interval of 1 second or more between keys.
÷ The standard remote-control range is within approximately 6 meters from the main unit's front
panel. Be sure to point the remote to the remote sensor on the front panel.
(2) Insert two R6("AA")-size batter-
ies following the polarity indi-
cations.
(1) Remove the battery com-
partment cover of the re-
mote.
Unpacking
Unpack the unit carefully and make sure that all the accessories are present.
If any accessories are missing, or if the unit is damaged or fails to operate, notify your dealer
immediately. If the unit was shipped to you directly, notify your shipper immediately. Kenwood
recommends that you retain the original carton and packing materials in case you need to
move or ship the unit in the future.
Keep this manual handy for future reference.
remote sensor
MD PERSONAL STEREO SYSTEM
STANDBY
/TIMER
DISC LOADING MECHANISM
ON/STANDBY
EJECT
ONE
RANDOM
PGM
REPEAT
TRACK NO.
SLEEP
DISC
O.T.T.
PROG.
TOTAL
O.T.E.
HIGH-SPEED
AUTO TUNED
SP
REC
LP
BEST HITS
EX. BASS
MD-EDIT
LOUD
kHz
MHz
MD
MD
CD
CD
(3) Attach the battery com-
partment cover.
*5052/04-09/EN
5/29/01, 10:28 AM
4
5 EN
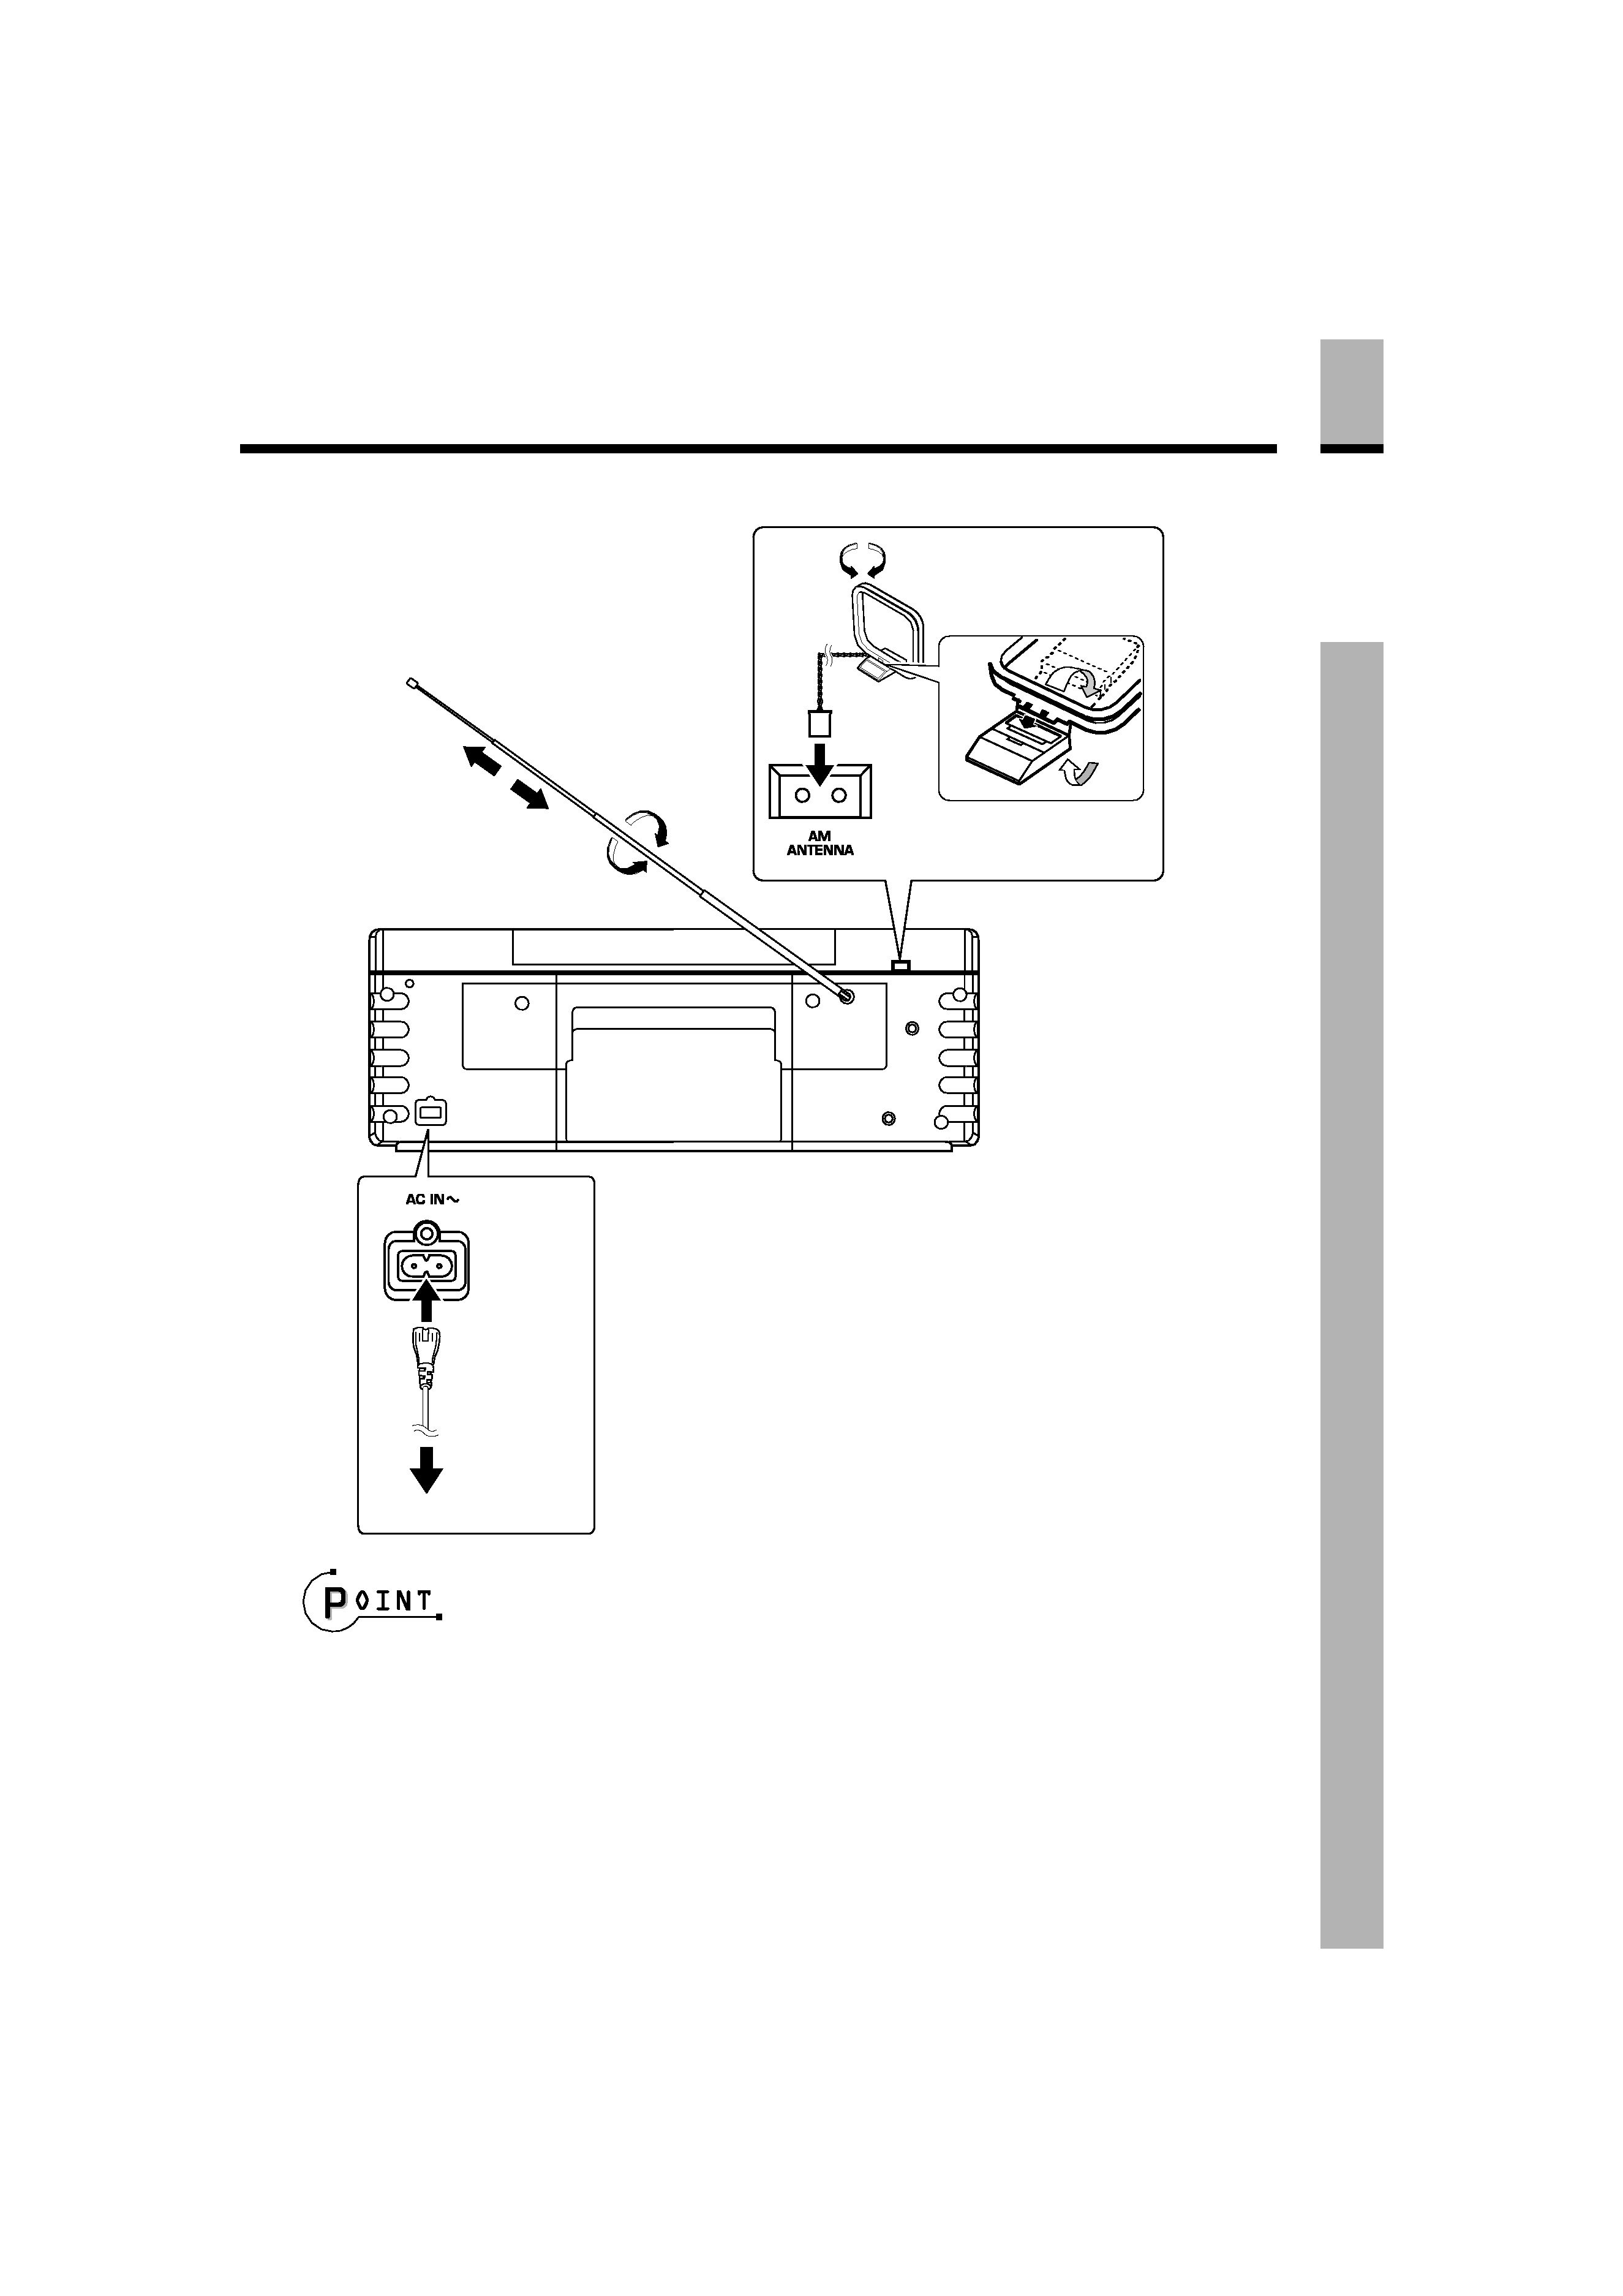
Preparation
section
÷ Be sure to insert each connection cord securely. If a cord is plugged in incompletely, audio may not
be output or noise may be generated.
÷ Before connecting or disconnecting any connection cord, be sure to first unplug the power cord
from the wall power outlet.
÷ Do not install the speakers near a TV set. Otherwise, color irregularities due to magnetism may be
observed on the TV screen.
÷ Be sure to put the unit to the STANDBY mode (page 59) before unplugging the power cord.
Continued on next page
\
÷ When removing the power cord connection,
unplug the power plug of the wall outlet
first.
The provided antenna has
been designed for indoor
use. Place it in a position as
apart as possible from a TV
and power cords and orient
it to obtain the best receiv-
ing condition.
Connecting the accessories
POWER cord
To an AC wall outlet
AM loop antenna
Antenna assembly
method
Extend the FM antenna and
orient it to obtain the best re-
ceiving condition possible.
FM rod antenna
*5052/04-09/EN
5/29/01, 10:28 AM
5