
KRC-PS959R
KRC-859R
KRC-859C
KRC-859W
KRC-759R
© B64-1159-00 (EW)
CASSETTE RECEIVER
INSTRUCTION MANUAL

Contents
-- 2 --
English
Befor use
Safety precautions .......................................................................................3
Buttons and Display
Basic operations...........................................................................................5
Tuner features..............................................................................................5
RDS features................................................................................................6
Cassette player features ..............................................................................6
Disc control features ....................................................................................7
Other features..............................................................................................7
Steering remote control ...............................................................................8
Remote control ............................................................................................8
Basic operations
Stealth Retraction Mechanism.....................................................................8
Switching Modes .........................................................................................9
Volume .........................................................................................................9
Attenuator ....................................................................................................9
Loudness ...................................................................................................10
Menu System ............................................................................................10
Tuner features
K2I (Kenwood Intelligent Twin IF) ..............................................................12
Selecting Tuning Mode ..............................................................................12
Tuning ........................................................................................................12
Local Seek Function ...................................................................................12
Monaural Reception ...................................................................................13
Switching Display for Tuner(non-RDS station) ...........................................13
Station Preset Memory ..............................................................................13
Auto Memory Entry ...................................................................................14
Direct Access Tuning .................................................................................14
Preset station seek with Programme service name .................................15
RDS features
RDS (Radio Data System) ..........................................................................15
EON (Enhanced Other Network)................................................................15
Alarm..........................................................................................................15
AF (Alternative Frequency) Function ..........................................................16
Restricting RDS Region (Region Restrict Function) ...................................16
Traffic Information Function .......................................................................16
Auto TP Seek Function ..............................................................................17
Presetting Volume for Traffic Information/News .......................................17
News Bulletin Function with PTY News Timeout Setting .........................18
Programme Type (PTY) Function ...............................................................18
Cassette player features
Playing Cassette Tapes ..............................................................................20
Fast Forwarding and Rewinding Cassette Tapes.......................................20
Using Dolby B/C NR (Noise Reduction) .....................................................20
Switching Tape Types ................................................................................20
Blank Skip Function....................................................................................20
Tuner Call Function ....................................................................................21
Tape Advance Function..............................................................................21
Music Repeat Function ..............................................................................21
Switching Display for Tape ........................................................................21
Disc control features
Playing Disc mode .....................................................................................22
Fast Forwarding and Reversing Disc Play ..................................................22
Track Search ..............................................................................................22
Disc Search ................................................................................................23
Track / Disc Repeat Function .....................................................................23
Track Scan Function ...................................................................................23
Disc Scan Function ....................................................................................24
Random Play Function ...............................................................................24
Magazine Random Play Function ...............................................................24
Switching Display for Discs .......................................................................25
Text Scroll ..................................................................................................25
Presetting Disc Names ..............................................................................26
Direct Track Search ....................................................................................27
Direct Disc Search .....................................................................................27
Disc Name Preset Play (DNPP) ..................................................................28
Other features
Audio Control Setting .................................................................................29
Table of Audio Control Setting ...................................................................29
Switching preout ........................................................................................30
TEL Mute Function ....................................................................................30
Navigation Mute Function ..........................................................................30
Touch sensor tone .....................................................................................30
Automatic Dimmer Function ......................................................................31
Selectable Illumination ...............................................................................31
Contrast Adjustment ..................................................................................31
Switching Spectrum Analyzer Display .......................................................32
Switching Graphic Display .........................................................................32
Switching Clock display .............................................................................32
Adjusting Time ...........................................................................................33
Code Security Function ..............................................................................34
Basic operations of steering remote control ........................35
Basic operations of remote control ...........................................36
Installation
Accessories................................................................................................37
Installation Procedure ................................................................................38
Connecting Cables to Terminals ................................................................39
Installtion....................................................................................................40
Removing the Unit .....................................................................................41
Attaching Steering Remote Control ...........................................................42
Troubleshooting guide ......................................................................43
Specifications ........................................................................................46

-- 3 --
To prevent injury and/or fire, take the
following precautions:
· Insert the unit all the way until it is fully
locked in place. Otherwise it may fly out of
place during collisions and other jolts.
· When extending the ignition, battery or
ground cables, make sure to use automotive-
grade cables or other cables with an area of
0.75mm2 (AWG18) or more to prevent cable
deterioration and damage to the cable
coating.
· To prevent short circuits, never put or leave
any metallic objects (e.g., coins or metal
tools) inside the unit.
· If the unit starts to emit smoke or strange
smells, turn off the power immediately and
consult your Kenwood dealer.
· Make sure not to get your fingers caught
between the faceplate and the unit.
· Be careful not to drop the unit or subject it to
strong shock.
The unit may break or crack because it
contains glass parts.
· Do not touch the liquid crystal fluid if the LCD
is damaged or broken due to shock. The
liquid crystal fluid may be dangerous to your
health or even fatal.
If the liquid crystal fluid from the LCD
contacts your body or clothing, wash it off
with soap immediately.
2WARNING
To prevent damage to the machine,
take the following precautions:
· Make sure to ground the unit to a negative
12V DC power supply.
· Do not open the top or bottom covers of the
unit.
· Do not install the unit in a spot exposed to
direct sunlight or excessive heat or humidity.
Also avoid places with too much dust or the
possibility of water splashing.
· Do not subject the faceplate to excessive
shock, as it is a piece of precision equipment.
· When replacing a fuse, only use a new one
with the prescribed rating. Using a fuse with
the wrong rating may cause your unit to
malfunction.
· To prevent short circuits when replacing a
fuse, first disconnect the wiring harness.
· Do not place any object between the
faceplate and the unit.
· During installation, do not use any screws
except for the ones provided. The use of
improper screws might result in damage to
the main unit.
2CAUTION
IMPORTANT INFORMATION
You cannot connect the unit directly to the
following CD automatic changers. For users
who want to use older changers with the
unit, follow the directions below according to
the type of changer you own:
· KDC-C200 / KDC-C300 / KDC-C400
Use the extension cable and the control box
attached to the CD changer, and the optional
CA-DS100 converter cable.
· KDC-C301 / KDC-C600 / KDC-C800 / KDC-C601 /
KDC-C401
Use the extension cable attached to the CD
changer, and the optional CA-DS100
converter cable.
· KDC-C100 / KDC-C302 / C205 / C705 /
non-Kenwood CD changers
Cannot be used with this model.
You can damage both your unit and
the CD changer if you connect them
incorrectly.
2CAUTION
Safety precautions
-- 4 --
English
· If you experience problems during
installation, consult your Kenwood dealer.
· If the unit fails to operate properly, press the
RESET button. When the faceplate is not
visible, press "the touch-sensitive spot" at
the rear of the faceplate (as illustrated on p.9)
to make the faceplate control appear. The
unit returns to factory settings when the
RESET button is pressed. If the unit still fails
to operate properly after the RESET button
has been pressed, contact your local
KENWOOD dealer for assistance.
· Press the reset button if the CD auto changer
is first controlled and operates incorrectly.
The original operating condition will return.
· We strongly recommend the use of the Code
Security function (see p.34) to prevent theft.
NOTE
AUD
DISC
DAB
B NR
SCAN
B.S/RDM
REP
T.C/D.SCN
MTL/M.RDM
MENU
LOUD
40W
4
x
TI
DISP/
TEXT
VOL
NAME. S
ADJ
EJECT
PROG/PTY
CLOSE
PWR OFF
TUNER
Reset button
Cleaning the Unit
If the front panel gets dirty, turn off the
power and wipe the panel with a dry silicon
cloth or soft cloth.
Do not wipe the panel with a stiff cloth or a
cloth dampened by volatile solvents such as
paint thinner and alcohol. They can scratch
the surface of the panel and/or cause the
indicator letters to peel off.
2CAUTION
Safety precautions
Cleaning the Tape Head
After you have used the tape player many
times over a long period, magnetic powder
from the tapes and dust accumulates on the
tape head, causing noise and a deterioration
in sound quality. Clean the tape head using a
cleaning tape or cleaning kit designed for use
in car audio systems.
Handling Cassette Tapes
· Do not play a cassette whose tape has gone
slack. In such a case, wind it tight using a
pencil or the like in one of the spools. Playing
slack cassette tapes can result in the tape
tangling around the capstan and/or pinch
rollers, causing trouble.
· Do not play a deformed cassette or one
whose label is starting to come off, as it can
cause the unit to malfunction.
· Do not leave tapes in hot places, such as
above the fascia panel (dashboard) and other
spots exposed to direct sunlight, or near
heater outlets. They can deform the cassette.
· Avoid using extremely long cassette tapes,
such as 100-minute-long tapes. Such tapes
are very thin, and can tangle easily around
the pinch rollers or other parts inside the unit,
causing unit failure.
· Remove a cassette tape from the unit when
not listening to it for a whilst. If you leave a
tape in the unit too long, it may stick to the
tape head and cause unit malfunction.
-- 5 --
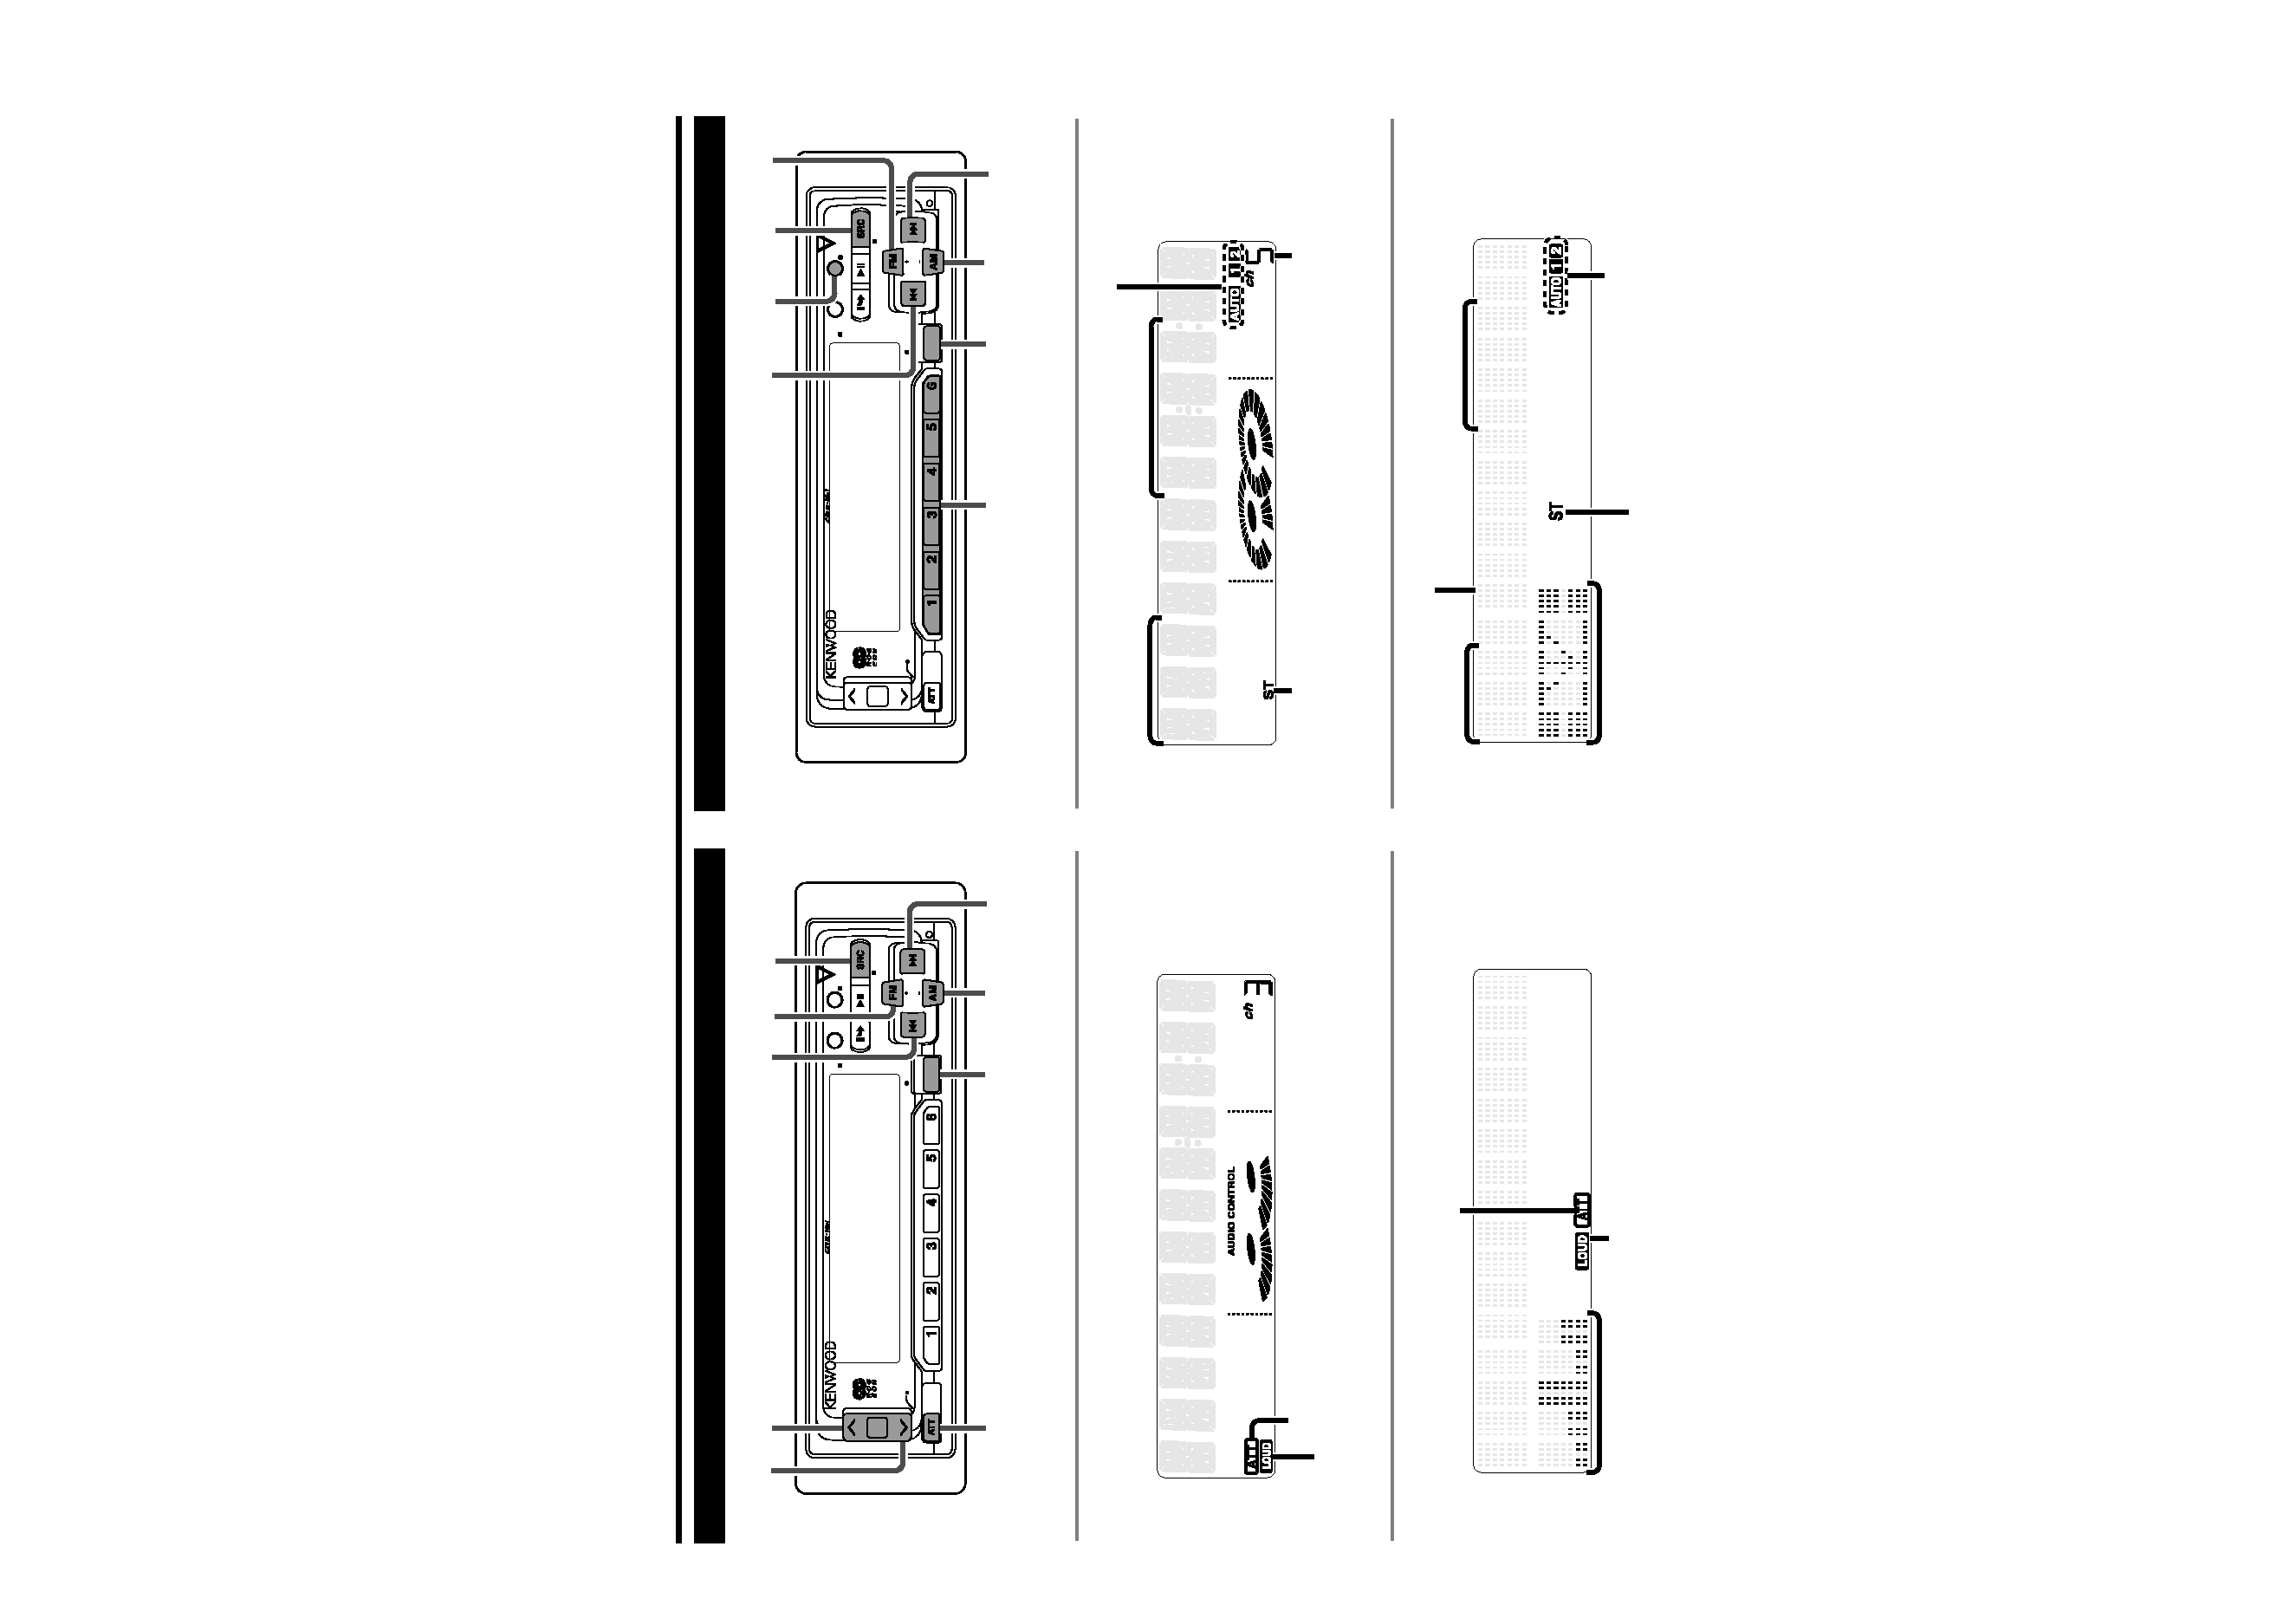
Buttons and Display
DISC
DAB
B NR
SCAN
B.S/RDM
REP
T.C/D.SCN
MTL/M.RDM
MENU
LOUD
40W
4
x
TI
DISP/
TEXT
VOL
NAME. S
ADJ
EJECT
PROG/PTY
CLOSE
PWR OFF
TUNER
MENU
SRC
ATT/LOUD
u
d
FM
¢
4
AM
AUD
DISC
DAB
B NR
SCAN
B.S/RDM
REP
T.C/D.SCN
MTL/M.RDM
MENU
LOUD
40W
4
x
TI
DISP/
TEXT
VOL
NAME. S
ADJ
EJECT
PROG/PTY
CLOSE
PWR OFF
TUNER
MENU
SRC
#1~6
FM
¢
4
AM
DISP
AUD
Basic operations
Tuner features
for KRC-859R/C/W, 759R
FM1
92.1
5ch
92.1
FM1-
VOLUME 10
LUME
10
VO
AUTO indicator
Frequency
ATT indicator
LOUD indicator
Band display
AUTO indicator
ST indicator
for KRC-859R/C/W, 759R
for KRC-PS959R
ATT indicator
LOUD indicator
for KRC-PS959R
Frequency
Band display
Preset station number
ST indicator
Preset station number
Mode display
Spectrum analyzer display