
KCA-RC107MR
REMOTE CONTROL UNIT
INSTRUCTION MANUAL
UNITÉ DE TÉLÉCOMMANDE
MODE D'EMPLOI
FERNBEDIENUNG
BEDIENUNGSANLEITUNG
AFSTANDSBEDIENING
GEBRUIKSAANWIJZING
TELECOMANDO
ISTRUZIONI PER L'USO
UNIDAD DE MANDO A DISTANCIA
MANUAL DE INSTRUCCIONES
UNIDADE DE CONTROLO REMOTO
MANUAL DE INSTRUÇÕES
© B64-4448-00/00 (W)
US Residence Only
Register Online
Register your Kenwood product at www.Kenwoodusa.com
English
English
Function and Operation
/
· ID should be registered for this unit when connecting this
unit to the receiver. For details on how to register ID, refer
to <Remote control ID setup> in the receiver instruction
manual.
· You can control only the front or rear side with this unit
when the dual zone function of the receiver is active. By
default, the front side can be controlled. To switch to the
rear side, refer to <Dual Zone control setup> in the receiver
instruction manual.
· You may not able to control the receiver from this unit just
after turning the power on. Wait for 1 to 2 seconds and then
operate it.
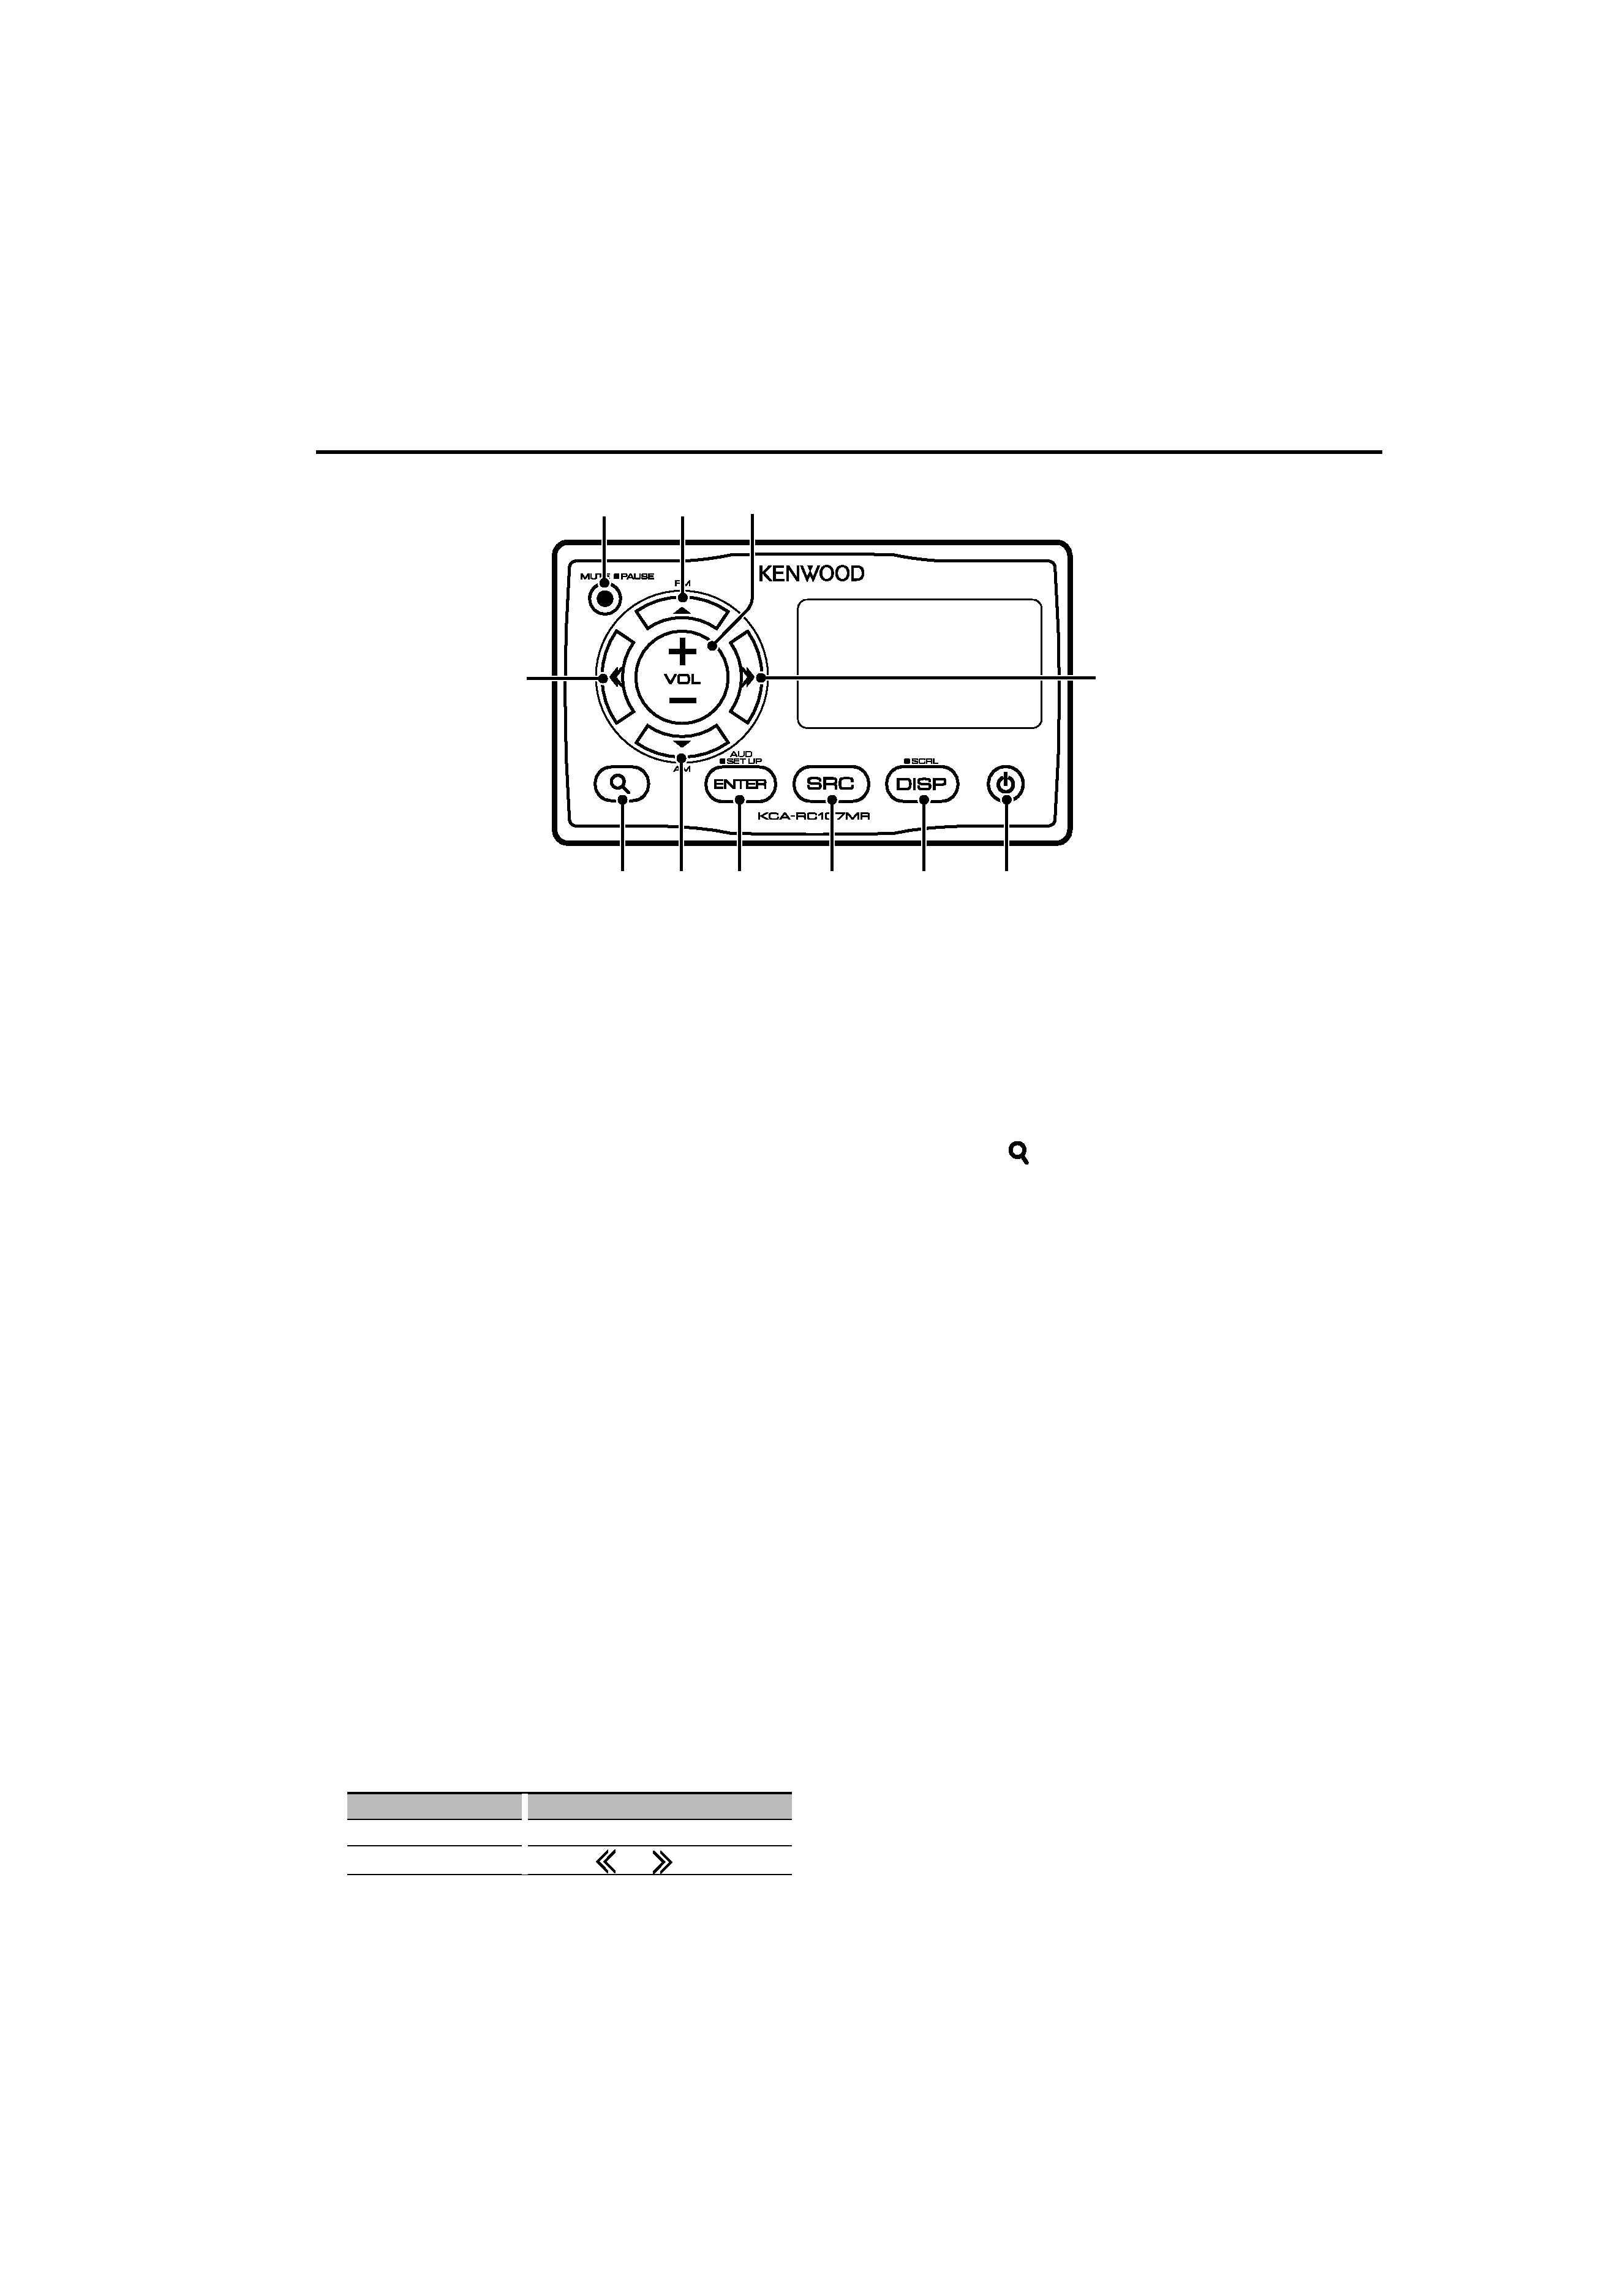
¡ The power turns ON and OFF each time this
button is pressed.
TM Enters the Display setting mode.
For details, refer to <Display Setup> (described
later).
Pressing the button for at least 1 second scrolls
the screen.
£ Pressing the button switches a source as follows:
SIRIUS Satellite Radio ("SIRIUS") (Optional
accessory; only available in US market), Tuner
("TUNER"), iPod ("IPOD"), USB ("USB"), Bluetooth
Audio ("BT-A EXT") (Optional accessory; not
availabel in US market), and Auxiliary input
("AUX")
Unavailable sources cannot be switched.
¢ Enters the Audio control mode.
Pressing the button for at least 1 second
switches to the Audio setup mode.
Operation type
Operation
Selection of item
Press the [
5] or [] button.
Adjust the item
Press the [
] or [
] button.
This button is used to select a highlighted item
in the Search mode or another mode.
Tuner/Satellite radio: Selects the band.
iPod/USB: Selects folder.
§ Enters the Search mode.
"SRCH/FAV" is displayed.
When this unit is connected to KMR-700U,
pressing the §[
] button again switches to
the Favorite mode and pressing the ª[+] or []
button to the Music Search mode.
For further details on the Search mode, refer
to the instruction manual of the connected
receiver. The Search mode function can be used
with the same operation as the receiver.
¶ Tuner/Satellite radio: Selects station/channel.
iPod/USB: Selects music.
· Reduces the volume.
When the button is pressed again, the volume
returns to the previous level.
Pressing the button for at least one second
pauses a song being played. Pressing again for
at least one second resumes the song.
ª Adjusts the volume.
English
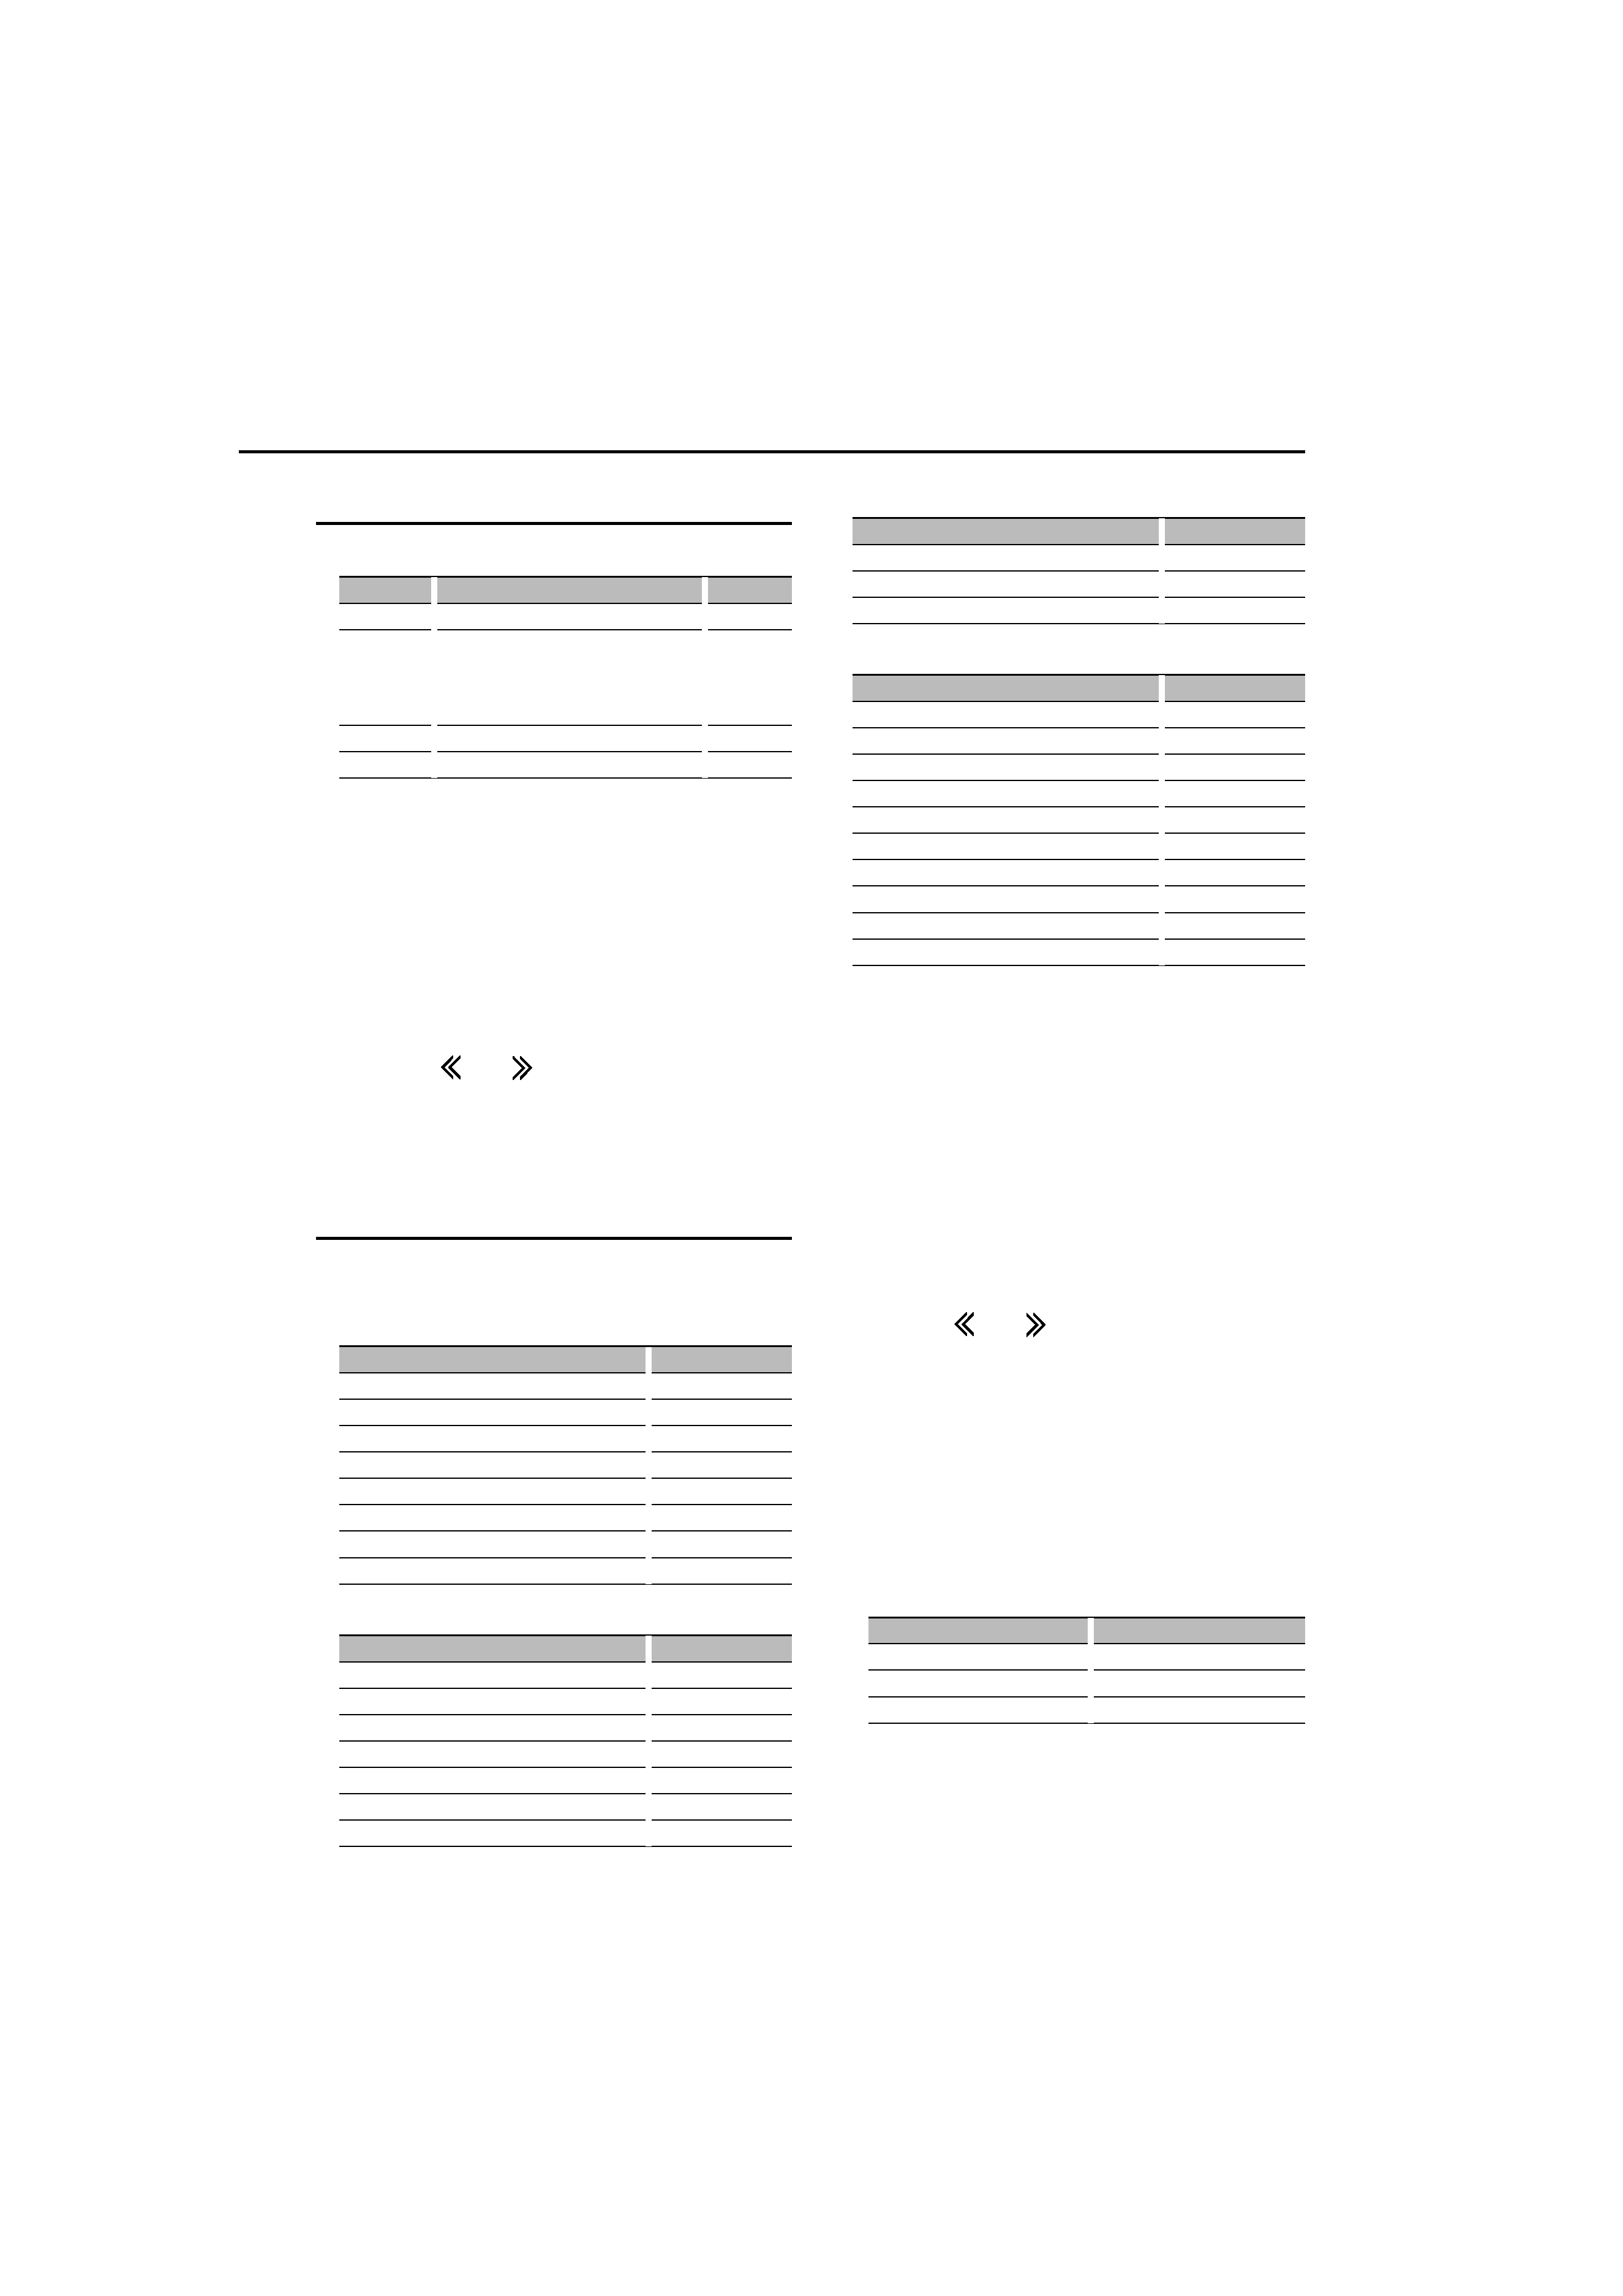
Display Setup
You can adjust following Display items;
Display
Item
Setting
"DISP SEL"
Refer to <Text Display Selection>.
--
"DIM"
Sets whether the display illumination is
dimmed in conjunction with the light
switch of the vessel or it is dimmed
constantly.
"AUTO",
"MANU",
"OFF"
"CNTRST"
Adjusting the display contrast.
"0" "10"
"ID:"
Display the Remote control ID.
--
/
· For details on Remote control ID, refer to <Remote
control ID setup> in the receiver instruction manual.
1 Enter Display setup mode
Press the [DISP] button.
2 Select the Display setup item
Press the [
5] or [] button.
3 Adjust the Display setup item
Press the [
] or [
] button.
4 Exit Display setup mode
Press the [DISP] button.
Text Display Selection
Displays the following abbreviated text for settings
and functions;
In Tuner source
Information
Display
Frequency & Program Service name (RDS)
"FREQ/PS"
Music title (RDS) & Artist name (RDS)
"TITLE"
Station Name (RDS)
"ST NAME"
Radio text Plus (RDS)
"R-TEXT+"
Radio text (RDS)
"R-TEXT"
Frequency (FM/AM)
"FREQ"
Clock
"CLOCK"
Date
"DATE"
In iPod/ USB source
Information
Display
Music title & Artist name
"TITLE"
Album name & Artist name
"ALBUM"
Folder name
"FOLDER"
File name
"FILE"
Play time & Music number
"P-TIME"
Clock
"CLOCK"
Date
"DATE"
In Auxiliary input source
Information
Display
AUX name
"SRC NAME"
Clock
"CLOCK"
Date
"DATE"
In SIRIUS source (Optional)
Information
Display
Channel Name
"CH-NAME"
Music Title
"SONG"
Artist Name
"ARTIST"
Composer Name
"COMPOSER"
Category Name
"CATEGORY"
Label Name
"LABEL"
Comment
"COMMENT"
Channel Number
"CH NUM"
Clock
"CLOCK"
Date
"DATE"
1 Enter Display setup mode
Press the [DISP] button.
2 Select the Display text select item
Press the [
5] or [] button.
Select the "DISP SEL" display.
3 Enter Display text select mode
Press the [ENTER] button.
4 Select the text display part
Press the [
5] or [] button.
5 Select the Display text
Press the [
] or [
] button.
6 Exit Display text select mode
Press the [ENTER] button.
/
· If the selected display item does not have any
information, alternative information is displayed.
· When selecting "FOLDER" while playing with iPod, text
will be displayed depending on the currently selected
browsing mode.
· If all characters cannot be displayed while playing with
iPod, the file number in the list is displayed.
Information
Display
Music title
"TITLE***"
Folder name
"FLD***"
File name
"FILE***"
English
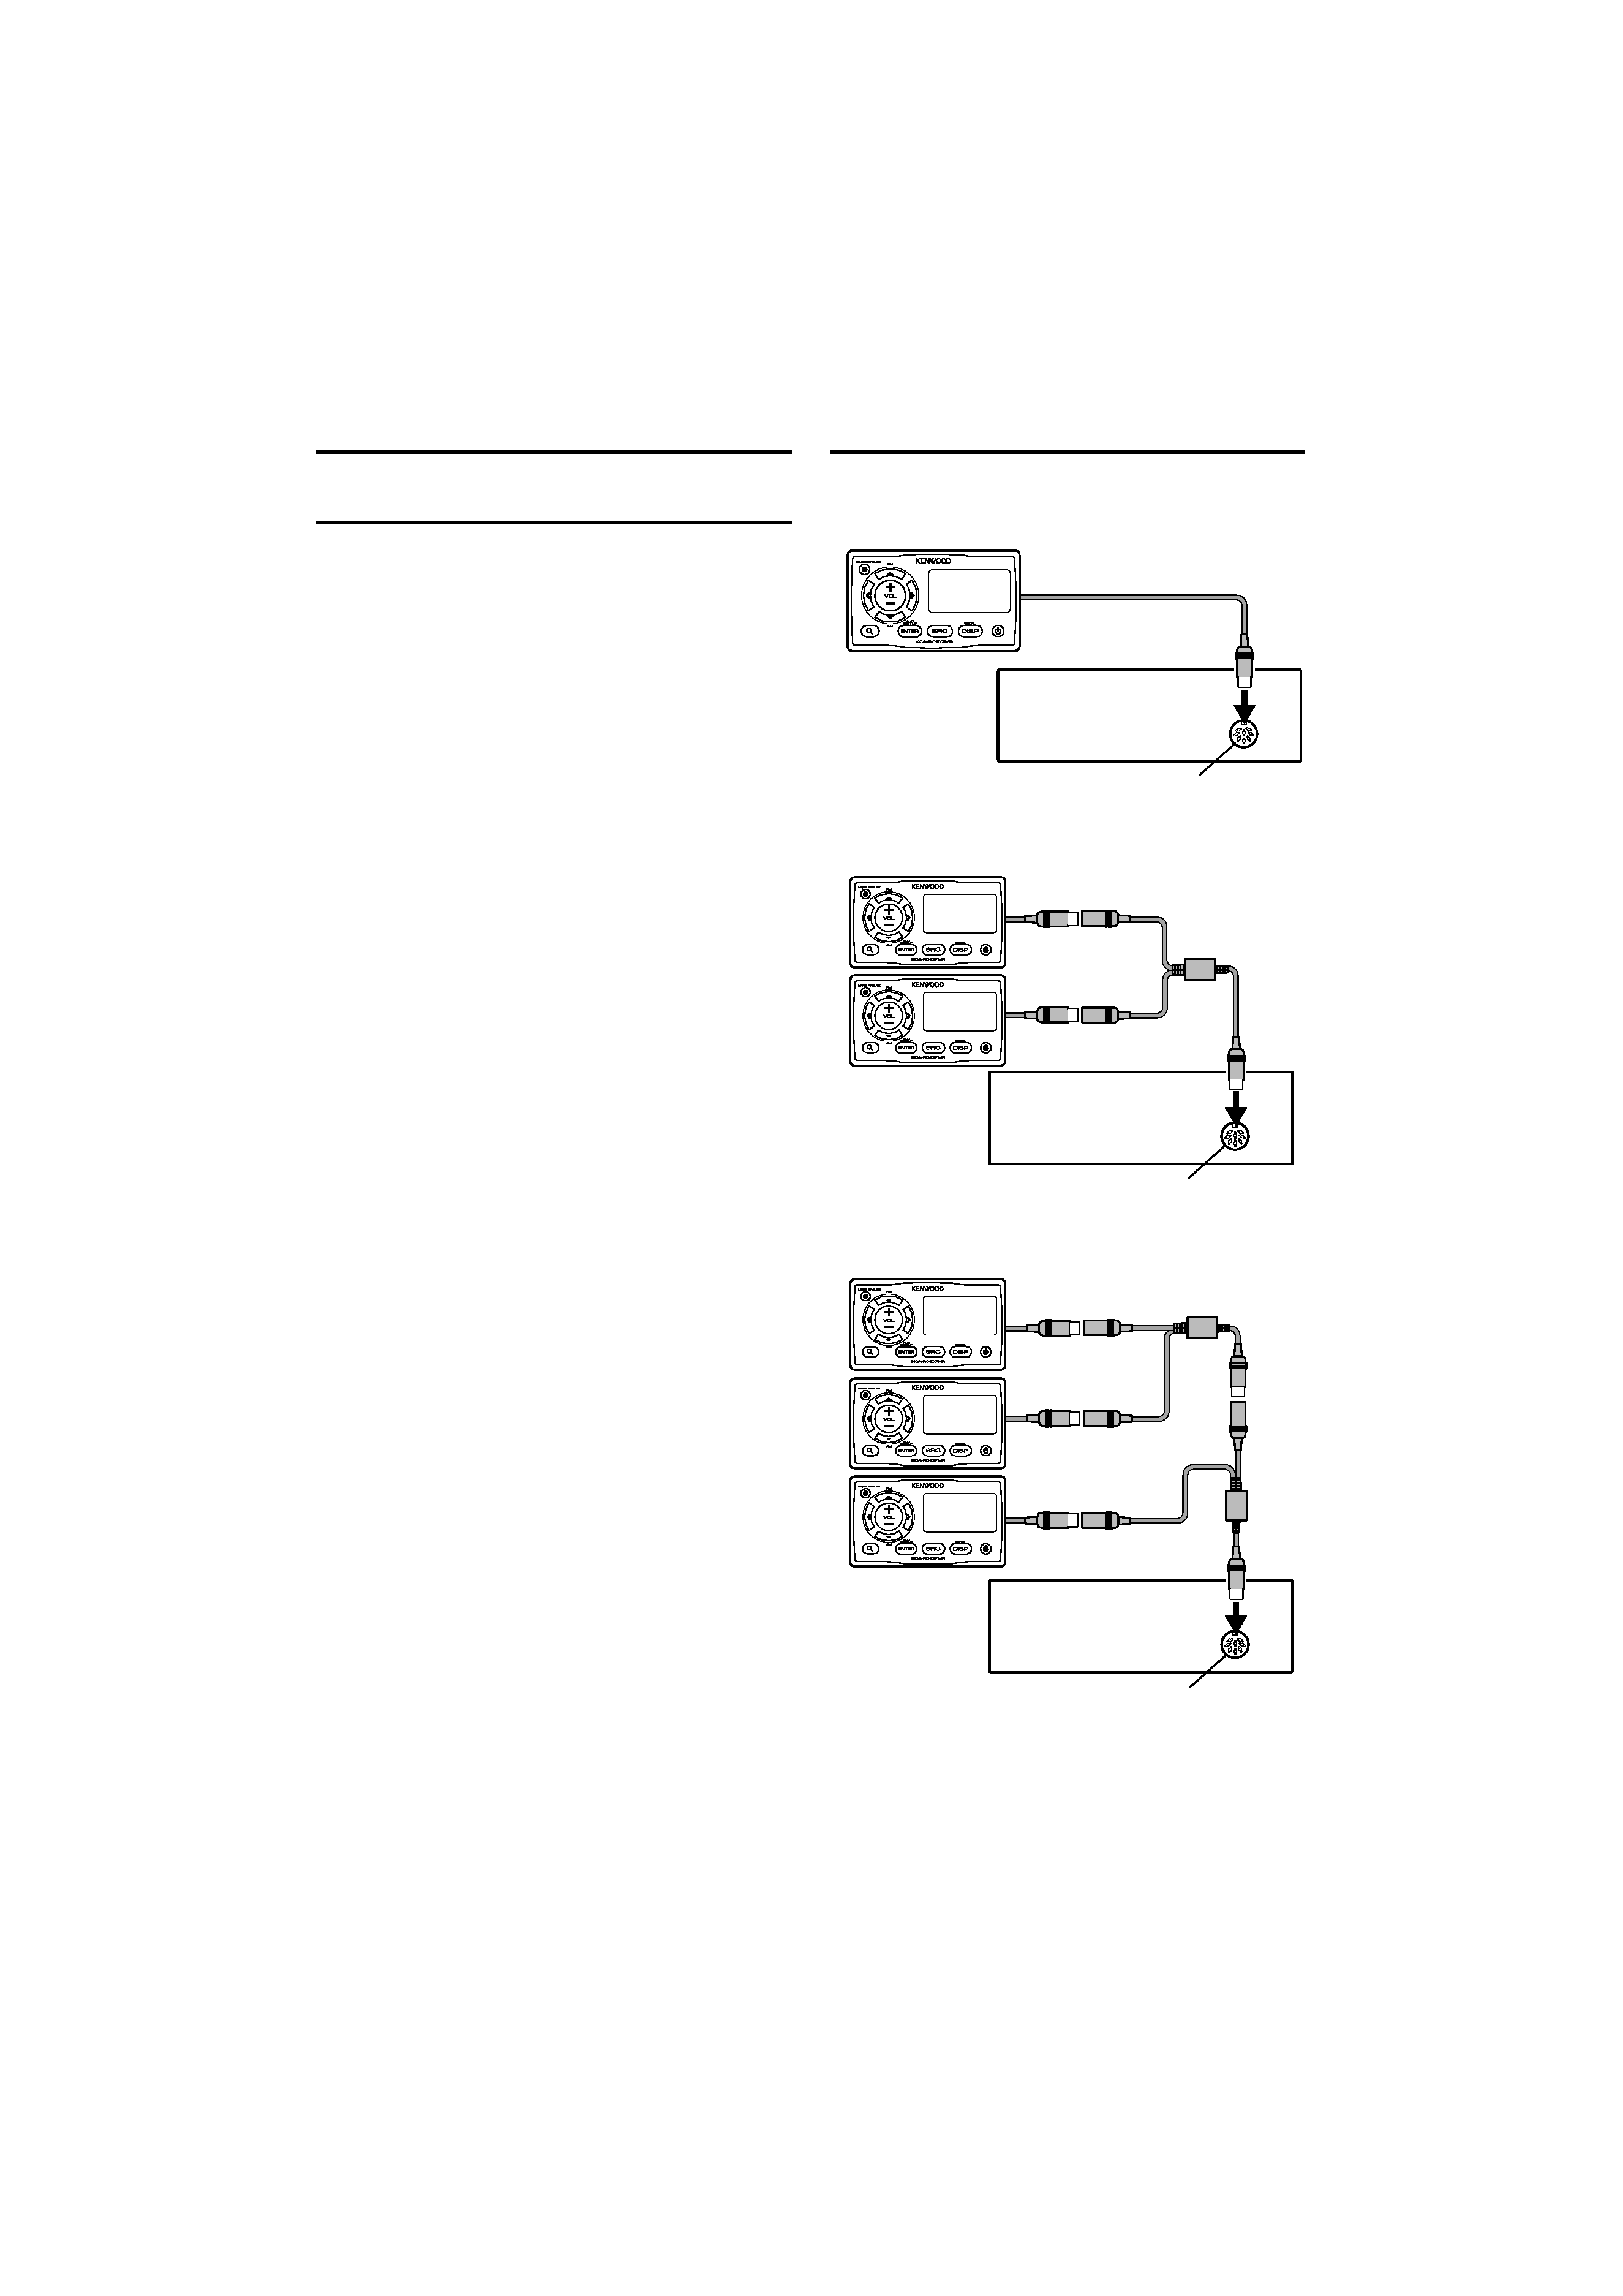
Before Installation
Connection
Connectable model (as of February 2009)
· KMR-700U
¤
· Mounting and wiring this product requires skills and
experience. For safety's sake, leave the mounting and wiring
work to professionals.
· Do not install the unit in a spot exposed to direct sunlight
or excessive heat or humidity.
· Do not use your own screws. Use only the screws provided.
If you use the wrong screws, you could damage the unit.
· After installing the unit, check to make sure that electrical
equipment such as the signal lamps and gauges operate
normally.
When connecting single KCA-RC107MR
Remote control input
Marine Receiver
KCA-RC107MR
When connecting two KCA-RC107MRs
Remote control input
Marine Receiver
KCA-RC107MR
CA-Y107MR
(Optional
accessory)
When connecting three KCA-RC107MRs
Remote control input
Marine Receiver
KCA-RC107MR
CA-Y107MR
(Optional
accessory)
CA-Y107MR
(Optional
accessory)
/
· You can use the extension cable CA-EX7MR (7m) or
CA-EX3MR (3m) to extend the wiring cable up to 15
meters, if the installation positions of the receiver and KCA-
RC107MR are long distance apart.
English
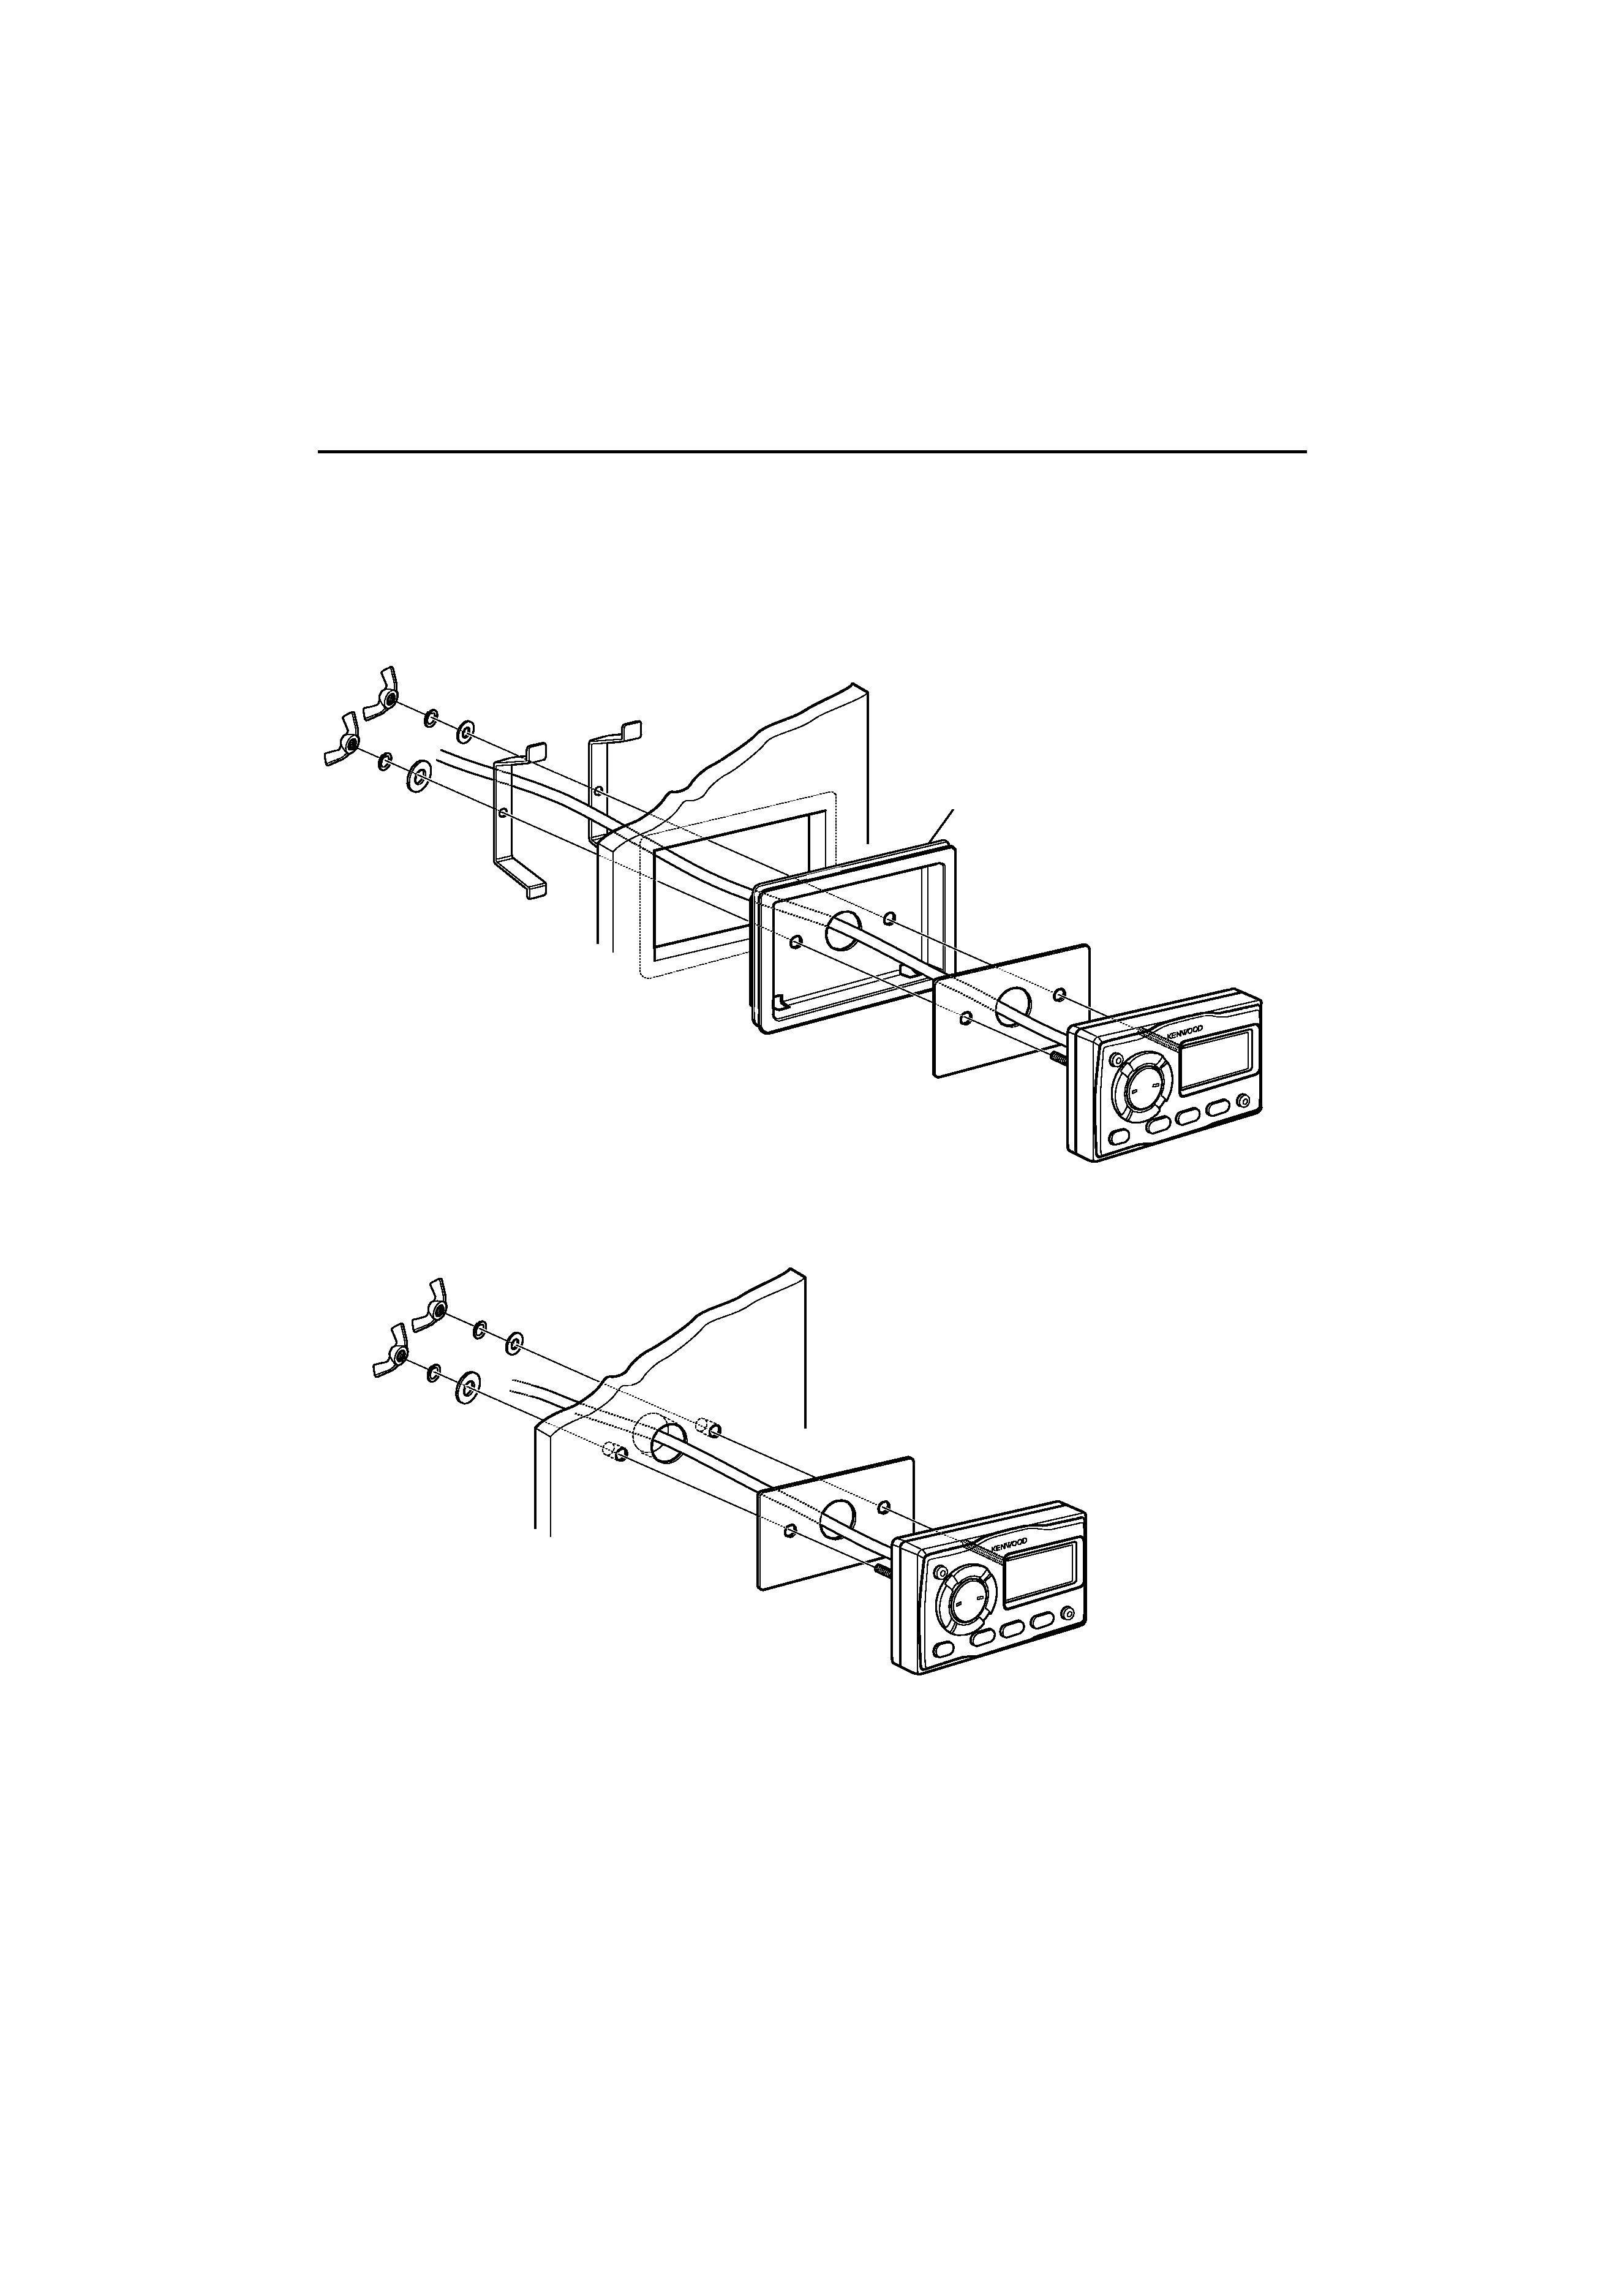
Installation
1 Drill holes on the mounting surface in accordance
with Template (back cover).
2 Install the KCA-RC107MR as shown in the figure
below.
When using the Mounting frame
Surface Mounting (not using mounting frame)
Nut
Lock washer
Mounting surface (Max. board thickness: 18 mm)
Mounting frame
Waterproof rubber
Gasket
KCA-RC107MR
Washer
Mounting bracket
Nut
Lock washer
Mounting surface (Max. board thickness: 26 mm)
Gasket
KCA-RC107MR
Washer